
Working with Workflows in SharePoint Designer
Many times you will find that the out of the box workflows are not sufficient to meet your requirements. You may need to modify the out of the box workflows or at times even create workflows from scratch. The easiest way to do this is to create or modify workflows in SharePoint Designer 2010.
You could not modify the out of the box workflows in SharePoint 2007. In SharePoint 2010 you can modify some of the out of the box workflows.
In SharePoint 2007 workflows created in SharePoint Designer could not be exported and reused. This is now possible in SharePoint 2010 in the form of reusable workflows.
Modifying the Out of the Box Approval Workflow
In this example you modify the out of the box approval workflow. The approval workflow routes a document for approval. Approvers can approve or reject the document. You customize the approval workflow to move the approved documents to another list.
Try It Yourself: Modify Out of the Box Workflows
1. Browse to the SharePoint site and create a new document library named ApprovalDemo. This library will use your customized workflow.
2. In addition you need a list where you will move the approved documents. For this create another document library named ApprovedDocuments.
3. Open your SharePoint site in SharePoint Designer 2010. Go to the Workflows section. This shows up as a list of workflows that can be customized. You can see the workflow Approval – SharePoint 2010 listed there. It is a good idea to keep the out of the box workflow unchanged and customize the copy of it.
4. Right-click Approval – SharePoint 2010 and click Copy and Modify.
5. This opens the Create Reusable Workflow dialog as shown in Figure 15.8. Name the workflow ArchiveApproval. Leave the Content Type set to All. Click OK.

Figure 15.8. Creating a reusable workflow
6. You can see the ArchiveApproval workflow screen as shown in Figure 15.9. Save the workflow.

Figure 15.9. Edit the ArchiveApproval workflow in SharePoint Designer 2010.
7. Set the focus at the end and add a new condition from the ribbon of type If Any Value Equals Value as shown in Figure 15.10.

Figure 15.10. Adding a condition to the workflow in SharePoint Designer 2010
8. The new condition is added to the workflow as shown in Figure 15.11.

Figure 15.11. The new condition added to the ArchiveApproval workflow
9. Click the first Value link. Open the Define Workflow Lookup dialog by clicking on the fx button. In the Define Workflow Lookup dialog select Workflow Variables and Parameters in the Data Source drop-down. Select Variable: IsItemApproved in the Field from Source drop-down. This is shown in Figure 15.12. Click OK.

Figure 15.12. The Define Workflow Lookup dialog
10. Click the second Value link in the condition. You can see that the options “Yes” and “No” are prepopulated. SharePoint Designer is smart enough to fill this based on the type of variable you are checking for. Select Yes.
11. Specify the action you want to do when the condition is satisfied. Add the Copy List Item action. Click the first This List link and select the Current Item in the Choose List Item dialog. Click OK to close the dialog.
12. Click the other This List link and select the ApprovedDocuments library.
13. Add the Delete Item action. Click the This List link and select the Current Item in the Choose List Item dialog.
14. Save the workflow. The designer should look as shown in Figure 15.13.
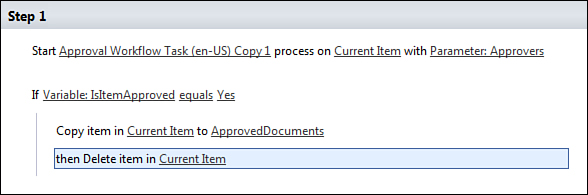
Figure 15.13. Final layout of the ArchiveApproval workflow
15. Publish the workflow by clicking on the Publish command in the ribbon.
16. Browse to the ApprovalDemo document library. Browse to the Workflow Settings page and click Add a Workflow. You can see your new workflow along with the other out of the box workflows listed there.
17. Enter the name of the workflow as ArchiveApprovalWF. Click Next.
18. The workflow association form appears in which you can configure the various parameters specific to the workflow as shown in Figure 15.14. Enter some valid user in the list of Approvers and click Save.
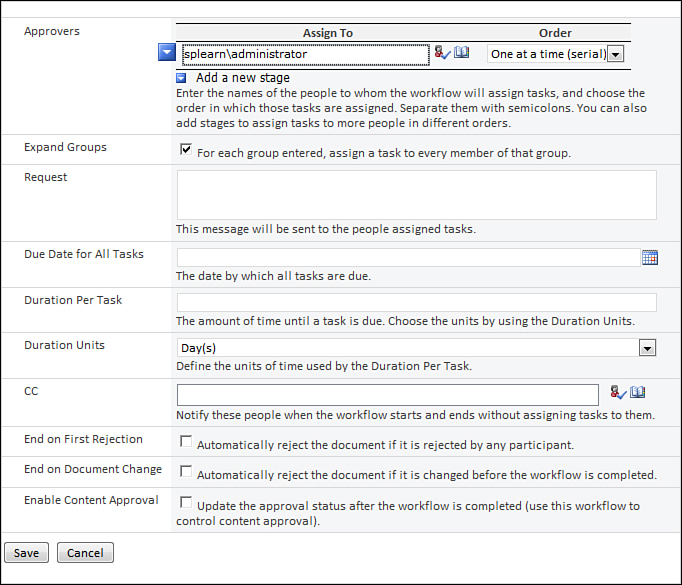
Figure 15.14. Associate ArchiveApproval workflow to the ApprovalDemo document library
19. Add a new document to the ApprovalDemo document library. Open the context menu for the list item and go to the Workflows page. Click the ArchiveApprovalWF link to start the workflow.
20. You see the workflow initiation screen. This is similar to the workflow association screen and allows you to configure the individual instance of the workflow. The Approvers field is automatically populated with the name of the user you entered in the workflow association screen. Click Start to start the workflow.
21. You can now see the workflow status as In Progress. Go to the Workflow Status screen by clicking on the In Progress link. You can see a new task has been created for the workflow. Edit the task. This gives you the option to approve or reject the item as shown in Figure 15.15.

Figure 15.15. Starting the ArchiveApproval workflow
22. Approve the item. Browse back to the ApprovalDemo document library. You can see the list item has been deleted from the library. Browse to the ApprovedDocuments library, and you can see the document has been moved there by your workflow.