
Give away a business card that recipients will never throw away By Tom Ward

Figure A: The finished flashlight business card
If you’ve read my other business card projects on Instructables, you know what this is all about: make a business card that’s actually useful, or too cool for people to want to throw away, and you have a successful piece of advertising. This is a variation on my previous flashlight card, here made to look a bit more flashy, and to be much easier to construct. No printed circuit board is required, just some self-adhesive copper tape. The finished design costs less than a dollar to make, and they’re simple enough to make up a small batch in an hour or two.
1. Materials
What you will need:
![]() A CR2032 battery (I got them for about 16 cents on eBay when I bought 100)
A CR2032 battery (I got them for about 16 cents on eBay when I bought 100)
![]() A 3mm high-intensity white LED (eBay again! I got 100 for about $16, so 16 cents each)
A 3mm high-intensity white LED (eBay again! I got 100 for about $16, so 16 cents each)
![]() Blank PVC ID cards (2) (Again, I got these for about 16 cents—find a specialized ID card printing store on the Web near you—I used www.digitalid.co.uk)
Blank PVC ID cards (2) (Again, I got these for about 16 cents—find a specialized ID card printing store on the Web near you—I used www.digitalid.co.uk)
![]() Some double-sided foam adhesive tape (I got mine from an office supply store for a couple of dollars—you just need tape that is thicker than the battery you are using—mine was 4.5mm thick)
Some double-sided foam adhesive tape (I got mine from an office supply store for a couple of dollars—you just need tape that is thicker than the battery you are using—mine was 4.5mm thick)
![]() Some self-adhesive copper tape (eBay! Mine cost a few dollars for a long roll of 1" thick tape, and I cut it into thinner strips.
Some self-adhesive copper tape (eBay! Mine cost a few dollars for a long roll of 1" thick tape, and I cut it into thinner strips.
Tools: You will also need a soldering iron (plus solder), a cutting knife, some spray adhesive, and a way of printing the front of your card—you can use a color laser or inkjet printer. I printed on paper and laminated it, but have had success before with printing in reverse on OHP transparency film which can look good as well.

Figure B: Parts—1. CR2032 2. High-intensity LED 3. PVC ID cards 4. Doublesided tape 5. Self-adhesive copper tape

Figure C: One LED lead soldered to the first copper strip
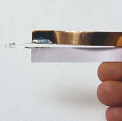
Figure D: The other lead of the LED soldered to second copper strip (the copper sides should face away from each other)
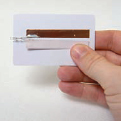
Figure E: Affixing the LED/copper tape to the card (with the LED bulb protruding slightly)
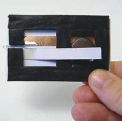
Figure F: Applying foam tape around the components

Figure G: The card art printed and laminated

Figure H: Cutting the excess around the edges after mounting with spray adhesive
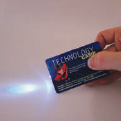
Figure I: The business card flashlight in action
2. Soldering the LED to copper
Cut a couple of strips of copper tape about 1/4” wide and 2-1/2” long. Solder one end of the LED to one of the copper strips, starting about half way down the lead of the LED. Make the connection so that the soldering joint is close to the edge of the copper strip, and don’t use too much heat or the self-adhesive backing paper will peel off. Turn the LED over and do the other side (Figure C).
3. Attaching to the card
One of the leads of the LED will be longer than the other. This will connect to the positive side of the battery. Peel off the backing on the copper strip attached to this lead, and apply it to the middle of one of the blank ID cards. Try and get it so that the LED is poking out just a bit from the edge of the card (Figures D-E).
4. Attaching the foam tape
Apply some self-adhesive foam tape around the perimeter of the card and around the battery to stop it from moving. Make sure that the unattached copper strip is free to go above the battery. It does not need to be attached to anything (Figure F).
5. Attaching the overlay
Design the layout of your card on the computer and print it out. I just printed on plain paper and then laminated it. You will want the image to be a little bit bigger than the card (called a “bleed”), so that you can cut it exactly to size later (and not have a white border around it). Spray some adhesive on the back of the printout, and attach it to the unused ID card. Then turn the card over, and cut neatly around the outside of the card. Finally, attach this ID card to the front of the electronic assembly (Figures G-H).
6. Changes
If you are making a few of these, you can ditch the double-sided tape and use foam sheeting attached with adhesive spray. By using one of the blank cards as a template and cutting out around the outside, you can get a neater edge on the finished design. You can then just cut holes for the battery and LED, making sure there is a vertical cut halfway down the card for the top copper strip to poke through. You might also want to fix the LED a bit more securely so that it doesn’t get knocked around in use. A blob of 5-minute epoxy does the job well, and dries transparent.
If I produced these en masse, I would probably change a couple of things. First I would change the CR2032 cell to a CR2016, as this is thinner. I’d also design a custom self-adhesive foam cut-out for the LED and battery to replace the double-sided tape. Getting the cards printed professionally would then allow them to be assembled in seconds each, rather than minutes. If anyone is interested in getting commercial versions of this card or another design produced for corporate use in quantity, please let me know.
Tom Ward ([email protected]) is a an electrical engineer who has a short attention span and has never really grown up. He spends some of his time designing weird and wonderful gadgets, and the rest teaching science and running technology camps for children.