
Geometric Cut Paper Table Lamp
Add a warm glow to your life with this kirigami lamp
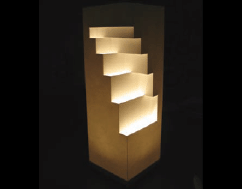
Figure A: Finished lamp
I’ve been making cut and folded paper lamps for a while now and get a lot of pleasure from designing, building, and enjoying them. I was thinking that I’ve gotten so much from Instructables I would give a little back.
You can probably get this lamp made in an afternoon (depending on paint drying time) and it should cost about $15-$20. It uses simple techniques of symmetric and asymmetric pop folds that can be the basis for more complex designs. My goal when designing is to make things with a single sheet of paper that look like they couldn’t be made with a single sheet of paper.
1. Gather materials
Supplies:
![]() Paper—24-3/4” x 18" (see step 4)
Paper—24-3/4” x 18" (see step 4)
![]() Long metal ruler or metal straight edge and ruler
Long metal ruler or metal straight edge and ruler
![]() Craft knife with new blade
Craft knife with new blade
![]() Something to indent the paper—embosser, blunted nail, empty ballpoint pen, etc.
Something to indent the paper—embosser, blunted nail, empty ballpoint pen, etc.
![]() Tool for pressing folds—bone folder, hard thing, etc.
Tool for pressing folds—bone folder, hard thing, etc.
![]() Double-stick tape, 3/4” wide
Double-stick tape, 3/4” wide
![]() Puck light with cord, switch, and plug
Puck light with cord, switch, and plug
![]() 3/4” wood cut to 5-15/16” square
3/4” wood cut to 5-15/16” square
![]() Bumper feet about 1/4” tall
Bumper feet about 1/4” tall
![]() Cord holder clips
Cord holder clips
![]() Heat shrink tubing or liquid electrical tape
Heat shrink tubing or liquid electrical tape
![]() Drill with 1/4” and 3/32” bits
Drill with 1/4” and 3/32” bits
![]() Soldering equipment
Soldering equipment
![]() White paint
White paint
![]() Possibly some other stuff
Possibly some other stuff
2. Building the base
Most pucks have a place to wrap the wire on the underside. Use this to secure the wire so a tug on the cord won’t cause damage.
Take the wood piece and choose a side to be the back (any side will do). Center the puck light on the base with the cord toward the back. Mark the screw holes through the puck light and mark where the cord comes out from under the light.
With the 3/32” bit, drill pilot holes for the puck. Use the 1/4” bit to drill the hole for the cord at a slight angle from the center of the top towards the back of the bottom.
Turn the wood over and drill pilot holes for the feet near the corners. Clean up the edges of the holes with sandpaper.
Now paint the entire base. You will probably lose sight of the pilot holes doing this, but when the paint dries you should see divots where they are.
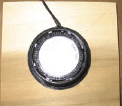
Figure B: Marking the base around the puck
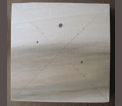
Figure C: Marked base top
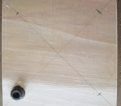
Figure D: Feet go here!

Figure E: Threading the cord through the painted base
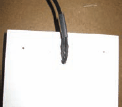
Figure F: Re-attaching the wires and wrapping with heat shrink
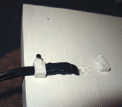
Figure G: Securing the wire to the base
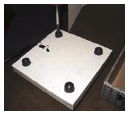
Figure H: Attach the feet
3. Assemble the base
Cut the wire about 3" from the puck and feed the wire from the puck through the base (from the top). Now screw the puck into position and re-cut the wire so it stops about half way between the hole and the edge of the wood. Strip the puck wire and the power wire about 1/4” back.
Solder the wire back together using heat shrink tubing or liquid electrical tape to isolate and wrap the junction.
Now is a good time to test the lamp. If it’s working, use the wire clips to secure the wire to the wood. The clips I had used nails to secure, so I drilled a small pilot hole in the base. Make sure that the cord is in snug enough that a tug on the cord won’t strain the junction. Finally, attach the feet.
4. Laying out the lamp design
I like to use Strathmore 500 Bristol 3-ply for my lamps but anything good and stiff should work. For reference, the Bristol is 375 grams/sq.meter (gsm).
On the lampshade design drawings (Figures I and J), the solid red lines are cut lines and the broken blue lines are fold lines. The little piece on the right edge will be referred to as the flap.
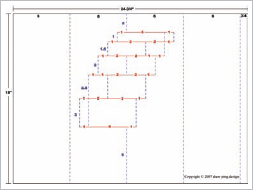
Figure I: Shade design pattern in inches
Draw the pattern on the backside of the paper with a pencil. Using a very sharp blade and the straight edge, cut where appropriate. Use the indenting tool to dent the paper along the fold lines. Make sure all the cuts go right to the corners and the dents are well defined. If you do not have deep enough dents in the paper it can be difficult to get a clean fold. Now carefully erase the pencil lines.
(The downloadable files, found on this project's Instructable page, are .jpg versions of the lampshade design drawings in both inch and centimeter scale. Please note that the two designs are slightly different, and I built mine in inches. If you go metric you’ll have to adjust other parts on your own.)
5. Folding the lamp
Note: I was folding and shooting the photos at the same time during the building so my technique is poor with a lot of pressure and curved paper and the like. You should almost always use two hands, and usually with one on either side of the paper.
Using a straight edge, table edge, or other method, fold the three corners that don’t have the cut out design, and crease well. Unfold enough so the paper is relatively flat.
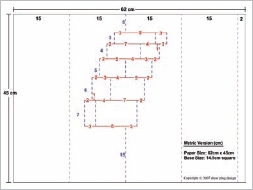
Figure J: Shade design pattern in metric

Figure K: Design penciled on Bristol
Figure L: Folding on the edge of a table
Figure M: Folding with a straight-edge
Figure N: Using a bone folder to press the fold flat

Figure O: Start folding from the top of the shade
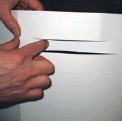
Figure P: Pressing the crease in from the outside and backing up the crease from the inside
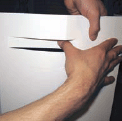
Figure Q: Pressing in with thumb
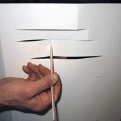
Figure R: Using the folding tool to push in the crease in the middle—work down each of the strips
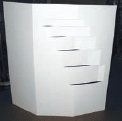
Figure S: Starting to look like a lampshade!
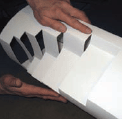
Figure T: Squash fold
Now comes the tricky part. Starting with the top and bottom creases, fold the paper as far as it will go without putting undo strain on the paper. With this accomplished you should be able to start pushing the design into the body of the lamp.
Standing the shade upright at this point can help. Doing one at a time, use the indenting tool or your fingers to push and press the paper into position. Don’t do any one all at once; in order to avoid unwanted creases, tearing, or curved paper you have to do a little bit on each until the folds are established.
Once everything is going the way it should go, you can lay the paper flat on the table and carefully push it down (all the while pushing and pressing the individual folds) until the whole thing is flat. Now crease every fold very well, if you don’t the lamp will tend to be out of square.
With the lamp folded over, place a piece of double stick tape on the outside of the flap. If the tape has a protective strip on it, leave it in place for later. If you put a big flat thing on top of the lamp to press it down the tape will be easier to apply.
6. Final assembly—attach the paper
Put a strip of double stick tape all along the edge of the base (remove protective strip if present).
On a flat surface, place several risers at least as tall as the feet under the base. I used DVD cases and they worked very well. What you are trying to do is create a surface that is level to the bottom of the base so when the paper is applied it will be flush with the bottom.
Open up the lamp and place the flap on the back left corner of the base. Press into the tape to adhere. Aligning this corner well is essential to ease construction. Continue around the base adhering the paper to the tape.
If all of your components were accurately measured, it should fit easily. If it’s a bit tight you can gently tug the paper and hopefully it will give enough to fit. If the paper is too big you should try to put an equal amount of gap on both sides.
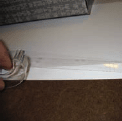
Figure U: Putting doublestick tape on the flap—note weight on top of lamp

Figure V: Putting doublestick tape on the edge of the base
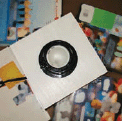
Figure W: Propping up the prepared base before attaching the shade
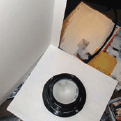
Figure X: Starting to attach the shade—note the wire coming out the back, with the flap at the back left corner
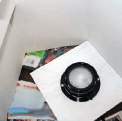
Figure Y: Continuing to wrap the shade around the base
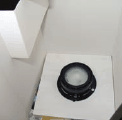
Figure Z: Around the third corner of the base—it’s getting exciting!
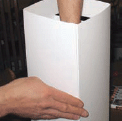
Figure ZA: Securing the vertical seam
Figure ZB: A nice, even seam
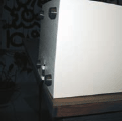
Figure ZC: Hang the wire off the edge of the table
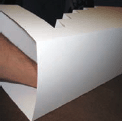
Figure ZD: Pressing the seam down from the inside
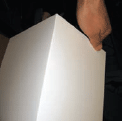
Figure ZE: Pressing the shade onto the base

Figure ZF: Pinching the shade to square it up
7. Final assembly—vertical seam
Now that the paper is attached all around the base, begin to secure the vertical seam. Put one hand inside the lamp and one outside. Starting at the bottom, attach the two sides. The flap will be on the inside and the edge of the other piece should be just shy of the corner. Continue adjusting, attaching, and pressing the pieces together until you reach the top. Hopefully you will have a nice straight seam.
Place the lamp on its back with the flap towards the ground and the wire just off the edge of the table. Now press all along the seam to get really good contact. Press around the base to attach the paper firmly there as well as doing the top edge, then rotating 90 degrees all the way around.
Stand the lamp up and look at it from above. If it is not square, gently adjust the folds until it is.
8. Light up your life
Now plug it in and flip the switch. Of course, like so many things on Instructables, this idea can be expanded upon and be made significantly cooler. These are great with better lighting (high power LEDs—thank you, Dan: www.instructables.com/member/dan), modular bases, and much more complex designs.
Andrew Barnes is a paper art enthusiast and lighting fanatic. He is the founder of drew ping design (www.drewpingdesign.com), a company devoted to legitimizing creative whims.