
Build the biggest, baddest beanbag ever!
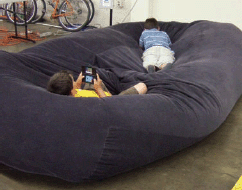
Figure A: Our finished big, bad beanbag sofa/bed
I started out thinking about building a beanbag, but being the prototypically exuberant man’s man that I am, I thought: “I’m going to go huge! Why make a typical beanbag just like everyone else? I’ll make the biggest, baddest beanbag evah!!!”
Well, in the end, I did make the biggest, baddest beanbag ever, but I think any practical assessment would say that it’s too large to be convenient (e.g., hard to get through doorways and it tends to absorb all available floor space in room). But I learned enough through this effort that I can advise you, dear reader, how to build a more practically sized beanbag sofa.
1. Materials and tools
![]() Bean bag beans (see next steps)
Bean bag beans (see next steps)
![]() Spool of sturdy cloth (see next steps)
Spool of sturdy cloth (see next steps)
![]() About 3 feet of Velcro
About 3 feet of Velcro
![]() A sewing machine
A sewing machine
![]() A 4–6" diameter cardboard tube about 2–3' long
A 4–6" diameter cardboard tube about 2–3' long
![]() Optional: a shop-vac
Optional: a shop-vac
2. Choose your sofa size
The size of your sofa determines how much cloth you’ll need. Where a standard beanbag chair is a sphere (ball), the beanbag sofa is a cylinder shape (tube with end caps). There are several possible sizes of sofa you can make, with convenient names (see Table 1).
It turns out there is also a jellyfish sofa. The jellyfish is what you get when you don’t have enough beans in the bag to keep its shape and it just squooshes out all over the floor. The problem with the banana slug that I built—and the reason I don’t recommend it—is that when it’s filled enough to not be a jellyfish, it will no longer fit through a standard doorway. And it’s just way too huge for a normal room; it tends to envelop everything else in the room. Months later, you’ll discover your little dog Toto buried in the folds of your jellyfish.
Sofa Model |
Diameter |
Length |
Pea |
3 feet |
3 feet (standard beanbag chair) |
Garden slug |
3 feet |
8 feet (recommended) |
Banana slug |
4 feet |
10 feet (bad! diameter is too big!) |
Centipede |
3 feet |
30 feet (around-theroom sofa) |
Earthworm |
1.5 feet |
8 feet (back rest only) |
Millipede |
3 feet |
1000 feet (block party sofa) |
Oh yes, your spool of cloth must be as wide as the diameter of the sofa. For the recommended “garden slug” sofa, you’ll need a spool 3' wide and 32' long. Use something sturdy! I made mine out of corduroy. There’s a good selection of fabrics for $4–8 per yard at your local fabric store.
3. What about the beans?
You’ll want to fill the beanbag at least 80% full of beans. A normal beanbag chair is not this full, but the sofa will not hold its shape unless it is nearly full. For the earthworm type used as a backrest, you may want to pack it 100%. Calculate the volume of the sofa (a cylinder) like this: pi * radius * radius * length. So the garden slug is 56 cubic feet (3.14 * 1.5 * 1.5 * 8). Beanbag beans are sold by the cubic foot, so you’ll need about 50 cubic feet of them.
Where to get the beans: you will need a lot of beans, so the best thing is to find a local styrofoam (EPS) products manufacturer. Try epsmolders.org to find a list of EPS manufacturers around the country. Getting the beans will be a fun excursion unto itself, as you can see below. The technical term for what you want is “Expanded Polystyrene Beads,” or “EPS beads” for short. Usually they will have both new beans (“virgin beads”), and used beans (“regrind”). Virgin costs about 10x as much as regrind, usually more than you’ll want to spend on some lunatic project you read about on Instructables. My local foam manufacturer (Bay Foam in Hayward, CA) sells 35 cubic foot bags of regrind for $10. They had a huge mountain of them behind their factory. The fancy places online that sell beanbags will tell you that virgin beads have a better feel in the beanbag, but my sofa seems perfectly nice with the regrind. Remember: regrind = recycling!
How to find a styrofoam products maker: they do not seem to like to list themselves under “foam” in the phone book, that seems to be reserved for the lowly urethane-foam folks only! Instead, you’ll want to look under “packaging & shipping materials,” or whatever else they might be making out of styrofoam, such as architectural trim.
No airbag needed! On your drive back from the foam factory, you’ll be about as safe as you’ve ever been in your motor vehicle. Now is the time to enter a demolition derby. It took some effort, but I was able to wedge about 120 cubic feet of beans into my minivan after I took most of the seats out.
4. The plans
We’re making a basic cylinder out of cloth. Of course, I made the banana slug model (I would have gone bigger, but I had not heard of the centipede or millipede until after I’d finished):
![]() Cut two circles of fabric 3' in diameter—these will be the ends of the cylinder
Cut two circles of fabric 3' in diameter—these will be the ends of the cylinder
![]() Cut three rectangles 3' wide and as long as you want the sofa (8' or 10' long). These three will orm the tube of the cylinder.
Cut three rectangles 3' wide and as long as you want the sofa (8' or 10' long). These three will orm the tube of the cylinder.
![]() Cut a 2' square, this will cover the fill-hole
Cut a 2' square, this will cover the fill-hole
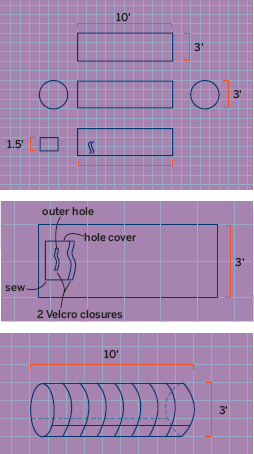
Figures B-D: The plans for our “banana slug” beanbag. I recommend doing the smaller “garden slug” design. form the tube of the cylinder.
5. Make the double-sealed filling hole
Whether you’re making a slug or a centipede, surely nothing can be more important than a HUGE GAPING MAW TO SWALLOW UP YOUR CHILLUN AND NEVER LET THEM OUT AGAIN!
The filling hole is how you’ll get the beans into the sofa. I made a double-seal to ensure that no beans can escape by accident. The double-seal also reinforces the Velcro closures so that you’ll be able to jump all over the sofa with no fear of it opening up.
![]() Cut a one-foot slit in one of the 3' x 8' fabric rectangles, about one foot from one end of it. Put Velcro on each side of the slit so that you can close it up. This is the outer seal.
Cut a one-foot slit in one of the 3' x 8' fabric rectangles, about one foot from one end of it. Put Velcro on each side of the slit so that you can close it up. This is the outer seal.
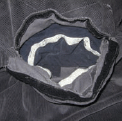
Figure E: The outer and inner Velcro seals. The outer seen here in black Velcro, the inner, in white.

Figure F: This is my 2' x 2' rectangle, with Velcro, before attaching to the bag
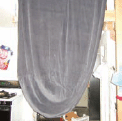
Figure G: Finished, empty bag, waiting for some beans
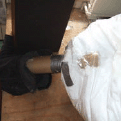
Figure H: The fill assembly, with a cardboard tube placed in the bag’s fill hole (left) and duct tape sealing the tube to the bean supply (right)
![]() Sew the 2' fabric rectangle onto the 3 'x 8' piece so the middle of it covers over the one-foot slit. Sew it only on three edges; on the fourth edge, attach Velcro. This is the inner seal. Of course, do this on the “inside” side of the 3' x 8' fabric.
Sew the 2' fabric rectangle onto the 3 'x 8' piece so the middle of it covers over the one-foot slit. Sew it only on three edges; on the fourth edge, attach Velcro. This is the inner seal. Of course, do this on the “inside” side of the 3' x 8' fabric.
6. Sew the sofa!
![]() Sew the three 3' x 8' rectangles together along their long edges, i.e., make a 9' long x 9' wide sheet, then fold the sheet in half and sew its 8' edges to make a tube (do it inside-out). When you’re done, you’ll have a 8' long tube with open ends.
Sew the three 3' x 8' rectangles together along their long edges, i.e., make a 9' long x 9' wide sheet, then fold the sheet in half and sew its 8' edges to make a tube (do it inside-out). When you’re done, you’ll have a 8' long tube with open ends.
![]() Go over all seams twice for strength
Go over all seams twice for strength
![]() Keep the tube inside-out
Keep the tube inside-out
![]() Sew on one of the end-cap circles (also insideout). Remember the circle circumference is a teeny bit larger (9.4') than the tube circumference (9'). If you’re a perfectionist, that means you’d actually want your circle to be about 2.9' diameter, not 3' in diameter.
Sew on one of the end-cap circles (also insideout). Remember the circle circumference is a teeny bit larger (9.4') than the tube circumference (9'). If you’re a perfectionist, that means you’d actually want your circle to be about 2.9' diameter, not 3' in diameter.
![]() Sew on the other end-cap circle, inside-out.
Sew on the other end-cap circle, inside-out.
7. Flip it! Fill it!
Like an unhappy sea cucumber, it’s time to pull the entire sofa out through its mouth, to make it rightside-out.
Once it is righted, the fun starts! How are you going to get all those beans into it? The most important thing to remember is: no matter how you do it, you’ll be finding beans all over your house (and probably your neighborhood) for the rest of your life. So you might as well have fun trying:

Figure I: Bag partially filled, using the Boring (aka staircase) Method
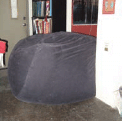
Figure J: Our finished banana slug, too large to fit through doorways!
The Shop-Vac Method 1:
![]() Put mouth of sofa over head of Shop-Vac
Put mouth of sofa over head of Shop-Vac
![]() Suck beans out of bag from whence they came
Suck beans out of bag from whence they came
The Shop-Vac Method 2 (the Bean Cannon):
![]() Turn the Shop-Vac into blower-mode
Turn the Shop-Vac into blower-mode
![]() Put the Shop-Vac head into bean supply (careful not to clog it)
Put the Shop-Vac head into bean supply (careful not to clog it)
![]() Point nozzle at unsuspecting passersby. When bored, point nozzle into sofa mouth to fill it.
Point nozzle at unsuspecting passersby. When bored, point nozzle into sofa mouth to fill it.
The Leaf Blower Method:
![]() Just like Shop-Vac Method 2, but with a leaf blower.
Just like Shop-Vac Method 2, but with a leaf blower.
The Boring Method:
![]() Hold the mouth of the sofa with the rest hanging down a staircase
Hold the mouth of the sofa with the rest hanging down a staircase
![]() Attach 6" diameter cardboard tube to your bag of beans
Attach 6" diameter cardboard tube to your bag of beans
![]() Insert cardboard tube into the sofa mouth
Insert cardboard tube into the sofa mouth
![]() Pour in your beans
Pour in your beans
Dan Goldwater loves beams of light and the devices that make them. Dan is a co-founder of Instructables.com and SQUID Labs and now makes practical digital light art for bicycles at Monkeylectric.