
Universal Lamp Shade Polygon Building Kit
One simple cut-out shape lets you build all sorts of different designer-looking lamp shades By Dan Goldwater
You can make dozens of different geometric forms using various numbers of this cut-out shape made from paper or plastic. The pieces just fold together by hand into rigid forms, and you can take them apart and build them into new shapes any time! This is fun and educational for kids and adults alike, and you get a really nice lamp shade when you are done (as seen in ReadyMade magazine, Dec. 2007/Jan. 2008 issue).
1. What you need
I saw a lamp shade made from a simple repeating shape at a friend’s house, so I traced the shape and made my own. The lamp I saw used thin plastic for the pieces. I believe the original design for this lamp was done over 30 years ago by the firm Iqlight (www.iqlight.com); they sell pre-cut parts in case you do not want to make the parts yourself.
The basic working shape is shown in the illustration in Figure F; the DXF file can be found on the Instructable page.
You will need sheets of paper or plastic that allow light to get through. The stiffness of your material determines how large your pieces can be—stiffer material for larger pieces and larger lamps, thinner material for smaller pieces and smaller lamps.
You will need a lamp fixture—just a raw socket on a cord. I found some nice ones at IKEA for $4, and some fluorescent bulbs. Use a compact fluorescent bulb so you can get more light without melting the plastic.
I experimented with a number of different plastics and sizes for the parts, here are my results:

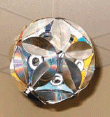
Figure A: This one is made from 30 pieces of 0.5mm acetal (Delrin)—the photo looks amber but the lamp is actually white

Figure B: 24 pieces of 0.8mm nylon—a bit annoyingly yellow-ish
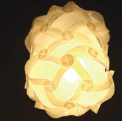
Figure C: 35 pieces, basically a tube with 2 end-caps, of 0.8mm HDPE
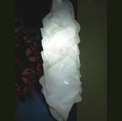
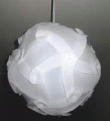
Figure D: 24 pieces, with a cool-white bulb—the others have warm-white bulbs

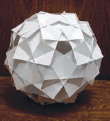
Figure E: 80 pieces
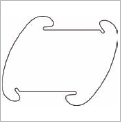
Figure F: The basic shape—surprisingly simple!
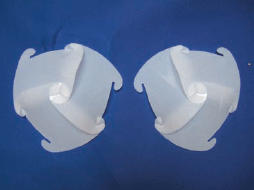
Figure G: Right-handed vertex and left-handed vertex—
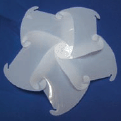
Figure H: Five narrow angles meet at the vertex (corner)—this is a top view mirror images of each other
![]() HDPE: works well, looks good, cheap and easy to get. I used 0.8mm thick stock for 8cm pieces (measured flat-side to flat-side). That’s about the smallest you’d want to go with that thickness, you could go up to 12 or 15cm with that thickness. This is the least expensive plastic by far. One of the commenters suggested using plastic milk-bottles, which are made of HDPE, this is a good idea!
HDPE: works well, looks good, cheap and easy to get. I used 0.8mm thick stock for 8cm pieces (measured flat-side to flat-side). That’s about the smallest you’d want to go with that thickness, you could go up to 12 or 15cm with that thickness. This is the least expensive plastic by far. One of the commenters suggested using plastic milk-bottles, which are made of HDPE, this is a good idea!
![]() Acetal (Delrin): this seems to be the best choice for looks, it has the purest white color and best light dispersion (basically, looks just like acrylic except it doesn’t crack as easily). I used 0.35mm stock for 6cm and 8cm pieces, and 0.5mm stock for 8-12cm pieces, and 0.65mm stock for 12-15cm pieces. It is still a bit brittle and harder to work with than HDPE or paper, and more expensive—I don’t recommend it for your first lamp. If you cut this with scissors it will be somewhat tricky due to the brittleness, but possible.
Acetal (Delrin): this seems to be the best choice for looks, it has the purest white color and best light dispersion (basically, looks just like acrylic except it doesn’t crack as easily). I used 0.35mm stock for 6cm and 8cm pieces, and 0.5mm stock for 8-12cm pieces, and 0.65mm stock for 12-15cm pieces. It is still a bit brittle and harder to work with than HDPE or paper, and more expensive—I don’t recommend it for your first lamp. If you cut this with scissors it will be somewhat tricky due to the brittleness, but possible.
![]() Vinyl: I didn’t try it, probably want to use thicker pieces as it’s not very stiff. But you can use colors!
Vinyl: I didn’t try it, probably want to use thicker pieces as it’s not very stiff. But you can use colors!
![]() Paper: I did not try paper but it should be good for smaller constructions.
Paper: I did not try paper but it should be good for smaller constructions.
![]() Laminated paper: this is a great idea suggested in the comments section. Try laminating color tissue paper, then cut the pieces from that. Very unique and colorful!
Laminated paper: this is a great idea suggested in the comments section. Try laminating color tissue paper, then cut the pieces from that. Very unique and colorful!
![]() Acrylic: too brittle, it will crack when you try to assemble. Too bad!
Acrylic: too brittle, it will crack when you try to assemble. Too bad!
![]() Nylon: has a yellow-ish look when lit up which makes it undesirable.
Nylon: has a yellow-ish look when lit up which makes it undesirable.
![]() For a large construction use stiffer material for the same size piece. For example, if you are making a lamp shade with 12 pieces use thinner material than if you are making a shade with 100 pieces, assuming same size pieces.
For a large construction use stiffer material for the same size piece. For example, if you are making a lamp shade with 12 pieces use thinner material than if you are making a shade with 100 pieces, assuming same size pieces.
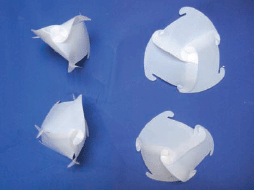
Figure I: (clockwise from top left) 3 narrow angles at the vertex; 3 wide angles at the vertex; 1 narrow angle and 2 wide angles at the vertex; 2 narrow angles and 1 wide angle at the vertex
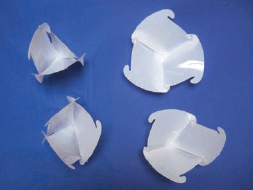
Figure J: Bottom view of the same 4 assemblies as seen in Figure I

Figure K: (clockwise from top left) 3 narrow angles and 1 wide angle at the vertex; 2 narrow and 2 wide angles meet at the vertex in a checkerboard pattern—the 2 narrow angles are across from each other; 2 narrow angles and 2 wide angles, with the narrow angles adjacent to each other; 4 narrow angles at the vertex
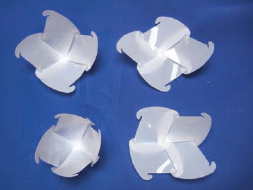
Figure L: Bottom view of the same 4 assemblies as seen in Figure K

Figure M: This lamp has 3-piece, 4-piece, and 5-piece corners
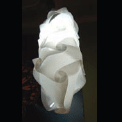
Figure N: Another view of the 24-piece lamp shown above in Figure D
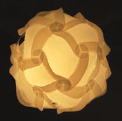
Figure O: 30 pieces, in a less-rounded configuration
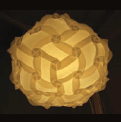
Figure P: Another view of the 80-piece lamp
Where to get it:
![]() HDPE 1/32” sheet: www.usplastic.com, item number 42584
HDPE 1/32” sheet: www.usplastic.com, item number 42584
![]() Acetal sheet, 0.015" and 0.020": www.mcmaster.com, item numbers 8738K52 and 8738K53
Acetal sheet, 0.015" and 0.020": www.mcmaster.com, item numbers 8738K52 and 8738K53
2. Cut out your pieces
You can cut your pieces in a couple ways:
![]() Trace them out with a marker, then use scissors or a knife. This is slow, but can be done easily.
Trace them out with a marker, then use scissors or a knife. This is slow, but can be done easily.
![]() Make a “cookie cutter” out of sheet metal in the shape of the part, then heat the cutter with a torch and use it to stamp out the parts (only works for plastic).
Make a “cookie cutter” out of sheet metal in the shape of the part, then heat the cutter with a torch and use it to stamp out the parts (only works for plastic).
![]() Use a laser cutter
Use a laser cutter
3. Assemble
Just try fitting the parts together! They go together in many different ways. You can make a variety of corners with three, four or five adjoining pieces.
There are several ways to think about and categorize the different types of geometric shapes that can be constructed. I’ve shown top and bottom views of every different type of vertex (corner) that can be built. All larger assemblies are made up of a combination of the types of corners shown, so think of them as your building blocks.
Corners can also be “left-handed” and “righthanded—mirror images of each other.
4. Assemble (part two)
You can make forms with anything from 8 to 100 or more pieces each. The only drawback seems to be that there is no way to make concave corners, only convex corners are possible.
You can see my examples, and you can see more at this site: www.iqlight.com. That site also sells the parts if you don’t want to make them yourself.
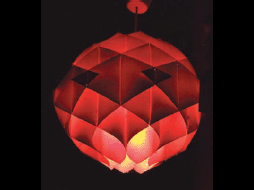
Figure Q: Lamp seen in China
5. Other ideas
I think the design I’ve presented is my favorite because it is reconfigurable into lots of shapes, but I thought I’d put some links to other styles which can also be made from sheets of paper or plastic.
I spotted the lamp shade shown in Figure Q hanging from the eaves of a hotel in China. It is made from (I think) six identical pieces (possibly seven or eight). Each piece is a large diamond shape with slots cut in it to allow sliding the pieces together. It looks like each diamond is slid into itself to form one of the central vertical tubes; its free tips are then slid into the other pieces to hold the whole thing together. I have not actually made one yet, so please comment if you have.
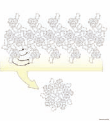
Also see: www.instructables.com/id/Flower-Calender; www.yasutomo.com/project/paperlampshade.htm.
You can also usually find one or two polygoninspired lamp shade designs at your local designer lighting store, and at IKEA.
User Notes

Benito Cavazos made several different sizes!
Travis Swaim’s variations include one with squared-off pieces

Thomas Tonino made a rice bag lamp
Steve “the gibbon” Gennrich shows one hung from a cord

Paul “Manggo” made a standing lamp
Nicolás De Francesco, aka nevermore78, created a construction roadmap
Travis Swaim also made one with CDs!
Dan Goldwater loves beams of light and the devices that make them. Dan is a co-founder of instructables.com and SQUID Labs and now makes practical digital light art for bicycles at Monkeylectric.