

Make a 21st century fashion statement out of techno-junk By Ryan McFarland
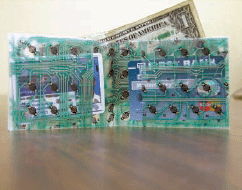
Figure A: The surprisingly stylish and cool-looking keyboard wallet
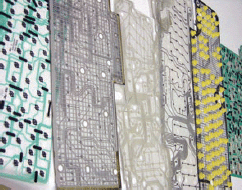
Figure B: All of the different types of circuit sheets you’ll find inside of keyboards. The one on the left is from a Gateway 2000 keyboard and has a nice black and green pattern on it.
In all likelihood, there’s a keyboard within a few feet of you. Inside, there’s likely a circuit sheet that makes a surprisingly durable and thin material for wallet-making.
To make a keyboard wallet, you’ll need:
![]() A desktop computer keyboard (for the circuit sheets)
A desktop computer keyboard (for the circuit sheets)
![]() A screwdriver
A screwdriver
![]() A ruler or tape measure
A ruler or tape measure
![]() A cutting board or mat
A cutting board or mat
![]() A razor knife
A razor knife
![]() Sharp scissors
Sharp scissors
![]() A roll of clear packing tape
A roll of clear packing tape
1. Open the keyboard
All of the keyboards I’ve opened have used small Phillips screws to secure the top and bottom pieces. Remove these and open the keyboard. There’s probably a sheet of metal secured with more screws. Remove this and set the metal aside to use as a straight-edge during cutting. Next is the circuit sheet, which should be quite easy to remove. Some keyboards have two.
Note: Keyboards with the numeric keypad extension have a larger circuit sheet. Using a 3"x 4" billfold and two 3" x 3" card/ID pockets requires more than one sheet, even of this size though. Hope for two circuit sheets inside the keyboard you crack open.

Figure C: Planning your layout with the circuit sheets you’re using
2. Plan your wallet
At a minimum, you’ll need four 3" x 4" rectangles of the circuit sheet to form the billfold area. I only carry a few credit cards and my ID, so I added two 3" square pockets. It might help if you make a template on a sheet of paper and tape the pieces together to better visualize your end product. The circuit sheets are very forgiving and tape can be pulled off without damage.

Figure D: A template to help you plan. Make a paper version first to work everything out.
Use thick packing tape for the best durability. I’ve been using my wallet daily for six months now and have only had to add one small piece of tape. Where the wallet folds, leave a few millimeters between the circuit sheets to act as a hinge. The more space, the more cash (or receipts) the wallet can carry without being forced open by the thick bills. Remember to try and build your wallet so that the tape is folded over any seams. Tearing the packing tape is much more difficult if it’s folded onto itself.
3. Taping instructions
For a detailed sequence of taping instructions, check out the project page for this Instructable.
4. Suggestions/tips
![]() Look over your wallet to see if any spots need reinforcing. Another piece of tape will not add much to the thickness.
Look over your wallet to see if any spots need reinforcing. Another piece of tape will not add much to the thickness.
![]() If you have a lot of shopping club cards, check out Just One Club Card (www.justoneclubcard.com) to consolidate them.
If you have a lot of shopping club cards, check out Just One Club Card (www.justoneclubcard.com) to consolidate them.
![]() Use the same materials to create a matching circuit sheet checkbook cover (Figure E).
Use the same materials to create a matching circuit sheet checkbook cover (Figure E).
![]() Other things to do with the keyboard parts: Keys—make fridge magnets, bracelets, clocks, or 3D notes to loved ones (I Ctrl U! :-)) Plastic casing—If your area accepts #6 or #7 plastics for recycling, do that Metal—Recycle as scrap or use as a surface for projects that use glue, solder, or other messy materials.
Other things to do with the keyboard parts: Keys—make fridge magnets, bracelets, clocks, or 3D notes to loved ones (I Ctrl U! :-)) Plastic casing—If your area accepts #6 or #7 plastics for recycling, do that Metal—Recycle as scrap or use as a surface for projects that use glue, solder, or other messy materials.
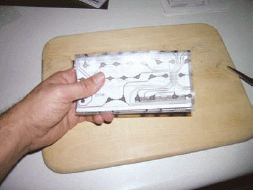
Figure E: A circuit board checkbook cover
Ryan “Zieak” McFarland lives in Alaska and spends his days as the parks and recreation director for a small town. Nights and weekends he does computer stuff, tinkers with projects, and spends quality time with his friends.
User Notes
Looking for ideas on what to do with the other parts of the keyboard (or boards) you cannibalized to make your wallet? How about making the keys into fridge magnets:
www.instructables.com/id/Keyboard-Refrigerator-Magnets---New-Method
Or try Instructable member TangMu’s snazzy keyboard bracelet to go with it? Instructions can be found here:
www.instructables.com/id/Wintereenmusideas-Keyboard-Bracelet
