
Add transparency to your virtual shredding with these lightable fret buttons By Matthew Borgatti

Figure A: The finished neck, ready for lights
I recently molded a Guitar Hero controller at the behest of fungus amungus. I’m going to show you how to create duplicates of your GH Controller keys in frosted clear plastic.
I’ll review two types of molds using the same materials and principles. The first will be a simple block mold for a single key. The other will be a single mold for multiple keys; this is often called a gang mold.
1. You’re going to need
![]() RTV silicone: I will be using Smooth-On OOMOO two part silicone molding compound. This is fairly easy and inexpensive to pick up. You can order it online or at some craft and plastics stores. Any RTV (or Room Temperature Vulcanizing) silicone will do. For this process, the polyester casting resin I will be using has more cure inhibition (meaning that it will remain sticky) than tin cure silicone (your standard inexpensive RTV). This means that to get good parts out of the mold, you will have to coat the mold in sealant before casting your parts, bake the parts after they’re cured, or apply a clear sealant to the parts after they are molded.
RTV silicone: I will be using Smooth-On OOMOO two part silicone molding compound. This is fairly easy and inexpensive to pick up. You can order it online or at some craft and plastics stores. Any RTV (or Room Temperature Vulcanizing) silicone will do. For this process, the polyester casting resin I will be using has more cure inhibition (meaning that it will remain sticky) than tin cure silicone (your standard inexpensive RTV). This means that to get good parts out of the mold, you will have to coat the mold in sealant before casting your parts, bake the parts after they’re cured, or apply a clear sealant to the parts after they are molded.
![]() Latex gloves
Latex gloves
![]() Foamcore
Foamcore
![]() Stirring sticks
Stirring sticks
![]() A digital scale or graduated measuring cups
A digital scale or graduated measuring cups
![]() Bondo car body filler: You can pick this up at most hardware stores and auto shops.
Bondo car body filler: You can pick this up at most hardware stores and auto shops.
![]() Clear polyester resin: find it at a plastics store, or order it online. Sometimes craft stores will sell this as a way to make cutesy paperweights with flowers trapped in them, etc.
Clear polyester resin: find it at a plastics store, or order it online. Sometimes craft stores will sell this as a way to make cutesy paperweights with flowers trapped in them, etc.
![]() MEKP catalyst: This will often come with your resin. You can also find it as fiberglass catalyst in most hardware stores.
MEKP catalyst: This will often come with your resin. You can also find it as fiberglass catalyst in most hardware stores.
![]() Polyester resin dye
Polyester resin dye
![]() Respirator, ventilation system, or open wellventilated space to work in: be mindful of your neighbors, as the polyester resin smells something awful, and will cause some people with sensitivities to feel ill.
Respirator, ventilation system, or open wellventilated space to work in: be mindful of your neighbors, as the polyester resin smells something awful, and will cause some people with sensitivities to feel ill.
![]() Hot glue
Hot glue
![]() A mold board: any piece of smooth wood or plastic will do. Remember to seal the wood before casting on it, or else the mold will be difficult to remove.
A mold board: any piece of smooth wood or plastic will do. Remember to seal the wood before casting on it, or else the mold will be difficult to remove.
![]() Disposable paintbrushes
Disposable paintbrushes
![]() Plenty of paper towels
Plenty of paper towels
![]() The touch
The touch
![]() The power
The power

Figure B: Opening the neck

Figure C: Take out the circuit board

Figure D: Take the rubber bumpers off the keys; save all the parts!

Figure E: The five original keys
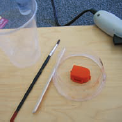
Figure F: Setting up for a single key mold; glue the piece of cup to the mold board
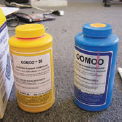
Figure G: Magical OOMOO silicone rubber compound
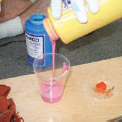
Figure H: Pour in equal parts of compounds A and B
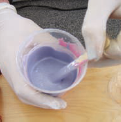
Figure I: Stir for at least a minute; try not to stir in bubbles
2. Dismantle your controller
It’s time to suck it up and take the screwdriver to this fancy bit of extruded dinosaurs. You must remove the main body panel before the neck will unfasten. Once you’ve opened the neck, take a small electronics screwdriver and carefully take out the circuit board (you are saving all the parts, right?). Remove the keys, and take their rubber bumpers off. The rubber bumpers will fit perfectly into the new keys once everything is done.
3. Single key mold
This is pretty simple and straightforward. You lay a single key down on your mold board. Then you cut the bottom off of a disposable cup, and hot glue the top portion to the mold board around the key. That’s it. You’re ready to mix up and pour.
4. A high pour
Check over your mold and part to make sure there isn’t any dust, grit, or fingerprints that will screw up your casting. Remember that whatever you see here will show up in your final parts, and there’s no way to correct a screwed up mold. A few extra seconds of inspection will save you the massive headache of recasting the whole part.
Mix your silicone according to the manufacturer’s specifications. The OOMOO instructions called for equal parts of compounds A and B. Stir your mixture for at least a minute, making sure to scrape down the sides and bottom. Avoid whipping bubbles into the mix by moving the stick in and out of the mixture.
One of the crucial factors in making a successful mold is making sure there are no voids or bubbles in your casting. This means you pour your mixture from high above the mold in a very thin stream. This stream will pop the large bubbles that would have been included in the casting. Start in one corner of the mold, and let it fill evenly to the other side. When you’ve poured enough that you can only see the top of your key, go in with the paintbrush, and make sure there’s silicone filling up the small divots where the rubber bumpers were. Now you can fill the mold until your silicone is about 1/4” above the level of your key.
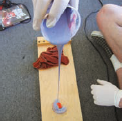
Figure J: Pour in a thin stream
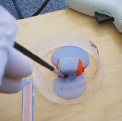
Figure K: Use a paintbrush to make sure the silicone is getting into all the small spaces
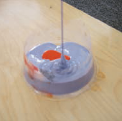
Figure L: Continue pouring in the silicone
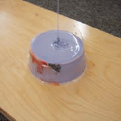
Figure M: Make sure the silicone covers the key by about 1/4"
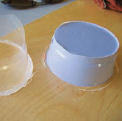
Figure N: After the silicone sets, remove the mold
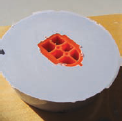
Figure O: Turn the mold over
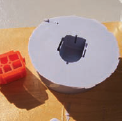
Figure P: Remove the key carefully
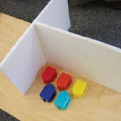
Figure Q: Preparing a gang mold; building a mold box from foamcore

Figure R: The finished mold box with the keys glued down

Figure S: Starting to pour the silicone

Figure T: Pour in a thin stream to cover keys completely

Figure U: Remove the box from the finished mold
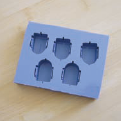
Figure V: The finished gang mold with keys removed
5. Gang mold
This mold is simply a slightly more complex version of your block mold. Start with several rectangles of foamcore. Adhere them to the mold board and seal the foamcore joins with hot glue. Run a bead of hot glue around the base of the mold, where the foamcore meets the mold board. Spray with a sealant or shellac to seal. Then glue down your parts with a daub of hot glue; this makes things a little simpler to arrange and cast. Fill this mold with silicone exactly as described in the previous step.
6. Casting the plastic keys
The Polyester resin I used was clear. For the translucent frosted look I was going for, it had to be modified a little before casting. For a frosted look, you can apply a crystal clear spray into the mold in a thick coat before molding. When the parts come out of the mold you can wipe the spray off of them with acetone. For a super smooth look, you can spray PVA mold sealant into the mold using a Preval Sprayer (http://tinyurl.com/5gfwr2). It will form a super shiny water soluble layer in the mold. When your parts come out, rinse them in water to reveal a remarkable shine.
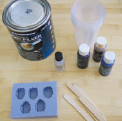
Figure W: Materials for casting the keys

Figure X: Mix the resin, adding dyes and a bit of Bondo to add opacity

Figure Y: Pour resin into molds, removing bubbles with a stirring stick

Figure Z: Resin-filled molds

Figure ZA: Rock on!
To begin, I measured about an ounce and a half of resin on a digital scale. I marked how much resin was in the cup with a marker and measured its height. Then I transcribed that line onto another cup and cut it in half vertically. Now I could put this half cup over each cup I’d use to mix and just draw the line on it, meaning that I didn’t have to weigh out my resin each time.
To color the resin, I used red, yellow, and blue dyes made especially for it. I also made the resin slightly more opaque by adding a pea sized daub of Bondo to it before mixing. Make sure you mix your resin thoroughly before adding your catalyst. Each of my 1.5oz servings of resin would need six drops of MEKP. Be careful when using MEKP, as it burns when it contacts the skin, and is very bad for your health. Make sure to work in a well ventilated area or use a NIOSH rated respirator.
User Notes
isuark made one with clear keys (he later used Bondo to frost them)

After you’ve mixed your resin and catalyst, you can pour your keys using the same high pour method described before. Make sure to go slowly, and to take out all the bubbles you can with a stirring stick or other small instrument.
7. De-mold and admire
Since the silicone mold is very flexible, you can simply bend it until your parts fall out. Make sure to insert the little rubber bumpers in your parts before putting the guitar back together. Look here (www.instructables.com/id/Guitar-Hero-LED-Mod) for the details on lighting up your guitar for night shredding!
Matthew Borgatti says: “I started tinkering in the interest of bringing ideas I drew as a child to life. That, and it’s a perfect outlet for my plethora of absurd and disparate knowledge. I also do Dinobot impressions in the car.”