
How to Build an Indispensable Tool for Small-Item Photography By Bill Wilson

Figure A: An apple photographed inside the tent
I was inspired to do this project after seeing the PVC light tent posted on the MAKE blog (www.makezine.com/go/PVCLightTent). This light tent uses a cardboard box, some white material (Tyvek), and lets you take reasonable photos of products such as bottles, watches, jewelry, small objects, etc.
1. Select Materials
First thing to do is find yourself a usable box. The box I used is a half of a resin plastic shelf. The dimensions are roughly 16" x 15" x 15". This size has handled most things I have put in it, however I think something a little wider would be easier to use.
Materials used:
![]() Masking or other heavy tape (duct, packing, etc.)
Masking or other heavy tape (duct, packing, etc.)
![]() X-Acto knife
X-Acto knife
![]() Ruler
Ruler
![]() Glue stick
Glue stick
![]() Bristol board
Bristol board
![]() Semi-transparent white material (Tyvek, white suiting/Ripstop nylon, bed sheets, etc.)
Semi-transparent white material (Tyvek, white suiting/Ripstop nylon, bed sheets, etc.)
2. Cut the Box
![]() Lay the box flat
Lay the box flat
![]() Using the ruler, add a 1" to 1-1/2” border to all sides of the box (top, bottom, left, and right)—essentially you want to cut a hole in all sides of the box. Tip: don’t forget to add a line on either side of the center of the box as it lays flat
Using the ruler, add a 1" to 1-1/2” border to all sides of the box (top, bottom, left, and right)—essentially you want to cut a hole in all sides of the box. Tip: don’t forget to add a line on either side of the center of the box as it lays flat
![]() Cut out the four panels of the box by using an X-Acto knife to cut on the lines.
Cut out the four panels of the box by using an X-Acto knife to cut on the lines.
3. Assemble the skeleton
![]() Open up the box and close the bottom of the box.
Open up the box and close the bottom of the box.
![]() Tape down the interior and exterior seam.
Tape down the interior and exterior seam.
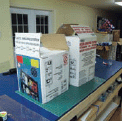
Figure B: Pick a good cardboard box

Figure C: Materials you will need

Figure D: Laying the box flat on a cutting mat
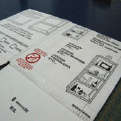
Figure E: Marking the borders before cutting

Figure F: Cutting the first hole
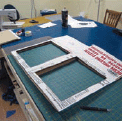
Figure G: Cut holes in four sides of the box
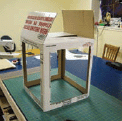
Figure H: Box upside down: close the base of the box
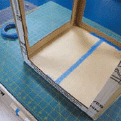
Figure I: Tape the interior seam

Figure J: Tape the exterior seam
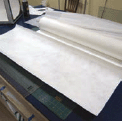
Figure K: Measure and cut the Tyvek
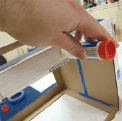
Figure L: Glue the material to the box

Figure M: Cutting the bristol board
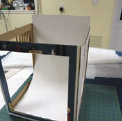
Figure N: Installing the continuous background

Figure O: Setting up the light tent
Figure P: Diffusing the light

Figure Q: Photograph taken in the tent
![]() The bottom of the box will serve as the platform for placing your objects.
The bottom of the box will serve as the platform for placing your objects.
4. Wrap the box
Using the semi-transparent material you have chosen, wrap it around the box so that it covers three of the four sides. I used sign printing grade Tyvek and attached it using a glue stick.
5. Add a Continuous Background
This is part of the magic of the light tent: creating a continuous background in your images. To do this we add a piece of bristol board cut to fit the box.
![]() Use the depth of the box + the height of the box as a rough measurement
Use the depth of the box + the height of the box as a rough measurement
![]() Cut out a piece of bristol board that matches the dimensions. This creates a nice white platform to shoot your images against. Try using other colors, blue, black, etc.
Cut out a piece of bristol board that matches the dimensions. This creates a nice white platform to shoot your images against. Try using other colors, blue, black, etc.
![]() Insert the bristol board into the box so the edge of the bristol board is placed against the front of the box and the board is allowed to curve like a wave, half-pipe… you get the picture… I hope :-)
Insert the bristol board into the box so the edge of the bristol board is placed against the front of the box and the board is allowed to curve like a wave, half-pipe… you get the picture… I hope :-)
6. Add light and enjoy
Now you’re ready to take some photos. I used a desk lamp and a couple of Ott-Lites (13watt) for the apple shot in the beginning of this Instructable.
For better/different results I tried switching to the simple clamp-style fixture used in the PVC light tent with 100 watt bulbs.
Experiment with the light’s location and try diffusing the light that shines through the top of the box with other semi-transparent material (such as nylon). The light entering the box will be diffused and the shadows will soften or disappear…
Note: At this stage (or perhaps before) you can probably cover the inside of the box with white as well, at least the frame. Or you could switch the white material from the outside to the inside. I bring this up because It was pointed out at DPReview.com (http://tinyurl.com/4r38y6) that there is a black reflection in the photos produced using this box.
7. End result
Figure Q shows a shot taken with this light box. To my untrained eye, it looks pretty good.
Bill Wilson is a long-time tinkerer, dismantler, and maker of stuff. His most recent obsession is kite building and flying. Taking this hobby to new heights, Bill’s latest kite accessory is a camera mount that allows him to combine his passion for kites with his love of photography. Visit Bill’s kiting blog at www.steadywinds.com or find his insightful comments on the www.kitebuilder.com forum, where he is a regular contributor.