
Have fun doing a little “backwoods cooking” in your yard with a pit oven By John Lock
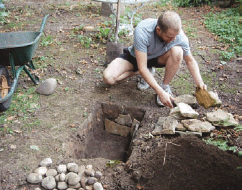
Figure A: Digging the hole for the pit oven
We had a BBQ on the weekend and thought it might be fun to do a little backwoods cooking with a pit oven. The meal was to be a whole salmon that had been taking up valuable real estate in our freezer for about a year, so we thought this would be the perfect opportunity to get rid of the beast. After a bit of research on the Net, we set to the task. It was a fun little project and we all had a good laugh pretending to be cavemen!
1. Dig the hole!!!
No great surprises here. Grab yourself a spade and start digging. You’ll need to find an open piece of earth with no fire hazards overhead (overhanging trees, etc.).
Our hole measured roughly 2' (L), 1' (W), 1' (D). We tried to keep everything pretty square, but that’s only because we’re slightly anal and I don’t think it’s that important in the great scheme of things. We made sure we kept the pile of excavated earth near the pit so that it was close at hand when we needed to bury our feast!
At this point you may want to make sure that any nosy neighbors, etc., haven’t gotten the wrong idea about this hole in the ground you’re digging; police searches and BBQs rarely mix!
2. Line the pit
We searched around the garden and found a load of medium-sized stones (like those you might find on a river bed) and some flat slabs of rock from a collapsed wall. We lugged these back to the pit in a wheelbarrow and began to line the pit.
The earth at the bottom of the pit was loosened up to give the rocks something to bed into. Starting with the walls of the oven, we used the slabs to line each face. We then used the remaining slabs to form a base for the oven. With a bit of trial and error, we managed to find bits that were just wide enough to push against the wall slabs, giving them some support.
The medium stones were then dumped onto the base and spread out so that they formed a fairly flat and even cooking surface.
And there you have it, one pit oven, ready for action!
3. Build the fire
Now for the fun bit. Fire! We gathered together plenty of small, dry twigs for the kindling and some larger branches for the main fuel of the fire.
We started by loosely scrunching up some newspaper to form the base of the fire, added the kindling, followed by the larger branches. Next we lit the paper and danced around the fire like madmen, celebrating our power over nature. (Not really!)
It goes without saying, but take great care when building and lighting fires; even though we were careful there were still a few singed hairs!
We kept the fire fueled with larger and thicker branches, making sure that the fire burned evenly over the whole pit. What you’re aiming for is a nice even distribution of glowing embers over the bed of the pit. This will heat the stones, and it is this heat, retained by the stones, that does the cooking.
We planned on burning the fire for about two hours to give the stones a thorough baking but after an hour we’d run out of wood. The solution? We just chucked a load of charcoal onto the embers and retired to watch England vs. Israel football on the TV.
4. Prepare the salmon
Just time before kick-off to prep Sammy (aka, the salmon). Traditional methods of pit cookery use large leaves to wrap the meat. This protects it from being contaminated with earth when buried. More modern methods tend to use kitchen foil as a substitute.
We rolled out a length of kitchen foil long enough to accommodate the fish and doubled it over for extra protection. It was then lightly greased with butter and on went Sammy.
The corners were pinched up to form a tray so that our baste wouldn’t spill all over. Next we thinly sliced a lemon and put that inside Sammy along with herbs, seasoning, and a little butter.
The baste was made by melting some butter and adding lemon juice, honey, seasoning, and paprika. This was poured all over the fish.
We sealed everything up with another doubled up sheet of kitchen foil that was crimped together with the bottom sheet.
5. Bury the beast!
Half-time and the fire’s hot. The charcoal’s done its job well and it’s time to put Sammy in the oven.
Guides found on the Internet suggested removing the ashes before placing the meat in (or at least scooping them up to one end of the oven) so that the meat is in direct contact with the hot stones. We didn’t bother with this and just laid down a couple of layers of kitchen foil over the embers as an additional layer of protection.
In went the fish, another layer of foil, and then the earth. We shoveled carefully at first, progressing to great big spade-fulls, until Sammy was well and truly buried.
6. Let it cook
We reckoned about 1 hour and 30 minutes would be enough for salmon to be cooked through (purely guesswork). By the time the match had finished, and we’d had our burgers and hot dogs, it was time to get digging.
7. Digging for treasure
Obviously, you want to be careful at this stage, one false move with the spade and dinner’s ruined!

Figure B: The finished pit oven, dug, fitted with stones, and ready for dinner
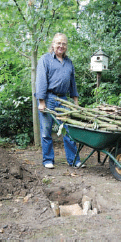
Figure C: You’re going to need a LOT of wood. You can also use or supplement with charcoal.

Figure D: The fire in full flame
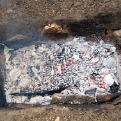
Figure E: The fire, down to cinders within an hour
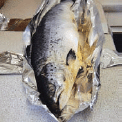
Figure F: Sammy, our beloved dinner, about to be wrapped in aluminum foil

Figure G: The cavity, filled with lemon, herbs, seasoning, and butter filled with lemon, herbs, seasoning, and butter
We knew Sammy was about 4" down and once we saw the silver glow of the foil, the rest of the extraction was done by hand. Again, be careful here. We were surprised by how hot the earth, the food, and the stones still were. After about five minutes, Sammy was out and ready for the table.
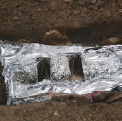
Figure H: Adding a kitchen foil bed on top of the coals
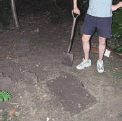
Figure I: Once the fish is in the oven, bury the evidence

Figure J: Out of the pit, ready for the plate
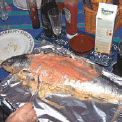
Figure K: Our pit-oven “Sammy,” cooked to perfection
8. Enjoy your bounty
And now, the moment of truth. We gently peeled back the foil to a release of steam and a wonderful smell. It had worked! The fish was perfectly cooked; the skin peeled off easily, and the meat just fell off the bone.
Thanks, Sammy—you were one spectacular fish. There was more than enough to go round and everyone had their fill.
9. The clean up
Next day and time to clean up. After removing any non-biodegradables (like foil, etc.) we just filled the pit in, leaving a nice little mystery for archaeologists of the far future.
I hope this helps you to decide to make your own pit oven. After blundering through our first attempt, I’d recommend it; we’ll definitely be building another one soon. Thanks for reading!
User Notes
Kamakana Kaimuloa says: I am surprised you found success with river rock. It has been my experience that when you use river rock, or any other non-porous rock, there’s a strong possibility that they will explode as a result of the heat. Shards of extremely hot rock can quickly ruin a pleasant evening.
Fatafehi Fonua says: In New Zealand, the indigenous Maoris call it “hangi,” and in the Pacific Islands, they call it “umu” (earth oven). They’ve been cooking like this for a thousand years. You start a fire, pile on wood and stones, and wait for the stones to turn white-hot (the stones you have are ideal). Big embers are chucked out. Flat stones are settled at the bottom of the pit and the food is added (you have to work quickly). Criss-crossed sticks or branches are placed on top of the hole, supports are spread across pit (should be breathable). A thick blanket from the linen closet is ideal. You then cover with thin “veneer” of dirt to the point where you can’t see steam rising from the pit. You can cook anything you’d cook in a conventional oven this way. My aunt bakes bread with this method. Cooking time depends on amount of food in your pit. In a pit about the size of the one in this Instructable, cooking time would be about 30 minutes.
Uncle Cy says: This has long been used for beans, called “bean hole beans.” Families have their own recipes that they share with no one. These have been passed along for many generations. Another variation of this is, of course, the traditional lobster bake. Mainers place the lobsters over hot coals with clams and a few eggs smothered in seaweed. When the eggs are hard-boiled, the lobster and clams are done. Nothing tastes better. Seaweed provides the moisture for the steam, and also insulates the catch. Never better than on the seashore. Now I’m hungry. Thanks for sharing this ancient, and still used, cooking method.
John Lock is a web designer and music producer from Birmingham, UK. He can be found at www.novawebs.co.uk and www.novatronic.co.uk.