Tools for drawing light doodles By Stuart Nafey

Figure A: Our collection of light doodle pens

Figure B: Lori in action
My wife Lori is an incessant doodler and I’ve played with long exposure photography for years. Inspired by the PikaPika light artistry group, and the ease of digital cameras, we took on the light drawing artform to see what we could do.
We have a large gallery of drawings on our website (LightDoodles.com). There you will also find a description of how we draw and a brief history of light drawing.
Any light source can serve as your creative implement and we shopped for every keychain flashlight, gimmick pen, and light wand we could find.
We finally sat down and asked what type of flashlight would accommodate Lori’s most natural and comfortable hand position while drawing in mid-air. The answer was to hold the light like a pencil with instant on/off control directly under the index finger.
Since we wanted to complete each full drawing in one exposure, she needed to be able to switch between different colored pens quickly. We also found that when drawing a large picture we needed the light to be completely exposed on all sides to minimize fading around the edges.
With these parameters, I went hunting for parts at the local electronics and hardware stores and came up with what turned out to be a simple and versatile tool that resulted in some incredible art.
1. Parts list
I’ll be creating a blue light pen. Attention to voltage requirements and current draw are important as different color LEDs have different ratings. Here is a list of the parts used.
![]() One LED
One LED
![]() One Normally Open (NO) switch
One Normally Open (NO) switch
![]() A 20Ω resistor (size is determined using Ohm’s Law)
A 20Ω resistor (size is determined using Ohm’s Law)
![]() 1.5 volt button-cell batteries (3)
1.5 volt button-cell batteries (3)
![]() Plastic tubing: 5/8” outside diameter, 1/2” inside diameter
Plastic tubing: 5/8” outside diameter, 1/2” inside diameter
![]() Plastic tubing: 1/2” outside diameter, 3/8” inside diameter
Plastic tubing: 1/2” outside diameter, 3/8” inside diameter
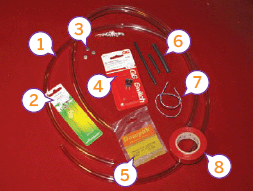
Figure C: The parts you need: 1. Plastic tubing 2. LED lamp 3. Button cell batteries 4. NO Switch 5. Resistor 6. Heat-shrink tubing 7. Wire 8. Electrical tape
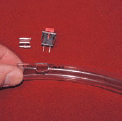
Figure D: The switch hole cut in the 5/8” tubing, cut near one end
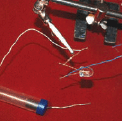
Figure E: The LED, the resistor, and the wires soldered in series

Figure F: Heat-shrink tubing being threaded onto the two wires

Figure G: The heat shrink in-place, covering the solder joins and components
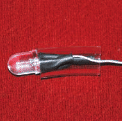
Figure H: A length of 1/2” tubing threaded over heatshrink assembly

Figure I: The lamp assembled and switch wires threaded into the 5/8” tubing and the switch soldered to one of the wires
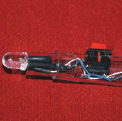
Figure J: The switch installed
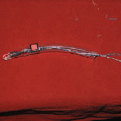
Figure K: The pen assembled, waiting for the power assembly
![]() Heat-shrink tubing
Heat-shrink tubing
![]() 24-gauge wire
24-gauge wire
![]() Electrician’s tape
Electrician’s tape
LEDs, switch, resistors, heat-shrink tubing, and electrician’s tape can be purchased at a local electronics store.
The plastic tubing was “discovered” in the hardware store. Many sizes are displayed on spools which are purchased by the foot. The 5/8” outsidediameter clear tubing best fit Lori’s hand. The natural curve of the tubing turned out to be ergonomic and it helps keep the pens upright and stable when placed down.
The switch is a “Normally Open” type, which means that the circuit is complete and the light is on only when the button is pushed and held down. As soon as the button is released, the circuit is broken and the light goes off. Otherwise, I chose this switch for its size and shape, not for any of its other electrical properties.
Adding a resistor to the circuit is good practice in obeying Ohm’s Law.
2. Warning: math content ahead
I picked up the basics of LED science from the “LEDs for Beginners” Instructable (www.instructables.com/id/LEDs-for-Beginners), reading not only the Instructable, but many of the follow-up comments. They supplied a wealth of theory and important links to everything you need to know about LEDs.
The back of the LED package provides the information you need to properly build the working circuit. Use this information to determine which type and quantity of battery and what size resistor to use.
The blue LED I used here requires a 4.0 Forward Voltage Drop (Vf) to light. It will pass 25 mA of Current (If). Three 1.5 volt batteries in series will supply 4.5 volts.
Any combination of batteries that add up to the required voltage will do. For instance, AAA batteries are 1.5 volts and three in series will give you 4.5 volts.
I found these tiny 1.5 volt button batteries inside of an A23 battery. Three of these work nicely.
Obeying Ohm’s Law and using this Current Limiting Resister Calculator of LEDs (ledcalc.com), a 20Ω resistor should be placed in-line in the circuit.
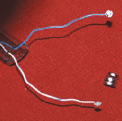
Figure L: The three button cell batteries in series

Figure M: The button stack being wrapped in electrical tape

Figure N: The battery stack attached to the power wires
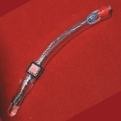
Figure O: Our finished LED pen, ready to paint with light

Figure P: The pen powered up
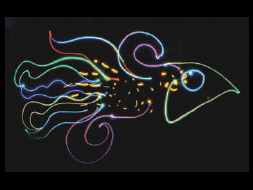
Figure Q: A finished piece of art created with LED light pens
3. Put it together
Everything in this simple circuit is placed in series and the parts can be arranged in any order with one exception: the LED will only light if the battery polarity is correct.
Cut an appropriate length of the 5/8” OD (outside diameter) tubing and cut a hole close to one end to accommodate the switch. Keep in mind how the pen will fit in your hand and where your finger will lie to operate the button. Since we hold the light like a pen, I placed the switch where we can easily push it with the index finger.
Solder the LED, the resistor, and the wires in series. Remember: the resistor can be placed anywhere in the circuit.
I placed heat-shrink tubing over the exposed wires and heated the tubing with a lighter, protecting against short circuits.
Next, fold the wiring up and slide inside of a 1" piece of the smaller 1/2” OD plastic tubing.
4. Add the switch
Feed the wires through the 5/8” tube, one through the hole, and solder the switch inline.
Continue feeding all wires through the tube. Squeeze the switch into the cut-out hole (I bent the leads to fit). Squeeze the 1/2” tube into the 5/8” tube.
5. Add the power source
Finally, add the batteries. This is very low-tech, but I have yet to find or build a battery holder that suits my purposes.
Strip the ends of the wires and wrap the bare wire and a small bit of aluminum foil together into a ball.
Use the electrical tape to hold the batteries together in series (positive terminal to negative terminal) and the wire ends in place on each end of the battery stack.
Polarity is important here. Test the light at this point and try reversing the connections if it doesn’t work. (Remember that you have to push the switch while testing.)
Wrap a second piece of tape around the terminal ends. Stretch and wrap the tape tightly, insuring a positive connection. Fit the battery pack into the end of the finished pen.
6. Finished product and drawing example
It works for me! Now drawing is another story.
To see what we’ve done, visit us at LightDoodles.Com. You can also see more of our drawings on Flickr (flickr.com/photos/unklstuart/sets/72157601507669278).
To find out how to do the long-exposure photography, check out the “Write or Draw with Light” Instructable (www.instructables.com/id/Write-or-Draw-with-Light!).
Stuart Nafey is a mild-mannered IT guy by day, a bohemian long exposure photographer by night. He seeks ways to exploit his wife Lori’s quick drawing skills and together they create fun art at Lightdoodles.com.
User Notes
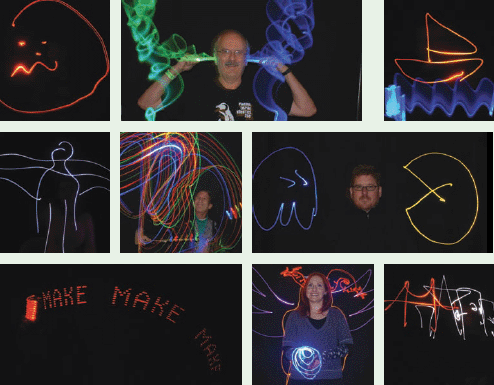
We took our Light Doodles to the 2008 Bay Area Maker Faire (makerfaire.com). Here are some of our favorite images from the Faire sessions.