

The purpose of this project is to build a vehicle that:
![]() Provides free, “green” transportation for short distances (~ 10 miles), thus it must never plug into a wall socket, or emit any pollutants
Provides free, “green” transportation for short distances (~ 10 miles), thus it must never plug into a wall socket, or emit any pollutants
![]() Charges while at work
Charges while at work
![]() Is cheap, simple, and low maintenance
Is cheap, simple, and low maintenance
![]() Draws attention to the practical application of green energies and promotes fossil fuel alternatives
Draws attention to the practical application of green energies and promotes fossil fuel alternatives
![]() Reduces excess automobile wear and pollution from cold driving and short, in-town trips.
Reduces excess automobile wear and pollution from cold driving and short, in-town trips.
This is a project for Dr. Reza Toosi’s “Energy and the Environment, a global perspective” class at California State University, Long Beach. We look at the sources, technologies, and impacts of energy on our environment.
1. Acquire a vehicle
Find a lightweight vehicle with low rolling resistance. A two-, three-, or four-wheeler will do, depending on how much work you want to do, but the concept is the same. Four-wheeled vehicles may be regulated under different laws. Of course, the best vehicle is one that you already have, if you happen to have a three- or four-wheeled pedal-powered vehicle. In the interest of simplicity, a three wheeler was chosen for this project. This Schwinn Meridian Trike was $250 new, readily available locally, and the basket provides a convenient location for batteries and solar panels with minimal fabrication.
The first thing to do was to completely disassemble the trike and paint it a bright “fern” green. This step may not be necessary, but I felt that it was in my case since this is a school project that is supposed to grab attention, and let you know that it is a true green vehicle. It is a vehicle that does not use gas, and does not plug into a wall socket, which would defeat the purpose since electricity from the grid likely comes from a non-renewable energy source. It runs on pure solar energy.

Figure A: The Solar Trike. It’s a cool green machine.
Before painting the frame, I used this stage as an opportunity to reinforce the frame where the batteries were going to mount. Lead-acid batteries are heavy, but they are relatively cheap. One tube was welded in to distribute the load over four points on the axle carrier instead of two. It also ties the rear subframe together, which makes the tube the load bearer rather than the weld beads, which may eventually fatigue and fail. High pressure (65psi) tubes were equipped and the Trike was meticulously assembled in order to minimize rolling resistance.
While the welder was out, a battery mount was fabricated, and bolts welded to the basket to be used as battery mount studs making removal easier. 12V LEDs were put in the reflectors and wired as brake lights through the brake levers that cut the motor when you brake. They are wired through only one of the three 12V batteries.
2. Drive train/running gear
The drive train consists of your electrical system and electric motor. The Electric Hub Motor Kit was purchased from GoldenMotor.com, costs $259, and consists of a front wheel with an integrated brushless 36V electric motor as part of the hub, along with the necessary components such as a twist grip throttle, brake levers that are wired to cut power to the motor, battery level indicator, and the motorspeed controller, 36V battery charger, and a battery pack connector. Not sure if the kit is still available, but they still sell everything needed. The customer service is basically an owners’ forum, which did prove useful in diagnosing a bent pin on one of the electrical connections.

Figure B: Reinforcing the frame where the batteries will mount

Figure C: The fabricated battery mount installed

Figure D: The drive train system on the front wheel

Figure E: The battery in its basket mount
The motor installation requires a simple front wheel change, and routing the wires back to the controller which will be mounted under the rear basket (Figure D). Slack must be left in the wires around the steering tube/fork juncture so they will not be in tension even at the maximum steering angle. The grips and brake levers are replaced with the new ones, and their wires also routed back to the controller.
Choosing the right battery is a compromise between price, weight, and range vs. charge time. Lots of money can be spent on batteries, but since I was on a budget, I had to take what I could get. I took a multimeter to a local industrial liquidation warehouse and found three batteries for $20 each, and they have worked well so far. Three 12V, 20 Amp/hour batteries are run in series to make 36 volts. 20A/hr provides long range, with the trade-off being a longer charge time. A battery cut-off switch was added so the rider doesn’t have to unplug the battery pack to shut the electrical system off.
3. Charging system/solar panels
The solar panels need to be as large as possible to maximize the available wattage, but they also must provide the right voltage. Solar panels produce a range of voltages, which peak and drop, but the nominal voltage of the panel is what matters for selecting the right charge controller. I purchased three Q-cell brand mono-crystalline solar panels that I found on eBay for $110 each. They produce 21.8V peak and 17V nominal, at about 1.2 amps nominal. With the three panels wired in series, this makes around 66V peak and 51V nominal, which is plenty over the 42V needed to charge the batteries. A basket was added in the front to accommodate the third solar panel.
From Ohm’s Law, Power (P) is equal to Voltage (V) times current (I), (P=V*I), so the panels produce ((17V*3)*1.2 Amps)= 61.2 Watts nominal, and over 80 Watts peak. A Maximum Power Point Tracking (MPPT) charge controller tricks the panels by hiding the battery load from them and allowing them to operate at their peak power when conditions allow.
A charge controller was purchased from solarsellers.com. The controller basically takes the varying voltage/amperage input from the solar panel array and converts it into a constant voltage (42V) or current, to optimize charging the 36V source. Maximum input voltage to the controller is 100V, so the peak of 66V will not harm the controller. The controller is a MPPT type, which charges faster as more sun is available, rather than at a set rate as most controllers do.
In order to charge the batteries in a practical amount of time, they need to charge about as fast or faster than the provided 110V wall socket to 36V charger/converter, which charges at a rate of 1.5 amps. At 1.2 amps the panels do not quite achieve this, but with the MPPT controller, it takes right around the same amount of time for a charge. The bike is stored in a location that gets a few hours of sun every day (where I live the sun is pretty reliable), which keeps the batteries topped off and ready to go whenever needed.
And for those of you wondering, the electric motor draws up to 20 Amps, and the 1.2+ Amps added by the solar panels do not make it go faster, since the 1.2 amps are routed through the controller and only serve to charge the batteries. The motor speed controller does not see this extra amperage, and outputs just the same as without panels, except the batteries will stay charged slightly longer, (extending your range) with the net drain being (20-1.2) A= 18.8A rather than 20A without the panels. The motor only pulls 20A when taking off though, so the draw is much less when at cruising speed. The motor speed controller cuts the voltage off at 32V to keep the batteries from going below 10.5V, but I monitor the voltage and try not to discharge the batteries below 36V. Consult the wiring diagram in Figure F to see how the system was put together.

Figure F: The Solar Trike wiring diagram
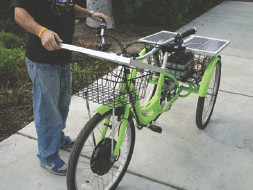
Figure G: The solar panel hinging
4. Solar panel mounts
Now you have to figure out how you’re going to mount the panels on your vehicle. Hinges were welded on the baskets to mount the panels and allow them to tilt for access to the basket, with rubber hold-downs on the other side to keep them from opening while riding (Figure G).
Once your wires are all routed and zip tied, your batteries and panels held securely down, double check every thing and you are ready to go.

Figure H: Feel the power of free energy
Performance:
This solar-powered trike does about 15-18mph, depending on the weight of the rider. The furthest I’ve gone is a little over ten miles with small hills and little pedaling, and the battery meter still read full (green) at the end of the trips.
At ten miles, the voltage drops to around 36V, safely above the controller’s cut-off voltage. If the batteries are kept from discharging too low, the panels take about the same amount of time as the plug-in charger, since both the plug-in charger and the solar charge controller charge with constant wattage. With constant wattage charging, Power (P), and Ohm’s Law again (P=V*I), the charging current goes down as the voltage goes up, as the batteries near their fully charged state.
What this means is if you keep the voltage from dropping too low, the panels provide adequate current to match the charging speed of the plug-in charger, but if it drops below a certain point the panels are slower at charging. This is easily avoided since my typical trip range is around three miles or less, semidaily at most, so low voltage is not an issue, but on longer trips I bring the multimeter.
The Trike cost a little over $910 to build:
|
$250.00 |
|
$330.00 |
|
$95.00 |
|
$260.00 |
|
$ 60.00 |
|
$ 15.00 |
David Pearce is a mechanical engineering student at California State University, Long Beach. His interests include all forms of human propulsion, surfing, skateboarding, nature, and traveling.