
Paracord Bracelet with a Side-Release Buckle
Transform a simple piece of cord into this fantastic bracelet!
This tutorial will show how to make a paracord bracelet with a side-release buckle. When made on a larger scale, you can make this for use as a dog or cat collar as well. I get my paracord from the Supply Captain (www.supplycaptain.com/index.cfm?fuseaction=page.Store) and the side-release buckles from Creative Designworks (cdwplus.com/singleSRB.html). More projects, links, and knot references can be seen on my blog page, Stormdrane’s Blog (stormdrane.blogspot.com).
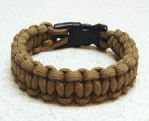
Figure A: The finished bracelet
1. Materials
You’ll need:
![]() Paracord, or equivalent 1/8” diameter cord Tape measure or ruler
Paracord, or equivalent 1/8” diameter cord Tape measure or ruler
![]() Scissors
Scissors
![]() Side-release buckle
Side-release buckle
![]() A lighter (torch lighter works best)
A lighter (torch lighter works best)
The amount of cord used can vary, but for this example, we’ll start with 10' of paracord. Actual amount of cord used for the bracelet is about 1' of cord for every 1" of knotted bracelet length. So if your wrist is 8", you’d use approximately 8' of cord.
2. Measure wrist
Wrap the paracord around your wrist and make a note of where the cord meets. Hold this point next to your ruler or tape measure and that’s your wrist size.
3. Find the center of the cord
Hold the ends of the cord together and find the center of the loop. Take the center of the cord and pull it through one end of the buckle (either side of the buckle). Now pull the cord ends through the loop until it’s tightened up and attached to the buckle.
4. Finding the bracelet length
Take the buckle apart and pull the free ends of the cord through the other part of the buckle, sliding it up towards the attached part. You’re going to measure the distance between the two buckle ends for the bracelet size for your wrist. Add about 1" to your measured wrist length; this will make the finished bracelet a comfortable fit. You’re measuring from the end of the female part of the buckle to the flat part of the male end of the buckle (the part with the prongs). The prongs don’t count for the measurement because they fit inside the female part of the buckle when the bracelet is closed.
5. Start making the knots
The knot used for the bracelet has a few different names: cobra stitch, Solomon bar, and Portuguese sinnet. Take the cord on the left side and place it under the center strands running between the buckle ends. Now take the cord on the right side under the left side cord, over the center strands, and through the loop of the left side cord. Tighten up the cords so the half knot you just formed is next to the buckle. Now take the right side cord under the center strands. The left side cord goes under the right side cord, over the center strands, and through the loop of the right side cord. Tighten up the cords; not too tight, just until they meet the resistance of the knot. Now you have a completed knot. You will continue alternating the left and right sides as you go. If you don’t alternate, you’ll quickly see a twisting of the knots; just undo the last knot and alternate it to correct (Figures I-L).
6. Continue knotting
Keep tying the knots until you have filled the space between the buckle ends. The knots should be uniform from one end to the other. Tie each knot with the same tension to keep them all the same size.
7. Trim the excess cord and melt the ends
You can now use your scissors to trim off the extra cord closely to the last knot you tied. I trim one at a time, and use my lighter to quickly melt the end. I cut, wait a second for the melted cord to cool just a bit, and then use my thumb to press the melted end onto the surrounding cord so it hardens as it attaches. You must be careful with this step. The melted cord is extremely hot, and it’s possible to get burned. Use a soldering iron for the melting step if you wish, or even something like a butter knife to flatten out the melted end of the cord to finish it.

Figure B: Gather your materials

Figure C: Wrap the cord around your wrist to measure
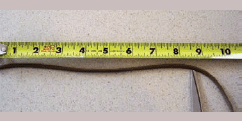
Figure D: Measure the cord to find your wrist size

Figure E: Find the center of the cord and pass through the buckle
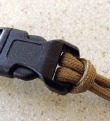
Figure F: Pull cord ends through loop and snug up
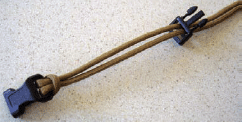
Figure G: Thread the free ends of the cord through the other part of the buckle
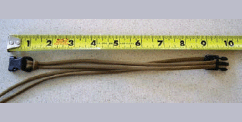
Figure H: Fold over the cord at your wrist measurement plus about an inch
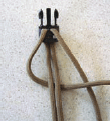
Figure I: Begin the first knot

Figure J: Thread the cord through the loop as shown and snug up to the buckle
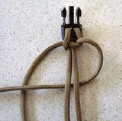
Figure K: Begin the second half of the knot. Don’t forget to alternate sides!

Figure L: Thread cord through loop and tighten to complete the first knot

Figure M: Continue making knots to fill the space between the buckle ends
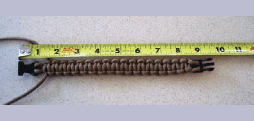
Figure N: Keep the knots uniform

Figure O: Trim the end of the cord
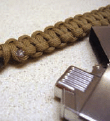
Figure P: Melt the end

Figure Q: Press the melted end into the surrounding cord
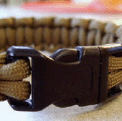
Figure R: Another view of the finished bracelet
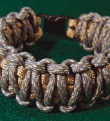
Figure S: Variation with king cobra stitch
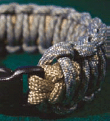
Figure T: Add interest with two colors of paracord

Figure U: Add even more interest with three colors!
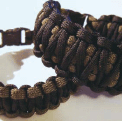
Figure V: Basic bracelet and bracelet with another layer of cobra stitches

Figure W: Skulls make it scary!
8. You’re finished
If you did everything correctly, it should look something like the finished one. Once you know what you’re doing, you can vary the amount of cord used by making the knots tighter or looser. Pushing the knots closer together as you go will use more cord.
9. Other variations
Once you have the hang of the basic bracelet/collar, you can add another layer of cobra stitches overlapping the first set of knots, called a king cobra stitch. The amount of cord used for the king cobra stitch is about twice as much as for the regular stitch.
Stormdrane, aka David Hopper, is a former Boy Scout and enjoys a hobby of learning decorative and useful knot work.