

Give your speakers some extra personality by making them out of a vinyl doll By Ed Lewis
Kid Robot (kidrobot.com) makes the easily hackable Munny doll and I’ve been meaning to cut one up. The combined need for some new speakers created a happy union of doll and speaker.
Now, I’m not the first person to think of this. I’ve seen at least three different versions of a Munny with a speaker in its head. Still, the only one I’ve seen in person was just one doll for mono sound and the driver was pretty worthless. I wanted mine to sound at least decent and I’d say I surpassed that.
1. Get a pair of Munny dolls and the drivers of your choice
I went to the Kid Robot store in San Francisco to offset the $25 price tag by not having to pay for shipping. At the time I couldn’t find any of the black Munnys online and kept calling till they were back in stock.
Each Munny comes with a few random accessories: a big pencil, a cape, goggles, all sorts of stuff. The drivers I got are Tang Band 3" Bamboo Cone Drivers (PartExpress.com) and have an extended range of 105-20,000 Hz.
2. Trace the circle
I bought drivers that are reasonably small, at 3". But this was still pushing it pretty close to what would fit on the Munny head. To be sure everything was where it should be, I measured the diameter of the back of the driver and cut that out of card stock. I then put this card template onto the face of the Munny and traced out the circle (Figure C).
3. Heat ’em up!
The vinyl that the Munny is made of is pretty firm when it’s at room temperature, but heat it up with a hair dryer or a heat gun, and it softens up nicely. After that, an X-Acto cuts through it like butter.
Cutting is all about careful subtraction. I cut within my safe area quickly, but when I was getting close to my line, I started whittling down the space with constant checks against the drivers, eyeballing it from the side to see where I needed to remove more vinyl next (Figure D).
4. Cut the faces off
Here’s how the Munny heads look without their faces. Cute, huh? (Figure E)
5. Wire it and fill it
Thread the speaker wire through the neck and stuff the head with some polyfill (Figure F).
6. Seal it up
I was considering using bolts to keep the head in place, but the look was a little too S&M for my taste so I decided to seal the connection with some Lexel. Run a bead around the whole driver, tie it up, and let it sit over the weekend (Figure G).
7. Hook it up and enjoy the music!
The Munny speakers are all set and ready to go. Hook them up to an amp (I’m using a Sonic Impact T-Amp), run in an input from an MP3 player or your computer, and you’re good to go!
Ed Lewis lives in Oakland, CA, with his wife Maria and Biscuit, the stunt cat. Being outside, cooking, making wine, and building funny objects are current favorite activities.

Figure A: Give your speakers some extra personality by making them out of a vinyl doll

Figure B: The Munny doll ready to be hacked for sound
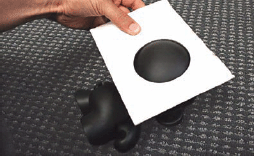
Figure C: Using a template to position the speaker hole

Figure D: Softening the vinyl with a heat gun

Figure E: The Munny heads with holes for the drivers cut

Figure F: Wiring the speakers and adding polyfill

Figure G: Using Lexel sealant to affix the driver
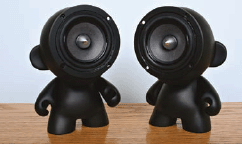
Figure H: The finished Munny speakers, ready to rock