
Use this easy step-by-step instruction on putting the parts together to build your own project. It requires no soldering, gluing, or anything other than the following parts. Everything is in the plumbing area of a hardware store such as Home Depot (Figure A):
![]() One pop-up basin drain
One pop-up basin drain
![]() One drain extension tube with threads and slip nut
One drain extension tube with threads and slip nut
![]() One slip nut and washer
One slip nut and washer
![]() 1-1/4” disposal gaskets (6). These are for the grip. There are a few different kinds. What you select depends on what you’d like it to look like.
1-1/4” disposal gaskets (6). These are for the grip. There are a few different kinds. What you select depends on what you’d like it to look like.
![]() 1-1/4” slip joint washers (6). These come in packages of three.
1-1/4” slip joint washers (6). These come in packages of three.
![]() One faucet hole cover (If your hardware store has a separate sink section, you may need to mosey over there.)
One faucet hole cover (If your hardware store has a separate sink section, you may need to mosey over there.)
Note: I used a plastic chromed pop-up basin drain. There are some that are made of all brass or all metal that looked great but they were around $24 and we were looking to save money. The rods and brackets shown next to it are part of the package, but are not used in this project.
1. Head—blade length adjustment ring
Put aside the drain cap, rods, and brackets that came with the pop-up basin drain. You can use them for other projects, but you don’t need them here. Slide the slip nut onto the pop-up basin drain, and then slide its washer onto the pop-up basin drain until the slip nut is against the ball valve. Figures B, C, and D illustrate these steps.
2. Butt and handle
Unscrew the slip nut from the extension tube, remove and put aside the wing nut on the faucet hole cover, and insert the faucet hole cover into the threaded end of the extension tube. Replace and tighten the slip nut. You may have to put the faucet hole cover into the slip nut first and then fit it onto the extension tube to make it easier (Figures E-F).
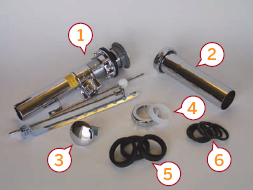
Figure A: 1. Pop-up basin drain 2. Drain extension tube with threads and slip nut 3. Faucet hole cover 4. Slip nut and washer 5. Slip joint washers 6. Disposal gasket
3. Preparing head for connection to handle
Slide two slip joint washers over the pop-up basin drain on the long end; put them about 1-2 inches apart as shown in Figure G.
4. Adding the grip to the handle
Slide a disposal gasket over the non-threaded end of the extension tube, then slide a slip joint washer. Repeat this five more times. You can vary this depending on how much of a grip you want relative to the grooves in the grip. You may need more (more of a black fully covered grip) or less (more chrome showing through if you space them apart). Figure H shows the handle with three grips.

Figure B: Attaching the slip nut

Figure C: Attaching the washer
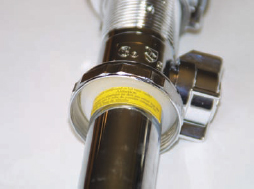
Figure D: Slip nut and washer in place

Figure E: Attaching the butt

Figure F: The butt in place

Figure G: Two slip joint washers in place
5. Connect handle and head
This is the hardest part. Slide the pop-up basin drain into the extension tube. You’ll need to feed the slip joint washers into the tube because the fit will be tight. After you get the first one in, press down until the next one is lined up and get that fed in. Be careful to work it so the two tubes aren’t crooked with respect to each other.
Then get your weight over it and push: be careful before you push, and make sure all the rubber is inside the tube or the hilt will be crooked. I found that when I worked the last little bit of the second gasket, if I applied pressure on the opposite side of where I worked the last part of the first gasket, it gave me a straight line-up of the two tubes.
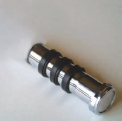
Figure H: Attaching the grips (disposal gaskets and slip joint washers)

Figure I: Connecting the handle to the head

Figure J: This spindle and wire wrapping are from an old 3 gig hard drive. A CD-ROM drive spindle will also work and fits nicely into the hole. We used hot glue to add this feature.

Figure K: The finished project (1. This was just a small plastic cylindrical bead from some craft materials we had.)

Figure L: The battle
If you are using the plastic pop-up drain, be careful to not break it. I was able to put a fair amount of pressure on it though. Figure K shows the assembled project.
6. Optional items
Instead of the disposal gaskets, you could wrap the hilt with leather or cord to give it a multimedium kind of feel. Or just leave it plain chrome.
As shown in Figure J, if you have a spare hard drive or CD-ROM drive lying around, you can take out the spindle hub and use it as the emitter on the business end.
You can make a button by inserting something into the ball valve on the pop-up basin drain, replacing the nut (or you could just use the nut as the on/off button or even remove it altogether), as shown in Figure K.
7. The battle
Unknown to me, my kids had some Adegan/Ilum crystals and inserted them into the blade matrix when I wasn’t looking. I was able to snap this image shown in Figure L before breaking it up. It’s all fun and games until someone loses an arm. (Please note: the blades in this image are Photoshopped. Technology hasn’t come that far.)
Craig Janson is owner and chief electron wrangler of a technology consulting firm in Castle Rock, Colorado. His interests include learning, reading, music, photography, and the creation of projects at the whim of his wife, Diane, and their two boys, Andrew and Wesley.
User Notes
nstru, Instructables member, says: Thanks for the great design. I used foam weather stripping for the hand grip, and had some issues with the washers (either too big or too small!), so I ended up putting three strips inside the handle and the handle came together easily and stayed perfectly.
Also, I went to RadioShack and got a pushbutton switch, and screwed it into the button spot and now there’s a “working” button.
One other small change: I put in the flat drain cover under the washer at the end, one with holes above the washer under the slip nut—it makes a cool vent-like effect, and I might be able to thread a D-ring in there too.