
Put together your own drill lathe to make this super-soaking water mortar By Carl Morris
This water mortar is made from PVC using a variation on the “drill press lathe” technique from the book Eccentric Cubicle (MAKE). It launches over a quart of water per shot!
1. Parts and tools
![]() 30" of 1-1/2” schedule 40 PVC
30" of 1-1/2” schedule 40 PVC
![]() 24" of 2" schedule 40 PVC
24" of 2" schedule 40 PVC
![]() End caps for 2" PVC
End caps for 2" PVC
![]() Plumber’s silicone lubricant
Plumber’s silicone lubricant
![]() Size 224 Buna-N O-rings (2)
Size 224 Buna-N O-rings (2)
![]() 6" of 1" x 3" oak
6" of 1" x 3" oak
![]() Chunks of 2" x 4" for pillow blocks (2)
Chunks of 2" x 4" for pillow blocks (2)
![]() 6" of 1/4” x 20tpi threaded rod
6" of 1/4” x 20tpi threaded rod
![]() 4" long 1/4” x 20tpi carriage bolt
4" long 1/4” x 20tpi carriage bolt
![]() 1-1/2” long 1/4” x 20tpi bolt
1-1/2” long 1/4” x 20tpi bolt
![]() 1/4” x 20tpi nuts
1/4” x 20tpi nuts
![]() Drill, twist bits, spade bits
Drill, twist bits, spade bits
![]() 1-3/4” hole saw (the kind that cuts out a plug) Bearings with shoulder bushings from old inline skate (2)
1-3/4” hole saw (the kind that cuts out a plug) Bearings with shoulder bushings from old inline skate (2)
![]() 8" clamps (2)
8" clamps (2)
![]() Gouge
Gouge
![]() Dial caliper
Dial caliper
You can get O-rings from Superior Seals (www.superiorseals.com).
2. Make centers for the inside pipe
Use the hole saw to cut two plugs from the 1" oak. From this table for PVC pipe (www.gizmology.net/pipe.htm), we see that 1-1/2” Schedule 40 has an inside diameter of 1.592", so the plug left after cutting a 1.75" hole turns out to be just about the right size to fit the inside of the pipe. If you tighten the collar of the hole saw, you will get a larger plug; if you loosen it, you will get a smaller plug (because the bit wobbles). These pieces should jam tightly into the ends of the 1-1/2” pipe, so it’s best if they start out a little too big; you can sand a little to taper the plug if necessary. Use the 1/4” x 20 bolt and nuts to chuck it into your drill and hold a sanding block up against it to sand evenly. If your pieces are too small, build up their diameter by adding wraps of masking tape. Let the tape hang off the inner edge a bit so it can guide the pipe onto the center without being pushed back.
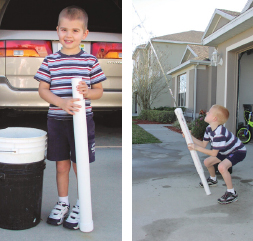
Figure A: The finished water mortar
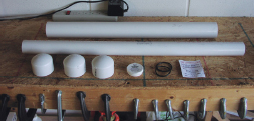
Figure B: Parts
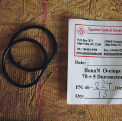
Figure C: O-rings

Figure D: Centers for the inside pipe
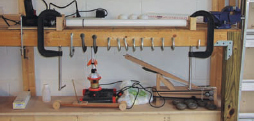
Figure E: Turning set-up—a drill lathe!
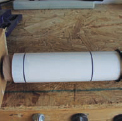
Figure F: Mark the grooves for the O-rings

Figure G: Turn and cut the grooves
Once you’ve got the fit right, assemble the centers (Figure D). The “driven” center is in the foreground, the “non-driven” center is in the background. Using spade bits, drill the 2" x 4" chunks to make pillow blocks for the bearings.
3. Set up for turning
Insert the centers into the ends of the pipe. Roll an O-ring over the pipe. Seat the bearings into the pillow blocks. Check to see that the pipe rotates smoothly. Firmly secure the pillow blocks.
The carriage bolt protruding from the driven center is chucked into the drill.
I haven’t tried it, but the whole setup might be more solid with a single piece of 1/4” x 20 threaded rod running from end to end.
4. Mark grooves
Set the drill for a relatively low speed and lock it on. Use a permanent marker to mark positions for the grooves. The first one should be a little over 1" from the end; the second one should be about 4" further down the pipe.
5. Turn grooves
Start with the drill at a slow speed until you get a feel for things, then speed it up for faster cutting action. If you get too much wobble in the pipe, slow down. If you don’t have a gouge, experiment with different sharp-edged objects held at about a 90 degree angle to the pipe. I used the bottom end of a round-file for my grooves.
Grooves should be flat-bottomed with smooth, squared-up sides, and enough width to give the Oring some room to breathe.
6. Check groove depth
Roll the O-ring into the groove and measure the outside diameter of the O-ring with a dial caliper. Rotate the pipe slightly and measure at a couple positions to get an average diameter. The average diameter needs to be about .010" bigger than the inside diameter of the large pipe. The table referenced earlier says the inside diameter of 2" Schedule 40 PVC should be 2.049", but measure yours and add .010" to get your target diameter. If the O-ring fits too tightly, it will bind and not slide smoothly, if it is too loose, water will leak past it (Figure H).
Once the target diameter is reached, remove the pipe from the turning setup. Bevel the inside lip of the outer pipe so the O-rings will slide into it easier. Clean everything before assembly. Put damp, folded pieces of paper towel over the end of the inner pipe and push them through the outer pipe to clean dust and debris out. Put both O-rings into their grooves, liberally lubricate everything, and check the fit.
7. Prepare end plug
Use one of the centers to make an end plug. Insert a 1-1/2” long 1/4” x 20 bolt, put a nut on the other end, and tighten (Figures I-J).
8. Install end plug
Work the end cap into the end of the inner pipe. The head of the bolt should be visible. Once it is started you can turn the pipe over and tap it against the floor to seat the plug tightly. If the plug isn’t tight enough it will get sucked out when you draw water into the chamber. You can wrap electrical tape at the base of the plug to make it fit more snugly.
9. Check fit
This is what the end should look like when everything is together (Figure M). It should be nice and even, with smooth motion.
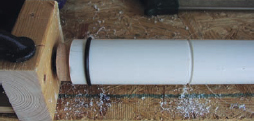
Figure H: Check the groove depth and put on the O-rings
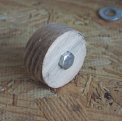
Figure I: Put a bolt through one of the centers to make an end plug
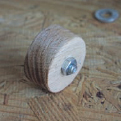
Figure J: Hold the bolt on with a nut
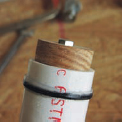
Figure K: Install the end plug
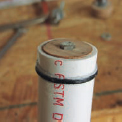
Figure L: Tap the plug in so it fits tightly
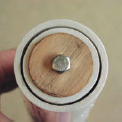
Figure M: Check the fit of the inside pipe and the outside pipe
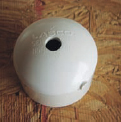
Figure N: Drill a 1/2” hole in the end cap
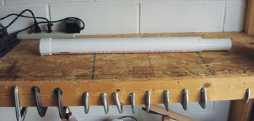
Figure O: Assembled water mortar with end cap seated
10. Prepare end cap
Drill the end cap. A single 1/2” hole seems to work pretty well. Get a few end caps and experiment.
11. Final assembly
Place the end cap onto the outer pipe and seat it by tapping firmly on the floor. Remove the cap by tapping the opposite end of the inner pipe.
12. Try it out
Get a bucket of water, push the inner pipe all the way in, put the end cap under water, and pull the inner pipe back until you can just see an O-ring. Quickly tip the end cap skyward to keep leakage to a minimum, placing the end of the inner pipe on the ground. Tilt in the direction you want to fire, then pull downwards on the outer pipe to fire.
Bonus fun: if you pull the inner pipe back and seat an undrilled end cap, you can launch the end cap with pneumatic pressure, generating an impressive bang in the process. Make sure it’s not aimed at anything or anyone. Also make sure you’re not inside your garage when you discover how cool this is: a garage door makes a resounding boom when you nail it with an end cap!
Carl Morris is an engineer who likes to build things, solve problems, and learn how other people build things and solve problems. He recently collaborated with MAKE to produce a Magnet Sculpture Kit sold in the Maker Shed.
User Notes
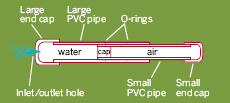
robert.a.scheffler shared a cross-section diagram