
Make this realisticlooking magic wand from simple materials (and a wave of your hand) By Kaptin Scarlet

Figure A: The stages of a wand’s birth
If you ever wanted to have a go at making some really nice magic wands, this is a simple but effective Instructable for you. With a sheet of paper, some glue and a bit of paint, and about 40 minutes to spare, this Instructable will show you how you can make a magic wand that would not look out of place in a fantasy film. I designed it and I have already made a load for my kids; even my girlfriend and her 18-year-old daughter and her boyfriend wanted one each! For the first few stages I have drawn pictures of what you have to do, and then for the painting part I have taken photos to show you exactly what to do. It’s very simple, but the effect is fantastic. For more projects like this visit dadcando (www.dadcando.com), where there are more wizarding projects and a load of other craft printables and templates.
If you like this but want more of a challenge, why not try it with added magic? In the Instructable www.instructables.com/id/EU718C9F3YWV6QY, you get to make a wand with a UV LED at the tip that can reveal secret and otherwise invisible writing. (But I’d try this one first to get the idea.)
1. Prepare your paper
Stick a strip of double-sided tape diagonally across a sheet of A4 or U.S. letter-sized paper.
2. Tightly roll the paper starting in the corner
Roll the paper starting in the corner and roll diagonally, rolling one end slightly less that the other so that the thin paper roll is tapered. Roll until you get to the double-sided tape, then roll over it so that the tapered roll sticks to it.
3. Glue the last third of the roll
Smear the free corner of the paper with a little PVA glue (Elmer’s Glue) so that whole corner is covered in glue.
Continue to roll the wand tightly and hold (with fingers) until it’s dry.
4. Trim the wand
Wait about 20 to 30 minutes for the wand to dry. As the PVA glue hardens, it should become much stiffer. When dry, trim a little bit off both ends of the wand to make the ends straight.
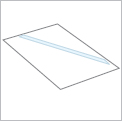
Figure B: Put double-sided tape across a sheet of paper
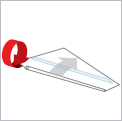
Figure C: Tightly roll the paper diagonally
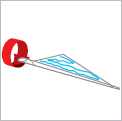
Figure D: Glue the last third of the paper before you finish rolling it

Figure E: Trim the ends of the wand after the glue has dried

Figure F: Fill the wand with hot glue

Figure G: Decorate the wand with hot glue

Figure H: Apply a base coat of paint to the entire wand to seal it

Figure I: Wand half-painted with main color
5. Plug the ends of the wand and fill it
Carefully dribble hot glue into both ends of the wand (one at a time, waiting till each end is set). For the bigger of the two ends, you can pack the end with a little crumpled-up tissue pushed down a bit with a pencil so that you don’t have to use too much glue. For the bigger end you will probably need to have two goes. If you are careful you can achieve a rounded end; as the glue is setting, make sure that you rotate the wand to stop it slumping to one side or dripping over the edge. The same goes for the little end, although if you have wound the wand tightly enough, you will not need to fill this twice.
Note: if you want your wand to be stiff and very robust, after plugging the little end, but before plugging the big end, you can fill the wand with quick setting, two-part epoxy resin. (This is the sort of glue where you have to mix two equal amounts of glue from glue and hardener tubes.) Use the 5-minute setting version rather than the really fast 90-second version, and carefully dribble the glue down the inside of the wand, making sure not to get it on the outside. Don’t worry if you do get a little bit on the outside though, just wipe it off carefully and quickly, you’ll be painting over that later.
6. Create the surface detail
Holding the wand in one hand and the glue gun in the other, slowly rotate the wand between finger and thumb as you gently squeeze out glue onto the surface of the wand. Try to keep it even and make a nice pattern. Start with one or two rings at the thicker end, leaving a space for the grip area, then make a criss-cross lattice effect lower down the wand by rotating the wand and moving the glue gun along the wand at the same time.
As the glue sets, rotate the wand in the air to make sure that no uneven drips build up. The glue should be set in about a minute or so, but might be tacky for a couple more minutes so be careful what you rest it on to set properly.
7. Spray with base coat
Apply a base coat to the wand to seal it. You can use spray paint (more or less any color will do); spray paint is good because it dries hard, but you can use latex wall paint if you don’t have spray. Make sure that the wand is dry before going to the next step.
8. Paint the main color
I chose brown because I wanted it to look like natural wood, but you could use black, or an off-white for ivory, or any other muted color. Paint the whole surface, but don’t worry if it isn’t too even; this will make it look more like a natural material.
Important: you must use a type of paint that is waterproof when it dries. Ideally, use acrylic. The next step uses a wash that you have to wipe off while it is wet, and if you have used a non-waterproof paint for this stage, then when you apply the paint from the next stage, it will rub this paint off as well.
To mix brown, use all the primary colors (red, blue, and yellow) in varying proportions depending on what sort of brown you want, or one primary color with any secondary color (orange, purple, or green). Mix in a little black (but not too much) for a darker brown, and allow it to be streaky if you want.

Figure J: Paint part of the wand with a wash of the second color
Figure K: Wipe off some of the top coat. Repeat with the rest of the wand.

Figure L: Add details in gold or silver

Figure M: A variety of finishes for different types of wizards
9. Start distressing the wand
No, this doesn’t mean telling it upsetting news; distressing is the furniture makers’ term for making something new look old.
You do this by mixing up a wash of black. Not too washy, but enough so that it remains wet long enough to be able to wipe it off. The best type of paint for this is acrylic. DO NOT paint the whole wand before starting to wipe the paint off, otherwise it will dry and you won’t be able to wipe it off.
User Notes

Jenny Burgesse made some colorful wands you can check out at www.whimsicalwands.net
10. Finish distressing the wand
Wipe off the paint as you go along. Use a damp cloth or piece of kitchen towel. Dab and wipe; if you are not happy with the effect, paint over and wipe more. You are trying to achieve the natural look of grime and aging that collects in the cracks and corners.
You won’t be able to wipe all the paint off; some will collect in the corners round the glue and this will make it look really old.
Work on the handle area; in real life, handles get worn more so they will be shinier and have less dark areas. Go with the flow, look at the work, and wipe and paint until you are happy with the results.
Don’t be afraid to go back a stage and add more light colors and then repeat the distressing until you get the right effect. Always wait till the previous layer is dry. If you use acrylic you can do this as many times as you want, but you really only need to do it once.
User Notes
By Zot O’Connor Years ago, my family moved to Louisiana, where my wife and I home school our children. Through home schooling, we soon met a family with whom we became fast friends. Our older sons especially hit it off.

Eventually they relocated to England. While there on business, I stopped in to see them. Their son, Derek, who is always taking things apart and making new things, had gotten into electronics. I wasn’t sure if he was doing what he claimed he was—it all seemed pretty advanced for a 14-year-old—but at least his terms matched with my aging electrical engineering background.
When I visited recently, Derek showed me a circuit diagram. It looked similar to one I was trying (and failing) to build, called a Joule Thief [found on Instructables and MAKE, BTW—Ed.]. “Oh, I’ve built a couple of these,” he said dismissively.” I mention MAKE and he’s heard of it, so I mention Instructables. “Oh, you know about that?” he asks. I say “Why, yes,” and am about to mention that I’m going to be in the upcoming book, writing a sidebar story about “The Marshmallow Shooter” (page 232) when Derek cuts me off: “I’ve posted some projects. Ever hear of the ‘World’s Smallest Electronic Shocker’?” (No, but now my spidey sense is tingling.) “How about a Marx Bridge?” he continues. (You mean the high-voltage spark-gap thingy I spent 30-45 minutes reading about this past week!?) “You built one?” I ask. “Uh, no—I posted the Instructable! You want to see the real thing?” “I would love to!” I say, trying to bring the conversation back to my point. “You know they’re publishing The Best of Instructables?” “Yeah, I’m in it, for the tiny shocker…” (See The Best of Instructables Community Contest winners, page 304.)
After seeing Derek last year, I thought maybe I should become or find him a mentor. This year, I shot video of his Marx Bridge, shockers, and the other Instructables he’s posted. I was thinking, he still should have a mentor. And then, as I was leaving, he offered to show me how to make a Joule Thief—this time, without screwing it up.
11. Apply the gold detail
Using your finger tip, apply some gold rubbing paste to the raised bits of the wand. You can use a gold marker, or a gold gel pen, or gold modeling paint. The best stuff is the art store product that is designed to be rubbed on with the finger tip and then burnished a bit, but any gold paint will do.
For one of my kid’s wands, I used silver leaf to make some highly reflective parts metallic-looking. It was a brilliant effect but a bit more complicated. Paint a thin layer of gold size (a model makers’ and artists’ liquid glue that dries slightly tacky) onto the raised surface and let dry for two hours. Then apply the gold or silver leaf with great care (it is sooo thin), remove the excess with a very fine brush, and burnish with a soft cloth. The effect is truly amazing, like real polished gold or silver (which is what it is, of course). Gold or silver leaf is cheap, but you need to get it from a good art shop or from the Web.
12. My (but could be your) finished wands
There are photos of my wands (each took about 20 minutes to make) on my website dadcando (www.dadcando.com), just one of the 100s of free projects available there. Many have printables and templates of the highest quality, and are designed for kids to be able to do with their dads or mums.
Have fun making the Magic Wand, and send me a picture of any you make so that I can put them up on my website (in the Your Models section). Send a message through Instructables and I’ll give you my email address.
A single father of four, Chris Barnardo is the founder of Dadcando.com, a website full of craft projects, tips, and advice for dads and single parents. An inventor and designer at heart, Chris holds 25 patents.