
Web Content Management (WCM) is a set of features integrated into SharePoint 2007 that allows users to create and manage content-centric web sites, providing the ability to author, review, and publish content over the Web. These features were part of Microsoft Content Management Server 2002 (MCMS), which has been incorporated into Office SharePoint Server 2007. Combined with other built-in capabilities such as workflow and enterprise search, Office SharePoint 2007 offers a rich set of features for web-based content management.
Web Content Management in Office SharePoint 2007 integrates tightly with Microsoft Office 2007 products, such as Word 2007 and InfoPath 2007. Content can be authored using these Microsoft Office products, and the resulting documents can then be converted on the server side to pages using the document converters built into SharePoint (discussed in the “Smart Client Authoring” section, later in this chapter). Custom document converter components can also be created for file types that are not built into SharePoint.
WCM in Office SharePoint Server 2007 could be the subject of an entire book. This chapter provides an overview of working with publishing features, such as configuring, customizing, and using the WCM features. The chapter is divided into five main sections:
Architecture
Configuring the publishing features
Customizing a publishing site
Content management
Smart client authoring
Web content management is built as a WSS 3.0 Feature. The Office SharePoint Server Publishing Infrastructure Feature first needs to be activated within the site. If the site is applied with any of the publishing templates, this feature is activated automatically. WCM uses the lists infrastructure of WSS 3.0 to store templates, resources, and pages. Therefore, WCM components can take advantage of the list capabilities (covered in detail in Chapter 14), such as versioning, auditing, security, and workflow.
In Office SharePoint 2007, the publishing infrastructure consists of the following two main templates:
- Master pages
These pages contain placeholder controls for content and navigation controls. Master pages also contain the overall site branding elements, such as banners, logos, search, login controls, and the page editing toolbar (used by content authors and approvers). Master pages are stored in the Master Pages and Layout Pages gallery of the site collection and are represented by a .master extension.
- Layout pages
Layout pages are built for specific SharePoint content types. Content types define the structure—in other words, the fields—of the data collected from the content authors. Layout pages contain content controls, also called field controls, which are associated with specific fields of the content type. Layout pages can also be created with zones for Web Parts, thereby allowing authors to add Web Parts. Layout pages are created with an .aspx extension and are also stored in the master pages and layout gallery of the site collection.
Combined, the master page and the layout page dictate the final page, resulting in its overall look, as depicted in the block diagram shown in Figure 29-1.
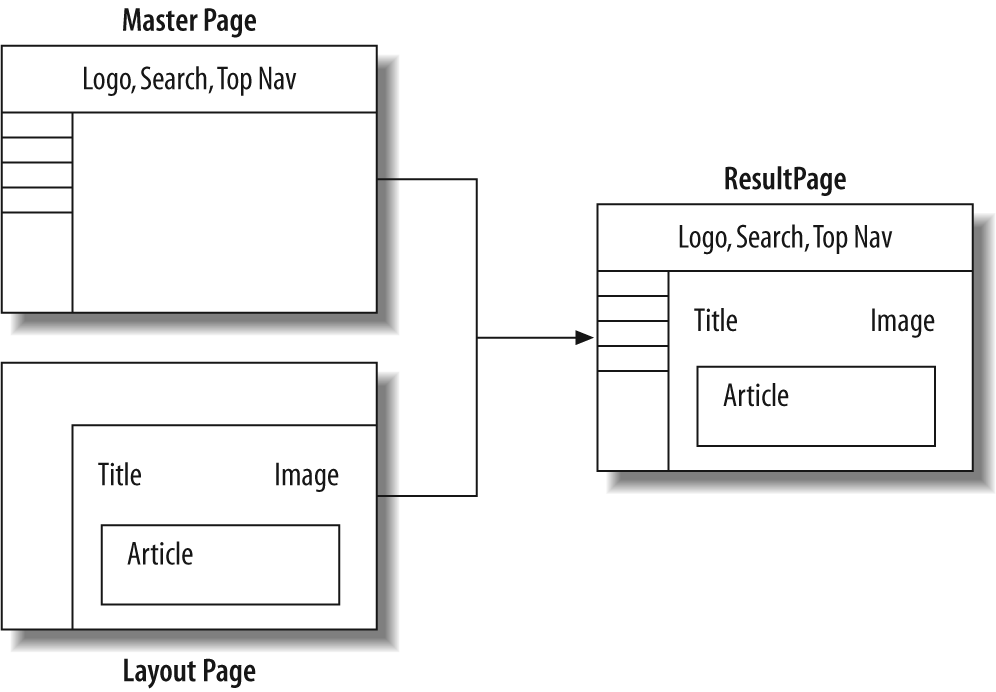
In Office SharePoint Server 2007, content storage and presentation are separated. Content types define the storage structure, and layout pages are used to present the content. Multiple layout pages can be created for a given content type, thus allowing multiple views of the same type of content. This is accomplished using the following:
- Master pages
Defines the overall look and feel of the web site.
- Content Types
This collection of settings defines the information that is published.
- Page Layouts
Defines the display layout for the content. A layout page is built for a specific content type, whereas a content type can have multiple layout pages associated with it.
- Page Libraries
Collection of web pages created for a specific publishing site.
Let’s take an example of a news web site to understand the purpose of the master page and layout pages. The web site’s overall look and feel, such as its banners and navigation, is governed by the master page. Any change in the master page will reflect on all the sites that inherit that master page. From a content perspective, let us assume that the web site uses different SharePoint content types defined for different news types, such as breaking news, sports news, business news, international news, and so on. Each content type will have its own set of columns and other related settings, such as workflows. Layout pages, as the name suggests, consist of content controls, such as text boxes, rich text controls, or image placeholders, which are mapped to the columns of a content type. To create a news article page, an author would choose an appropriate layout page. When the news page is approved and published, the resulting page will have the look and feel designed in the master page and the content of the layout page. We will explore more on the master page and layout pages in the “Creating and Configuring a SharePoint WCM-Enabled Site” section of this chapter.
A typical page rendering in a publishing web site follows a three-step process:
When the request for a web page comes in, SharePoint retrieves the layout page associated with the page.
The master page is then retrieved.
Content associated with the layout’s field controls are retrieved and presented in the final web page.
WCM-enabled sites have two master pages:
Defines the look and feel of the system pages, such as the home page for the Master Page Gallery and the settings pages.
In most cases, you will want to modify the Site Master Page rather than the System Master Page. The Site Master defines the content that most users will see, whereas the System Master defines only the internal content visible to SharePoint administrators and site designers.
Master page settings for a WCM-enabled web site can be changed using the “Master page” option under the “Look & Feel” section of the Site Settings page. Figure 29-2 depicts this page.

As discussed earlier, WCM is deployed as a standard SharePoint Feature. This feature is pre-enabled when a site collection is created with publishing templates (discussed later in this chapter). Sites created with other templates can take advantage of the publishing capabilities by activating the “Office SharePoint Server Publishing Infrastructure Feature.” Figure 29-3 depicts the activated SharePoint 2007 publishing feature.
Office SharePoint Server 2007 comes with two publishing site templates:

To create a site with the publishing portal, follow these steps:
Create a web application:
Open the SharePoint 3.0 Central Administration and select Application Management.
Under SharePoint Web Application Management, select “Create or extend a web application.”
In the “Create or extend a web application” page, choose “Create a new web application.”
Specify the host header port number, application pool account, and other information, and click OK. A new web application is created at the specified port number.
Create a site collection and apply the publishing site template:
Click the Create Site Collection link in the page that appears after a new web application has been created. Alternatively, you can also go to the “Application management” page in Central Administration and choose “Create a Site Collection.” Make sure the “Select a web application” link points to the new web application created in the previous step.
Fill in a Title and choose the Publishing tab under “Select a template,” and then choose Publishing Portal. Figure 29-4 depicts this screen.
Click OK to create a site collection with the publishing feature.
Site collections created or activated with the publishing template are preconfigured with the following two categories of content types:

- Page layout content types
This category contains content types related to pages that would be used by content authors and editors for publishing, for example, articles and welcome pages.
- Publishing content types
This category includes system content types for master pages (applied to all master pages) and page layouts (applied to all pages libraries). Publishing content types define the base columns for all publishing content types.
In this section, we will take a look at the following actions involved in creating and customizing a WCM-enabled site:
Creating a custom master page and setting the default site master
Creating a custom layout page and creating a page using the layout
Creating a welcome page and setting the default welcome page
Creating an article page and approving the page
Configuring anonymous access to the web site
The best approach to creating a custom master page is by copying an existing master page and then customizing the layout as necessary. To create a custom master page, follow these steps:
Open the Office SharePoint 2007 Designer and select File → Open Site. Enter the URL of the WCM-enabled web site created in the previous steps. Click OK to open the site in the SharePoint Designer.
Select “_catalogs” under the site name, and select “MasterPage (Master page gallery).”
Right-click BlueBand.Master, one of the built-in master pages that comes with the SharePoint 2007 publishing feature, and select Copy.
Paste the file inside the “_catalogs” → MasterPage library, and rename the file as CustomSite.Master.
Double-click CustomSite.Master to open the page in the SharePoint Designer. Figure 29-5 depicts this screen.
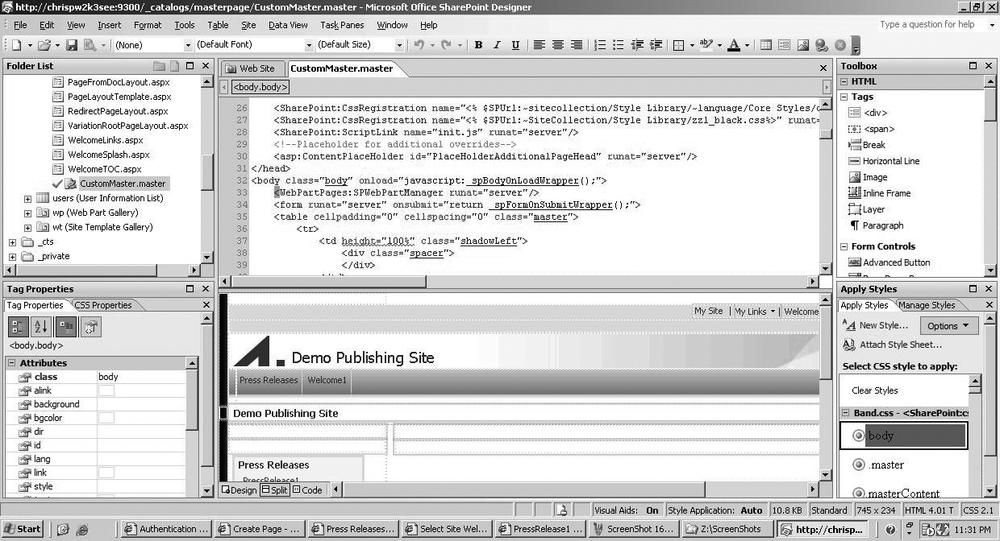
Customize the master page as required using the Designer.
Office 2007 SharePoint Designer is an intuitive tool used to customize SharePoint 2007 sites and pages. The Designer contains areas for presenting the preview and the code-behind for the page, sections to edit the CSS styles that apply to the page or selected control, a toolbar with the list of controls that can be used in the page, and the Properties window to configure the control properties. The Designer consists of three main views:
- Code view
The code view presents a full view of the ASP.NET code-behind.
- Design view
The design view displays the full view of the page as it would look in the browser.
- split view
Displays the code and the preview in the same page. In the split view, the Designer allows you to choose a specific control in the preview window or code window, and it automatically highlights the control in the other window.
Warning
If you aren’t familiar with SharePoint Designer, see Chapter 19.
Once the changes are complete, the master page needs to be published before it can be used on the site:
To publish the master page, right-click the CustomSite.Master page in the folder list window and select Check In.
Choose “Publish a major version” in the “Check in” dialog box that appears and click OK.
The Master Page Gallery is configured with an approval workflow by default. When a new document is checkedinto the library through the Designer, a dialog box with the text to modify the status of the page appears. Click Yes in the dialog box.
The Master Page Gallery page opens up, and the new CustomSite.Master page appears in the Pending category. To approve the status of this page, click the drop-down button for the page and click Approve. Figure 29-6 depicts the screen.
This master page now needs to be set as the default site master page for the layout pages. To set the default master page, follow these steps:
Navigate to the web site and select Site Actions → Site Settings → Modify All Site Settings.
Choose Master Page under the “Look & Feel” option
Select CustomSite.Master in the drop-down listbox under Site Master Page and click OK. This page can also be used to set an alternate CSS file and the system master page.

This example creates a layout page that contains an authoring container and field controls for the columns in the article content type. To create a custom layout page, follow these steps:
In the SharePoint Designer, click File → New.
Choose the SharePoint Content tab and select SharePoint Publishing.
In Content Type Group, select Page Layout Content Types.
In Content Type Name, choose Article.
Provide a URL and a Title for the Layout and click OK. Figure 29-7 depicts this screen.
The toolbox in the SharePoint Designer displays the page fields and the content fields associated with the content type. The Edit Mode panel control under the Server Controls category in the toolbar is used as the authoring container control. Controls placed inside this control will not be published in the pages.
The content fields and the field controls can be dragged into the layout pages and organized into HTML tables, as in the sample custom layout page depicted in Figure 29-8.
To publish the custom layout page, right-click on the page in the “Folder list” window of the Designer and click Check In.
In the dialog box that follows, click “Publish a major version.”
As with the master pages, the layout pages need to be approved through the workflow.
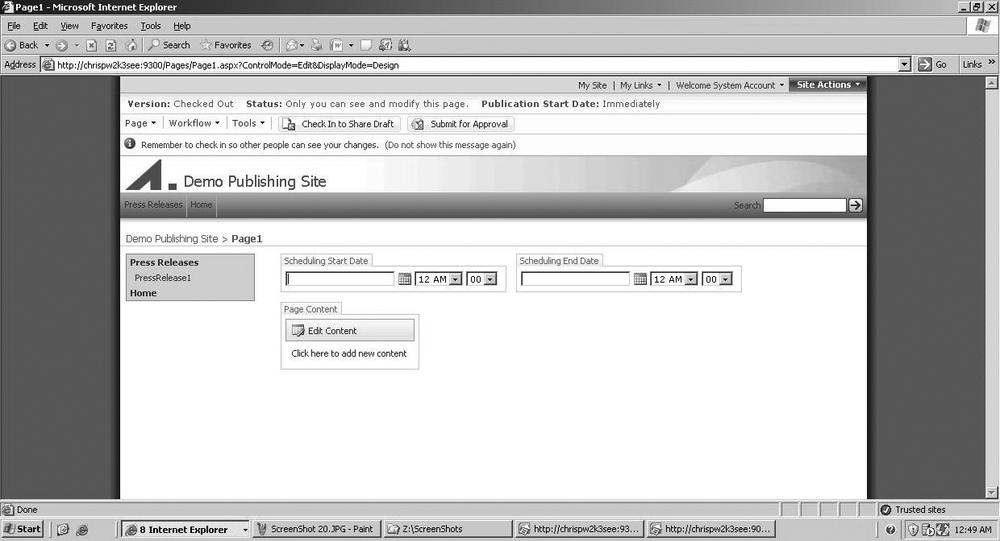
To create a new page using the newly created layout page, navigate to the Website Site Actions → Create Page and choose the title of the layout created earlier. Figure 29-9 displays the page created with the sample layout.


The Schedule Start Date and Schedule End Date field controls can be used to schedule the publishing of the page. This is discussed a little later in the “Content Scheduling” section of this chapter.
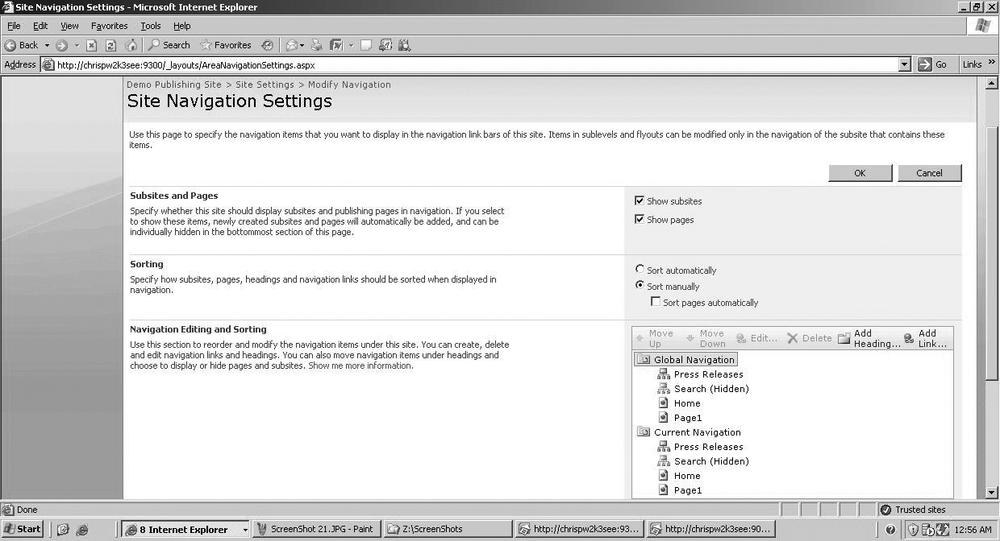
The left navigation and top navigation in a SharePoint site can be customized using the Site Navigation Settings page. Custom navigation controls can also be plugged into the master pages. To customize the built-in navigation, choose Modify Navigation under Site Actions of the root site. Some of the customization options are as follows:
The “Show subsites” and “Show pages” options, when checked, display the subsites and pages as navigation elements in the top navigation (also considered the global navigation) and the left navigation.
Custom Links can be added to the navigation using the Add Link option.
Hide menu options by selecting the title in the navigation and clicking Hide.
Control the navigation item hierarchy by selecting the specific navigation element and choosing Move Up or Move Down.
Figure 29-10 depicts the Site Navigation Settings page.
To create a custom welcome page for the WCM-enabled web site, follow these steps:
Navigate to the web site and click Create Page from the Site Actions menu.
The next page presents the default set of page layouts available out-of-the-box with the Publishing Portal template. Enter a title and URL for the welcome page, choose the “Welcome Page with Table of Contents” option, and click OK.
A page is created with the page editing toolbar at the top. The page editing toolbar contains a set of options that the authors can use to perform different actions, such as publish the page, submit the page for approval, start a workflow, set the page publishing settings, and check unpublished items. Enter text for the welcome page and select Save from the Page option in the page editing toolbar.
Submit the page for approval by clicking on “Submit for Approval.” This starts the workflow process. If the author has “Quick deploy” privileges (discussed later in this chapter), the author can directly publish the page by choosing the “Publish from the Workflow” option on the page editing toolbar.
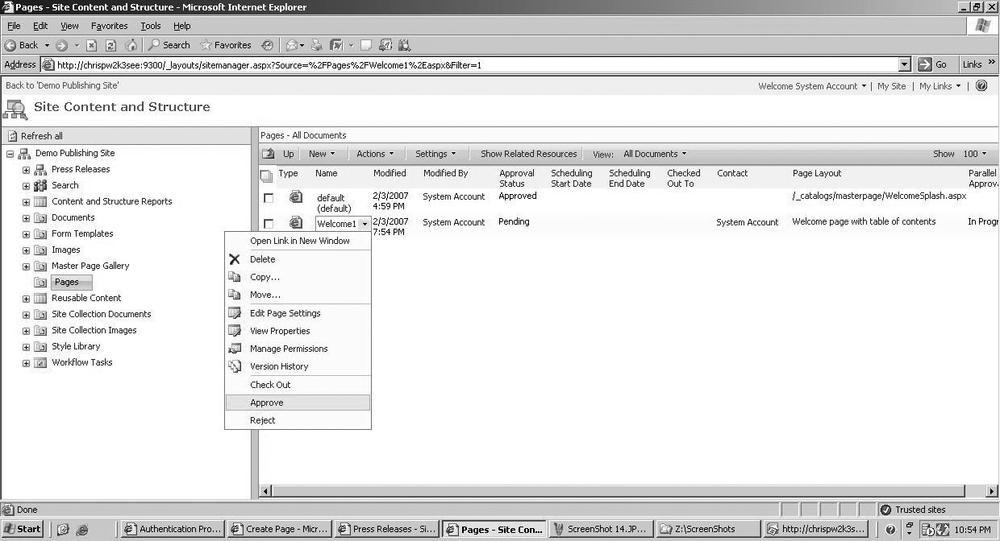
Authors with appropriate privileges can approve the page by clicking on Site Actions → “Manage Content and Structure.”
Click on the Page library in the left navigation.
Click the drop-down option on the custom welcome page and select “Approve.” Figure 29-11 depicts this screen.
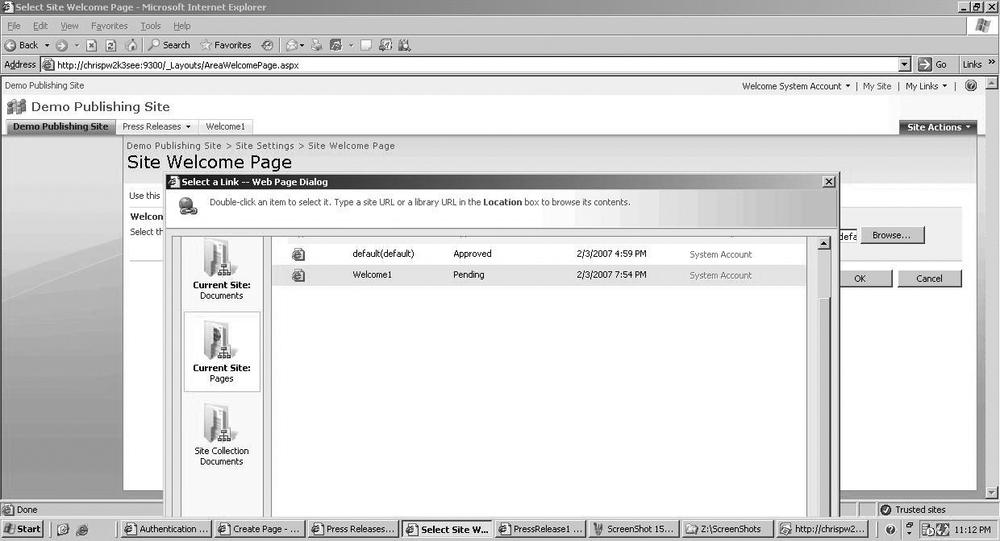
The newly created welcome page needs to be set as the default welcome page before visitors can see it. To set the new welcome page, follow these steps:
Navigate to the web site and select Site Actions → Site Settings → Modify All Site Settings.
Select Welcome Page under the “Look and Feel” section; this opens the Site Welcome page.
Select Browse, choose the created custom welcome page, and select OK. Figure 29-12 depicts this screen.
The default publishing template creates a subsite called Press Releases. To create a new press release page, follow these steps:
Navigate to the Press Releases site.
Choose Create Page from the Site Actions menu.
Choose any of the article page layouts—for example, “Article Page with body only.”
Provide a title and URL and click Create. A page with the page editing toolbar at the top and controls to enter article content is created. Figure 29-13 depicts the newly created page.
SharePoint includes an HTML editor control to insert and format text or HTML. Authors can use this tool to copy and paste formatted HTML. For the news article sample page, enter some sample text in the Page Content area.
To save the page, choose Page → Save from the page editing toolbar.
To publish a page, choose “Submit for approval” from the page editing toolbar, and the workflow drives the approval process for the page.
Internet-facing web sites need to be configured with anonymous access to allow visitors to view the pages without being challenged for authorization. Configuring anonymous access for a WCM-enabled site is a two-step process: configuring the authentication provider with anonymous access, and then configuring the web site to allow anonymous access.
To configure the authentication provider for anonymous access, follow these steps:
Navigate to the Central Administration page for SharePoint.
Select Authentication Providers under Application Security.
Select Default from the available authentication providers; this opens up the Edit Authentication page. The default authentication provider is the Windows authentication provider. SharePoint builds on ASP.NET 2.0 and hence can take advantage of the pluggable authentication provider model of ASP.NET 2.0. You can also configure a database-based forms authentication provider or other custom providers for authentication in SharePoint. A detailed analysis of this configuration is beyond the scope of this chapter.
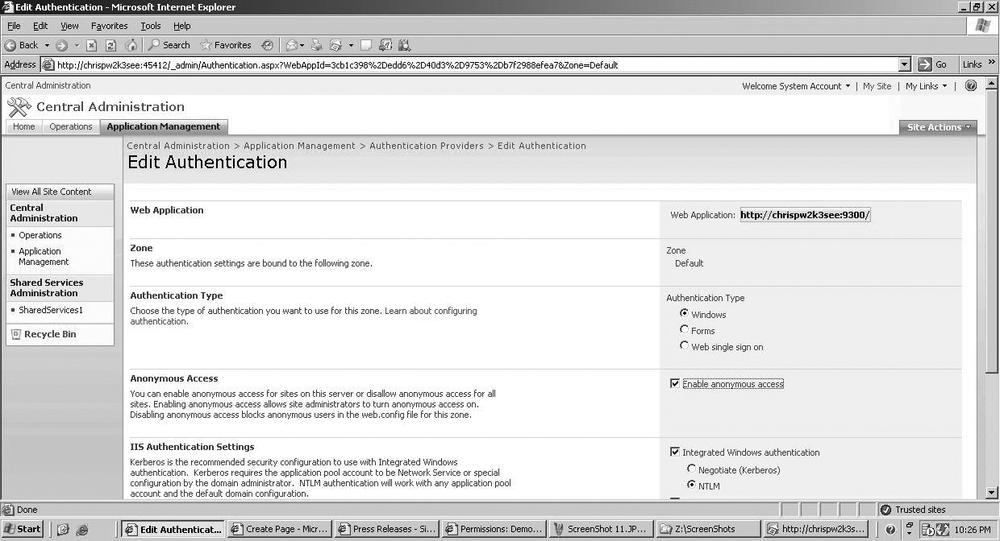
In the Edit Authentication page, check the Enable Anonymous Access checkbox under the Anonymous Access section and click OK. Figure 29-14 depicts the Edit Authentication page for default provider.
Once the authentication provider has been configured for anonymous access, the web site can now be enabled for anonymous access. To configure the web site, follow these steps:
Navigate to the publishing web site and select Site Actions → Site Settings → Modify All Site Settings.
Choose Advanced Permissions under “Users and Permissions.”
From the Permissions page, choose Site Settings → Anonymous Access.
Choose Entire Web Site from the Anonymous Access setting page and click OK. Figure 29-15 depicts this screen.

In a publishing environment, different servers would be used for content authoring, staging, and publishing. In such a scenario, content approved for publishing needs to be deployed from the staging area to the production server. To facilitate this process, SharePoint 2007 provides built-in content deployment capabilities. This section explores the main components of content deployment and the different configuration aspects involved in setting it up.
One of the many features of WCM is the built-in content scheduling and content deployment capabilities. This section explores the content deployment features in more detail.
Content deployment in configured in two phases:
- Path
A path represents the connection between the source and the destination web applications. When a path is created, a quick-deploy feature associated with the path is also created. Quick deploy is a special job that can be configured to run at frequent intervals and allows authors to publish content immediately without waiting for the scheduled content deployment job to run. Authors need to belong to the Quick Deploy Users group in order to publish content through this special job.
- Job
A job is associated with the path and represents the deployment of a specific site collection or site under the source web application. A job can be scheduled to run at a specific time, and can also be configured to deploy all or incremental changes.
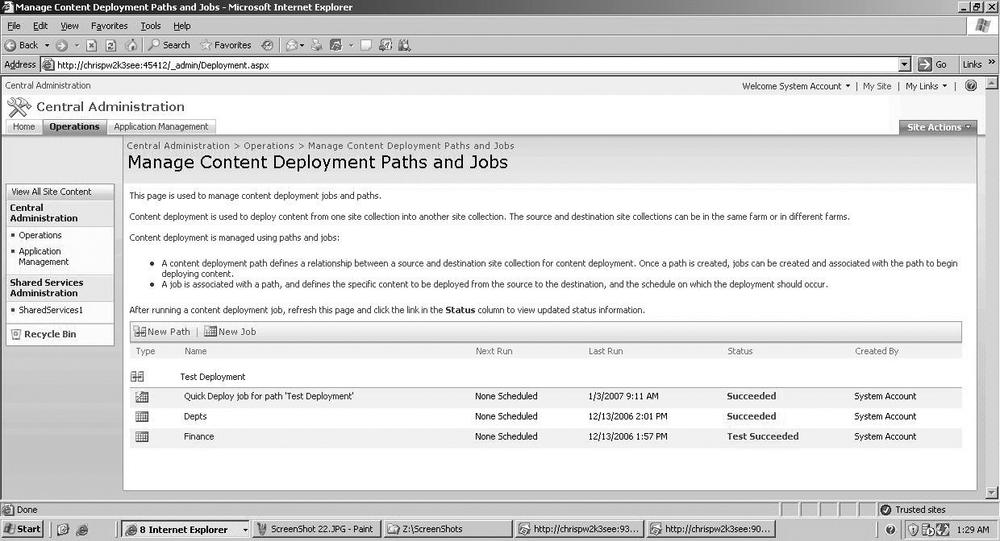
To configure content deployment, follow these steps:
Navigate to the SharePoint 2007 Central Administration and select Operations.
Select “Content DeploymentPaths and Jobs” under Content Deployment. Figure 29-16 depicts this screen.
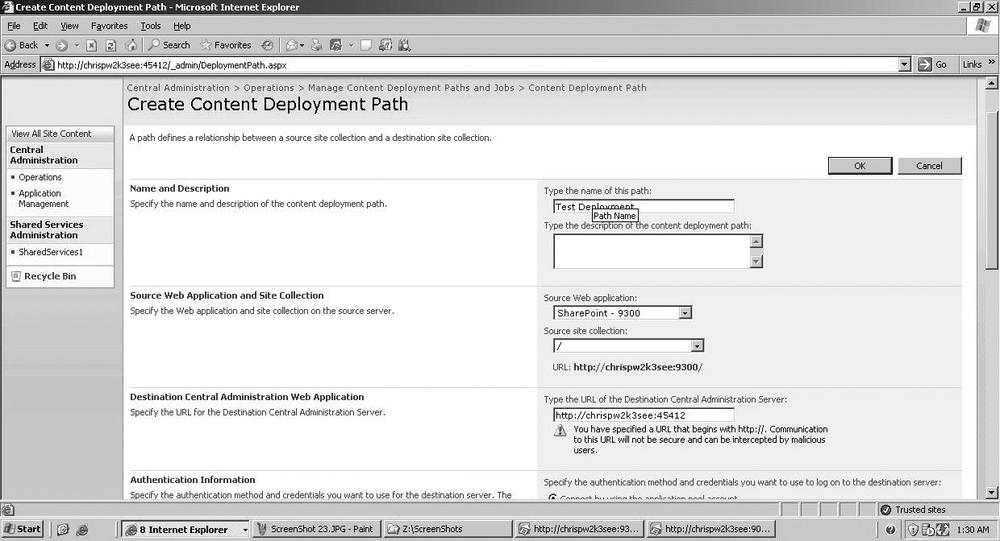
The first step is to set up a path. Click New Path, and in the page that opens, enter a title and description for this path.
Choose the source web application from the drop-down list, and then choose the site collection from the “Choose site collection” option. “/” represents the root.
Enter the URL of the Central Administration of the destination server, enter the connection information, and choose the Connect option.
From the drop-down for the destination web application, add the site collection on the destination server.
The content deployment feature can move content with all the security intact or without any security. This can be configured in the Security Information section of the page. Press OK when all information is complete. Figure 29-17 depicts the screen.
Once the path is configured, the next step is to configure the job. To create a job associated with a path, in the “Manage content deployment paths and jobs” page under the Operations section, select the Path created in the previous step and choose Create Job.
Enter a name and description for the job, and choose the deployment path created in the previous step.
Choose “Entire site collection” if you want to deploy the entire site, or choose specific sites by selecting “Specific sites within the site collection.” You can choose an individual site or the branch of the site.
Some other options for the job include:
Setting a schedule for the job to execute
Option to configure email alerts based on successful or failed jobs.
Figure 29-18 depicts the screen.
Click OK to create the job. To test the job, click on the job in the “Manage content deployment Path and Jobs” page and choose Test.

Content deployment deploys the pages and any dependent objects associated with the page collection. Content deployment will take the most recent major (published) version and the most recent minor (draft) version of a page. If the page contains any custom assemblies or Web Parts, these need to be explicitly configured on the destination site. Another important aspect to remember is that deployment assumes that the source site is being replicated in the destination web application. In other words, what you have in the source site is what you’ll get on the target site.
Content scheduling lets authors publish pages during a specified time period. For content scheduling to work correctly, the library containing the pages must have versioning and moderation enabled. There is no other explicit configuration that needs to be done for scheduling to work. To check for the versioning setting of a page, go to the settings page of the library and select Versioning. The document version setting should be set to “Create major and minor versions.” Figure 29-19 depicts this screen.

When a page is edited, a new minor version of the page is created, and when a page is approved, a new major version is created.
The scheduling date and time can be set using the content types Schedule Start Date and Schedule End Date. Using the page versioning and moderation built into the SharePoint lists, the scheduling system automatically brings the page online at the specified start date and takes the page offline at the specified end date.
Site Variations is a publishing feature that allows maintenance of parallel structures of the web site. A real-world example of this feature would be a multilingual website. For example, when a press release is published, the page could be published in all language web sites at the same time. Using variations, when a page is created in the “source” web site, it is automatically replicated to the “target” sites of other language. The replicated page still needs to be published separately through the workflow. A couple of things to notice about the variations are that they do not translate pages across different languages and that the replication of change is one-way—from the source (master site) to the target site (variation site)—and not both ways.
To set up the variations, follow these steps:
Navigate to the WCM-enabled site and navigate to Site Actions → Variations under the Site Collections Administration section.
Choose the site where the variation sites would be created under the web site.
Some of the other options you can specify while configuring variations are as follows:
Specify whether the feature should automatically create variation sites and pages.
Specify whether the target page needs to be republished when a source page is deleted and republished.
Once you have all the necessary options, click OK. Figure 29-20 depicts the variation page.

Once the variation root has been configured, the next step is to configure the variation labels. Variation labels represent the different sites that will be maintained in parallel by the feature. To create a variation label, follow these steps:
Navigate to the site settings page of the site and select Variation Labels from the Site Collection Administration section.
Provide a name, description, and display name for the label, and also specify the locale for this site variation. One of the variation labels needs to be set as the source from which the features will replicate. To set the source label, choose “Set this variation to be the source variation” checkbox under the “Source variation” section of the page. Also choose a template for this site.
Repeat the label creation (step 2) to set up target site variations. The “Source variation” section will now be disabled, as only one site can be set up as the source.
Once all the variation sites have been set up, click Create Hierarchies in the Variation Labels page under the site settings. This creates subsites for each label and replicates the site hierarchies from the source to the target sites. Figure 29-21 depicts a sample Variation Labels page after the site hierarchies have been created.

To test the site variation feature, navigate to the source site and create a subsite or article page. The variation feature automatically creates the same page in all the other target sites.
Office SharePoint Server 2007 allows content authors to create content using Office products such as Word 2007 and then convert the document into a web page using the built-in document converters. Office SharePoint Server 2007 ships with document converters for Word 2007 and InfoPath 2007. For other document types, custom converters can be developed using the SharePoint API. This section explores the overall configuration of the document converters and then uses Word 2007 to create a sample article page.
The document conversion process in SharePoint uses the following services:
Document converters are configured at a web application level. Once activated for a web application, document conversion cannot be disabled for specific sites or libraries within the web application.
Configuring document conversion is a two-step process. The first step is to configure the load balancer and launcher services; the second is enabling the document conversion for the web application. The following steps can be used to configure the document conversion:
To configure the Load Balancer Service:
Navigate to the SharePoint Central Administration Operations page.
Choose “Services on Server” under the “Topology and Services” section.
Select Document Conversions Load Balancer Service. Enter the port number on which to run this service and choose OK. If the service is not already started, choose the Start link under Action.
To configure the Document Conversions Launcher Service:
From the “Services on Server” page, choose “Document conversions launcher service.”
Select the server that runs the Load Balancer service, enter a port number to run this service, and choose OK. On the “Services on Server” page, click the Start link under Action if the service is not already started.
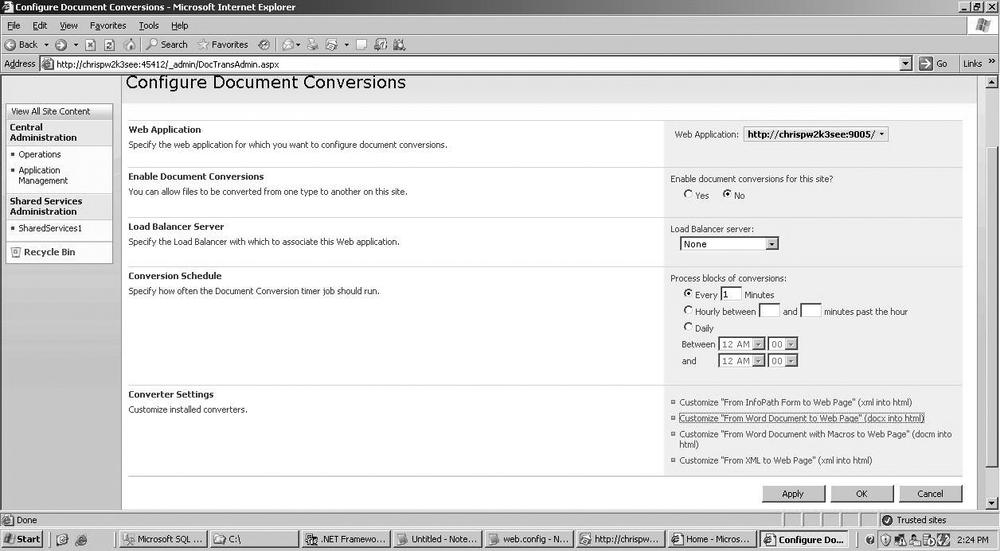
To enable document conversion in the web application:
Navigate to the SharePoint 2007 Central Administration page and choose “Document conversions” under the External Service Connections section.
Select the web application to be configured with the document conversion services. Choose Yes for the “Enable document conversions for this site” option and click OK. This page can also be used to customize the different converter settings and to specify a schedule for block processing. Figure 29-22 depicts the document conversion settings page for a web application.
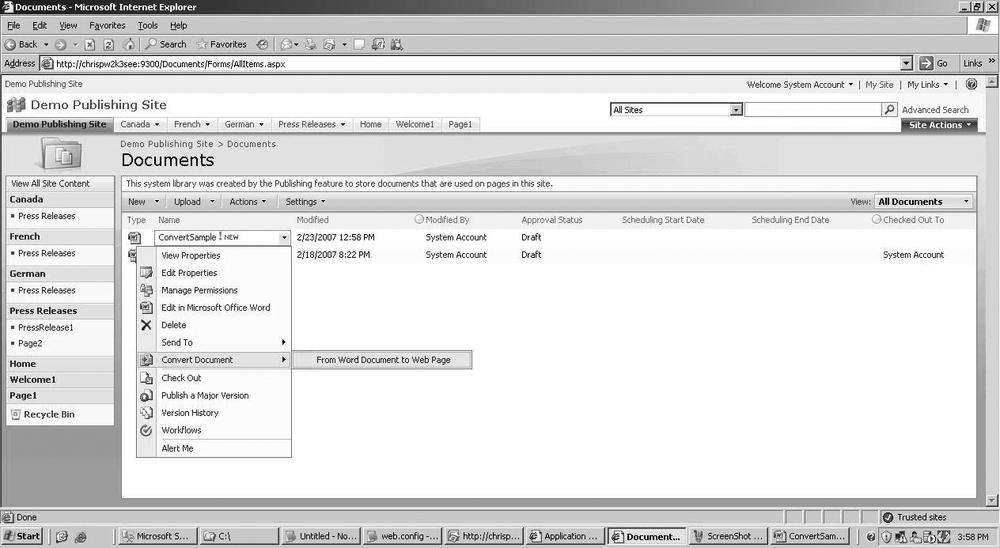
Once the document conversion settings have been applied to a site, a Convert Document menu appears for documents within the document libraries. Figure 29-23 depicts this menu option for a Word 2007 document within a document library.
To demonstrate the document conversion process, Figure 29-24 shows a simple Word document.

Once the document is uploaded to the document library and converted using the Convert Document option, the converted page should look like the one in Figure 29-25.

In this chapter, we have explored the basic web content management functionalities available in Office SharePoint Server 2007. We discussed how to configure the WCM features, created and customized a WCM-enabled site in SharePoint, and explored the content deployment features built into the product. SharePoint’s extendable and pluggable architecture creates a flexible platform for building complex content-centric sites.