
Generating and Displaying a PDF Report
Let's now look at how you can use a common reporting tool to generate the reports as PDF files and display them within the application. We will use a reporting tool to generate the PDF and then display the report in the application, by overlaying an IFrame on the application when running inside the browser and using the WebBrowser control when running outside the browser.
Generating a Report on the Server
The first step is to generate the PDF reports on the server and make them available to the Silverlight client. Let's look at how you can go about implementing this.
Choosing a Reporting Tool/Engine
When implementing reports, you could take the path of manually creating the reports yourself, which is a time-consuming and mostly unnecessary meta-problem that diverts focus away from actually solving the business problem at hand, or you can use one of the many reporting tools available on the market to manage the reporting component of your system.
There are three major components to a reporting tool:
- The report designer
- The reporting engine
- The report viewer
The report designer enables you to create the structure of the report, its formatting, and its rules (filter/sorting/grouping logic, database queries, calculations, and so on)—effectively, it's used to create a report template. The reporting engine then uses these templates to create and populate the reports when they are requested. When reports are served up to the client, the client needs some means of displaying the report to the user. This is where the report viewer component comes in; the reporting engine may generate the reports in a proprietary format in which a custom viewer is required, or it may generate the report in an open or common format (such as PDF, DOC, XLS, and so on) in which that format may have its own viewer.
When choosing a reporting tool, you need to ensure all three components are compatible with the technologies used in your system. Since the report designer is used only to create the templates, it's not really dependent on the system; however, since each report designer works in different way, you will need to ensure it has the ability to cater for the complexity of your reports. You need to have programmatic access to the reporting engine so you can ask it to generate a report, using the parameters and data you pass to it, and then capture this output and stream it back to the client, unless the engine can expose the reports on the Web that your application can directly access. Finally, the reporting tool needs to contain a report viewer control that can display the report in your Silverlight application.
There are reporting solutions for Windows Forms and ASP.NET provided with each copy of Visual Studio (Crystal Reports for Visual Studio in the Professional or higher editions, and the Visual Studio Report Designer, also known as Report Viewer in the Standard or higher editions and in the Visual Web Developer 2010 Express Edition after installing an add-in). While the report designer and reporting engine components of each are suitable for our system, neither of these generates reports in a format that can be viewed or printed within a Silverlight application, and neither has a Silverlight-enabled report viewer control. This is a problem since you need to display the report within your application to users and then give them the ability to send it to their printers. However, the reports can be generated as PDF files, which, using the method described shortly, can be displayed in your Silverlight application and printed.
In most cases, you are by far best off using a commercial reporting tool; otherwise, reports become difficult to maintain and modify, and maintaining the reporting tool tends to become a never-ending project on its own. Some of the third-party reporting tools discussed earlier in this chapter come with source code, so there is little reason to create your own tool for fear of vendor lock-in.
![]() Note You may have to try various reporting tools to find one with the flexibility you require, but in the vast majority of cases, you are better off using an off-the-shelf reporting tool. Many developers have created a black hole in the cost and time budget of a project while attempting to write their own reporting tool, and the project/client ends up suffering greatly for this decision. There are many reporting tool packages out there, and although none of them is perfect, one will tend to satisfy most client requirements at a reasonable cost.
Note You may have to try various reporting tools to find one with the flexibility you require, but in the vast majority of cases, you are better off using an off-the-shelf reporting tool. Many developers have created a black hole in the cost and time budget of a project while attempting to write their own reporting tool, and the project/client ends up suffering greatly for this decision. There are many reporting tool packages out there, and although none of them is perfect, one will tend to satisfy most client requirements at a reasonable cost.
In the following workshops, we will focus on generating the reports using the Visual Studio Report Designer along with the Local Report Engine here, because it's a reasonably capable reporting tool (it uses the same template format as used by SQL Server Reporting Services). Also, it's a reporting tool that all Silverlight developers will have available, since it's provided with the Standard and higher editions of Visual Studio. Many third-party reporting tools are available—most of which can export reports to PDF and be used in the manner described in this chapter. If you have a preferred reporting tool, it should be fairly easy to substitute the one used here with your own.
![]() Note A report designer is built into Visual Studio 2010 Standard edition and higher, but this is omitted from the Visual Web Developer 2010 Express edition. At the time of this writing, Microsoft has chosen not to release an add-in to provide the Visual Web Developer 2010 Express edition with a report builder (as it did for the 2008 version), so this will be an issue if you are using this for developing your Silverlight applications. One option is to download the Visual Web Developer 2008 Express edition and download the add-in from
Note A report designer is built into Visual Studio 2010 Standard edition and higher, but this is omitted from the Visual Web Developer 2010 Express edition. At the time of this writing, Microsoft has chosen not to release an add-in to provide the Visual Web Developer 2010 Express edition with a report builder (as it did for the 2008 version), so this will be an issue if you are using this for developing your Silverlight applications. One option is to download the Visual Web Developer 2008 Express edition and download the add-in from www.microsoft.com/download/en/details.aspx?id=16682 to design your reports. Another is to download SQL Server Express 2008 with Advanced Services and use the Business Intelligence Development Studio 2008 tool that it contains to design your reports. Alternatively, you can try using the open source fyiReporting designer, which you can get from www.fyireporting.com. When using any of these options, you will need to download and install the Microsoft Report Viewer 2010 Redistributable Package to generate the reports at runtime; it's at www.microsoft.com/download/en/details.aspx?id=6442.
Unfortunately, the reporting tool we are using doesn't have a particular name that we can use to refer to it as a whole. It's particularly hard to find help on it on the Web because of this (www.gotreportviewer.com is probably the best place to start if you want more information). It's often referred to as Report Viewer, which apart from not being particularly unique is also a bit confusing, because the tool is not just used for viewing reports. You may want to try searching for RDLC (the file extension of the report templates). Throughout this chapter, I will refer to the report designer as the Visual Studio Report Designer, the reporting engine as the Local Report Engine, and the report viewer control as the Report Viewer.
Choosing an Output Format
The Local Report Engine can render to a number of different formats, including the following:
- HTML (when hosted within the ASP.NET Report Viewer control)
- A Word document
- An Excel document
- An image
- A PDF document
Each of these can be displayed within a browser (HTML and images natively, Excel and PDF documents by browser plug-ins).
Only the image output can be displayed directly within a Silverlight application, but this option is not a particularly suitable because of the large file size of the images and because the quality of the printouts would be low. Therefore, we need to look at other means of rendering the report outside the Silverlight application, using the capabilities of the browser instead.
Of the four remaining options, we can exclude rendering to Excel because it would generally be appropriate to do so only when generating matrix- or table-based reports.
Although we can now (using the 2008 or higher version) print directly from ASP.NET's Report Viewer control, doing so requires the installation of an ActiveX control, which will work only in Internet Explorer running on Windows (not Mac) machines and will not work within Firefox. You want your Silverlight application to run cross-browser and cross-platform, so this could be considered an unnecessary restriction to put on your application in most scenarios, and printing is a vital feature for implementing reporting.
This leaves PDF or Word documents as the only viable options, and both provide the functionality we require. They both do the following:
- Display on the screen exactly as they appear on the printed page
- Can be printed directly from within the browser where they are being viewed (assuming the users have the Adobe Reader or FoxIt Reader plug-in installed, which is not an unrealistic expectation, or otherwise are using Google Chrome as their browser, which has a PDF reader built in)
- Can be saved to the user's hard disk (or a network drive) for archiving purposes
- Can be easily e-mailed to colleagues
- Can be published to content management/collaboration/document management systems such as Microsoft SharePoint
For the purpose of this chapter, we will be generating reports as PDFs.
Serving Reports to the Client
To serve reports to your Silverlight application, you need to create a mechanism that enables the application to request a report from the server, have the server generate the report (using the Local Report Engine and rendered as a PDF), and finally stream this back to the application for display.
To handle report requests on the server, we'll create an HTTP handler in our web project. The Silverlight application will make a web request to the HTTP handler (which is a simple HTTP request, via a URL). The HTTP handler will then do the following:
- Ensure the user is authenticated
- Find the corresponding report renderer for the report requested
- Let it handle the logic for generating the report
![]() Note A report renderer is a class created by the author and used to simplify the generation of reports.
Note A report renderer is a class created by the author and used to simplify the generation of reports.
The report renderer will return the report to the HTTP handler, which will then stream it back to the client as a PDF.
You'll also create report renderers. Each report will have a corresponding report renderer that handles the following:
- The logic behind generating that report (such as specifying the location of the report template)
- Ensuring the user has permission to generate the report based on the roles to which they are assigned
- Obtaining the data from the database to populate the report with
![]() Note You will need to add a reference to
Note You will need to add a reference to Microsoft.Reporting.WebForms.dll to your web project to enable reports to be generated using the Local Report Engine.
 Workshop: Obtaining Data to Populate the Report
The first step that we need to do when generating a report is to provide a way to populate it with data. The Local Report Engine will accept either DataTables or collections of objects as a data source. In this set of workshops, we'll be using an existing product catalog report that we'll populate with data from our Entity Framework model, and we'll do so using a collection of objects.
- Being a predefined report, our objects will need to conform to the data that is expected, meaning that it must have properties with names that match the fields used in the report. For this, we'll create a class named
ProductCatalogReportData, like so:using System.Collections.Generic;
using System.Linq;
namespace Chapter15Sample.Web.Reports.Products
{
public class ProductCatalogReportData
{
public string ProdSubCat { get; set; }
public string ProdModel { get; set; }
public string ProdCat { get; set; }
public string Description { get; set; }
public byte[] LargePhoto { get; set; }
public string ProdName { get; set; }public string ProductNumber { get; set; }
public string Color { get; set; }
public string Size { get; set; }
public decimal? Weight { get; set; }
public decimal StandardCost { get; set; }
public string Style { get; set; }
public string Class { get; set; }
public decimal ListPrice { get; set; }
}
} - We now need to create a collection of
ProductCatalogReportDataobjects, populated with data from our Entity Framework model. For a class to appear as a project data source in the report designer, it needs to have astaticmethod that returns a collection (such as aList<T>or array) of itself. You'll find that you can't simply select entities from the Entity Framework model when building a report because of this requirement for a static method. In any case, reports often require data combined from multiple entities, so you will generally need to create your own data source class to populate the report with anyway. Therefore, we'll follow this pattern to populate a collection with data from our Entity Framework model. Add the followingstaticmethod to theProductCatalogReportDataclass:public static List<ProductCatalogReportData> GetCatalogProductReportData()
{
using (AdventureWorksEntities context = new AdventureWorksEntities())
{
var reportData = from p in context.Products
where p.ProductModel != null && p.ProductSubcategory != null
select new ProductCatalogReportData()
{
ProdName = p.Name,
ProductNumber = p.ProductNumber,
ListPrice = p.ListPrice,
Class = p.Class.TrimEnd(),
Color = p.Color,
Size = p.Size,
StandardCost = p.StandardCost,
Style = p.Style.TrimEnd(),
Weight = p.Weight,
ProdCat = p.ProductSubcategory.ProductCategory.Name,
ProdSubCat = p.ProductSubcategory.Name,
ProdModel = p.ProductModel.Name,
LargePhoto = p.ProductProductPhotoes
.FirstOrDefault().ProductPhoto.LargePhoto,
Description = p.ProductModel
.ProductModelProductDescriptionCultures
.Where(x => x.CultureID == "en")
.FirstOrDefault()
.ProductDescription.Description
};
return reportData.ToList();
}
}
Workshop: Creating the Report Template
The next step is to create your report template using the Local Report Designer that comes with Visual Studio 2010. Creating reports is beyond the scope of this book, but you can find some good tutorials to help you at http://gotreportviewer.com. In summary, the class created in the previous workshop will show up as a data source that the report can use, and you can then lay out the report, mapping fields to the data source class's properties, as required.
For the purpose of this set of workshops, we'll use a predefined report named ProductCatalog.rdlc as our report template. This report shipped as part of the SQL Server Reporting Services examples on CodePlex (www.codeplex.com/MSFTRSProdSamples) and has been included as part of the code accompanying this book, available from the Apress web site. Simply create a Reports folder in your Web project, and put the report template file into it.
Creating a Report Renderer
We now need to provide a way to populate a report template with data. Instead of doing this in the HTTP handler, which can get very complicated very quickly, we'll create a report renderer class that will handle the generation of the report. Often, there are a few processes in generating a report—such as populating the report with data, populating subreports with data, and so on—and properties to set—such as the report path, name, authorization rights, orientation, size, and so on—that are specific to that report. A report renderer essentially handles this whole process.
To simplify the creation of a report renderer, a base report renderer class providing much of the required functionality can be found in the code accompanying this book. Let's take a quick look at this class and then look at implementing a functional report renderer.
About the Base Report Renderer Class
The sample project accompanying this chapter contains a base report renderer class, named BaseReportRenderer. Its class diagram is shown in Figure 15-2.
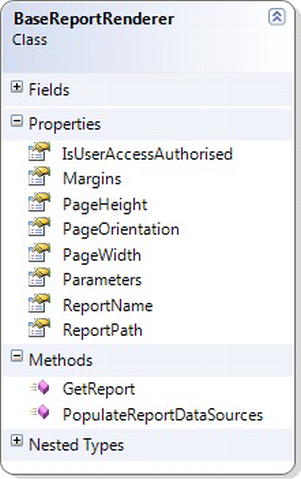
Figure 15-2. The BaseReportRenderer class diagram
Each report should have a dedicated renderer class that inherits from BaseReportRenderer and overrides the appropriate methods and properties that will be called when generating the report.
Your report renderer class basically needs to inherit from this base class and override the ReportPath property and the PopulateReportDataSources function in the report renderer (the minimum requirements for any report to be rendered).
The GetReport method in the base class handles the generation of the report, and its workflow is as follows:
- Create a
LocalReportinstance. - Set the location to the report template.
- Populate the report data sources.
- Return this
LocalReportinstance back to the HTTP handler.
If you have the need to implement a different workflow, you can override the GetReport function to have full control over this workflow.
Workshop: Creating a Report Renderer
Let's create a report renderer that will handle generating the Product Catalog report:
- Add the
BaseReportRenderer.csclass from the sample code for this chapter (available from the Apress web site) to your project. - Create a new class in your project, named
ProductCatalogReportRenderer, that inherits from theBaseReportRendererclass:using SilverlightLOBFramework.Reports;
namespace Chapter15Sample.Web.Reports.Products
{
public class ProductCatalogReportRenderer : BaseReportRenderer
{
}
} - Add the following using statements to the top of the class's file:
using System.Collections.Generic;

using Microsoft.Reporting.WebForms; - You now need to override some of the base class's methods and properties. Start by overriding the
ReportPathproperty, and return the path to the report template (.rdlc) file.public override string ReportPath
{
get { return @"ReportsProduct Catalog.rdlc"; }
} - Override the
ReportNameproperty, and return a name for the report.public override string ReportName
{
get { return "Product Catalog"; }
} - Finally, you need to override the
PopulateReportDataSourcesmethod. This method essentially gets a collection of objects to populate the report with and adds the collection to the collection of data sources used by the report. In the following code, we get a collection ofProductCatalogReportDataobjects by calling theProductCatalogReportDataclass's staticGetCatalogProductReportDatamethod that we created earlier in the workshop titled “Obtaining Data to Populate the Report.”public override void PopulateReportDataSources(ReportDataSourceCollection dataSources)
{
List<ProductCatalogReportData> productCatalogReportData =
ProductCatalogReportData.GetCatalogProductReportData();
dataSources.Add(new ReportDataSource("ProductCatalog", productCatalogReportData));
}
The report renderer class is now complete. The base report render class takes care of actually generating the report using the report template and the data that you provided in this class.
Creating the Report HTTP Handler
HTTP handlers execute in response to an HTTP request and return custom output to the client. We need to create a HTTP handler that will generate and serve up reports to the client. To make creating HTTP handlers that generate reports easier, the sample code accompanying this chapter has a class named BaseReportHandler that your HTTP handler can inherit from, providing much of the base functionality required by your handler. Let's take a quick look at this class and then look at implementing a functional report HTTP handler.
About the Base Report HTTP Handler
The sample project accompanying this chapter contains a base report renderer class, named BaseReportHandler. Figure 15-3 shows the class diagram for this class.
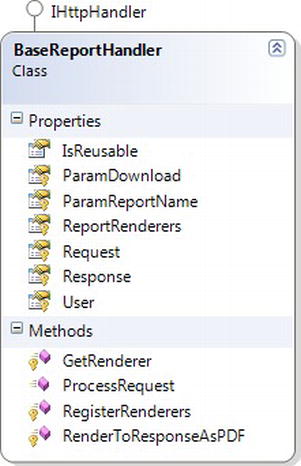
Figure 15-3. The BaseReportHandler class diagram
The BaseReportHandler class has been designed to permit reusability of the HTTP handler code that handles report requests in a generic fashion. This class handles the following:
- Ensuring the user is authenticated
- Finding the renderer for the report they have requested and checking whether the user is authorized to view that report
- Requesting that the renderer handle the report generation
- Streaming it back to the client as a PDF file
Workshop: Creating the Report HTTP Handler
Creating a report HTTP handler that will serve up reports to your Silverlight application is very easy when you use the BaseReportHandler class provided in the code accompanying this book. Let's create one that serves up the Product Catalog report:
- Add the
BaseReportHandler.csclass from the sample code for this chapter (available from the Apress web site) to your project. - Create a new HTTP handler in your project named
Report.ashx, using the Generic Handler item template (found under the Web category in the Add New Item dialog) as its base. - Instead of implementing
IHttpHandler, change the class definition to inherit from theBaseReportHandlerclass:public class Report : BaseReportHandler - Remove the content of the class that was created by the Generic Handler item template, so that the class is empty.
public class Report : BaseReportHandler

{


} - Add the following
usingstatements to the top of the file:using System;
using System.Collections.Generic;
using Chapter15Sample.Web.Reports.Products;
using SilverlightLOBFramework.Reports; - Override the base class's
RegisterRenderersmethod. The purpose of this method is to populate theReportRenderersdictionary in the base class, which defines all the supported renderers, providing each with a unique name that will be used to reference the renderer and the renderer object's type. The following code demonstrates registering theProductCatalogReportRendererreport renderer that we created in the previous workshop and naming itProductCatalog. The client will use this name when requesting the report that the corresponding report renderer generated.
When a report is requested, the base class will then find the entry matching the ReportName query parameter from the HTTP request and instantiate the associated report renderer from the specified type. The report renderer will then generate the report, and the report HTTP handler will stream the report back to the client. This entire process is handled for you by the base classes. You need to worry only about configuring the report in the report renderer class and registering the report renderer with the report HTTP handler; the rest is taken care of for you.
![]() Note You might like to put each of the report renderers in a separate assembly, reference these assemblies in the
Note You might like to put each of the report renderers in a separate assembly, reference these assemblies in the web.config file, and have the report HTTP handler load them dynamically for even more generic code, enabling you to add reports to the server without needing to recompile the core server code. However, for the purposes of this example, we'll keep the implementation as simple as possible.
Passing Parameters to the Report
The workshops that we've just worked through demonstrate a simple scenario that requires no parameters (i.e., the report is being populated with all the data from the database). However, often you will want to pass parameters to the report renderer to be used in the database query. For example, you may have a Product Details report and want to pass a ProductID parameter from the client to the server such that the report displays the details for only the given product. The base HTTP handler and report renderer classes help you with this task. The base report renderer class contains a Parameters property (of type NameValueCollection) that the base HTTP handler will assign all the HTTP request query parameters to. The report renderer can then find the required parameters and their values from this collection and pass the values through to the static Get function of the data class to be included as part of the where clause when querying the database.
To see how this is done, the sample code that accompanies this chapter demonstrates a Product Details report that accepts a ProductID parameter, and displays the data in the report for that product only. Look at the ProductDetailsReportRenderer and ProductDetailsReportData classes for the details.
Securing Access to the Report
To limit the users who are permitted access to a report, you can override the IsUserAccessAuthorised property in the report renderer and determine, based on the user's role, whether that person should be permitted access to the report, as was demonstrated in the ProductDetailsReportRenderer code. For example, the following code demonstrates overriding the BaseReportRenderer class's IsUserAccessAuthorised property and providing permission only for user's with the Managers role to view the report.
public override bool IsUserAccessAuthorised

{

   get

   {

       // Sample role check - user must be a manager
       return HttpContext.Current.User.IsInRole("Managers");

   }

}
You may also want to limit what data users are permitted to view by their user IDs or roles, such as allowing salespeople to view only lists of their own sales. This should be implemented in the PopulateReportDataSources function as part of the where clause in your LINQ to Entities query.
![]() Note It's important to implement security on your reports because they may contain the most sensitive business data that you would not want anyone to obtain access to. Another function security can provide is to filter the data in a report to contain only the data that a specific user has the rights to view, while still using a common report template.
Note It's important to implement security on your reports because they may contain the most sensitive business data that you would not want anyone to obtain access to. Another function security can provide is to filter the data in a report to contain only the data that a specific user has the rights to view, while still using a common report template.
Deploying the Report Viewer/Engine
When deploying the application to the server, you will need to install the runtime for the report engine, which isn't installed as part of the .NET Framework. If you don't have the Microsoft Report Viewer
Redistributable 2010 setup file, you can download it from www.microsoft.com/downloads/details.aspx?FamilyID=a941c6b2-64dd-4d03-9ca7-4017a0d164fd. Alternatively, you can simply copy the referenced reporting DLLs to your Bin directory on the server.
Displaying the Report on the Client
Unfortunately, you cannot view a PDF document from within a Silverlight application. However, you can take advantage of the browser's ability to host the Adobe Reader or FoxIt Reader plug-in, which will host your PDF report, and that is what we'll be looking at next
Creating the HtmlViewer Control
You now need to display the PDF that you generated on the server in your Silverlight application.
Doing so requires a little bit of work. When you navigate to a PDF file in your web browser, it will be displayed within the browser using the Adobe Reader or FoxIt Reader plug-in, assuming you have one of those installed. Google Chrome is an exception, in that it provides its own built-in PDF reader and will display the PDF file using that instead. Ideally, we'd like to implement the same sort of behavior in our application, and we'll look at doing that now.
Solution Overview
Silverlight 4 introduced a WebBrowser control that you could display the PDF within; however, when you run your application inside the browser, you will get the output shown in Figure 15-4.
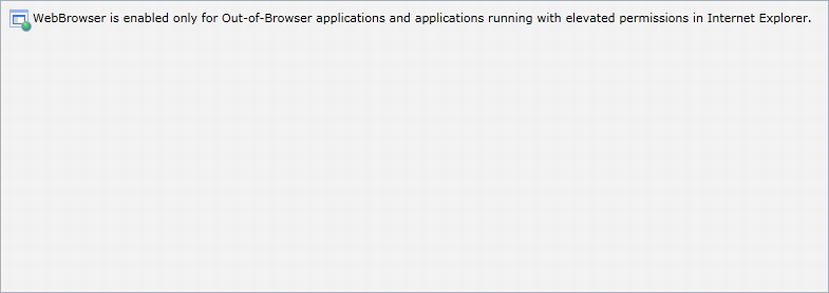
Figure 15-4. The WebBrowser control when used in an application running inside the browser
For security purposes, the WebBrowser control will work only when the application is running outside the browser (as will be discussed in Chapter 16) or in the browser with elevated trust in Internet Explorer (also discussed in Chapter 16). If your application is running in one of these modes, you can use this control in your application and navigate to the URL for your report, and the report will be displayed within the control. However, if your application isn't running in one of these modes, another solution is required.
Simply opening the report in another browser window is a possible solution but is not ideal because it separates the display of the report from the application.
Ultimately, the best solution, although a little complex to implement, is to manipulate the underlying HTML page, using the HTML Bridge, and overlay an IFrame onto your application. You can then display the PDF in this IFrame to achieve the effect you want. This solution won't work when the application is running outside the browser because the HTML Bridge would not be available in this mode, but you can use the WebBrowser control instead.
To support displaying an IFrame within the application, the sample code accompanying this book contains a control that wraps this functionality into a reusable component. It handles creating and destroying the IFrame when running inside the browser and uses the WebBrowser control when running outside the browser. This way, wherever support is required in this or other applications for displaying HTML content within the application itself, you can easily drop it in.
The HTML Bridge
The HTML Bridge provides the means to interact with the underlying browser and Document Object Model (DOM) from a Silverlight application. You may also see this referenced as HTML DOM Interoperability. Throughout this chapter, you will see how you can use the HTML Bridge to provide various features such as opening a pop-up window, creating elements in the DOM (such as an IFrame), inspecting the DOM (checking properties of the Silverlight plug-in), and handling JavaScript events.
To access the HTML Bridge, add a reference to the System.Windows.Browser namespace, and then, you can access the DOM of the underlying HTML document that is hosting the plug-in via the static HtmlPage class.
![]() Note The HTML Bridge is not available when the application is running outside the browser, because it's not (technically) being hosted by an HTML page. It is, however, being hosted by a browser control (Internet Explorer on Windows and Safari on Mac), which then hosts your Silverlight application. If you're interested in finding out more, try using Microsoft Spy++ to inspect the window and its structure.
Note The HTML Bridge is not available when the application is running outside the browser, because it's not (technically) being hosted by an HTML page. It is, however, being hosted by a browser control (Internet Explorer on Windows and Safari on Mac), which then hosts your Silverlight application. If you're interested in finding out more, try using Microsoft Spy++ to inspect the window and its structure.
Overlaying an IFrame on Your Application
Now that you know a bit about the HTML Bridge, let's look at some of the issues that you will face in displaying an IFrame over the top of your Silverlight plug-in.
Setting Windowless Mode
The primary issue that you face is that, by default, the Silverlight plug-in is in windowed mode, where the plug-in handles rendering the Silverlight content in its own window, on top of any HTML content in the underlying HTML document. Therefore, even though you are able to create the IFrame in the underlying HTML document, it won't be visible because the Silverlight plug-in occupies the entire browser area, rendering on top of any HTML content in the DOM of the page, regardless of the z-index of the plug-in or the IFrame. Therefore, you need to ensure windowed mode is turned off so that the browser is in charge of the rendering instead of the Silverlight plug-in; then, your Silverlight content will be rendered alongside the underlying HTML content.
![]() Note There are performance issues in placing the browser in charge of the rendering, so the decision to use windowless mode needs to be carefully considered. Silverlight is optimized for rendering complex animations and video, and using windowless mode will cause a significant performance loss in these two areas. Considering that we are building a line-of-business application here, the loss in rendering performance is unlikely to affect us in most cases, so the benefits in this case should outweigh the costs.
Note There are performance issues in placing the browser in charge of the rendering, so the decision to use windowless mode needs to be carefully considered. Silverlight is optimized for rendering complex animations and video, and using windowless mode will cause a significant performance loss in these two areas. Considering that we are building a line-of-business application here, the loss in rendering performance is unlikely to affect us in most cases, so the benefits in this case should outweigh the costs.
To enable windowless mode, you need to open the HTML page hosting the Silverlight plug-in, find the object tag, and add a param node to its children that specifies a value for the Windowless property—setting its value to true as follows:
<param name="Windowless" value="True" />
Creating the IFrame
The next step is to create the IFrame in the underlying HTML page. The IFrame is contained within a DIV element so that you can set its position properly. This DIV should have its z-index set to 99 so that it displays on top of other controls, assuming each of their z-index values is less than 99, and its positioning mode should be set to absolute. This means you can set its position by its coordinates in the browser window. You can then append this DIV as a child of the FORM tag in the DOM and append the IFrame element as a child of the DIV tag.
divElement = HtmlPage.Document.CreateElement("div");

divElement.Id = "HtmlFrameDiv";

divElement.SetStyleAttribute("position", "absolute");

divElement.SetStyleAttribute("z-index", "99");


iframeElement = HtmlPage.Document.CreateElement("iframe");

iframeElement.Id = "HtmlFrame";

iframeElement.SetAttribute("scrolling", "no");

iframeElement.SetAttribute("frameborder", "0");


HtmlElement formElement =

    HtmlPage.Document.GetElementsByTagName("form")[0] as HtmlElement;


formElement.AppendChild(divElement);

divElement.AppendChild(iframeElement);
Positioning and Sizing the IFrame
Once the required elements have been created in the DOM, you need to position and size them. As previously mentioned, this involves setting the coordinates and size of the DIV. The height and width of the IFrame also need to be set to support multiple browsers. In some browsers, the IFrame fills the area of the DIV, and in others, it doesn't.
Because the content being displayed is not being rendered by Silverlight, you need to take resizing of the IFrame into account yourself. If the control is resized (such as if the browser window was resized or a grid splitter was implemented that enabled the user to resize or move the location of the control), you need to handle the LayoutChanged event of the control and adjust the size and location of the IFrame accordingly.
![]() Note We're deliberately not handling the
Note We're deliberately not handling the SizeChanged event for detecting any repositioning or resizing of the IFrame control—the reason being that if the control location was simply moved, the SizeChanged event is not raised. Therefore, although the LayoutChanged event is raised even when the control hasn't been moved or resized (and can be raised many times for many reasons because it is raised when anything occurs in the visual tree), it's the only event that will handle all situations—even if it isn't ideal. It is best to never handle this event if an alternative is available, because of the high frequency at which it can be raised.
Additional Features and Functionality
The HtmlViewer control is already created and available for download as part of the sample code accompanying this chapter. However, let's take a look at some of the more important aspects of how it was built.
Ensuring That the Windowless Property Is Set
For the control to work properly, you must have turned on the Windowless property for the Silverlight plug-in. Since we are creating a reusable control, it's worth checking to make sure this Windowless property is turned on and raise an exception if not in order to save confusion as to why the IFrame isn't being displayed.
Using the HTML Bridge, the HtmlViewer control can navigate through the DOM of the page and ensure this property is turned on. First, it needs to get a reference to the plug-in element, which is rendered as an object tag. Rather than searching for the object tag in the page, we can simply get a reference to it using the HtmlPage.Plugin property. Then, the control enumerates through its children looking for param tags that have a name attribute of Windowless. If the tag isn't found or its value is set to false, the control throws an exception.
HtmlElement silverlightObject = HtmlPage.Plugin;

bool isWindowless = false;


foreach (HtmlElement param in silverlightObject.Children)

{

    if (param.TagName == "param")

    {

        string name = param.GetAttribute("name");

        string value = param.GetAttribute("value");


        if (name == "Windowless")

        {

            isWindowless = Convert.ToBoolean(value);

            break;

        }

    }

}


if (!isWindowless)

    throw new Exception("The Silverlight plugin needs to be in windowless mode!");
Positioning and Sizing the IFrame
This involves working out the location of the control with reference to the application root visual element—in other words, the whole area occupied by the Silverlight plug-in—by creating a transform object to transform the coordinates of the two and relating (0, 0) on the control to (0, 0) on the application root visual element. This gives you the coordinates of the control with reference to the application root visual element but not necessarily with reference to the browser window itself, if the Silverlight control is not located at (0, 0) to the browser window. Therefore, for completeness, you should calculate the offset of the Silverlight plug-in in the underlying page, moving up the DOM and adding offsets of each parent element, and add that to your calculations.
Because the Silverlight application is filling the entire browser window, it will be located at (0, 0), making this calculation unnecessary, so the HtmlViewer control makes this an assumption and forgoes these additional calculations. Therefore, it can now use these coordinates to set the left and top properties of the DIV, and the width and height properties are simply the width and height of the control.
if (iframeElement != null && this.ActualHeight != 0)

{

    GeneralTransform gt = this.TransformToVisual(Application.Current.RootVisual);

    Point pos = gt.Transform(new Point(0, 0));

    divElement.SetStyleAttribute("left", pos.X.ToString() + "px");

    divElement.SetStyleAttribute("top", pos.Y.ToString() + "px");

    divElement.SetStyleAttribute("width", this.ActualWidth.ToString() + "px");

    divElement.SetStyleAttribute("height", this.ActualHeight.ToString() + "px");

    iframeElement.SetStyleAttribute("width", this.ActualWidth.ToString() + "px");

    iframeElement.SetStyleAttribute("height", this.ActualHeight.ToString() + "px");

}
Determining When Content Is Loaded
Ideally, the HtmlViewer control would monitor when the content has loaded, handling the JavaScript onLoad event raised by the IFrame via the HTML Bridge, and raise an event to notify the application as such. This could potentially be useful in showing an animation and/or indicating that the application is communicating with the server.
Capturing this DOM event in Silverlight is actually quite easy—when creating the IFrame, you can use the AttachEvent method on the HTML element, specifying the JavaScript event to capture and the .NET method to handle the event. However, you run into a problem in loading a PDF in the IFrame, because for some reason, the onLoad event is never raised, presumably it is because a separate plug-in takes over loading the page, although it is raised correctly for HTML pages.
Therefore, because the reports will be PDF files, you won't be able to use this feature in your application to indicate that server communication is in progress, although the functionality has still been included in this control for reuse purposes when displaying HTML pages. It is preferable to show something to the user rather than a blank area while the report loads, such as a “Please wait—loading…” message in the control area. If you set some HTML locally to display immediately in the IFrame before navigating to the report URL on the server, this will continue to display until the report has been retrieved from the server (and the PDF reader plug-in has loaded itself and the report). Figure 15-5 demonstrates a simple example of doing so.

Figure 15-5. The “Please wait” message
If you attempt to build up the page to display using the DOM object available via the HTML Bridge, you will find that it is displayed differently in Internet Explorer (IE) than in Firefox. IE will display the content in quirks mode, and there is no way to set the DOCTYPE for the loading page via the DOM. Therefore, you need to use an alternative means of creating and loading this page locally. Another method is to get a reference to the empty document created in the IFrame automatically when it is created and use it instead to set the content to display. You can then open it for direct HTML content writing, write the entire HTML document to be displayed (including the DOCTYPE, html, head, and body tags), and then close it. This document would then be displayed in the IFrame. The open, write, and close functions are not available via the HTML Bridge but can be called using the Invoke method on the document object.
// Add some HTML to the iframe before requesting the document

HtmlWindow contentWindow = iframeElement.GetProperty("contentWindow") as HtmlWindow;

HtmlDocument document = contentWindow.GetProperty("document") as HtmlDocument;


// Write the html to display to the document

document.Invoke("open", null);

document.Invoke("write", "<HTML to display goes here>");

document.Invoke("close", null);
![]() Note There appears to be a bug in Internet Explorer 8 and below, for which there doesn't seem to be a workaround. Even after the report has loaded, the progress bar in the status bar continues to show. This appears to be because of a combination of writing directly to the document in the IFrame and then navigating to a different page—if you comment out one or the other, the progress bar is hidden correctly, but using both together leaves it visible. This problem does not appear to occur in Firefox or Chrome.
Note There appears to be a bug in Internet Explorer 8 and below, for which there doesn't seem to be a workaround. Even after the report has loaded, the progress bar in the status bar continues to show. This appears to be because of a combination of writing directly to the document in the IFrame and then navigating to a different page—if you comment out one or the other, the progress bar is hidden correctly, but using both together leaves it visible. This problem does not appear to occur in Firefox or Chrome.
Destroying the IFrame
The final issue is how to know when to remove the IFrame from the underlying DOM. Silverlight user controls don't have a Closing or Closed event, the Dispose event when implementing IDisposable isn't automatically called, and the destructor/finalize method being called is unreliable because it relies on the idiosyncrasies of the garbage collector as to when the control is cleaned up.
The HtmlViewer control still implements the IDisposable interface and uses the Dispose method to remove the IFrame from the DOM, but you need to know when to call this method. When it's created, the control will walk its way up the visual tree and see whether it can find a Page object that is hosting it. If so, the application is using the navigation framework, and the Page object exposes a NavigationService object whose Navigating event the HtmlViewer control hooks into to determine when the page is being navigated away from. When this event is raised, it will call the Dispose method to remove the IFrame.
If the application isn't using the navigation framework, the HtmlViewer control won't know when the IFrame should be removed, and the application hosting it will need to call its Dispose method at the appropriate time.
Using the WebBrowser Control When Running Outside the Browser
As previously mentioned, the HTML Bridge isn't available when running outside the browser, so you can't create an IFrame in this scenario. However, Silverlight 4 introduced the WebBrowser control that you can use instead in out-of-browser scenarios. The HtmlViewer control determines whether the application is running inside or outside of the browser and will create an IFrame or a WebBrowser control accordingly, providing a seamless solution to this problem.
![]() Note Silverlight 5 introduces the ability for the WebBrowser control to be used when running inside the browser, but the Silverlight application must be running with elevated privileges inside the browser (discussed in Chapter 16), and it will work only in Internet Explorer. Due to these restrictions, the HtmlViewer control will simply use the IFrame method whenever the host Silverlight application is running inside the browser.
Note Silverlight 5 introduces the ability for the WebBrowser control to be used when running inside the browser, but the Silverlight application must be running with elevated privileges inside the browser (discussed in Chapter 16), and it will work only in Internet Explorer. Due to these restrictions, the HtmlViewer control will simply use the IFrame method whenever the host Silverlight application is running inside the browser.
Workshop: Using the HtmlViewer Control
Now that you have seen how the HtmlViewer control works, it's time to use it to display a report in our application. In this workshop, we're going to use the HtmlViewer control to display the Product Catalog report generated by the server.
- The first task is to ensure that your Silverlight application object is set to run in windowless mode. Without this, the HtmlViewer control will raise an exception when it loads. Open the HTML page hosting the Silverlight plug-in, find the object tag, and add a
paramnode to its children that sets the Silverlight plug-in'sWindowlessproperty to true:<param name="Windowless" value="True" /> - If the HtmlViewer control is near the right or bottom edge of the application, Internet Explorer 9 tries to show scroll bars on the page (this behavior has not been detected in other browsers or earlier versions of Internet Explorer). This starts a battle between the HtmlViewer control and the browser resizing, causing the browser to go crazy. If this is happening for you, or simply to prevent it from happening, find the
html, bodystyle in the HTML page that hosts the Silverlight plug-in, and set itsoverflowproperty tohidden, instead of its default ofauto. This prevents the browser from showing scroll bars and stops the problem from occurring.html, body {
height: 100%;
overflow: hidden;
} - Add the HtmlViewer control and the
ReportRequestclass to your project, and compile the project. The HtmlViewer control and theReportRequestclass can both be found in the sample code accompanying this chapter on the Apress web site. - Create a new view in your project, using the
Pageitem template, and declare the layout namespace prefix, like so:xmlns:my="clr-namespace:SilverlightLOBFramework.Controls.Layout" - Now, add the HtmlViewer control to the view:
<layout:HtmlViewer Name="htmlViewer" /> - You now need to set the HtmlViewer control's
Urlproperty to the URL of the report HTTP handler on the server, passing it the report name and any report parameters in its query string. Although you set this property in XAML, doing so would result in you hard-coding the URL, when you will usually want it to be dynamic—pointing to the server from which the Silverlight application was downloaded and passing it some parameters. Therefore, you're best off binding theUrlproperty to a view model or setting its value in the code behind. For the purpose of simplicity, we'll simply set this value in the code behind.htmlViewer.Url = ReportRequest.GetReportUrl("ProductCatalog");As you can see, we're using the
ReportRequestclass that we added to the project earlier, which contains a helper function for building up this URL when requesting reports. This class determines the location of theReport.ashxHTTP handler on the same server that's hosting the Silverlight application and passes it the report name as a query string parameter. An overload of theGetReportUrlmethod also takes in key/value pairs as parameters and includes them as part of the URL's query string, enabling you to easily pass parameters to the report. Note The
 ReportRequestalso contains another helper function for requesting reports. Instead of using the HtmlViewer control to display the report “within” the application, you might want to use theOpenReportInNewWindowmethod, which will open the report in a new browser window. This is a simple process that uses the HTML Bridge—theHtmlPage.PopupWindowfunction will pop up a new window with the specified options, such as the size of the window, whether the menu bar or scroll bars should be shown, and so on, and will navigate to the specified URL. Of course, this requires the browser to permit the opening of pop-up windows, so the IFrame option will generally be your best option. - When you run the application and navigate to this view, you will see a “please wait” message while the PDF report downloads, and the report will then appear, seemingly within your application. Figure 15-6 demonstrates the final result of displaying the Product Catalog report in the HtmlViewer control.

Figure 15-6. The Product Catalog report
![]() Note An issue worth mentioning (because it can create confusion and frustration) is that the Adobe Acrobat Reader plug-in occasionally fails to load, leaving you with just a white screen where the report should be. You can fix this by opening Task Manager and ending the
Note An issue worth mentioning (because it can create confusion and frustration) is that the Adobe Acrobat Reader plug-in occasionally fails to load, leaving you with just a white screen where the report should be. You can fix this by opening Task Manager and ending the AcroRd32.exe process. When you then attempt to view the report again, the plug-in should load correctly.