
Deploying the Application to the Server
Depending on the nature of your Silverlight application, it might simply involve a client component (the Silverlight application itself), or it could include both server and client components (both a Silverlight application running on the client, and services running on the server). Both the server and the client components are deployed to the server, and it's the server that then deploys the client components to the clients.
To deploy a Silverlight application to the server, you actually deploy the Web project, as it contains both the server and the client components. The process is essentially identical to deploying a traditional ASP.NET web application/web site to a server.
You have the following three primary options of deploying your application to the server:
- Simply copy the files to the server and configure the web server manually.
- Use Visual Studio's built-in publishing functionality.
- Create a setup program.
We'll take a look at these methods shortly, but let's first discuss the requirements for the server.
Server Requirements
As a general rule, Silverlight applications are downloaded from a server, and therefore, the server must be able to serve up the application to the client via web server software. In addition, depending on the various needs of your Silverlight application, the application could place additional demands on the server to serve it up data. Let's look at the requirements that your Silverlight application might place on the server, and what it needs installed to meet these needs.
Server Operating System and Web Server
One of the things that many people do not realize is that you do not need a Windows-based server, running Internet Information Services (IIS), to host your Silverlight application. Silverlight is a client-based technology, and hence, is executed on the client, not the server. Therefore, Silverlight applications simply need to be downloadable from a server, and will be run entirely by the Silverlight runtime on the client, requiring no special handling on the host server. This means that you could potentially host a Silverlight application on a Linux box running an Apache HTTP Server or Apache Tomcat server, or even on cloud-based platforms such as Windows Azure. Essentially, any web server that can serve files over HTTP can be used to deploy Silverlight applications.
That said, Silverlight applications that need to communicate with ASP.NET-based services on the server, such as RIA Services, will obviously require those services to be hosted by a Windows-based server running IIS. However, the Silverlight application still does not place any requirements on the server.
![]() Note If you don't have custom web services accompanying your Silverlight business application, but use existing services hosted elsewhere, such as on Windows Azure, the application does not need to be deployed from a Windows-based server.
Note If you don't have custom web services accompanying your Silverlight business application, but use existing services hosted elsewhere, such as on Windows Azure, the application does not need to be deployed from a Windows-based server.
RIA Services
As a core focus of this book has been around creating end-to-end business applications that make use of RIA Services, we will assume here that you are also deploying these services as a part of your server deployment. Hence, the server must adhere to the following rules:
- It must be a Windows-based server.
- It must be running IIS.
- It must have the .NET Framework 4 installed (full profile).
Installing RIA Services Assemblies to the GAC
You can choose to deploy RIA Services to the Global Assembly Cache (GAC) so that it's accessible to all web applications, or you can distribute these as a part of your deployment. By default, the RIA Services assemblies referenced by your Web project are not copied to your Bin folder, and hence, are not deployed with your application when you publish your web site to the server.
To deploy RIA Services to the GAC, start by downloading the RIA Services installer from www.silverlight.net/learn/advanced-techniques/wcf-ria-services/get-started-with-wcf-ria-services. If you tried running this installer, you will probably find that it complains about requiring both Visual Studio 2010 and Silverlight to be installed on the machine, neither of which the server will generally have. However, you can type the following line at the command prompt to perform a server install, which will install only the components required by a server:
msiexec /i RIAServices.msi SERVER=true
Installing RIA Services Assemblies to the Bin Directory
On a hosted server, you most likely will not be able to deploy the RIA Services assemblies to the GAC, but you can deploy the RIA Services assemblies required by your application along with it to its Bin directory. Simply select all the assemblies starting with System.ServiceModel.DomainServices in the Solution Explorer window for your Web project, and set their “Copy Local” property (in the Properties window) to True. They will be copied into the Bin directory in your project, and deployed when you publish the Web project to the server.
![]() Note If you encounter RIA Services–related issues when attempting to run your Silverlight application, Saurabh Pant, a member of the RIA Services team, has a detailed blog post on troubleshooting these, which should be your first port of call. You can access it at
Note If you encounter RIA Services–related issues when attempting to run your Silverlight application, Saurabh Pant, a member of the RIA Services team, has a detailed blog post on troubleshooting these, which should be your first port of call. You can access it at http://blogs.msdn.com/b/saurabh/archive/2010/03/16/ria-services-application-deployment.aspx.
Cross-Domain Policy File
If your services are deployed to a different location from where your Silverlight application will be downloaded from, you will need to place a cross-domain policy file in the root of the web site containing the services in order for the Silverlight application to be permitted to access them. See Chapter 5 for more information on the required contents of this file and where it needs to be placed on the server.
Using Xcopy
The most primitive means of deploying your application to a server is by copying the required files to the required location (a process often referred to as xcopy, from the old DOS command), and configuring an application in IIS to point to the folder that these files were copied to.
Copy all the noncode-related files from the Web project—the HTML file hosting the Silverlight plug-in, any JavaScript files, the web.config file, the ClientBin folder, the Bin folder, and so on—to a folder on the server. This may be a new folder, or you can add to/update a folder containing an existing web site.
![]() Note The quickest way to determine what files must be copied to the server is to publish your project to a folder on your local hard drive (using the procedure detailed in the next section), and then copy all the contents of that folder to your server. When doing this, ensure that the “Items to deploy” option in the Package/Publish Web tab in the project properties has been set to “Only files required to run this application.”
Note The quickest way to determine what files must be copied to the server is to publish your project to a folder on your local hard drive (using the procedure detailed in the next section), and then copy all the contents of that folder to your server. When doing this, ensure that the “Items to deploy” option in the Package/Publish Web tab in the project properties has been set to “Only files required to run this application.”
If you are creating a new web site, you need to configure an “application” in IIS. How you go about doing so will largely depend on the version of IIS that it will be running under, and the type of user interface available to you—that is, either the Internet Information Services Manager or a web-based user interface. Therefore, we will not go through a step-by-step process for this in detail, but it follows the same process as for configuring an ASP.NET 4 web site. A guide for creating an application in IIS 7 can be found at http://technet.microsoft.com/en-us/library/cc772042.aspx.
 Workshop: Publishing from Visual Studio
Visual Studio 2010 provides a feature enabling you to publish a web site in a myriad of ways to a server—both local and remote. Depending on the settings you are using, publishing a web site using Visual Studio will both copy the required files to a server and create the application for you in IIS if it's not already configured. This feature makes it easy to deploy your project from right within Visual Studio.
- Start by right-clicking on your Web project in the Solution Explorer window, and select the “Package/Publish Settings” item from the context menu. This will open the Package/Publish Web tab in the project properties, and enable you to configure what will be deployed to the server as a part of the publishing process, and where on the server it will be published.
- After you have configured the settings appropriately, right-click on the Web project in the Solution Explorer window again, and select the Publish item from the context menu. This will display the Publish Web dialog shown in Figure 17-1.
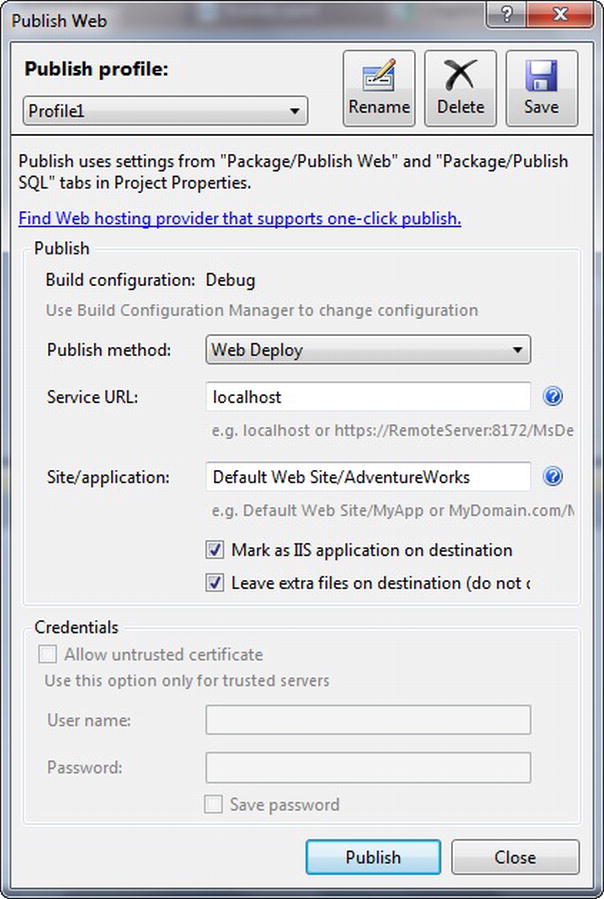
Figure 17-1. The Publish Web dialog
- Using this dialog, configure how you want to publish your web site, and click the Publish button to start the publishing process. It will copy the files used in your Web project (that will include your Silverlight application), and will create the application in IIS if you have selected the “Mark as IIS application on destination” option in the Publish Web dialog.
![]() Note You can publish your project to the file system, and then xcopy these files to the server if required.
Note You can publish your project to the file system, and then xcopy these files to the server if required.
Workshop: Creating a Web Package
Instead of publishing the web site directly to the server, you can instead create a web package, which is essentially a .zip file containing your web site and configuration files dictating how the web site should be created under IIS on the server. You can then take this package and import it into IIS either using the Internet Information Services Manager or via the command line using the msdeploy tool.
![]() Note You can get more information about the msdeploy tool from
Note You can get more information about the msdeploy tool from http://blogs.iis.net/msdeploy/default.aspx.
To create a package, follow these steps:
- Right-click your Web project in the Solution Explorer window, and select the “Build Deployment Package” item from the context menu. This will immediately compile the web site into a package, using the settings configured in the Package/Publish Web tab in the project properties for the Web project.
- Open up the Internet Information Services Manager and import the package. This will install the files on the server, and create the application in IIS. Alternatively, if you want to import the package via the command line, you can find instructions on doing so in a text file created in the same folder as the package.
Workshop: Creating a Setup Program
If your application is to be a packaged product sold to companies who then install it on their own server, the best way to provide it to your customers to install it is as a setup program.
- Add a new project to your solution, and use the Web Setup Project template. (You will find this under the Other Project Types
 Setup and Deployment Visual Studio Installer category.)
 - In the Solution Explorer window, right-click the setup project, and select Add Project Output.
- When the dialog that appears, select the Web project from the Project drop-down, and select both the “Primary Output” and the “Content Files” outputs from the list. Click OK.
- Select the setup project in the Solution Explorer window again, then go to the Properties window and assign values to the properties, as you require. After you are done, you can compile the project.
You can test the setup program locally by compiling your project and then right-clicking on the setup project in the Solution Explorer window and selecting the Install item from the context menu.