i
i
i
i
i
i
i
i
11.4. Lines 527
11.4 Lines
Rendering of simple lines is often considered relatively uninteresting. How-
ever, they are important in fields such as CAD for seeing the underlying
model facets and discerning the object’s shape. They are also useful in
highlighting a selected object and in areas such as technical illustration. In
addition, some of the techniques involved are applicable to other problems.
We cover a few useful techniques here; more are covered by McReynolds
and Blythe [849]. Antialiased lines are briefly discussed in Section 5.6.2.
11.4.1 Edge Highlighting
Edge highlighting is a fixed-view technique useful for rapid interaction with
large models (see Section 10.2). To highlight an object, we draw its edges
in a different color, without having to redraw the whole scene. This is an
extremely fast form of highlighting, since no polygons are rendered. For
example, imagine a blue polygon with gray edges. As the cursor passes
over the polygon, we highlight it by drawing the edges in red, then drawing
gray edges again when the cursor leaves. Since the view is not moving,
the whole scene never has to be redrawn; only the red highlight edges are
drawn on top of the existing image. The idea is that the original gray
edges were drawn properly, so that when a red edge is drawn using the
same geometric description, it should perfectly replace the gray edge.
11.4.2 Polygon Edge Rendering
Correctly rendering edges on top of filled polygons is more difficult than it
first appears. If a line is at exactly the same location as a polygon, how do
we ensure that the line is always rendered in front? One simple solution
is to render all lines with a fixed bias [545]. That is, each line is rendered
slightly closer than it should truly be, so that it will be above the surface.
In practice, the underlying polygon is usually biased away from the viewer.
This works much of the time, but there are problems with this naive
approach. For example, Figure 6.26 on page 185 shows a torus that has
some edge dropouts due to biasing problems. If the fixed bias is too large,
parts of edges that should be hidden appear, spoiling the effect. If polygons
are near edge-on to the viewer, a fixed bias is not enough. Current APIs
provide a separate factor that makes the bias also vary with the slope of the
polygon rendered, thereby helping avoid this particular problem. If API
support is not available, other techniques include changing the projection
matrix: The viewport near and far values could be adjusted [833], or the
z-scale factor could be modified directly [758, 833]. These techniques can
often require hand adjustment to look good.

i
i
i
i
i
i
i
i
528 11. Non-Photorealistic Rendering
Figure 11.17. Pixel-shader-generated lines. On the left are antialiased single-pixel width
edges; on the right are variable thickness lines with haloing. (Images courtesy of J.
Andreas Bærentzen.)
Herrell et al. [545] present a scheme that avoids biasing altogether. It
uses a series of steps to mark and clear a stencil buffer, so that edges draw
atop polygons correctly. The drawback of using this method on modern
GPUs is that each polygon must be drawn separately, hindering overall
performance considerably.
Bærentzen et al. [54, 949] present a method that maps well to graphics
hardware. They use a pixel shader that uses the triangle’s barycentric
coordinates to determine the distance to the closest edge. If the pixel is
close to an edge, it is drawn with the edge color. Edge thickness can be
any value desired and can be affected by distance. See Figure 11.17. This
method has the further advantage that lines can be antialiased and haloed
(see Section 11.4.4). The main drawback is that silhouette edges are not
antialiased and are drawn half as thick as interior lines.
11.4.3 Hidden-Line Rendering
In normal wireframe drawing, all edges of a model are visible. Hidden-line
rendering treats the model as solid and so draws only the visible lines.
The straightforward way to perform this operation is simply to render the
polygons with a solid fill color the same as the background’s and also render
the edges, using a technique from the previous section. Thus the polygons
are painted over the hidden lines. A potentially faster method is to draw
all the filled polygons to the Z-buffer, but not the color buffer, then draw
the edges [849]. This second method avoids unnecessary color fills.

i
i
i
i
i
i
i
i
11.4. Lines 529
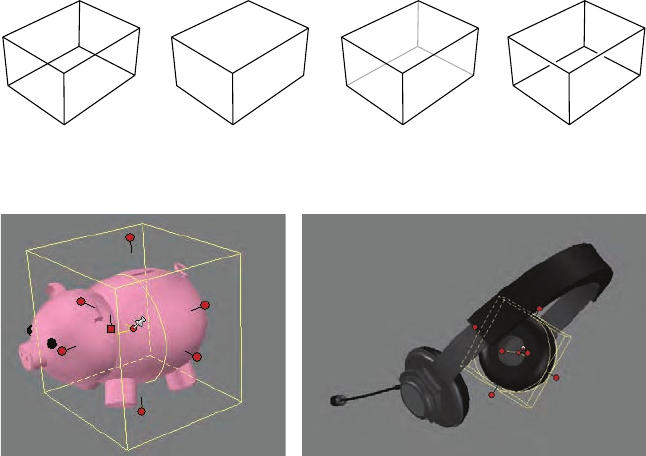
Figure 11.18. Four line rendering styles. From left to right: wireframe, hidden-line,
obscured-line, and haloed line.
Figure 11.19. Dashed lines are drawn only where the Z-buffer hides the lines.
Lines can also be drawn as partially obscured instead of fully hidden.
For example, hidden lines could appear in light gray instead of not being
drawn at all. To do this, first draw all the edges in the obscured style
desired. Now draw the filled polygons to the Z-buffer only. In this way,
the Z-buffer protects the hidden lines from being drawn upon. Finally,
draw the edges again in the style desired for visible lines.
The method just described has the property that the obscured lines are
rendered overlapped correctly by the visible lines. If this feature is not
necessary, there are other ways to perform the task that are normally more
efficient. One technique is to first draw the surfaces to the Z-buffer. Next,
draw all lines in the visible style. Now reverse the sense of the Z-buffer, so
that only lines that are beyond the current pixel z-depth are drawn. Also
turn off Z-buffer modification, so that these lines drawn do not change any
depth values. Draw the lines again in the obscured style. This method
performs fewer pixel operations, as visible lines are not drawn twice, and
obscured lines do not modify the Z-buffer.
Figure 11.18 shows results for some of the different line rendering meth-
ods discussed here. Figure 11.19 show dashed lines rendered as part of the
user interface.
i
i
i
i
i
i
i
i
530 11. Non-Photorealistic Rendering
11.4.4 Haloing
When two lines cross, a common conventionistoeraseapartofthemore
distant line, making the ordering obvious. In computer graphics, this can
be accomplished relatively easily by drawing each line twice, once with a
halo. This method erases the overlap by drawing over it in the background
color. Assume the lines are black and the background white. For each line,
first draw a thick version in the background color, then draw the line itself
normally. A bias or other method will have to be used to ensure that the
thin black line lies atop the thick white background line.
As with hidden-line rendering, this technique can be made more efficient
by first drawing all the white halo lines only to the Z-buffer, then drawing
the black lines normally [849].
A potential problem with haloing is that lines near each other can get
obscured unnecessarily by one line’s halo. For example, in Figure 11.18,
if the haloing lines extend all the way to the corners, then near the cor-
ners, the closer lines may halo the lines further away. One solution is to
shorten the lines creating the halos. Because haloing is a technical illustra-
tion convention and not a physical phenomenon, it is difficult to automate
perfectly.
Further Reading and Resources
For inspiration about non-photorealistic and toon rendering, read Scott
McCloud’s Understanding Comics [834]. The book by the Gooch’s [425] is
a fine guide to NPR algorithms in general, though a little dated. Newer
research can be found in the proceedings of the International Symposium on
Non-Photorealistic Animation and Rendering (NPAR).ThebookAdvanced
Graphics Programming Using OpenGL [849] has chapters on a wide range
of technical illustration and scientific visualization techniques.
This chapter focused on a few methods commonly used for silhouette
edge detection and rendering. A comprehensive, wide-ranging survey of
silhouette edge algorithms is provided by Isenberg et al. [589]. In this same
issue is a survey by Hertzmann [590] of stroke-based rendering techniques.
While this field tends toward methods to aid artists, and to algorithms
that process static images or models, some techniques are applicable to
interactive rendering.
Mitchell et al. [882] provide a case study about how engineers and artists
collaborated to give a distinctive graphic style to the game Team Fortress 2.
This book’s website at http://www.realtimerendering.com has pointers
to a number of worthwhile websites, tutorials, demonstration programs,
and code related to NPR.
..................Content has been hidden....................
You can't read the all page of ebook, please click here login for view all page.
