Replacing a Background
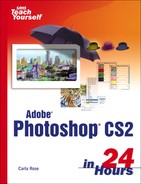
Many times you'll need to give something a different background, as I did earlier by moving the doll from my desk to the desert. The hardest parts of the job are finding appropriate backgrounds and objects to place in them, and separating the object from its original background. The doll was fairly easy to select, because I shot her against the plain paper backdrop. Suppose we took something more difficult and moved it to the same scene. Remember that hot dog wagon from New York? That would be a welcome oasis out there in the middle of The Valley of Fire. Let's do it. The cart is shown in Figure 20.13.
Figure 20.13. This image is not going to be easy to extract. There's a lot going on in the background.

The Magic Wand won't be much help here. I'll begin by tracing loosely around the cart with the Lasso, and inverting so I can delete the outer pieces of the picture. Figure 20.14 shows the lassoed cart; what's left after removing the background appears in Figure 20.15.
Figure 20.14. This is obviously a rough selection.

Figure 20.15. It still needs lots of cleaning up.

There are several ways to get rid of the remaining edges around the cart. You can erase it, bit by bit. You can remove some small parts, but not many, by selecting them with the Magic Wand. You can use Filter→Extract. But the easiest way is to use a tool called the Background Eraser. It pops out from the toolbox when you click and hold on the regular Eraser, and it erases pixels to transparency as you drag it.
In Figure 20.16, I've erased most of the background. I used both the Background Eraser as described, and the Magic Eraser, which determines where the chosen color ends and erases to the line of color change. (You choose the color by clicking it with the Magic Eraser.) It did a fine job on the umbrella. The cart still needs a bit of cleaning up with the regular Eraser, though. After that, I'll be able to slide it into position and rescale it if necessary (see Figure 20.17).
Figure 20.16. The Background Eraser took away most of the edges.

Figure 20.17. The cart's moved from West 43rd St. to the desert.

It's there, but it doesn't quite fit in yet. It's sitting sort of on top of a tuft of grass. I can copy the grass from the Background layer and paste it over the cart. It needs a shadow as well, but the drop shadow won't work in these lighting conditions. The shadow should be more or less under the cart. So I can add a layer between the background and the cart and use the Rectangular Marquee to create an oblong shadow shape. I'll feather the edges a little, about 3 pixels, and then fill it with black. That's too dark, so I'll slide the opacity down to about 20%, and then flatten the image. Figure 20.18 shows the finished picture.
Figure 20.18. I would like a diet root beer and a pretzel, please.

So you see, combining pictures isn't at all difficult. You simply need to prepare them by removing unwanted backgrounds or other bits, and then assemble them in layers. Don't forget to merge the layers when you're sure that you're done working on the picture. Otherwise, your files, if they have several layers, can be quite large, and you won't be able to save them in specialized formats such as JPEG or PCX. Save copies unmerged on a Zip disk, hard drive, or CD-ROM so that you can go back and improve on your work later.