
Chapter 37. Building Templated Databound Controls
The ASP.NET Framework is a framework. If you don’t like anything about the framework, you always have the option of extending it. In particular, if you discover that the standard databound controls in the framework don’t do everything you need, you can create a custom databound control.
In this chapter, you learn how to create custom controls that work like the ASP.NET GridView, DetailsView, ListView, and FormView controls. In the first part of this chapter, you learn how to create controls that support templates. You learn how to implement controls that support both standard templates and two-way databinding templates. You also learn how to supply a control with a default template.
The last part of this chapter is devoted to the topic of databound controls. You learn about the new base control classes included in the framework that were supplied to make it easier to create custom databound controls. We create a custom templated databound control.
Creating Templated Controls
A template enables you to customize the layout of a control. Furthermore, a template can contain expressions that are not evaluated until runtime.
The ASP.NET Framework supports two types of templates. First, you can create a one-way databinding template. You use a one-way databinding template to display data items. In a one-way databinding template, you use the Eval() expression to display the value of a data item.
Second, you have the option of creating a two-way databinding template. A two-way databinding template can not only display data items, but also can update data items. You can use the Bind() expression in a two-way databinding template to both display a data item and extract the value of a data item.
Typically, you use templates with a databound control. For example, the GridView, Repeater, DataList, FormView, and DetailsView controls all support an ItemTemplate that enables you to format the data items that these controls display. However, you can use a template even when you are not displaying a set of data items. For example, the Login control supports a LayoutTemplate that enables you to customize the appearance of the Login form.
This part of this chapter concentrates on creating nondatabound controls that support templates. In the next part of this chapter, you learn how to use templates with databound controls.
Implementing the ITemplate Interface
You create a one-way databinding template by adding a property to a control that returns an object that implements the ITemplate interface. The ITemplate interface includes one method:
• InstantiateIn—Instantiates the contents of a template in a particular control.
You are not required to implement the InstantiateIn() method. The ASP.NET Framework creates the method for you automatically. You call the InstantiateIn method in your control to add the contents of a template to your control.
For example, the control in Listing 37.1 represents an article. The Article control includes a template named ItemTemplate, which lays out the elements of the article: title, author, and contents.
Listing 37.1. Article.cs
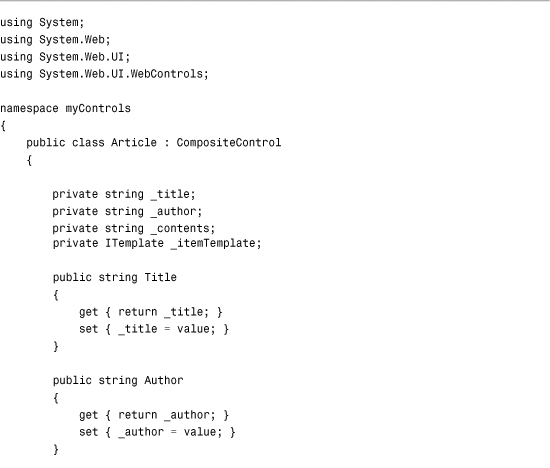

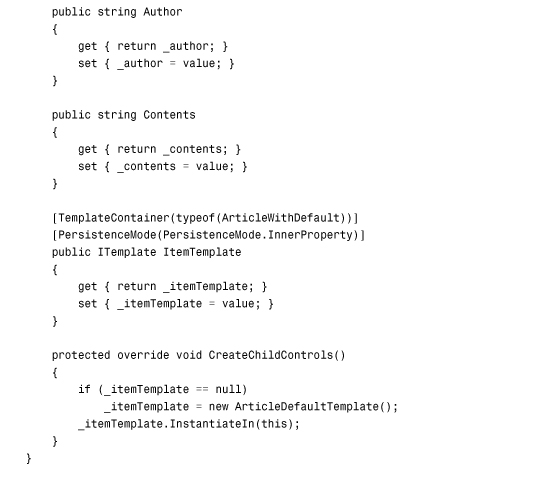
The Article control contains a property named ItemTemplate that returns an object that implements the ITemplate interface. This property is decorated with two attributes: TemplateContainer and PersistenceMode.
The TemplateContainer attribute specifies the type of control that contains the template. For the Article control, the template is contained in the Article control. Therefore, the Article control’s type is passed to the TemplateContainer attribute.
The PersistenceMode attribute indicates how a property is persisted in an ASP.NET page. The possible values are Attribute, EncodedInnerDefaultProperty, InnerDefaultProperty, and InnerProperty. We want to declare the ItemTemplate like this:

Because we want to declare the ItemTemplate inside the Article control, the PersistenceMode attribute needs to be set to the value InnerProperty.
The Article control overrides the base WebControl class’s CreateChildControls() method. The ItemTemplate is added as a child control to the Article control. Any controls contained in the template become child controls of the current control.
The page in Listing 37.2 illustrates how you can use the Article control and its ItemTemplate.
Listing 37.2. ShowArticle.aspx


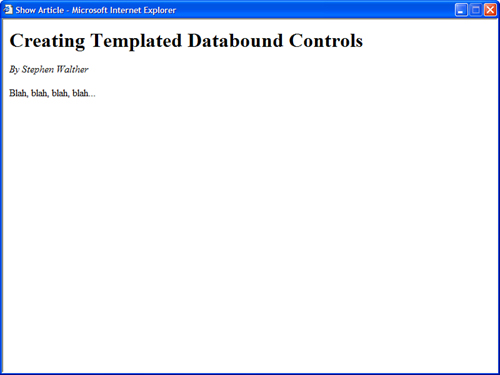
When you open the page in Listing 32.2, the contents of the ItemTemplate display (see Figure 37.1).
Figure 37.1. Using a template to display an article.
In the Page_Load() method, the Title, Author, and Contents properties of the article are set. These properties are used within databinding expressions within the Article control’s ItemTemplate. For example, the value of the Title property displays with the following databinding expression:
<%# Container.Title %>
The Container keyword refers to the current binding container. In this case, the binding container is the Article control. Therefore, you can refer to any property of the Article control by using the Container keyword.
The Article control’s DataBind() method is called at the end of the Page_Load() method. Don’t forget to call this method when you include databinding expressions in a template. If you don’t call this method, the databinding expressions are never evaluated and displayed.
Creating a Default Template
The previous section discussed the ITemplate interface’s InstantiateIn() method. Normally, you don’t implement the InstantiateIn() method; you let ASP.NET Framework do it for you. However, if you want to supply a control with a default template, you need to implement this method.
The modified Article control in Listing 37.3 includes a default template for the ItemTemplate. The default template is used when an ItemTemplate is not supplied.
Listing 37.3. ArticleWithDefault.cs


The control in Listing 37.3 is similar to the control created in the previous section; however, the CreateChildControls() method has been modified. The new version of the CreateChildControls() method tests whether there is an ItemTemplate. If no ItemTemplate exists, an instance of the ArticleDefaultTemplate class is created.
The ArticleDefaultTemplate class, which is also included in Listing 37.3, implements the ITemplate interface. In particular, the class implements the InstantiateIn() method, which creates all the controls that appear in the template.
In Listing 37.3, three Label controls are created that correspond to the Title, Author, and Contents properties. The DataBinding event is handled for all three of these Label controls. When the DataBind() method is called, the DataBinding event is raised for each child control in the Article control. At that time, the values of the Title, Author, and Contents properties are assigned to the Text properties of the Label controls.
The page in Listing 37.4 illustrates how you can use the modified Article control.
Listing 37.4. ShowArticleWithDefault.aspx

The ArticleWithDefault control in Listing 37.4 does not include an ItemTemplate. When the page displays in a browser, the contents of the ItemTemplate are supplied by the ArticleDefaultTemplate class (see Figure 37.2).
Figure 37.2. Displaying an article with a default template.

Supporting Simplified Databinding
The databinding expressions used in the previous two sections might seem a little odd. For example, we used the following databinding expression to refer to the Title property:
<%# Container.Title %>
When you use a databinding expression with one of the standard ASP.NET controls, such as the GridView control, you typically use a databinding expression that looks like this:
<%# Eval("Title") %>
Why the difference? The standard ASP.NET controls support a simplified databinding syntax. If you want to support this simplified syntax in your custom controls, you must implement the IDataItemContainer interface.
The IDataItemContainer includes the following three properties, which you are required to implement:
• DataItem—Returns the value of the data item.
• DataItemIndex—Returns the index of the data item from its data source.
• DisplayIndex—Returns the index of the data item as it is displayed in a control.
Typically, you implement the IDataItemContainer when creating a databound control. For example, you wrap up each record retrieved from a database table in an object that implements the IDataItemContainer interface. That way, you can use a simplified databinding expression to refer to the value of a particular database record column.
In this section, we create a nondatabound control that supports the simplified databinding syntax. The control is named the Product control, and is included in Listing 37.5.
Listing 37.5. Product.cs


The file in Listing 37.5 actually contains two classes: Product and ProductItem. The Product control includes an ItemTemplate property. The TemplateContainer attribute that decorates this property associates the ProductItem class with the ItemTemplate.
In the CreateChildControls() method, the ItemTemplate is instantiated into the ProductItem class, which in turn, is added to the controls collection of the Product class.
The ProductItem class implements the IDataItemContainer interface. Implementing the DataItemIndex and DisplayIndex properties is a little silly because there is only one data item. However, you are required to implement all the properties of an interface.
The page in Listing 37.6 illustrates how you can use the Product control with the simplified databinding syntax.
Listing 37.6. ShowProduct.aspx


Notice that the Eval() method is used in the Product control’s ItemTemplate. For example, the expression Eval("Name") displays the product name. If you prefer, you can still use the Container.Name syntax. However, the Eval() syntax is more familiar to ASP.NET developers.
Supporting Two-Way Databinding
Two-way databinding is a feature introduced with ASP.NET 2.0 Framework. Two-way databinding enables you to extract values from a template. You can use a two-way databinding expression not only to display the value of a data item, but also to update the value of a data item.
You create a template that supports two-way databinding expressions by creating a property that returns an object that implements the IBindableTemplate interface. This interface inherits from the ITemplate interface. It has the following two methods:
• InstantiateIn—Instantiates the contents of a template in a particular control.
• ExtractValues—Returns a collection of databinding expression values from a template.
For example, the ProductForm control in Listing 37.7 represents a form for editing an existing product. The control includes a property named EditItemTemplate that represents a two-way databinding template.
Listing 37.7. ProductForm.cs


The EditItemTemplate property does two special things. First, the property returns an object that implements the IBindableTemplate interface. Second, the TemplateContainer attribute that decorates the property includes a BindingDirection parameter. You can assign one of two possible values to BindingDirection: OneWay and TwoWay.
The ProductForm includes an OnBubbleEvent() method, which is called when a child control of the ProductForm control raises an event. For example, if someone clicks a Button control contained in the EditItemTemplate, the OnBubbleEvent() method is called.
In Listing 37.7, the OnBubbleEvent() method calls the EditItemTemplate's ExtractValues() method. This method is supplied by ASP.NET Framework because the EditItemTemplate is marked as a two-way databinding template.
The ExtractValues() method returns an OrderedDictionary collection that contains name/value pairs that correspond to each of the databinding expressions contained in the EditItemTemplate. The ProductForm control exposes this collection of values with its Results property. After the values are extracted, the control raises a ProductUpdated event.
The page in Listing 37.8 illustrates how you can use the ProductForm control to update the properties of a product.
Listing 37.8. ShowProductForm.aspx
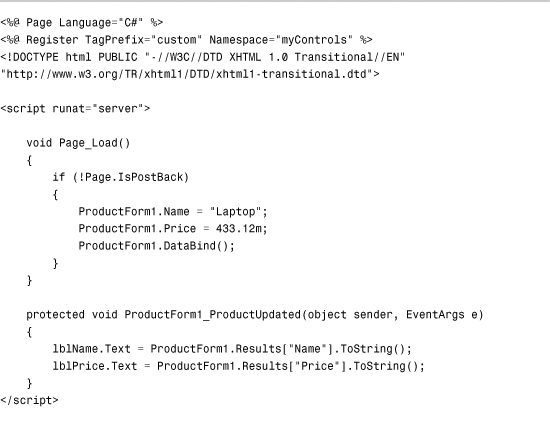


In the Page_Load() method in Listing 37.8, the ProductForm Name and Price properties are set. Next, the DataBind() is called to cause the ProductForm control to evaluate its databinding expressions.
The ProductForm control’s EditItemTemplate includes Bind() expressions instead of Eval() expressions. You use Bind() expressions in a two-way databinding template.
The EditItemTemplate includes a Button control. When you click the Button control, the ProductForm control’s OnBubbleEvent() method executes, the values are retrieved from the EditItemTemplate, and the ProductUpdated event is raised.
The page in Listing 37.8 handles the ProductUpdated event and displays the new values with two Label controls (see Figure 37.3).
Figure 37.3. Using a two-way databinding template.

Creating Templated Databound Controls
In this section, you learn how to build templated databound controls. A databound control can be bound to a DataSource control such as the SqlDataSource or ObjectDataSource controls.
The ASP.NET Framework provides you with a number of base classes that you can use when creating a custom databound control. So, let’s look at some tables and figures. Table 37.1 lists the base control classes for all the standard ASP.NET databound controls. Figure 37.4 displays the inheritance hierarchy of all the new databound controls in ASP.NET Framework. Typically, you inherit from one of the leaf nodes. You create a control that derives from the base CompositeDataBoundControl, HierarchicalDataBoundControl, or ListControl class.
Table 37.1. Base Databound Control Classes

Figure 37.4. Databound control inheritance hierarchy.
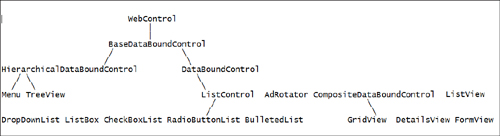
This chapter concentrates on inheriting new controls from the base CompositeDataBoundControl class. This is the easiest base class to use when you want to display one or more database records and use templates.
Note
You learned how to create controls that inherit from the base ListControl class in Chapter 10, “Using List Controls.”
Creating a DivView Control
Let’s start simple. In this section, we create a custom databound control named the DivView control, which displays a set of data items (database records) in HTML <div> tags.
The DivView control inherits from the base CompositeDataBoundControl class and overrides a single method of the base class. The DivView control overrides the base class’s CreateChildControls() method.
The DivView control is contained in Listing 37.9.
Listing 37.9. DivView.cs


The DivView control supports an ItemTemplate used to format each of its data items. You are required to supply an ItemTemplate when you use the DivView control.
All the work happens in the CreateChildControls() method. This is not the same CreateChildControls() method included in the base System.Web.UI.Control class. The DivView control overrides the CompositeDataBounControl’s CreateChildControls() method.
The CreateChildControls() method accepts the following two parameters:
• dataSource—Represents all the data items from the data source.
• dataBinding—Represents whether the CreateChildControls() method is called when the data items are retrieved from the data source.
The CreateChildControls() method is called every time that the DivView control renders its data items. When the control is first bound to a DataSource control, the dataSource parameter represents the data items retrieved from the DataSource control. After a postback, the dataSource parameter contains a collection of null values, but the correct number of null values.
After a postback, the contents of the data items can be retrieved from View State. As long as the correct number of child controls is created, the Framework can rebuild the contents of the databound control.
You can use the dataBinding parameter to determine whether the data items from the data source actually represent anything. Typically, the dataBinding parameter has the value True when the page first loads and the value False after each postback.
The DataBind() method is called after the child controls are created. You must call the DataBind() method when a template includes databinding expressions. Otherwise, the databinding expressions are never evaluated.
The page in Listing 37.10 illustrates how you can bind the DivView control to a SqlDataSource control.
Listing 37.10. ShowDivView.aspx


In Listing 37.10, the SqlDataSource control represents the Movies database table. The DivView control includes an ItemTemplate that formats each of the columns from this database table (see Figure 37.5).
Figure 37.5. Displaying database records with the DivView control.

Summary
This chapter was devoted to the topic of building templated databound controls. In the first part, you learned how to support templates in your custom controls. You learned how to create templates that support both one-way and two-way databinding expressions. You also learned how to create a default template for a control.
The second half of this chapter focused on the topic of building databound controls. You learned how to create a simple DivView control that displays the records from a database table in a series of HTML <div> tags.