
MVVM in Practice
Now that you've seen the theory, it's time to learn how you can apply the MVVM design pattern to a simple example that will demonstrate the key concepts covered in the theory of how to structure the layers, and allow them to communicate with one another. This example will implement a login screen that allows the user to enter a user name and password, authenticate credentials, and navigate to another view if the authentication was successful or display an error if it failed.
![]() Note For this scenario, we'll be assuming a one-to-one relationship between the view and the ViewModel to keep the implementation of this example simple.
Note For this scenario, we'll be assuming a one-to-one relationship between the view and the ViewModel to keep the implementation of this example simple.
Creating the Layers
To implement our simple scenario, let's start by creating the objects in the layers independently, before bringing them together.
 Workshop: Creating the LoginView View
By now, you will be familiar with creating new views using the navigation framework. We'll create a simple view for this example consisting of two text boxes, with corresponding labels, for the user to enter a user name and password into and a button that will initiate the user authentication check on the server.
1. Add a new view named LoginView to your project, using the SilverlightPage item template.
2. Add the following code in bold to the view:
<navigation:Page x:Class="Chapter13Sample.Views.LoginView"

      xmlns="http://schemas.microsoft.com/winfx/2006/xaml/presentation"

      xmlns:x="http://schemas.microsoft.com/winfx/2006/xaml"

      xmlns:d="http://schemas.microsoft.com/expression/blend/2008"

      xmlns:mc="http://schemas.openxmlformats.org/markup-compatibility/2006"

      xmlns:navigation="clr-namespace:System.Windows.Controls; ?

               assembly=System.Windows.Controls.Navigation"

      xmlns:sdk="http://schemas.microsoft.com/winfx/2006/xaml/presentation/sdk"

      mc:Ignorable="d" Title="Login">


    <Grid x:Name="LayoutRoot" Background="White" Width="300" Height="110">

        <Grid.ColumnDefinitions>

            <ColumnDefinition Width="90" />

            <ColumnDefinition Width="*" />

        </Grid.ColumnDefinitions>


        <Grid.RowDefinitions>

            <RowDefinition Height="35" />

            <RowDefinition Height="35" />

            <RowDefinition Height="*" />

        </Grid.RowDefinitions>


        <sdk:Label Content="User Name:" Margin="5,0"

                   HorizontalContentAlignment="Right" />

        <sdk:Label Content="Password:" Margin="5,0"

                   HorizontalContentAlignment="Right" Grid.Row="1" />


        <TextBox Name="UserNameField" Grid.Column="1" Height="25" />

        <PasswordBox Name="PasswordField" Grid.Column="1" Grid.Row="1" Height="25" />


        <Button Name="LoginButton" Content="Log In" Margin="0,5,0,0"

                Grid.Column="1" Grid.Row="2" Height="30" Width="90"

                HorizontalAlignment="Right" VerticalAlignment="Top" />

    </Grid>

</navigation:Page>
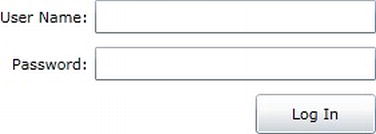
This will give you the View layout shown in Figure 13–7.
Creating the Model
For the purposes of this example, where we are primarily concerned with the interaction of the view and the ViewModel, we'll be disregarding the model from the equation to keep things simple. However, as an exercise for when you have completed this workshop, use the authentication service provided by RIA Services to validate the user's credentials. In that scenario, the User entity returned from RIA Services will act as the model.
Workshop: Creating the LoginViewModel ViewModel Class
The next step is to create a ViewModel class that will serve the needs of the view.
1. Add a new class to your project, named LoginViewModel.
2. Implement the INotifyPropertyChanged interface on the class:
using System;

using System.ComponentModel;

using System.Windows.Input;


namespace Chapter13Sample

{

    public class LoginViewModel : INotifyPropertyChanged

    {

        public event PropertyChangedEventHandler PropertyChanged;

    }

}
![]() Note Usually, your ViewModels will inherit from a base class that provides common functionality required by all the ViewModels in your project. At a minimum, this base class will implement the
Note Usually, your ViewModels will inherit from a base class that provides common functionality required by all the ViewModels in your project. At a minimum, this base class will implement the INotifyPropertyChanged interface, and it will commonly also implement either the INotifyDataErrorInfo or the IDataErrorInfo interface. If you make use of a MVVM framework, this base class will generally be provided as a key part of the framework. However, to demonstrate the simplicity of implementing the MVVM design pattern, we'll avoid hiding details away in base classes in this workshop and implement all the requirements directly in the ViewModel class.
3. The ViewModel class needs to expose two properties—UserName and Password:
private string _userName;

private string _password;


public string UserName

{

    get { return _userName; }

    set

    {

        _userName = value;


        if (PropertyChanged != null)

            PropertyChanged(this, new PropertyChangedEventArgs("UserName"));

    }

}


public string Password

{

    get { return _password; }

    set

    {

        _password = value;


        if (PropertyChanged != null)

            PropertyChanged(this, new PropertyChangedEventArgs("Password"));

    }

}
![]() Note As demonstrated, all properties exposed by the ViewModel should raise the
Note As demonstrated, all properties exposed by the ViewModel should raise the PropertyChanged event when their value changes. This will notify the view of the change so that it can update itself accordingly. However, rather than raising these events manually, you are better off having this behavior implemented automatically, using a tool such as NotifyPropertyWeaver (discussed in Chapter 7).
4. The ViewModel class also needs to expose a Login operation to the view. As discussed earlier in this chapter, you can implement this operation either as a command that the View can bind to or simply as a method. For this workshop, we'll do use a command. So we can keep the operation's logic inside our ViewModel class, we'll implement the command as a DelegateCommand. Add the code for the DelegateCommand to your project (the code can be found in Chapter 11 and in the source code for this chapter, downloadable from the Apress web site). Now define the Execute and CanExecute methods for the command in your ViewModel class, and create a property that will expose the command to the view:
public ICommand LoginCommand

{

    get

    {
        return new DelegateCommand(BeginLogin, CanLogin);

    }

}


private void BeginLogin(object param)

{

    // Logic to validate the user's login goes here

}


private bool CanLogin(object param)

{

    return true;

}
5. In a scenario like this, the login logic would generally have to make an asynchronous call to the server to validate the user's credentials. Once that call returns, the ViewModel needs to notify the View of the result, which it can do by raising one of the following events defined on the ViewModel:
public event EventHandler LoginSuccessful;

public event EventHandler LoginFailed;

public event EventHandler LoginError;
6. To keep this workshop simple, we'll avoid making the asynchronous call and simply raise the LoginSuccessful event as soon as the Login command is executed. Update the BeginLogin method like so:
private void BeginLogin(object param)

{

    // Logic to validate the user's login goes here.  We'll assume the

    // credentials are immediately valid (you'd normally go back to the

    // server first), and raise the LoginSuccessful event

    if (LoginSuccessful != null)

        LoginSuccessful(this, new EventArgs());

}
Workshop: Connecting the ViewModel to the View
Now that you have both the View and the ViewModel, it's time to connect them.
1. Declare a namespace prefix named vm, pointing to the namespace where the ViewModel class can be found, and assign an instance of the ViewModel to the View's DataContext property:
<navigation:Page x:Class="Chapter13Sample.Views.LoginView"

      xmlns="http://schemas.microsoft.com/winfx/2006/xaml/presentation"

      xmlns:x="http://schemas.microsoft.com/winfx/2006/xaml"

      xmlns:d="http://schemas.microsoft.com/expression/blend/2008"

      xmlns:mc="http://schemas.openxmlformats.org/markup-compatibility/2006"

      xmlns:navigation="clr-namespace:System.Windows.Controls;

               assembly=System.Windows.Controls.Navigation"

      xmlns:sdk="http://schemas.microsoft.com/winfx/2006/xaml/presentation/sdk"

      xmlns:vm="clr-namespace:Chapter13Sample"

      mc:Ignorable="d" Title="Login">
    <navigation:Page.DataContext>

        <vm:LoginViewModel />

    </navigation:Page.DataContext>


    <!-- View contents removed for brevity -->

</navigation:Page>
![]() Note When you declaratively connect the ViewModel to the view in this fashion, the Visual Studio XAML designer actually creates an instance of your ViewModel class. Be careful when doing so because any logic in the ViewModel's constructor will be executed at design time each time the View is opened in the designer. For example, you generally won't want to make calls to the server at design time. If you have logic in the ViewModel's constructor that you don't want to be executed at design time, you can put it in an
Note When you declaratively connect the ViewModel to the view in this fashion, the Visual Studio XAML designer actually creates an instance of your ViewModel class. Be careful when doing so because any logic in the ViewModel's constructor will be executed at design time each time the View is opened in the designer. For example, you generally won't want to make calls to the server at design time. If you have logic in the ViewModel's constructor that you don't want to be executed at design time, you can put it in an if block that checks whether it's in design-time mode. The System.ComponentModel.DesignerProperties.IsInDesignTool static property can be used for this purpose.
Alternatively, you can simply assign an instance of the ViewModel class to the View's DataContext property in the View's constructor in the code-behind:
this.DataContext = new LoginViewModel();
Communicating Between the View and the ViewModel
Let's now look at how you can implement the three core interactions between a View and a ViewModel:
- Consuming data from the ViewModel in the view (data binding)
- Enabling the view to invoke an operation on the ViewModel (binding to a command)
- Enabling the view to respond to an event in the ViewModel (implementing a trigger)
Workshop: Consuming Data from the ViewModel in the View
The Text properties of both text fields in our view now need to be bound to their corresponding properties on the ViewModel using two-way binding.
1. Bind the Text property of the UserNameField control in the View to the UserName property on the ViewModel:
<TextBox Name="UserNameField" Grid.Column="1" Height="25"

         Text="{Binding UserName, Mode=TwoWay}" />
2. Bind the Text property of the PasswordField control in the View to the Password property on the ViewModel, like so:
<PasswordBox Name="PasswordField" Grid.Column="1" Grid.Row="1" Height="25"

             Password="{Binding Password, Mode=TwoWay}" />
Workshop: Invoking the Login Operation (Command) on the ViewModel
We now need the Log In button in the view to execute the LoginCommand property exposed by the ViewModel.
1. Bind the Command property of the Button control in the View to the LoginCommand property exposed by the ViewModel class.
<Button Name="LoginButton" Content="Log In" Margin="0,5,0,0"

        Grid.Column="1" Grid.Row="2" Height="30" Width="90"

        HorizontalAlignment="Right" VerticalAlignment="Top"

        Command="{Binding LoginCommand}" />
When the button is clicked, the LoginCommand command will call the BeginLogin method in the ViewModel class.
Workshop: Invoking the Login Operation (Method) on the ViewModel
Instead of a command, if you were to simply expose a parameterless method named Login (for example) from the ViewModel class, you can use the CallMethodAction action from the Expression Blend Interactivity Library to wire up the Button control to call that method when it's clicked. Let's look at how you can invoke an operation exposed from the ViewModel class as a method instead of as a command, as the previous workshop demonstrated.
1. Add a public method named Login to the LoginViewModel class. This will be the method that will be called when the Log In button in the View is clicked. We'll simply add the same logic to it that we used for the command:
public void Login()

{

    // Logic to validate the user's login goes here.  We'll assume the

    // credentials are immediately valid (you'd normally go back to the

    // server first), and raise the LoginSuccessful event

    if (LoginSuccessful != null)

        LoginSuccessful(this, new EventArgs());

}
2. Add a reference to the System.Windows.Interactivity.dll and Microsoft.Expression.Interactions.dll assemblies to your project. As discussed in Chapter 10, these assemblies are installed along with Express Blend, or the Expression Blend SDK, and can be found under the Silverlightv5.0Libraries path of the corresponding product.
3. Declare the following namespace prefixes in the XAML file:
xmlns:i="http://schemas.microsoft.com/expression/2010/interactivity"

xmlns:ei="http://schemas.microsoft.com/expression/2010/interactions"
4. Add the following XAML in bold to the Log In button:
<Button Name="LoginButton" Content="Log In"

        Grid.Column="1" Grid.Row="2" Height="30" Width="90"

        HorizontalAlignment="Right" VerticalAlignment="Top">

    <i:Interaction.Triggers>

        <i:EventTrigger EventName="Click">

            <ei:CallMethodAction TargetObject="{Binding}" MethodName="Login" />

        </i:EventTrigger>

    </i:Interaction.Triggers>

</Button>
5. Now when you click the button, the Login method on the ViewModel class will be called.
Workshop: Responding to the ViewModel's LoginSuccessful Event in the View
Our ViewModel raises a LoginSuccessful event to simulate the successful authentication of the user's credentials. We now need to configure the View to listen for this event and respond accordingly. One way of doing so is by simply handling the event in the View's code-behind. For example, the XAML that instantiates the LoginViewModel class and assigns it to the View's DataContext property can wire up an event handler to handle the event in the code-behind, like so:
<navigation:Page.DataContext>

    <vm:LoginViewModel LoginSuccessful="LoginViewModel_LoginSuccessful" />

</navigation:Page.DataContext>
You can then write the logic for how the View should respond to that event in the event handler in the code-behind.
In this workshop, we're going to focus on a more declarative approach to the problem. We'll use the EventTrigger trigger and listen for the LoginSuccessful event to be raised on the ViewModel. The trigger can then invoke an action in response to the event.
1. To start, we need an action to call once the event is raised. Typically, in a scenario like this, once the user has logged in successfully, you'd navigate to a new view. The section titled “How Do I Navigate to a Different View?” later in this chapter includes the source for a custom action named NavigateAction that you can used for this purpose, but to keep this workshop simple, we'll just create a simple action that displays a message box when it is invoked. Add a new class named LoginSuccessAction to your project, and add the following code to it:
using System;

using System.Windows;

using System.Windows.Interactivity;


namespace Chapter13Sample.Actions

{

    public class LoginSuccessAction : TriggerAction<UIElement>

    {

        protected override void Invoke(object parameter)

        {
            MessageBox.Show("Login successful!");

        }

    }

}
2. Define a namespace prefix in the XAML file to let us use the action:
xmlns:actions="clr-namespace:Chapter13Sample.Actions"
![]() Note You'll also need the
Note You'll also need the i and ei namespace prefixes declared, as in the previous workshop.
3. You can now make use of the Interaction.Triggers attached property to handle the LoginSuccessful event and invoke the action when the event is raised. You can use this attached property anywhere in your XAML. Since it can be considered a View-level trigger, let's define it immediately after setting the view's DataContext property. We'll use an EventTrigger to bind to the ViewModel and listen for the LoginSuccessful event. When the event is raised, the trigger will invoke the LoginSuccessAction action that we created in step 1:
<navigation:Page x:Class="Chapter13Sample.Views.LoginView"

      xmlns="http://schemas.microsoft.com/winfx/2006/xaml/presentation"

      xmlns:x="http://schemas.microsoft.com/winfx/2006/xaml"

      xmlns:d="http://schemas.microsoft.com/expression/blend/2008"

      xmlns:mc="http://schemas.openxmlformats.org/markup-compatibility/2006"

      xmlns:navigation="clr-namespace:System.Windows.Controls;

               assembly=System.Windows.Controls.Navigation"

      xmlns:sdk="http://schemas.microsoft.com/winfx/2006/xaml/presentation/sdk"

      xmlns:vm="clr-namespace:Chapter13Sample"

      xmlns:i="http://schemas.microsoft.com/expression/2010/interactivity"

      xmlns:ei="http://schemas.microsoft.com/expression/2010/interactions"

      xmlns:actions="clr-namespace:Chapter13Sample.Actions"

      mc:Ignorable="d" Title="Login">


    <navigation:Page.DataContext>

        <vm:LoginViewModel />

    </navigation:Page.DataContext>


    <i:Interaction.Triggers>

        <i:EventTrigger SourceObject="{Binding Mode=OneWay}"

                        EventName="LoginSuccessful">

            <actions:LoginSuccessAction />

        </i:EventTrigger>

    </i:Interaction.Triggers>


    <!-- View contents removed for brevity -->

</navigation:Page>
4. When you click the button, the login operation exposed by the ViewModel will be called, via one of the methods described in the previous workshops. That operation will then raise the LoginSuccessful event. The trigger we just defined is now listening for that event and will invoke the LoginSuccessAction action when the event is raised, showing the message box.