
Data Validation
One of the most important roles in a typical data entry form is to notify the user of any problems with the data that has been entered. Invalid data in a business system can have major consequences for the business, so effective validation of data is vital to reduce the number of data entry mistakes that make it into the system. It's impossible to catch all errors, but you want to minimize the number of them as much as possible, and ensure that almost all the data entered into the system is correct and accurate. In Chapter 4, we looked at how you can decorate entities and their properties exposed by RIA Services with validation attributes. These attributes are replicated by the RIA Services code generator on the corresponding client-side entities that it creates. These rules need to be executed as the data is being entered into the data entry form, notifying the user of any invalid data that's been entered and preventing any invalid data being submitted back to the server.
In this section, we'll look at how you can display validation errors to the user in your data entry forms. We'll also look at how you can implement validation behavior on your own objects via validation attributes and notify the user interface of the errors accordingly.
Displaying Validation Errors
Data entry forms require a friendly and nonintrusive way to notify users when they've entered invalid data and give them the reason why the data is invalid so that they can fix it accordingly. Silverlight has very strong support for displaying validation errors, with little work required on the part of the developer to implement them.
Data Entry Controls
Data entry controls can be notified by their bindings of any validation issues with their bound properties and will automatically restyle themselves accordingly to notify the user as such. A red border will appear around the control, and when the control has the focus, it will also display a red tooltip, showing the validation error message to explain the problem. If a Label control is associated with the control, it will also turn red. Figure 7-22 demonstrates what happens when the user enters invalid data into a TextBox control.
Figure 7-22. A TextBox control displaying a validation error
![]() Note You can customize how a control displays validation errors by restyling the control's template. Customizing control templates is discussed in Chapter 9.
Note You can customize how a control displays validation errors by restyling the control's template. Customizing control templates is discussed in Chapter 9.
For the control to be notified of related validation errors by its bindings, the bindings need to be configured to listen for and handle validation errors. How you configure this depends on the method you are using to expose the validation errors to the user interface and will be discussed later in this chapter (in the “Exposing Validation Errors from Objects” section) as we detail these methods.
The ValidationSummary Control
The ValidationSummary control can be used to display a list of all the data validation errors for a data entry form. It listens for the BindingValidationError event raised by its container and maintains a collection of the validation errors that it reports. This means that you can simply place it in a view, like so:
<sdk:ValidationSummary />
Then it will automatically display any validation errors in your data entry form, as shown in Figure 7-23.

Figure 7-23. A ValidationSummary control
![]() Note For their validation errors to appear in this control, data input controls in the data entry form need their bindings to have their
Note For their validation errors to appear in this control, data input controls in the data entry form need their bindings to have their NotifyOnValidationError property set to True. By default, its value is False.
The ValidationSummary control will remain hidden until it has validation errors to show and returns to the hidden state when the errors are fixed.
If you want to take a more manual approach to assigning errors for it to display, you can also manually assign errors to its Errors property in the code behind or bind this property to a collection of validation errors that you maintain, like so:
var error = new ValidationSummaryItem("The Name field is required", "Name",

                                      ValidationSummaryItemType.PropertyError,

                                      null, null);

validationSummary.Errors.Add(error);
The DataForm Control
The DataForm control has a built-in ValidationSummary control that will display validation errors, in addition to the validation error notification behavior exhibited by the data input controls within the form. The ValidationSummary control will automatically appear at the bottom of the DataForm control when the bound object reports any data validation errors, as shown in Figure 7-24.
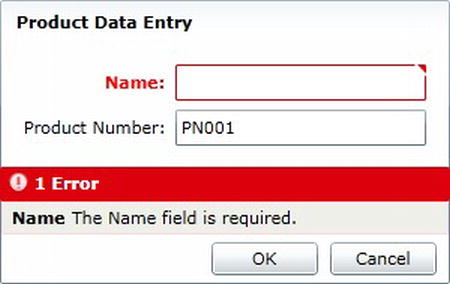
Figure 7-24. A DataForm control displaying a field in error and a validation summary
When its AutoCommit property is set to False, the DataForm control also ensures that the bound entity/object is valid before allowing the user to commit any changes. When its AutoCommit property is set to True, it prevents the user from moving away from the record until the validation errors have been resolved.
![]() Note You can force the DataForm control to validate the object that it's currently bound to and display any validation errors by calling its
Note You can force the DataForm control to validate the object that it's currently bound to and display any validation errors by calling its ValidateItem method.
The DataGrid Control
Like the DataForm control, the DataGrid control also has a ValidationSummary control built in, which appears when the object/entity bound to the current row has validation errors. Validation errors will result in the background color of the row changing to a light red. Also, cells with associated validation errors will display a red border and a tooltip explaining the reason for the validation error when they have the focus, as shown in Figure 7-25.

Figure 7-25. A DataGrid control displaying a cell in error and a validation summary
![]() Note Until all validation errors are fixed on a row, the user cannot modify or add any other rows. If the bound object implements the
Note Until all validation errors are fixed on a row, the user cannot modify or add any other rows. If the bound object implements the IEditableObject interface, the user can press the Esc key (twice if a field is currently in edit mode; otherwise, once) to cancel the changes. The DataGrid control will respond by calling the CancelEdit method on that object and return the object to its state before editing began.
Types of Data Validation
There are three types of data validation that you usually need to perform in business applications:
- Property-level validation, in which there are one or more validation rules associated with a property. Property-level validation rules are generally confined to validating the value of a single property, without being reliant on the values of other properties on the object. For example, a typical property-level validation rule may ensure that a numeric value assigned to a property is within a given range. Property-level validation is performed whenever the value of a property is updated (in its setter) and when validating the object as a whole.
- Object-level validation, in which each validation rule generally relates to the values of multiple properties on a single object. For example, a typical object-level validation rule may ensure that the value of the
EndDateproperty is greater than the value of theStartDateproperty. Object-level validation is performed when committing all the changes to the object, which is usually when the object'sEndEditmethod is called, assuming it implements theIEditableObjectinterface. - Domain-level validation, in which a full object hierarchy is validated as a whole against a set of validation rules, with validation rules spanning across multiple objects. For example, a typical domain-level validation rule may ensure that when an order is placed enough items are in stock to fulfill the order. Domain-level validation is usually performed when committing changes back to the server, and often on the server itself.
In the following sections, we'll focus primarily on implementing property-level and object-level validation.
Defining Validation Rules
As described in Chapter 4, RIA Services enables you to define property-level and object-level validation rules by decorating your entities with validation attributes on the server, which are then replicated on the corresponding entities created on the client by the RIA Services code generator. This enables the validation rules to be run on the client as well as the server. Data can be validated on the client during data entry, and the rules will be run again on the server when the data is submitted.
When exposing entities from RIA Services, you will generally use validation attributes to specify property-level and object-level validation rules, but you can also use these attributes in your own client-side classes, such as your ViewModels, when using the MVVM design pattern (discussed in Chapter 13). Simply add a using directive to the System.ComponentModel.DataAnnotations namespace, and you can use the validation attributes described in Chapter 4 (e.g., Required, StringLength, Range, and RegularExpression) in exactly the same manner, for example:
[Required]

[StringLength(50)]

[RegularExpression(@"(?<user>[^@]+)@(?<host>.+)")]

public string EmailAddress;


[Range(0, 150)]

public int Age;
Note that the predefined validation attributes are all property-level rules. To define object-level validation rules, you will need to create a custom validation attribute that inherits from the base ValidationAttribute class demonstrated in Chapter 4. Repeating that same example, here is a custom validation rule for ensuring that the sell finish date on a product is later than the sell start date:
public class SellDatesValidationAttribute : ValidationAttribute

{

    protected override ValidationResult IsValid(object value,

                                        ValidationContext validationContext)

    {

        Product product = value as Product;

        return product.SellEndDate > product.SellStartDate ?

            ValidationResult.Success : new ValidationResult(

                "The sell end date must be greater than the sell start date");

    }

}
You can then apply the validation rule to your class like so:
[SellDatesValidation]

public class Product
Of course, you can also create custom property-level validation attributes in exactly the same way (also demonstrated in Chapter 4).
![]() Note Using validation attributes is not the only way of implementing validation rules in Silverlight. Alternatively, you can manually implement property-level validation rules in the property setters and object-level validation rules in the object's
Note Using validation attributes is not the only way of implementing validation rules in Silverlight. Alternatively, you can manually implement property-level validation rules in the property setters and object-level validation rules in the object's EndEdit method, assuming you implement the IEditableObject interface. You can then expose them publicly using one of the approaches discussed in the next section. However, validation attributes tend to provide the most elegant means of implementing validation rules on your objects and allow the rules to be encapsulated and reused throughout your application.
Reporting Validation Errors from Objects
There are several means of reporting data validation errors from your entities/objects in Silverlight. Bindings can listen for validation errors reported by your objects using one of the following approaches:
- Throwing exceptions
- Implementing the
IDataErrorInfointerface and its corresponding behavior - Implementing the
INotifyDataErrorInfointerface and its corresponding behavior
Let's look at each of these in turn.
![]() Note Entities exposed from the server via RIA Services are automatically configured to report both property-level and object-level validation errors to the user interface. These entities inherit from the
Note Entities exposed from the server via RIA Services are automatically configured to report both property-level and object-level validation errors to the user interface. These entities inherit from the Entity class, which automatically implements the INotifyDataErrorInfo interface, and reports any data validation errors identified by the validation attributes when properties are updated to the bindings via the means provided by that interface. Therefore, the methods described here are primarily included to demonstrate the different methods that Silverlight provides to enable the user interface to be aware of data validation errors so that you can understand how data validation works behind the scenes and how to implement data validation in your own client-side classes.
Validation by Exception
Prior to Silverlight 4, the only means of notifying the user interface of property-level data validation errors was to throw an exception in the setter of the property. The ValidationException class (found in the System.ComponentModel.DataAnnotations namespace) was generally used for this purpose. An example of how you would validate a property value and notify the user interface of a data validation error using the exception approach is demonstrated here:
public string Name

{

    get { return _name; }

    set

    {

        _name = value;


        // Check validation rule

        if (string.IsNullOrEmpty(value))

            throw new ValidationException("You must enter a name for the product");

    }

}
When you bind the Text property of a TextBox control to this Name property, you need to set the binding's ValidatesOnExceptions property to True, like so:
<TextBox Text="{Binding Name, Mode=TwoWay, ValidatesOnExceptions=True}" />
Now if the user enters an “empty string” value into the text box and tabs away, the text box will display a validation error.
The process of throwing data validation errors as exceptions has never been popular with most developers, as conceptually data validation errors are not “exceptional” scenarios. Ideally, exceptions should be used only when an unexpected error occurs. Another problem with this method is that when you debug your application, every time an exception is thrown due to a data validation error, the execution of the application would break and throw you back into Visual Studio. You can still continue running the application, but it is a frustrating development experience.
![]() Note You can stop Visual Studio breaking on these validation errors by opening the Exceptions window from the Debug menu in Visual Studio and configuring it to not break when a
Note You can stop Visual Studio breaking on these validation errors by opening the Exceptions window from the Debug menu in Visual Studio and configuring it to not break when a ValidationException exception is raised.
This validation by exception approach is also a problem when populating an entity with data, as assigning a value to a property that causes the object to temporarily become invalid, but will become valid as further properties are assigned their values, will raise an exception.
Although the exception approach of notifying bindings of validation errors has now been superseded by the approaches we'll discuss shortly, it can still be useful to turn on the ValidatesOnExceptions property of bindings, as it allows you to display validation errors due to type conversion errors. When a type converter fails to convert the user input to the destination type of the bound property, it will throw an exception. For example, the type converter behind the scenes will raise an exception when you try and enter a value of “asdf” into a text box that's bound to a property of type integer. Setting the ValidatesOnExceptions property to True will result in this exception being displayed to the user as a validation error.
![]() Note It's not necessary to set the
Note It's not necessary to set the ValidatesOnExceptions property to True when the bindings are within a DataForm control—they will still be restyled and the validation summary will appear accordingly when there are validation errors on the bound object.
The IDataErrorInfo Interface
Silverlight 4 introduced support for the IDataErrorInfo interface, which was already being used in WPF to provide data validation support to objects. Implementing the IDataErrorInfo interface on an object enables you to expose validation errors for an entity/object, without requiring the use of exceptions. In addition, the big benefit of this approach is that it can report all the validation errors on an entity/object, instead of just that of the property being updated—a big advantage, especially when updating one property invalidates one or more other properties.
The IDataErrorInfo interface requires you to implement two properties on the object:
- The
Errorproperty exposes a string identifying the validation status of the entity/object as a whole (i.e., a single validation error message). - The
Itemproperty accepts the name of a property as a parameter and returns any validation error as a string relating to that property.
The following code snippet demonstrates implementing the IDataErrorInfo interface in a simple class:
public class Product : IDataErrorInfo, INotifyPropertyChanged

{

    private string _name;

    private Dictionary<string, string> _validationErrors =

        new Dictionary<string, string>();


    public string Name

    {

        get { return _name; }

        set

        {

            _name = value;


            // Check validation rule

            if (string.IsNullOrEmpty(value))

            {

                _validationErrors["Name"] =

                    "You must enter a name for the product";

            }

            else

            {

                if (_validationErrors.ContainsKey("Name"))

                    _validationErrors.Remove("Name");

            }


            RaisePropertyChanged("Name");

        }

    }


    public string Error

    {

        get

        {

            string error = "";


            if (_validationErrors.Count != 0)

                error = "This object is invalid";


            return error;

        }

    }


    public string this[string columnName]

    {

        get

        {

            string error = "";


            if (_validationErrors.ContainsKey(columnName))

                error = _validationErrors[columnName];


            return error;

        }

    }


    private void RaisePropertyChanged(string propertyName)

    {

        if (PropertyChanged != null)

            PropertyChanged(this, new PropertyChangedEventArgs(propertyName));

    }


    public event PropertyChangedEventHandler PropertyChanged;

}
To configure bindings to look for validation errors reported by an object that implements the IDataErrorInfo interface, they have a property named ValidatesOnDataErrors which needs to be set to True (its default value is False.) You must set this to True on your bindings, even in the DataForm control; otherwise, the controls will not be notified of validation errors associated with their bound properties and thus won't restyle themselves accordingly.
<TextBox Text="{Binding Name, Mode=TwoWay, ValidatesOnDataErrors=True}" />
![]() Note There is no event included in the
Note There is no event included in the IDataErrorInfo interface that can be raised when there is a data validation error, so you may be wondering how the user interface will be made aware of any data validation errors on a bound entity/object. You do so by implementing the INotifyPropertyChanged interface on your entity/object and raising the PropertyChanged event for the invalid property, as was demonstrated in the previous code snippet. Any bindings bound to the property will handle this event and be notified of the change accordingly. If a binding has its ValidatesOnDataErrors set to True and if the entity/object also implements the IDataErrorInfo interface, it will check the Error and Item properties for any data validation errors corresponding to its bound property. If validation errors are found, it will notify the control so that it can display them.
The INotifyDataErrorInfo Interface
In addition to the IDataErrorInfo interface, Silverlight 4 also introduced an interface named INotifyDataErrorInfo. This interface provides a number of benefits over the IDataErrorInfo interface and is generally the preferred approach for enabling your objects to publicly report data validation errors. Benefits of this approach include
- Unlike the
IDataErrorInfointerface,INotifyDataErrorInforequires the implementation of anErrorsChangedevent that can be used to notify bindings of validation errors, without relying on thePropertyChangedevent from theINotifyPropertyChangedinterface. - You can report multiple validation errors per property.
- You can report multiple object-level validation errors.
- Bindings are automatically configured to listen for validation errors in this manner, without the need to explicitly configure them to do so.
- Data validation can be performed asynchronously. For example, you may wish to have a validation rule executed on the server and notify the user interface of the result when the call returns.
The INotifyDataErrorInfo interface requires your objects to implement the following members:
GetErrors: This method returns a collection of all the errors related to a given property.HasErrors: This property returns a Boolean value indicating whether the entity or object has any errors.ErrorsChanged: This event should be raised when the collection of errors is changed—that is, when a validation rule fails and is added to the collection of errors, or when a validation error is resolved.
Bindings automatically listen for the ErrorsChanged event to be raised on the bound entity/object. When the ErrorsChanged event is raised for a property, corresponding bindings will call the GetErrors method to get the validation errors relating to that property.
![]() Note The bindings treat this approach to implementing validation differently from the other approaches described. With those approaches, for the bound controls to be aware of validation errors, you have to explicitly set the value of the
Note The bindings treat this approach to implementing validation differently from the other approaches described. With those approaches, for the bound controls to be aware of validation errors, you have to explicitly set the value of the ValidatesOnExceptions and ValidatesOnDataErrors properties on the associated bindings to True. Bindings also have a ValidatesOnNotifyDataErrors property, but its default value is already True. This means that it's unnecessary to explicitly configure a binding for it to be aware of validation errors reported in this manner.
The following code snippet demonstrates implementing the INotifyDataErrorInfo interface in a simple class:
public class Product : INotifyDataErrorInfo

{

    private string _name;

    private Dictionary<string, List<string>> _validationErrors =

        new Dictionary<string, List<string>>();


    public string Name

    {

        get { return _name; }

        set

        {

            _name = value;


            // Check validation rule

            if (string.IsNullOrEmpty(value))

            {

                _validationErrors["Name"] = new List<string>();

                _validationErrors["Name"].Add(

                    "You must enter a name for the product");

            }

            else

            {

                if (_validationErrors.ContainsKey("Name"))

                    _validationErrors.Remove("Name");

            }


            RaiseErrorsChanged("Name");

        }

    }


    private void RaiseErrorsChanged(string propertyName)

    {

        if (ErrorsChanged != null)

            ErrorsChanged(this, new DataErrorsChangedEventArgs(propertyName));

    }


    public event EventHandler<DataErrorsChangedEventArgs> ErrorsChanged;


    public System.Collections.IEnumerable GetErrors(string propertyName)

    {

        List<string> errors = null;


        if (_validationErrors.ContainsKey(propertyName))

            errors = _validationErrors[propertyName];


        return errors;

    }


    public bool HasErrors

    {

        get { return _validationErrors.Count != 0; }

    }

}
Deciding Which Approach to Use
As you can see, three different approaches are available for exposing data validation errors from your entities/objects. Ultimately, the INotifyDataErrorInfo interface approach is the most flexible and provides the most benefits.
Exposing Object-Level Validation Errors
Sometimes, you need to define a validation rule that encompasses multiple properties on an object. You can implement this type of rule as an object-level validation rule, using similar techniques to how you implement property-level validation. However, instead of executing the validation rules in property setters as you do for property-level validation, you need to create a method in your class that will execute all the object-level validation rules and report any failures to the user interface. This logic is usually best implemented as part of the EndEdit method in your class, assuming the object implements the IEditableObject interface.
Both the DataForm and DataGrid controls automatically call the EndEdit method when attempting to commit the changes to the object, and you can use this opportunity to validate the object as a whole. You can execute the rules to validate the object, and then add any failures to the list of validation errors that you are maintaining and publicly reporting via the means provided when implementing the IDataErrorInfo or INotifyDataErrorInfo interface.
When publicly reporting these object-level validation errors, you still need to associate the validation errors with properties on the object; otherwise, the errors will not be displayed in the user interface. Therefore, you should associate object-level validation errors with each of the properties that the rule involves or, at the very least, assign the validation error to one of them instead.
Once you've done so, you will also have to notify the user interface of these validation errors. When implementing the IDataErrorInfo interface, you will need to raise the PropertyChanged event, available by implementing the INotifyPropertyChanged interface, for each property involved in the object-level validation rule. When implementing the INotifyDataErrorInfo interface, you will need to raise the ErrorsChanged event for each property involved in the object-level validation rule.
![]() Note Neither the DataForm nor the DataGrid controls will display validation errors associated with properties on a bound object that their fields/columns do not bind to. However, these controls do display validation errors for properties they do not bind to if the corresponding validation rules are implemented as validation attributes.
Note Neither the DataForm nor the DataGrid controls will display validation errors associated with properties on a bound object that their fields/columns do not bind to. However, these controls do display validation errors for properties they do not bind to if the corresponding validation rules are implemented as validation attributes.
Handling Validation Errors in Your View's Code-Behind
Sometimes, you need to handle validation errors in your view's code behind. Bindings can raise an event when they detect a validation error associated with their bound property, which you can then handle in your code behind. The following steps are involved in this process:
- Set the binding's
NotifyOnValidationErrorproperty toTrue. - Set the
ValidatesOnproperty associated with the approach you've taken for reporting validation errors toTrue. - Handle the control's
BindingValidationErrorevent in the code behind.
A typical binding for this scenario is demonstrated here:
<TextBox Text="{Binding Name, Mode=TwoWay, NotifyOnValidationError=True,

                        ValidatesOnDataErrors=True}"

         BindingValidationError="NameTextBox_BindingValidationError" />
You can then handle the control's BindingValidationError event in the code behind, like so:
private void NameTextBox_BindingValidationError(object sender,

                                                ValidationErrorEventArgs e)

{

    if (e.Action == ValidationErrorEventAction.Added)

    {

        // Do something with the error

        string errorMessage = e.Error.ErrorContent.ToString();

    }

}
![]() Note The
Note The NotifyOnValidationError property is used purely to specify whether the BindingValidationError event should be raised on the control and has no bearing on whether the control should display a validation error to the user, as its name might initially suggest.
Executing Validation Rules Implemented as Attributes
Chapter 4 shows how you can implement validation rules on an entity by decorating it with validation attributes. Entities exposed from the server via RIA Services inherit from the Entity class. This class automatically executes any validation rules corresponding to a property when it is updated (i.e., in its setter) and reports any validation errors to the bindings via the INotifyDataErrorInfo interface. However, when you decorate your own class's properties with validation attributes, you will need to perform this task yourself—simply decorating the properties with the validation rules is not enough. The reason is that the attributes are simply metadata, and you need to actually execute the validation rule(s) and notify the user interface yourself if any rules are broken.
To implement the same behavior as the RIA Services entities in your own client-side objects, you need to use the Validator class (found in the System.ComponentModel.DataAnnotations namespace). The Validator class is a static class and contains a number of methods that you can use to validate properties and objects decorated with validation attributes. You can use the methods on this class to validate property values as they are assigned (in the property setters) and to validate the object as a whole in its EndEdit method, assuming it implements the IEditableObject interface.
Validating Properties
To validate the new value for a property (in its setter), you can use either the ValidateProperty method or the TryValidateProperty method on the Validator class. When you call the ValidateProperty method, if the given value for a property fails a validation rule, it will raise a ValidationException exception. When you call the TryValidateProperty method, it will simply return a Boolean value, indicating whether the new value will be valid, and a collection of the failed rules. This is the preferred method because it allows you to avoid exceptions and handle the validation errors by using the means provided by implementing either the IDataErrorInfo or INotifyDataErrorInfo interface in your class.
Here's the process to use the property validation methods on the Validator object:
- Create a
ValidationContextobject (to whose constructor you pass the object to validate, any services required by the validators, and any other validation state information that you want to pass to them).ValidationContext validationContext = new ValidationContext(this, null, null); - Assign it the name of the property or member to be validated on the object to validate.
validationContext.MemberName = "Name"; - Pass the
ValidationContextobject to the appropriate method (ValidatePropertyorTryValidateProperty) on theValidatorobject, along with the value you are validating, plus an empty collection in which the method will put the results of the failed validation rules if you are calling theTryValidatePropertymethod.bool isValid = Validator.TryValidateProperty(value, validationContext,
validationResults);
![]() Note As you may have noticed from the example of creating a custom validation attribute earlier in this chapter, the
Note As you may have noticed from the example of creating a custom validation attribute earlier in this chapter, the ValidationContext object is passed into each validation attribute on the property, which the validation attributes can then use as they see fit.
Typically, your classes will inherit from a base class that implements the INotifyDataErrorInfo interface and provides the validation functionality for your objects. The following code demonstrates a method that will validate a property based on its validation attributes and maintain the results in a class-level variable named _validationErrors.
private Dictionary<string, List<string>> _validationErrors =
new Dictionary<string, List<string>>();
protected bool ValidateProperty(string propertyName, object value)
{
var validationResults = new List<ValidationResult>();
var validationContext = new ValidationContext(this, null, null);
validationContext.MemberName = propertyName;
bool isValid = Validator.TryValidateProperty(value, validationContext,

                                             validationResults);
List<string> errors = new List<string>();
foreach (ValidationResult result in validationResults)
errors.Add(result.ErrorMessage);
if (errors.Count == 0)
{
if (_validationErrors.ContainsKey(propertyName))
_validationErrors.Remove(propertyName);
}
else
{
_validationErrors[propertyName] = errors;
}
if (ErrorsChanged != null)
ErrorsChanged(this, new DataErrorsChangedEventArgs(propertyName));
return isValid;
}
You can then implement the GetErrors method and HasErrors property required by the INotifyPropertyChanged interface like so:
public IEnumerable GetErrors(string propertyName)

{

    List<string> errors = null;


    if (_validationErrors.ContainsKey(propertyName))

        errors = _validationErrors[propertyName];


    return errors;

}


public bool HasErrors

{

    get { return _validationErrors.Count != 0; }

}
You then call the ValidateProperty method in the property setters in your class to validate the properties as their values are set:
[Required]

public string Name

{

    get { return name; }

    set

    {

        name = value;


        if (PropertyChanged != null)

            PropertyChanged(this, new PropertyChangedEventArgs("Name"));


        ValidateProperty("Name", value);

    }

}
Validating Objects
You can also use the Validator class to validate the object as a whole, based on its validation attributes using the ValidateObject or TryValidateObject method. These methods behave similarly to their property validation counterparts, but validate the object using the validation attributes applied to the object itself and its properties. You'll generally validate the object in its EndEdit method when implementing the IEditableObject interface.
![]() Note By default, the
Note By default, the ValidateObject and TryValidateObject methods do not validate the object based on any of its property-level validation attributes other than the Required attribute (StringLength, Range, etc.). To include these property-level validations in the object-level validation, you will need to use the overload of the ValidateObject and TryValidateObject methods that includes the validateAllProperties parameter, which you should set to True, as demonstrated in the following example.
The following code can be used in conjunction with the code shown in the previous section. It will validate the current object and all its properties and add any validation errors to the _validationErrors class level variable.
public bool Validate()

{

    var validationContext = new ValidationContext(this, null, null);

    var validationResults = new List<ValidationResult>();


    bool isValid = Validator.TryValidateObject(this, validationContext,

                                               validationResults, true);


    _validationErrors.Clear();


    foreach (ValidationResult result in validationResults)

    {

        foreach (string propertyName in result.MemberNames)

        {

            List<string> errors = null;


            if (_validationErrors.ContainsKey(propertyName))

            {

                errors = _validationErrors[propertyName];

            }

            else

            {

                errors = new List<string>();

                _validationErrors[propertyName] = errors;

            }


            errors.Add(result.ErrorMessage);


            if (ErrorsChanged != null)

                ErrorsChanged(this,

                              new DataErrorsChangedEventArgs(propertyName));

        }

    }


    return isValid;

}
![]() Note Although these examples have demonstrated validating an object or one of its properties from within the object itself, you can just as easily initiate the validation outside the object, in much the same way as the DataForm and DataGrid controls automatically do, using exactly the same methods.
Note Although these examples have demonstrated validating an object or one of its properties from within the object itself, you can just as easily initiate the validation outside the object, in much the same way as the DataForm and DataGrid controls automatically do, using exactly the same methods.
Customizing Validation Attribute Error Messages
Worth noting is that the default error messages provided by the validation attributes are not always particularly user friendly. By default, they reference the property that failed the validation rule by name, which will often be different from the label corresponding to that field in the user interface, especially if the application is localized. However, if you decorate the property with the Display attribute and assign a friendly name to its Name property, the validation error message will use the value of that property instead of the property name.
Alternatively, you can create a custom validation error message by assigning a value to the ErrorMessage property of the validation attribute, like so:
[Required(ErrorMessage="Please enter a name for the product")]

public string Name;
If you are storing your strings in resource files, you can use those instead by setting the ResourceType and ResourceName properties on the validation attributes instead, for example:
[Required(ResourceType=typeof(ProductResources), Name="ProductNameRequiredError")]

public string Name;
Complex Validation Rules
Sometimes, you need to implement complex validation rules on your properties or objects. For example, you may need to retrieve some data asynchronously from the server, or have the validation performed on the server itself. It may not have been immediately apparent when we looked at them earlier, but you can implement quite complex validation rules as custom validation attributes. The IsValid method on a custom validation attribute is passed in a ValidationContext object, which helps enable complex validation attributes to be implemented. For example, it contains an Items property that enables you to pass data into the validation attributes, and an ObjectInstance property that the validation attribute can use to reference the object being validated. (If a property is being validated, the ObjectInstance property will be assigned the property's parent object).
The best source for how to go about building complex validation attributes is Jeff Handley's blog at http://jeffhandley.com/tags/Validation/default.aspx. He has a series on validators and includes information on creating asynchronous validation rules, cross-entity validation rules, and more.