
6
Events, Virtual Pageviews, Social Actions, and Errors
In the previous chapters, we learned how to record pageviews in Google Analytics (GA)—by including the default GA tracking code on all pages of our website, or by including the Google Tag Manager (GTM) container code on each page of our website and then publishing a GA pageview tracker tag to the container. Either of these straightforward approaches will immediately begin populating your GA property with pageview data but will invariably leave big gaps in understanding the full range of your visitors’ interaction with your Web pages.
To fill these gaps, you can configure events and also virtual pageviews and social tracking, all of which are covered quite thoroughly in this chapter, along with error tracking. Along the way, we’ll get a great deal of practice with GTM skills beyond basic GA tracking.
Please note that this is a lengthy chapter that delves into fairly deep technical detail and introduces some more advanced GTM functionality, so if you are a marketer or analyst, you can read through the chapter to learn the fundamentals of tracking events, virtual pageviews, social actions, and errors and then work with your developers on the implementation procedures.
The Need for Event Tracking
As illustrated in Figure 4.7, pageview tracking is quite comprehensive in the sense that each default pageview hit includes a wide range of dimension values that describe the page, the visitor’s traffic source and geographic location, the technology that the visitor used to access the page, and the visitor’s status as a new or returning visitor.
As comprehensive as a pageview hit is, it’s important to recognize that a pageview hit is generated only when a page loads and that your GA property does not by default record any user interaction that does not cause one of your own GA-tracked pages to load. Event tracking also tends to play an important role in mobile app tracking, where there may be typically a great deal of interaction without a new screen load.
The Click Does Nothing
To elaborate on the preceding discussion, it’s critical for anyone who works with GA, particularly on implementation, to understand this fundamental tracking concept: by default, no click action is tracked in GA. If a click accesses a page on your website and that page contains the GA tracking code or a GA pageview tag in GTM, GA records a pageview. The click is not directly recorded in GA: it’s the pageview that results from the click that’s recorded. By the same token, browser actions such as scrolling and hovering also go unrecorded in GA by default.
By reviewing Figure 6.1, we can begin to enumerate the many types of user interactions that are not recorded through the default pageview-based tracking code:

Figure 6.1 This mockup represents a wide range of user interactions that are not tracked in GA by default.
- non-pageview links:
- offsite
- mailto: (opens email client)
- PDF, spreadsheet, PowerPoint/presentation
- anchor within the same page
- social connect links
- social content links
- video
- hovering to display help or product variations
- live chat, map, or any other modal or nonmodal popup that doesn’t appear as a separate document
- tabs
- list filters
- scrolling
Not pictured in Figure 6.1 are several other types of events that you may need to track:
- navigating to an image within a carousel
- comment submissions review/rating submissions
- completion of individual form fields or drop-down menu selections
- distinguishing between multiple links on one page that point to the same other page
- multistep/multiscreen process that does not involve a URL refresh, as discussed in Virtual Pageviews for Multiple AJAX Screens later in the chapter
- single-page Web applications
- any other interactions designed to use AJAX, jQuery (and other JavaScript libraries), or the HTML5 canvas element to update the page without a pageload
Figure 6.2 illustrates mobile (particularly smartphone) interactions that are not tracked by default, including:

Figure 6.2 Several types of mobile interactions are not tracked in Google Analytics by default.
- tel: links (prompts autodial)
- accordion menu
- portrait/landscape rotation
- pinching in and out
DOM Listeners
We’ve identified a problem: many user interactions on desktop and mobile are not tracked by default. What’s the solution?
The solution begins with another critical concept that underlies GA event tracking: you can code a response to any user interaction in the browser, whether the interaction generates a page load or not. As part of its broader role as a notation format for referencing and manipulating browser and page elements through JavaScript, the Document Object Model (DOM) provides a way for us to “listen” for user actions and code specific responses.
Following are some of the DOM listeners that we can implement:
- onclick
- onmouseover (hover over an element)
- onmouseout (hover away from an element)
- onkeydown (can check for a specific key)
- onkeyup (can check for a specific key)
- onchange (drop-down menu selection)
- onfocus (user clicks into a form field)
- onblur (user clicks away from a form field)
- onscroll
Unless you’re a front-end Web developer, it’s not necessary to memorize this list, but, as a GA practitioner, you should understand that you can use these listeners to execute additional scripting in the page. In GTM, clicks (and form submissions) will generally be the easiest type of action to listen for, but we’ll still be able to configure extra scripting in response to other types of user actions.
In our case, this extra scripting will take the form of GA events and virtual pageviews, as the examples in this chapter will demonstrate.
Populating the Events Reports
Before continuing the discussion on event implementation, let’s take a look at the Top Events report in Figure 6.3. The report displays Event Category as the default primary dimension, and we’ve added Event Action as the secondary dimension.

Figure 6.3 Top Events report, with Event Category displayed as primary dimension and Event Action displayed as secondary dimension.
To view the pages on which events have occurred, you can apply Pages as a secondary dimension (and filter on a primary dimension value as needed), as shown in Figure 6.4.

Figure 6.4 Pages applied as secondary dimension to the Top Events report.
GA provides multiple dimensions that we can populate to describe events:
- Event Category (mandatory)
- Event Action (mandatory)
- Event Label (optional but often used)
How do we record event data in GA? Let’s start with a PDF link as an example. On your website, you have included a link to your catalog:
˂a href="/catalog.pdf"˃Download our catalog˂/a˃
Taking advantage of the onclick DOM listener listed above, we can execute additional code when a Web visitor clicks the link:
   ˂a onclick="ga('send','event','pdf','click','/catalog.pdf');"
   href="/catalog.pdf"˃Download our catalog˂/a˃
The diagram in Figure 6.5 demonstrates potential event parameters for a video interaction.

Figure 6.5 An event call with Event Category, Event Action, and Event Label.
Note that we have a great deal of flexibility when populating events. In fact, we do not in all instances have to treat event category, action, and label literally. It can be perfectly valid to instead consider these three event parameters (or event arguments) as follows:
- Event Category: A general descriptor for the event.
- Event Action: A more specific descriptor for the event.
- Event Label: The most specific descriptor for the event.
To return to our PDF example, we could capture the catalog download as shown in Figure 6.6.

Figure 6.6 We could opt to record this event with Event Category, Event Action, and Event Label.
Since event label is optional, we could opt to record the PDF name as the event action and omit the label argument, as shown in Figure 6.7.

Figure 6.7 If Event Category and Event Action adequately describe the action, it's valid to omit Event Label, which is optional.
As two more examples of generating events with DOM listeners, you can use onmouseover as below to record a hover over a graphic (or any other visible HTML-element):
   ˂img src="/group-photo.jpg"
   onmouseover="ga('send','event','photo','hover',this.src);" /˃
And let’s say that you’ve just added a suggestion field to a contact form on your website, and that you want GA to record completions of that field. Let’s break down the following code block to understand how we can accomplish this event tracking:
- textarea is the HTML element that can render a wide, multirow field in a form.
- onblur is the DOM listener that fires when a page element loses the cursor (i.e., the user clicks somewhere else on the page or tabs to another field).
- if(this.value.length ˃ 0) is a bit of extra JavaScript logic that tests if the length of the text in the field is greater than zero (that is, if it’s not empty). We don’t want to send an event for every onblur in the textarea—only when the visitor has entered a suggestion.
   ˂textarea name="suggestion" cols="60" rows="10"
   onblur="if(this.value.length ˃ 0)
   {ga('send','event','form','completed','suggestion');}" /˃
Will you need to set up this type of very specific event tracking on a regular basis? Perhaps not, but the previous example illustrates an important point: you can generate GA events for any user interaction on a Web page, and you can build in any front-end logic to determine if the event is recorded.
Later in the chapter, we’ll learn how to use GTM to generate events for many types of user interactions without actually editing the page’s HTML directly.
Don’t Track Every User Interaction
None of the previous discussions are intended to imply that you should track every conceivable interaction between a user and your Web page. If data on image hovers would be useful for design, development, or content decisions (e.g., many users are hovering over the question mark help icon next to the product delivery options in the checkout form, so maybe you need to make that section clearer), it makes sense to track events for that user interaction. It is not, however, recommended to track every cursor movement on every page: you could deplete the GA hit limit for your property and create clutter that obscures the important data. Measure what matters.
To visually overlay user interaction trends on a page, you can possibly refer to the In-Page Analytics report within GA, but this report sometimes does not load correctly. As another option for displaying on-page interactions, you can use a third-party heatmapping tool such as CrazyEgg or HotJar, discussed in Appendix A.
Consistency Is Critical
You may have already noted two fundamental differences between, on the one hand, event tracking and, on the other hand, pageview tracking as implemented through the native tracking snippet or GTM:
- You have to be more specific in dictating the conditions for event firing.
- For events, you’re populating two or more dimensions with your own values; GA does not automatically pull them from the environment.
So you have full power to populate the event values in any way you choose, but with great power comes great responsibility. For your event reporting to be meaningful and usable it’s critical that you adopt a consistent convention for your event category, action, and label values. More specifically, you must take care to avoid the metrics fragmentation as represented in Figure 6.8:
- Don’t use two different values to refer to the same thing, as in play and played in rows 1 and 3.
- Don’t vary case, as in rows 1 and 5.
- Don’t swap the same values between different dimension slots, as in rows 2 and 4.

Figure 6.8 Metrics fragmentation due to inconsistent event naming.
The five rows in the report should have appeared as just two, but there’s no way that we can consolidate retroactively. Right from the start, you must make sure to avoid unnecessary fragmentation when generating event data in GA. There isn’t one right way to name your events; you can adopt whatever convention makes the most sense for you and your organization, but it’s vitally important to adhere to that convention.
Fortunately, as we’ll see a bit further on in the chapter, we can use GTM to enforce consistency in much of our event tracking.
Event Tracking in GTM
To continue our discussion on event consistency, let’s consider a few specific points about the manual event tracking that we demonstrated previously in this chapter.
- You’d need to avoid errors in the code.
- You’d need to maintain consistency in the event category, action, and label parameters.
- It does not take advantage of any extensibility. For instance, you’d need to set up event tracking for each new PDF or outbound link.
So if you were thinking that the previous examples would be cumbersome and hard to manage on anything but a very limited scale, you were right.
Understand Manual Event Tracking, but Avoid It When You Can
It is important to understand the underlying mechanisms behind event tracking as demonstrated in the previous discussions, especially since manual event tracking may be the only option for certain user interactions that we need to record. What we want to do now, however, is take this nuts-and-bolts knowledge of manual event tracking and actually implement most of our events through GTM (and third-party scripts as needed) so the entire process is less invasive, more consistent, better managed, and faster.
Tracking PDF Downloads through GTM
In this example, we’re going to perform the following actions to configure consistent and extensible event tracking for any PDF link on your website:
- Enable the built-in Click URL variable.
- Create a GA tag to generate PDF events.
- Create a trigger that fires the tag on PDF link clicks.
These steps are explained below—they’re all quite straightforward. It’s recommended that you first implement these steps in a test environment as detailed in Chapter 5.
Enable the Click URL Variable
GTM variables, both built-in and custom, offer the ideal combination of flexibility and control. In the case of PDF tracking, the Click URL variable will offer the flexibility of dynamically populating the event label with the filename of the PDF, and the control of consistently retrieving this filename from the href value of the HTML link to the PDF.
GTM offers many built-in variables, but only a few are actually enabled by default. You can enable the Click URL variable by clicking Variables in the left navigation of your container and checking Click URL, as shown in Figure 6.9.

Figure 6.9 The Click URL variable is built into GTM but not enabled by default.
Create a Google Analytics Event Tag
Next step is to set up the actual GA event tag for PDF tracking. The Event tag will be somewhat similar to the GA pageview tag outlined in Chapter 5, “Google Tag Manager,” with some additional considerations:
- Tracking ID. We can reuse the Google Analytics Property ID variable as shown in Figure 6.10, which we first used for basic pageview tracking. (If you’re using a separate GA property for testing, you can specify the corresponding property ID for the event tag, either as a hard value or through a separate variable.)

Figure 6.10 Our PDF event tag uses two static values and one variable.
- Track Type. Select Event.
- Event Category. In most cases, you’ll “hard-code” a static event category—link, in this case.
- Event Action. In many cases, you’ll also hard-code the event action, as we did with pdf in this example.
- Event Label. Because the event label should dynamically pull in the href value of the link to any PDF file, it would make little sense to hard-code the event label. Instead, we just use the Click URL variable enabled in the previous step.
Note that different configurations of this event tag could be equally valid. For instance, we could have used Courier as the Event Category and Click URL as the Event Action and left the Event Label blank, since it’s not obligatory. In either case, we enjoy the consistency of static values and the flexibility of variables wherever either is needed.
As a note, if you need more than three dimensions to adequately describe your event, you can record the event with additional custom dimensions as described in Chapter 12, “Implementation Customizations.”
We selected Enable Display Advertising Features to populate the Demographics and Interests reports, also discussed in Chapter 12. You can leave Event Value blank; it is usually left unpopulated.
Create a Trigger for PDF Clicks: Think in Patterns
As we have learned previously, a tag can be active only if you have applied at least one trigger to it. In plain terms, we want a click on any PDF link to trigger this tag. What is the common pattern that we can identify for these links? The filename always ends in .pdf.
If you are already thinking about using the Click URL variable for the trigger, your instincts are serving you well once again. To create the trigger:
- In the Fire On section of the tag configuration, select Click.
- Create the trigger as shown in Figure 6.11.
- In the Configure Trigger section, select Just Links from the Targets drop-down. (All Elements would also work in this case, but would not allow the checks described in the following step.)
-
The Enable When setting is required when Wait for Tags or Check Validation is selected in section 2. Wait for Tags pauses the execution of the click action until any other GTM tag completes firing, and Check Validation suppresses the click event in case you have scripted the click action to return false under certain conditions. (You can similarly use Check Validation to block a Form Submission trigger if the form fails validation and you have coded the submit action to return false under this condition.)
In most cases, you can use the .* regular expression (that is, a dot followed directly by an asterisk) to match all pages for Enable When. If you have any trouble getting your Event tag to fire when following the debugging procedures outlined below, you can disable Wait for Tags and Check Validation, at least temporarily.
-
In Fire On, you specify the exact conditions that will cause the trigger to fire any associated tags.
If the links to your PDFs include a URL fragment following .pdf, you could instead configure the trigger in Figure 6.11 as Click URL – matches RegEx (ignore case) – ^(.*).pdf instead of using the ends with match. For more on regex, see Regular Expressions in Google Analytics in Chapter 9.

Figure 6.11 This trigger uses the Click URL variable to detect a click on a link that ends with .pdf.
Tracking Other File Types and Offsite Links
Note that you could easily adapt our PDF tracking for clicks to other file types. For instance, to track downloads of Microsoft Excel spreadsheets, you could change the Event Action field in Figure 6.10 to excel-spreadsheet and the trigger in Figure 6.11 to Click URL - ends with - .xlsx.
To track offsite links, you could change the Event Action to offsite-link and configure the two-condition trigger as in Figure 6.12.

Figure 6.12 Two-condition trigger for clicks on offsite links.
Testing the PDF Event Tag
To verify that our event is firing, we’ll use three of the techniques first reviewed in Chapters 4 and 5 and shown again in Figures 6.17, 6.18, and 6.19

Figure 6.17 GTM Preview and Debug mode displays the initial pageview hit and then the event hit when you click the PDF link.

Figure 6.18 The GA Debug extension for Chrome that we first activated to verify pageviews in Chapter 4 can also display the event dimensions.

Figure 6.19 You can access the Real-Time ˃ Events report in GA to verify that the event is firing.
Non-Interaction Events and Bounce
If a visitor lands on your home page and watches a video, does GA consider that session to be a bounce?
As we learned in Chapter 4, a bounce is defined as a single-hit session, so there’s our answer. If a visitor lands on your home page and watches a video, GA does not consider that session to be a bounce, provided that you generate GA events for the video interactions. In this case, the page would generate a pageview hit, and the video would generate an event hit, and so the second hit would classify this session as non-bounce.
But what if the video played automatically 15 seconds after page load? In this case, the video play does not represent an additional user engagement, so the session should still count as a bounce until the visitor deliberately initiates another tracked interaction. You could still track this autoplay video as an event, without inadvertently lowering bounce rate, by selecting True as the Non-Interaction Hit value within the event tag configuration as shown in Figure 6.20.

Figure 6.20 Set Non-Interaction Hit to True only for events that the visitor does not initiate.
Note that it is an exception to set Non-Interaction Hit to true: the overwhelming majority of events do signify user engagement. For these events, leave Non-Interaction Hit set to False so they will rightfully influence bounce rate (and session duration).
Virtual Pageviews
Referring to non-pageview actions that appear in Figures 6.1 and 6.2 and other points earlier in the chapter, it’s important to note that we don’t need to track all of these actions as events. In some cases, we can—or should—opt instead for virtual pageview tracking.
Unlike events, which appear in dedicated Events reports, virtual pageviews are integrated into the Pages report that displays all our physical pageviews. In fact, once we record virtual pageviews, GA considers and represents them the same as physical pageviews.
Notice in Figure 6.21 that we’ve recorded a PDF download as a virtual pageview instead of an event as shown previously in Figure 6.10. Both approaches are equally valid. If you consider a clickthrough to a PDF to be an interaction that is unlike the regular pageviews that occur on your site, especially if you have configured your website to download the PDF instead of opening it directly in the browser, you may decide to track the PDF clicks as events. If, however, you consider the PDF view to be closely akin to a view of a Web page, you may opt instead to track it as a virtual pageview.

Figure 6.21 Virtual pageviews appear integrated with physical pageviews in the Pages report.
So how would we track the PDF click as a virtual pageview instead of an event? Let’s start again with our basic HTML link to the PDF:
˂a href="/catalog.pdf"˃Download our catalog˂/a˃
And let’s also look back to the main GA pageview tracking function first presented in Chapter 4:
ga('send','pageview');
When ga('send','pageview') or a GA tag in GTM executes, the Page dimension value (i.e., the Request URI) sent to GA defaults to the page that visitor is loading in the browser. When we generate a virtual pageview, we’ll use the same function as with the physical pageviews, but we’ll overwrite the default Page/Request URI with whichever value we choose, as in the following code:
   ˂a onclick="ga('send','pageview','/virtual/catalog.pdf');"
   href="/catalog.pdf"˃Download our catalog˂/a˃
As we discussed for event category, action, and label, you should take care to name your virtual pageviews in a way that will facilitate your reporting. Although in no way obligatory, including virtual in the Page value of a virtual pageview will allow easy visibility and filtering of virtual pageviews within the Pages report. Furthermore, if we add /virtual/ at the beginning of the Page value for all virtual pageviews to mimic the top level of a directory structure, we’ll be able to easily create a view filter based on subdirectory to include or exclude all virtual pageviews within /virtual.
What steps would we need to take in GTM to implement virtual pageview tracking for PDF downloads? We’d need to set up a GA Pageview tag, but with settings that differ from the main pageview tracker that we configured in Chapter 5. There a few steps required in the process, which seems a bit involved but is actually quite straightforward and provides some good practice with built-in and user-defined variables. (And if you can complete these steps, you can congratulate yourself for having graduated from elementary to intermediate GTM skills.)
Specifically, we’ll need to record a pageview for a page other than the default. As an option, we can also set a page title. The first step in completing this process is enabling the built-in Click Text as shown in Figure 6.22.
As the next step, we’ll need to create an Auto-Event variable as follows. We can use an Auto-Event variable to retrieve an attribute of a clicked element when a built-in variable won't do the trick. In this case, we're using an Auto-Event variable to read the href value only: /catalog.pdf. We could have used the built-in Click URL attribute, but this actually pulls in the entire click URL, with the domain: http://www.mysite.com/catalog.pdf.
- From the User-Defined Variables section on the bottom of the Variables panel, click New.
- In the Choose Type section, click Auto-Event Variable.
-
Configure the variable to return the href attribute of the clicked link, as shown in Figure 6.23, and click Create Variable.

Figure 6.22 Enabling the built-in Click Text variables.

Figure 6.23 This variable returns the href value of the clicked link.
With our href Attribute variable ready to go, we can configure the virtual pageview tag itself as in Figure 6.24. The More Settings ˃ Fields To Set section of the tag is configured to overwrite two dimensions that a GA tag would otherwise pull directly from the page: page (i.e., request URI) and title.

Figure 6.24 The page setting that overrides the default page URL is what distinguishes a virtual pageview from a regular physical pageview. Here we’re also setting the page title to populate with the text of the clicked link.
Of these two, page is required for a virtual pageview; otherwise, the tag would populate the GA page dimension with that page that you’re linking from instead of the page or resource that you’re linking to. In a previous step, we configured the href Auto-Event variable to return the asset that we’re linking to, and we’ve prepended /virtual as a static string so the virtual pageview will be easier to identify in the Pages report as previously demonstrated in Figure 6.21.
We’re also overriding the default page title with the Click Text variable that we enabled, prepended with Virtual: as a static string.
To fire this virtual pageview, we can save the tag with the same trigger that we used for PDF event tracking as shown previously in Figure 6.11. (We could have also defined our trigger as {{href Attribute}} - ends with - .pdf.) There is no need to maintain a one-to-one relationship between tags and triggers: to a single tag, you can apply multiple triggers, any of which would cause the tag to fire, and you can certainly apply a single trigger to multiple tags.
Once we save our tag, we can validate it the same ways that we tested our event tag earlier in the chapter: Preview and Debug mode in GTM, GA Debug extension for Chrome, and the GA Real-Time reports. Checking the Real-Time ˃ Content report in Figure 6.25, we can see that the page and title dimensions have populated with the variables that we configured in GTM, and that static-text prepends will make it easy to identify the virtual pageviews among the physical pageviews. Both Page and Page Title will be available as primary dimensions in the GA Pages report.
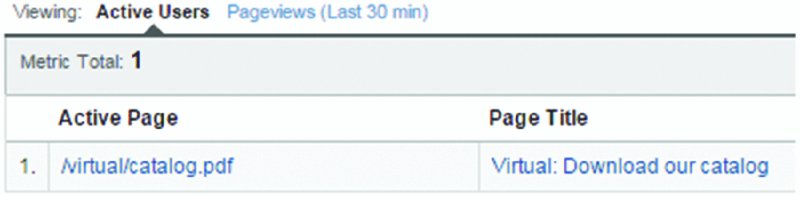
Figure 6.25 The Real-Time ˃ Content report shows that our virtual pageview tag configuration has successfully overwritten the default Page and Title dimensions.
Also note that this virtual pageview tag will work not only for this one link but for all links to .pdf files. As with our event tag, the variables that we use in the virtual pageview tag and associated trigger provide a winning combination of flexibility, extensibility, and consistency.
Virtual Pageviews for Multiple AJAX Screens
As mentioned earlier, virtual pageviews may be more suitable than events for tracking actions that are more akin to physical pageviews. In addition to the previous example of a virtual pageview for PDF clicks, we could also potentially configure tab navigation—especially if each tab displays a lot of its own content—and page scrolls as virtual pageviews. (Scrolling is discussed later in the chapter.)
The preeminent candidate for virtual pageviews, however, is a multiscreen process in which the URL does not change. In the early days of the Web, each new screen that the browser displayed usually required a full round trip to the server and new load of a different page for the screen to refresh.
For some time, however, we have seen the emergence of front-end Web technologies that allow page updates without page loads. This provides a more continuous and fluid end-user experience by avoiding the visible flicker that usually occasions complete page loads.
The HTML5 canvas element (which you can hand-code or now output from development environments such as Flash) and JavaScript libraries such jQuery all allow rich user interactions without page reloads. AJAX (which stands for Asynchronous JavaScript and XML) goes a step further by enabling actual round trips to the Web server (for processing and data transfer) without a page load. Multiscreen, single-URL end-user processes as demonstrated in Figure 6.26 and single-page Web applications are usually implemented in AJAX or a comparable technology.

Figure 6.26 In this multiscreen process, the screens update, but the URL does not change, and the page does not reload.
Apart from the fact that the screen refreshes serve as separate pageviews from a user experience standpoint, there is sometimes another compelling reason to opt for virtual pageviews instead of events: you can use both events and virtual pageviews as the basis for a goal, but you cannot use an event anywhere in a goal funnel. (Chapter 8 provides a detailed discussion of goal and funnel configuration. The Custom Funnel feature for Analytics 360 described in Chapter 18 does allow events as funnel steps.)
Referring again to Figure 6.26, you should ideally track the four-step process as a goal with three funnel steps so you can measure drop-off from screen to screen and begin to optimize for improved conversion rate. If you generate a virtual pageview for each of the steps (after the first step, which GA would record as a physical pageview when the URL first loaded), you’ll be able to configure the screens as funnel steps leading to the thank-you page and view a Funnel Visualization report as in Figure 8.9.
Generating virtual pageviews will be somewhat more challenging for this multistep process than for PDFs, but with the help of some logic and another GTM variable, we’ll devise a good solution.
Create the Lookup Table
As outlined below, we’re going to use the text of each button as the key in a lookup table, from which we’ll pull the page dimension to record for each virtual pageview.
- Create an Auto-Event Variable as in Figure 6.27 to read the value attribute of the button, which appears as the button text. (We can't use the built-in Click Text variable in this case, since the text is not surrounded by an open and close HTML element.)

Figure 6.27 This custom GTM variable reads the value attribute of the button, which appears as the button text.
- As shown in Figure 6.28, configure a lookup table variable that outputs different text values based on the Button Value variable created in the previous step. We can now use the Lookup for Checkout Virtual Pageviews variable as the page field in a virtual pageview tag similar to Figure 6.24.

Figure 6.28 Instead of using the button text directly as the page dimension for the virtual pageview, we’ll use the Button Text variable defined in Figure 6.27 as the input variable in a lookup table and retrieve better page dimension values to populate into our virtual pageviews.
- Create a similar lookup table that also uses Button Text as the input but outputs the page title that we’ll use in our virtual pageview tag.
- Create a GA pageview tag similar to Figure 6.24, but use the two new lookup variables for as the page and title values in the Fields to Set section.
Create the Trigger
Before we configure the trigger, let’s take a look at the HTML for the blue button on the checkout screens.
   ˂input type="button" value="PAYMENT ˃" id="btn1001"
   class="blueButton" /˃
In most cases, your HTML button will contain an ID and/or class attribute, both of which are used primarily for CSS styling but can also identify an HTML element for other purposes. You can use either of the attributes for GTM triggers. (Even without class or ID, you could base your GTM trigger on an Auto-Event variable for the style attribute of the clicked element. In the example below, we’ll use the class attribute.
- Enable the Page Path and Click Classes built-in variables.
- Configure the trigger as in Figure 6.29.

Figure 6.29 The trigger for the multiscreen virtual pageviews specifies conditions for the page path and the class name of the button on the form.
Once you have applied the trigger to your virtual pageview tag, you can test the tag using GTM Preview and Debug mode, GA Debug Chrome extension, and the GA Real-Time reports as described above.
Should You Use Events or Virtual Pageviews?
Referring again to the list of non-pageview interactions at the beginning of this chapter, it’s generally considered standard practice to opt for events in most instances.
A compelling reason to opt for virtual pageviews is if you need to include the interaction anywhere in a goal funnel, as described earlier.
A compelling reason not to opt for virtual pageviews: if your pageview counts are closely monitored or audited and the virtual pageviews could be construed as willful pageview “inflation,” or if for any reason you wish to keep any hits other than physical pageviews out of the Pages report, you should opt for events, which appear in their own reports and do not affect pageview metrics. (As mentioned earlier, if you prefix the page field of your virtual pageviews with /virtual, you’ll be able to easily filter virtual pageviews out of any view by applying a subdirectory filter, while also maintaining an unfiltered view that displays your virtual pageviews. View filters are discussed in Chapter 10.)
Several aspects of events and virtual pageviews are compared in Table 6.2.
Table 6.2 Comparison of Events and Virtual Pageviews
| Events | Virtual Pageviews | |
| Reporting | Appear in dedicated Events reports. | Integrated with physical pageviews in the Pages report; “inflates” pageviews. |
| Parameters passed | Usually described with three parameters: category and action are obligatory, and label is usually used; value is normally omitted, and non-interaction hit is normally left to the false default value. | Page parameter only. |
| Non-interaction | You can configure an event as a non-interaction hit that does not influence bounce rate or session duration. | Always counts as a pageview hit and lowers bounce rate, session duration, and time on page as calculated. |
| Goals and funnels | You can use events as goals, but you can’t build a funnel that leads to an event-based goal, and you can’t use events as funnel steps. (You can use events as part of the Custom Funnels feature in Analytics 360 described in Chapter 18.) | You can use virtual pageviews as goals and funnel steps, and you can build a funnel that leads to a virtual-pageview-based goal. |
Tracking Google Analytics Events through the Google Tag Manager Data Layer and Custom Event Trigger
The event tag that we configured previously in Figure 6.10 and its associated trigger demonstrated two of the basic benefits the GTM provides: rule-based tracking, and variables. Once this tag and trigger are deployed, clicks on any PDF we add to any page will be recorded as events.
A slight disadvantage of this approach, however, is that we need to create a separate tag and trigger for each link type (such as offsite, mailto: or tel:). This is not a big drawback, and it would certainly be manageable to create a dedicated tag and trigger to track each link type as an event. You may have suspected, however, that there is an even more automated approach that will cover multiple file types, as described below.
In the following discussion, we’re going to continue building out our GTM skills by considering three more important GTM concepts:
- Data layer. You can use the data layer page object to store variables (in the form of name: value pairs, such as 'eventCat':'Outbound links') that you can then read into your tags.
- DOM Ready trigger. We first learned about this trigger in Chapter 5, and we’ll see it in action in the following example.
- Custom Event trigger. This special trigger is activated when the data layer is populated with an event variable—the actual name of the data layer variable is event.
We’re also going to be configuring a GA event tag that reads the event category, action, and label from the data layer and is triggered by the special event variable in the data layer.
Tracking Blog Comments as Events
Using the same principles that we discussed in the event autotracker setup above, you could generate an event each time a visitor submits a comment on your blog.
Let’s say that the HTML for your comment box and submit button is written basically as follows:
   ˂textarea id="comment" /˃
   ˂input type="submit" id="submitButton" value="Post Comment" /˃
You could place the code in Listing 6.1 in a GTM Custom HTML tag and apply the DOM Ready trigger to the tab. This tag will then wait until the page is fully parsed before adding an onclick handler to the comment submit button that will populate the data layer with the event category, action, and label values. Our GTM event tag shown previously in Figure 6.31 will be triggered when the eventTracker event value is written to the data layer, and the tag will read in event category, action, and label values using data layer variables. Note that we’ll populate the data layer only if the textarea is not empty, and that we’ll write the first 200 characters of the comment as the event label. (Length of the event label dimension in GA is limited to 500 bytes, which should equate to nearly 500 characters, unless the event label includes many non-ASCII characters.)
Tracking Page Scroll and Video Embeds
Scrolling and video plays are among the important user actions that are not tracked by default. Scroll tracking is especially useful for blogs and content-focused websites, on which it’s more critical to understand user engagement with the page itself rather than specific conversion steps. Below we look at two script resources that can respectively help you track scrolling and interactions with embedded YouTube videos.
For YouTube embeds, you could also opt to code your own solution using the YouTube Player API. Other video hosting providers, such as Vimeo and Wistia, offer direct integrations into your GA property or similar APIs that you can use to listen on the back end for video interactions and generate corresponding GA events. If you’re in the process of choosing a video host, be sure to verify the provision for GA tracking before you make the decision and enter into an agreement.
Using Events to Track Navigation
As a specialized and potentially very useful application of event tracking, you can populate an event category, action, and label to track each navigation click hierarchically and individually.
For instance, to track a click on the Office Renovation link under the Services menu in the top navigation of your remodeling company’s website, you could populate the event into the data layer as shown in Listing 6.2.
Note that we’re basically generating the event the same way as in the previous event autotracker and blog comment examples: in the data layer, we write event category, action, and label values that GA will read into the event tag using the data layer variables that we have also configured, and we also write the specialized event value, which does not relate directly to GA events but that we can use in a GTM Custom Event trigger (for any type of tag). A difference in this navigation example is that we’re setting the onclick handler directly in the HTML, but we could have instead used jQuery within GTM Custom HTML tags as in the previous examples; the jQuery approach, however, might be less practical due to the large number of navigation links.
You would need to work with your developers to add the data layer code to each link in your navigation. The initial code changes would likely require a good bit of time and manual effort, but you would then be able to view your navigation data more easily in the Events and Pages reports (with secondary dimensions applied as needed, as illustrated in Figure 6.36) and in custom reports as described in Chapter 11, “Dashboards, Custom Reports, and Intelligence Alerts.”

Figure 6.36 Top Events report, with Page applied as secondary dimension, displaying the navigation data that we’re populating into the data layer. You could drill down to Event Action and Event Label to show more granular navigation details.
Tracking Social Interactions
Figure 6.1 includes two types of social actions that we may need to track in GA:
- Social connect/follow actions. Likes or follows of your organization’s social profiles.
- Social content actions. Likes, shares, or tweets of your content.
We can track either of these types of social actions as either events or the more specialized social hit. Either approach is valid. Let’s first consider social connects/follows.
Social Connects
The simplest way to record social connect actions (or, more precisely, clickthroughs to your social profiles after which the visitor, ideally, completes the connect action) would be to track them as offsite link events as discussed earlier in the chapter. You might, however, choose to track social profile clickthroughs separately from other, more general offsite links.
To track social connects within a separate event category, let’s look at a simple example for tracking likes of your company’s Facebook page.
Let’s say that you have a link in your Web page footer to https://www.facebook.com/mycompany.
You could set up a dedicated event tag as follows:
- Category: social-profile.
- Action: like (or like-facebook-page, to distinguish from content likes).
- Label: facebook-page.
- Trigger: Click - Just Links - Enable When url matches Regex .* - Click URL equals https://www.facebook.com/mycompany.
As another option, however, you could choose to track a social follow (or a social content action) with Track Type set to Social as in Figure 6.37. Setting the Track Type to Social populates the data into the Social ˃ Plugins report rather than the Event reports.

Figure 6.37 A Google Analytics tag in Google Tag Manager with Track Type set to Social populates the Social ˃ Plugins report.
Note that the Action Target parameter is optional. If not specified, it defaults to the URL of your current Web page. The purpose of Action Target is to indicate the asset that received the social attention, so in many cases, it’s fine to leave the default. In this case, we have specified facebook-page to indicate that the target of the social action was your Facebook page itself rather than the Web page from which the Facebook click originated. (And we could always apply Page as a secondary dimension in the Social Plugins report to view the originating page.)
We’ll set the trigger for this tag to Click URL equals https://www.facebook.com/mycompany.
You may have observed that neither of these two preceding approaches is particularly efficient, since both would require you to set up a separate tag and trigger for each of your social profile links. That said, four or five additional GTM tags and triggers to track your social profile clickthroughs would not be unreasonable to configure and manage. (As a note, you could house all your social tags within a single GTM folder for better organization.)
The event autotracker example discussed earlier in the chapter provides a more streamlined solution to tracking your social profile clickthroughs as events. If you wanted to generate social hits instead of event hits for the social profile clickthroughs, you or your developer could adapt the script to populate the data layer with the following values:
- event: socialTrigger
- socialNetwork: facebook
- socialAction: like (or like-facebook-page)
You would populate the data layer in the same way for your other social profile links, and you would then need to set up corresponding data layer variables to populate the Network and Action fields in the GTM tag.
We’ll use the data layer event value for our trigger. As mentioned previously in the chapter, event serves as a specially designated data layer variable that activates a Custom Event trigger once the variable is populated into the data layer. Again, the event variable in the data layer does not correspond directly to a GA event; in the current example, we’re using the data layer event value as the trigger for a GA social hit.
To summarize, there are three basic options for tracking social connect/follow links:
- Track the same way as other offsite links events.
- Track as events, but within a separate category.
- Track as social hits.
The latter two options offer the slight advantage for separating social connects/follows from other outbound link events.
Social Content Actions
We also have the option of tracking content shares and content likes as events or social hits. In the example below, we’ll track Facebook likes of a page on our website as social hits by populating event, social network, and social action variables into the data layer. Unlike the preceding social follow examples, we’ll take advantage of a callback option to send our social hit only after confirming that the visitor has logged into the social network and completed the social content action: we won’t have to just assume that the social action was completed.
Listeners and Callback Functions
Let’s say that on your blog pages, you have the social content action buttons for Google Plus, Facebook, Twitter, LinkedIn, and Pinterest. To record the social hit only when the user has completed Facebook content like or a tweet, we’ll bind a callback function to the listeners that Facebook and Twitter provide. The listener executes the callback function once the user has actually signed into the social network and completed the like or the tweet.
The callback is not related directly to GTM or GA; you could execute any JavaScript code as your callback function. In our case, we’ll write variable values to the GTM data layer that we can read into a GA social hit tag.
Since callback is not available for LinkedIn and Pinterest, we’ll set up tags with triggers based directly on the click action.
For Google Plus, you don’t need to add any code to generate a social hit. For any site that is tracked with GA, +1 actions will be recorded automatically (on callback) in the Social Plugins report. (+1 actions for your organization’s Google Plus page would not be recorded automatically; you’d still need to track this action using one of the options outlined above for tracking social follows.)
The fact that Google Plus content actions are tracked automatically in the Social Plugins report provides an incentive for us to track our other social content actions as social hits and not as events; in this way, all of our social content actions would be consolidated in the Social Plugins report.
Let’s begin by setting up the callback for Facebook likes:
- Create a Custom HTML tag for each listener/callback, as shown for Facebook in Figure 6.38. To each of these tags, we can apply the same DOM Ready trigger as in the event autotracker example earlier in the chapter to make sure the page is fully parsed before the listeners attempt to bind.

Figure 6.38 You can create this Custom HTML tag to set up the listener and callback for Facebook content likes.
- Create a Data Layer variable for each of the values (except event) that we populate into the data layer.
- Create a single GA tag with Track Type Social that reads in the Data Layer variables as shown in Figure 6.39.
- For the GA social tag created in step 3, apply a Custom Event trigger with Event Name set to socialTrigger (or whichever event value you populate to the data layer).

Figure 6.39 This Google Analytics social tag reads the values that we wrote to the GTM data layer from Facebook and Twitter callback functions as well as LinkedIn and Pinterest click actions.
Note the Facebook callback does not respond to share actions. You may be able to work with the Facebook SDK to create a share callback, or you can directly track clicks on the Facebook share button by applying a trigger based the Click Classes or Click ID variables, similarly to the approach described below for LinkedIn and Pinterest content action tracking.
Using the snippets in Listing 6.3, you can create a similar Custom HTML tag for tweet callbacks. Please note that the social networks may update these snippets periodically, so it’s advisable to refer to their developer resources for the most current version of each script.
The LinkedIn data-onsuccess callback attribute no longer seems to be operational, and Pinterest does not offer a listener for callback. For LinkedIn shares and Pinterest pins, Listing 6.4 demonstrates scripts that will write GA data to the data layer as soon as the user clicks on the respective social button (with the assumption that most users actually complete the social action).
We can begin to configure the GTM trigger by choosing Inspect Element (not View Source) from the right-click/context menu for the LinkedIn share button to display the source HTML, and then following the procedure below:
˂a id="li_ui_li_gen_1439046400859_0-link" href="javascript:void(0);"˃
- Enable the built-in Click ID variable.
- Create a new trigger.
- Under Choose Event on the trigger setup screen, click Click.
- Select Just Links from the Targets drop-down.
- Configure the remaining settings as shown previously in Figure 6.39.
For Pinterest pins, we can basically follow the same procedure demonstrated in Listing 6.4 and Figure 6.39. Apart from the Pinterest-related values that we write to the data layer, the main difference will be in the trigger, which we’ll configure based on class value instead of ID value. The tag below seems hard to parse, but we can easily enable the built-in Click Classes variable and specify Fire On as Click Classes contains pin_it_button.
   ˂a data-pin-href="http://www.pinterest.com/pin/create/button/"
   data-pin-log="button_pinit_bookmarklet" class="PIN_1439052112077_
   pin_it_button_28 PIN_1439052112077_pin_it_button_en_28_red
   PIN_1439052112077_pin_it_button_inline_28 PIN_1439052112077_pin_
   it_none_28" data-pin-config="none"˃˂span class="PIN_1439052112077_
   hidden" id="PIN_1439052112077_pin_count_0"˃˂/span˃˂/a˃
As mentioned above, the Facebook Share button does not invoke the callback function. Facebook Share is identical for Facebook Like in terms of HTML and class name:
   ˂span class="pluginButtonLabel"˃Like˂/span˃
   ˂span class="pluginButtonLabel"˃Share˂/span˃
So how could we isolate the Share button as a trigger? We could not use the Click Classes built-in variable: this could only match both Like and Share. Instead, we'll make sure that the built-in Click Text variable is enabled as in Figure 6.22. We'll then configure a click trigger as in Figure 6.41 to fire the script in Listing 6.5 included in a Custom HTML tag.

Figure 6.41 This trigger is using the built-in Click Text variable to isolate the Facebook Share button.
Distinguishing between Social Connects and Content Actions
In instances where a social action (such as like for Facebook or +1 for Google Plus) could equally represent a social connect or a social content action, you can instead populate more specific values as shown in Table 6.3. The separate values would be even more useful if you’re recording both types of actions as social hits (i.e., neither type as event) so you could readily distinguish social connects from social content actions in the Social Plugins report.
Table 6.3 Recommendations for Social Action Values to Distinguish between Connects and Shares
| Social Network | Connect Action | Content Action |
| like-facebook-page | like-content | |
| follow | tweet | |
| Google Plus | plus-one-or-circle | +1 (automatic) |
| connect | share | |
| follow | pin |
6.6.4 Social Plugins Report
GA populates the Social ˃ Plugins report with any GA hits generated from GTM with Track Type set to Social. [The native equivalent ga('send','social',network, action,target) also populates the Plugins report.]
As the Plugins report in Figure 6.42 demonstrates, the Social Source dimension corresponds to the social network value that you provide in the social hit, and Social Entity corresponds to the social target value. By using specific action values as listed in Table 6.3, we can easily distinguish between follow and share actions, even without Social Entity selected as the secondary dimension.

Figure 6.42 The Plugins report is populated with social hits.
Google Analytics Tracking for Social Widgets
Some widgets such as ShareThis or WordPress plugins such as Sharrre that allow you to add social sharing buttons to your Web pages offer built-in or easily configurable GA integration. (ShareThis populates social sharing data into the Events reports; Sharrre populates Social Plugins.) You can review documentation or check with support for additional details. If you do opt for a social widget instead of adding social buttons manually, it’s advisable to choose a widget that integrates easily with GA.
Error Tracking
GA and GTM can track several different types of errors on your Web pages:
- 404 errors (page not found)
- 500 errors (server errors, such as uncaught exceptions in a database operation)
- JavaScript errors (script errors that occur in the browser environment)
Tracking 404 and 500 Errors
Our error tracking strategy for 404 and 500 errors will depend on the URLs and titles of the error pages. In all cases, however, we’ll aim to record the error state as a pageview, either physical or virtual, so we can more easily isolate the referring pages that contain the bad links.
As a prerequisite, make sure that your error pages include the GTM container code so GA pageview tracking is occurring as on all other pages.
Error Indicated in URL
If the URLs of your error pages directly indicate the error as follows, you don’t have to take any additional steps for basic error tracking:
   http://www.mysite.com/404/y2k-update.aspx


   http://www.mysite.com/505-error/quote-results
With URLs such as these, you’ll be able to readily spot the errors as regular physical pageviews within the Pages report and perform the additional analytics and alert steps below.
Error Indicated in Title but Not URL
Many websites indicate 404 or 500 errors through text in the page title such as Page Not Found or 404, as in Figure 6.43.

Figure 6.43 Similarly to many websites, the page title indicates a request for a nonexisting page on the London Times.
To view the URLs corresponding to the error page titles, we could apply Page Title as a secondary dimension in the Pages report and filter for the error text as in Figure 6.44.

Figure 6.44 With Page Title selected as the secondary dimension and filtered, we can list the invalid page requests.
Error Not Indicated in URL or Title
Some Web servers are designed or configured to display a 404 or 500 error page as warranted but do not include an error indicator in either the URL or the page title. In this case, you or your Web developer will need to edit the 404 and 500 pages to provide GTM with some type of error indicator. You can do a great deal with GTM variables, but you do need the right inputs to start with.
A simple approach would be to add an event value to the data layer as shown in Listing 6.6.
Note that you are not placing this code into a GTM tag; you’ll instead need to include this code directly in the source of the page, before the GTM container code (so when GTM is processing all tags and triggers for the page, the data layer is already populated with the event value).
To add an error indicator to the URL that you’ll be able to view and filter in the GA Pages report, you’ll create alternate pageview tags that will fire only when the 404-error or 500-error value is present in the data layer.
To summarize the procedure:
- Write a 404-error and 500-error event value (or whichever values you choose—any text string will work) to the data layer higher in the 404 and 500 error pages than the GTM container code, as shown in Listing 6.6.
- Create two Custom JavaScript variables in GTM that respectively prepend /404-page-not-found or /500-server-error (or whichever text you prefer as an error indicator) to the URL path, as shown in Figure 6.45 Note that you should not use the built-in Page Path variable in this case, since it would exclude the ? symbol and any characters following in the URL.
- Create Custom JavaScript variables that also prepend error indicators to the page titles. (The DOM notation for the page title is document.title.)
- Create two GA pageview tags that use the path and title variables created in the previous steps as shown in Figure 6.46.
- To the two tags created in step 4, apply Custom Event triggers based on the 404-error and 500-error event values in the data layer similarly to Figure 6.47.
- Block your main GA pageview tracker when either of the error triggers is activated (to avoid double pageview tracking), as in Figure 6.47.

Figure 6.45 This Custom JavaScript variable prepends an error indicator to the document path.

Figure 6.46 Instead of generating a regular GA pageview on our error pages, we’ll trigger a pageview tag that overwrites that default page and title values with the error prepends.

Figure 6.47 Add the 404 and 500 triggers as exceptions to the main GA pageview tracker to avoid double pageview counting.
View Referring Pages in the Navigation Summary
In all of the cases above, the error indicator will appear in the Pages report directly as the Page dimension and/or as the Page Title dimension. Once you’ve filtered for your bad page requests, you can then use the Navigation Summary shown in Figure 2.9 to determine which internal pages are calling the bad URLs.
To identify external referrals to bad URLs, you could apply Source/Medium, Campaign, or Full Referral as a secondary dimension in the Landing Pages report, as shown in Figure 6.48.

Figure 6.48 By sorting the Landing Pages report for your error identifier and applying Full Referral as a secondary dimension, you can see the external origins of bad requests.
Tracking Errors as Events
As an alternative or an addition to the error tracking options outlined above, you could track your errors as GA events, populating the event dimensions as follows:
- Event Category: error
- Event Action: 404 or 500
-
Event Label: {{Page URL}}
Your trigger would depend on which of three URL/title scenarios above apply:
- Error indicated in URL. Configure trigger as {{Page Path}} contains 404 or 505 (or whichever text you have used).
- Error indicated in title. Set up a Custom JavaScript variable that returns document .title, and configure trigger as {{Document Title}} contains Page Not Found or Server Error (or whichever text appears in the title HTML tag of the error pages).
- Error not indicated in URL or title. Apply a Custom Event trigger based on an event variable that you have written to the data layer as shown in Listing 6.6.
Intelligence Alerts for Errors
Errors are logical candidates for custom intelligence alerts. In Chapter 11, we configure GA to send us a proactive email or text notification when our website or app reaches a specific error threshold.
Crawl Errors in Google Search Console
In addition to setting up error tracking in GA, it’s recommended that you gain access (through validation or user addition) to Google Search Console, where you can view the Crawl Errors report. This report displays errors that Googlebot has experienced in crawling your Web pages, from either internal or external referring pages.
The Crawl Errors report, however, does not indicate how frequently actual users tried to access the problematic URLs, and it does not include errors for pages that reside behind a login and are therefore blocked from search engine spidering. GA can fulfill these two aspects of error reporting.
Chapter 14 reviews Google Search Console in greater detail.
Tracking JavaScript Errors
Google Tag Manager provides a built-in JavaScript error trigger and built-in JavaScript error variables that you can use to record JavaScript errors in GA, as outlined in the following procedure:
- Enable the built-in JavaScript error trigger as shown in Figure 6.49.
- Enable the built-in Error Message, Error URL, and Error Line variables as shown in Figure 6.50.
- Configure a GA event tag similarly to Figure 6.51. Be sure to set Non-Interaction Events to False so error tracking does not artificially lower bounce rate.
- Apply the JavaScript error trigger to the event tag.

Figure 6.49 Enabling the built-in JavaScript error trigger.

Figure 6.50 Enabling the built-in JavaScript error variables.

Figure 6.51 The GA event tag is configured with the JavaScript error variables enabled in Figure 6.50. Apply the trigger configured in Figure 6.49 to this tag.
Confer with your developers as you configure JavaScript error tracking in GTM.
Viewing JavaScript Errors in the Events Reports
Let’s say that you have added a mouseover script (natively or through GTM) to an image that is supposed to display a popup, but you have misspelled the JavaScript function that you’re trying to call:
˂img src="/images/starburst.png" onmouseover="specailOffer()" /˃
If you have configured JavaScript error tracking as shown above, the error would appear in the Top Events report as shown in Figure 6.52.

Figure 6.52 JavaScript error listed in the Top Events report.
Note that the JavaScript Error trigger can fire for a user interaction or a script that appears after the GTM container in the page, but it cannot fire for any JavaScript errors that occur before the GTM container, namely, JavaScript errors within the ˂head˃ and ˂/head˃ tags.
The error trigger can activate for errors within JavaScript that you have deployed in a Custom HTML tag through GTM. The only small caveat is that the line number for the JavaScript error in your Custom HTML tag is reported relative to the tag and not to the entire page, such that the error line number would appear as 3 if the error occurs on the third line of your Custom HTML tag.
 Key Takeaways
A click does nothing. By default, GA does not record a click action per se; it records a pageview hit only if the click loads another page on your site that contains GA pageview tracking.
Opt for events or virtual pageviews. For the many important user actions that are not tracked by default, you can opt for event or virtual pageview tracking.
Virtual pageviews for multiscreen processes. The most suitable option for most untracked user actions is event tracking, but you might want to opt for virtual pageview tracking when the action is more akin to a physical pageview, as is the case in a multiscreen AJAX process in which the URL does not change.
Events as goals but not funnels. You can use events as goals but not as a part of a funnel process. To include an untracked user action in any step of a funnel, track the action as a virtual pageview rather than an event.
Events appear in dedicated reports. Events appear in their own reports, while virtual pageviews are integrated in the Pages report and serve otherwise as physical pageviews in GA. If there is any concern about pageview “inflation” due to virtual pageviews, opt for event tracking rather than virtual pageview tracking, or be sure to begin the Page dimension for your virtual pageviews with /virtual so you can easily apply a view filter to exclude your virtual pageviews as a subdirectory.
Be consistent in event naming. Events require the event category and event action arguments, and usually include an event label argument as well. To avoid fragmentation of your event data, choose a consistent naming convention. GTM can greatly help you maintain consistency in your event naming.
Auto-Event variable for clicked element. You can configure a GTM Auto-Event variable to read an attribute of a clicked element when the built-in GTM Click variables are not suitable.
Distinguish between social connect and social content actions. When recording social actions, it’s advisable to use different action arguments so your reports can readily distinguish between connect and content actions.
Record social actions as either event hits or social hits. It’s valid to record social actions as either GA event hits or GA social hits. If you record social hits, the data appears in the Social ˃ Plugins report. Because Google +1 actions are automatically recorded as social hits, you may also decide to record your other social content actions as social hits so all social tracking is consolidated in the Social Plugins report.
Twitter and Facebook provide callbacks. You can track tweets and Facebook content likes through callback functions that execute only when the user has logged into the social network and completed the action.
Check 404 and 500 errors in URL or title. Many Web servers indicate 404 and 500 errors directly in the page URL or title. If your 404 or 500 error pages do not contain an error indicator in the URL or title, you can manually add a data layer event variable to the pages that you can then use to prepend an error indicator to the page and title dimensions in a virtual pageview, or to trigger an event.
Track JavaScript errors. You can use built-in variables and the built-in trigger to track JavaScript errors through GTM, but this approach will not record errors in JavaScript that is embedded natively into your page and that executes immediately on page load.
 Actions and Exercises
- Take inventory of all untracked user interactions. Assess all important user interactions that are not currently tracked. Decide if you will track each action as an event or a virtual pageview.
- Establish a naming convention. Provide consistent, hierarchical naming for your event categories, actions, and labels.
- Set up event tracking for a single link type. As a proof of concept, set up event tracking for .pdf links, external links, and so on. When creating new tags, follow one of the testing scenarios outlined in GTM Environments in Chapter 5.
- Set up virtual pageview tracking for a single link type. As a proof of concept, set up virtual pageview tracking for links to PDFs or another file type.
- Configure the event autotracker. Create the tags, variables, and triggers required for the event autotracker, as outlined in this chapter. This will provide event tracking for outbound links, links to PDFs and other file types, mailto: links, tel: links, and—as a separate category—social follow links. Once you install the event autotracker, you can remove the tags for individual link tracking that you set up in steps 3 and 4.
- Configure social tracking. If you’re using the event autotracker, the social follow actions will already be tracked. If you’re not using the event autotracker, create a plan for tracking your social follow actions. In either case, create a plan for tracking your social content actions.
- Assess 404 and 500 error tracking. If there is an error indicator in the URL and or page title of your 404 and 500 error pages, you can track these errors in GA without further setup (as long as the pages execute basic GA pageview tracking). If neither the URL nor the title indicates an error, write an event variable to the data layer that you can use as a trigger to fire an alternate pageview tag; you can configure this tag to add an error indicator to the page and title dimensions. You can additionally opt to track 404 and 500 errors as GA events.
- Set up JavaScript error tracking. Using the built-in trigger and built-in variables, set up JavaScript error tracking in GTM.
- Download the container export and sample pages. From www.e-nor.com/gabook, download the GTM container export and the sample pages. You can create a new GTM container and select Import Container under in the GTM Admin screen to import the tags, triggers, and variables. If you have a test Web server to which you can upload pages, you can update the pages to use your container code, upload the pages, and then test out the configuration of the imported GTM container.