
9
View Settings, View Filters, and Access Rights
In this chapter, we’re going to learn about the settings and view filters that you can apply to the raw, unfiltered property to modify, consolidate, or completely rewrite the incoming data and to create focused subsets of the data.
Since you may want to provide certain individuals with access only to the subsets of your data rather than to all data that you collect in the property, we’re also going to discuss Google Analytics (GA) access rights at the account, property, and view level.
Why Do We Need Multiple Views?
In Chapter 4, “Account Creation and Tracking Code Installation,” we learned that:
- A GA property normally corresponds to a single website or mobile app.
- Data collection is associated with a specific property ID (also called a tracking ID or UA number), and website and mobile app data therefore flows into GA at the property level (rather than at the account level).
Since data collection occurs at the property level, we might at first wonder why we need multiple views at all, but, as we learn some of the basic concepts behind views, we soon realize the critical role played by the view level of the account hierarchy.
As demonstrated in Figure 9.1, views allow us to alter the raw, underlying property data in the following ways:
- Data cleanup and consolidation. Exclude your own internal website traffic from tracking, consolidate URLs and case variations, and rewrite any dimension value.
- Configuration for additional metrics. Configure goals and site search.
- Data subsets. Create subsets of the raw data by including or excluding a subdirectory, a geographical area, or another type of dimension value. As discussed later in the chapter, you can take advantage of dedicated views and restricted privileges to selectively control access to specific portions of your GA data.

Figure 9.1 In Google Analytics, a view is a representation of property data that has been processed with different settings and filters.
The same principles apply for views within a mobile app property, but some of the potential view settings and filters, such as URL consolidation and site search configuration, would not pertain.
Best Practice: Working, Test, and Unfiltered Views
When you create a new account, or just a new property within an existing account, GA automatically creates a single view called All Web Site Data or All App Data within the property. It’s considered best practice to perform at least some data cleanup on your raw property in your working views, and it’s also considered best practice—or rather a critical precaution—to try view settings and filters in a test view before applying to a main working view. If you’re applying view settings and filters to any view, it’s also imperative to maintain a raw view to which you apply no view settings or filters.
To create a new view, you only need to select Create New View from the view drop-down on the Admin screen as shown in Figure 9.2. You can rename All Web Site Data or All App Data to 01 Working, 01 Main, or *Main, as a few examples, to keep that view at the top of the list. There’s not a single correct convention for view naming, so name them as makes senses for you and your organization.

Figure 9.2 As an essential practice for Google Analytics, you should maintain a test view, an unfiltered view, and one or more working views for each property.
Note that you need Edit access at the view level to change any view settings and Edit access at the property level to create a new view.
View Settings
Several of the view settings rewrite or exclude data that’s delivered in the raw property feed. In this way, they are very similar to the actual rewrite and exclude filters that we’ll examine later in the chapter. As a specialized setting, site search tracking is also configured at the view level.
Before we explore the view settings highlighted in Figure 9.3, here are a few quick notes on some of the more administrative view settings:
- Name. For your first three views (main, test, and backup), the names shown above are suitable; you can name additional views to describe the filtering or configuration that you have applied (e.g., North America Only).
- Website’s URL. Inherited from the property; you can leave this as is.
- Time Zone Country or Territory. As best practice, match the time zone in any AdWords accounts that you have linked to the property so reporting by hour of day is aligned as much as possible.
- Currency Displayed As. Determines only the currency symbol displayed for Ecommerce revenue, goal value, and so on.

Figure 9.3 Example view settings.
Default Page
Does the top page in your Pages report appear as a single forward slash? We may recognize / as the home page, but you can rewrite / into a more meaningful Page dimension value.
Before you specify the default page in the view settings, you need to check your reports to determine which one of two scenarios pertains to your Pages report:
- Rewriting and consolidation. If your home page is accessible to visitors as both / and /default.aspx, and therefore appears in the Pages report as either of these two dimension values as in Figure 9.4, specify default.aspx (without the forward slash) as the default page in the view settings. This will rewrite all instances of / to /default.aspx and thereby consolidate the reporting with all other instances of /default.aspx that were recorded with the pageview. (We’ll address the case variations in our upcoming discussion on view filters.)
- Rewriting only. Many websites are configured to redirect the default home page (such as index.html, index.php, default.aspx, etc.) to just the domain, such that users who may attempt to access http://www.yoursite.com/index.php are redirected to http://www.yoursite.com, which would generate a pageview for /. If this is the case—that is, you have no instances of index.html, index.php, or default.aspx already recorded as the Page in GA—you can rewrite / to any value you choose. You could, for example, specify home as the default page, which would rewrite all instances of / to /home.

Figure 9.4 Because these three Page dimension values represent the same actual page, they fragment the metrics in the Pages report.
A bit surprisingly, the Default Page setting applies not just to / but to all pages that end with /. If you specify home as the Default Page, all URLs that end in / will also be rewritten, such that /topics/ would be rewritten as /topics/home.
If you don’t see / in your Pages report, and if none of your Page dimension values end in /, you can disregard the Default Page setting.
Exclude URL Query Parameters
It’s easy to misconstrue the name of this setting. It does not serve to exclude URL query parameters in the sense of blocking data from the view (as an actual exclude view filter would); instead, it removes URL query parameters from multiple URL variations and consolidates them into a single Request URI. We can thus think of Exclude URL Query Parameters as Strip URL Query Parameters.
This setting does not apply to all websites. If you do not use any query parameters in your URLs, this setting does not pertain to you. (You still may have fragmented request URIs, but if the fragmentation is not caused by name=value query parameters as shown below, you’ll instead need to apply a rewrite filter as described later in the chapter.)
Also, if your URL parameters do determine significantly different page content and therefore a different end-user experience, you certainly do not want to remove and consolidate. Let’s say, for example, that you have the following two URLs on your learn-how-to-paint website:
- /article.jsp?id=123 (about brushstrokes)
- /article.jsp?id=456 (about oil paint)
Since, in this case, the id query parameter dictates different page content, we definitely would not want to strip it out of the URL. If we chose, we could rewrite each URL to a more human-readable format using a view rewrite filter, or we could rewrite the URLs in Google Tag Manager (GTM) before even sending the hit to GA, but we’d certainly want to maintain two separate URLs in GA for these two different page experiences.
Here’s where the URL Query parameters become a problem: when they don’t change any of page content, or do not change the page content significantly enough for the URLs to be analyzed separately. Let’s say that after a user logs into your website, a sessionid parameter is added to the URL as follows:
- /account-settings/?sessionid=123 (“Hello, Nigel”)
- /account-settings/?sessionid=456 (“Hello, Sandra”)
The sessionid parameter is not in any way a bad thing from a Web coding standpoint; it allows each page to display a personalized welcome message in the top navigation. The problem from a GA standpoint is that we don’t need to know if the account settings page showed a greeting for Nigel or Sandra; we only need to know that the account setting page was accessed in these two sessions. Therefore, it’s not useful—in fact, it’s a serious hindrance for analysis—to have multiple URLs for the same content and user experience. (However, as we discuss in Chapter 12, we do want to use custom dimensions to distinguish between authenticated and unauthenticated sessions and to record additional, non-PII data from the back end about authenticated users, such as customer level.)
This is where the Exclude URL Query Parameters setting comes in. By listing sessionid and any other parameters that do not determine different page content and create Page fragmentation as illustrated in Figure 9.5, GA strips the query parameter—actually, the entire name=value pair—from the URL, thus consolidating pageviews and all other page-related metrics, as you can see in Figure 9.6.

Figure 9.5 Without consolidation of Pages through Exclude URL Query Parameters, the unfiltered view for this website shows 21,679 Page (aka Request URI) variations.

Figure 9.6 By specifying Exclude URL Query Parameters, we have consolidated the 21,679 Request URI variations in Figure 9.5 down to just 51, with the same number of total pageviews in both cases.
Exclude URL Query Parameters for PII Blocking
In Chapter 4, “Account Creation and Tracking Code Installation,” Brian Clifton’s top 10 gotchas included a strategy for detecting and preventing personally identifiable information (PII) in GA. If PII is sent to GA following a query parameter such as name, lname, fname, email, address, tel, or mobile, you can list these parameters in Exclude URL Query Parameters. You’ll not only be removing PII; you’ll also be consolidating your Request URIs.
Site Search Tracking
We first saw the Search Terms report in Figure 2.19. This report provides explicit data and unique insights on what your visitors are searching for. None of the Site Search reports are populated by default. In the Site Search Tracking view settings, you can tell GA which URL query parameter signifies a search results page.
If, for instance, we were configuring site search in a GA implementation for amazon.com, our first step would be to perform a search and inspect the URL of the search results page, as in the following example of a search for big query:
http://www.amazon.com/s/ref=nb_sb_noss_1?url=search-alias%3Dstripbooks&field-keywords=big+queryWe can start by identifying the ? and & symbols—the ? demarcates the query string from the domain and path portions of the URL, and the & symbols demarcate the query parameter name=value pairs from each other. Here we can see that field-keywords is the query parameter we’d need to specify in the Site Search view setting.
The URL of the search results page for economy on the Chicago Tribune website readily indicates that we’d need to specify Query as the Site Search Query parameter.
http://www.chicagotribune.com/search/dispatcher.front?Query=economy&target=all&spell=onIf your site search includes a category option that is displayed in the URL as a separate name=value pair, you can configure the Site Search Category parameter in addition to the Site Search Query parameter. (Site Search Category is available as a primary dimension in the Search Terms reports and as a secondary dimension throughout GA.)
Note that we can use the Site Search Query parameter setting only if the search page URL includes the search parameter as the name and the search term as the value in a name=value pair. If the search term appears in the URL in another format, we’ll instead need to use a view filter as shown in Figure 9.12.
Bot Filtering
You can select the checkbox under Bot Filtering, shown previously in Figure 9.3, to remove all GA data generated by bots and spiders that have been compiled into the frequently updated IAB/ABC International Spiders & Bots List.
While many bots and filters cannot execute JavaScript, others can, and can therefore execute the GA tracking code and send hits to GA. Bot Filtering removes this data from the view.
Some bots and spiders are perfectly legitimate, and some not. While search engines and site monitoring bots serve aboveboard purposes, other bots operate illicitly. The most grievous bot and spider transgressions occur on publishing sites that run CPM (i.e., cost per thousand impressions) advertising: in some cases, bots are thought to represent one-third of the activity on a website, thus inflating pageview counts, benefitting the ad networks and the publishers, and costing the advertiser money for ad “impressions” that were never seen by human eyes.
In this way, bot and spider activity may account for a significant portion of your Web analytics data. On other websites, they have minimal impact on analytics. In either case, you can follow the steps below to determine if bots and spiders are inflating your GA data to any extent:
- In the view settings of your unfiltered view, click Copy View.
- Name the view Bot Filtered.
- Check the Bot Filtered checkbox in the view settings of the new view.
- After one or two weeks, note the difference in pageviews and sessions between your unfiltered view and the Bot Filtered view.
- Check the Bot Filtered checkbox in the view settings of your main view.
- Create an annotation, as described in Chapter 11, “Dashboards, Custom Reports, and Intelligence Alerts,” to record the date of the change to your main view.
If you noted a significant difference in the bot-filtered view, you may want to alert your Web developers and anyone who is responsible for any CPM campaigns you may be running on your own site as a publisher. (If you’re an advertiser, you may want to verify that your network has implemented controls to prevent you from paying for bot and spider impressions.)
View Filters
As mentioned previously, many of the view settings that we reviewed in the preceding sections serve as filters in that they exclude sessions or rewrite a dimension value. Beyond the view settings, GA provides rich functionality for view filtering. Table 9.1 summarizes the types of filtering that you can perform on a view.
Table 9.1 Summary of View Filter Functionality
| Filter Functionality | Example |
| Include sessions that match a rule. | Include Device Category = tablet only. |
| Exclude sessions that match a rule. | Exclude internal IP addresses. |
| Modify a dimension value. | Lowercase Campaign Name. |
| Rewrite a dimension value. | Add Hostname to the Page dimension. |
Excluding internal IP addresses, lowercasing dimension values, and even prepending the hostname name to the Page (used often in cross-domain or roll-up reporting, as discussed in Chapter 12) can all be considered forms of cleanup or enhancement: they’re not creating a view that is fundamentally different from the raw property feed.
The first filter in Table 9.1, on the other hand, alters the raw property feed more drastically by allowing only a subset of data into the view.
Despite their dynamic-sounding name, view filters permanently alter the view data for the duration that they’re applied. Let’s say, for example, you’re tracking the Android and iOS versions of your mobile app into the same property. You create a view on July 1 and apply a filter to a mobile app view to include traffic only from Android OS, and you then remove that filter on July 31. Data collected in the view from August 1 forward will include Android and iOS, but iOS is gone forever within the view for July.
By the same token, filters are not retroactive. If the Android/iOS property mentioned in the example above has been collecting data for one year and you then apply an Android filter, the iOS data will remain in the view for the time that the filter was not applied.
Since view filters do permanently alter the underlying property data that the view receives, you need Edit rights to create and apply them, as discussed later in the chapter.
The “Segments vs. Filtered Views” section in Chapter 10 compares view filters with custom segments, which serve as a retroactive and dynamic equivalent of the permanent, now-forward data subsetting that view filters perform.
Next, we demonstrate setup for several different types of filters. As we’ve highlighted before, do not apply any of these filters to any working view, especially not your main view, before trying them in a test view.
Exclude Internal Traffic by IP Address
Because IP address is available for filtering (even though it’s not available in the reporting interface or through the API), you can identify sessions that originate from within your own organization’s IP address range(s) and exclude those sessions from your working views.
Your network admin should be able to inform you of the IP address range that your organization uses to access the Internet from your own office; an example would be 32.161.79.1 to 32.161.79.18. Knowing the IP address range, you have two options for excluding your internal traffic:
- a predefined filter: Exclude—Traffic from the IP Addresses—That Begin with—32.161.79
- a custom filter
The predefined filter would work well overall, but it would be a little broader than necessary since it would exclude all 255 IP addresses that matched the first three octets instead of excluding the 18 IP addresses in your range only.
We can still avoid creating 18 separate filters for each of the IP addresses we need to exclude. Fortunately, a single regular expression will allow us to create a single filter that matches all 18 IP addresses but no more. You can use RegexIP (http://www.regexip.com) to generate a regular expression that you can then use in an exclude view filter as shown in Figure 9.8.

Figure 9.8 Single filter to exclude sessions originating from any IP address within a range.
If your IP address range is expressed in CIDR format (e.g., 25.32.210.1/28), you can use a tool such as http://www.ipaddressguide.com/cidr to display the beginning and end IP addresses of the range that you can then enter into the RegexIP tool.
Once you have the regex for your IP address range:
- In the view column of the Admin screen, click Filters.
- Click + Add Filter.
- Configure the filter as in Figure 9.8.
If your organization uses noncontiguous IP addresses for Internet access, you can potentially configure an exclude filter for internal traffic based ISP Organization or ISP Domain instead of IP Address. Your network admin can advise.
If you’re accessing the Internet from outside your own organization’s networks, it’s difficult to exclude your traffic by IP. Since individual, home-based IP addresses tend to be assigned dynamically, a single filter to exclude your sessions is not feasible in most cases.
As another potential option for excluding your own traffic from a GA website property, post a dedicated page for which you configure Google Tag Manager to record a user-scope custom dimension and then exclude that custom dimension from your working views. This would be a somewhat special case, however, and would probably be worth the extra overhead only if you and colleagues also working from home offices were significantly inflating sessions, pageviews, and especially any conversions.
To filter out traffic from IPv6 addresses, see “Exclude IPv6 Addresses” in the GA help pages.
9.5.2 Rewrite Medium to social for Social Sources
As discussed in Chapter 7, “Acquisition Reports,” traffic from websites that GA recognizes as social networks are still recorded with referral as the medium in most instances. (This differs from traffic from websites that GA recognizes as search engines, for which the medium is recorded as organic.) If we wish to record social traffic with social as the medium instead of referral (or feed or twitterfeed, as may also be the case), we can configure a rewrite filter as in Figure 9.9.

Figure 9.9 This filter rewrites the medium of social clickthroughs to social.
Note that we use an advanced filter to match two dimensions (and output to one). In this example, we can disregard Extract A and Extract B—we’re using the two fields only for matching, and not for copying to the output field (as we do in Figure 12.26).
The full string used for Campaign Source as follows is also available at www.e-nor.com/gabook:
youtube|wikipedia|stumbleupon|netvibes|groups.google|bloglines|
groups.yahoo|linkedin|facebook|webmasterworld|del.icio.us|digg|fe
edburner|twitter|technorati|blog|faves.com|wordpress|newsgator|prwe
b|econsultancy|toprankblog|forums.searchenginewatch|t.co|plus
.(url.)?google|feedly
Several regex metacharacters discussed previously are used in this filter: pipe (|), escape (), and zero-or-one quantifier (?). Notice also that you don’t need to specify the full domain names: any text string between two pipes can “find itself” anywhere within the source dimension text string, such that the technorati portion of the regular expression would match www.technorati.com as the Source dimension.
There’s no need to rewrite the medium to social for the traffic to be correctly classified as Social in the Default Channel Grouping, but this filter will allow us to immediately identify social traffic wherever Medium is displayed. Note also that you can omit feed from Field B if you intend to break out your RSS traffic as separate channel as described in Chapter 7, or you could define your channel based on Source rather than Medium.
This filter will not in any way replace the need for campaign parameters in social clickthroughs from a Twitter app, a Facebook app, or any other social app: without URL parameters to specify medium, source, and campaign, GA will classify these clickthroughs as direct, also as discussed in Chapter 7.
Lowercase Filters
As we saw in Figure 9.4, GA treats case variations as separate dimension values. To reconcile these variations, we could apply a lowercase filter to Request URI as shown in Figure 9.10.

Figure 9.10 This filter consolidates case variations in the Pages report and anywhere else that Request URI appears.
It’s quite common practice to lowercase the following dimensions (or Filter Fields, as dimensions appear in the custom filter setup) so they’re consolidated in all reporting:
- Request URI
- Search Term
- Campaign Medium
- Campaign Source
- Campaign Name
Include Traffic to a Specific Subdirectory
Let’s say that you run a website about video production. The two primary experiences that your website offers to visitors are tutorials, all housed in the /tutorials directory, and sales of video equipment, all housed in the /products directory. If your tutorial and product sales teams want to see activity only in their own subdirectories, or if, for any reason, one team should not have access to the other team’s Web analytics, you can easily create two new views and apply a predefined subdirectory filter to each, as shown in Figure 9.11.

Figure 9.11 This filter will allow only traffic within the /tutorials/ subdirectory to appear in the view.
Note that specifying a subdirectory in a view filter produces a very different result from specifying a subdirectory as the Page field of a custom segment. If we defined a custom segment as Page— contains— /tutorials/, your reporting would show all activity for all sessions that included at least one pageview within the /tutorials/ subdirectory, as discussed in Chapter 10, “Segments,” while a view filter for the /tutorials/ subdirectory would not allow any activity outside of that subdirectory into the view.
Hostname Filters
Figures 12.26 and 12.28 demonstrate the use of the Hostname dimension in a rewrite filter (to prepend the hostname to the request URI, as in www.mysite.com/page) and in an include filter (to include only one subdomain, such as news.mysite.com, in the view).
As stated about Google Tag Manager and GA implementations in Chapter 5, “Google Tag Manager,” we generally recommend a single GTM container but separate GA properties in your production and development environments, but if you are using a single GA property across environments, you can also create separate views and apply an include hostname filter for www.mysite.com and dev.mysite.com as respective examples.
Configure Site Search for Nonstandard Search Results URLs
When we reviewed the Site Search view settings earlier in the chapter, we saw that this configuration works only if the search parameter appears within the URL of the search results page as the name in a name=value querystring pair. For a search results URL such as below, we need to follow a different procedure for GA Site Search configuration.
If, for example, a search for wireless router on your website leads to the following search results URL, we would configure site search with the advanced filter shown in Figure 9.12.

Figure 9.12 The (.*) regex capturing group serves to extract the search term from the Request URI, so we can then output it into the Search Term dimension.
http://www.mundonetworking.com/search/results/wireless+routerAs we’ll discuss below in “Filter Execution Order,” if you have this Search Term extract filter and a Search Term lowercase filter applied to the same view, make sure to position the lowercase filter after the extract filter so it can lowercase, as needed, all search terms received as output from the extract filter.
Exclude Referral Spam
Referral spam is generated in GA by spam bots designed to populate your Source/ Medium and Referral reports with spam domains (such as semalt.com) in the hopes that you, while reviewing your reports in GA, will click through. Apart from inflating your session and user count, these fake sessions increase your bounce rate and lower your conversion rates as reported.
At this time of writing the book, a referral spam solution is expected to become available directly within Google Analytics. In the meantime, see “How to Remove Referral Spam from Google Analytics” on Brian Clifton’s blog. (Brian’s blog post also steps through custom segment setup for excluding referral spam from GA data that has already been recorded. We discuss custom segments in the next chapter.)
Filter Execution Order
When you apply multiple filters to one view, each succeeding filter receives as input the output of the previous filter. You can click Assign Filter Order as shown at the top of Figure 9.13 to change the order of filter execution.
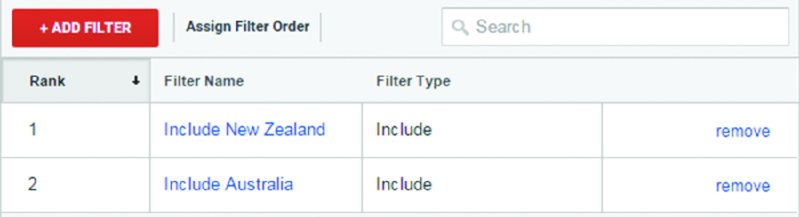
Figure 9.13 Because include filters are not cumulative, users from Australia will never make it into this view.
Filter order is normally not a primary consideration for filters that relate to different dimensions, but for filters that apply to the same dimension, we need to fully understand how include filters work.
Include filters do not work cumulatively: include means exclude everything else. Once you apply an include filter for one dimension value—such as New Zealand as Country in Figure 9.13—you lose the sessions that match all other dimension values. In this case, once the New Zealand filter executes, sessions from Australia are irrevocably excluded.
A regular expression will save the day in this case as well. By including both New Zealand and Australia separated by the regex pipe symbol, we’ll be able to apply a single filter as shown in Figure 9.14 to include website visitors or mobile app users from both countries.

Figure 9.14 The regex pipe symbol allows us to include two or more dimension values within the same include filter.
If you wanted instead to exclude New Zealand and Australia from your view, either approach would work. Since exclude filters can function in series, you could apply separate exclude filters for the two countries, or you could apply a single filter that uses the pipe symbol.
Applying the Same Filter to a Different View
We’ve stressed the importance of trying your filters in a test view before applying to a working view. To facilitate this best practice, GA allows you to copy filters between views: no need to re-create a view that you’ve already applied to another view within the property.
If you have validated lowercase filters for campaign medium, source, and name in your test view, you can perform the following steps to replicate them in your main working view (or any other view):
- In the view column of the Admin panel, select your working view and click Filters.
- Click + Add Filter and select Apply Existing Filter as in Figure 9.15.
- Select one or more filters that exist in the property but are not yet applied to your working view.

Figure 9.15 Once you have created a filter view, the Add Filter to View panel allows you to apply it to any other view in the property.
While it would certainly be considered best practice to apply cleanup filters (such as lowercase) to all views except your unfiltered view, you’d apply the specialized filters (such as Europe only) more selectively. As stated previously, different combinations of filters and settings applied to the same raw property feed illustrate the fundamental purpose of GA’s multiple-view functionality.
Access Rights
Access rights management in GA is both flexible and quite straightforward. When you (as an individual) create a GA account, you can manage GA user access by clicking User Management in the Admin panel at all three levels of the account hierarchy:
- Account
- Property
- View
Access rights work top-down: rights that you grant to a user at the account or property levels flow down to the lower levels. Furthermore, you can’t apply more restrictions for a user at a lower level than the level of access that you have provided at a higher level.
At each level of the account hierarchy, you can assign as many as four permissions, as shown in Figure 9.16 and detailed below. Of these permissions, you should consider Manage Users and Edit to be administrative and grant them very judiciously.

Figure 9.16 At each level of the account hierarchy, you can assign four levels of privileges.
The requirement for a user to be given any level of access to GA is the same as for creating a GA account to begin with: a gmail address, or any email address that the user has associated with a Google account.
The permissions also work somewhat top-down: if you provide Edit or Collaborate access to a user, the lower permissions are selected automatically. Manage Users does not select any of the lower permissions, but it’s routine to grant the other three levels of access to accompany Manage Users.
Manage Users
This permission allows other GA users to manage permissions in turn. Assign this permission only to fully trusted parties.
Edit
The Edit permission allows a GA user to dictate how data is captured and processed. Edit has different meanings at different levels of the account hierarchy; Table 9.3 lists several privileges that Edit access includes at each level.
Table 9.3 Edit Permissions at Account, Property, and View Levels
| Account Level | Allowed through Edit Permission |
| Account |
|
| Property |
|
| View |
|
Collaborate
The Collaborate permission can be a bit confusing, mainly because it means two things depending on whether or not the user created the asset at hand:
- If you have Collaborate permissions, you can share a Dashboard, Custom Segment, or Annotation with other GA users who have Collaborate or only Read & Analyze access.
- If the GA user with whom you have shared a Dashboard, Custom Segment, or Annotation also has Collaborate access, that user can edit or delete the asset.
The sharing option for dashboards and annotations is illustrated in Figure 11.2 and 11.12 respectively. You can share a segment from the Segment Availability popup as shown in Figure 9.17.

Figure 9.17 If you share a custom segment, other GA users with Read & Analyze rights to the view will be able to apply the segment to reports, and GA users who also have Collaborate rights will be able to edit or delete the segment.
Read & Analyze
This level of access formerly appeared in GA as View Reports Only. While still designating the most basic rights, the current name—Read & Analyze—hints at the many capabilities that this permission enables.
Read & Analyze users can create:
- Custom segments
- Custom reports
- Personal channel groupings
- Dashboards
- Intelligence alerts
- Private annotations
- Shortcuts
We discussed personal channel groupings in Chapter 7. We’ll explore custom segments in Chapter 10 and the other capabilities listed above in Chapter 11.
Data Subset Access Control through View Filters and User Permissions
Earlier in this chapter, we learned how to apply an include filter to create a subset of the raw property. If we had to report on activity from a specific referring website, and we wanted to share with the website owners the GA data only for the sessions resulting from clickthroughs from their website, we could take the following steps:
- Create a new view and name it Partnersite Clickthroughs.
- Apply an include filter to the view as shown in Figure 9.18.
- Click Manage Users in the View Admin, and assign Read & Analyze permission, possibly with Collaborate, to individuals at the partner organization.

Figure 9.18 You could create a view containing data only for sessions that originated as clickthroughs from another website and then assign rights to that view only.
No Direct Access
No Direct Access is clearly not an actual access level that you can assign in GA, but it should be a consideration in some cases. Since you, as the reader, have taken the initiative to acquire this book and read it to this point, you understand that it takes some time, effort, and specialized skills to navigate and interpret GA reports effectively.
If an executive, a manager, a colleague (especially outside of marketing/analytics), or anyone within a client organization might be overwhelmed with the GA interface—or, more seriously, make ill-advised business decisions based on faulty report interpretation—it might be more appropriate, efficient, and safe to configure one or two dashboards or custom reports to be emailed to that individual on a weekly or monthly basis as described in Chapter 11.
User Management for Agencies
When managing analytics for websites and apps belonging to many organizations, consider these factors:
- You can create only 100 GA accounts under a single Google login, but other GA users can provide that single login with access to a large number of GA accounts, properties, and views. (For Analytics 360 clients, make sure to check with Google directly or your GAP reseller on settings and thresholds for the number of accounts, properties and views that you can create under a single login. Your total hit volume plays a factor here.)
- Once a Google login is granted all four permissions at the account, property, or view level, that login has the same rights within that account, property, or view as the GA user who created it.
With these two points in mind, it may make more sense for clients to create a GA account or property under a client login and to then provide full access to your agency, as we first discussed in Chapter 4. As one benefit, you won’t need to be concerned about reaching the limit for GA account creation under a single login; as another, you’ll eliminate the chance of inadvertently providing one client with access to another client’s data. By the same token, if you’re working with an analytics or digital marketing agency to assist you with GA, it’s recommended that you create new accounts and properties as needed and then grant access to individuals at the agency (instead of the other way around).
Change History
The Change History panel (Figure 9.19) shows detailed a record of all account, property, and view changes that GA users with Edit and Manage User rights have performed.

Figure 9.19 The Change History documents configuration and permissions changes at the account, property, and view levels.
Trash Can
GA users can no longer immediately delete an account, property, or view. A user must instead move an account, property, or view to the Trash Can as shown in Figure 9.20 from which it can be restored within 35 days by a GA user with Edit access to the account, after which the trashed item is deleted permanently9.20.

Figure 9.20 GA users with Edit access to the account have 35 days to restore a trashed item.
When an account, property, or view is moved to the Trash Can, GA users with Edit access to the account receive a notification, as shown in Figure 9.21.

Figure 9.21 View deletion notification.
 Key Takeaways
View settings and filters transform the raw property feed. View filters and many view settings serve to clean the property data, add metrics such as goal completions, or create subsets of the data. The reason for multiple views is primarily to represent different filtered output of the same raw property data.
Consolidate Request URIs as warranted. If you have tens or hundreds of thousands of rows in the Pages report, your data likely suffers from fragmentation of the Page (aka Request URI) dimension: multiple Request URIs representing the same content and user experience. Start with the URL Parameters report in Google Search Console, and populate Exclude URL Query Parameters accordingly.
Filters and view permissions for controlled access to data subsets. If it’s not appropriate for all GA users to access all data recorded in the property, you can use a view filter to create a subset of your property data and then provide access only to that view.
Don’t be afraid to create new views, but be sure to validate with view filters and settings. Take advantage of the 25 views that you can create in each property. Create a test view and a backup view within each property, and carefully validate view settings and filters in the test view before copying to a working view.
Unlimited account access. You can be given access to an unlimited number of accounts, properties, and views.
Be very cautious with Edit and Manage Users access. Provide Edit and Manage Users rights, especially at the Account level, to trusted parties only.
Deletions restorable from the Trash Can for 35 days. If you have Edit access at the account level, you can restore a trashed account, property, or view within 35 days.
 Actions and Exercises
- Create test and backup views. Create a test view and a raw, unfiltered backup view for each GA property that you manage. You can also provide view names that keep your views in order, with your main view on top.
- Exclude internal traffic. Consult with your network admins on your company IP address ranges, and create an exclude filter for your internal IP addresses accordingly. As another potential option, you may be able to filter internal traffic by Internet service provider (ISP) Domain or ISP Organization.
- Configure site search tracking. If you provide a site search function on your website, use one of the two methods outlined in the chapter to configure site search tracking.
- Consolidate URLs. Use the Default Page and Exclude URL Query Parameters to consolidate URL variations as needed.
- Apply lowercase filters. Lowercase Campaign Medium, Campaign Source, and Campaign Name, and also Search Term if site search tracking is enabled.
- Test bot filtering. Create a copy of your unfiltered view, check the Bot Filtering checkbox, and note the difference in sessions and pageviews after a week or two before enabling bot filtering your one or more working views.