
4. Customizing How Your iPhone Works

In this chapter, you learn how to make an iPhone into your iPhone. Topics include the following:
![]() Configuring notifications
Configuring notifications
![]() Scheduling Do Not Disturb
Scheduling Do Not Disturb
![]() Configuring the Control Center
Configuring the Control Center
![]() Configuring the Widget Center
Configuring the Widget Center
![]() Setting keyboard, language, and format options
Setting keyboard, language, and format options
![]() Setting Privacy and Location Services preferences
Setting Privacy and Location Services preferences
![]() Setting passcode, Touch ID, and content restrictions
Setting passcode, Touch ID, and content restrictions
![]() Customizing how your iPhone works with apps
Customizing how your iPhone works with apps
As you’ve seen in previous chapters, the Settings app enables you to configure various aspects of your iPhone, such as connecting your iPhone to a Wi-Fi network and configuring iCloud and other online accounts. The Settings app provides many other configuration tools that you can use to tailor how your iPhone works to suit your preferences.
Perhaps the most important settings are related to the security of your iPhone, which you can configure by setting a passcode and fingerprint recognition using Touch ID along with your privacy and location settings. Also very important is configuring the notifications your iPhone uses so you get the information you need without being constantly bombarded; setting a Do Not Disturb schedule helps prevent your iPhone from bothering you when you don’t want it to. You can also configure the Control Center, Widget Center, keyboards, privacy and location services options, and how content on your phone can be accessed.
Although the Settings app enables you to customize how your iPhone works in many ways, installing apps on your iPhone enables it to do so much more than it can “out of the box.” You’ll want to explore and download apps to completely customize how you use your iPhone; the possibilities of what your phone can do with apps are limitless!
Configuring Notifications
In Chapter 2, “Using Your iPhone’s Core Features,” you learned how to work with the various types of notifications your iPhone presents to keep you informed of important (and at times, not-so-important) information. Notifications can become distracting or overwhelming because the apps on your phone can provide notifications about all manner of things—incoming mail, messages, news updates, and so on. If an app manages a lot of activity, it can generate multiple notifications over a short period of time.
You can configure how apps can provide notifications and, if you allow notifications, which type. You can also configure other aspects of notifications, such as whether an app’s notifications appear in the Notification Center or if they appear on the Lock screen. Apps can support different notification options; some apps, such as Mail, support notification configuration by account (for example, you can set a different alert sound for new mail in each account). You can follow the same general steps to configure notifications for each app; you should explore the options for the apps you use most often to ensure they work the best for you.
The steps in the following task show you how to configure Mail’s notifications, which is a good example because it supports a lot of notification features; the notification settings for other apps might have fewer features or might be organized slightly differently. But configuring the notifications for any app follows a similar pattern as exemplified by the steps for Mail’s notification settings.
To configure notifications from the Mail app, perform the following steps:
1. Tap Settings on the Home screen.

2. Tap Notifications.

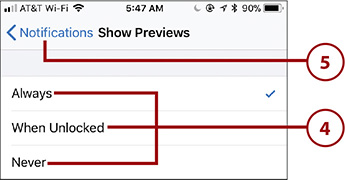
3. Tap Show Previews. As you may recall from Chapter 2, alerts from an app can contain a preview of the information related to the alert, such as part of an email message.

4. To have alerts always show the preview, tap Always; tap When Unlocked to show previews only when your iPhone is unlocked; or tap Never to hide previews. This is a global setting for all apps. You can override this for individual apps as you see in later steps.
5. Tap Notifications. In the Notification Style section, you see all the apps installed on your phone. Along with the app name and icon, you see the current status of its notifications.
6. Swipe up or down the screen to locate the app whose notifications you want to configure. (The apps are listed in alphabetical order.)

7. Tap the app whose notifications you want to configure.

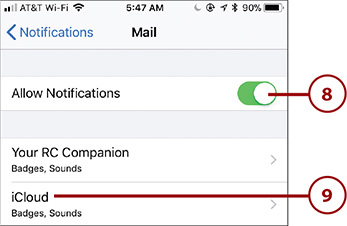
8. If you want the app to provide notifications, set the Allow Notifications switch to on (green) and move to step 9. If you don’t want notifications from the app, set the Allow Notifications switch to off (white) and skip to step 25.
9. Tap the account for which you want to configure notifications; if the app doesn’t support accounts, skip this step.
10. Tap Sounds.

11. Use the resulting Sounds screen to choose the alert sound and vibration for new email messages to the account (see “Choosing the Sounds and Vibratory Feedback Your iPhone Uses“ in Chapter 5, “Customizing How Your iPhone Looks and Sounds,” for the details about configuring sounds and vibrations).
12. Tap the back icon located in the upper-left corner of the screen (how it is labeled depends on what you are working with; for example, it shows the account name when you are working with a Mail account).

13. To display the app’s badge (which shows the number of new items in that app or account), set the Badge App Icon switch to on (green). (If you set this to off (white) for an account, new items sent to that account won’t be included in the count of new items shown on the badge.)
14. If you want the app’s or account’s notifications to appear on the Lock screen, slide the Show on Lock Screen switch to on (green). If you receive sensitive information to the account, you might want to leave this off so that this information isn’t displayed on the Lock screen, which anyone who has access to your iPhone can view.
15. To show notifications from the app/account in the Notification Center, set the Show in History switch to on (green); if you set this to off (white), notifications from the app/account are not shown in the Notification Center.

16. If you want to receive banner notifications for the account, set the Show as Banners switch to on (green); if you don’t want banner notifications, leave this set to off (white) and skip to step 18.
17. Tap Temporary if you want banners to appear on the screen for a few seconds and then disappear or Persistent if you want them to remain on the screen until you take action on them (such as reading the associated email). You know which type is currently selected because its name appears in an oblong.

18. Tap Show Previews.

19. Tap Always (Default) if you always want previews to appear in notifications; When Unlocked if you want them to appear only when your iPhone is unlocked; or Never if you don’t want previews to be displayed at any time. This setting overrides the global setting you configured earlier.
20. Tap the back icon, which is located in the upper-left corner of the window.

21. Tap the back icon, which is located in the upper-left corner of the window.

22. Configure notifications for the other accounts used in the app.
23. Configure notifications for VIP email and threads.
24. Tap Notifications.

25. Repeat steps 6 through 24 for each app shown on the Notifications screen. Certain apps might not have all the options shown in these steps, but the process to configure their notifications is similar.
26. Swipe up until you reach the bottom of the screen.
27. Configure any special notifications you see. What you see here depends on the country or region your phone is associated with. For example, where I live in the United States, the GOVERNMENT ALERTS section includes two notifications. AMBER Alerts are issued when a child is missing and presumed abducted, whereas Emergency Alerts are issued for things such as national crises, local weather, and so on. You can use the switches to enable (green) or prevent (white) these types of alerts, but you can’t configure them.

More Options
Some apps provide notifications for the types of activity they manage. For example, the Calendar app enables you to configure notifications for upcoming events, invitations, and so on. Open the Notification Settings screen for the apps you use frequently to explore the notification options they offer.
>>>Go Further: NOTIFY THIS
Here are some other hopefully useful notification tidbits for your consideration:
• VIPS—Mail supports VIPs, which are people from whom email messages are treated specially, such as having a dedicated mailbox in the Mail app. You can apply specific notification settings to VIP messages using the VIP notification option. These override the notification settings for the email account to which messages from VIPs are sent.
• Threads—Mail can keep related messages together as threads. Like VIP messages, you can override Mail’s notifications for messages that are part of threads using the Thread Notifications option.
• Special sounds and vibrations for contacts—You can override some app’s sounds and vibration notification settings for individuals in your Contacts app. For example, you can configure a specific ringtone, new text tone, and vibrations for calls or texts from a contact. You do this using the contact information screen as explained in Chapter 6, “Managing Contacts.”
• Installed app not shown—You must have opened an app at least once for it to appear on the Notifications screen.
• Initial notification prompt—The first time you open many apps, you are prompted to allow that app to send you notifications. If you allow this, the app is able to send notifications about its activity. If you deny this, the app isn’t able to send notifications. You can always configure the app’s notifications using the steps in this task regardless of your initial decision.
• Lots of apps—If you have a lot of apps or activity on your iPhone, notifications can become disruptive. It can take a little time to set each app’s notifications, but making sure you receive only the notifications that are important to you prevents your iPhone from bothering you unnecessarily.
Scheduling Do Not Disturb
As you learned in Chapter 1 “Getting Started with Your iPhone,” the Do Not Disturb feature enables you to temporarily silence notifications; you can also configure quiet times during which notifications are automatically silenced by performing the following steps:
1. Open the Settings app and tap Do Not Disturb.

2. To activate Do Not Disturb manually, set the Manual switch to on (green). (This does the same thing as activating it from the Control Center as explained in Chapter 1.)
3. To configure Do Not Disturb to activate automatically on a schedule, set the Scheduled switch to on (green).
4. Tap the From and To box.

5. Tap From.
6. Swipe on the time selection wheels to select the hour and minute (AM or PM) when you want the Do Not Disturb period to start.

7. Tap To.
8. Swipe on the time selection wheels to set the hour and minute (AM or PM) when you want the Do Not Disturb period to end.
9. Tap Back.

10. If you want notifications to be silenced during the Do Not Disturb period only when your phone is locked, tap While iPhone is locked. Tap Always if you want notifications to be silenced regardless of the Lock status. This setting presumes that if your iPhone is unlocked, you won’t mind taking calls or having notifications even if it is within the Do Not Disturb period because you are probably using the phone.
11. Tap Allow Calls From.

12. Tap the option for the group of people whose calls should be allowed during the Do Not Disturb period. The options are Everyone, which allows all calls to come in; No One, which sends all calls directly to voicemail; Favorites, which allows calls from people on your Favorites lists to come through but calls from all others go to voicemail; or one of your contact groups, which allows calls from anyone in the selected group to come through while all others go to voicemail.
13. Tap Back.

14. Set the Repeated Calls switch to on (green) if you want a second call from the same person within three minutes to be allowed through. This feature is based on the assumption that if a call is really important, the person calling you will try again immediately.
15. Tap Activate in the DO NOT DISTURB WHILE DRIVING section.

16. To have Do Not Disturb activate automatically when you are driving, tap Automatically to have this based on your iPhone’s motion (once the iPhone’s accelerometer detects that the phone has reached a particular speed) or When Connected to Car Bluetooth to have Do Not Disturb active whenever your iPhone is connected to your car’s Bluetooth system; to prevent this type of automatic activation, tap Manually.
17. Tap Do Not Disturb.

18. Tap Auto-Reply To.

19. Configure when you want automatic replies to be sent when Do Not Disturb is on (regardless of how it was activated) by tapping No One to prevent automatic replies; Recents to send replies to people on your recent lists (such as calls you have recently received); Favorites to send replies to your favorites; or All Contacts to automatically reply to anyone on your Contacts lists.
20. Tap Back.

21. Tap Auto-Reply.

22. Type the message you want to be automatically sent.
23. Tap Do Not Disturb. During the Do Not Disturb period or based on the DO NOT DISTURB WHILE DRIVING setting, your iPhone is silent, except for any exceptions you configured. Automatic replies are sent according to your configuration. When the scheduled Do Not Disturb period ends, your iPhone resumes its normal notification activity.

Configuring the Control Center
As you learned in Chapters 1 and 2, the Control Center provides quick access to a number of your iPhone’s features and tools. The top part of the Control Center screen always contains the same controls, but you can configure the controls toward the bottom of the Control Center by performing the following steps:
1. Open the Settings app and tap Control Center.

2. To be able to access the Control Center while you are using apps, set the Access Within Apps switch to on (green). If you set this to off, you need to move back to the Home or Lock screen to use the Control Center.
3. Tap Customize Controls. The Customize screen has two sections: INCLUDE shows the tools installed in your Control Center, whereas MORE CONTROLS shows tools that are available for you to add to the Control Center.

4. To remove a tool from the Control Center, tap its unlock (–) icon.

5. Tap Remove. The tool is moved from the INCLUDE list to the MORE CONTROLS list.

6. To add a control to the Control Center, tap its add (+) icon. The control moves to the bottom of the INCLUDE list.

7. Move a control higher on the Control Center by dragging its order (three lines) icon up the INCLUDE list or move it lower by dragging its order icon down the list. The top four controls on the list appear first in the customizable part of the Control Center; the next four are below those, and so on.

8. Repeat steps 4 through 7 until you have all the controls you want on the Control Center in the order you want them. The next time you open the Control Center, it reflects the changes you made.
Your Control Center Options Are Limited
There are more controls on the Control Center than you see on the Customize screen. You can’t change some of the Control Center’s options. For example, you always see the Airplane Mode, Cellular Data, Wi-Fi, and Bluetooth icons on the Control Center. The area you can customize is below the Screen Mirroring, Brightness, and Volume controls.
Configuring the Widget Center
As described in Chapters 1 and 2, the Widget Center provides quick access to widgets that enable you to take action or to view information. You can determine which widgets are shown in the Widget Center and the order in which those widgets appear on the screen; for example, you might want your most frequently used widgets to be at the top of the screen.
To configure the Widget Center, perform the following steps:
1. Open the Widget Center by moving to the Home screen and swiping all the way to the right.

2. Swipe all the way up the screen.
3. Tap Edit. You see the Add Widgets screen. This screen has two sections. At the top are the currently installed widgets; installed widgets have the unlock (–) icon next to their icons. Toward the bottom of the screen, you see the MORE WIDGETS section that shows you available widgets that aren’t currently in your Widget Center.

4. To remove a widget, tap its unlock (–) icon.

5. Tap Remove. The widget is removed from your Widget Center and moved onto the MORE WIDGETS list.

6. Swipe up the screen until you see the MORE WIDGETS section. Widgets that are new since the last time you viewed this list are marked with a blue circle.
7. To add a widget to the Widget Center, tap its add (+) icon. The widget jumps up the screen to become the last widget on the list of widgets in the Widget Center.

8. To change where a widget appears in the Widget Center, drag its order icon up or down the screen. When it is in the position you want, take your finger off the screen and the widget is placed there.
9. Repeat steps 4 through 8 until the Widget Center contains the widgets you want to access, in the order in which you want them to be shown.
10. When you’re done making changes to the Widget Center, tap Done. You return to the Widget Center and see the results of the changes you’ve made.

New Widgets
When new widgets become available, you see a message under Edit on the Widget Center screen. Tap this to move into Edit mode, so you can see the new widgets and add them to the Widget Center if you want to use them.
Setting Keyboard, Language, and Format Options
You’ll be working with text in many apps on your iPhone. You can customize a number of keyboard- and format-related options so text appears and behaves the way you want it to.
Setting Keyboard Preferences
You use the iPhone’s keyboard to input text in many apps, including Mail, Messages, and so on. A number of settings determine how the keyboard works.
1. On the Settings screen, tap General.

2. Swipe up the screen.
3. Tap Keyboard.

4. Tap Keyboards. This enables you to activate more keyboards so that you can choose a specific language’s keyboard when you are entering text. At the top of the screen, you see the keyboards that are available to you.

5. Tap Add New Keyboard.

Fun in Text
The Emoji keyboard allows you to include a huge variety of smiley faces, symbols, and other icons whenever you type. The Emoji keyboard is active by default; however, if you don’t see it on the list of active keyboards, you can use these steps to activate it.
6. Swipe up and down the screen to browse the available keyboards.
7. Tap the keyboard you want to add.

8. Tap the keyboard you added in step 7.

9. Tap the keyboard layout you want to use. (Not all keyboards support options; if the one you are configuring doesn’t, skip this step.)
10. Tap Keyboards.

11. Repeat steps 5–10 to add and configure additional keyboards.
12. Tap Keyboards.

>>>Go Further: THIRD-PARTY KEYBOARDS
You can install and use keyboards from third parties (meaning not Apple) on your iPhone. To do this, open the App Store app and search for “keyboards for iPhone” or you can search for a specific keyboard by name if you know of one you want to try. (See “Using the App Store App to Find and Install iPhone Apps,” later in this chapter for help using the App Store app.) After you have downloaded the keyboard you want to use, use steps 1–5 to move back to the Keyboards Settings screen. When you open the Add New Keyboard screen, you see a section called THIRD-PARTY KEYBOARDS in which you see the additional keyboards you have installed. Tap a keyboard in this section to activate it as you do with the default keyboards. When you move back to the Keyboards screen, you see the keyboard you just activated. Tap it to configure its additional options. Then you can use the new keyboard just like the others you have activated. Make sure you check out the documentation for any keyboards you download so you take advantage of all of their features.
13. Tap One Handed Keyboard.

14. To be able to use the one-handed keyboard (which squishes all the keys toward one side of the screen), tap Left to place it on the left side or Right to put it on the right side of the screen; tap Off if you don’t want to use the one-handed keyboard.
15. Tap Back.

16. To prevent your iPhone from automatically capitalizing as you type, set Auto-Capitalization to off (white).
17. To disable the automatic spell checking/correction, set Auto-Correction to off (white).
18. To disable the iPhone’s Spell Checker, set the Check Spelling switch to off (white).
19. To disable the Caps Lock function, set the Enable Caps Lock to off (white).
20. To disable the iPhone’s Predictive Text feature (see Chapter 2), set the Predictive switch to off (white).

21. To prevent the iPhone from automatically trying to correct your punctuation, set the Smart Punctuation switch to off (white).
22. To prevent the character you type from being shown in a magnified pop-up as you type it, set the Character Preview switch to off (white).
23. To disable the shortcut that types a period followed by a space when you tap the space bar twice, set the “.” Shortcut switch to off (white). You must tap a period and the spacebar to type these characters when you end a sentence.
24. To disable the iPhone’s dictation feature, set the Enable Dictation switch to off (white). The microphone key won’t appear on the keyboard and you won’t be able to dictate text.
25. If dictation is enabled, tap Dictation Languages.

26. If you don’t want to be able to use dictation with a language, tap it so that it doesn’t have a check mark. If you do want to be able to dictate in a listed language, ensure it has a check mark (if it doesn’t, tap it).

Language Options
The keyboard options you see depend on the language being used. For example, if settings apply only to a specific language, you see them in that language’s section.
Changing Keyboards
To delete a keyboard, move to the Keyboards Settings screen and swipe to the left on the keyboard you want to remove. Tap Delete. The keyboard is removed from the list of activated keyboards and is no longer available to you when you type. (You can always activate it again later.) To change the order in which keyboards appear, move to the Keyboards screen, tap Edit, and drag the keyboards up and down the screen. When you’ve finished, tap Done. (An explanation of how to switch between keyboards when you type is provided in Chapter 2.)
Creating and Working with Text Replacements
Text replacements are useful because you can use just a few letters to type a series of words. You type the replacement, and it is replaced by the phrase with which it is associated. To configure your text replacements, do the following:
1. Move to the Keyboards screen as described in steps 1–3 in the previous task.
2. Tap Text Replacement.

3. Review the current replacements.
4. To add a replacement, tap Add (+).

5. Type the phrase for which you want to create a replacement.
6. Type the shortcut you want to be replaced by the phrase you created in step 5.
7. Tap Save. If the replacement doesn’t contain any disallowed characters, it is created and you move back to the Text Replacement screen where you see your new text replacement. If there is an error, you see an explanation of the error; you must correct it before you can create the replacement.

8. Repeat steps 4–7 to create other text replacements.
9. When you’ve created all the replacements you want, tap Keyboards.

Shortcuts to Replacements
To change a replacement, tap it. Use the resulting screen to change the phrase or shortcut, and tap Save to update the replacement. To remove a replacement, swipe to the left on it and tap Delete. To search for a replacement, tap in the Search bar at the top of the screen and type the replacements you want to see; you can also use the index along the right side of the screen to find replacements. You can also tap Edit on the Shortcuts screen to change your replacements. And, yes, you can create a phrase without a replacement, but I don’t really see much use for that!
Setting Language and Region Preferences
There are a number of formatting preferences you can set that determine how information is formatted in various apps. For example, you can choose how addresses are formatted by default by choosing the region whose format you want to follow.
1. On the Settings screen, tap General.

2. Swipe up the screen.
3. Tap Language & Region.

4. Tap iPhone Language.

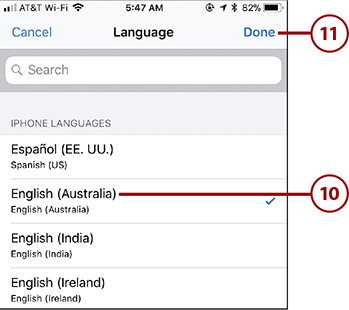
5. Swipe up and down the screen to view the languages with which your iPhone can work or tap in the Search bar and type a language you want to use to find it. The current language is marked with a check mark.
6. Tap the language you want to use.
7. Tap Done.

8. Tap to confirm the change in language you indicated. Your iPhone screen goes dark while the iPhone switches to the new language. When it comes back, you return to the Language & Region screen, and the language you selected starts being used.

9. Tap Add Language.

10. Using steps 5–7, find and tap a secondary language. This language is used when your primary language can’t be, such as on websites that don’t support your primary language.
11. Tap Done.
12. Tap the language you want to be primary to confirm it. The language you selected is configured and you move back to the Language & Region screen. The new language is shown on the list in the center of the screen.

Order, Order!
To change the order of preference for the languages you have configured, tap Edit, drag the languages up or down the screen to set their order, and tap Done to save your changes.
13. To add more languages, tap Add Language and follow steps 10–12 to add more languages.
14. Tap Region.

15. Swipe up and down the regions available to you. The current region is marked with a check mark.
16. Tap the region whose formatting you want to use; if there are options within a region, you move to an additional screen and can tap the specific option you want to use.
17. Tap Done.

18. If you’ve changed the region, tap the language you want to use as the primary iPhone language. Your iPhone starts using the formatting associated with the region you selected.

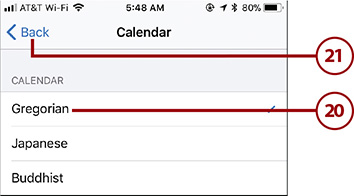
19. Tap Calendar.

20. Tap the calendar you want your iPhone to use.
21. Tap Back.
22. Tap Temperature Unit.

23. Tap the unit in which you want temperatures to be displayed.
24. Tap Back.

25. Swipe up until you see the bottom of the screen where there are examples of the format options you have selected, such as the time and date format.

>>>Go Further: THE ACCESSIBLE iPHONE
If you tap the Accessibility option on the General Settings screen, you see a large number of options you can configure to make your iPhone more accessible. For example, you can enable VoiceOver to have the iPhone guide you through screens by speaking their contents. Zoom magnifies the entire screen. Magnifier enables you to use the iPhone’s camera to quickly magnify things. Under the Speech option, Speak Selection has the iPhone speak text you have selected, and Speak Auto-text has the iPhone speak corrections it suggests to you, such as auto-capitalizations. There are other options you can configure; explore this screen to find settings of interest to you. If your iPhone starts looking or behaving quite differently, move back to this screen to make sure an Accessibility option hasn’t been enabled accidentally. There are many options here, and sometimes one or more of them is turned on accidentally, and it can be confusing if you aren’t expecting it. Even if you don’t have any type of physical challenges, some of these options can still be quite useful. For example, the Magnifier comes in really handy when you need to look at something too small to see comfortably without an aid (you can put the Magnifier on your Control Center for quick access).
Setting Privacy and Location Services Preferences
Using its GPS or network connection, your iPhone’s Location Services feature can determine where the phone is. This is useful in many situations, such as in the Maps app when you want to generate directions. Lots of other apps use this capability, too, such as apps that provide you location-specific information (the Uber app uses it to determine your location when you request a ride, for example). You can configure certain aspects of how these services work. And, if you don’t want specific apps to be able to access your iPhone’s current location, you can disable this feature for those apps. Of course, if you do, apps that rely on this capability don’t work properly (they prompt you to allow access to this service as you try to use them).
You can also determine which apps can access certain kinds of information, such as the apps that are able to access your contact information in the Contacts app.
To configure privacy settings, do the following:
1. Move to the Settings screen and tap Privacy.

2. Tap Location Services.

3. To disable Location Services for all apps, set the Location Services switch to off (white); to leave it enabled, skip to step 5.

4. Tap Turn Off at the prompt. No apps are able to identify your location; skip the rest of these steps because they don’t apply when Location Services is disabled.

5. Tap Share My Location. You can share your location with others in several areas, such as the Messages app.

6. To prevent your location from being shared, set the Share My Location switch to off (white) and skip to step 10. If you leave this switch on (green), move to the next step.
7. Tap From.

8. Tap the device that should be used to identify your location (this only applies if you have multiple devices configured with your Apple ID).
9. Tap Back.

10. Tap Back.

11. Swipe up and down the list of apps on the Location Services screen. These are all the apps that have requested access to your iPhone’s location. Along the right side of the screen, you see the current status of Location Sharing for the app. Always means that the app can always access your location. While Using means the app can only access your location information while you are using it. Never means that using location information for the app has been disabled (some apps don’t work properly when set to this status). Apps marked with a purple arrow have recently accessed your location; those that have done so within the past 24 hours are marked with a gray arrow. An outline purple arrow indicates that the app is using a geofence, which is a perimeter around a location that defines an area that is used to trigger some event, such as a reminder.
12. Tap an app to configure its access to Location Services.

13. Tap the status in which you want to place the app’s access to your location. Some apps only have the Always or Never options, whereas others also have the While Using the App option.
14. Tap Back.

Share with Family?
The iPhone’s Family Sharing feature enables you to designate up to five other people as a family (they don’t actually have to be related to you in any way). When you do this, you can allow members of this group to share content you have downloaded, such as music or movies, from the iTunes Store. You can also share your location information with them. When Family Sharing is enabled, you see the members of the family group on the Share My Location screen. You can tap each person and tap Share My Location to share your location with that person. The people in your family with whom you share your location can see it in the Find Friends app.
15. Repeat steps 12–14 for each app whose access to your location you want to configure.
16. Tap System Services.

17. Enable or disable Location Services for the System Services you see. As with apps, if you disable Location Services for a system function, it might not work properly.
18. Tap Back.

19. Tap Privacy. Next, allow or prevent apps or other services from accessing data stored on your iPhone.

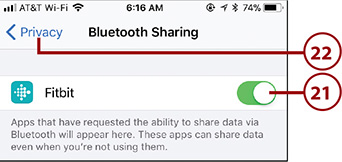
20. Tap an app or service on the list; this example shows Bluetooth Sharing. A list of apps that have requested to use the app’s data or a service (in this example, Bluetooth) is displayed. If the requesting app or service is able to use the app’s data, its switch is on (green).

>>>Go Further: MORE ON SYSTEM SERVICES
One of the System Services is Significant Locations. This service tracks places you visit. This information is used to improve the performance of some apps. If you want to prevent this, tap Significant Locations, enter your passcode or touch the Touch ID/Home button, and then set the Significant Locations switch to off (white).
You can use the switches in the PRODUCT IMPROVEMENT section to enable or disable various types of information from being collected, such as what is popular near you.
Use the Status Bar Icon switch to enable or disable the Location Services arrow at the top of the screen when a system service is accessing location information. (This arrow always appears when apps use location information.)
21. Prevent a requesting app or service from accessing the app’s data by setting its switch to off (white). That app is no longer able to use the data it requested (which can inhibit some of its functionality).
22. Tap Privacy.
23. Repeat steps 20–22 for each app or service on the list. Most of time, you can just leave the permissions with the default setting (unless you want to block a specific app from using a certain kind of data).

>>>Go Further: MORE ON PRIVACY
At the bottom of the Privacy screen, you see Analytics. Under this section, you can determine if information about performance of apps and your device is communicated back to Apple. You can also determine if information about the performance of apps is shared with app developers.
You also see the Advertising option. If you tap this, you can limit the tracking of ads you view by setting the Limit Ad Tracking switch to on (green). Typically, this tracking is used by advertisers to present ads that are related to ads you have viewed (the point being to make the ads more effective). You can reset the identifier used to identify you by tapping Reset Advertising Identifier and then tapping Reset Identifier. You can tap View Ad Information to see your status with respect to advertising in Apple apps.
Configuring Passcode, Touch ID, and Content Restrictions
Your iPhone contains data you probably don’t want others to access. You can (and should) require a passcode so your iPhone can’t be unlocked without the proper passcode being entered. This gives you a measure of protection should you lose control of your phone. If you have an iPhone 5s or later, you can record your fingerprints so that you can unlock your phone (by automatically entering the passcode) and enter your Apple ID password by touching the Touch ID/Home button. The capability can also be used in other apps and services that require confirmation, such as Apple Pay, banking apps, and others.
You can also restrict the access to specific content and apps on your phone. Suppose you let other people borrow your iPhone but don’t want them to use certain apps or to see data you’d rather keep to yourself. You can enable a restriction to prevent someone from accessing these areas without entering the restriction code. You can also restrict the use of apps, movies, music, and other content based on the age rating that the app or other content has.
Configuring Your Passcode and Touch ID
To configure the passcode you have to enter to unlock your iPhone, perform the following steps (note these steps show an iPhone that supports Touch ID; if your model doesn’t have this, the steps are slightly different as you will only be configuring a passcode):
iPhone X and Face ID
The iPhone X uses Face ID instead of Touch ID. For help configuring and working with Face ID, download the online supplement My iPhone X by going to www.informit.com/myiphone11.
1. On the Settings screen, tap Touch ID & Passcode.

2. Tap Turn Passcode On.

3. Enter a six-digit passcode.

4. Re-enter the passcode. If the two passcodes match, the passcode is set.

Already Have a Passcode?
When you first turned your iPhone on, you were prompted to create a passcode and to record a fingerprint for Touch ID. If your iPhone already has a passcode set, when you perform step 1, you’re prompted to enter your current passcode. When you enter it correctly, you move to the Passcode Lock screen, and you can make changes to the current passcode, add new fingerprints, and so on. In that case, you can skip directly to step 5. If you want to change your current passcode, tap Change Passcode and follow steps 3 and 4 to change it. Then continue with step 5.
5. If you have an Apple ID configured, enter your Apple ID password; if you don’t have an Apple ID configured, skip to step 7.
6. Tap Continue.

7. Tap Require Passcode; when you use Touch ID to unlock your iPhone, you don’t have an option for when the passcode is required, so if you are going to or already use Touch ID, skip to step 10.

8. Tap the amount of time the iPhone is locked before the passcode takes effect. The shorter this time is, the more secure your iPhone is, but also the more frequently you’ll have to enter the passcode if your iPhone locks frequently.
9. Tap Back.

10. If you have an iPhone 5s or later, tap Add a Fingerprint and continue to step 11; if you have a model that doesn’t support Touch ID, skip to step 25.

Are You Complex?
By default, your passcode is a simple six-digit number. If you want to have a more complex (and more secure) passcode, on the Create or Change Passcode screen, tap Passcode Options. You are prompted to create a new, complex passcode. You can choose Custom Alphanumeric Code, Custom Numeric Code, or 4-Digit Numeric Code (this is a less secure option and I don’t recommend it). Choose the option you want and then follow the onscreen prompts to create it. The Alphanumeric Code option is the most secure, especially if you use a code that is eight characters or longer that includes both letters and numbers. The steps to set a complex passcode are similar; the difference is that you use the keyboard and numeric keypad to configure the passcode instead of just the numeric keypad.
11. Touch the finger you want to record to the Touch ID/Home button, but don’t press it. An image of a fingerprint appears.
12. Leave your finger on the Touch ID/Home button until you feel the phone vibrate, which indicates part of your fingerprint has been recorded and you see some segments turn red. The parts of your fingerprint that are recorded are indicated by the red segments; gray segments are not recorded yet. This step captures the center part of your finger.

13. Lift your finger off the Touch ID/Home button and touch the button again, adjusting your finger on the button to record other parts that currently show gray lines instead of red ones. Other segments of your fingerprint are recorded.

14. Repeat step 13 until all the segments are red. You are prompted to change your grip so you can record more of your fingerprint.
15. Tap Continue.

16. Repeat step 13, again placing other areas of your finger to fill in more gray lines with red. This step captures the fingerprints more toward the edges of your fingers. When the entire fingerprint is covered in red lines, you see the Complete screen.

17. Tap Continue. The fingerprint is recorded and you move back to the Touch ID & Passcode screen. You see the fingerprint that has been recorded.

18. Tap the fingerprint you recorded.

19. Give the fingerprint a name.
20. Tap Passcode Lock.

21. Repeat steps 10–20 to record up to five fingerprints. These can be yours or someone else’s if you want to allow another person to access your iPhone.
22. To be able to use Touch ID to unlock your iPhone, ensure the iPhone Unlock switch is set to on (green).
23. To use your fingerprint to make Apple Pay payments, set the Apple Pay switch to on (green). (Refer to Chapter 15, “Working with Other Useful iPhone Apps and Features,” for more information about Apple Pay.)
24. If it isn’t enabled already and you want to also be able to enter your Apple ID password by touching your finger to the Touch ID/Home button, set the iTunes & App Store switch to on (green). You need to enter your Apple ID password and tap Continue to complete this configuration.

25. Swipe up the screen until you see the Voice Dial switch.
26. To prevent Voice Dial from working, set the Voice Dial switch to off (white). (Voice Dial enables you to make calls by speaking even if you don’t use Siri.)
27. Use the switches in the ALLOW ACCESS WHEN LOCKED section to enable or disable the related functions when your iPhone is locked. The options include Today View (the Today section of the Notification Center), Recent Notifications, Control Center, Siri, Reply with Message, Home Control, Wallet, and Return Missed Calls. If you set a switch to off (white), you won’t be able to access the corresponding function when your iPhone is locked.

28. If you want the iPhone to automatically erase all your data after an incorrect passcode has been entered 10 times, set the Erase Data switch to on (green).

29. Tap Enable.

Touch ID and Apps
The first time you launch an app that supports Touch ID, you’re prompted to enable Touch ID in that app. If you allow this, you can log into the associated account by touching the Touch ID button, just like unlocking your phone or using Apple Pay.
Automatic Erase
When you have enabled the Erase Data function and you enter an incorrect passcode when unlocking your iPhone, you see a counter showing the number of unsuccessful attempts. When this reaches 10, all the data on your iPhone is erased on the next unsuccessful attempt.
Making Changes
Any time you want to make changes to your passcode and fingerprint (iPhone 5s or later) settings, move back to the Passcode Lock screen by tapping Touch ID & Passcode and entering your passcode. To disable the passcode (not recommended), tap Turn Passcode Off, tap Turn Off, and enter the passcode. To change your passcode, tap Change Passcode. You then enter your current passcode and enter your new passcode twice. You return to the Passcode Lock screen, and the new passcode takes effect. You can change the other settings similar to how you set them initially as described in these steps. For example, you can add new fingerprints. To remove a fingerprint, move to the Fingerprints screen, swipe to the left on the fingerprint you want to remove, and tap Delete.
Automatic Locking
For security purposes, you should configure your iPhone so that it locks automatically after a specific amount of idle time passes. To do this, you use the Auto-Lock setting on the Display & Brightness settings screen as explained in Chapter 5.
Setting Restrictions for Content and Apps
To restrict access to content or apps, perform the following steps:
1. On the Settings screen, tap General.

2. Swipe up the screen until you see Restrictions.
3. Tap Restrictions.

4. Tap Enable Restrictions.

5. Create a Restrictions Passcode. You have to enter this passcode to change the content restrictions or to be able to access restricted content.

6. Re-enter your Restrictions Passcode. You return to the Restrictions screen, and the Allow switches are enabled.

Dueling Passcodes
Your iPhone can have two passcodes: the Lock passcode and the Restrictions passcode. Each controls access to its respective functions. Limiting access to content and apps likely means you will be letting someone else use your phone. The person who will be using your iPhone might need to be able to unlock it unless you want to have to unlock it for them. If you want to allow them to unlock the phone but want to restrict access to your Apple Pay information or Apple ID, create a fingerprint for that person, but disable Touch ID for Apple Pay and iTunes & App Stores (see the previous task for details). This enables the person to unlock and use your iPhone; you can control what they can do by setting a Restrictions passcode and configuring permissions as described in these steps. (You don’t want to give the person the passcode to the phone as that defeats the purpose of configuring restrictions.)
7. In the ALLOW section, set the switch next to each function you want to disable to off (white). For example, to prevent FaceTime calls, set the FaceTime switch to off (white); the FaceTime icon is removed from the Home screen and can’t be used. With the other controls, you can prevent access to Safari, the Camera, Siri & Dictation, AirDrop, CarPlay, the iTunes Store, and so on.

In-App Purchases
Some apps, especially games, allow you to make purchases while you are using the app. For example, you can buy additional levels for a game. To prevent in-app purchases, set the In-App Purchases switch to off (white). This is especially important if you let your phone be used by children or others who might inadvertently make purchases you don’t want made.
8. Swipe up to see the ALLOWED CONTENT section.
9. Tap Ratings For.

10. Tap the country whose rating system you want to use for content on your iPhone.
Whose Ratings?
The country you select in step 10 determines the options you see in the remaining steps because the restrictions available depend on the location you select. These steps show the United States rating systems; if you select a different country, you see rating options for that country instead.
11. Tap Restrictions.

12. Tap Music, Podcasts & News.

13. To prevent content tagged as explicit from being played, set the EXPLICIT switch to off (white). Explicit content will not be available in the associated apps, such as Music or News.
14. Tap Back.

15. Tap Movies.

16. Tap the highest rating of movies that you want to be playable (for example, tap PG-13 to prevent R and NC-17 movies from playing); tap Allow All Movies to allow any movie to be played; or tap Don’t Allow Movies to prevent any movie content from playing. Prevented movie ratings are highlighted in red.
17. To prevent movies from being streamed to the iPhone, set the Show Movies in the Cloud switch to off (white).
18. Tap Restrictions.

19. Tap TV Shows and use the resulting screen to set the highest rating of TV shows that you want to be playable (for example, tap TV-14 to prevent TV-MA shows from playing); tap Allow All TV Shows to allow any show to be played; or tap Don’t Allow TV Shows to prevent any TV content from playing. Prevented ratings are highlighted in red. Use the Show TV Shows in the Cloud switch to allow or prevent TV content from streaming on the iPhone. Tap Restrictions to return to the Restrictions screen.
20. Use the Books option to enable or disable access to sexually explicit books.
21. Tap Apps and set the highest rating of app that you want to be available (for example, tap 12+ to prevent 17+ applications from working); tap Allow All Apps to allow any application to be used; or tap Don’t Allow Apps to prevent all applications. Tap Restrictions to return to the Restrictions screen.
22. Use the Siri option to restrict explicit language or content during web searches.
23. Use the Websites option to control the websites that can be accessed. The options are to limit sites with adult content or to allow only specific websites to be visited. When you select the Specific Websites Only option, you can create a list of sites and only those sites can be visited.

24. Swipe up the screen until you see the PRIVACY section.
25. Use the settings in the PRIVACY section to determine whether apps can access information stored in each area and whether they should be locked in their current states. For example, you can prevent apps from accessing your calendars or photos. Configuring these is similar to the Privacy settings you read about earlier in this chapter.

26. Swipe up the screen until you see the ALLOW CHANGES section.
27. Tap areas that you want to restrict, such as Cellular Data or Volume Limit, and then tap Don’t Allow Changes to prevent changes to that area.

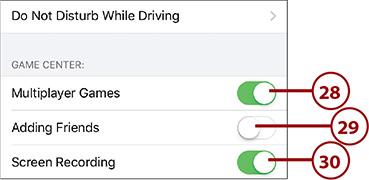
28. To prevent multiplayer games in the Game Center, set the Multiplayer Games switch to off (white). Users will no longer be able to play games against other people.
29. To prevent new friends from being added in the Game Center, set the Adding Friends switch to off (white). Players will be restricted to the friends already allowed.
30. To prevent the screen from being recorded during game play associated with the Game Center, set the Screen Recording switch to off (white).
Removing Restrictions
To remove all restrictions, move to the Restrictions screen (your Restrictions passcode is required) and tap Disable Restrictions. Enter your Restrictions passcode, and all restrictions are removed.
Customizing How Your iPhone Works with Apps
Installing apps on your iPhone enables you to add more functionality than you can probably imagine. As the old Apple ad use to proclaim, “There’s an app for that.” And in all likelihood, there probably is an app for a lot of what you would like to use your iPhone for. The App Store app enables you to find, download, and install apps onto your iPhone.
Before you jump into the App Store, take a few moments to ensure your iPhone is configured for maximum ease and efficiency of dealing with new apps.
Configuring Your iPhone to Download and Maintain Apps
To download apps from the App Store, you need an Apple ID (if you need help getting or configuring an Apple ID, see Chapter 3, “Setting Up and Using an Apple ID, iCloud, and Other Online Accounts”). With your Apple ID configured on your phone in the iCloud area, make sure it is also ready to go for the App Store and ensure you can use Touch ID when you download apps (instead of typing your password).
1. Open the Settings app.
2. Tap iTunes & App Store.

3. Ensure the Apple ID you want to use to download apps is shown at the top of the screen; if it isn’t tap the Apple ID shown, tap Sign Out, and then sign into your Apple ID.
4. Ensure the Apps switch is on (green); this causes any apps you download to your iPhone to also automatically be downloaded to other devices (with which the apps are compatible, of course) that use the same Apple ID.
5. Ensure the Updates switch is on (green); this causes any updates to apps you have installed on your iPhone to be downloaded and installed automatically. I recommend you use this option so you can be sure you are always running the most current versions of your apps.
6. If you don’t have an unlimited cellular data plan, you might want to set Use Cellular Data to off (white) so apps and other content are downloaded only when you are on a Wi-Fi network. If this is enabled (green), apps and content are downloaded to your iPhone when you are using a cellular network, which can consume significant amounts of your data plan. (Some apps or content are so large, they can only be downloaded when you are using a Wi-Fi connection.)

7. Use the information in the task “Configuring Your Passcode and Touch ID” to ensure the iTunes & App Store switch is enabled (green) so that you can use Touch ID to download apps instead of typing your password. (If it isn’t enabled, tap the switch, enter your Apple ID password, and tap OK to enable it.)

Using the App Store App to Find and Install iPhone Apps
The App Store app enables you to quickly and easily browse and search for apps, view information about them, and then download and install them on your iPhone with just a few taps.
When you use the App Store app, you can find apps to download using any of the following options:
• Today—This tab takes you to apps featured in the App Store on the day you go into the store. They are grouped in various ways, such as APP OF THE DAY, based on what is trending, and so on. When you tap any of the items on the Today screen, you move into the group or app on which you tapped.
• Games—Easily the most popular category of apps, Games enables you to find those critical games you need to prove your skills and pass the time. When you move into the Games area, the games are also grouped in various ways, such as Top Paid, Top Free, Top Categories, etc.
• Apps—This category leads you to apps that aren’t games. On this screen, in addition to the Top Paid and Top Free lists, you see apps organized by category. Tap a category to explore the apps it contains.
• Updates—Through this option, you can update your apps (if you don’t have automatic updates set as described earlier) or if you have automatic updates enabled, you see the list of updates made to the apps on your iPhone along with those that are pending.
• Search—This tool enables you to search for apps. You can search by name, developer, and other keywords.
Finding and downloading any kind of app follows this same pattern:
1. Find the app you are interested in. You can use the options described in the previous list to find apps by browsing for them, or you can use the search option to find a specific app quickly and easily.
2. Evaluate the app. The information screen for apps provides lots of information that you can use to decide whether you want to download an app (or not). The information available includes a text description, screenshots, ratings and reviews from users, and so on.
3. Download and install the app.
The following tasks provide detailed examples for each of these steps.
Searching for Apps
If you know something about an app, such as its name, its developer, its purpose, or just about anything else, you can quickly search the App Store to find the app. Here’s how to search for an app:
1. Move to the Home screen and tap App Store.

2. Tap Search.
3. Tap in the Search box.

4. Type a search term. This can be the type of app you are looking for based on its purpose (such as travel apps) or the name of someone associated with the app, its title, its developer, or even a topic. As you type, the app suggests searches that are related to what you are typing.
5. Tap the search you want to perform or tap the Search key on the keyboard to search for the term you entered in step 4. The apps that meet your search term appear.

6. Swipe up and down on the screen to review the apps in the search results.
7. If none of the apps are what you are looking for, tap Clear (x) in the Search box and repeat steps 4–6.
8. When you find an app of interest to you, tap it. You move to the app’s information screen.

9. Use the app’s information on the information screen to evaluate the app and decide if you want to download it. You can read about the app, see screenshots, and read other peoples’ reviews to help you decide. If you want to download the app, see “Downloading Apps” later in this chapter for the details.
Follow the Trends?
Before you enter a search term on the Search screen, you see the Trending Searches, which are the searches that are being performed most frequently. You can tap one of these to use it to search for apps.
Browsing for Apps
If you don’t know of a specific app you want, you can browse the App Store. To browse, you can tap any graphics or links you see in the App Store app. One of the most useful ways to browse for apps is by using categories:
1. Open the App Store app.

2. Tap Apps (browsing for games or using the Today option works very similarly).
3. Swipe up the screen until you see the Top Categories section.
4. Tap See All to browse all available categories.

5. Tap a category in which you are interested.

6. Swipe up and down to browse the groupings of apps, such as Apps We Love, Top Paid, and so on.
7. Tap See All for a grouping to browse the apps it contains.

8. Swipe up and down to browse the apps in the group you selected in step 7.
9. Tap an app in which you are interested. You move to that app’s information screen.

10. Use the information on the information screen to decide whether you want to download the app. You can read about the app, see screenshots, and read other peoples’ reviews to help you decide. If you want to download the app, see “Downloading Apps” later in this chapter for the details. Or, you can continue browsing by tapping the Back icon in the top-left corner of the screen to return to the category list.

>>>Go Further: MORE ON FINDING APPS
Following are a few pointers to help you use the App Store:
• When you see a + inside an app’s price or Get button, that means the app is a universal app, which means it runs equally as well on iPhones, iPads, and iPod touches.
• Some apps include video previews. When you see the Play icon on an image, it is a video preview. Tap the Play icon to watch it. Tap Done in the upper-left corner of the screen to move back to the screenshots.
• After you have used an app, you can add your own review by moving back to its Reviews tab and tapping Write a Review. You move to the Write a Review screen where you have to enter your iTunes Store account information before you can write and submit a review.
• You can read user reviews of the apps in the App Store. You should take these with a grain of salt. Some people have an issue with the developer or the type of app; are reviewing an older version of the app; or are commenting on issues unrelated to the app itself; and these issues can cause them to provide unfairly low ratings. The most useful individual user reviews are very specific, as in “I wanted the app to do x, but it only does y.” It can be more helpful to look at the number of reviews and the average user rating than reading the individual reviews.
Downloading Apps
Downloading and installing apps is about as easy as things get, as you can see:
1. In the App Store, view the app you want to download.
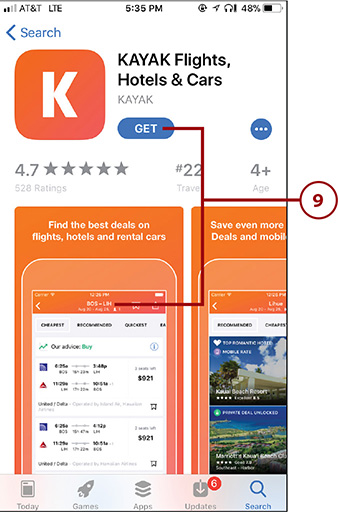
2. Tap GET (for free apps) or the price (for apps that have a license fee). The icon then becomes INSTALL, if it is a free app, or BUY if it has a license fee.

3. Tap Install or Buy. Depending on your iTunes & App Store settings, you might be prompted to sign in with your Apple ID and password to start the download. If you aren’t prompted to confirm the download, you can skip the next step because the app starts downloading immediately.

4. If you are prompted to confirm the download, and you are using an iPhone 5s or later and have enabled Touch ID for store downloads, touch the Touch ID/Home button at the prompt; if you are using another model, or you don’t use Touch ID for store downloads, type your Apple ID password, and then tap Sign In.


Face ID
If you have an iPhone X, you can configure Face ID so that you can confirm an app download by looking at your phone. See the online supplement My iPhone X by going to www.informit.com/myiphone11 for the details.
You see the progress of the process.
When the process is complete, the status information is replaced by the OPEN button.

>>>Go Further: MORE ON APPS
As you use the App Store app to install apps on your iPhone, keep the following hints handy:
• Like other software, apps are updated regularly to fix problems, add features, or make other changes. If you set the iTunes & App Store Updates setting to on (green) as described earlier in this chapter, updates to your apps happen automatically in the background. Your apps are always current so you don’t have to update them manually. (More information on updating apps is in Chapter 16, “Maintaining and Protecting Your iPhone and Solving Problems.”)
• If you see the Download icon next to an app rather than Get or Buy, that means you have previously downloaded (and paid for if it isn’t free) the app but it is not currently installed on your iPhone. Tap the icon to download and install it.
• To let someone else know about an app, tap the Share icon and then tap how you want to let him know; the options include AirDrop, Message, Mail, Twitter, and Facebook. To buy an app for someone, tap Gift.
• Apps can work in the background to keep their information current, such as Weather and Stocks. To configure this, open the Settings app, tap General, and tap Background App Refresh. Tap Background App Refresh and tap Off to disable this, Wi-Fi to enable it only when your iPhone is connected to a Wi-Fi network, or Wi-Fi & Cellular Data to allow it any time your iPhone is connected to the Internet. Tap the Back icon, located in the upper-left corner of the screen, to see the list of apps installed on your iPhone. To enable an app to work in the background, set its switch to on (green). To disable background activity for an app, set its switch to off (white).
• After you install an app, move to the Settings screen and look for the app’s icon. If it is there, the app has additional settings you can use to configure the way it works. Tap the app’s icon in the Settings app and use its Settings screen to configure it.