
15. Working with Other Useful iPhone Apps and Features

In this chapter, you learn about some other really useful apps and iPhone functionality. Topics include the following:
![]() Touring other cool iPhone apps
Touring other cool iPhone apps
![]() Listening to music with the Music app
Listening to music with the Music app
![]() Finding your way with Maps
Finding your way with Maps
![]() Using Bluetooth to connect to other devices
Using Bluetooth to connect to other devices
![]() Connecting your iPhone to other iPhones, iPod touches, or iPads
Connecting your iPhone to other iPhones, iPod touches, or iPads
![]() Working with the Wallet app and Apple Pay
Working with the Wallet app and Apple Pay
![]() Working seamlessly across your devices
Working seamlessly across your devices
In previous chapters, you learned about many of the iPhone’s most useful apps, such as Phone, Mail, Messages, Photos, Safari, and Calendar. In this chapter, you learn about three more: Music to listen to your favorite tunes wherever you are, Maps to find and navigate your way to locations near and far, and Wallet that helps you manage and use various kinds of information such as boarding passes, reward cards, and so on.
In this chapter, you also learn how you can connect your iPhone to other devices in several ways. You can use Bluetooth to connect to speakers, headphones, fitness trackers, keyboards, and more. You can connect to other iPhones, iPads, and Macs using AirDrop, so you can quickly and easily share files across those devices.
You find out how Apple Pay enables you to safely and easily pay for purchases in online stores or in the “real world.” You can store credit or debit cards in the Wallet app and then use them to pay for purchases with a wave of your phone or tap of a button.
The iOS Handoff feature makes it easy to work on the same tasks on Macs, iPhones, and iPads. For example, you create an email on a Mac, and see the same version on an iPad and your iPhone, too. When a phone call comes in to your iPhone, you can choose to answer it on your Mac, iPad, or Apple Watch.
Before getting into those details, take a tour of some of the other great iPhone apps you might want to explore on your own.
Touring Other Cool iPhone Apps
The following table provides an overview of a number of other apps (all of which are installed by default) that you might find useful or entertaining:
Other Cool iPhone Apps
Icon |
App |
Description |
|---|---|---|
|
Calculator |
In portrait orientation, the Calculator is the equivalent of one you would get at the local dollar store. Rotate the iPhone to access scientific calculator options. Access the Calculator quickly by swiping up from the bottom of the screen to open the Control Center; then, tap the Calculator icon. You can also tap the Calculator icon on a Home screen to launch the app. |
|
Clock |
Get the current time in multiple locations around the world, set alarms, set a consistent time to sleep every day, use a stopwatch, or count down time with a timer. Quickly access the Clock app by swiping up from the bottom of the screen to open the Control Center. Tap the Clock icon to open the Clock app. Or, tap the Clock icon on a Home screen. |
|
Compass (Extras folder) |
Transform your iPhone into a compass. Using this app, you can see your current location on the analog-looking compass and with your exact position shown in latitude and longitude. If you swipe to the left, you transform your iPhone into a level that measures on the horizontal planes along with angles. Swipe to the right to get back to the compass. |
|
Files |
When you enable the iCloud Drive under your iCloud account, use the Files app to access the documents stored there. (See Chapter 3, “Setting Up and Using an Apple ID, iCloud, and Other Online Accounts,” for information on configuring your iCloud account.) |
|
Find Friends (Extras folder) |
See the current location of “friends” who are part of your Family Sharing group or who you add to the app manually. You can also share your location with others. |
|
Find iPhone (Extras folder) |
Use this app to locate other iPhones, iPads, or Macs that have enabled Find My iPhone using the same iCloud account. (Learn about Find My iPhone in Chapter 16, “Maintaining and Protecting Your iPhone and Solving Problems.”) |
|
Flashlight (Control Center) |
Use your iPhone’s flash as a flashlight. Open the Control Center and tap the Flashlight icon to turn the light on; tap it again to turn it off. Press and hold on the icon to pop up the brightness slider; drag the slider up to increase the brightness or down to decrease it. This is a very simple app, but also happens to be extremely useful. |
|
Health |
Track and manage health-related information from multiple sources, such as other apps and devices, in one location. You can see your information on dashboards, or you can drill down into the details. You can configure the information you see by selecting the sources and types of information you want to track. You can also store your vital information in the Medical ID so that emergency workers can access it from your Lock screen in order to help you. |
|
Home |
After you configure it to work with your home automation devices, use the Home app to control those devices. |
|
iBooks |
Access and organize books and PDFs so that you always have something to read. The app enables you to change how the books appear on the screen, such as making the font larger or smaller. iBooks syncs across your devices so that you can read something on your iPhone and then pick it up later at the same spot on an iPad. |
|
iTunes Store |
The iTunes Store enables you to browse or search for music, TV shows, movies, and other content. When you find something you want to listen to or watch, you can easily download it to your iPhone. You access the iTunes Store using your Apple ID; any purchases you make are completed using the purchase information associated with that account. Content you download to your iPhone is available in the associated app; for example, when you download music, you listen to that music using the Music app. This app works very similarly to the App Store app, which is covered in Chapter 4, “Customizing How Your iPhone Works.” |
|
News |
Read news from a variety of sources. You can search news and save items of interest to you. You can also choose your favorite news sources so that you can focus more on what you care about and avoid what you don’t have any interest in. |
|
Notes |
Capture different kinds of information, including text notes, lists, photos, maps, and more. You can also draw in the app and attach different types of objects to notes, and then use the Attachment Manager to view them. Using online accounts with the Notes app, such as iCloud, means that your notes are available on all your devices. If you want to share a note, tap the Share icon and choose how you want to share it. |
|
Podcasts |
This app enables you to subscribe to and then listen to podcasts on a wide variety of topics. Episodes of podcasts to which you are subscribed download to your iPhone automatically. You can configure how many episodes are saved on your phone globally and for individual podcasts. There are podcasts on any topic you can imagine so it’s very likely you can find podcasts that are of interest to you. You can search for specific podcasts or browse for them based on category and topic. |
|
Reminders |
Create reminders for just about anything you can imagine, such as to-do lists, items you need to purchase, etc. You can configure alarms for reminders that trigger notifications based on date and time or by location. You can set up repeating reminders, too. If that isn’t enough, you can also create multiple lists of reminders, such as one for work and one for personal items. Like other apps, you can store your reminders on the cloud so that you can access them from multiple devices. |
|
Stocks |
Use this app to track stocks in which you are interested. You can add any index, stock, or mutual fund as long as you know the symbol for it, and you can even use the application to find a symbol if you don’t know it. You can see current performance and view historical performance for various time periods. Rotate the iPhone to see a more in-depth view when you are examining a specific stock. You can see the current “ticker” for the items you are tracking by opening the Widget screen and swiping up or down until you see the Stocks widget. |
|
Tips (Extras folder) |
Use this app to get a few pointers about working with your iPhone. Of course, because you have this book, you are way ahead of the game. |
|
TV |
Use this app to watch TV shows and movies. You can sign in to a cable provider to watch TV content and you can subscribe to video services, such as HBO Now. Movies or TV shows you purchase or rent using the iTunes Store app are added to this app so you can watch them. |
|
Voice Memos (Extras folder) |
Record audio notes using the Voice Memos app. Play them back, and, through syncing, move them onto your computer, or share them by tapping the Share icon. You can record through the iPhone’s microphone or via the mic on the earbud headset. |
|
Watch |
Use this app to pair and configure your iPhone with an Apple Watch. Once paired with your iPhone, you can configure how your Apple Watch accesses content from your iPhone’s apps such as Mail, Calendar, Messages, Phone, Contacts, Photos, Music, Reminders, and more. |
|
Weather |
See current weather conditions and a high-level forecast for any number of locations. You can use the default locations, and if you tap the List icon in the lower-right corner of the screen, you can add, remove, and organize the locations you want to track. Swipe through the screens to see each location’s forecast. |


Your Control Center
You can configure some of the icons you see on the Control Center. See Chapter 4, “Customizing How Your iPhone Works,” for details.
Listening to Music with the Music App
The Music app enables you to quickly move to and play any music in your personal music library, or you can access Apple’s enormous music library through Apple Music and iTunes Radio. The Music app is quite powerful and offers lots of useful features for working with and listening to all types of music. The following tasks provide you with a good start toward making the most of this amazing app.
There are different sources of music to which you can listen. These include the following sources:
• Music you own—You can purchase music using the iTunes Store app; this music immediately becomes available in the Music app. You can buy individual songs or collections of songs. Once purchased, you can download this music onto any of your devices using the same Apple ID as was used for the purchase.
You can also add music you own on audio CDs or in a digital format by first adding that music to the iTunes app and then syncing that music onto your iPhone. If you already own music like this, there is no additional cost to add it to your iPhone, but it does require some time and effort along with the use of the iTunes app on a computer.
• Apple Music—This subscription service from Apple enables you to access its huge music library. You use Apple Music to stream music onto your phone. You can also download it to the phone so that you can listen to it when your phone isn’t connected to the Internet or if you want to avoid using cellular data to stream music.
The benefit of Apple Music is that the amount of music available to you is both enormous and extremely diverse. Unless you have very niche musical tastes, you are likely to find any music you want to listen to in Apple Music. You can also access Apple Music on any of your compatible devices, such as an iPad or a Mac, at no additional charge.
The downside of Apple Music is that it requires a monthly subscription fee. And you are only “renting” the music. If you let your Apple Music membership expire, you lose access to all of its music.
• iTunes Radio—This source, which is free to use, consists of streamed music organized in “stations.” You can listen to existing stations or you can create your own stations based on songs or playlists that you like. You must have your phone connected to the Internet to be able to listen to iTunes Radio.
Of course, you can mix and match these sources. For example, you may already own music and also use Apple Music and iTunes Radio to expand the music available to you. Understanding which type of music you are working with is important because the source can change what you can do with that music. For example, you have to download Apple Music onto your phone to be able to listen to it when you aren’t connected to the Internet.
There are lots of ways to use the Music app; the following tasks show you how to find and listen to music in your library and Apple Music. Working with iTunes Radio is similar.
Music Settings
Like most other apps you use, the Music app has settings you can configure to change some aspects of how the app works.
Finding Music in Your Library
The Library source contains music you own and music from Apple Music that you’ve added to it. There are a number of ways music in your library is organized and you can use these categories to find music to which you want to listen. Following are a couple of examples to get you started.
Finding Music by Artist
Finding music by a specific artist is a quick way to get to music you want to hear.
1. Open the Music app.

2. Tap Library. (Like other apps, Music remembers where you left off. If you don’t move directly to the main Library page, tap the back icon located in the upper-left corner of the screen until you move to that page.)
3. Tap Artists.

4. Swipe up or down the list of artists to find the one you are interested in or tap the first letter of the artist’s name on the index (tap # for artists whose name starts with a number).
5. Tap the artist whose music you want to explore.

6. Swipe up or down the screen to browse the artist’s music.
7. Tap an album to see its contents.

8. Review and play the music you see (see “Playing Music” later in this chapter for details).

Finding Songs
Finding specific songs to which you want to listen is also simple.
1. Open the Music app.

2. Tap Library. (Like other apps, Music remembers where you left off. If you don’t move directly to the main Library page, tap the back icon located in the upper-left corner of the screen until you move to that page.)
3. Tap Songs. On the Songs screen, you see a list of all the songs in your library organized by artist and song title.

4. Tap Sort.

5. Tap Title to have the songs sorted by title or Artist to have them sorted by the artist’s name. If you know a specific song you want to hear, choose Title, or if you are looking for music from a specific artist, choose Artist instead. This example shows the Title option selected.

6. Swipe up or down the screen to browse songs.
7. To find a song by its title, tap the index on the first letter of the song’s or artist’s name and then swipe up or down the screen to find the song you want to hear.
8. Tap the song you want to hear (see “Playing Music” later in this chapter for details).

Other Library Categories
There are a number of other categories of music in your library. Playlists takes you to a list of your playlists. Albums shows you music grouped by album. Downloaded Music takes you to the music in your library that is currently stored on your iPhone so you can listen to it without an Internet connection. Home Sharing takes you to music you are sharing on a local network. The Recently Added section shows you music you’ve added to your library most recently.
Change Your Library Categories
You can edit the categories you see in your library as well as adding different ones by tapping Edit. Then add categories by tapping their circles, remove them by tapping their check marks, or reorganize them by dragging their List icons up or down the screen. When you’re done making changes, tap Done.
Setting Up and Finding Music with Apple Music
Apple Music is Apple’s subscription music service. Apple gives you the first three months for free to try it out, and after that you pay a monthly fee (currently $9.99 per month for an individual membership, $14.99 per month for a family membership of up to six people, or $4.99 for a student membership in the United States). The Apple Music Library is huge and you are likely to be able to find and listen to any music of interest to you. You can stream music to listen to it via the Internet or you can download it to your phone so that you don’t have to be connected to the Internet to hear it.
Apple Music provides suggestions to you for music you might enjoy based on the music you listen to, or search for, and based on music you indicate that you like by tapping the heart icon while you view or listen to it. Over time, these suggestions get more specific to your musical tastes so that Apple Music’s recommendations should help you discover and enjoy new music.
Apple Music is accessible on your iPhone, other iOS devices (such as an iPad), and any computer with the iTunes software on it. (Note that with a single membership, you can play Apple Music on only one device at a time.)
To access Apple Music, you must subscribe to the service.
Subscribing to Apple Music
You can subscribe to Apple Music as follows:
1. Open the Music app.
2. Tap For You.
3. Tap Try It Now.

4. Tap the type of account you want to create (Individual, Family, or College Student).
5. Tap Start Trial.

6. Follow the onscreen instructions to complete the process by first selecting an existing Apple ID to use or creating a new one. After you’ve completed the process, Apple Music is enabled in the Music app and you see its options on the Dock at the bottom of the screen. (These steps are not shown in figures.)
Browsing Apple Music for You
For You music is music that Apple Music has selected for you (hence the name) based on what you have listened to, what is already in your music library, and what you indicate that you like (you learn how to do this later). To browse the music Apple Music has selected, perform the following steps:
1. Open the Music app and tap For You. On the For You screen, you see a collection of playlists, albums, and songs that Apple Music recommends based on music you’ve listened to or that you indicated you like.
2. Swipe up and down the screen to browse the selected music. It is organized in different categories, and the content of each category changes over time.

3. Explore the contents of a playlist or album by tapping its artwork. You see the list of songs in the collection you tapped.

4. Review and play the music you see (see “Playing Music” later in this chapter for details).
5. Tap Back to return to the For You screen to browse for other music.

Browsing Apple Music
You can browse Apple Music to find music you want to hear.
1. Tap Browse.
2. Tap a category of music you want to browse, such as Genres.

3. Swipe up and down to browse all the genres.
4. Tap a genre to explore its contents.

5. Swipe up and down and left and right to browse all the content available.
6. Tap a playlist, album, or other grouping to see the music it contains.

7. Review and play the music you see (see “Playing Music” later in this chapter for details).

Curated Playlist?
A curated playlist is one in which the music has been selected by a person (the curator) or a group of people (the curators). Other types of playlists are generated by software, such as a playlist based on a song you select; software then picks other songs that “go with” the selected song.
Adding Apple Music to Your Library
You can add Apple Music to your Library to make it easier to listen to again and so that it is downloaded to your iPhone so you can play it without an Internet connection. Here’s how:
1. Using the information in the previous tasks, find Apple Music you want to add to your library.
2. To add all the songs you see to your Library, tap + ADD or to add an individual song to your library, tap its Add icon (+). You see the Added confirmation pop up briefly and then all of the songs in the current collection or the individual songs download to your iPhone. When the process is complete, you see DOWNLOADED at the top of the screen.

In Your Library, but Not on Your iPhone
If you see a collection of music that has the download icon (a cloud with a downward-pointing arrow) instead of + ADD, that means the music is in your library but hasn’t been downloaded to your iPhone. When you listen to that music, it streams onto the phone, which requires an Internet connection. You can tap the download icon to download the music onto your iPhone.
Limited Data Plan?
If you have a limited data plan, you might want to disable music downloading when you are using a cellular Internet connection. Open the Settings app and tap Music. Tap Cellular Data. Use the controls on the Cellular Data screen to determine whether cellular data can be used at all (the Cellular Data switch), if it can be used for streaming, or if it can be used to download music. You also use the Cellular Data screen to choose the quality level of streamed music.
Limited Data Plan, Part II
If you have a limited data plan, you should consider downloading music if you think you’ll listen to it more than once. That way, you can play it from the copy stored on your iPhone rather than streaming it over your cellular connection. You can always delete any music on your iPhone that you no longer want, so there’s no downside to downloading it (especially if you download music when you are using a Wi-Fi network)—assuming your iPhone has plenty of free space of course.
Searching for Music
Searching for music enables you to quickly find music you want to hear. You can search music in your library or music available via Apple Music. To search for music, do the following steps:
1. Open the Music app.

2. Tap Search.
3. Tap a recent search to repeat that same search, and move to step 6.
4. Tap a trending search (one that other people are performing) to perform that search, and move to step 6.
5. Tap in the Search bar to perform a new search.
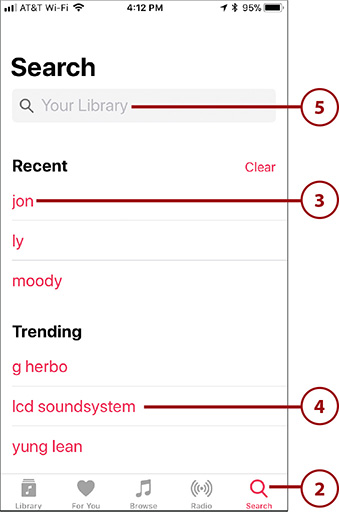
6. Search the music in your library by tapping Your Library, or search Apple Music by tapping Apple Music.
7. Type the term for which you want to search; this can be an artist’s name, song title, album title, and so on. As you type, the results that meet your search term appear under the tabs.
8. Swipe up and down the screen to review the results of your search.
9. When you find something of interest, tap it. You move to that content’s page. What this contains depends on what you tapped on. For example, if you tap an album, you move to the album’s page. If you tap an artist, you move to a screen showing sections for top results, albums, songs, videos, and so on.

10. Browse the content of what you tapped in step 9.
11. Tap See All to see all the items in a group, such as all albums (not shown in the figure).
12. Tap an album, song, or other item to view it.

13. If you tapped an album, browse the songs it contains.
14. Tap a song to play it.

Playing Music

In the prior tasks, you learned how to find music to which you want to listen. No matter what you choose to listen to, such as a song, album, playlist, or other content, you use the same set of controls to listen to that music. When you find what you want to play, tap it to start it. The following sections describe several ways you can control music that is playing.
Playing Music on the Miniplayer

When you play music, the Miniplayer appears at the bottom of the screen. On this bar, you see the song currently playing and the art associated with the song playing. You also see the Pause/Play icon that you can tap to stop or start the music.
While the Miniplayer appears, you can use the upper part of the Music app’s screen to find other music to listen to, to download more music, and so on. The Miniplayer remains on the screen as long as music plays so you can control what is playing while you are doing other things with the app.
To have more control over the music and to see other options, tap the Miniplayer. The Now Playing screen opens.
Playing Music on the Now Playing Screen

The Now Playing screen has many features, including:
• Timeline—Just below the art, you see the timeline. The elapsed time is on the left side, and the remaining time is on the right. The Playhead shows you where you are in the song. You can drag this to the left to move back in the song or to the right to move ahead.
• Song information—Below the timeline is the song’s name (in larger, bold font). Under that is the artist and album title. If any of this information is too large to fit on the screen, it scrolls across the screen to display it all.
• Previous/Rewind—If the current song has been playing for more than a second or two, tap this icon once to move to the beginning of the current song. If you are at the beginning of the current song, tap it to move to the previous song in the current source (album, artist, and so on). Tap and hold to rewind in the current song.
• Pause/Play—Tap Pause to pause the song. Tap Play to play it again.
• Next/Fast-Forward—Tap once to move to the next song on the list (or the next randomly selected song, if you are shuffling). Tap and hold to fast-forward in the current song.
• Volume—Drag the slider to the left to lower the volume or to the right to increase it.
• Output device—Tap this icon to change where music is playing. When you tap this, a menu showing all the options appears. For example, if you have Bluetooth speakers paired with your iPhone, you can tap them to play the music there. If you have devices connected via AirPlay, such as an Apple TV, you can tap them to use them to listen to music. If you have EarPods connected to your iPhone, you can choose to play music over them. To return playback to the iPhone’s speakers, tap iPhone.
• Ellipsis—Whenever you see the ellipsis icon (…), you can tap it to open a menu of commands as described in the following text and figure.
When you open an item’s menu by tapping the ellipsis (…) icon, you see a menu of commands for that item. The commands you see depend on the item you are viewing at the time. For example, you see a different set of commands for an album than you do for an iTunes radio station. Also, the status of the item affects the commands you see. If you are viewing Apple Music that has been added to your library, you see the Remove command, which enables you to remove the music; if you are viewing music that hasn’t been added, you see the Add to Library command instead.
Following is an example of this menu for an album that is part of my library.

To collapse the Now Playing screen, swipe down from the top of the Now Playing screen. You return to the Miniplayer.
Turn It Up! (Or Down!)
No matter which technique you use to find and play music, you can control the volume using the Volume buttons on the left side of your iPhone. Press the upper button to increase volume or the lower one to decrease it. While you are pressing a button, a volume indicator appears on the screen to show you the relative volume level as you press the buttons. When you are on the Now Playing screen or viewing the Music control bar (covered later in this chapter), you can also use the Volume slider to set the sound level. If you listen with the EarPods included with your iPhone, you can use the buttons on the right EarPod’s wire to crank it up (press and hold the top button) or down (press and hold the bottom button).
Sleep Timer
Here’s a tip courtesy of my acquisitions editor. To cause your music to stop playing after a specific period of time, open the Control Center (by swiping up from the bottom of the screen), tap the Clock icon, and then tap Timer. Use the wheels to set the amount of time that you want the music to play. Tap When Timer Ends. Swipe up the screen and tap Stop Playing. When the timer expires, the music stops.
Playing Music from the Lock Screen

When audio is playing and your iPhone is locked, you can control music playback right from the Lock screen.
Press the Side or Touch ID/Home button or lift the phone (with Raise to Wake enabled). Your iPhone wakes up and you see the Lock screen, which displays information about and controls for the music currently playing. Use the controls you see; these work like they do in the Music app.
When you’re done controlling the tunes, press the Side button again to prevent the controls from being on the screen (so that they don’t accidentally get activated if you put your iPhone back in your pocket, for example).


If your phone is unlocked, you can open the same tool by swiping down from the top of the screen. You see the same music controls as on the Lock screen. The Notification Center is under those controls; you can swipe up and down the list of notifications to review them. Swipe up from the bottom of the screen to return to the previous screen.
Playing Music from the Control Center


To get to some of the music controls quickly, swipe up from the bottom of the Home screen (all models except the iPhone X) or swipe down from the upper-right corner of the screen (iPhone X) to open the Control Center. In the upper-right corner of the Control Center, you see Audio tools. Press and hold on this area to open the same set of music controls as you see on the Lock screen. When you’re done, tap outside the music controls to return to the Control Center. Use the controls you see; then, close the Control Center by tapping the downward-facing arrow at the top and continue what you were doing.
More Than Just Music
The controls in the Audio section of the Control Center change based on the app you are using to play audio. For example, when you are using the Podcasts app to play a podcast, these tools control the podcast’s playback. Likewise, if you play audio with a different app, these controls work for that app.
Siri and Music
You can use Siri to select, play, and control music, too. For example, you can activate Siri and say “Play album Frank Sinatra’s Greatest Hits” to play that album or “Play Song ‘Free Bird’” to play that song. You can say, “Show me music by Switchfoot” to see music by that group. Refer to Chapter 11, “Working with Siri,” for details.
Using 3D Touch with the Music App (iPhone 6s/6s Plus and Later)
Like other default iPhone apps, the Music app supports 3D Touch, which you can use in a couple of ways.


When you press on the Music app’s icon, you see the Quick Actions menu. At the bottom of this menu, you see the Music widget displaying music you have played recently; tap an album cover or playlist art to play its music. You can tap Play Beats 1 to play that music or tap Search to jump to the search screen.


When you are browsing music, press on music in which you are interested to perform a Peek on it. In the Peek window, you view the music on which you pressed and you see a menu of commands. Tap a command to perform it. For example, tap the Play icon to play the music you are viewing.
Finding Your Way with Maps
The Maps app enables you to find locations and view them on the map. However, the real power of the Maps app is that you can then get detailed, turn-by-turn, voice directions to those places. You can use these directions to drive, walk, or even take public transportation to the places you find. Maps monitors your path; when there are issues that might be a problem, such as heavy traffic or an accident, the app attempts to reroute you to a better way.
Generating directions with the Maps app is easy and quick to do as the following steps demonstrate:
1. On the Home screen, tap Maps.

2. Tap in the Search bar.

3. Type in the location you want to find. You can type in an address, a place name (such as Indianapolis Executive Airport), or even a description of what you are looking for (for example, coffee). As you type, the app presents a list of locations that meet your search. Keep typing until you see the location you want to find on the list; if it isn’t a public location, such as a business, you will likely have to type the entire address.
4. Tap the location you want to see on the map. The map appears and the location, or locations (if you do a more general search), for which you searched are marked with a pushpin. (If you found multiple locations, tap the one to which you want to navigate.)

5. To get directions to the selected location, tap Directions.

6. Tap how you want to travel to the destination, such as Drive, Walk, etc. The options you see depend on where you are going and where you are. The app generates alternative paths when possible. The primary or default path is shown in dark blue; alternative paths are in light blue. You see a time estimate for each path.
Don’t Want to Get There from Here?
Maps assumes you want a path from your current location to the destination you selected. However, you can choose a different starting point by tapping My Location. Use the Change Route screen to search for and select a different starting location. Tap Route. Maps updates the route to start from the location you selected on the Change Route screen.
7. If you want to follow an alternate path, tap it. Maps re-generates the route.
8. Tap Go. The app shows you the part of the route you are on and announces what you need to do.

9. Follow the verbal or onscreen directions to start your journey. Maps shows you where you are on your route and what is coming next. As you approach the next step, such as a turn, the app starts to make announcements about what you need to do.

10. Listen for the app’s instructions about the next step and follow the directions you hear.

11. To get more information or find interim locations (such as gas stations or restaurants), swipe up from the bottom of the screen.

12. Tap the kind of service you need, such as Coffee (other options can include Gas Stations, Lunch, Breakfast, Dinner, or Restaurants). Maps locates services of that type that are “convenient” to your path and presents options on the map and in the panel at the bottom of the screen.

13. Swipe up and down on the list of options to review how far away from you they are and how much time will be added to the trip if you go to those locations.
14. To navigate to one of the locations on the list, tap GO. Maps reroutes you to that location. (After you arrive at that location, Maps prompts you to resume your previous route.)
15. If you don’t want to choose one of the locations and just return to the directions to the original location, tap Done.

16. If you move out of the Maps app, you can tap the blue bar at the top of the screen to return to it. When the next step in your path approaches, you see that step in a pop-up box on the screen.

17. Continue following the directions until you arrive at your destination.
18. Tap End Route to reset Maps.

>>>Go Further: GET THERE WITH MAPS
Here are a few Maps pointers to help you along your way:
• If you want to stop the navigation before you reach the end, tap End and then tap End Route.
• On the Options panel (that appears when you swipe up from the bottom of the screen), tap Audio to change the volume of the instructions or pause the audio directions. You can also choose where the audio directions are played from, such as through the Dock connector or via your car’s audio system.
• If you tap Overview on the Options panel, you see the overview of your route, similar to what you see at the beginning. Tap the black box that shows the next step to return to the step-by-step view.
• Tap Details to see a list of each step along the way.
• The Ride option shows your route using a ride-sharing service and app, such as Uber. When you choose Ride, your iPhone identifies the ride-sharing app configured on your phone. You see an estimate of wait time for your ride and cost for each service. Tap NEXT on the option you want to use. Maps then starts the ride-sharing process just like when you use the ride-sharing app directly.
• To repeat the current step you are on, tap it. The app speaks the current step.
• You can use the standard zoom and swipe motions on the map to change your view. For example, you can swipe down on the map to see further ahead on the path. Maps uses a “3D” view so you can see along your path as if you are flying above it.
• If you change the map so you can no longer see your location, tap the arrow icon and the map re-centers on your current location.
• If you get off the planned path, such as by taking a wrong turn, Maps reroutes you automatically.
• If Maps identifies a potentially faster route (perhaps because of traffic conditions on the current route), it prompts you to change to the updated route. If you allow that, Maps reroutes you. If not, you continue on your current path.
• If you tap the Info (i) icon, you can configure some aspects of how the app works or looks. For example, you can enable or disable the traffic re-routing function or change the view from a map to a satellite image.
• Maps remembers your recent searches and presents them on the search list when you move into search mode. You can tap a recent search to repeat it.
• Maps has a number of settings you can configure to tailor how the app works for you. For example, in the Driving & Navigation settings, you can choose to avoid tolls or highways or if the speed limit is displayed on the screen. Open the Settings app and tap Maps to see all its settings options.
• If you connect your iPhone to a car audio/video system that supports AirPlay, you see the Maps screen on the car’s video screen and hear its directions over the car’s audio system.
• If you connect your iPhone to a car stereo via Bluetooth or AirPlay and have the Show Parked Location switch on the Maps Settings screen enabled (green), the location of your parked car is shown on the map (assuming its location can be determined). This can eliminate the need to try to remember where you parked.
Using Bluetooth to Connect to Other Devices
The iPhone includes built-in Bluetooth support so you can use this wireless technology to connect to other Bluetooth-capable devices. The most likely devices to connect to your iPhone in this way are Bluetooth headphones, speakers, headsets, or car audio/entertainment/information systems, but you can also use Bluetooth to connect to other kinds of devices, most notably keyboards.
To connect Bluetooth devices together, you pair them. In Bluetooth, pairing enables two Bluetooth devices to communicate with each other. The one constant requirement is that the devices can communicate with each other via Bluetooth. For devices to find and identify each other so they can communicate, one or both must be discoverable, which means they broadcast a Bluetooth signal other devices can detect and connect to.
There is also a “sometimes” requirement, which is a pairing code, passkey, or PIN. All those terms refer to the same thing, which is a series of numbers, letters, or both, entered on one or both devices being paired. Sometimes you enter this code on both devices, whereas for other devices you enter the first device’s code on the second device. Some devices, such as headphones or speakers, don’t require a pairing code at all.
When you have to pair devices, you’re prompted to do so, and you have to complete the actions required by the prompts to communicate via Bluetooth. This might be just tapping Connect, or you might have to enter a passcode on one or both devices to connect them.
Connecting to Bluetooth Devices
This task demonstrates pairing an iPhone with Bluetooth headphones; you can pair it with other devices similarly.
1. Move to the Settings screen. The current status of Bluetooth on your iPhone is shown.
2. Tap Bluetooth.

3. If Bluetooth isn’t on (green), tap the Bluetooth switch to turn it on. If it isn’t running already, Bluetooth starts up. The iPhone immediately begins searching for Bluetooth devices. You also see the status Now Discoverable, which means other Bluetooth devices can discover the iPhone. In the MY DEVICES section, you see devices to which you’ve previously paired your iPhone; their current status is either Connected, meaning the device is currently communicating with your iPhone, or Not Connected, meaning the device is paired with your iPhone, but is not currently connected to it. In the OTHER DEVICES section, you see the devices that are discoverable to your iPhone but that are not paired with it.
4. If the device you want to use isn’t shown in the OTHER DEVICES section, put it into Discoverable mode. (Not shown; see the instructions provided with the device.) When it is discoverable, it appears in the OTHER DEVICES section.
5. Tap the device to which you want to connect. If the device isn’t currently paired with your iPhone, you might need to provide a passkey. If a passkey is required, you see a prompt to enter it on the device with which you are pairing; perform step 6. If no passkey is required, skip to step 7.

6. If it is required (not shown in a figure), input the pairing code, passkey, or PIN on the device, such as typing the passkey on a keyboard if you are pairing your iPhone with a Bluetooth keyboard.
7. If required, tap Connect (not shown in a figure)—some devices connect as soon as you select them or enter the passkey and you won’t need to do this. You see the device to which the iPhone is connected in the MY DEVICES section of the Bluetooth screen, and its status is Connected, indicating that your iPhone can communicate with and use the device.
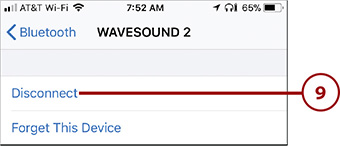
8. To manage a device, tap its Info icon.

9. Tap the command you want to use; for example, to stop working with a device, tap Disconnect. The options you see depend on the device and its current status.
When your iPhone is paired with a device that supports audio, such as headphones, you can open the device menu (such as the one on the Audio controls panel) and tap the device on which you want to hear that audio.

>>>Go Further: MANAGING BLUETOOTH
Following are a few pointers for using Bluetooth with other devices:
• Like other connections you make, the iPhone remembers Bluetooth devices to which you’ve connected before and reconnects to them automatically, which is convenient—most of the time anyway. If you don’t want your iPhone to keep connecting to a device, move to the Bluetooth screen and tap the device’s Info (i) button. Tap Forget this Device and then tap Forget Device. The pairing is removed. Of course, you can always pair the devices again at any time. If you just want to stop using the device, but keep the pairing in place, you can tap Disconnect instead.
• If a device is already paired but has the Not Connected status, you need to connect it to use it. Move to the Bluetooth screen and tap the device to connect it to your iPhone. Once its status becomes Connected, your iPhone can communicate with the device again.
• You can use multiple Bluetooth devices with your iPhone at the same time. For example, you might want to be connected to a Bluetooth speaker and a keyboard at the same time.
Connecting Your iPhone to Other iPhones, iPod touches, or iPads
The iPhone (and other devices that run the iOS software, including iPod touches and iPads) supports peer-to-peer connectivity, which is the technical way of saying that these devices can communicate with one another directly via a Wi-Fi network or Bluetooth. This capability is used in a number of apps, especially multiplayer gaming, for information sharing, and for other collaborative purposes.
If the app you want to use communicates over a Wi-Fi network, such as a network you use to access the Internet, all the devices with which you want to communicate must be on that same network. If the application uses Bluetooth, you must enable Bluetooth on each device and pair them (as described in the previous task) so they can communicate with one another.
The specific steps you use to connect to other iOS devices using a collaborative app depend on the specific app you are using. The general steps are typically as follows:
1. Ensure the devices can communicate with each other. If the app uses Wi-Fi, each device must be on the same Wi-Fi network. If the app uses Bluetooth, the devices must be paired.
2. Each person opens the app on his device.
3. Use the app’s controls to select the devices with which you’ll be collaborating. Usually, this involves a confirmation process in which one person selects another person’s device and that person confirms that the connection should be allowed.
4. Use the app’s features to collaborate. For example, if the app is a game, each person can interact with the group members. Or, you can directly collaborate on a document with all parties providing input into the document.
Using AirDrop to Share Content with Other iPhones, iPod touches, iPads, or a Mac
You can use the AirDrop feature to share content directly with people using a Mac running OS X Yosemite or later, or using a device running iOS 7 or later. For example, if you capture a great photo on your iPhone, you can use AirDrop to instantly share that photo with iOS device and Mac users near you.
AirDrop can use Wi-Fi or Bluetooth to share, but the nice thing about AirDrop is that it manages the details for you. You simply open the Share menu—which is available in most apps—tap AirDrop, and tap the people with whom you want to share.
When you activate AirDrop, you can select Everyone, which means you see anyone who has a Mac running OS X Yosemite or later, or an iOS device running version iOS 7 or newer and is on the same Wi-Fi network as you (or has a paired Bluetooth device); those people can see you, too. (You can decline any request to share with you via AirDrop so even if you choose Everyone, you can still decide which content is moved onto your iPhone.) Or, you can select Contacts Only, which means only people who are in your Contacts app are able to use AirDrop to communicate with you. In most cases, you should choose the Contacts Only option so you have more control over who uses AirDrop with you.
Is AirDrop Safe?
Anything you share with AirDrop is encrypted, so the chances of someone else being able to intercept and use what you share are quite low. Likewise, you don’t have to worry about someone using AirDrop to access your information or to add information to your device without your permission. However, like any networking technology, there’s always some chance—quite small in this case—that someone will figure out how to use this technology for nefarious purposes. The best thing you can do is to be wary of any requests you receive to share information and ensure they are from people you know and trust before you accept them.
Enabling AirDrop
To use AirDrop, you must enable it on your iPhone.
1. Open the General screen of the Settings app.
2. Tap AirDrop.

3. Tap Receiving Off if you don’t want to receive any content via AirDrop (you can still share your content with others), tap Contacts Only to allow only people in your Contacts app to be able to request to share content with you, or Everyone to allow anyone using a device running iOS 7 or later or a Mac running OS X Yosemite or later in your area to request to share content with you.

Another Way to Configure AirDrop
You can also configure AirDrop by opening the Control Center and pressing on the Airplane mode, Wi-Fi, Cellular Data, or Bluetooth icons. On the resulting panel, tap the AirDrop icon. Then choose the AirDrop status you want to set (these are the same as described in step 3).
Share and Share Alike?
You should choose the Receiving Off option when you aren’t using AirDrop, especially if you usually use the Everyone option. By disabling it, you avoid having people in your area be able to try to communicate with you without you wanting them to do so. When you want to receive content again, you can quickly reset AirDrop to Contacts Only or Everyone again.
Using AirDrop to Share Your Content
To use AirDrop to share your content, do the following:
1. Open the content you want to share. This example shows sharing a photo using the Photos app (this app is covered in detail in Chapter 14, “Viewing and Editing Photos and Video with the Photos App”). The steps to share content from any other app are quite similar.
2. Tap the Share icon.

3. If the app you selected in step 1 supports it, you can swipe to preview other content and select it by tapping it. Each item you select is available for sharing. When marked with the check mark, the content will be shared.
4. Tap AirDrop (not shown on the figure) or just wait a couple of seconds. The AirDrop icon is replaced with icons for each person in your area who has AirDrop enabled that you have permission to access (such as being in her Contacts app if she is using the Contacts Only option).
5. Swipe to the left or right to browse all the people with whom you can share.

6. Tap the people with whom you want to share the content. A sharing request is sent to those people’s devices. Under their icons, the Waiting status is displayed. When a recipient accepts your content, the status changes to Sent. If a recipient rejects your content, the status changes to Declined.


7. If the app supports it, browse and select more content to share by tapping items that aren’t selected; tap items currently selected if you don’t want to send them again.
8. Tap the people with whom you want to share the content.
9. When you’re done sharing, tap Done.

Using AirDrop to Work with Content Shared with You
When someone wants to share content with you, you receive an AirDrop sharing request. (If you use AirDrop to share content among your own devices such as sending a photo from your iPhone to a Mac, it is accepted automatically.) Respond to sharing requests by doing the following:
1. Make sure you know the person attempting to share with you.
2. Make sure the content being shared with you is something you want. In this case, a photo is being shared.
3. To accept the content on your iPhone, tap Accept. To reject it, tap Decline.

4. Use the associated app to work with the shared content. For example, the Photos app provides tools to edit and share photos that are shared with you. In some cases, such as saving a contact shared with you, you need to tap Save to save the content on your iPhone or Cancel to not save it. (Other apps provide different controls depending on the type of content and the app it opens in.)

Working with the Wallet App and Apple Pay
The Wallet app manages all sorts of information that you need to access, from airline tickets to shopping and credit cards to movie tickets and rewards cards. Instead of using paper or plastic to conduct transactions, you can simply have your iPhone’s screen scanned.
You use the Wallet app to access your Apple Pay information to make payments when you are in a physical location, such as a store or hotel (Apple Pay is covered in detail in “Working with Apple Pay” later in this chapter). You can also use Apple Pay when you make purchases online using some apps on your iPhone.
Working with the Wallet App
You can store a wide variety of information in your wallet so that it is easily accessible. Examples include boarding passes, membership cards (to a gym for example), store cards (such as Starbucks if you are an addict like I am), and loyalty or discount cards (like those loyalty cards that grocery stores or gas stations offer). The Wallet app eliminates the need to carry physical cards or paper for each of these; instead, your information is available to you digitally, and you can enter it as needed by scanning the iPhone’s screen.


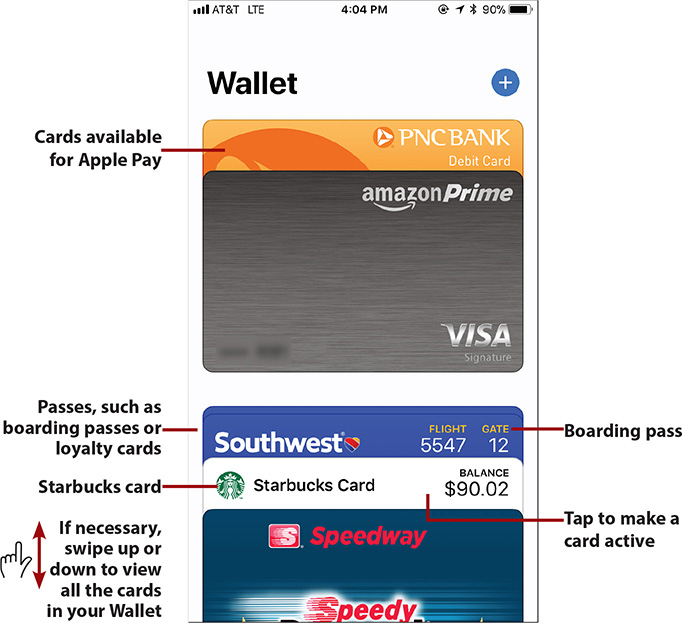
To open your wallet, tap the Wallet icon on a Home screen or first open the Control Center and then tap the Wallet icon. The Wallet app opens. At the top, you see the Apple Pay section that shows the cards you’ve enabled for Apple Pay. In the Passes section, you see other cards, such as boarding passes and loyalty cards.
As you add cards and boarding passes to your Wallet, they “stack up” at the bottom of the screen. Tap the stack to see the list of items available in your Wallet. The cards expand so that you can see at least the top of each card; if you have a lot of cards installed, swipe up or down on the screen to view all of them.

To use a card in your Wallet, tap it. It becomes the active card and you can access its information. For example, you can quickly access a boarding pass by opening the Wallet app and tapping it. To board the plane, you scan the code on the boarding pass. Even better, boarding passes start appearing on the Lock screen a few hours before the take-off time. Press (3D Touch) or swipe to the right (non-3D Touch) on the boarding pass on the Lock screen and you jump directly to the boarding pass in the Wallet app (you don’t even need to unlock your phone).
Some passes enable you to share them or information about them by tapping the Share icon and using the standard sharing tools that appear.
Others are connected to an app; you can tap the icon on the pass or card to move into the associated app.


When you tap a card’s info icon (i), you can use the controls on a card’s Configure screen to adjust certain aspects of how the card works. If you set the Suggest on Lock Screen switch to on (green), for a card that works based on a location, such as your favorite stores, the card automatically appears on your Lock screen at the appropriate times. And, some cards can be automatically refilled from your bank account or credit/debit card so that they always have a positive balance.
To delete a card from your Wallet (such as a boarding pass when the flight is finished), tap its Info icon, tap Delete or Remove Pass, and then confirm that you want to delete or remove it. The pass or card is removed from your Wallet.
When you’re done configuring a card, tap Done. The Configure screen closes and you return to the card you were configuring.
There a couple of ways to add cards to your Wallet. The most frequent way to add a card is by using the Add to Wallet command in the app associated with the card. In some cases, you might be able to scan the code on a card to add it.
Adding Passes or Cards to Your Wallet Using an App
If you are a frequent patron of a particular business (perhaps you are addicted to Starbucks coffee like I am) that has an iPhone app, check to see if it also supports the Wallet app. For example, when you use the Starbucks app configured with your account, you can add a Starbucks card to your Wallet as follows:
1. Open the app for which you want to add a pass or card to your Wallet.

2. Tap Pay. (These steps are specific to the Starbucks app, but you can add other cards to your Wallet in similar ways. Look for the command that enables you to configure how you pay for purchases associated with that card.)

3. Tap the app’s command to manage its information; this command can be labeled with different names in different apps (it is the MANAGE command in the Starbucks app), or it might be accessed with an icon or menu.

4. Tap Add to Wallet.

5. Tap Add. The card or pass is added to your Wallet and is ready to use. (You might be prompted to do some additional configuration of the card, such as to indicate favorite locations.)

Finding Apps that Support the Wallet
You can search for apps that support the Wallet by opening your Wallet, tapping Edit Passes at the bottom of the Passes section, and tapping Find Apps for Wallet. This takes you into the App Store app and you see apps that support the Wallet. You can then download and install apps you want to use as described in Chapter 4.
Adding Passes or Cards to Your Wallet by Scanning Their Codes
In some cases, you can add a card or pass to the Wallet by scanning its code. To do so, follow these steps:
1. Open the Wallet app and swipe until you reach the bottom of the screen.
2. Tap Edit Passes.

3. Tap Scan Code.

4. Use the iPhone’s camera to scan the bar code on the card by positioning the phone so that the white box encloses the bar code on the card (not shown on a figure). If the bar code is recognized and is available for the Wallet, the pass or card is added to the Wallet and is ready for use. If the bar code isn’t recognized or doesn’t support the Wallet, you see an error and you need to find an associated app for the card to use it with the Wallet.
Working with Apple Pay
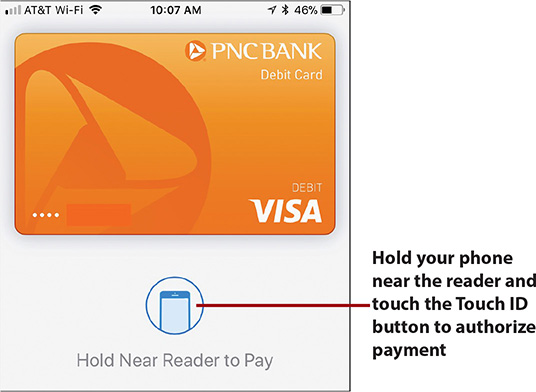
With Apple Pay, you can store your cards in the Wallet app, and they are instantly and automatically available to make purchases. Apple Pay enables you to pay for things more easily and securely than with physical credit or debit cards. (Note that Apple Pay requires an iPhone 6 or later.) When you are making a purchase in a physical store, you can simply hold your iPhone up to a contactless reader connected to the cash register and tap your finger on the Touch ID button. The iPhone communicates the information required to complete the purchase.
iPhone X
Using Apple Pay on an iPhone X is a bit different than on other models. Refer to the online supplement My iPhone X by going to www.informit.com/myiphone11 for the details of using Apple Pay on an iPhone X.

Apple Pay also simplifies purchases made in online stores. When you use an app or a website that supports Apple Pay, you can tap the Buy with Apple Pay icon to complete the purchase.
Apple Pay is actually more secure than using a credit or debit card because your card information is not passed to the device; instead, a unique code is passed that ties back to your card, but that can’t be used again. And, you never present your card so the number is not visible to anyone, either visually or digitally.
Apple Pay Support
In addition to requiring an iPhone 6 or later model, a credit or debit card must support Apple Pay for it to work with that card. The easiest way to figure out if your cards support it is to try to add a card to Apple Pay. If you can do so, the card is supported and you can use it. If not, you can check with the credit or debit card company to see when support for Apple Pay will be added so you can use it.
Adding Credit or Debit Cards to Apple Pay
To start using Apple Pay, add a credit or debit card to it:
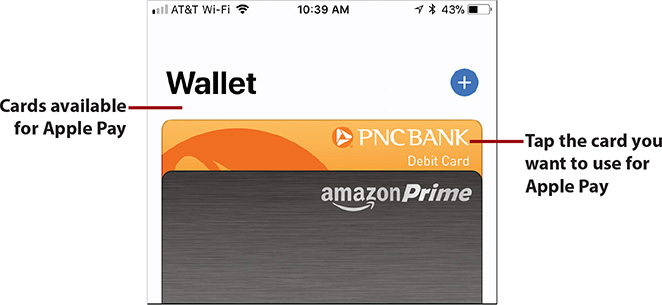
1. Open your Wallet by tapping its icon on the Home screen.

2. Tap Add (+) in the Apple Pay section at the top of the screen.

3. Tap Continue.

4. Position the iPhone so that the card is inside the white box. The app captures information from the card, which is highlighted in white on the screen. When it has captured all the information it can, you move to the Card Details screen.

Prefer to Type?
If you don’t want to use the camera option, or if that option doesn’t capture the information correctly, you can also type your card’s information directly into the fields. To do this, perform step 3, and then tap Enter Card Details Manually, which is at the bottom of the Scan screen. You can use the resulting Card Details screens to manually enter the card’s information.
5. Use the keyboard or keypad to enter any information that wasn’t captured or to correct any information that wasn’t captured correctly.
6. Tap Next.

7. Use the keyboard or keypad to enter any information that wasn’t captured or to correct any information that wasn’t captured correctly.
8. Tap Next.

9. Tap Agree. The information for the card is verified. If it can’t be verified, you see an error message. For example, if the card doesn’t support Apple Pay, you see a message saying so. If this happens, tap OK to close the message and then wait for your card to support Apple Pay or enter a different card’s information. When the card’s verification is complete, you see it in your Wallet. Once the card is activated, you are ready to use it with Apple Pay.


More Verification Required
In some cases, there might be an additional verification step after you tap Agree in step 9. When this is the case, the Complete Verification screen appears. Tap how you want to receive the verification code, such as via Email or Text Message, and then tap Next. The card configuration completes. You should receive a verification code. When you have the code, open the Settings app and tap Wallet & Apple Pay. Tap the card you need to verify, and then tap Enter Code. Enter the verification code you received; when you enter the correct code, the card is verified and becomes available for Apple Pay.
Managing Apple Pay

To manage Apple Pay, open the Settings app and tap Wallet & Apple Pay. On the resulting screen, you can do the following:
• Tap a card to configure it, such as to determine if notifications related to it are sent. You also see a list of recent transactions for the card.
• Add a new credit or debit card.
• Use the Double-Click Home Button switch to determine whether you can access the cards in your Wallet by pressing the Touch ID/Home button twice when the phone is locked. This makes using your Wallet even easier because you press the Home button twice and your cards appear; tap a card to use it or touch the Touch ID/Home button to pay for something with Apple Pay.
• Set the Allow Payments on Mac switch to on (green) if you use a Mac computer and want to be able to use Apple Pay for online transactions.
• Set your default Apple Pay card. The default card is used automatically; you have to manually select other cards in the Wallet app to use one of them instead.
• Update your shipping address, email addresses, and phone numbers.

You should also make sure Apple Pay is set to use Touch ID because this makes it much easier and faster. Open the Settings app, tap Touch ID & Passcode, and then enter your passcode. Ensure that the Apple Pay switch is on (green). This enables you to complete Apple Pay transactions by touching the Touch ID/Home button. (See Chapter 4 for the steps to help you configure Touch ID.)
Paying People with Apple Pay
Apple Pay will enable you to send and receive money from other individuals; however, this feature was not active at press time. Refer to the online supplement My iPhone X by going to www.informit.com/myiphone11 to learn how you can pay individuals with Apple Pay and receive payment from them as well.
Working Seamlessly Across Your Devices
Your iPhone can work seamlessly with other iOS devices running iOS 8 and later (such as iPads) and Macs running OS X Yosemite and later. This enables you to change devices and keep working on the same tasks. For example, you can start an email on your iPhone and then continue it on your Mac without missing a beat.
You can also take phone calls on iPads or Macs.
Working with Handoff
Handoff enables you to work seamlessly between iOS devices, as well as Macs running OS X Yosemite or later. Each device needs to be signed into the same iCloud account and have Handoff enabled. If you do not have multiple iOS devices running iOS 8 or later, or a Mac running OS X Yosemite or later, then there is no need to turn on this feature.

Ensure that Handoff is enabled on all the devices with which you want to use it. On iOS devices, enable Handoff by opening the Settings app, tapping General, and then tapping Handoff. Set the Handoff switch to on (green).
To enable handoff on a Mac running OS X Yosemite or later, open the System Preferences app, and then open the General pane. Ensure that the Allow Handoff between this Mac and your iCloud devices check box is checked.

If you want to be able to take phone calls on other devices, open the Phone settings and tap Calls on Other Devices. Set the Allow Calls on Other Devices switch to on (green). Set the switch to on (green) for each device on which you want to be able to take calls.
Using Handoff
When Handoff is enabled on your devices, you can work on the same items on any device, as the following example of working with email shows:
1. Start an email on your iPhone (note this only works for iCloud email).

2. To work on the email on another iOS device, swipe up on the Mail icon on its Lock screen and unlock the device or to work on a Mac, click the Handoff icon on the left end of the Dock.

3. Work on the email on the iOS device or Mac.

Handoff Goes Both Ways
This works in the other direction, too. For example, if you open a web page on your Mac, you see the Safari icon on the iPhone’s Lock screen. Swipe up on it and unlock your iPhone, and the web page on your Mac opens on your iPhone.
Most Apple apps support Handoff, and Apple has made it available to other software developers so they can add support to their apps, too.
Taking Phone Calls on Macs or iPads

When your iPhone is on the same Wi-Fi network as an iPad running iOS 8 or later, or a Mac running OS X Yosemite or later, you can take phone calls on those devices. When a call comes in to your iPhone, you see the call screen on the other devices and can take the call on one of those devices (see Chapter 7, “Communicating with the Phone and FaceTime Apps”).