3. Setting Up and Using an Apple ID, iCloud, and Other Online Accounts

In this chapter, you learn how to connect your iPhone to various types of accounts, such as iCloud, Exchange, and Google, so that apps on your iPhone can access data stored on the Internet cloud. Topics include the following:
![]() Configuring an Apple ID
Configuring an Apple ID
![]() Configuring and using iCloud
Configuring and using iCloud
![]() Setting up other types of online accounts on your iPhone
Setting up other types of online accounts on your iPhone
![]() Configuring other types of online accounts
Configuring other types of online accounts
![]() Setting how and when your accounts are updated
Setting how and when your accounts are updated
No iPhone is an island. Connecting your iPhone to the Internet enables you to share and sync a wide variety of content using popular online accounts such as iCloud, Exchange, and Google. Using iCloud, you can put your email, contacts, calendars, photos, and more on the Internet so that multiple devices—most importantly your iPhone—can connect to and use that information. You can also use Exchange, Google, and other online accounts to store, manage, and use email, calendars, and contact information.
You need to configure these accounts on your iPhone to be able to use them; in this chapter are sections for several different accounts you might want to use. Of course, you only need to refer to the sections related to the accounts you actually use. With all of these services, you need to understand how and when your information is updated along with tasks you might find valuable as you manage the various accounts on your iPhone.
Configuring an Apple ID
An Apple ID is required to access Apple’s online services, including iCloud, the App Store, iTunes, and the online store. You can access all of these services with one Apple ID.
An Apple ID has two elements. One is the email address associated with your account; this can be one provided by Apple or you can choose to use an address from a different service (such as Google Gmail). The other element is a password.
In addition to your email address and password, your contact information (such as physical address and phone number) and payment information (if you make purchases through your account, such as apps or storage upgrades) is also part of your Apple ID.
If you have used Apple technology or services before, you probably already have an Apple ID. If you don’t already have one, obtaining an Apple ID is simple and free.
If you have any of the following accounts, you already have an Apple ID:
• iTunes Store—If you’ve ever shopped at the iTunes Store, you created an Apple ID.
• Apple Online Store—As with the iTunes Store, if you made purchases from Apple’s online store, you created an account with an Apple ID.
• Find My iPhone—If you obtained a free Find My iPhone account, you also created an Apple ID.
Another way you might have already obtained an Apple ID is during the initial iPhone startup process when you were prompted to sign in to or create an Apple ID.
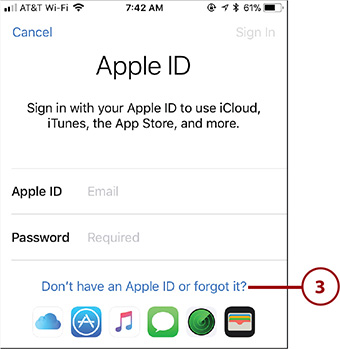
If you don’t have an Apple ID, read the next section to obtain one. If you already have an Apple ID, move to “Signing into Your Apple ID” to learn how to sign into it on your iPhone. If you both have an Apple ID and have already signed into it on your iPhone, skip to the section “Changing the Personal Information Associated with Your Apple ID” to learn how to configure it.
Two-Factor Authentication
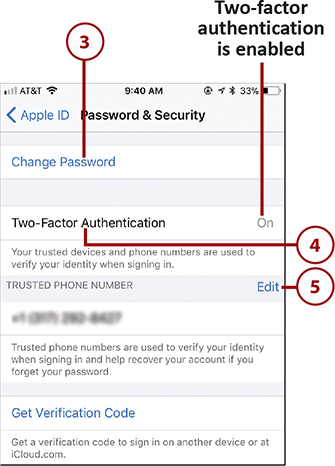
Apple uses two-factor authentication for its services. This requires that you have two pieces of information to be able to access your Apple accounts. One is your Apple ID login information (email and password). The other is a verification code that is sent to other devices on which the Apple ID is already configured (called trusted devices). This makes using Apple services more secure because even if someone was able to get your Apple ID and password (which is unlikely), he would still need the verification code to be able to sign in to your account (meaning he would also have to be able to access another device on which your Apple ID is already configured, which is very, very unlikely). In general, you should use two-factor authentication when it is available (it requires you have at least two devices that can use your Apple ID, such as an iPhone and a Mac).
You can configure two-factor authentication for your Apple ID in the Password & Security settings, which are described in the next section.
Changing the Personal Information Associated with Your Apple ID
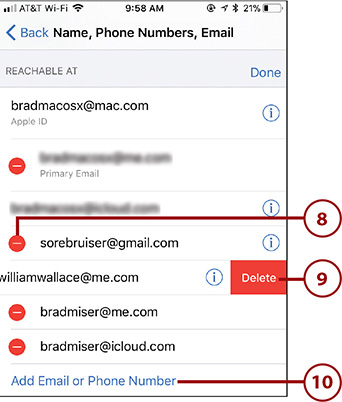
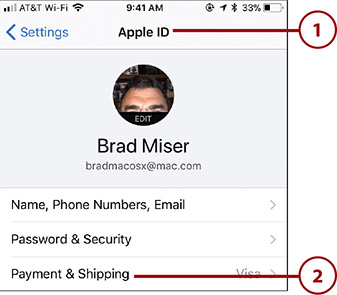
When you create or sign in to your Apple ID, the personal information associated with your account is used on your iPhone. You can change this information on your phone, for example, if you want to change your contact information or how you pay for purchases from Apple. Following are the steps you can use to change the personal information associated with your Apple ID:
Confirmations Galore
Many changes you make to your Apple ID, such as adding a new email address or changing security settings, result in you receiving confirmation emails and notifications from Apple on all of the devices tied to your account. These are helpful because they confirm the actions you are taking. If you ever receive such a notification but you haven’t changed your account, carefully review it. In many cases, especially email notifications, these unexpected notifications are attempts to get your information for nefarious purposes. Don’t respond to emails you don’t expect even if they appear to be from Apple (if you make a change and then receive an email, that is expected). Instead, log in directly to your account on your iPhone or other device to make sure it hasn’t been changed by someone else.
Signing Off
If don’t want to continue accessing your Apple ID on your iPhone or you want to sign into a different Apple ID, tap Sign Out at the bottom of the Apple ID screen. If Find My iPhone is enabled, you need to enter your password and tap Turn Off to continue the process. You might be prompted to keep some information on your iPhone; if you choose to keep that information, it remains on your iPhone but is no longer synchronized to the information stored on the cloud. After you have completed the process, you can sign in to the same or a different Apple ID using the information in “Signing In to Your Apple ID” earlier in this chapter.
Configuring and Using iCloud
iCloud is a service provided by Apple that provides you with your own storage space on the Internet. You can store content from your computer or devices in your storage space on the cloud, and because it is on the Internet, all your devices are able to access that information at the same time. This means you can easily share your information on your iPhone, a computer, and iPad, so that the same information and content is available to you no matter which device you are using at any one time.
Although your iPhone can work with many types of online/Internet accounts, iCloud is integrated into the iPhone like no other (not surprising because the iPhone and iCloud are both Apple technology). An iCloud account is part of an Apple ID; if you have an Apple ID, you also have an iCloud account.
An iCloud account is useful in a number of ways, including the following:
• Photos—You can store your photos in iCloud to back them up and to make them easy to share.
• Email—An iCloud account includes an @icloud.com email address. You can configure any device to use your iCloud email account, including an iPhone, an iPad, an iPod, and a computer.
• Contacts—You can store your contact information in iCloud.
• Calendars—Putting your calendars in iCloud makes it much easier to manage your time.
• Reminders—Through iCloud, you can be reminded of things you need to do or anything else you want to make sure you don’t forget.
• Notes—With the Notes app, you can create text notes, draw sketches, and capture photos for many purposes; iCloud enables you to use these notes on any iCloud-enabled device.
• Messages—This puts all of your text messages on the cloud so you can access the same messages from any device.
• Safari—iCloud can store your bookmarks, letting you easily access the same websites from all your devices. And you can easily access websites currently open on other devices, such as a Mac, on your iPhone.
• News—iCloud can store information from the News app online, making reading news on multiple devices easier.
• Health—This causes the information stored using the Health app to be available to multiple devices. For example, you might track information on your Apple Watch and want to be able to analyze it on your iPhone.
• Wallet—The Wallet app stores coupons, tickets, boarding passes, and other documents so you can access them quickly and easily. With iCloud, you can ensure that these documents are available on any iCloud-enabled device.
• Game Center—This capability stores information from the Game Center app on the cloud.
• Siri—It can be helpful to manage Siri information on multiple devices; this setting puts that information on the cloud.
• Keychain—The Keychain securely stores sensitive data, such as passwords, so that you can easily use that data without having to remember it.
• Find My iPhone—This service enables you to locate and secure your iPhone and other devices.
• iCloud Backup—You can back up your iPhone to the cloud so that you can recover your data and your phone’s configuration should something ever happen to it.
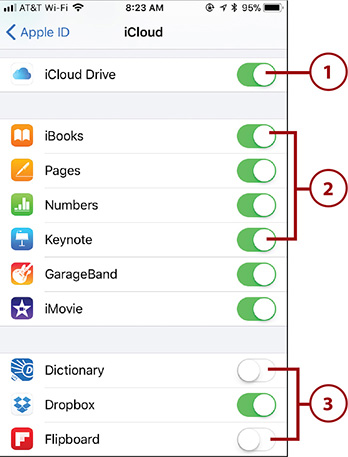
• iCloud Drive—iCloud enables you to store your documents and other files on the cloud so that you can seamlessly work with them using different devices.
• App Data—When iCloud Drive is enabled, you can allow or prevent apps from storing data there.
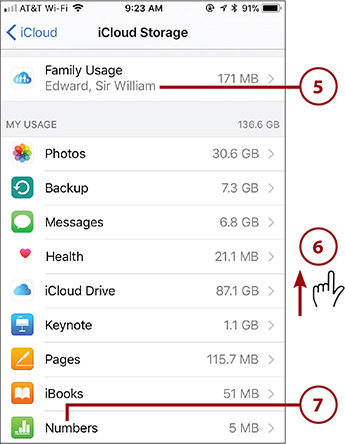
You can also manage your iCloud storage space, share your location, and configure some aspects of iCloud mail.
You learn about iCloud’s many useful features throughout this book (such as using iCloud with your photos, which is covered in Chapter 14). The tasks in this chapter show you how to set up and configure the iCloud features you want to use.
Multiple iCloud Accounts
You can have more than one iCloud account. However, you can be signed in to only one iCloud account on your iPhone at a time.
I’m In
To access your iCloud account, sign in to your Apple ID as described in “Signing In to Your Apple ID” earlier in this chapter.
It’s Not All Good: Proceed with Caution
If you store a lot of sensitive information in your keychain on a Mac, such as usernames and passwords to websites, credit cards, and such, be careful about enabling keychain syncing. When you enable this iCloud feature, all this data becomes available on your iPhone and can be used by anyone who can use your phone. Assuming you have a passcode to the phone, you are protected from someone using your phone without you knowing it, but if you let someone use your phone, they can also use your sensitive information. You might choose to leave keychain syncing off and just keep a minimum amount of sensitive information on your phone.
>>>Go Further: CONFIGURING FIND MY iPHONE
Find My iPhone enables you to locate and secure your iPhone if you lose it. This feature is enabled by default when you sign in to your iCloud account. You should usually leave it enabled so that you have a better chance of locating your iPhone should you lose it—or in case you need to delete its data should you decide you won’t be getting the iPhone back. There are a couple of configuration tasks you can do for Find My iPhone:
• To disable Find My iPhone, open the iCloud settings screen and tap Find My iPhone. Set the Find My iPhone switch to off (white) and enter your Apple ID password at the prompt. You can no longer access your iPhone via the Find My iPhone feature.
• To send the last known location of the iPhone to Apple when power is critically low, open the Find My iPhone settings screen and set the Send Last Location switch to on (green). When your iPhone is nearly out of power, its location is sent to Apple. You can contact Apple to try to determine where your iPhone was when the battery was almost out of power.
>>>Go Further: Yet Even More iCloud Configuration Options
Most of the time, you can use your iCloud account just fine if you only configure it as described in the previous tasks. However, there are some other configuration options located at the bottom of the iCloud settings screen that you might want to use at some point:
• Look Me Up. Some iCloud-aware apps can look you up via your Apple ID; people who do this see your first and last names. You can tap Look Me Up to see which apps and people have accessed this information.
• Share Your Location. With this feature, you can share your location with others. You can enable the feature by setting its switch to on (green) and choosing which of your iCloud devices is used to determine your location. You can share your location in Messages, and you can enable people you’ve included in your Family Sharing group to view your location.
• Mail. Use this option to configure certain aspects of your iCloud email. These options are explained in Chapter 8, “Sending, Receiving, and Managing Email.”
>>>Go Further: EMAIL ALIASES
One of the great features of iCloud is using email aliases. You can create alias addresses for specific purposes, such as avoiding spam or just to use an email address you prefer. Email sent to one of your aliases comes into your normal inbox. When you send email from an alias, it appears to be from the alias address, even though any aliases are still related to the same email account. You can create email aliases for your iCloud account using your iCloud website, available at www.icloud.com. Log in to your iCloud account, and then open the Mail app. Open the Mail Preferences dialog by clicking the gear icon and choosing Preferences. Then, click the Accounts tab, where you can create and manage up to three aliases.
Setting Up Other Types of Online Accounts on Your iPhone
Many types of online accounts provide different services, including email, calendars, contacts, social networking, and so on. To use these accounts, you need to configure them on your iPhone. The process you use for most types of accounts is similar to the steps you used to set up your iCloud account. In this section, you learn how to configure Exchange and Google accounts.
Configuring an Exchange Account
Microsoft Exchange is the most widely used system for corporate email. Your iPhone is compatible with Exchange, which is good news indeed. (You can even configure multiple Exchange accounts on your iPhone if you can’t get by with just one.) You can sync Exchange email, contact, calendar, reminder, and notes information on your iPhone; this works similarly to synchronizing with your iPhone using an iCloud account.
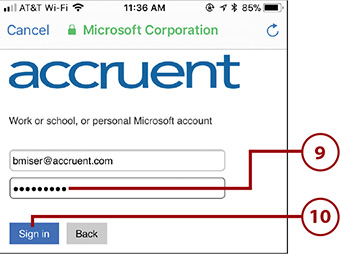
Before you can use Exchange on your iPhone, the Exchange server for your account must be configured to support iOS devices. Almost all are these days. You need to have your email address, username, and password; you might also need the server address and domain. If you don’t know this information for the Exchange account, you need to contact the IT organization providing the account to get it so you can configure it on your iPhone. With this information in hand, you can use the following steps to configure the Exchange account:
>>>Go Further: MORE ON EXCHANGE CONFIGURATION
There are several other things you might need to do to keep your Exchange account working as you want it to:
• The automatic configuration option, as described in these steps, is the easiest one and is also the one most widely used in the business world today. If it doesn’t work for you, check with the IT organization that manages your Exchange account to get the exact configuration steps for your account. If you can’t get direct support, you need the details about your account, including username, password, server address, and domain. With that information, you need to manually configure the account. This is similar to configuring other types of accounts, as described in “Setting Up an Online Account That Isn’t Built-in.”
• Sometimes, you might need to change your account’s password if it gets reset (for security purposes most organizations require that Exchange passwords be reset after a certain amount of time, such as 90 days). Because your iPhone won’t be able to connect your account with the current password, you see messages telling you the iPhone can’t access your account. If you know the new password, enter it and tap OK; your account is updated and works again. However, if you don’t have the new password with you, these prompts can be quite annoying as you have to keep clearing them and they keep reappearing immediately. They might even get your Exchange account locked if the iPhone tries and fails to connect a certain number of times. If this happens, you can disable the account by turning off all the data options so your phone won’t try to connect to the account. After you get a new password, turn on the data options again and enter the new password at the prompt. Or, use the technique my great acquisitions editor employs; when she encounters a password issue, she puts the iPhone in Airplane mode and turns off Wi-Fi so it won’t present annoying warnings until she updates the password.
• You can’t change the password for an Exchange account on your iPhone. You have to change the password elsewhere, such as through your company’s process or via the Outlook app on a Mac or Windows PC. After your Exchange password has been changed, you’re prompted to enter the new password the first time your iPhone attempts to access your account.
• You can have a reply automatically sent in response to email you receive. To configure an automatic reply, move to the Exchange account’s Settings screen. Tap Automatic Reply at the bottom of the screen. Set the Automatic Reply switch to on (green) and type the text to be sent in the automatic reply. Swipe down the screen and tap End Date at the top of the screen. Use the resulting date and time wheels to set when you want the automatic reply to stop being sent. Tap Save. From the current time until the one you set as the End Date, the automatic reply is sent to any email that is received by your Exchange account. You can stop the reply at any time by moving to the Automatic Reply screen and setting the Automatic Reply switch to off (white). You can also edit the text in the automatic reply on this screen.
Advanced Google
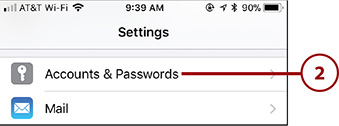
Similar to iCloud and Exchange, a Google account has some settings you aren’t likely to use, but it’s good to know how to get to them in case you do. To access these settings, move to the tap Accounts & Passwords screen and tap your Google account. On the Gmail account’s screen, you can change the types of data you are syncing by setting the switches to on or off. Tap Account, and then tap Advanced to see additional settings. Working with these is similar to working with iCloud and Exchange. For example, you can determine where draft email messages are stored, such as on the Gmail server or on your iPhone.
You can’t change the password for a Google account in the Settings app on your iPhone. You have to change the password elsewhere, such as by accessing your Google account via the Google website. After your Google password has been changed, you’re prompted to enter the new password the first time your iPhone attempts to access your account.
Configuring Other Types of Online Accounts
You can access many types of online accounts on your iPhone. These include accounts that are “built in,” which are iCloud, Exchange, Google, Yahoo!, AOL, and Outlook.com. Setting up a Yahoo!, AOL, or Outlook.com account is similar to iCloud, Exchange, and Google. Just select the account type you want to use and provide the information for which you are prompted.
There are other types of accounts you might want to use that aren’t “built in.” An email account included with an Internet access account, such as one from a cable Internet provider, is one example. Support for these accounts isn’t built in to the iOS; however, you can usually set up such accounts on your iPhone fairly easily.
When you obtain an account, such as email accounts that are part of your Internet service, you should receive all the information you need to configure those accounts on your iPhone. If you don’t have this information, visit the provider’s website and look for information on configuring the account in an email application. You need to have this information to configure the account on the iPhone.
Setting How and When Your Accounts Are Updated
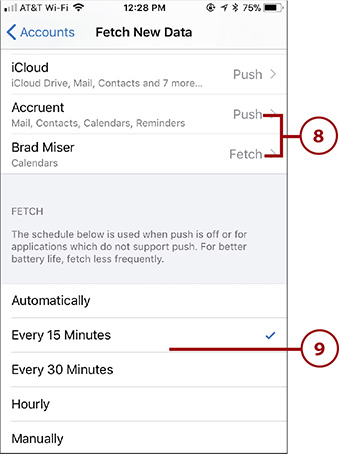
The great thing about online accounts is that their information can be updated any time your iPhone can connect to the Internet. This means you have access to the latest information, such as new emails, changes to your calendars, and so on. There are three basic ways information gets updated:
• Push—When information is updated via Push, the server pushes (thus the name) updated information onto your iPhone whenever that information changes. For example, when you receive a new email, that email is immediately sent (or pushed) to your iPhone. Push provides you with the most current information all the time but uses a lot more battery than the other options.
• Fetch—When information is updated via Fetch, your iPhone connects to the account and retrieves the updated information according to a schedule, such as every 15 minutes. Fetch doesn’t keep your information quite as current as Push does, but it uses much less battery than Push does.
• Manual—You can cause an app’s information to be updated manually. This happens whenever you open or move into an app or by a manual refresh. For example, you can get new email by moving onto the Inboxes screen in the Mail app and swiping down from the top of the screen.
You can configure the update method that is used globally, and you can set the method for specific accounts. Some account types, such as iCloud and Exchange, support all three options whereas others might support only Fetch and Manual. The global option for updating is used unless you override it for individual accounts. For example, you might want your work account to be updated via Push so your information there is always current, whereas configuring Fetch on a personal account might be frequent enough.
>>>Go Further: TIPS FOR MANAGING YOUR ACCOUNTS
As you add and use accounts on your iPhone, keep the following points in mind:
• You can temporarily disable any data for any account by moving to the Accounts & Passwords screen and tapping that account. Set the switches for the data you don’t want to use to off (white). You might be prompted to keep or delete that information; if you choose to keep it, the data remains on your iPhone but is disconnected from the account and is no longer updated. If you delete it, you can always recover it again by simply turning that data back on. For example, suppose you are going on vacation and don’t want to deal with work email, meeting notifications, and so on. Move to your work account and disable all its data. That data disappears from the related apps; for example, the account’s mailboxes no longer appear in the Mail app. When you want to start using the account again, simply re-enable its data.
• If you want to completely remove an account from your iPhone, move to its configuration screen, swipe up the screen, and tap Delete Account. Tap Delete in the confirmation dialog box and the account is removed from your iPhone. (You can always sign in to the account to start using it again.)
• You can have different notifications for certain aspects of an account, such as email. See Chapter 2, “Using Your iPhone’s Core Features,” for the details about using notifications, and Chapter 4 for the steps to configure the notifications your online accounts use. For example, you might want to hear a different sound when you receive work emails versus those sent to your personal account.
• You can change how information is updated at any time, too. If your iPhone is running low on battery, disable Push and set Fetch to Manually so you can control when the updates happen. When your battery is charged again, you can re-enable Push or set a Fetch schedule.


