
2. Using Your iPhone’s Core Features

In this chapter, you learn to use some of your iPhone’s core features. Topics include the following:
![]() Working with the Settings app
Working with the Settings app
![]() Connecting to the Internet using Wi-Fi networks
Connecting to the Internet using Wi-Fi networks
![]() Connecting to the Internet using cellular data networks
Connecting to the Internet using cellular data networks
![]() Working with text
Working with text
![]() Using widgets
Using widgets
![]() Searching on your iPhone
Searching on your iPhone
![]() Working with Siri Suggestions
Working with Siri Suggestions
![]() Working with notifications
Working with notifications
![]() Printing from your iPhone
Printing from your iPhone
In Chapter 1, “Getting Started with Your iPhone,” you learned how to interact with your iPhone including using apps, locking and unlocking it, swiping to open and close things, and zooming in or out. In this chapter, you learn to use some of the iPhone’s “core” features, meaning those that apply across multiple apps and functions of your iPhone. For example, an Internet connection is required by many, and used by most, of the apps on your iPhone. As another example, you’ll be typing or speaking text in many different situations from emails to messages to searches, so it’s fundamental to know how to work with text on your iPhone. Getting comfortable with these core features helps you do the many other things you can do with your iPhone that you learn about throughout the rest of this book.
Working with the Settings App
Aptly named, the Settings app is where you configure the many settings that change how your iPhone looks, sounds, and works. In fact, virtually everything you do on your iPhone is affected by settings in this app. As you use and make an iPhone into your iPhone, you frequently visit the Settings app.
Using the Settings App on Any iPhone
You can work with the Settings app on any iPhone as follows:
1. On the Home screen, tap Settings. The Settings app opens. The app is organized in sections starting at the top with your Apple ID information followed by Airplane Mode, Wi-Fi, Bluetooth, and Cellular.

2. Swipe up or down the screen to get to the settings area you want to use.

3. Tap the area you want to configure, such as Sounds & Haptics (iPhone 7 or later) or Sounds (earlier models).

4. Use the resulting controls to configure that area. The changes you make take effect immediately.
5. When you’re done, you can leave the Settings app where it is (it remains there when you come back to it) or tap the back icon, which is always located in the upper-left corner of the screen (its name changes based on where you are in the app), until you get back to the main Settings screen to go into other Settings areas.

Searching for Settings
You can quickly find settings you need by searching for them:
1. Move into the Settings app. (If you aren’t on the main Settings screen, tap the back icon until you get there.)
2. Tap in the Search bar; if you don’t see the Search bar, swipe down from the top of the Settings screen until it appears.

3. Type the setting for which you want to search. As you type, potential matches are shown on the list of results. Matches can include a settings area, such as Sounds & Haptics, or specific settings, such as the ringtone and vibrations used when you receive a call.
4. Tap the setting you want to use.

5. Configure the setting you selected in the previous step.

Using the Settings App on an iPhone Plus
When you hold an iPhone Plus in the horizontal orientation and use the Settings app, you can take advantage of the split-screen feature as follows:
1. Hold the iPhone Plus so it is horizontal.
2. Tap the Settings app to open it. In the left pane, you see the areas of the Settings app that you can configure. In the right pane, you see tools you can use to configure the selected setting. The two panes are independent, making navigation easier than with other iPhones.

3. Swipe up or down on the left pane until you see the function, feature, or app you want to configure.

4. Tap the function, feature, or app you want to configure, such as Sounds. Its controls appear in the right pane.
5. Swipe up or down on the right pane until you see the specific setting you want to change.
6. Tap the setting you want to configure, such as Ringtone. Its controls appear in the right pane.

7. Use the tools in the right pane to configure the setting you selected in step 6. These work just as described in the previous task and throughout this chapter except that you move within the right pane instead of changing the entire screen.
8. To move back through the screens in the right pane, use the back icon, which is labeled with the name of the screen you came from.
9. Tap another area in the left pane to configure it. As you can see, the split screen makes it very easy to quickly switch between areas in the Settings app.

Connecting to the Internet Using Wi-Fi Networks
Your iPhone is designed to seamlessly connect to the Internet so apps that use the Internet to work, such as Safari to browse the Web, are always ready when you need them. Wi-Fi networks provide fast Internet connections and you usually have an unlimited amount of data to work with, so you don’t have to worry about paying more based on how you are using your iPhone. Because of their speed and unlimited data (usually), Wi-Fi networks are the best way for your iPhone to connect to the Internet.
Wi-Fi networks are available just about everywhere you go, including homes, offices, hotels, restaurants, and other locations. Fortunately, it’s very easy to connect your iPhone to the Wi-Fi networks you encounter. (And, if there isn’t a Wi-Fi network available, your iPhone uses its cellular data network to connect to the Internet, which is covered later in this chapter.)
Almost all Wi-Fi networks broadcast their information so that you can easily see them with your iPhone; these are called open networks because anyone who is in range can attempt to join one because they appear on Wi-Fi devices automatically. The Wi-Fi networks you can see on your iPhone in public places (such as airports and hotels) are all open. Likewise, any Wi-Fi networks in your home or office are very likely to be open as well. To connect your iPhone to an open network, you tap its name and then enter its password (if required).
Your iPhone remembers Wi-Fi networks you’ve connected to previously and joins one of them automatically when available; these are called known networks. For example, if you have a Wi-Fi network at home and another in your office, when you change locations, your iPhone automatically changes Wi-Fi networks.
If your iPhone can’t connect to a known network, it automatically searches for other Wi-Fi networks to join. If one or more are available, a prompt appears showing the networks available to your iPhone. You can select and join one of these networks by tapping its name on the list of networks and entering its password (if one is required, you need to obtain it from the source of the network, such as a hotel or restaurant).
If no Wi-Fi networks are available or you choose not to connect to one, your iPhone automatically switches to its cellular data connection (covered in “Connecting to the Internet Using Cellular Data Networks” later in this chapter).
Connecting to Open Wi-Fi Networks
To connect your iPhone to a Wi-Fi network, perform the following steps:
1. On the Home screen, tap Settings. Next to Wi-Fi, you see the status of your Wi-Fi connection. It is Off if Wi-Fi is turned off, Not Connected if Wi-Fi is turned on and your phone isn’t currently connected to Wi-Fi, or the name of the Wi-Fi network to which your iPhone is connected.

2. Tap Wi-Fi.

3. If Wi-Fi isn’t enabled already, slide the Wi-Fi switch to on (green) and your iPhone searches for available networks. A list of available networks is displayed in the CHOOSE A NETWORK section (it can take a moment for all the networks available in the area to be shown). Along with each network’s name, icons indicating whether it requires a password (the padlock icon) to join and the current signal strength (the radio waves icon) are displayed.

4. Tap the network you want to join. Of course, when a network requires a password, you must know that password to be able to join it. Another consideration should be signal strength; the more waves in the network’s signal strength icon, the stronger the connection.

5. At the prompt, enter the password for the network you selected. If you aren’t prompted for a password, skip to step 7. (You’re likely to find networks that don’t require a password in public places; see the next section for information on these types of networks.)
6. Tap Join. If you provided the correct password, your iPhone connects to the network and gets the information it needs to connect to the Internet. If not, you’re prompted to enter the password again. After you successfully connect to the network, you return to the Wi-Fi screen.

7. Review the network information. The network to which you are connected appears just below the Wi-Fi switch and is marked with a check mark. You also see the signal strength for that network.

8. Try to move to a web page, such as www.bradmiser.com, to test your Wi-Fi connection. (See Chapter 12, “Surfing the Web,” for details.) If the web page opens, you are ready to use the Internet on your phone. If you are taken to a login web page for a Wi-Fi provider rather than the page you were trying to access, see the next task. If you see a message saying the Internet is not available, there is a problem with the network you joined. Go back to step 4 to select a different network.

Quick Access to the Wi-Fi Switch
You can quickly turn Wi-Fi on or off by swiping up from the bottom of the Home screen (all models except the iPhone X) or swiping down from the upper-right corner of the screen (iPhone X) to open the Control Center. If the Wi-Fi icon (it looks like the signal strength indicator on the Wi-Fi Setting screen) is blue, Wi-Fi is on. Tap that icon to turn Wi-Fi off (the icon becomes gray). Tap it again to turn Wi-Fi on and reconnect to a known network. See Chapter 1 for more information about working with the Control Center.
>>>Go Further: CONNECTING TO WI-FI NETWORKS
As you connect to Wi-Fi networks, consider the following:
• Typing passwords—As you type a password, each character is hidden by a dot in the Password field except for the last character you entered, which is displayed on the screen for a moment. Keep an eye on characters as you enter them because you can fix a mistake as soon as you make it rather than finding out after you’ve entered the entire password and having to start over.
• Changing networks—You can use these same steps to change the Wi-Fi network you are using at any time. For example, if you have to pay to use one network while a different one is free, simply choose the free network in step 4.
• Be known—After your iPhone connects to a Wi-Fi network successfully, it becomes a known network. This means that your iPhone remembers its information so you don’t have to enter it again. Your iPhone automatically connects to known networks when it needs to access the Internet. So unless you tell your iPhone to forget a network (explained later in this chapter), you need to enter its password only the first time you connect to it.
• Security recommendation—If you are connected to a network that doesn’t use what Apple considers sufficient, you see the words “Security Recommendation” under the network’s name. If you tap that network, you see its Info screen. At the top of that screen, you see the type of security the network is using and a recommendation about the type of security it should use. If the Wi-Fi network comes from a router or modem you own or rent, contact your Internet service provider, such as a cable company, to learn how the security provided by that router or modem can be reconfigured to be more secure. If the network is in a public place or business, you just have to use it as is (unless you can contact the administrator of that network to see if better security is available).
• Personal hotspots—iPhones and iPads can share their cellular Internet connection (how to do this is covered in a later Go Further sidebar) with other devices by providing a Wi-Fi network to which you can connect your iPhone. The icons for these networks are a bit different, being two connected loops that indicate the network is from a hotspot. You can select and use these networks just like the other types of networks being described in this chapter. The speed of your access is determined mostly by the speed of the device’s cellular data connection. Also, the data you use while connected to the hotspot’s network counts against the data plan for the device to which you are connected.
Connecting to Public Wi-Fi Networks
Many Wi-Fi networks in public places, such as hotels or airports, require that you pay a fee or provide other information to access the Internet through that network; even if access is free, you usually have to accept terms and conditions for the network to be able to use it.
When you connect to one of these public networks, you’re prompted to provide whatever information is required. This can involve different details for different networks, but the general steps are the same. You’re prompted to provide whatever information required. Then, follow the instructions that appear.
Following are the general steps to connect to many types of public Wi-Fi networks:
1. Move to the Settings screen.
2. Tap Wi-Fi.

3. Tap the network you want to join. You move to that network’s Log In screen. Follow the onscreen prompts to complete the process. This often involves selecting a connection option and providing payment or identification information, as this example of connecting to a hotel’s Wi-Fi network shows.

4. Choose the connection option you want to use.

5. Provide the information required to join the network, such as a last name and room number. If a fee is required, you have to provide payment information. In many cases, you at least have to indicate that you accept the terms and conditions for using the network, which you typically do by checking a check box.
6. Tap the icon to join the network. This icon can have different labels depending on the type of access, such as Connect, Authenticate, Done, Free Access, Login, and so on.

7. Tap Done (if required).

8. Try to move to a web page, such as www.wikipedia.org, to test your Wi-Fi connection (not shown in a figure). (See Chapter 12 for details.) If the web page opens, you are ready to use the Internet on your phone. If you are taken to a login web page for the Wi-Fi network’s provider, you need to provide the required information to be able to use the Internet. For example, when access is free, as it is at most airports, you usually just have to indicate you accept the terms of use for that network.
No Prompt?
Not all public networks prompt you to log in as these steps explain. Sometimes, you use the network’s website to log in instead. After you join the network (step 3), your iPhone is connected to the network without any prompts. When you try to move to a web page as explained in step 8, you’re prompted to log in to or create an account with the network’s provider on the web page that appears.
A Closed Network
Some Wi-Fi networks are closed, which means they don’t broadcast their names. This means that you don’t see closed networks listed in the CHOOSE A NETWORK section on the Wi-Fi screen. To be able to access a closed network, you need to know its name, its password, and the type of security it uses. With this information in hand, tap Other in the CHOOSE A NETWORK section. Then type the network’s name. Tap Security, choose the appropriate type, and tap Other Network. Enter the network’s password and tap Join.
Disabling Automatic Prompting
When your iPhone can’t find a known network—meaning one that you’ve used before—it presents a prompt showing you the currently available networks. You can use this prompt to select and join one of these networks. This can be useful because you don’t have to use the Settings app to find a network to which you are going to connect; instead, you can just tap a network at the prompt to join it.
However, this automatic prompting for networks can be as annoying as it is helpful. It is helpful in that your iPhone prompts you when it comes into range of a network it doesn’t know, which can make it easier to know when a network is available to you. It can be annoying when you are moving around a lot because what you are doing can be frequently interrupted by the prompt, even if you don’t want to connect to one of the available networks. For example, when you walk through an airport, the prompt can appear multiple times as you move between networks.
To disable automatic network prompting, perform the following steps:
1. Open the Settings app and move to the Wi-Fi screen.
2. Set the Ask to Join Networks switch to off (white). To connect to unknown networks, you need to use the Settings app as described in the previous tasks because your iPhone no longer automatically prompts you to join unknown networks. (Remember that it still joins known networks, meaning those you have used before, automatically.)

Forgetting Wi-Fi Networks
As you learned earlier, your iPhone remembers networks you have joined and connects to them automatically as needed; these are known networks. Although this is mostly a good thing, there are times when you no longer want to use a particular network any more. For example, when in an airport, you might decide to connect to a network for which you have to pay for faster Internet access, or you might prefer to access the Internet using cellular service. Each time you move through that airport, your iPhone connects to that network again automatically, which might not be what you want it to do.
To have your iPhone forget a network so it doesn’t automatically connect to it in the future, do the following:
1. Tap Wi-Fi in the Settings app to view the Wi-Fi screen.
2. Tap the Info icon for the network that you want your iPhone to forget. (You can forget a network only if you are or have previously been connected to it.)

3. Tap Forget This Network.

4. Tap Forget in the resulting prompt. Your iPhone stops using and forgets the network. You return to the Wi-Fi screen. If another known network is available, your iPhone connects to it automatically. If a network you’ve forgotten is still in range of your iPhone, it continues to appear in the CHOOSE A NETWORK section, but your iPhone no longer automatically connects to it. You can re-join a forgotten network at any time, just as you did the first time you connected to it.

Forget Versus Auto-Join
When you forget a network, your iPhone stops connecting to it automatically and erases the network’s password so you have to enter it again if you want to re-join that network. If you just want to stop automatically joining the network but keep its password on your iPhone, set the Auto-Join switch to off (white) instead of performing step 3. Your iPhone stops automatically connecting to that network, but you can re-join it at any time by tapping it on the CHOOSE A NETWORK list (you don’t have to re-enter the password as you do if you forget a network).
Cell Phone Provider Wi-Fi Networks
Many cell phone providers also provide other services, particularly public Wi-Fi networks. In some cases, you can access that provider’s Internet service through a Wi-Fi network that it provides; often, you can do this at no additional charge. So, you can take advantage of the speed a Wi-Fi connection provides without paying more for it. You connect to these networks just like any other by selecting them on the network list. What happens next depends on the specific network. In some cases, you need to enter your mobile phone number and then respond to a text message to that phone number. Check your provider’s website to find out whether it offers this service and where and how you can access it.
Connecting to the Internet Using Cellular Data Networks
When you don’t have a Wi-Fi network available or you don’t want to use one that is available (such as if it has a fee or is slow), your iPhone can connect to the Internet through a cellular data network.
The provider for your iPhone also provides a cellular data connection your iPhone uses to connect to the Internet automatically when you aren’t using a Wi-Fi network (such as when you are in a location that doesn’t have one). (Your iPhone tries to connect to an available Wi-Fi network before connecting to a cellular data connection, because Wi-Fi is typically less expensive and faster to use.) These cellular networks cover large geographic areas and the connection to them is automatic; your iPhone chooses and connects to the best cellular network currently available. Access to these networks is part of your monthly account fee; you choose from among various amounts of data per month for different monthly fees.
Most providers have multiple cellular data networks, such as a low-speed network that is available widely and one or more higher-speed networks that have a more limited coverage area. Your iPhone chooses the best connection available automatically.
The cellular data networks you can use are determined based on your provider, your data plan, the model of iPhone you are using, and your location within your provider’s networks or the roaming networks available, when you are outside of your provider’s coverage area. The iPhone automatically uses the fastest connection available to it at any given time (assuming you haven’t disabled that option, as explained later).
In the United States, the major iPhone providers are AT&T, Verizon, T-Mobile, and Sprint. There are also other smaller providers, such as Virgin Mobile. All these companies offer high-speed Long Term Evolution (LTE) cellular networks (these are also referred to as true 4G networks) along with the slower 4G and 3G networks. In other locations, the names and speeds of the networks available might be different.
The following information is focused on LTE networks because I happen to live in the United States and use AT&T as my cell phone provider. If you use another provider, you are able to access your provider’s networks similarly, though your details might be different. For example, the icon on the Home screen reflects the name of your provider’s network, which might or might not be LTE.

LTE high-speed wireless networks provide very fast Internet access from many locations. (Note: LTE networks might not be available everywhere, but you can usually access them near populated areas.) To connect to the LTE network, you don’t need to do anything. If you aren’t connected to a Wi-Fi network, you haven’t turned off LTE, and your iPhone isn’t in Airplane mode, the iPhone automatically connects to an LTE network when available. When you are connected to the LTE network, you see the LTE indicator at the top of the iPhone’s screen. If you can’t access the LTE network, such as when you aren’t in its coverage area, the iPhone automatically connects to the next fastest network available, such as 4G. If that isn’t available, it connects to the next fastest and so on until it finds a network to which it can connect if there is one available. If it can’t connect to any network, you see No Service instead of a network’s name; this indicates that you currently can’t connect to any network, and so you aren’t able to access the Internet.
One thing you do need to keep in mind when using a cellular network is that your account might include a limited amount of data per month. When your data use exceeds this limit, you might be charged overage fees, which can be very expensive. Most providers send you warning texts or emails as your data use approaches your plan’s limit, at which point you need to be careful about what you do while using the cellular data network to avoid an overage fee. Some tasks, such as watching YouTube videos or downloading large movie files, can chew up a lot of data very quickly and should be saved for when you are on a Wi-Fi network to avoid exceeding your plan’s monthly data allowance. Other tasks, such as using email, typically don’t use very much.
Unlimited Data
If you don’t already have an account with unlimited data, check with your provider periodically to see if an unlimited data plan is available for a reasonable price. As competition has increased among cell providers, unlimited data plans have become more common and less expensive in many areas. If other cell providers are available to you, check to see if they offer unlimited data plans; if so, you can consider changing providers or using a competitor’s plan to lower the cost of your plan. Having an unlimited data plan is good because you don’t need to worry about overage charges from using more data than your plan allows.
An App for That
Various apps are available in the App Store that you can install on your iPhone that monitor how much data you are using. These apps are a good way to know where your data use is relative to your plan’s monthly allowance so that you can avoid an overage situation. To get information on finding, downloading, and installing apps, see the section “Using the App Store App to Find and Install iPhone Apps” in Chapter 4, “Customizing How Your iPhone Works.” (To find an app for this purpose, search for “data monitoring app.”)
When you move outside your primary network’s geographic coverage area, you are in roaming territory, which means a different provider might provide cellular phone or data access, or both. The iPhone automatically selects a roaming provider, if there is only one available, or allows you to choose one, if there is more than one available.
When you are outside of your primary provider’s coverage area, roaming charges can be associated with calls or data use. These charges are often very expensive. The roaming charges associated with phone calls are easier to manage, because it’s more obvious when you make or receive a phone call in a roaming area. However, data roaming charges are much more insidious, especially if Push functionality (where emails and other updates are pushed to your iPhone from the server automatically) is active. And when you use some applications, such as Maps to navigate, you don’t really know how much data is involved. Because data roaming charges are harder to notice, the iPhone is configured by default to prevent data roaming. When data roaming is disabled, the iPhone is unable to access the Internet when you are outside of your cellular network, unless you connect to a Wi-Fi network. (You can still use the cellular roaming network for telephone calls.)
You can configure some aspects of how your cellular network is used, as the following task demonstrates. You can also allow individual apps to use, or prevent them from using, your cellular data network. This is especially important when your data plan has a monthly limit.
In most cases, the first time you launch an app, you’re prompted to allow or prevent it from using cellular data. At any time, you can use the Cellular Data options in the Settings app to enable or disable an app’s access to your cellular data network.
The options you have for configuring how your iPhone uses its cellular data connection depend on the provider your iPhone is connected to and the model of iPhone you use. For example, if you live in the United States and use Sprint as your cellular provider, the Cellular screens in the Settings app look a bit different than the figures in this section (which are based on AT&T’s service). Regardless of the specific options you see on your phone, the basic purpose is the same, which is to configure how your iPhone uses its high-speed network and to enable and disable roaming.
Configuring Cellular Data Use
The following steps show configuring cellular data use on an iPhone using AT&T in the United States; you can use similar steps to configure these options on an iPhone from a different provider:
1. Open the Settings app.
2. Tap Cellular.

3. To use a cellular Internet connection, set the Cellular Data switch to on (green) and move to step 4; if you don’t want to use a cellular Internet connection, set this switch to off (white) and skip the rest of these steps. To use the Internet when the Cellular Data switch is off, you have to connect to a Wi-Fi network that provides Internet access.
4. Tap Cellular Data Options.

5. To configure the high-speed network, tap Enable high-speed network, where high-speed network is the name of the high-speed network your provider has. With some providers, this is a switch that enables or disables the high-speed network; set the switch to be on or off and skip to step 8 (if you set the switch to off, the iPhone can’t use the higher-speed network, but can use slower networks).

6. To disable the high-speed network, tap Off; to use it for both voice and data, tap Voice & Data; or to use it only for data, tap Data Only. (When you enable the high-speed network for voice, the quality of the sound of your calls may be better.)
7. Tap the back icon.

8. If you want to allow data roaming, slide the Data Roaming switch to the on (green) position. With some providers, Roaming is an option instead of a switch; tap Roaming and use the resulting switches to enable or disable roaming for voice or data and then tap the back icon.
9. Tap Cellular.

10. Use the controls in the PROVIDER, where PROVIDER is the name of your provider, to configure how the cellular service interacts with other services, such as to enable Wi-Fi calling, calls on other devices, and so on. These settings are explained in Chapter 7, “Communicating with the Phone and FaceTime Apps.”

11. Swipe up the screen until you see the CELLULAR DATA section. This section enables you to allow or prevent individual apps from accessing a cellular data network. To limit the amount of data you use, it’s a good idea to review this list and allow only those apps that you rely on to use the cellular data network. (Of course, if you are fortunate enough to have an unlimited cellular data plan, you can leave cellular data for all the apps enabled.) This list can be quite long if you have a lot of apps stored on your iPhone.
12. Set an app’s switch to on (green) if you want it to be able to use a cellular data network to access the Internet.
13. Set an app’s switch to off (white) if you want it to be able to access the Internet only when you are connected to a Wi-Fi network.

14. Set the Wi-Fi Assist switch to on (green) if you want your iPhone to automatically switch to its cellular connection when the Wi-Fi connection is weak. If you have a limited cellular data plan, you might want to set this switch to off (white) to minimize cellular data use.
15. If you want to access files on your iCloud drive when you aren’t using a Wi-Fi network, set the iCloud Drive switch to on (green). If you set this switch to off, files are synced the next time you connect to a Wi-Fi network.

Unlimited Data, Limited Speed?
Under an unlimited data plan, some providers limit the speed at which your cellular data service operates if you pass a threshold amount of data used that month. You can continue to use all the data you want, but the performance of the connection might be slower. Check your plan’s details to see what the threshold is and what speed reduction is applied.
>>>Go Further: MORE ON CELLULAR DATA
Using a cellular network to connect to the Internet means you seldom have to be without a connection unless you choose to be. Here are some things to keep in mind as you keep connected:
• GSM versus CDMA—There are two fundamental types of cellular networks, which are GSM (Global System for Mobile Communications) or CDMA (Code-Division Multiple Access). The cellular provider you use determines which type of network your iPhone uses; the two types are not compatible. GSM is used by most of the world whereas some very large carriers in the United States (such as Verizon and Sprint) use CDMA. There are differences between the two, which is why you might see different cellular options than shown in the figures here (which show the options for AT&T, which uses GSM). If your iPhone uses CDMA, you see the International CDMA switch on the Roaming screen. If your phone has poor performance when you are roaming in different countries, set this switch to off (white).
• Cellular data usage—In the Cellular Data section, you see how much data you’ve used for the current period and how much you’ve used while roaming. This can help you see where your use is compared to your monthly plan allowance (if you have a monthly plan allowance of course) so you know whether you are getting close to exceeding that allowance (thus incurring overage charges). This isn’t proactive at all, as you have to remember to check the information. If you are concerned about data use, you’re better off getting an app with more active monitoring, as discussed earlier in this chapter in the “An App for That” note.
If you tap System Services at the bottom of the list of apps on the Cellular screen, you see the data usage for core system functions, such as Time & Location, Messaging Services, and Siri. This can be useful information to see how much data these services use, especially when you are in a roaming situation. You can limit the data use by some of these services by not accessing the related function; for example, you can turn off Siri to prevent it from using cellular data.
• Higher-speed networks use more power—Using a higher-speed network, such as an LTE network, also uses somewhat more battery power than using a slower network. If getting the absolute maximum time on a charge is important, you might want to disable the high-speed network.
• Apps’ cellular data use—Just under each app’s name in the CELLULAR DATA section, you see how much data the app has used since the counter was reset. This number can help you determine how much data a particular app uses. For example, if an app’s use is shown in megabytes (MB), it’s used a lot more data than an app whose use is shown in kilobytes (KB).
• Cellular data use reset—You can reset all of the statistics on the Cellular screen by swiping up until you reach the bottom of the screen and tapping Reset Statistics. Tap Reset Statistics again.
• Personal hotspot—The iPhone can be a personal hotspot, which is when it provides an Internet connection to computers or other devices through its cellular data connection. This is useful when you are in a location where you can’t connect a computer or other device to a Wi-Fi or cellular network with Internet access (or don’t want to spend the money to do so) but can access the Internet with the iPhone’s cellular data connection.
There are a lot of caveats to this service, including whether your provider offers it, additional costs, and so on. Check with your provider to see if the personal hotspot feature is supported and if there are additional fees to use it. If it is provided and the fees are acceptable, this is a good way to provide Internet access to other devices when a Wi-Fi or cellular connection either isn’t available or is too expensive.
First, add the personal hotspot service to your cellular account. Second, move to the Cellular screen in the Settings app, and then tap Set Up Personal Hotspot (if you don’t see this option, your provider doesn’t offer personal hotspot service). Follow the onscreen prompts to complete the configuration of the personal hotspot; the details depend on the specific provider you are using. After your iPhone is configured as a hotspot, it can share its Internet connection with other devices. To allow access to the Internet through your phone’s hotspot, provide the name of its network and password (which are both automatically generated when you enable the hotspot) to the people you want to allow to use your hotspot.
Working with Text
You can do lots of things with an iPhone that require you to provide text input. There are a couple of ways you can do this, the most obvious of which is by typing. The iPhone’s keyboard is quite amazing. Whenever you need it, whether it’s for emailing, messaging, entering a website URL, performing a search, or any other typing function, it pops up automatically.

To type, just tap the keys. As you tap each key, you hear audio feedback (you can disable this sound if you want to) and the key you tapped pops up in a magnified view on the screen. The keyboard includes all the standard keys, plus a few for special uses. To change from letters to numbers and special characters, just tap the 123 key. Tap the #+= key to see more special characters. Tap the 123 key to move back to the numbers and special characters or the ABC key to return to letters. The keyboard also has contextual keys that appear when you need them. For example, when you enter a website address, the .com key appears so you can enter these four characters with a single tap.
Working with Predictive Text
You can also use Predictive Text, which is the feature that tries to predict text you want to enter based on the context of what you are currently typing and what you have typed before. Predictive Text appears in the bar between the text and the keyboard and presents you with three options. If one of those is what you want to enter, tap it and it is added to the text at the current location of the cursor. If you don’t see an option you want to enter, keep typing and the options change as the text changes. You can tap an option at any time to enter it. The nice thing about Predictive Text is that it gets better at predicting your text needs over time. In other words, the more you use it, the better it gets at predicting what you want to type. You can also enable or disable Predictive Text, as you see shortly.
Predictive Text Need Not Apply
When you are entering text where Predictive Text doesn’t apply, such as when you are typing email addresses, the Predictive Text bar is hidden and can’t be enabled. This makes sense because there’s no way text in things such as email addresses can be predicted. When you move back into an area where it does apply, Predictive Text becomes active again.
Working with Keyboards
The great thing about a virtual keyboard like the iPhone has is that it can change to reflect the language or symbols you want to type. As you learn in Chapter 4, you can install multiple keyboards, such as one for your primary language and more for your secondary languages. You can also install third-party keyboards to take advantage of their features (this is also covered in Chapter 4).
By default, two keyboards are available for you to use. One is for the primary language configured for your iPhone (for example, mine is U.S. English). The other is the Emoji keyboard (more on this shortly). How you change the keyboard you are using depends on whether you have installed additional keyboards and the orientation of the iPhone.
If you haven’t installed additional keyboards, you can change keyboards by tapping the Emoji key, which has a smiley face on it.
If you have installed other keyboards, you change keyboards by tapping the Globe key.
Each time you tap this key (Globe if available, Emoji if there isn’t a Globe), the keyboard changes to be the next keyboard installed; along with the available keys changing, you briefly see the name of the current keyboard in the Space bar. When you have cycled through all the keyboards, you return to the one where you started.
The Keys, They Are A-Changin’
The keys on the keyboard can change depending on the orientation of the iPhone. For example, when you have more than one keyboard installed and hold the iPhone vertically, the Emoji key disappears and you see only the Globe key. Not to worry though, you can still get to the Emoji keyboard by tapping the Globe key until the Emoji keyboard appears, or by opening the Keyboard menu and tapping Emoji. When you have installed additional keyboards and hold the iPhone horizontally, you see both the Globe and Emoji keys. Tap the Emoji key to switch to that keyboard or the Globe key to cycle through all the keyboards.

You can also select the specific keyboard you want to use and access keyboard and text options by touching and holding on the Globe key (or the Emoji key, if you don’t see the Globe key). The Keyboard menu appears. Tap a keyboard to switch to it. Tap Keyboard Settings to jump to the Keyboards screen in the Settings app where you can configure keyboards and enable or disable text options (these settings are covered in Chapter 4).


Because you often type on your iPhone while you are moving around, it has a one-handed keyboard. This keyboard “squishes” all the keys to the left or right side of the screen to suit typing with a thumb. To use a one-handed keyboard, tap and hold the Globe or Emoji key to open the keyboard menu (this only works when the iPhone is held vertically). Tap the left or right keyboard; the keyboard compresses toward the side you selected and you can more easily tap its keys with one thumb. To return to the full-screen keyboard, tap the right- or left-facing arrow that appears in the “empty” space on the side of the screen not being used for the keyboard or open the Keyboard menu and tap the full-screen keyboard.
Using Emojis

Emojis are icons you insert into your text to liven things up, communicate your feelings, or just to have some fun (if you don’t have this keyboard installed, see Chapter 4). You can open the Emoji keyboard by tapping its key (the smiley face) or by selecting it on the Keyboard menu. You see a palette containing many emojis, organized into groups. You can change the groups of emojis you are browsing by tapping the icons at the bottom of the screen. Swipe to the left or right on the emojis to browse the emojis in the current group. Tap an emoji to enter it at the cursor’s location in your message, email, or other type of document. To use an emoji you’ve used often, tap the Clock icon to see emojis you’ve used frequently; you’ll probably find that you use this set of emojis regularly so this can save a lot of time. To return to the mundane world of letters and symbols, tap the ABC key.

The Predictive text feature also suggests emojis when you type certain words; just tap the emoji to replace the word with it.
Emoji Options
If you tap and hold on some emojis, you see options. For example, if you tap and hold on the thumbs-up emoji, you see a menu with the emoji in different flesh tones. Slide your finger over the menu and tap the version you want to use. The version you select becomes the new default for that emoji. You can go back to a previous version by opening the menu and selecting it.
Emojis Galore
Emojis are very widely used in text messages because you can communicate a lot with a single icon. The Messages app enables you to access many kinds of emojis through the apps you can install within the Messages app itself; these are often called stickers, but they work the same way as emojis. See Chapter 9, “Sending, Receiving, and Managing Texts and iMessages,” to learn how to add and use sticker apps within the Messages app.
What’s Your Typing Orientation?
Like many other tasks, you can rotate the iPhone to change the screen’s orientation while you type. When the iPhone is in the horizontal orientation, the keyboard is wider, making it easier to tap individual keys, and you have access to more keys. When the iPhone is in vertical orientation, the keyboard is narrower, but you can see more of the typing area. So, try both to see which mode is most effective for you.
Correcting Spelling as You Type
If you type a word that the iPhone doesn’t recognize, that word is flagged as a possible mistake and suggestions are made to help you correct it. How this happens depends on whether or not Predictive Text is enabled.

If Predictive Text is enabled, potential replacements for suspicious words appear in the Predictive Text bar. When you tap the space key, the suspicious word is replaced with the word in the center of the Predictive Text bar. Tap the word on the far left to keep what you’ve typed (because it isn’t a mistake) or tap the word on the right end of the bar to enter it instead of what you’ve typed.

If Predictive Text isn’t enabled, a suspicious word is highlighted and a suggestion about what it thinks is the correct word appears in a pop-up box. To accept the suggestion, tap the space key. To reject the suggestion, tap the pop-up box to close it and keep what you typed. You can also use this feature for shorthand typing. For example, to type “I’ve” you can simply type “Ive” and iPhone suggests “I’ve,” which you can accept by tapping the space key.
Typing Tricks
Many keys, especially symbols and punctuation, have additional characters. To see a character’s options, tap it and hold down. If it has options, a menu pops up after a second or so. To enter one of the optional characters, drag over the menu until the one you want to enter is highlighted, and then lift your finger off the screen. The optional character you selected is entered. For example, if you tap and hold on the period, you can select .com, .edu, and so on, which is very helpful when you are typing a website or email address.
Your Own Text Replacements
You can create your own text shortcuts so you can type something like “eadd” and it is automatically replaced with your email address. See Chapter 4 for the details.
By default, the iPhone attempts to correct the capitalization of what you type. It also automatically selects the Shift key when you start a new sentence, start a new paragraph, or in other places where its best guess is that you need a capital letter. If you don’t want to enter a capital character, simply tap the Shift key before you type. You can enable the Caps Lock key by tapping the Shift key twice. When the key is highlighted (the upward-facing arrow is black), everything you type is in uppercase letters.
Options, Options
Using the Keyboards screen in the Settings app, you can enable or disable text-related functions, such as Auto-Capitalization. See Chapter 4 for details.
Editing Text

To edit text you’ve typed, touch and hold on the area containing the text you want to edit. A magnifying glass icon appears on the screen, and within it you see a magnified view of the location of the cursor. Drag the magnifying glass to position the cursor where you want to start making changes, and then lift your finger from the screen. The cursor remains in that location, and you can use the keyboard to make changes to the text or to add text at that location, or you can make a selection on the menu that appears.
Using 3D Touch with Text
When you are using an iPhone that supports 3D Touch (6s and later models), you can apply slight pressure when you touch the screen to have the closest word selected automatically; it is highlighted in blue to show you that it is selected. To place the cursor without selecting words that are near your finger, just touch the screen without applying any pressure.
Selecting, Copying, Cutting, or Pasting Text

You can also select text or images to copy and paste the selected content into a new location or to replace that content. Touch and hold down briefly where you want to start the selection until the magnifying glass icon appears; then lift your finger off the screen. The Select menu appears. Tap Select to select part of the content on the screen, or tap Select All to select everything in the current window.
More Commands
Some menus that appear when you are making selections and performing actions have a right-facing arrow at the right end. Tap this to see a new menu that contains additional commands. These commands are contextual, meaning that you see different commands depending on what you are doing at that specific time. You can tap the left-facing arrow to move back to a previous menu.

You see markers indicating where the selection starts and stops. (The iPhone attempts to select something logical, such as the word or sentence.) New commands appear on the menu; these provide actions for the text currently selected.

Drag the two markers so that the content you want to select is between them; the selected portion is highlighted in blue. As you drag, you see a magnified view of where the selection marker is, which helps you place it more accurately. When the selection markers are located correctly, lift your finger from the screen. (If you tapped the Select All command, you don’t need to do this because the content you want is already selected.)

Tap Cut to remove the content from the current window, or tap Copy to just copy it.
Have I Got a Suggestion for You!
As you select different items, explore the menu to see commands that might be useful to you. These commands are contextual so they change based on what you have selected. For example, when you have a word or phrase selected, one of the suggestions might be Look Up, which opens Siri Suggestions for the word or phrase you selected. The results can include dictionary or Wikipedia entries, suggested apps, and so on. Tap Done to return to the text with which you were working. As you use your iPhone, check out the options on this menu because you’ll find some very useful tricks tucked away there.
Format It!
If you tap BIU on the menu, you can tap Bold, Italics, or Underline to apply those formatting options to the selected text. You also can tap multiple format options to apply them at the same time. You might need to tap the right-facing arrow at the end of the menu to see this command, depending on how many commands are on the menu.

Move to where you want to paste the content you selected; for example, use the App Switcher to change to a different app. Tap where you want the content to be pasted. For a more precise location, tap and hold and then use the magnifying glass icon to move to a specific location. Lift your finger off the screen and the menu appears. Then tap Paste.

The content you copied or cut appears where you placed the cursor.
Correcting Spelling After You’ve Typed

The iPhone also has a spell-checking feature that comes into play after you have entered text (as opposed to the Predictive Text and autocorrect/suggests features that change text as you type it). When you’ve entered text the iPhone doesn’t recognize, it is underlined in red.

Tap the underlined word. It is shaded in red to show you what is being checked, and a menu appears with one or more replacements that might be the correct spelling. If one of the options is the one you want, tap it. The incorrect word is replaced with the one you tapped.
Contextual Menus and You
In some apps, tapping a word causes a menu with other kinds of actions to appear; you can tap an action to make it happen. For example, in the iBooks app, when you tap a word, the resulting menu enables you to look up the word in a dictionary. Other apps support different kinds of actions, so it’s a good idea to try tapping words in apps that involve text to see which commands are available.
Undo
The iPhone has a somewhat hidden undo command. To undo what you’ve just done, such as typing text, gently shake your phone back and forth a couple of times. An Undo Typing prompt appears on the screen. Tap Undo to undo the last thing you did or tap Cancel if you activated the undo command accidentally.
Dictating Text
You can also enter text by dictating it. This is a fast and easy way to type, and you’ll be amazed at how accurate the iPhone is at translating your speech into typed words. Dictation is available almost anywhere you need to enter text. (Exceptions are passcodes and passwords, such as for your Apple ID.)
To start dictating, tap the Microphone key. The iPhone goes into Dictation mode. A gray bar appears at the bottom of the window. As the iPhone “hears” you, the line oscillates.


Start speaking the text you want the iPhone to type. As you speak, the text is entered starting from the location of the cursor. Speak punctuation when you want to enter it. For example, when you reach the end of a sentence, say “period,” or to enter a colon say “colon.” To start a new paragraph, say “new paragraph.”

When you’ve finished dictating, tap the keyboard icon. The keyboard reappears and you see the text you spoke. This feature is amazingly accurate and can be a much faster and more convenient way to enter text than typing it.
You can edit the text you dictated just like text you typed using the keyboard.
Drawing in Text

You can use the iOS drawing tool to create and insert drawings that include shapes, text, colors, and other elements into places where you create text, such as emails. Tap in the window where you want the drawing to be. On the menu, tap the right-facing arrow until you see Insert Drawing and then tap that command.


Use the drawing tool to create the drawing. Tap Add (+) to add shapes, lines, or text. Tap text to edit it. Tap Signature to sign your name. You can tap objects to select them to move or change them. You can use the format tools (color and font) to format objects. When you’re done, tap Done. Then tap Insert Drawing to place the drawing where the cursor was located.
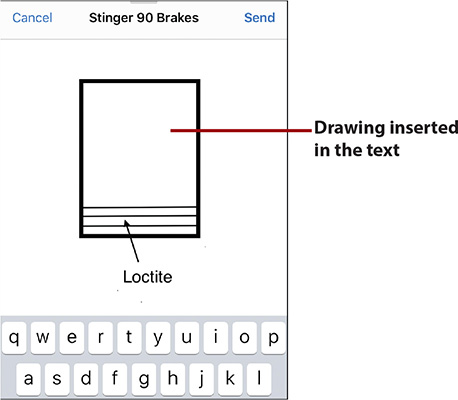
When you move back to the text, you see the drawing you created. You can then complete what you were doing, such as finishing and sending an email message.
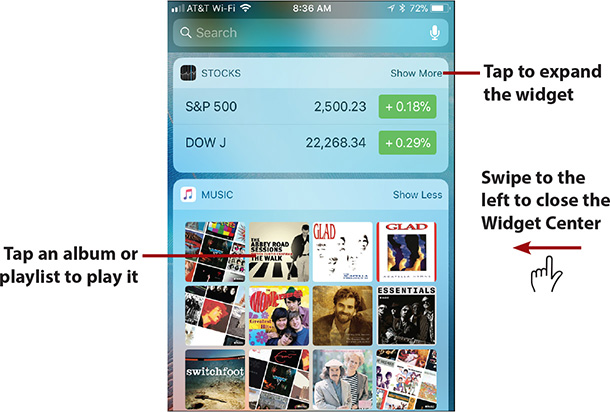
Using Widgets
Widgets are “mini” versions of apps installed on your iPhone that you can access easily and quickly from the Widget Center.

You can open the Widget Center in a number of ways:
• Wake your iPhone and swipe to the right on the Lock screen.
• Move to a Home page and swipe to the right.
• Swipe down the screen to open the Notification Center and then swipe to the right.

At the top of the Widget Center, you see the Search tool (more on this later). If you open the Widget Center from the Lock screen, you see the current time and date under the Search tool; if you open it from a Home screen, you don’t see the date or time. Beneath that, you see widgets for apps installed on your iPhone. Swipe up and down the screen to browse your widgets.
Configuring the Widget Center
You can choose the widgets that appear in the Widget Center and the order in which those widgets are shown on the screen. See “Configuring the Widget Center” in Chapter 4 for the step-by-step instructions to configure your Widget Center.
Each widget provides information or functions based on its app. For example, you can use the FAVORITES widget to place phone calls using the Phone app or to make FaceTime calls to your contacts you’ve designated as Favorites (you learn how to do this in Chapter 7). You can see your daily calendar in the CALENDAR widget, get news in the NEWS widget, or listen to music in the MUSIC widget.
You can expand a widget to show all of its information or tools by tapping the Show More command or collapse it to a more minimal state by tapping the Show Less command.
You can interact with widgets in several ways. Some widgets provide information that you can view within the widget, such as CALENDAR, STOCKS, or UP NEXT. Some apps provide options you can tap to perform specific actions; these include FAVORITES and MUSIC. When you tap something within a widget, the associated app opens and either performs the task you indicated or shows more information about what you selected.
Some apps even have multiple widgets. For example, the Calendar app has the UP NEXT widget that shows you the next events on your calendar and the CALENDAR widget that shows the events on the current date.
If you don’t move into an app from a widget, you can close the Widget Center by swiping to the left. You move back to the screen you came from, such as a Home screen. If you do move into an app from a widget, you work with that app just as if you moved into it from a Home screen.
Searching on Your iPhone
You can use the Search tool to search your iPhone to find many different types of information, including locations, emails, messages, apps, and so on.

There are a couple of ways you can start a search:
• Swipe to the right to open the Widget Center. The Search bar is at the top of the screen.
• On a Home screen, swipe down from the center of the screen. The Search bar appears at the top of the screen.
To perform a search, tap in the Search bar and type the search term using the onscreen keyboard. As you type, recent or suggested searches appear just below the Search bar; tap a search to perform it. Under the search list, you see the current items that match your search. If you don’t tap one of the recent or suggested searches, when you finish typing the search term, tap Search to see the full list of results.


The results are organized into sections, such as CONTACTS, MAIL, MESSAGES, APPLICATIONS, MAPS, MUSIC, and so on. Swipe up and down the screen to browse all of the results. To work with an item you find, such as to view a location you found, tap it; you move to a screen showing more information or into the associated app and see the search result that you tapped.


The results remain in the Search tool as you work with them. To move back to the search results, tap the back icon in the upper-left corner of the screen or tap Search (which you see depends on the result you tapped on).

The results of the most recent search are still listed. To clear the search term, tap Clear (x). To close the Spotlight tool without going to one of the results, tap Cancel.
Tell Me More
If one of the categories you find in a search has a lot of entries, you see the Show More command. Tap this to show more of the results for that category. Tap Show Less to collapse the category again. When you can search within an app, you see the Search in App text on the right side of the screen aligned with the results section; tap this to open the app and perform the search within that app.
Working with Siri Suggestions
Siri Suggestions can make it easy to get back to apps, searches, or other items you’ve used recently. Using Siri Suggestions can also lead you to useful things you weren’t necessarily looking for. These suggestions show up in many different areas on your iPhone and you can access them directly at any time.

To access Siri Suggestions, swipe down from the center of a Home screen. Just under the Search bar, you see the SIRI APP SUGGESTIONS panel. This panel shows you apps you’ve used recently or apps that might be useful to you based on your location. For example, the Starbucks app may be suggested when you are near a Starbucks location. Tap an app to open it.
There’s a Widget for That
You can also use the SIRI APP SUGGESTIONS widget in the Widget Center to quickly access recently used or suggested apps. This widget works just like the SIRI APP SUGGESTIONS panel because it’s basically the same thing.
Siri Suggestions can also appear in other apps. Siri monitors your activity and “learns” from what you do in order to improve the suggestions it makes. These suggestions can appear in many different places, such as when you are entering email addresses in a new email, dealing with new contact information, performing searches, editing a text message, and so on. When you see a list of Siri Suggestions, you can tap the suggestion you want to use. For example, if it is an email address, that address is entered for you. If it is a search, the search is performed.
You can enable or disable the apps and services that Siri can access to make these suggestions; the information to do this is provided in Chapter 11, “Working with Siri.” For example, if you don’t want Siri to be able to make suggestions based on a specific app, you can disable the Search & Siri Suggestions setting for that app.
Working with Notifications
As you learned in Chapter 1, the iPhone’s notification system keeps you informed of activity in which you may be interested, such as new emails, events, app updates, and so on. There are a number of types of these notifications that you will experience. Visual notifications include banners and badges. Alert sounds can also let you know something has happened, and vibrations make you feel the new activity.
You can determine which types of notifications are used for specific activity on your iPhone. This might be one of the most important areas to configure because you want to make sure you are aware of activity that is important to you, but too many notifications can be disruptive and annoying. So, you want to strike a good balance between being aware and being annoyed.
Notification Center
In Chapter 1, you learned how to use the Notification Center to work with groups of notifications. This can be a more efficient way to deal with notifications since you can access “batches” of them instead of dealing with each one individually. You might want to configure individual notifications for the activity that is most important to you and access the rest via the Notification Center.
Working with Visual Notifications
There are three types of visual notifications: badges, persistent banners, and temporary banners.

Badges appear on an app’s or a folder’s icon to let you know something has changed, such as when you have received new email.
Badges are purely informational, meaning you can’t take any action on these directly as you can with the other visual notifications. They inform you about an event so that you can take action, such as to download and install an update to your iPhone’s iOS software or read new text messages.
Badges on Folders
In Chapter 5, “Customizing How Your iPhone Looks and Sounds,” you learned how to organize apps in folders. When apps in folders have badges enabled, the badge you see on a folder is a total count of the badges on the apps within that folder. The only way to know which apps that are in the folders have badges is to open the folder so you can see the individual app icons and badges.


Banner notifications provide information for you, and you can take action related to the event that generated the notification. For example, you can respond to a text message directly from its notification.
There are two types of banner notifications. Persistent banner notifications remain on the screen until you take action on them, which can be closing them, responding to them, etc. Temporary banner notifications appear on the screen for a few seconds and if you don’t take action on them, they rotate off the screen to get out of your way.
When your iPhone is unlocked, banner notifications appear at the top of the screen. They provide a summary of the app and the activity that has taken place, such as a new email or text message. When a banner appears, you can view its information; if it is a temporary banner, it rotates off the screen after displaying for a few seconds; if it is a persistent banner, you need to do something to cause it to disappear. You can tap it to move into the app to take some action, such as to read an email. You can swipe up from the bottom of the banner to close it. For some apps, such as Email, you can press on the notification to open a menu of commands.
No 3D Touch?
If your iPhone doesn’t support 3D Touch (it’s not an iPhone 6s or later model), you can swipe down on a notification to take action on it, such as to reply to a text message.

Banner notifications can also appear on the Lock screen, which is really convenient because you can read and take action on them directly from that screen. If your phone is asleep, the notifications appear briefly on the screen and then it goes dark again; you can press the Side button or the Touch/ID Home button or raise your phone to see your notifications without unlocking the iPhone. You can swipe up or down the screen to browse the notifications.
To respond to a notification or take other action on it, press it to open it (3D Touch iPhones) or swipe to the right on it (non-3D Touch iPhones) and then take action, such as replying to a message. In some cases, you might need to unlock your phone to complete an action associated with a notification. In those cases, you’re prompted to use Touch ID, Face ID, or your passcode to proceed.
If don’t want the banners to appear, you can disable them.
Working with Other Types of Notifications
Sounds are audible indicators that something has happened. For example, you can be alerted to a new email message by a specific sound. You can choose global sound notifications, such as a general ringtone, and specific ones, such as a special ringtone when someone in your contacts calls you.
Vibrations are a physical indicator that something has happened. Like sounds, you can configure general vibrations, and you can also configure an app’s vibration pattern for its notifications.
Configuring Your Notifications
It’s a good idea to configure the notifications your iPhone uses so that you are aware of important activity, such as new work emails, without being distracted by constant notifications for things that don’t require your immediate attention (such as a post to Facebook). To learn how to configure your notifications, see “Configuring Notifications” in Chapter 4.
Printing from Your iPhone
You can print directly from your iPhone to AirPrint-compatible printers.

First, set up and configure your AirPrint printer (see the instructions that came with the printer you use).
It Depends
When you tap the Share icon, you might see a menu containing commands instead of the grid of icons shown in the figure. The way it appears is dependent upon the app you are using. If you see a menu, tap Print to move to the Printer Options screen.
AirPrint?
AirPrint is an Apple technology that enables an iOS device to wirelessly print to an AirPrint-compatible printer without installing any printer drivers on the iOS device. To be able to print directly to a printer via Wi-Fi, the printer must support AirPrint (a large number of them do). When an iOS device, such as your iPhone, is on the same Wi-Fi network as an AirPrint printer, it automatically detects that printer and is able to print to it immediately.
When you are in the app from which you want to print, tap the Share icon. Tap Print on the resulting menu. You might need to swipe to the right to expose the Print command. (If you don’t see the Share icon or the Print command, the app you are using doesn’t support printing.)
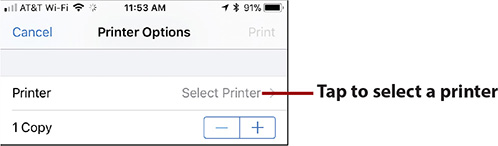

The first time you print, you need to select the printer you want to use. On the Printer Options screen, tap Select Printer. Then tap the printer you want to use. You move back to the Printer Options screen and see the printer you selected.

Tap the – or + to set the number of copies; the current number of copies is shown to the left of the controls. You can use other controls that appear to configure the print job, such as the Black & White switch to print in black and white on a color printer; the controls you see depend on the capabilities of the printer you selected. Tap Print to print the document.
The next time you print, if you want to use the same printer, you can skip the printer selection process because the iPhone remembers the last printer you used. To change the printer, tap Printer and tap the printer you want to use.