
8. Sending, Receiving, and Managing Email

In this chapter, you explore all the email functionality that your iPhone has to offer. Topics include the following:
![]() Configuring email accounts
Configuring email accounts
![]() Setting Mail app preferences
Setting Mail app preferences
![]() Working with email
Working with email
![]() Managing email
Managing email
For most of us, email is an important way we communicate with others, both in our professional and personal lives. Fortunately, your iPhone has great email tools so you can work with email no matter where you are. Of course, you need to be connected to the Internet through a Wi-Fi or cellular data connection to send or receive email—although you can read downloaded messages, reply to messages, and compose messages when you aren’t connected.
To use email on your iPhone, you use the Mail app. This app has lots of great features that help you really take advantage of email from all your accounts. Before jumping into the app, you need to have one or more email accounts configured on your iPhone. As you work with your email, there are a number of Mail settings that you might want to configure to tailor how the app works to suit your preferences.
Configuring Email Accounts
Before you can start using an iPhone for email, you have to configure the email accounts you want to access with it. The iPhone supports many kinds of email accounts, including iCloud, Exchange, Gmail, and so on. Setting up the most common types of email accounts is covered in Chapter 3, “Setting Up and Using an Apple ID, iCloud, and Other Online Accounts,” so if you haven’t done that already, go back to that chapter and get your accounts set up. Then come back here to start using those accounts for email.
Setting Mail App Preferences
There are a number of settings that affect how the Mail app works. The good news is that you can use the Mail app with its default settings just fine. However, you might want to tweak how it works for you by making changes using the Settings app; you can use the information in the table that follows to understand the options available to you.
To access the settings in the table, first tap the Settings icon on the Home screen, tap the option listed in the Settings Area column, and then move to the location to make changes to the setting (for example, to change the amount of text shown in email previews, open the Settings app; tap Mail; move to the MESSAGE LIST section; and then tap Preview). For each setting, you see a description of what it does along with options (if applicable).
Settings App Explained
To get detailed information on using the Settings app, see “Working with the Settings App” in Chapter 2, “Using Your iPhone’s Core Features.”
Mail and Related Settings
Settings Area |
Location |
Setting |
Description |
|---|---|---|---|
Accounts & Passwords |
Accounts |
Email accounts |
You can configure the accounts used in the Mail app to determine which account can receive or send email on your iPhone (see Chapter 3 for details). |
Accounts & Passwords |
N/A |
Fetch New Data |
Determines when new email is downloaded to your iPhone (see Chapter 3 for an explanation of the options). |
ALLOW MAIL TO ACCESS |
Siri & Search |
When enabled (green), Search, Siri, and other elements of the iOS can use information in the Mail app. For example, when you search for a person, the Search tool can search your email for relevant information. If you don’t want your email information to be used, set the switch to off (white). |
|
ALLOW MAIL TO ACCESS |
Notifications |
Configure the type of notifications the Mail app uses. See “Configuring Notifications” in Chapter 4, “Customizing How Your iPhone Works,” for a detailed explanation. |
|
ALLOW MAIL TO ACCESS |
Cellular Data |
When enabled (green), Mail can send and receive email when your iPhone is connected to the Internet using the cellular data network. Email typically doesn’t use a lot of data, but if you receive many emails with very large attachments and have a limited data plan, you might want to set this switch to off (white). |
|
MESSAGE LIST |
Preview |
Determines the number of lines you want to display for each email when you view the Inbox and in other locations, such as alerts. This preview enables you to get the gist of an email without opening it. More lines give you more of the message but take up more space on the screen. |
|
MESSAGE LIST |
Show To/Cc Label |
Slide the switch to on (green) to always see a To or Cc label next to the subject line on messages in your inboxes. This helps you know when you are included in the To line or as a Cc, which usually indicates whether you need to do something with the message or if it is just for your information. |
|
MESSAGE LIST |
Swipe Options |
Changes what happens when you swipe to the left or right on email when you are viewing an Inbox. You can set the Swipe Left motion to be None, Mark as Read, Flag, or Move Message. When you do a partial swipe to the left, you see the More icon, which leads to a menu of actions, and the option you configure for the Left Swipe setting. When you do a full swipe to the left, a message is deleted. You can set the Swipe Right motion to be None, Mark as Read, Flag, Move Message, or Archive. When you swipe all the way to the right on a message, the action you configure for the Swipe Right is performed. When you do a partial swipe, you see an icon that you can tap to perform the action. Note that you can’t have the same option configured for both directions. |
|
MESSAGE LIST |
Flag Style |
Determines how messages you flag are marked; you can choose a colored circle or a flag icon. Flagging messages marks messages that you want to know are important or that need your attention. |
|
MESSAGES |
Ask Before Deleting |
When this switch is on (green), you’re prompted to confirm when you delete or archive messages. When this switch is off (white), deleting or archiving messages happens without the confirmation prompt. |
|
MESSAGES |
Load Remote Images |
When this switch is on (green), images in HTML email messages are displayed automatically. When this switch is off (white), you have to manually load images in a message. (If you receive a lot of spam, you should turn this off so that you won’t see images in which you might not be interested.) |
|
THREADING |
Organize By Thread |
When this switch is on (green), messages in a conversation are grouped together as a “thread” on one screen. This makes it easier to read all the messages in a thread. When this switch is off (white), messages are listed individually. (You learn more about working with threads in the “Working with Email” task later in this chapter.) |
|
THREADING |
Collapse Read Messages |
When enabled and you read messages in a thread, the thread collapses so you see the thread rather than the individual messages in the thread. |
|
THREADING |
Most Recent Message on Top |
With this switch set to on (green), the most recent message in a thread appears at the top of the thread and the messages move backward in time as you move down the list of messages. When disabled (white), the first message in the thread displays at the top with the next oldest message appearing next, and so on until the last message, which is the most recent message in the thread. |
|
THREADING |
Complete Threads |
With this switch enabled (green), all the messages in a thread are displayed when you view the thread, even if you’ve moved messages to a different folder (other than the inbox). |
|
COMPOSING |
Always Bcc Myself |
When this switch is on (green), you receive a blind copy of each email you send; this means that you receive the message, but you are hidden on the list of recipients. When this switch is off (white), you don’t receive a blind copy. (Email you send is automatically saved in the Sent folder so you always have a record of emails you send.) |
|
COMPOSING |
Mark Addresses |
This feature highlights addresses in red that are not from domains that you specify. You enter the domains (everything after the @ in email addresses, such as icloud.com) from which you do not want addresses to be marked (highlighted in red) when you create email. You can add multiple domains to the list by separating them with commas. All addresses from domains not listed will be marked in red. To disable this feature, delete all the domains from the list. |
|
COMPOSING |
Increase Quote Level |
When this option is enabled (green), the text of an email you are replying to or forwarding (quoted content) is automatically indented. Generally, you should leave this enabled so it is easier for the recipients to tell when you have added text to an email, versus what is from the previous email messages’ quoted content. |
|
COMPOSING |
Signature |
Signatures are text that is automatically added to the bottom of new email messages that you create. For example, you might want your name and email address added to every email you create. You can configure the same signature for all your email accounts or have a different signature for each account. If you don’t want to use a signature, delete any signatures that are currently configured. (Note that the default signature is “Sent from my iPhone.”) |
|
COMPOSING |
Default Account |
Determines which email account is the default one used when you send an email (this setting isn’t shown if you have only one email account). You can override the default email account for an email you are sending by choosing one of your other email addresses in the From field. |
|
Display & Brightness |
N/A |
Text Size |
Changes the size of text in all apps that support Dynamic Type (Mail does). Drag the slider to the right to make text larger or to the left to make it smaller. |
Display & Brightness |
N/A |
Bold Text |
Changes text to be bold when the Bold Text switch is set to on (green). |
Control Center |
N/A |
Text Size |
Changes the size of text; you can add the Text Size tool to your Control Center to make it quicker and easier to use. See “Configuring the Control Center” in Chapter 4 for the steps to configure your Control Center. |
More on Marking Addresses
When you configure at least one address on the Mark Addresses screen, all addresses from domains except those listed on the Mark Addresses screen are in red text on the New Message screen. This is useful to prevent accidental email going to places where you don’t want it to go. For example, you might want to leave domains associated with your workplace off this list so that whenever you send email to addresses associated with your workplace, the addresses appear in red to remind you to pay closer attention to the messages you are sending.
Email Notifications and Sounds
If you want to be alerted whenever new email is received and when email you create is sent, be sure to configure notifications for the Mail app. These include whether unread messages are shown in the Notification Center, the type of alerts, whether the badge appears on the Mail icon, whether the preview is shown, the alert sound, and whether new messages are shown on the Lock screen. For a detailed explanation of configuring notifications, refer to Chapter 4.
Working with Email
The Mail app offers lots of great features and is ideally suited for working with email on your iPhone. This app offers a consolidated Inbox, so you can view email from all your accounts at the same time. Also, the Mail app organizes your email into threads (assuming you didn’t disable this feature), which makes following a conversation convenient.

When you move to a Home screen, you see the number of new email messages you have in the badge on the Mail app’s icon (assuming you haven’t disabled this); tap the icon to move to the app. Even if you don’t have any new email, the Mail icon still leads you to the Mail app. Other ways Mail notifies you of new messages include by displaying visual notifications and the new mail sound. (You determine which of these options is used for each email account by configuring its notifications as explained in the “Email Notifications and Sounds” note earlier in this chapter.)

If you are using an iPhone that supports 3D Touch (6s/6s Plus or later models), you can press on the Mail icon to open the Quick Actions menu and choose an action you want to perform. For example, you can start a new email message by tapping New Message or move directly to your VIP email by tapping VIP. You can move to the most recent messages from one of your VIPs by tapping him in the MAIL widget.
VIP
You can designate people with whom you correspond as a Very Important Person (VIP). Mail has options specifically for your VIPs, such as a dedicated inbox, the MAIL widget, and so on. You learn more about working with VIPs later in this chapter.
About Assumptions
The steps and figures in this section assume you have more than one email account configured and are actively receiving email from those accounts on your iPhone. If you have only one email account active, your Mailboxes screen contains that account’s folders instead of mailboxes from multiple accounts and the Accounts sections that appear in these figures and steps. Similarly, if you disable the Organize by Thread setting, you won’t see messages in threads as these figures show. Instead, you work with each message individually.
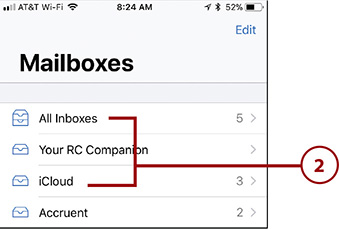
The Mail app enables you to receive and read email for all the email accounts configured on your iPhone. The Mailboxes screen is the top-level screen in the app and is organized into two sections.

The Inboxes section shows the Inbox for each account along with folders for email from people designated as VIPs, your unread messages, and your draft messages (those you’ve started but haven’t sent yet). Next to each Inbox or folder is the number of new emails in that Inbox or folder. (A new message is simply one you haven’t viewed yet.) At the top of the section is All Inboxes, which shows the total number of new messages to all accounts; when you tap this, the integrated Inbox containing email from all your accounts is displayed.
The Accounts section, which is underneath the Inboxes section on the screen, shows the set of inboxes and folders within each email account. The difference between these sections is that the Inbox options take you to just the Inbox for one or all of your accounts or specific folders (such as the VIP folder), whereas the Account options take you to all the folders under each account. You can tap any folder or inbox under an account to view the emails stored in that folder or inbox.
Receiving and Reading Email
To read email you have received, perform the following steps:
1. On the Home screen, tap Mail. When you open Mail (assuming you didn’t use the App Switcher to quit the app when you left it), you move back to the screen you were last on, for example, if you were reading an email you return to it. If the Mailboxes screen isn’t showing, tap the back icon in the upper-left corner of the screen until you reach the Mailboxes screen.

2. To read messages, tap the Inbox that contains messages you want to read, or tap All Inboxes to see the messages from all your email accounts. Various icons indicate the status of each message, if it has attachments, if it is from a VIP, or if it is part of a thread. A message is part of a thread when it has double right-facing arrows along the right side of the screen—individual messages have only one arrow.
3. Swipe up or down the screen to browse the messages. You can read the preview of each message to get an idea of its contents.
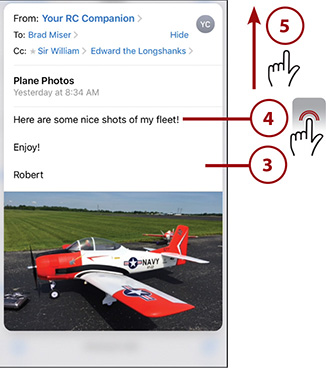
4. If a message you are interested in is in a thread, tap its arrows. (If it isn’t part of a thread, skip to step 6.) The thread expands (the double arrows point down instead of to the right) and you can see the messages it contains. The first message in the thread appears in a gray bar. The responses to the message appear under it in a lighter shade of gray; the responses don’t have a subject because they are all related to the subject of the thread.

Pulling on Threads
A thread is a group of emails that are related to the same subject. For example, if someone sends an email to you saying how wonderful the My iPhone book is, and you reply with a message saying how much you agree, those two messages would be grouped into one thread. Other messages with the same subject are also placed in the thread.
Collapsing Threads
To collapse an expanded thread, tap the downward-facing arrows. You see only the most recent message in the thread again.
5. Swipe up or down the screen to browse the messages in the thread.
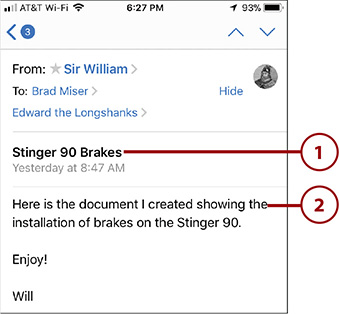
6. To read a message (whether in a thread or not), tap it. As soon as you open a message, it’s marked as read and the new mail counter reduces by one. You see the message screen with the address information at the top, including whom the message is from and whom it was sent to. Under that the message’s subject along with time and date it was sent are displayed. Below that is the body of the message. If the message has an attachment or is a reply to another message, the attachment or quoted text appears toward the bottom of the screen.

7. Swipe up and down the screen to read the entire message.

Standard Motions Apply
You can use the standard finger motions on email messages, such as unpinching or tapping to zoom, swiping directions to scroll, and so on. You can also rotate the phone to change the orientation of messages from vertical to horizontal; this makes it easier to type.
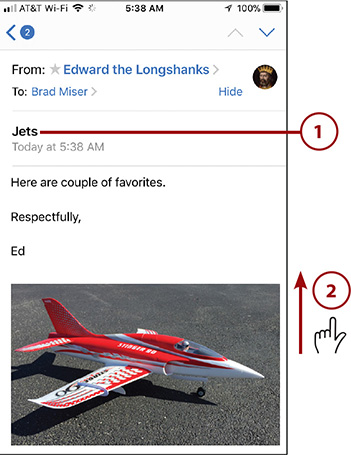
8. If the message contains an attachment, swipe up the screen to get to the end of the message. Some types of attachments, most notably photos, appear directly in the message and you don’t have to download them to the device. If an attachment hasn’t been downloaded yet, it starts to download automatically (unless it is a large file). If the attachment hasn’t been downloaded automatically, which is indicated by “Tap to Download” in the attachment icon, tap it to download it into the message. When an attachment finishes downloading, its icon changes to represent the type of file it is. If the icon remains generic, it might be of a type the iPhone can’t display, and you would need to open it on a computer or other device.


9. Tap the attachment icon to view it.

10. Scroll the document by swiping up, down, left, or right on the screen.
11. Unpinch or double-tap to zoom in.
12. Pinch or double-tap to zoom out.
13. Tap the Share icon to see the available actions for the attachment.

14. Swipe to the left or right to see all the available options.
15. Tap the action you want to take, such as opening the attachment in a different app, printing it, sharing it via email, and so on. Tap Cancel to return to the attachment if you don’t want to do any of these. If you open the attachment in an app, work with the attachment in that app. To return to the email, tap Mail in the top-left corner of the screen to return to the Mail app (not shown in the figures).

16. Tap Done (depending on the type of attachment you were viewing, you might tap the back icon instead).

17. To view information for an email address, such as who sent the message, tap it. The Info screen appears. On this screen, you see as much information for the person as is available. If it is someone in the Contacts app, you see all of the information stored there, and you can place a call, send a message, etc. If it is not someone in the Contacts app, you see the person’s email address along with actions you might want to perform, such as creating a contact for him or adding new information to an existing contact. (See Chapter 6, “Managing Contacts,” for information about working with contacts.)

18. Tap Done to return to the message.

19. To read the next message in the current Inbox, tap the down arrow. (If the arrow is disabled, you are viewing the most recent email in the inbox.)
20. To move to a previous message in the current Inbox, tap the up arrow. (If the arrow is disabled, you are viewing the oldest message in the inbox.)
21. To move back to see the entire Inbox, tap the back icon, which shows the number of unread messages in the inbox from which you came (all your inboxes if you were viewing them all).

Reading Threads
If you want to read all the messages in a thread instead of individual messages it contains, tap the thread (instead of tapping its arrows to expand it). The thread opens, and you see the title of the thread at the top of the screen in a gray bar. You can browse up and down the thread’s screen to read all of the messages it contains. When you are done with the thread, tap the back icon located in the upper-left corner of the screen.
Two Other Ways to Open New Email
You can view a preview of email messages in notifications you receive and press or swipe on the notification to get to the full message. You can also use Siri to get and read new email. If that isn’t enough ways, you can also use the MAIL widget to quickly get to email from your VIPs.
Receiving and Reading Email on an iPhone Plus
The larger screens on the iPhone Plus models (6, 7, and 8) provide some additional functionality that is unique to those models. You can access this by holding the Plus horizontally when you use the Mail app.
1. Open the Mail app and hold the iPhone so it is oriented horizontally. The mail window splits into two panes. On the left is the Navigation pane, where you can move to and select items you want to view. When you select something in the left pane, it appears in the Content pane on the right, which shows the email message you were most recently reading.
2. In the left pane, navigate to the Mailboxes screen by tapping the back icon until it disappears.
3. Swipe up or down the Navigation pane to browse the mailboxes and accounts available to you. Notice that the two panes are independent. When you browse the left pane, the right pane doesn’t change.
4. Tap the mailbox or account whose contents you want to view.

5. Swipe up and down the messages to browse all of them in the mailbox you selected.
6. Tap the message or thread that you want to read. If you tap a thread, the messages it contains appear in the left pane; browse the messages in the thread by swiping up and down the screen and then tap the message in the thread that you want to read. The message currently selected is highlighted in gray.

7. Read the message.
8. Use the other tools to work with it; these work just like they do on other models and when you hold the iPhone vertically. For example, tap the up arrow to move to the previous message in the current Inbox.
9. To read the message in full screen, tap the Full Screen icon. The Content pane uses the entire screen.

10. Work with the message.
11. When you’re done, tap the back icon, which shows the number of unread messages in the selected inbox from which you came (all your inboxes if you were viewing them all).

12. Select and read other messages.
13. When you’re done, tap the back icon, which is labeled with the name of the inbox or folder whose contents you are browsing.

Using 3D Touch for Email
You can use the 3D Touch feature (iPhone 6s/6s Plus or later models) for email as follows:
1. Browse a list of email messages.
2. Press and hold on an email in which you are interested. A Peek of that email appears.

3. Review the preview of the email that appears in the Peek.
4. To open the email so you can read all of it, press down slightly harder until it pops open and use the steps in the earlier task to read it (skip the rest of these steps).
5. To see actions you can perform on the email, swipe up on the Peek.
6. Tap the action you want to perform, such as Reply All, to reply to the email.

>>>Go Further: MORE ON RECEIVING AND READING EMAIL
Check out these additional pointers for working with email you receive:
• If more messages are available than are downloaded, tap the Load More Messages link. The additional messages download to the inbox you are viewing.
• You can change the amount of detail you see at the top of the message screen by tapping Details to show all of the detail, such as the entire list of recipients, or Hide to collapse that information.
• A thread is started based on its subject and sender. As replies are made, the messages continue to be categorized by subject because Re: is appended to it. It even remains in the thread if the initial subject continues to be in the message but other words are added.
• If a message includes a photo, Mail displays the photo in the body of the email message if it can (if the image is large, you might have to download it to see it). You can zoom in or out and scroll to view it just as you can for photos in other apps.
• If you tap a PDF attachment in a message and the iBooks app is installed on your iPhone, you’re prompted to select Quick Look or Open in iBooks. If you select Open in iBooks, the document opens in the iBooks app where you can read it using the powerful features it offers for reading ebooks and other documents.
• Some emails, especially HTML messages, are large and don’t immediately download in their entirety. When you open a message that hasn’t been fully downloaded, you see a message stating that this is the case. Tap the link to download the rest of the message.
• If you have other apps with which an attachment is compatible, you can open the attachment in that app. For example, if you have Pages installed on your iPhone and are viewing a Word document attachment, you can tap the Share icon and tap Open in Pages to open the document in the Pages app. You can get the same options by touching and holding on the attachment’s icon in the body of a message until the Share menu appears.
Sending Email
You can send email from any of your accounts. Follow these steps for a basic walk-through of composing and sending a new email message:
1. Tap the Compose icon at the bottom of any Mail screen. (If you are using an iPhone that supports 3D Touch, you can press down on the Mail app’s icon and choose New Message to create a new email from a Home page.) A new email message containing your signature is created. (For an explanation of where to configure a signature, see the table at the beginning of the chapter.)

2. Tap the To field and type the first recipient’s email address. As you type, Mail attempts to find matching addresses in your Contacts list, or in emails you’ve sent or received, and displays the matches it finds. These can include individuals or groups with which you’ve emailed. To select one of those addresses, tap it. Mail enters the rest of the address for you. Or, just keep entering information until the address is complete.

3. Address the email using your Contacts app by tapping the Add (+) icon.

4. Use the Contacts app to find and select the contact to whom you want to address the message. (Refer to Chapter 6 for the details about working with contacts.) When you tap a contact who has only one email address, that address is pasted into the To field and you return to the New Message window. When you tap a contact with more than one email address, you move to that contact’s screen, which shows all available addresses; tap the address to which you want to send the message.

Have Multiple Email Accounts?
If you have more than one email account, it’s important to know from which account you are sending a new message. If you tap the Compose icon while you are on the Mailboxes screen or the Inboxes screen, the From address is the one for the account you set as your default; otherwise, the From address is the email account associated with the Inbox you are in.
5. Repeat steps 2–4 to add other recipients to the message.
6. Tap the Cc/Bcc, From line. The Cc and Bcc lines expand.

Removing Addresses
To remove an address, tap it so it is highlighted in a darker shade of blue; then tap the Delete (x) icon on the iPhone’s keyboard.
7. Follow the same procedures from steps 2–4 to add recipients to the Cc field.

8. Follow the same procedures from steps 2–4 to add recipients to the Bcc field.
9. If the correct account is shown, skip to step 11; to change the account from which the email is sent, tap the From field. The account wheel appears at the bottom of the screen.

10. Swipe up or down the wheel until the From address you want to use is shown between the lines.
11. Tap in the Subject line. The account selection wheel closes.

12. Type the subject of the message.
13. If you want to be notified when someone replies to the message you are creating, tap the bell; if not, skip to step 16.

14. Tap Notify Me. When anyone replies to the message, you are notified.

15. If you don’t see the body of the message, swipe up the screen and it appears.
16. Tap in the body of the message, and type the message above your signature. Mail uses the iOS’s text tools, attempts to correct spelling, provides Predictive Text, and makes suggestions to complete words. (Refer to Chapter 2 for the details of working with text.)
17. To make the keyboard larger, rotate the iPhone so that it is horizontal.
18. When you finish the message, tap Send. The progress of the send process is shown at the bottom of the screen; when the message has been sent, you hear the send mail sound you configured, which confirms that the message has been sent. If you enabled the reply notification for the message, you are notified when anyone replies to it.

Start Writing Now, Finish Writing and Send Later
If you want to save a message you are creating without sending it, tap Cancel. A prompt appears; select Save Draft to save the message; if you don’t want the message, tap Delete Draft instead. When you want to work on a draft message again, touch and hold down the Compose icon. After a moment, you see your most recent draft messages; tap the draft message you want to work on. You can make changes to the message and then send it or save it as a draft again. (You can also move into the Drafts folder to select and work with draft messages; moving to this folder is covered later in this chapter.)
Using Mail’s Suggested Recipients
As you create messages, Mail suggests recipients based on the new message’s current recipients. For example, if you regularly send emails to a group of people, when you add two or more people from that group, Mail suggests others you might want to include. As you add others to the message, Mail continues suggesting recipients based on the current recipient list. You can use these suggestions to quickly add more recipients to a new message.
1. Create a new message.
2. Add at least two recipients. Just below the To line, Mail suggests additional recipients for the new message based on other messages you have created.
3. Tap the additional recipients you want to add to the new message. (Mail sometimes suggests multiple recipients as a group if you have emailed that group before.) As you select these recipients, Mail keeps making suggestions and new people appear in the gray bars.
4. When you’re done adding To recipients, tap in the next field you want to complete and continue creating the new message.

Replying to Email
Email is all about communication, and Mail makes it simple to reply to messages.
1. Open the message you want to reply to.
2. Tap the arrow icon.

3. Tap Reply to reply to only the sender or, if there was more than one recipient, tap Reply All to reply to everyone who received the original message. The Re: screen appears showing a new message. Mail pastes the contents of the original message at the bottom of the body of the new message below your signature. The original content is in blue and is marked with a vertical line along the left side of the screen.

4. Use the message tools to add or change the To, Cc, or Bcc recipients.
5. Write your response.
6. Tap Send. Mail sends your reply.

Including a Photo or Video in a Message
To add a photo or video to a message you create (new, reply, or forward), tap twice in the body. Swipe to the left on the resulting toolbar (if you don’t see it immediately) until you see the Insert Photo or Video command, and then tap it. Use the Photos app (see Chapter 14, “Viewing and Editing Photos and Video with the Photos App,” for information about this app) to move to and select the photo or video you want to attach. Tap Choose. The photo or video you selected is added to the message.
Sending Email from All the Right Places
You can send email from a number of places on your iPhone. For example, you can share a photo with someone by viewing the photo, tapping the Share icon, and then tapping Mail. Or you can tap a contact’s email address to send an email from your contacts list. In all cases, the iPhone uses Mail to create a new message that includes the appropriate content, such as a photo or link; you use Mail’s tools to complete and send the email.
Print Email from Your iPhone
If you need to print a message, tap the arrow icon at the bottom of the screen and tap Print. To learn about printing from your iPhone, refer to Chapter 2.
Forwarding Emails
When you receive an email you think others should see, you can forward it to them.
1. Read the message you want to forward.
2. If you want to include only part of the current content in the message you forward, tap where you want the forwarded content to start. This is useful (and considerate!) when only a part of the message applies to the people to whom you are forwarding it. If you want to forward the entire message, skip to step 4.
3. Use the text selection tools to select the content you want to include in your forwarded message.
4. Tap the arrow icon.

5. Tap Forward.

6. If the message includes attachments, tap Include at the prompt if you also want to forward the attachments, or tap Don’t Include if you don’t want them included. The Forward screen appears. Mail pastes the contents of the message that you selected, or the entire content if you didn’t select anything, at the bottom of the message below your signature. If you included attachments, they are added to the new message as well.

7. Address the forwarded message using the same tools you use when you create a new message.
8. Type your commentary about the message above your signature.
9. Tap Send. Mail forwards the message.

Large Messages
Some emails, especially HTML messages, are so large that they don’t immediately download in their entirety. When you forward a message whose content or attachments haven’t fully downloaded, Mail prompts you to download the “missing” content before forwarding. If you choose not to download the content or attachments, Mail forwards only the downloaded part of the message.
Managing Email
Following are some ways you can manage your email. For example, you can check for new messages, see the status of messages, delete messages, and organize messages using the folders associated with your email accounts.
Checking for New Email

To manually retrieve messages, swipe down from the top of any Inbox or the Mailboxes screen. The screen “stretches” down and when you lift your finger, the Mail app checks for and downloads new messages.
Mail also retrieves messages whenever you move into the app or into any Inbox or all your Inboxes. Of course, it also retrieves messages according to the selected Fetch New Data option. It downloads new messages immediately when they arrive in your account if Push is enabled or automatically at defined intervals if you’ve set Fetch to get new email periodically. (Refer to Chapter 3 for an explanation of these options and how to set them.)

The bottom of the Mailboxes or an Inbox screen always shows when email was most recently downloaded to your iPhone; on the bottom of Inbox screens, you also see the number of new email messages (if there are any unread messages).
Understanding the Status of Email

When you view an Inbox or a message thread, you see icons next to each message to indicate its status (except for messages that you’ve read but not done anything else with and that aren’t from a VIP, which aren’t marked with any icon).
Managing Email from the Message Screen

To delete a message while reading it, tap the Trash icon. If you enabled the warning preference, confirm the deletion and the message is deleted. If you disabled the confirmation prompt, the message is deleted immediately.

To take other action on a message you are reading, tap the Flag icon. On the menu that opens, you can choose a number of commands. The action you select is performed on the message you are viewing.
Dumpster Diving
As long as an account’s trash hasn’t been emptied, you can work with a message you’ve deleted by moving to the account’s screen and opening its Trash folder. Over time, a lot of deleted messages can accumulate in the Trash folder. To get rid of these messages, open the Trash folder under the account. Tap Delete All and tap Delete All again at the prompt. The deleted messages are removed from the folder and are gone forever. This frees up space on the cloud as well as on your iPhone.
Where Has My Email Gone?
When you send an email to the Archive folder, it isn’t deleted. To access messages you’ve archived, tap the back icon in the upper-left corner of the screen until you get to the Mailboxes screen. Tap the Archive folder under the account to which email you’ve archived was sent.
Managing Email from an Inbox
Previously in this chapter, you saw the settings options for swipe actions for email. You can use those to configure how right and left swipes affect your email from an Inbox screen, such as flagging a message with a left swipe. (Depending on the choices you set for the swipe preferences, the results you see when you swipe might be different than shown here. However, the swipe right or swipe left actions still reveal commands you can use unless you chose None in the settings, in which case nothing happens when you swipe on a message.)


Swipe to the right on a message to change its read status. If the message has been read, you can reset its status to unread, or, if it hasn’t been read, you can mark it as read.


Swipe to the left on a message to see several options. Tap Trash to delete the message or messages if you swiped on a thread (the number of messages that will be deleted is shown in parentheses). Tap Flag to flag the message or Unflag to remove the flag. Tap More to open a menu of additional commands.

When you tap More, you see other commands for actions you can take on the message, such as replying to it or moving it to a different folder.
No-Stop Swiping to Delete
If you quickly swipe all the way to the left on a message on an Inbox screen, the message is deleted in one fell swipe.
Managing Multiple Emails at the Same Time
You can also manage email by selecting multiple messages on an Inbox screen, which is more efficient because you can take action on multiple messages at the same time.
1. Move to an Inbox screen showing messages you want to manage.
2. Tap Edit. A selection circle appears next to each message, and actions appear at the bottom of the screen.

3. Select the message(s) you want to manage by tapping their selection circles. As you select each message, its selection circle turns blue and is marked with a check mark. At the top of the screen, you see how many messages you have selected.
When you use an iPhone Plus in the horizontal orientation, you see the selection screen on the left and a preview of what you have selected in the right pane. Even though it looks a bit different, it works in the same way.
4. To delete the selected messages, tap Trash. Mail deletes the selected messages and exits Edit mode. (If you enabled the warning prompt, you have to confirm the deletion.)
5. To change the status of the selected messages, tap Mark.


6. Tap the action you want to take on the selected messages. You return to the Inbox screen and exit Edit mode.

Organizing Email from the Message Screen
You can have various folders to organize email, and you can move messages among these folders. For example, you can recover a message from the Trash by moving it from the Trash folder back to the Inbox.
1. Open a message you want to move to a different folder.
2. Tap the Mailboxes icon. You’re prompted to move the messages into the folder you most recently moved messages into or to choose a different folder.

3. To move the messages into a folder you have previously used, tap Move to “foldername” where foldername is the name of that folder and skip the rest of these steps.
4. To move the message into a folder that wasn’t the one you used most recently, tap Other Mailbox. The Mailboxes screen appears. At the top of this screen is the message you are moving. Under that are the mailboxes available under the current account.

Move to Other Accounts
If you want to move selected messages to a folder under a different account, tap Accounts in the upper-left corner of the screen. Tap the account to which you want to move the message (not all accounts will be available; if an account is grayed out, you can’t move a message to it). Then tap the mailbox into which you want to move the message.
5. Swipe up and down the screen to browse the mailboxes available in the current account.
6. Tap the mailbox to which you want to move the message. The message moves to that mailbox, and you move to the next message in the list you were viewing.
When you use an iPhone Plus in the horizontal orientation, you see the list of folders you are navigating in the left pane and a preview of the messages you have selected in the right pane.

Makin’ Mailboxes
You can create a new mailbox to organize your email. Move to the Mailboxes screen and tap Edit. Then, tap New Mailbox located at the bottom of the screen. Type the name of the new mailbox. Tap the Mailbox Location and then choose where you want the new mailbox located (for example, you can place the new mailbox inside an existing one). Tap Save. You can then store messages in the new mailbox.
Organizing Email from the Inbox
Like deleting messages, organizing email from the Inbox can be made more efficient because you can move multiple messages at the same time.
1. Move to an Inbox screen showing messages you want to move to a folder.
2. Tap Edit. A selection circle appears next to each message. Actions appear at the bottom of the screen.

3. Select the messages you want to move by tapping their selection circles. As you select each message, its selection circle turns blue and is marked with a check mark.
4. Tap Move. You’re prompted to move the messages into the folder you most recently moved messages into or to choose a different folder.

5. To move the messages into a folder you have previously used, tap Move to “foldername” where foldername is the name of that folder and skip the rest of these steps.
6. To move the message into a folder that wasn’t the one you used most recently, tap Other Mailbox. The Mailboxes screen appears. At the top of this screen is the message you are moving. Under that are the mailboxes available under the current account.

7. Swipe up and down the screen to browse the mailboxes available in the current account.
On an iPhone Plus held horizontally, you see the list of folders in the left pane and a preview of the selected messages in the right pane.
8. Tap the mailbox to which you want to move the selected messages. They are moved into that folder, and you return to the previous screen, which is no longer in Edit mode.

Threading Your Way Through Email
When you select a thread, you select all the messages in that thread. Whatever action you select is taken on all the thread’s messages at the same time.
Viewing Messages in a Mailbox
You can open a mailbox within an account to work with the messages it contains. For example, you might want to open the Trash mailbox to recover a deleted message.
1. Move to the Mailboxes screen.
2. If necessary, swipe up the screen to see the email accounts you are using. Each account has its own section showing the mailboxes stored on that account.

3. If you don’t see an account’s mailboxes, expand the account by tapping its arrow.
4. Tap the folder or mailbox containing the messages you want to view. You see the messages it contains. In some cases, this can take a few moments for the messages to be downloaded if that folder or mailbox hasn’t been accessed recently.

5. Tap a message or thread to view it. (If you want to move messages, such as to recover messages that are in the Trash, see “Organizing Email from the Inbox.”)

Changing Mailboxes
You can change the mailboxes that appear on the Mailboxes screen. For example, you can display the Attachments mailbox to make messages with attachments easier to get to. Move to the Mailboxes screen and tap Edit. To cause a mailbox to be visible, tap it so that it has a check mark in its circle. To hide a mailbox, tap its check mark so that it shows an empty circle. Drag the Order icon for mailboxes up or down the screen to change the order in which mailboxes appear. Tap Add Mailbox to add a mailbox not shown on the list. Tap Done to save your changes.
Saving Images Attached to Email
Email is a great way to share photos. When you receive a message that includes photos, you can save them on your iPhone.
1. Move to the message screen of an email that contains one or more photos or images.
2. Swipe up the message to see all the images it contains.
3. Touch and hold on an image (if you are using an iPhone that supports 3D Touch, don’t press down when you touch or you Peek at the image instead).

4. Swipe to the left until you see the Save Image icons.
5. Tap Save Image to save just the image you touched or tap Save X Images, where X is the number of images attached to the message, to save all the attachments. (If there is only one image, the command is just Save Image.) The images are saved in the Photos app on your iPhone. (See Chapter 14 for help working with the Photos app.)

Filtering Email
You can quickly filter the email messages in an inbox as follows:
1. Open the inbox you want to filter.
2. Tap the Filter icon. The contents of the inbox are filtered by the current criteria, which is indicated by the terms under “Filtered by.” The Filter icon is highlighted in blue to show the inbox is filtered.

3. Tap the current filter criteria.

4. Set the criteria by which you want to filter the messages in the inbox; the current criteria are indicated by check marks or green switches. For example, tap To: Me to only show messages on which you are included in the To block.
5. Tap Done. You return to the inbox and only messages that meet your filter criteria are shown.

6. Tap the Filter icon to display all the messages again.

Searching Your Email
As you accumulate email, you might want to find specific messages. For example, suppose you want to retrieve an email message that was related to a specific topic, but you can’t remember where you stored it. Mail’s Search tool can help you find messages like this quite easily.
1. Move to the screen you want to search, such as an account’s Inbox or a folder’s screen. (This is optional as you can choose an area to search later in the process.)
2. If necessary, swipe down to move to the top of the screen to display the Search tool.
3. Tap in the Search tool.

4. Enter the text for which you want to search. As you type, Mail makes suggestions about what you might be searching for. These appear in different sections based on the type of search Mail thinks you are doing, such as People, Subjects, and more.
5. To use one of Mail’s suggestions to search, such as a person, tap their name; or continue typing your search term and when you are done, tap Search. Mail searches for messages based on your search criterion and you see the results.

6. To search for the term in the subject field, tap Subject, or to search in the body, tap Message.
7. Tap Search.

8. To search in all your mailboxes, tap All Mailboxes, or to search in only the current mailbox, tap Current Mailbox.
9. Work with the messages you found, such as tapping a message to read it. Tap the back icon in the upper-left corner of the screen to return to the search results.
10. To clear a search and exit Search mode, tap Cancel.
11. To clear a search but remain in Search mode, tap the Clear icon (x).
When you use an iPhone Plus horizontally, searching is even better, because you can select a found message in the search results in the left pane and read it in the right pane.


Designating VIPs
To designate someone as a VIP, perform the following steps:
1. View information about the person you want to be a VIP by tapping his name in the From or Cc fields as described earlier in the chapter.

2. On the Info screen, tap Add to VIP. The person is designated as a VIP and any email from that person receives the VIP treatment.

Accessing VIP Email
To work with VIP email, do the following:
1. Move to the Mailboxes screen.
2. Tap VIP.

3. Work with the VIP messages you see.

>>>Go Further: MORE ON VIPS
Here are a few more tidbits on VIPs:
• Messages from VIPs are marked with the star icon no matter in which mailbox you see the messages. If you haven’t read a VIP message, the star is blue. If you have read it, the star is gray.
• To see the list of your current VIPs, move to the Mailboxes screen and tap the Info icon (i) for the VIP mailbox. You see everyone currently designated as a VIP. Tap Add VIP to add more people to the list. Tap VIP Alerts to create special notifications for VIPs.
• To return a VIP to normal status, view his information and tap Remove from VIP.
Managing Junk Email
Junk email, also known as spam, is an unfortunate reality of email. No matter what precautions you take, you are going to receive some spam emails. Of course, it is good practice to be careful about where you provide your email address to limit the amount of spam you receive.
Consider using a “sacrificial” email account when you shop, post messages, and in the other places where you’re likely to get spammed. If you do get spammed, you can stop using the sacrificial account and create another one to take its place. Or you can delete the sacrificial account from your iPhone and continue to use it on your computer where you likely have better spam tools in place. If you have an iCloud account, you can set up and use email aliases for this purpose.
The Mail app on the iPhone includes a very basic junk management tool. However, if you use an account or an email application on a computer that features a junk mail/spam tool, it acts on mail sent to your iPhone, too. For example, if you configure spam tools for a Gmail account, those tools act on email before it reaches your iPhone. Similarly, if you use the Mail app on a Mac, its rules and junk filter work on email as you receive it; the results of this are also reflected on your iPhone. To change how you deal with junk email on your iPhone, change the junk email settings for your account online (such as for Gmail) or by changing how an email app on a computer deals with junk mail. The results of these changes are reflected in the Mail app on your iPhone.
Many email accounts, including iCloud and Google, have Junk folders; these folders are available in the Mail app on your iPhone. You can open the Junk folder under an account to see the messages that are placed there.
Marking Junk Email
You can perform basic junk email management on your iPhone by doing the following:
1. When you view a message that is junk, tap the Flag icon.

2. Tap Move to Junk. The message is moved from the inbox to the Junk folder for the account to which it was sent. Future messages from the same sender go into the Junk folder automatically.

Junk It
You can also move a message to the Junk folder by swiping slowly to the left on it, tapping More, and then tapping Move to Junk. If you swipe quickly all the way to the left side of the screen, you’ll delete the message instead.
Junk It or Trash It?
The primary difference between moving a message to the Junk folder or deleting it is that when you mark a message as junk, future messages from the same sender are moved to the Junk folder automatically. When you delete a message, it doesn’t change how future messages from the same sender are handled.