
16. Maintaining and Protecting Your iPhone and Solving Problems

In this chapter, you learn how to keep an iPhone in top shape and what to do should problems happen. Topics include the following:
![]() Maintaining an iPhone’s software
Maintaining an iPhone’s software
![]() Maintaining iPhone apps
Maintaining iPhone apps
![]() Backing up your iPhone
Backing up your iPhone
![]() Finding and securing your iPhone with Find My iPhone
Finding and securing your iPhone with Find My iPhone
![]() Maintaining an iPhone’s power
Maintaining an iPhone’s power
![]() Solving iPhone problems
Solving iPhone problems
![]() Getting help with iPhone problems
Getting help with iPhone problems
iPhones usually work very well, and you are unlikely to have problems with one, especially if you keep its software current. When problems do occur, you can usually solve them with a few simple steps. If that fails, there’s lots of help available for you on the Internet or you can visit the Genius bar at an Apple store.
Maintaining an iPhone’s Software
Like software on computers, the software on your iPhone gets updated periodically to fix bugs, solve issues, and introduce new features. For best results, you should ensure the software you use is current to the latest releases.
There are two types of software you need to maintain: the iOS software that runs your iPhone and the apps you have installed on it. Fortunately, maintaining both types is simple.
Maintaining the iOS Software with the Settings App
You can check for updates to the iOS using the Settings app. If an update is found, you can download and install it directly on the iPhone.
Update Notification
You might receive a notification on the iPhone when an update to iOS is available; you also see a badge on the Settings app’s icon. You can tap Update in the notification to move to the Update screen (and so won’t need to perform steps 1– 3).
1. On the Home screen, tap Settings.

2. Tap General.

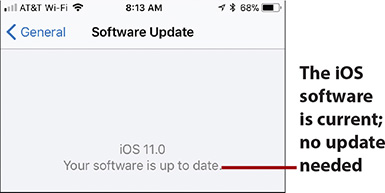
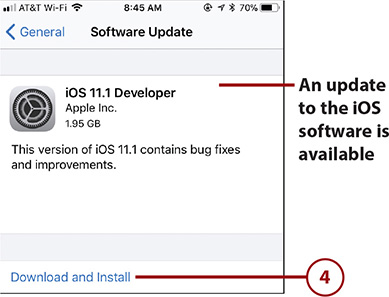
3. Tap Software Update. The app checks for an update. If one is available, you see information about it and should proceed to step 4. If no update is needed, you see a message saying so and you can skip the rest of these steps.

4. If automatic update downloads are enabled, tap Install Now; if not, tap Download and Install. The update is downloaded if it hasn’t been already and the installation process begins. You might see a brief prompt asking if the update should be installed; you can tap Install or just ignore it and the installation starts automatically. Depending on your iPhone’s status, you might see different warnings, such as if you aren’t connected to a power supply.
5. Enter your iPhone’s passcode.

6. Tap Agree.

7. Tap Agree at the prompt. The software update installs on your iPhone. As part of the update process, the iPhone restarts. When it does, the updated iOS software is ready for you to use.

Maintaining iPhone Apps
iPhone apps are regularly updated to fix bugs or add features and enhancements. If you enable the AUTOMATIC DOWNLOADS setting for Updates in the iTunes & App Store Settings (refer to the task “Configuring Your iPhone to Download and Maintain Apps” in Chapter 4, “Customizing How Your iPhone Works,” for details), you don’t need to worry about keeping your apps current because the iOS does that for you automatically whenever your iPhone is connected to a Wi-Fi network. (Updates to the iOS software are also downloaded automatically, but you have to start the installation process as described in the previous task.) If you enable the Use Cellular Data setting on the iTunes & App Store settings screen, the updates occur at any time your iPhone is connected to the cellular network, too (except for very large updates, which are only downloaded when your phone is connected to a Wi-Fi network).
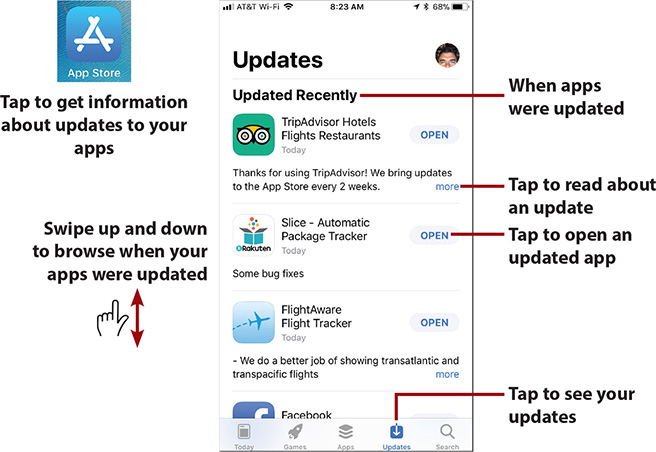
To see how your apps have been updated, tap the App Store app on the Home screen to open that app. Tap the Updates icon, and then swipe up and down to see the apps that have been updated. The updates are grouped by the date on which the updates occurred. To see details about an update, tap its more link. (Be aware that not all apps provide this link.) You can open the current version of the app by tapping OPEN. If an app’s update is pending, tap UPDATE to update it, or you can tap Update All to update all your apps. (With automatic updates enabled, you don’t need to manually update apps, but there might be times you don’t want to wait for the automatic update to be done.)
Backing Up Your iPhone
Like all things data related, it’s important to back up your iPhone’s data. If you ever need to restore your iPhone to solve a problem or replace your iPhone with a new one, having a current backup can get you back to where you want to be as quickly and easily as possible.
There are two places where you can back up your iPhone. You can back up to your iCloud account or to your computer. In fact, you can back up to both places for maximum protection.
Ideally, you’ll configure your iPhone to back up to iCloud so you can back up whenever your iPhone is connected to a Wi-Fi network that provides an Internet connection. Periodically, you can back up to your computer using the iTunes app.
To learn how to configure your iPhone to back up to your iCloud account, see “Configuring Your iCloud Back Up” in Chapter 3, “Setting Up and Using an Apple ID, iCloud, and Other Online Accounts.” With this enabled, your iPhone is backed up automatically. You can manually back up at any time as described in the following task.
Manually Backing Up Your iPhone to iCloud
To manually back up your iPhone to your iCloud account, do the following:
1. Tap Settings.

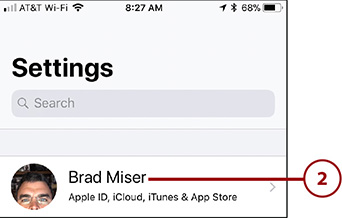
2. Tap your Apple ID account.
3. Tap iCloud.

4. Swipe up the screen.
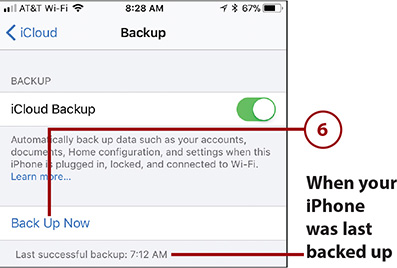
5. Tap iCloud Backup.

6. Tap Back Up Now. Your iPhone’s data is backed up to iCloud. You can see the progress on the screen; however, you can continue using your iPhone because the process works in the background. You just need to start the manual back-up process, and then do whatever you want while it completes.

>>>Go Further: BACKING UP TO A COMPUTER
Using iCloud to back up your iPhone is good because the back-up process is done over the Internet, and it’s automatic so you don’t have to remember to do it. You can also manually back up your iPhone to a computer using iTunes. Connect your iPhone to a computer and open the iTunes app on the computer. Select the iPhone you want to back up. Click the Summary settings. Click Back Up Now. The iPhone’s data is backed up and you can restore the iPhone using that backup should you need to.
If you don’t want to back up your iPhone to iCloud for some reason (not recommended), click This Computer on the Summary screen in iTunes and click Sync. The iPhone is backed up only on the computer. You must connect the iPhone to the computer to back it up so if you choose this option, make sure you do so regularly and often.
Finding and Securing Your iPhone with Find My iPhone
If you lose your iPhone, you can use iCloud’s Find My iPhone feature to locate your iPhone and to secure it by locking it or, in the worst case, erasing its data. Hopefully, you’ll never need to use this capability, but it’s good to know how just in case.
Keep It Secure
For better security, you should configure a passcode, as described in Chapter 4. When a passcode is required, it must be entered to unlock and use an iPhone. If you don’t have a passcode, anyone who picks up your iPhone can use it. This section assumes you have a passcode set. If not, go back to Chapter 4 and set one before continuing—unless you’ve already lost control of your iPhone. If you don’t have a passcode set and lose your iPhone, you’re prompted to create a passcode when you put it in Lost Mode.
After you configure Find My iPhone and use it to locate your iPhone, you can perform the following actions on it:
• Play Sound—This does just what it sounds like. A sound is played on the iPhone and an alert appears on its screen. This provides information to whoever has the device—such as if you’ve loaned the device to someone and want it back. The sound can help you locate the device if it is in the same general vicinity as you.
• Lost Mode—This locks the iPhone so it can’t be used without entering the passcode. This can protect your iPhone without changing its data. You can also display contact information on the iPhone’s screen to enable someone to get in touch with you.
• Erase Your iPhone—This erases the iPhone’s memory as the “last chance” to protect your data. You should only do this in the worst-case scenario because when you erase the iPhone, you lose the ability to find it again using Find My iPhone.
Keeping You Informed
Whenever you use one of the Find My iPhone actions, such as playing a sound or using the Lost Mode, you receive emails to your iCloud email address showing the action taken along with the device, date, and time on which it was performed.
To use Find My iPhone, it must be enabled on your iPhone using the iCloud Settings as explained in Chapter 3 (it is enabled by default so unless you have disabled it, it should be ready for you to use when needed).
Using Find My iPhone to Locate Your iPhone
To use Find My iPhone, perform the following tasks:

1. Use a web browser to move to and log in to your iCloud website located at icloud.com.
Two-Factor Authentication
If two-factor authentication is configured for your iCloud account, you need to enter an additional code after you perform step 1. This code appears on each device that is configured with your iCloud account. After you enter the code, click Trust so that you won’t have to enter the code each time you sign in to iCloud on that device.

2. Click Find iPhone. All the devices associated with your Apple ID and on which Find My iPhone is active are located.
3. Click the All Devices menu. All your devices are shown on the My Devices list.
4. Click the device you want to locate. If the device can be located, you see it on a map. You can use the map’s controls to zoom into the iPhone’s location so you get the best idea of where it currently is. You also see a dialog box that enables you to perform the three actions described earlier. The details for each are provided in the following tasks.


Using Find My iPhone to Play a Sound on Your iPhone
Here’s how to send a sound or message to an iOS device:
1. Locate your iPhone as described in the previous task.
2. Click Play Sound. The alert sound plays on the iPhone and the FIND MY IPHONE ALERT appears on the screen.

Passcode Required
When your iPhone is locked, a passcode is not required to stop the alert sound playing and to delete the alert. Therefore, anyone can do this. If you think someone else might have your iPhone, you should use the Lost Mode instead of playing a sound. The sound option is really only useful to help you locate the phone when you are certain no one else could have it—for example you know it is lost somewhere in your house, and the sound helps you to find it.
3. To stop the sound from playing on the iPhone when the phone is locked, press the alert if you are using a model with 3D Touch or swipe to the right on non-3D Touch models.

4. Tap X on models with 3D Touch or tap Clear on non-3D Touch models to stop the sound and delete the alert.

5. If the iPhone isn’t locked when the alert plays, tap OK to stop the sound and close the alert.

The Sound Remains the Same
When you send a sound to an iPhone, it plays even if the iPhone is muted.
Using Find My iPhone to Put Your iPhone in Lost Mode
You can put your iPhone into Lost Mode by doing the following:
1. Locate the device using the steps in the previous task.
2. Click Lost Mode. (If you haven’t entered a passcode, you’re prompted to create one by entering and verifying it.)

3. Enter the phone number you want someone to call if your phone is found.
4. Click Next.

5. Enter the message you want to appear on the iPhone. This can be your request that whoever has the device call you, instructions for returning the device, and so on.
6. Tap Done. The iPhone is locked and the message you entered displays on the screen. While the iPhone is in Lost Mode, the Lost Mode icon on the Find My iPhone screen rotates and you see the Lost Mode indicator.


When the device enters Lost Mode, it is locked and protected with the existing passcode. The phone number and message you entered appear on the iPhone’s screen. The person finding your phone can tap Call to call the number you entered.
In addition to being locked, the phone is placed in Low Power Mode so the battery’s charge lasts as long as possible. Apple Pay is also disabled.
The iPhone remains in Lost Mode until it is unlocked. You see the current status in the iPhone’s window on the iCloud Find iPhone website. When you get your phone back, you can unlock it. You might need to re-enter your Apple ID password to restart iCloud services and re-enable Apple Pay.

Using Find My iPhone to Erase Your iPhone
If you decide you’ve lost control of your device and want to protect the information it contains, take the following steps to erase it:
1. Locate the device using the steps in the task “Using Find My iPhone to Locate Your iPhone.”
2. Click Erase iPhone.

3. Click Erase.

4. Enter your Apple ID password.
5. Click the right-facing arrow.

6. If you want to send a phone number to the device so that someone can call you about it, enter it at the prompt.
7. Click Next.

8. Enter the message you want to appear on the iPhone. This can be your request that whoever has the device call you, instructions for returning the device, and so on.
9. Tap Done. The iPhone is erased and the message you entered displays on the screen. The person who finds it can tap Call to call the number you entered in step 6, hopefully to return your iPhone. If it does get returned, you have to restore the iPhone using a backup from iCloud or iTunes on your computer (the steps to do this are later in this chapter).

Erase a Device
When you erase an iPhone, all its data is deleted and it’s reset to factory conditions. This means you are no longer able to use Find My iPhone to locate it. Only do this when you’re pretty sure the iPhone is out of your control or that you won’t be getting it back any time soon.
>>>Go Further: USING FIND MY iPHONE
Here are some more tips on using Find My iPhone:
• To update the locations of your devices, refresh the web page and reopen the All Devices list.
• When you send a message to an iPhone that is in Lost Mode or when you erase it, you might want to include additional contact information in the message, such as your name and where you are currently located. You could also offer a reward for the return of the iPhone. Include enough information so that if someone wants to return the device to you, she has what she needs to be able to do so.
• If you lose your iPhone, use an escalation of steps to try to regain control. Look at the iPhone’s location on the map. If you are very sure no one else has the phone, play the sound because it might help you find it again. If the iPhone doesn’t appear to be near your current location or it appears to be but you can’t find it, put it in Lost Mode. This hopefully prevents someone else from using it while you locate it and allows someone who finds it to contact you. If you lose all hope of finding it again, you can erase the iPhone to delete the data it contains. When you do this, you lose the ability to track your iPhone and have to rely on someone finding it and contacting you. This is a severe action, so you don’t want to do it prematurely.
• Erasing an iPhone is a bit of a double-edged sword. It protects your data by erasing your device, but it also means you can’t use Find My iPhone to locate it anymore. You should use this only if you’re pretty sure someone has your device. After you erase it, there’s no way to track the iPhone’s location. How fast you move to erase your iPhone also depends on whether you’ve required a passcode. If you do require a passcode, you know your device’s data can’t be accessed without that code, so it will take some time for a miscreant to crack it, and you can be slower on going to the point of erasing it. If your iPhone doesn’t have a passcode, you might want to erase it sooner to prevent someone from accessing your content.
• As you use Find My iPhone, you receive email notifications about various events, such as when a device is locked, when a message you sent is displayed, and so on. These are good ways to know something about what is happening with your iPhone, even though you might not be able to see the iPhone for yourself.
• If Find My iPhone can’t currently find your iPhone, you can still initiate the same actions as when the iPhone is found, although they won’t actually happen until the iPhone becomes visible to the Find My iPhone service again. To be notified when this happens, check the Email me when this iPhone is found check box. When the iPhone becomes visible to Find My iPhone, you receive an email and then can take appropriate action to locate and secure it.
• There’s an app for that. You can download and use the free Find iPhone app on an iOS device to use this feature (it’s installed on iPhones by default and is located in the Extras folder). For example, you can use this app on an iPad to locate an iPhone.
Maintaining an iPhone’s Power

Obviously, an iPhone with a dead battery isn’t good for much. As you use your iPhone, you should keep an eye on its battery status. As long as the battery icon is at least partially filled, you’re okay. As the iPhone gets low on power, the battery status icon becomes almost empty. Two separate warnings alert you when the battery lowers to 20% and then again at 10%.

When you see the low-power warnings, you can tap Low Power Mode to have your iPhone run in this mode that reduces power use to extend the life of your battery. It does this by slowing down the phone’s processor, stops automatic downloads, stops email push, and any other processes that consume lots of power. Although this reduces the performance of your phone, it can significantly extend the time until your iPhone runs out of power. While in Low Power Mode, the battery status icon is yellow.
Manual Low Power Mode
You can put your iPhone in Low Power Mode at any time by opening the Control Center and tapping the Low Power Mode icon (the battery). (If you don’t see the battery icon on your Control Center, you can add it as explained in Chapter 4.) You might want to do this if you know you won’t be able to charge your iPhone for a long time and don’t need some of the functions it disables (such as push email).

If you keep going, whether you choose to run in Low Power Mode or not, the iPhone eventually runs out of power and shuts down. Once it shuts down because of a low battery, you won’t be able to unlock or use it until you connect it to a charger and the battery has recharged enough for the phone to operate, which can take a few minutes. If you try to use it before it has enough power, you see the red, empty battery icon on the screen.
Fortunately, it’s easy to avoid running out of power by keeping your iPhone charged. Connect the iPhone to the charger or a computer using the USB cable, and it charges automatically. Or, if you have an iPhone 8, 8 Plus, or X, you can place the phone backside down on a Qi wireless charger to charge it. While the phone is charging, you see the charging icon in the upper-right corner of the screen, and if you wake the iPhone, a large battery icon showing the relative state of the battery appears on its screen. When charging is complete, the battery status icon replaces the charging icon in the upper-right corner of the screen, the large battery icon disappears, and you see the iPhone’s wallpaper if it’s locked, or you see whatever screen you happen to be using if it isn’t locked.
If your iPhone moved into Low Power Mode automatically before you started charging it, it also moves out of Low Power Mode automatically when it has been recharged sufficiently. When this happens, you see an onscreen message saying that Low Power mode has been turned off.
Topping Off
It’s a good idea to keep your iPhone’s battery topped off; this type of battery actually does better if you keep it charged rather than letting it run down all the way before recharging. Periodically, say every month or two, you might want to let your iPhone run completely out of power and then recharge it to maximize its life. The key point is, as Apple puts it, to “keep the electrons moving.” So, don’t let your iPhone sit with no activity for long periods of time.
Setting Low Power Mode and Getting Information About Battery Use
You can configure and get information about your iPhone’s battery by doing the following:
1. Open the Settings app and tap Battery.

2. To manually activate Low Power Mode, set its switch to on (green); to leave it in automatic mode, skip to step 4.

For the First Time on this iPhone
The first time you manually activate Low Power Mode, you might see a warning prompt. Tap Continue to clear the prompt and activate Low Power Mode.
3. To return your phone to normal operation, set the Low Power Mode switch to off (white).

4. To see the percentage of charge remaining along with the battery icon, slide the Battery Percentage switch to on (green). The percentage of charge remaining appears to the left of the battery status icon at the top of the screen. (This happens automatically when you put the iPhone into Low Power Mode.)

5. Swipe up the screen to see the BATTERY USAGE section. This provides information about the percentage of power that apps have used over the last 2 hours, which can come in handy when you want to make your battery last longer (see the next task for details).

6. Tap the Clock icon to see the amount of time the app has been running to use the percentage of power it has consumed. You see this both for on-screen or background activity.

7. Swipe all the way up the screen to see information about the time since the last full charge that your iPhone has been in use or has been in standby.

Making the Battery Last Longer
If your iPhone’s battery doesn’t seem to last very long, the issue is likely that a service is very active and is requiring near-constant activity. Common causes of this problem are Push being turned on for an account that has a lot of activity, an application using GPS capabilities, and so on. Try these steps to find and stop the source of the power drain:
1. Use steps 5 through 7 in the previous task to identify apps using a large percentage of power.
2. If you identify a power-hungry app that you don’t want to use any more, press the Touch ID/Home button twice (all models except iPhone X) or swipe up from the bottom of the screen and pause toward the middle of the screen (iPhone X) to open the App Switcher.
3. Swipe to the left or right on the App Switcher until the power-hog’s screen is front and center.
4. Swipe up on the app’s screen to shut it down. You can use your iPhone to see if that was the cause of the rapid power drain. If so, you’re done. If not, you can continue with these steps to conserve power.

5. Open the Settings app and tap Accounts & Passwords.

6. Tap Fetch New Data (if you have a lot of accounts, you might need to swipe up the screen to see it).

7. Slide the status switch for Push to off (white). This disables Push functionality. To update your information, set a Fetch schedule using the controls on the bottom of the Fetch New Data screen or just open an app, such as Mail.

8. Turn off any transmitting and receiving functions that you aren’t using, such as Bluetooth. Using the Control Center is a handy way to do this quickly.

9. Use your iPhone to see if the battery lasts longer. If it does, you know one of the changes you made was the reason; you can either leave the offending source of power drain shut down or just be aware when you are using it. If the battery still doesn’t last very long, it might have a problem and you should contact Apple for assistance.
Battery Help
You can install apps on your iPhone that test the health of your battery. Use the App Store app to search for “battery life” and then download the app you want to use (see Chapter 4 for the details of using the App Store).
Solving iPhone Problems
Even a device as reliable as your iPhone can sometimes run into problems. Fortunately, the solutions to most problems you encounter are simple. If a simple solution doesn’t work, a great deal of detailed help is available from Apple, and even more is available from the community of iPhone users.
The problems that you can address with the simple steps described in this section vary and range from such issues as the iPhone hanging (won’t respond to commands) to apps not working as they should. Use the following tasks to address problems you encounter.
Restarting an App
If an app you are using locks up, displays an error, or isn’t working the way it should, try shutting it down and restarting it.
1. Press the Touch ID/Home button twice (all models except iPhone X) or swipe up from the bottom of the screen and pause toward the middle of the screen (iPhone X). The App switcher opens.
2. Swipe to the left or right until you see the app that has frozen.
3. Swipe up on the app to shut it down.

4. Press the Touch ID/Home button (all models except iPhone X) or tap outside the App Switcher (iPhone X) to move back to the Home screen.
5. Open the app again. If it works normally, you’re done. (It’s generally a good idea to restart your iPhone when you’ve had to force an app to quit.)

Restarting Your iPhone
Whenever your iPhone starts acting oddly, restarting it should be the first thing you try. It’s easy to do and cures an amazing number of problems. To restart your iPhone, do the following:
1. Press and hold the Side button (on 5s and SE models you use the Wake/Sleep button instead) until the slider appears on the screen.
2. Drag the slider to the right. The iPhone powers down and the screen goes completely dark.

3. Press and hold the Side button until you see the Apple logo on the screen. The iPhone restarts. When the Home screen appears, try using the iPhone again. If the problem is solved, you’re done.
Can’t Restart?
If your iPhone won’t restart normally, press and hold the Side and Touch ID/Home buttons (all models except the iPhone X) or the Side and Lower Volume buttons (iPhone X) at the same time until the iPhone shuts off (about 10 seconds) and the screen goes completely dark. Then, press the Side button to restart it. (On the 5s and SE, you use the Sleep/Wake button with the Touch ID/Home button instead.)
Resetting Your iPhone
If restarting your iPhone doesn’t help, try resetting your iPhone using the following steps:
1. On the Home screen, tap Settings.

2. Tap General.

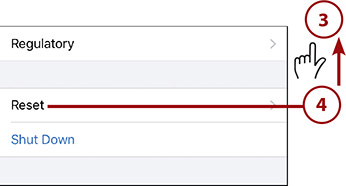
3. Swipe up the screen until you see the Reset command.
4. Tap Reset.
5. Tap the Reset command for the area in which you are having problems. For example, if you are having trouble with Wi-Fi or other networking areas, tap Reset Network Settings, or if you decide your Home screens are a mess and you want to go back to the default layout, tap Reset Home Screen Layout. If you are having lots of issues in multiple areas, tap Reset All Settings or Erase All Content and Settings (be careful because this erases everything on your iPhone).

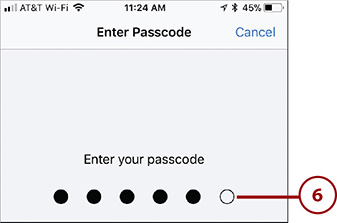
6. If prompted to do so, enter your passcode; if you don’t see a passcode prompt, skip to the next step.
7. Tap the confirmation of the reset you are doing. The reset is complete and that area of the iPhone is reset to factory conditions.

8. Reconfigure the area that you reset. For example, if you reset your network settings, you need to reconnect to the networks you want to use. If you did a Reset All Settings or Erase All Content and Settings, you basically start from the beginning as if your iPhone was just taken out of its box.
Restoring Your iPhone
The most severe action you can take on your iPhone is to restore it. When this happens, the iPhone is erased, so you lose all its contents and its current iOS software is overwritten with the latest version. If you have added information to your iPhone since it was last backed up (when you last connected it to the computer or it backed up to your iCloud account), that information is lost when you restore your iPhone—so be careful before doing this. If none of the other tasks in this section corrected the problem, restoring the iPhone should.
Installing iTunes
If iTunes isn’t installed on your computer, go to www.apple.com/itunes to download and install it.
To restore your iPhone, use the iTunes app on a computer and perform the following steps:

1. On the iPhone, turn off Find iPhone by opening the iCloud Settings screen, tapping Find My iPhone, setting the Find My iPhone switch to off (white), entering your Apple ID password, and tapping Turn Off. (If your iPhone has been erased using Find My iPhone or if iCloud services have previously been disabled, you won’t need to perform this step.)
2. Connect the iPhone to your computer.
Where’s the Trust?
The first time you connect an iPhone to your computer, you’re prompted to trust the computer or not. Tap Trust to be able to connect it to iTunes; you need to input your passcode if the iPhone is locked. You also see a trust prompt in iTunes on the computer; click Continue to connect the iPhone to iTunes on the computer.
3. If iTunes didn’t open automatically, launch the application.
4. If your iPhone is the only device connected to the computer, click the iPhone button at the top of the screen (not shown on the figure). (If you have more than one device connected to iTunes, this is the Devices button; click it and select your iPhone on the list of devices.)

5. Click Summary.
6. Click Restore iPhone. Remember that you lose everything on your iPhone when you restore it, so make sure that you have all its data stored elsewhere, such as backed up on iCloud, before you do this.
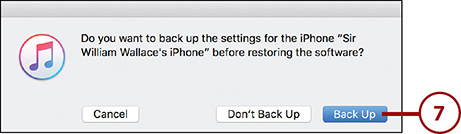
7. Click Back Up. This backs up your iPhone’s contents to your computer. This is a critical step because it enables you to recover the data and settings on your iPhone. If you don’t do this, some of your data and settings can be lost.
Backing Up Isn’t Hard to Do
iCloud is the most convenient way to back up your iPhone because it happens automatically. You can also manually back up your iPhone to your computer at any time by using these steps to access the iPhone in iTunes and then clicking the Back Up Now button. If you use iTunes regularly, it’s a good idea to use it to keep your iPhone backed up on your computer, too.

8. Click Restore in the dialog box. The Restore process begins, and iTunes extracts the software and prepares to install it.
Purchased Items?
If you have “purchased” items on the iPhone that haven’t been synced to iTunes, you see a warning dialog box stating that you will lose these items and have to purchase them again. If you can, you should sync your iPhone to iTunes before performing the restore. If you do this, you won’t see this dialog. Even if you haven’t, you aren’t likely to lose any content unless you purchased it from the iTunes Store very early in the iPhone’s lifecycle. At that time, you could only download content once so if it wasn’t in your iTunes library, you could lose it and would have to pay for it again. For the past several years, you are able to re-download content you purchase from the iTunes Store. If you can sync your iPhone, do so before completing the restore. If not, you’ll have to proceed with the restore, though you might lose content if you purchased it long ago (in which case, you have probably synced it to iTunes long ago as well).
9. Read the information about the current version of the iPhone’s software, and click Next. (This step is not shown in the figures.)
10. Click Agree (not shown). The current version of the iPhone’s software is downloaded to your computer, and iTunes reinstalls it on your iPhone. You see several progress indicators along the way, both on the computer screen and on your iPhone. Early in the process, the iPhone restarts and iTunes begins reinstalling its software. (If a firmware update is needed, iTunes handles that, too.) When the process is complete, you see a message explaining what has happened.
11. Click OK (not shown). The iPhone is restarted, and you see the Welcome to Your New Phone screen.

12. Click the Restore from this backup radio button.
13. On the pop-up menu, ensure that your iPhone’s name appears on the menu with no date and time. This indicates it is the most recent backup. If you don’t see this or you want to choose to restore the phone from an earlier backup, open the menu and choose the backup you want to use to restore the phone.
14. Click Continue. iTunes restores the iPhone from the backup.
15. Click OK in the completion dialog box (not shown in the figure). The iPhone is synced according to the settings stored in the backup. When the sync process is complete, the iPhone should be back in working condition with all your content restored to it. If you have a lot of content, this process can take a while because the sync is performed starting with the iPhone’s memory being “empty.” You need to redownload any content that you’ve purchased from the iTunes Store to restore it, such as movies or TV shows.
Starting Over
If you want to start from the beginning, select the Set up as a new iPhone radio button in step 12 instead. Follow the onscreen prompts. When that process is complete, you’re prompted to name and reconfigure the iPhone as you did when you first started using it.
How Does It Remember?
You might wonder how an iPhone can be restored. It’s because critical iPhone data and settings are backed up on your iCloud account or on your computer. Each time you back up your iPhone, this information is saved so that it is available again when it is needed, such as when you restore your iPhone. iCloud backups happen automatically when your iPhone is connected to the Internet so you don’t have to worry about backing it up manually. But, as described earlier, you can periodically back up your iPhone to your computer, too.
Restoring an iPhone Without iTunes
You can also restore an iPhone without using iTunes. Open the Settings app, tap General, tap Reset, and tap Erase All Content and Settings. After you enter your passcode and confirm the action, the data and settings on your iPhone are erased. You can then restore your iPhone from your iCloud backup as you had the option to do when you turned on your iPhone for the first time.
Finding a Missing App
I’ve had more than a few emails from people on whose phones an app icon seems to have disappeared. In many cases, these were core iPhone apps that can’t be removed from the iPhone, such as Settings or Photos. In almost all of these cases, the app’s icon had inadvertently been moved into a folder and so was not visible in its expected location. If this happens to you, perform the following steps to restore the app to where it should be:
1. Move to a Home screen.
2. Swipe down from the center top area of the screen. The Search tool opens.

3. Tap in the Search bar and enter the name of the app that is missing. As you search, you see a list of items that match your search. If the app is found, you know it is still on the iPhone and its icon was just accidentally misplaced; you can continue with these steps to find it.
If the app you are looking for isn’t found, it has been deleted from the iPhone and you need to reinstall it. Download and install it again using the App Store app (don’t worry; if it has a license fee, you don’t need to pay for it again). (Installing apps is covered in Chapter 4.)
4. Tap Search.

5. Note the current location of the app, which is shown on the right side of the screen. If no location is shown, the app is on one of your Home screens, in which case you need to browse through the screens to find it, and you can skip the rest of these steps.
6. Tap Cancel. You move back to the Home screen.

7. Open the folder where the app is currently located.
8. Touch and hold on the app icon until the icons start jiggling.

9. Drag the app’s icon out of the folder and place the icon back where you want it to be (refer to “Customizing Your Home Screens” in Chapter 5, “Customizing How Your iPhone Looks and Sounds,” for details of moving apps on the Home screens).

10. Press the Touch ID/Home button to lock the icons in their current positions (all models except iPhone X).
iPhone X
Refer to the online supplement My iPhone X by going to www.informit.com/myiphone11 for the details of locking icons on the Home screen on an iPhone X.
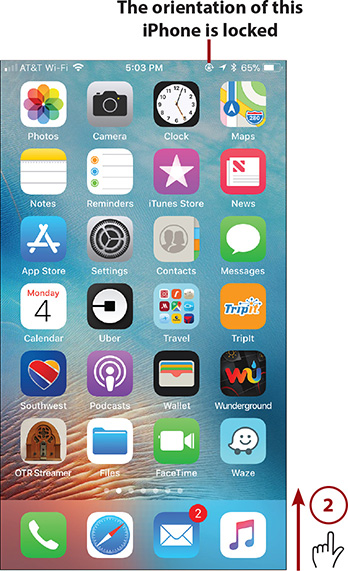
Making an iPhone’s Screen Rotate Again
If your iPhone stops changing from horizontal to vertical orientation when you rotate the phone, you probably have inadvertently enabled the orientation lock. Unlock it again by doing the following:
1. Look at the top of the screen. If you see the Orientation Lock icon, the iPhone’s orientation is locked.
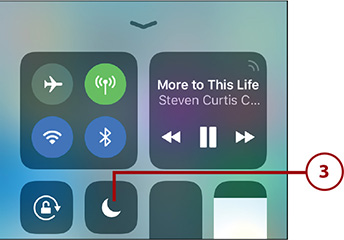
2. Swipe up from the bottom of the Home screen (all models except the iPhone X) or swipe down from the upper-right corner of the screen (iPhone X) to open the Control Center.
3. Tap the Orientation Lock button. Note that when Orientation Lock is on, the button’s graphic is red. When it is off, the button’s graphic is white.

4. Confirm that the Orientation Lock icon at the top of the screen has disappeared. The iPhone now changes orientation when you rotate it.
Blocking Unwanted Calls, Messages, or FaceTime Requests
If you want to block calls, messages, or FaceTime requests from someone, do the following:
1. Open the app through which the person you want to block is trying to contact you; you can use Phone, Messages, or FaceTime. These steps show the Phone app, but blocking people with the others is similar.
2. Tap Recents.
3. Tap the Info (i) icon for the person you want to block.

4. Tap Block This Caller.

5. Tap Block Contact. The contact becomes blocked, and you no longer receive calls, messages, or FaceTime requests from them. When the person who is blocked tries to contact you, the attempt fails, but the person doesn’t know that the reason it failed is that you blocked him.

Unblock
To remove the block on a contact, move to the contact’s screen and tap Unblock this Caller. You will be available to the addresses or phone numbers that you unblock again.
Unblock Without a Contact
If you block a number for which you haven’t created a contact, you need to unblock them from the settings for an app. For example, open the Phone settings screen and tap Call Blocking & Identification. You see a list of all blocked contacts. Swipe to the left on the person whom you want to unblock. Tap Unblock. The person will be able to contact you again. You can always block them again if needed.
Solving the Quiet iPhone Problem
If your iPhone stops ringing or making other sounds you believe it should, perform the following steps:
1. Make sure the iPhone isn’t muted. The Mute switch on the left side of the iPhone should be in the position toward the front of the phone. If you see color in the switch, the phone is currently muted. Slide the switch toward the front of the iPhone to unmute it. You should hear sounds again.
2. With the iPhone unlocked, press the upper volume switch on the left side of the iPhone to make sure that the volume isn’t set to the lowest level. As you press the button, a visual indicator of the current volume level appears on the screen. As long as you see a few “dots” on this indicator, you should be able to hear sounds the iPhone makes.
3. Make sure that the iPhone is not in Do Not Disturb mode by opening the Control Center and ensuring that the Do Not Disturb icon is off (the moon is white); if it is turned on (the moon is purple), tap it to turn it off. In Do Not Disturb mode, sounds are not made, such as a ring when you receive a phone call.
4. Try a different app or task. If you aren’t hearing sound from only one app and everything else sounds normal, you know there is a problem with that app. Try deleting and reinstalling it. If you still don’t hear sound from any app, you know the problem is more general.
5. Move to Sounds & Haptics in the Settings app.
6. Make sure the volume slider is set to at least the middle position.
7. Tap Ringtone.

8. Tap one of the default ringtones. You should hear it. If you do, you know the problem is solved. If not, continue.

9. If you aren’t hearing sounds when the EarPods aren’t plugged in, connect the EarPods and repeat the sound you should be hearing. If you hear the sound only when the EarPods are plugged in, try removing the EarPods and plugging them back in a few times to see if that solves the problem. If not, your iPhone needs to be serviced by an Apple authorized repair center, or you can take it to the Genius bar in an Apple Store.
Do Disturb!
If Do Not Disturb was on, but you hadn’t intended it to be, open the Settings app and tap Do Not Disturb to view its settings. Check to see if an automatic schedule has been set. If the Scheduled button is on (green) then a schedule for starting and stopping Do Not Disturb has been active on the phone. Slide the Scheduled switch off (white) to prevent it from automatically turning on Do Not Disturb.
Getting Help with iPhone Problems
If none of the previous steps solve your problem, including turning your phone off and restarting it, you can get help in a number of ways:
• Apple’s website—Go to www.apple.com/support/. On this page, you can access all kinds of information about iPhones, iTunes, and other Apple products. You can browse for help, and you can search for answers to specific problems. Many of the resulting articles have detailed, step-by-step instructions to help you solve problems and link to more information.
• Web searches—One of the most useful ways to get help is to do a web search for the specific problem you’re having. Just open your favorite search tool, such as Google, and search for the problem. You are likely to find many resources to help you, including websites, forums, and such. If you encounter a problem, it’s likely someone else has too, and has probably put the solution on the Web.
• Genius bar at an Apple Store—All Apple Stores have a Genius bar staffed with people who will try to help you with problems. If you can’t resolve a problem on your own, going to an Apple Store is often a great solution because the Apple geniuses can help you with any problem, whether it’s software or hardware. In many cases, the help they provide is free, too (though you might be charged for some hardware problems). You need to make an appointment before going to the Genius bar and can do so by going to www.apple.com/retail/geniusbar/.
• Me—You’re welcome to send an email to me for problems you’re having with your iPhone. My address is [email protected]. I’ll do my best to help you as quickly as I can. (I do respond to every email I receive, though at times, it might take me a few days to get back to you. I am not able to respond to FaceTime or Messages requests, so please use email to reach me.)