
Chapter 12 Advanced Novell Network Storage Management
This chapter covers the following testing objectives for Novell Course 3005: Advanced Novell Network Management:
![]() Identify and Configure NSS Volume Attributes
Identify and Configure NSS Volume Attributes
![]() Use VCU to Create an NSS Volume from a Traditional NetWare Volume
Use VCU to Create an NSS Volume from a Traditional NetWare Volume
![]() Expand an NSS Volume
Expand an NSS Volume
![]() Mount a DOS Partition as an NSS Volume
Mount a DOS Partition as an NSS Volume
![]() Restore a Deleted Logical Volume
Restore a Deleted Logical Volume
![]() Resolve Common NSS Errors
Resolve Common NSS Errors
![]() Implement RAID 0 with NSS
Implement RAID 0 with NSS
![]() Configure Partition Mirroring and Duplexing in NSS
Configure Partition Mirroring and Duplexing in NSS
![]() Describe Storage Area Networks and Network Attached Storage
Describe Storage Area Networks and Network Attached Storage
The NetWare 6 server acts as a midpoint between two different directory trees: the eDirectory (above the server) and the file system (below the server). Figure 12.1 shows this important relationship.
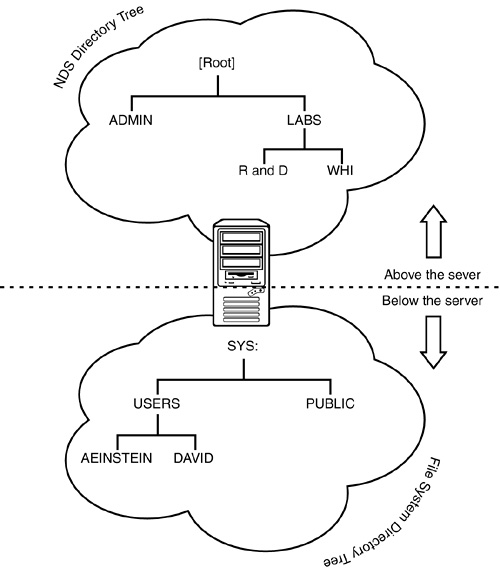
eDirectory is a highly scalable, high-performing, secure directory service that provides a database of network resources organized in a logical hierarchical tree structure and shared by all servers in the network. As shown in Figure 12.1, the directory tree above the NetWare 6 server organizes logical containers and physical resources into a network hierarchy.
The directory tree below the NetWare 6 server is the file system. It organizes network data files located on each server into a functional application hierarchy. As you can see in Figure 12.1, the typical NetWare file system organizes storage devices into one or more volumes, which are then divided into directories that contain subdirectories and/or files.
In addition to the traditional file system, NetWare 6 includes a powerful new high-performance file storage and access technology known as Novell Storage Services (NSS). NSS is the default storage and file system for NetWare 6. It is used to create, store, and maintain both traditional and NSS volumes, and is compatible with DOS, Macintosh, Unix, and long name spaces. As a network administrator, you must be well versed in both traditional and NSS file-system management.
In this first advanced storage management chapter, you’ll learn how to manage NetWare 6 NSS with the help of the following five lessons:
![]() “Understanding NSS”—NSS is a 64-bit file storage system that provides NetWare 6 networks with larger storage capacity, more efficient file management, and faster volume-mounting speeds. NSS architecture is much more complex than the traditional file system. It relies on the following five different hierarchical components: storage devices, storage deposits, partitions, storage pools, and volumes. In the first NSS lesson, we’ll explore this complex architecture and examine NSS features in five different categories: performance, reliability, security, storage, and management.
“Understanding NSS”—NSS is a 64-bit file storage system that provides NetWare 6 networks with larger storage capacity, more efficient file management, and faster volume-mounting speeds. NSS architecture is much more complex than the traditional file system. It relies on the following five different hierarchical components: storage devices, storage deposits, partitions, storage pools, and volumes. In the first NSS lesson, we’ll explore this complex architecture and examine NSS features in five different categories: performance, reliability, security, storage, and management.
![]() “Configuring NSS”—Although NSS is installed and configured by default during NetWare 6 installation, you might need to configure specific features after installation. NSS configuration is actually simpler than its architecture suggests. In the second NSS lesson, you’ll learn how to prepare the file system for NSS, how to create NSS volumes, how to create traditional NetWare volumes, and how to configure NSS software RAID (Redundant Array of Independent Disks).
“Configuring NSS”—Although NSS is installed and configured by default during NetWare 6 installation, you might need to configure specific features after installation. NSS configuration is actually simpler than its architecture suggests. In the second NSS lesson, you’ll learn how to prepare the file system for NSS, how to create NSS volumes, how to create traditional NetWare volumes, and how to configure NSS software RAID (Redundant Array of Independent Disks).
![]() “Managing NSS”—After you’ve configured NSS and created one or more NSS volumes, you can take advantage of the new NSS file system. Of course, that means you’ll have to become an NSS management pro. In the fourth NSS lesson of this chapter, we’ll explore file-management tasks, volume-management tasks, and some time-proven techniques for NSS troubleshooting.
“Managing NSS”—After you’ve configured NSS and created one or more NSS volumes, you can take advantage of the new NSS file system. Of course, that means you’ll have to become an NSS management pro. In the fourth NSS lesson of this chapter, we’ll explore file-management tasks, volume-management tasks, and some time-proven techniques for NSS troubleshooting.
![]() “Configuring RAID with NSS”—RAID is used industrywide as a method for storing the same data in different places on multiple hard drives. Eleven different levels of RAID provide varying degrees of value, depending on the number of disks involved and the features enabled. We’ll explore hardware and software RAID with the help of NSS.
“Configuring RAID with NSS”—RAID is used industrywide as a method for storing the same data in different places on multiple hard drives. Eleven different levels of RAID provide varying degrees of value, depending on the number of disks involved and the features enabled. We’ll explore hardware and software RAID with the help of NSS.
![]() “Using SANs and NAS”—Finally, Storage Area Networks (SANs) and Network Attached Storage (NAS) enable you to optimize and centralize your data storage as well as provide the benefits of RAID performance and reliability. In the final lesson of this chapter, you’ll learn how to use these solutions to move our advanced storage away from the server and into distributed eDirectory.
“Using SANs and NAS”—Finally, Storage Area Networks (SANs) and Network Attached Storage (NAS) enable you to optimize and centralize your data storage as well as provide the benefits of RAID performance and reliability. In the final lesson of this chapter, you’ll learn how to use these solutions to move our advanced storage away from the server and into distributed eDirectory.
As network users and applications have become more sophisticated in the twenty-first century, so has their insatiable appetite for storage. One of the greatest demands that you’ll face is the need for more storage, larger files, more efficient file management, and faster volume-mounting speeds. NSS is the answer.
TIP
This chapter builds on the NSS management topics covered in Chapter 3, “NetWare 6 Server Management.” Remember, we’re building advanced management skills now. So, we’ll be approaching similar topics from a more advanced perspective. Good luck.
Test Objective Covered:
![]() Identify and Configure NSS Volume Attributes
Identify and Configure NSS Volume Attributes
Novell Storage Services (NSS) is a 64-bit file storage system that enables you to configure, mount, and maintain large volumes. NSS is best suited for networks that need to store and maintain large volumes, numerous files, or large databases. Does that sound like your network?
In this first lesson, we’ll explore the sophisticated NSS architecture and examine its plethora of features in five different categories: performance, reliability, security, storage, and management. But before we dive into the NSS architecture, let’s summarize the differences between NetWare 6 NSS and the traditional file system.
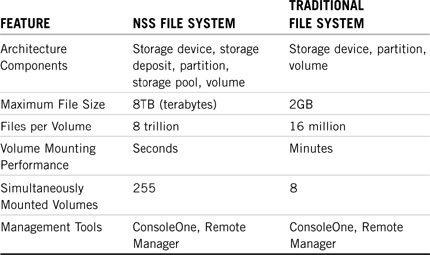
NSS is an extension of the traditional NetWare file system. In NSS, storage devices are organized into storage deposits and partitions are organized into storage pools. Table 12.1 compares key NSS improvements to NetWare’s traditional file system.
Unfortunately, there’s a downside to this wonderful NSS story. With all of its power, NSS does not support the following two features:
![]() Block suballocation
Block suballocation
![]() Auditing
Auditing
Despite these current limitations, you’ll want to use NSS as your primary (and maybe exclusive) file system in NetWare 6. NSS provides you with the advances of high storage capacity and increased data access performance. Now let’s take a closer look at how NSS accomplishes all these miracles by exploring its sophisticated architecture.
NSS is designed to make use of storage space regardless of its location. To accomplish this, Novell has added additional abstraction layers to file system management. As shown in Figure 12.2, the primary architecture differences between NSS and the traditional file system focus on two abstraction layers: storage deposits and storage pools. NSS also supports logical volumes that enable you to add storage devices to your system without having to create new volumes. NSS architecture consists of five interface layers that work together to present multiple storage devices as a single, cohesive file system to users. The five layers are illustrated in Figure 12.2 and described in the bulleted list that follows.
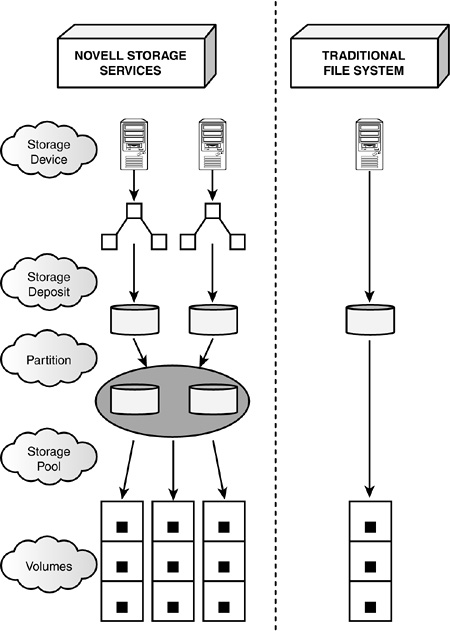
![]() Storage devices—NSS storage devices are simply hardware components that store NetWare data as electronic bits. Storage devices include hard drives, CD-ROM drives, and offline storage media (such as tape devices). The beauty of NSS is that storage devices are organized independently from volumes, and therefore can be added and removed from your network without adversely affecting volume architecture. Of course, data files that reside on storage devices that have been removed are no longer available to users.
Storage devices—NSS storage devices are simply hardware components that store NetWare data as electronic bits. Storage devices include hard drives, CD-ROM drives, and offline storage media (such as tape devices). The beauty of NSS is that storage devices are organized independently from volumes, and therefore can be added and removed from your network without adversely affecting volume architecture. Of course, data files that reside on storage devices that have been removed are no longer available to users.
![]() Storage deposits—Storage deposits are effectively free space. NSS gathers free space from unpartitioned areas of storage devices or available free space inside existing NetWare volumes. When NSS removes free space from a NetWare volume, the traditional file system acknowledges the reduction in free space and identifies the storage deposit as a file. Storage deposits are further organized into partitions.
Storage deposits—Storage deposits are effectively free space. NSS gathers free space from unpartitioned areas of storage devices or available free space inside existing NetWare volumes. When NSS removes free space from a NetWare volume, the traditional file system acknowledges the reduction in free space and identifies the storage deposit as a file. Storage deposits are further organized into partitions.
![]() Partitions—Partitions are pieces of storage deposits that have been configured for a specific operating system. In the case of NSS, partitions are typically configured for NetWare. Partitions are further organized into NSS storage pools.
Partitions—Partitions are pieces of storage deposits that have been configured for a specific operating system. In the case of NSS, partitions are typically configured for NetWare. Partitions are further organized into NSS storage pools.
![]() Storage pools—A storage pool is a specific amount of file system space that’s obtained from one or more storage devices. Storage pools are created after partitions but before NSS logical volumes. After a pool has been created, you can add storage devices to your server without affecting the volume hierarchy. Storage pools are the primary logical abstraction layer between NetWare volumes and multiple storage devices. Storage pools are further organized into volumes.
Storage pools—A storage pool is a specific amount of file system space that’s obtained from one or more storage devices. Storage pools are created after partitions but before NSS logical volumes. After a pool has been created, you can add storage devices to your server without affecting the volume hierarchy. Storage pools are the primary logical abstraction layer between NetWare volumes and multiple storage devices. Storage pools are further organized into volumes.
![]() Volumes—NSS supports three types of volumes: logical volumes, traditional volumes, and read-only volumes. Logical volumes are new to NetWare 6. They’re subsets of NSS storage pools that can be set to a specific size or allowed to grow dynamically according to the amount of physical space that you have in your pool. A single volume cannot be larger than its host storage pool because all NSS logical volumes must reside in a single pool. By default, NetWare 6 creates a storage pool named SYS and an equally sized logical volume named SYS:. Traditional volumes are also supported in NetWare 6, but do not reference storage pools. Instead, traditional volumes must be created directly as subsets of partitions, as shown in Figure 12.2. Read-only volumes are physical file system objects that reference CD-ROM storage devices. The cool thing about NSS is that it supports multiple volume types simultaneously.
Volumes—NSS supports three types of volumes: logical volumes, traditional volumes, and read-only volumes. Logical volumes are new to NetWare 6. They’re subsets of NSS storage pools that can be set to a specific size or allowed to grow dynamically according to the amount of physical space that you have in your pool. A single volume cannot be larger than its host storage pool because all NSS logical volumes must reside in a single pool. By default, NetWare 6 creates a storage pool named SYS and an equally sized logical volume named SYS:. Traditional volumes are also supported in NetWare 6, but do not reference storage pools. Instead, traditional volumes must be created directly as subsets of partitions, as shown in Figure 12.2. Read-only volumes are physical file system objects that reference CD-ROM storage devices. The cool thing about NSS is that it supports multiple volume types simultaneously.
Clearly, NSS is much more complex than the traditional file system. The good news is that most of its architecture is transparent to users. The storage pool layer enables you to add and subtract storage devices without affecting the file system hierarchy. This is a critical improvement over the fixed architecture found in earlier versions of NetWare.
NSS embraces state-of-the-art file system technology. In this section, we’ll explore some of its most exciting features, including multiple logical volumes, overbooking, data recovery, clustering, data shredding, hot fix, and software RAID (Redundant Array of Independent Disks) support. These features are organized into the following five categories:
![]() NSS performance features
NSS performance features
![]() NSS reliability features
NSS reliability features
![]() NSS security features
NSS security features
![]() NSS storage features
NSS storage features
![]() NSS management features
NSS management features
Each of these five features is discussed in the following sections.
NSS includes these three performance features:
![]() Volume mounting speed—When you mount volumes using the traditional file system, NetWare scans every file and directory while mounting, and then loads the file allocation table (FAT) into memory for quick access. If you increase the number or size of files, the traditional file system allocates memory from your available server pool. This process takes a long time and places a burden on server RAM. NSS, on the other hand, doesn’t require additional memory to mount large volumes because it skips the entire scanning process. In fact, NSS doesn’t load the FAT into memory until you access files. Therefore, increasing volume size or the number of files stored does not require additional memory; volume mounting is very fast.
Volume mounting speed—When you mount volumes using the traditional file system, NetWare scans every file and directory while mounting, and then loads the file allocation table (FAT) into memory for quick access. If you increase the number or size of files, the traditional file system allocates memory from your available server pool. This process takes a long time and places a burden on server RAM. NSS, on the other hand, doesn’t require additional memory to mount large volumes because it skips the entire scanning process. In fact, NSS doesn’t load the FAT into memory until you access files. Therefore, increasing volume size or the number of files stored does not require additional memory; volume mounting is very fast.
![]() File flushing—By default, NetWare 6 queues file modifications in memory until processor utilization is low. At that point, NSS writes such changes to disk (that is, it flushes them). This feature improves file saving and server performance by delaying queue operations until the processor is available. File flushing does, however, put data at risk if a server crash occurs during the queuing period. Fortunately, NSS includes a Flush Files Immediately parameter that overrides file flushing and increases data reliability (but decreases file saving and server performance).
File flushing—By default, NetWare 6 queues file modifications in memory until processor utilization is low. At that point, NSS writes such changes to disk (that is, it flushes them). This feature improves file saving and server performance by delaying queue operations until the processor is available. File flushing does, however, put data at risk if a server crash occurs during the queuing period. Fortunately, NSS includes a Flush Files Immediately parameter that overrides file flushing and increases data reliability (but decreases file saving and server performance).
![]() Software RAID—RAID is an industrywide standard for storing the same data in different places on multiple hard drives. By reading and writing data across multiple storage devices, disk I/O processes can be balanced, which significantly improves the performance of the file system. NetWare 6 NSS provides a software option that emulates a hardware RAID system. NSS software RAID comes in two flavors: data striping (level 0) and mirroring (level 1).
Software RAID—RAID is an industrywide standard for storing the same data in different places on multiple hard drives. By reading and writing data across multiple storage devices, disk I/O processes can be balanced, which significantly improves the performance of the file system. NetWare 6 NSS provides a software option that emulates a hardware RAID system. NSS software RAID comes in two flavors: data striping (level 0) and mirroring (level 1).
NOTE
Software RAID configuration is discussed in depth later in this chapter in the “Understanding RAID” section.
NSS includes these five reliability features:
![]() Data recovery—NSS can quickly recover data after a file system crash. How does this work? Instead of scanning an entire volume for corruption, NSS reviews the last known set of changes to the file system to ensure that they were written correctly. NSS either recovers the changed information or returns the data to its original settings before the transaction began (known as rollback).
Data recovery—NSS can quickly recover data after a file system crash. How does this work? Instead of scanning an entire volume for corruption, NSS reviews the last known set of changes to the file system to ensure that they were written correctly. NSS either recovers the changed information or returns the data to its original settings before the transaction began (known as rollback).
![]() File Snapshot—The File Snapshot feature in NSS automatically stores an original copy of all open files. This feature ensures that if you lose data between backup cycles, you still have a valid copy of the previously saved file. This helps ensure that your backup utility has a consistent copy of all files.
File Snapshot—The File Snapshot feature in NSS automatically stores an original copy of all open files. This feature ensures that if you lose data between backup cycles, you still have a valid copy of the previously saved file. This helps ensure that your backup utility has a consistent copy of all files.
![]() Modified File List (MFL)—The MFL is a list of files that changed since the previous backup. Your backup utility can access this list instead of searching the entire file system for modified files. Think of the MFL as a FAT for modified files.
Modified File List (MFL)—The MFL is a list of files that changed since the previous backup. Your backup utility can access this list instead of searching the entire file system for modified files. Think of the MFL as a FAT for modified files.
![]() Clustering—NetWare 6 NSS supports volume clustering via Novell Clustering Services (NCS) version 1.6. Clustering is a high-availability solution for fault tolerance of your critical network resources, including data applications, server licenses, and network services. In a nutshell, clustering allows two or more NetWare 6 servers (up to 32) to share high-speed hard disks. This way, if anything happens to any of the server components, the data is still available. See Chapter 14, “NetWare 6 High Availability with Novell Cluster Services.” for more a more in-depth lesson.
Clustering—NetWare 6 NSS supports volume clustering via Novell Clustering Services (NCS) version 1.6. Clustering is a high-availability solution for fault tolerance of your critical network resources, including data applications, server licenses, and network services. In a nutshell, clustering allows two or more NetWare 6 servers (up to 32) to share high-speed hard disks. This way, if anything happens to any of the server components, the data is still available. See Chapter 14, “NetWare 6 High Availability with Novell Cluster Services.” for more a more in-depth lesson.
![]() Hot Fix—Hot Fix is a redirection strategy that NSS uses to ensure that server data isn’t written to unreliable areas of a given storage device. With Hot Fix, data is redirected to the Hot Fix redirection area of a hard disk partition when unreliable blocks are encountered on the disk. When redirecting a block of data, the operating system records the address of the defective block so that no future attempts are made to write to that area. You must configure Hot Fix when you create NSS partitions. To add Hot Fix after volumes have been created, you must delete the host volume from the partition list, add Hot Fix, and then restore the volume from backup media. Because Hot Fix is associated with NSS mirroring, both features are enabled when you turn on Hot Fix. By default, 2% of a disk’s space is set aside as the Hot Fix redirection area—you can increase or decrease this amount.
Hot Fix—Hot Fix is a redirection strategy that NSS uses to ensure that server data isn’t written to unreliable areas of a given storage device. With Hot Fix, data is redirected to the Hot Fix redirection area of a hard disk partition when unreliable blocks are encountered on the disk. When redirecting a block of data, the operating system records the address of the defective block so that no future attempts are made to write to that area. You must configure Hot Fix when you create NSS partitions. To add Hot Fix after volumes have been created, you must delete the host volume from the partition list, add Hot Fix, and then restore the volume from backup media. Because Hot Fix is associated with NSS mirroring, both features are enabled when you turn on Hot Fix. By default, 2% of a disk’s space is set aside as the Hot Fix redirection area—you can increase or decrease this amount.
NSS includes these three security features:
![]() Data shredding—NSS data shredding adds a measure of security to your network by overwriting purged disk blocks with a random pattern of hexadecimal characters. This prevents unauthorized individuals from recovering purged files using a disk editor. You can place up to seven data shred patterns over deleted data—think of this as an electronic paper shredder for your server disks.
Data shredding—NSS data shredding adds a measure of security to your network by overwriting purged disk blocks with a random pattern of hexadecimal characters. This prevents unauthorized individuals from recovering purged files using a disk editor. You can place up to seven data shred patterns over deleted data—think of this as an electronic paper shredder for your server disks.
![]() User space restrictions—NSS user space restrictions enable you to limit the space that users have on specific volumes. When you create a volume, you can select the User Space Restriction option in ConsoleOne and restrict users to their own virtual area of the file system. This security feature prevents users from affecting other parts of the drive by placing unnecessary storage demands on the server.
User space restrictions—NSS user space restrictions enable you to limit the space that users have on specific volumes. When you create a volume, you can select the User Space Restriction option in ConsoleOne and restrict users to their own virtual area of the file system. This security feature prevents users from affecting other parts of the drive by placing unnecessary storage demands on the server.
![]() Directory space restrictions—NSS directory space restrictions enable you to limit the space that users have in a specific directory or subdirectory. This feature is similar to user space restrictions except that the restriction is at the directory level instead of at the user level.
Directory space restrictions—NSS directory space restrictions enable you to limit the space that users have in a specific directory or subdirectory. This feature is similar to user space restrictions except that the restriction is at the directory level instead of at the user level.
NSS includes these four storage features:
![]() Multiple logical volumes—NSS enables you to create multiple logical volumes within a single storage pool. This feature enables you to distribute multiple storage devices through a single storage pool to multiple logical volumes. You can also add storage devices to logical volumes without changing the volume hierarchy or affecting existing data.
Multiple logical volumes—NSS enables you to create multiple logical volumes within a single storage pool. This feature enables you to distribute multiple storage devices through a single storage pool to multiple logical volumes. You can also add storage devices to logical volumes without changing the volume hierarchy or affecting existing data.
![]() Overbooking—This feature enables you to configure the sum of the sizes of each volume in a storage pool to exceed the pool size. We’ll discuss this feature in much greater depth later in this chapter.
Overbooking—This feature enables you to configure the sum of the sizes of each volume in a storage pool to exceed the pool size. We’ll discuss this feature in much greater depth later in this chapter.
![]() File compression—When enabled, NSS automatically compresses inactive files to create additional disk space. One word of warning: After you’ve enabled file compression, you cannot turn it off without re-creating the volume! NetWare 6 includes a variety of SET parameters that enable you to manage the performance and efficiency of NSS file compression.
File compression—When enabled, NSS automatically compresses inactive files to create additional disk space. One word of warning: After you’ve enabled file compression, you cannot turn it off without re-creating the volume! NetWare 6 includes a variety of SET parameters that enable you to manage the performance and efficiency of NSS file compression.
![]() CD support—NSS has full CD-ROM support for the following two format standards: ISO 9660 and HFS. NSS CD-ROM devices map directly to read-only volumes. NSS integrates and mounts CD-ROM volumes automatically.
CD support—NSS has full CD-ROM support for the following two format standards: ISO 9660 and HFS. NSS CD-ROM devices map directly to read-only volumes. NSS integrates and mounts CD-ROM volumes automatically.
NSS includes the management feature of storage pool maintenance. With NSS, data storage maintenance is much less disruptive than with the traditional file system. Instead of bringing down the server for routine maintenance, you can deactivate individual storage pools while the server is running. You can use ConsoleOne or Remote Manager to configure and maintain NSS storage pools and volumes. Remember that when you deactivate a storage pool, users cannot access the volumes in that pool until the pool is reactivated.
This completes our lesson in the basic architecture and features of NSS. As you’ve learned, this new storage technology is a huge improvement over the traditional NetWare file system. The good news is that most of this sophistication is transparent to users. The bad news is that network administrators must learn much more about how to configure and manage this new architecture. Fortunately, that’s the subject of our next lesson.
Test Objectives Covered:
![]() Identify and Configure NSS Volume Attributes (continued)
Identify and Configure NSS Volume Attributes (continued)
![]() Use VCU to Create an NSS Volume from a Traditional NetWare Volume
Use VCU to Create an NSS Volume from a Traditional NetWare Volume
![]() Expand an NSS Volume
Expand an NSS Volume
Configuring NSS is much simpler than its architecture suggests. All you have to do is design the NSS volume to identify its intended purpose and then create it. Well...it’s not actually that easy. In fact, before you can create an NSS volume, you must first create a partition and a storage pool. It’s a three-step process, as you’ll learn in just a moment.
Although NSS is installed and configured by default during NetWare 6 installation, you must configure additional volumes after the fact. You should follow the same general planning strategies for NSS volumes that apply to creating traditional volumes. In this lesson, we’ll explore the three steps necessary to configure NSS volumes. In addition, you’ll learn how to configure traditional volumes, how to convert traditional volumes to NSS, and how to install software RAID using NSS. In summary, the four sections of this lesson are
Check it out!
Before you can configure NSS partitions, storage pools, and volumes, you must ensure that your server meets these minimum system requirements:
![]() A server running NetWare 6
A server running NetWare 6
![]() At least 10MB of free space to create an NSS storage pool and logical volume
At least 10MB of free space to create an NSS storage pool and logical volume
![]() Sixty percent of server cache buffers available
Sixty percent of server cache buffers available
Of these NSS system requirements, server cache buffers are the trickiest. By default, NSS uses 60% of the server’s cache buffers to temporarily store data files in RAM. Each cache buffer consumes 4KB of server memory by default.
The good news is you can change the NSS cache buffer allocation at any time by using either integers (with a range from 256 to 1,048,576 cache buffers) or percentages (calculated as a percentage of server cache buffers). You should adjust your NSS cache buffer allocation according to the number of NSS volumes on your server. If most volumes on the server are NSS volumes, consider allocating a larger cache buffer pool—say 80%. Doing so optimizes server performance and leaves sufficient cache buffers available for non-NSS tasks.
As a network administrator, you can configure NSS cache buffer allocation in one of three ways:
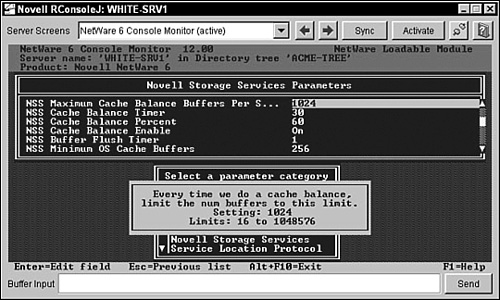
![]() MONITOR—You can use the MONITOR server utility as shown in Figure 12.3 to configure the NSS cache buffer allocation. Simply choose Server Parameters and Novell Storage Services. The Cache Buffer Allocation parameter will then appear.
MONITOR—You can use the MONITOR server utility as shown in Figure 12.3 to configure the NSS cache buffer allocation. Simply choose Server Parameters and Novell Storage Services. The Cache Buffer Allocation parameter will then appear.
![]() NSS console commands—You can use the following NSS console commands to allocate NSS cache buffers at the server console:
NSS console commands—You can use the following NSS console commands to allocate NSS cache buffers at the server console:
NSS /MinBufferCacheSize={value}
NSS /CacheBalance={value}
The minimum buffer cache size range is from 256 to 1,048,576. The cache balance range is from 1% to 99%.
![]() SET console commands—You can use the following SET console commands to allocate NSS cache buffers at the server console:
SET console commands—You can use the following SET console commands to allocate NSS cache buffers at the server console:
SET NSS MINIMUM CACHE BUFFERS={value}
SET NSS CACHE BALANCE PERCENT={value}
After you’ve set the NSS cache buffers appropriately at the server console and met the minimum system requirements, it’s time to configure your NSS volumes.
If you want to create an NSS volume from existing server disk space, pay attention to one particular caveat: Physical hard disk space might already be allocated to existing DOS or NetWare partitions. Remember that NSS volumes are created from storage pools, which are created from NSS partitions. Later in this lesson, you’ll learn how to convert existing traditional volumes to NSS volumes and how to mount DOS partitions as NSS volumes.
In this section, you’ll learn how to create an NSS volume from free server disk space (that is, storage deposits). NSS volume configuration is a three-step process:
As you recall from our NSS architecture discussion earlier in the chapter, NSS partitions are the grandparents of NSS volumes. Therefore, configuring an NSS partition is the first step in creating an NSS volume. Follow these simple steps to create an NSS partition:
1. Start ConsoleOne at a NetWare 6 workstation or server. At the server, you must immediately authenticate as Admin or an equivalent user with Admin privileges.
2. In ConsoleOne, browse to your Server object, right-click it, and select Properties. Next, select Media and then select Partitions. A screen similar to Figure 12.4 should appear.
3. In the Media Partitions window (shown in Figure 12.4), select New. The Create a New Partition window should then appear, as shown in Figure 12.5.
4. In the Create a New Partition window (shown in Figure 12.5), select a media device from the Device ID list on the left side of the screen. After you’ve made your selection, the New Partition form requires the following five configuration details:
![]() Type—Select the type of partition you want to create (either NSS or traditional). In the case of an NSS volume, select the NSS partition type.
Type—Select the type of partition you want to create (either NSS or traditional). In the case of an NSS volume, select the NSS partition type.
![]() Size—Enter the size of the partition in bytes (B), kilobytes (KB), megabytes (MB), gigabytes (GB), or terabytes (TB).
Size—Enter the size of the partition in bytes (B), kilobytes (KB), megabytes (MB), gigabytes (GB), or terabytes (TB).
![]() Hot Fix—Mark the Hot Fix box to activate NSS’s Hot Fix Error Correction feature. Next, enter the size of the Hot Fix reserve as either a fixed integer or percentage.
Hot Fix—Mark the Hot Fix box to activate NSS’s Hot Fix Error Correction feature. Next, enter the size of the Hot Fix reserve as either a fixed integer or percentage.
![]() Mirror—Mark the Mirror box to activate the NSS mirroring feature. You can choose to create a new mirror or add this NSS partition to an existing mirror group.
Mirror—Mark the Mirror box to activate the NSS mirroring feature. You can choose to create a new mirror or add this NSS partition to an existing mirror group.
![]() Label—Enter an optional label for this NSS partition. A naming syntax that you might want to use is as follows: {server}_NSSPARTITION{number} . Using this strategy, the first NSS partition in the WHITE-SRV1 server would be named WHITE_NSSPART01.
Label—Enter an optional label for this NSS partition. A naming syntax that you might want to use is as follows: {server}_NSSPARTITION{number} . Using this strategy, the first NSS partition in the WHITE-SRV1 server would be named WHITE_NSSPART01.
5. To complete the form and create the NSS partition, select OK. Finally, close ConsoleOne and log out to complete the process.
If NSS partitions are the grandparents of NSS volumes, storage pools are the parents. After you’ve created your NSS partition, it’s time to subdivide it into storage pools. Follow these simple steps to create a storage pool within your new NSS partition:
1. Start ConsoleOne at a NetWare 6 workstation or server. At the server, you must immediately authenticate as Admin or an equivalent user with Admin privileges.
2. In ConsoleOne, browse to your Server object, right-click it, and select Properties. Next, select Media and then select NSS Pools. A screen similar to Figure 12.6 should appear.

3. Select New in the NSS Pools window (shown in Figure 12.6) to create a new storage pool. The Create a New Pool window should appear.
4. In the Create a New Pool window, enter a name for the new storage pool and then select Next. The storage pool name should be at least 2 characters and no more than 15 characters. Pool names can contain the following characters: A through Z, 0 through 9, and _*@#$%&[]. The pool name cannot begin or end with an underscore (_) and cannot contain multiple underscores. You should use the same naming syntax for storage pools that you use for NSS partitions. For example, the first storage pool on the WHITE-SRV1 server could be named WHITE_NSSPOOL01.
5. After you’ve named the new storage pool, ConsoleOne responds with the Storage Information window (as shown in Figure 12.7). In this step, you must select the existing NSS partition or unpartitioned free space that you want to use for the storage pool. In the Used column, enter the amount of space you want to allocate from each NSS partition and select Next. Remember, a single storage pool can group disk space from multiple NSS partitions.
6. In the Attribute Information window, select Activate on Creation. This activates your storage pool and any logical volumes when you create the pool.
7. Select Finish to create your NSS storage pool and to return to the NSS Pools window of ConsoleOne. Finally, close ConsoleOne and log out.
This completes the process of creating a storage pool.
TIP
When you create storage pools, you can use partitioned or unpartitioned disk space. If you choose Unpartitioned Space in the Storage Information window (See Figure 3.15 in Chapter 3, “NetWare 6 Server Management.), ConsoleOne automatically creates an NSS partition and makes the storage pool the same size as the partition. Cool, huh?!!!
At last, we’ve made it to the target of this lesson: NSS volumes. After you’ve created a host storage pool, you can create any number of logical volumes within it. Remember that each NSS logical volume can be fixed in size or configured to expand according to the space available in the storage pool. Of course, the size of a single volume cannot exceed the size of the storage pool. Finally, remember that NSS is compatible with DOS, Macintosh, Unix, and long name spaces.
Follow these simple steps to create a logical NSS volume within the new storage pool:
1. Start ConsoleOne at the NetWare 6 workstation or server. At the server, you must immediately authenticate as Admin or an equivalent user with Admin privileges.
2. In ConsoleOne, browse to your Server object, right-click it, and select Properties. Next, select Media and NSS Logical Volumes. A screen similar to Figure 12.8 should appear.
3. In the NSS Logical Volumes window, select New (shown in Figure 12.8) to create a new volume. The Create a New Logical Volume window should appear. Notice from the figure that the default host pool is SYS. This storage pool is created by default when you install NetWare 6.
4. In the Create a New Logical Volume window, enter a name for the volume and then select Next. This name should be at least 2 characters and no more than 15 characters. Logical names can contain the following characters: A through Z, 0 through 9, and _*@#$%&[]. The name cannot begin or end with an underscore (_) and cannot contain multiple underscores. You should use the same naming syntax for logical volumes that you used for storage pools. For example, the first NSS volume on the WHITE-SRV1 server could be named WHITE_NSSVOL01.
5. Next, the Volume Storage Information window will appear (as shown in Figure 12.9). This window lists all storage pools that are available to host your new NSS volume and their available disk space. Select the storage pool where you want to create the volume and input the volume size in the Volume Quota (MB) field. If you want the volume size to expand dynamically, mark Allow Volume Quota to Grow to the Pool Size. Select Next to continue.

6. The Volume Attribute Information window will appear (as shown in Figure 12.10).

7. On the screen shown in Figure 12.10, you’ll select the attribute settings to use with your new NSS logical volume. The attributes shown are
![]() Backup—Indicates whether the volume should be backed up. Mark this box if the volume contains data that you want to back up using third-party backup software. Consult your vendor to ensure compatibility with NetWare 6 NSS.
Backup—Indicates whether the volume should be backed up. Mark this box if the volume contains data that you want to back up using third-party backup software. Consult your vendor to ensure compatibility with NetWare 6 NSS.
![]() Compression—Activates file compression for the logical volume. If you choose not to activate compression at this time, you’ll have to re-create the volume later to activate it.
Compression—Activates file compression for the logical volume. If you choose not to activate compression at this time, you’ll have to re-create the volume later to activate it.
![]() Data Shredding—Activates the data shredding security feature, which scrambles any data that you delete from the volume. Enter the number of times you want the data shredder to scramble your deleted files (from 1 to 7).
Data Shredding—Activates the data shredding security feature, which scrambles any data that you delete from the volume. Enter the number of times you want the data shredder to scramble your deleted files (from 1 to 7).
![]() Directory Quotas—Activate this feature to restrict the amount of space that a directory can use. The directory restriction settings are configured elsewhere in ConsoleOne.
Directory Quotas—Activate this feature to restrict the amount of space that a directory can use. The directory restriction settings are configured elsewhere in ConsoleOne.
![]() Flush Files Immediately—Activates the file flushing feature, which improves volume reliability, but decreases server performance. Refer to the “NSS Features” section earlier in this chapter for more information.
Flush Files Immediately—Activates the file flushing feature, which improves volume reliability, but decreases server performance. Refer to the “NSS Features” section earlier in this chapter for more information.
![]() Migration—Activates the data migration feature for this volume.
Migration—Activates the data migration feature for this volume.
![]() Modified File List (MFL)—Activates the MFL tracking list for incremental backups. Consult your backup software vendor to ensure compatibility with NetWare 6 NSS.
Modified File List (MFL)—Activates the MFL tracking list for incremental backups. Consult your backup software vendor to ensure compatibility with NetWare 6 NSS.
![]() Salvage Files—Activates the file salvage feature that tracks deleted files and enables you to retrieve them until the space is needed for other data.
Salvage Files—Activates the file salvage feature that tracks deleted files and enables you to retrieve them until the space is needed for other data.
![]() File Snapshot—Activates the NSS snapshot feature at the file level. This allows a backup utility to capture a snapshot of the last closed version of every file. Please refer to the “NSS Features” section earlier in this chapter for more information.
File Snapshot—Activates the NSS snapshot feature at the file level. This allows a backup utility to capture a snapshot of the last closed version of every file. Please refer to the “NSS Features” section earlier in this chapter for more information.
![]() User Space Restrictions—Activates the user space restrictions feature on this volume. User space restrictions can be configured later using ConsoleOne.
User Space Restrictions—Activates the user space restrictions feature on this volume. User space restrictions can be configured later using ConsoleOne.
![]() On Creation—You can choose to activate this volume as soon as you create it and/or mount this volume as soon as you create it.
On Creation—You can choose to activate this volume as soon as you create it and/or mount this volume as soon as you create it.
8. Select Finish in the Volume Attribute Information window to complete the form and create your new NSS logical volume. Finally, close ConsoleOne and log out to complete the process.
This completes the three-step NSS volume configuration process. After you’ve created the NSS family tree (partition grandparent, storage pool parent, and NSS logical volume), users can take advantage of the exciting new NSS file system. Of course, that’s not to say that there’s anything wrong with the traditional NetWare file system. In fact, there are many times when you might want to fall back on the traditional method of storing data files.
Now let’s take a step back in time and learn how to configure traditional NetWare volumes.
The traditional NetWare file system is much simpler than NSS but lacks many of NSS’s sophisticated features. As you learned in Figure 12.2, the traditional file system architecture is composed of storage devices, partitions, and volumes. Traditional volumes are further organized into directories and files—just as with the NSS file system.
Although NSS is the default file system in NetWare 6, you might want to maintain traditional partitions and volumes on your server for legacy applications and users. Before you create traditional NetWare volumes, however, you should keep these caveats in mind:
![]() The NetWare 6 version of NWCONFIG is incompatible with traditional volumes. You must use ConsoleOne or Remote Manager to create, modify, and rename traditional volumes.
The NetWare 6 version of NWCONFIG is incompatible with traditional volumes. You must use ConsoleOne or Remote Manager to create, modify, and rename traditional volumes.
![]() The NetWare 6 versions of VERIFY and REBUILD are incompatible with traditional volumes. You must use VREPAIR to fix traditional volumes.
The NetWare 6 versions of VERIFY and REBUILD are incompatible with traditional volumes. You must use VREPAIR to fix traditional volumes.
![]() You cannot create traditional volumes within an NSS storage pool.
You cannot create traditional volumes within an NSS storage pool.
![]() NetWare 6 traditional volumes cannot be mounted on servers running previous versions of NetWare. However, legacy NetWare servers can back up data from NetWare 6 traditional volumes.
NetWare 6 traditional volumes cannot be mounted on servers running previous versions of NetWare. However, legacy NetWare servers can back up data from NetWare 6 traditional volumes.
Even with these shortcomings, NetWare 6 traditional volumes provide an excellent bridge to cross the chasm from legacy NetWare servers to NSS. The following are the steps for creating a traditional volume using NetWare 6:
1. Start ConsoleOne at a NetWare 6 workstation or server. At the server, you must immediately authenticate as Admin or an equivalent user with Admin privileges.
2. In ConsoleOne, browse to your Server object, right-click it, and select Properties. Next, select Media and then select Traditional Volumes. A screen similar to Figure 12.11 should appear.

3. To create a traditional volume, select New in the Media Traditional Volumes window (shown in Figure 12.11). The Create a New Traditional Volume window should appear.
4. In the Create a New Traditional Volume window, enter a name for the traditional volume and then select Next. This name should be at least 2 characters and no more than 15 characters. Logical names can contain the following characters: A through Z, 0 through 9, and _*@#$%&[]. The name cannot begin or end with an underscore (_) and cannot contain multiple underscores. You should use the same naming syntax for traditional volumes that you used for NSS logical pools. For example, the first traditional volume on the WHITE-SRV1 server could be named WHITE_TRADVOL01.
5. The Traditional Volume Storage Information window should appear. Select an existing partition (or unpartitioned space) to host the traditional volume. In the Used column, enter a size for the volume and select Next.
6. The Traditional Volume Attribute Information window will appear (as shown in Figure 12.12). This window enables you to configure the following traditional volume attributes:

![]() Block Size—Select a block size for data partitioning within the traditional volume. NetWare determines the default block size according to the overall volume size. The range is from 4KB to 64KB.
Block Size—Select a block size for data partitioning within the traditional volume. NetWare determines the default block size according to the overall volume size. The range is from 4KB to 64KB.
![]() Compression—Mark this box to activate file compression for your new traditional volume. File compression increases available disk space by automatically compressing inactive files. Users can save up to 63% of the server’s disk space when file compression is activated.
Compression—Mark this box to activate file compression for your new traditional volume. File compression increases available disk space by automatically compressing inactive files. Users can save up to 63% of the server’s disk space when file compression is activated.
![]() Migration—Mark this box to activate the migration feature on the new traditional volume. Data migration provides near-line storage by automatically transferring inactive files from your traditional volume to a tape drive or optical disk. Data migration is part of NetWare’s High Capacity Storage System (HCSS).
Migration—Mark this box to activate the migration feature on the new traditional volume. Data migration provides near-line storage by automatically transferring inactive files from your traditional volume to a tape drive or optical disk. Data migration is part of NetWare’s High Capacity Storage System (HCSS).
![]() Suballocation—Mark this box to activate block suballocation on your new traditional volume. Block suballocation increases available disk space by storing portions of multiple files in a single disk allocation block. This feature solves the inherent problem of wasted disk space by dividing partially used disk blocks into 512-byte suballocation blocks.
Suballocation—Mark this box to activate block suballocation on your new traditional volume. Block suballocation increases available disk space by storing portions of multiple files in a single disk allocation block. This feature solves the inherent problem of wasted disk space by dividing partially used disk blocks into 512-byte suballocation blocks.
![]() Mount Volume on Creation—Mark this box to mount the new traditional volume after the volume has been created.
Mount Volume on Creation—Mark this box to mount the new traditional volume after the volume has been created.
7. Select Finish in the Volume Attribute Information window to complete the form and to create your new NSS volume.
Now that you’ve created a traditional volume in NetWare 6, your server is fully prepared to accept new and old user data. Because traditional volumes have limitations, many network administrators prefer to stick with a single, more sophisticated file system: NSS. Fortunately, NetWare 6 includes VCU.NLM, a utility to convert traditional NetWare volumes to NSS logical volumes. Keep in mind that VCU only converts existing volumes; it doesn’t create new ones.
The VCU.NLM conversion utility is not an in-place tool. It simply copies the data and directory structure from a traditional volume to an NSS logical volume in an existing storage pool. Therefore, you must have enough available disk space to transition from one volume to another. VCU affects server performance, so you should consider performing volume conversions only when server demands are low (such as late in the evening).
To convert a traditional volume, load VCU.NLM at the NetWare 6 server console and specify the following two pieces of information: the traditional volume name and the host NSS storage pool. For example, to convert the WHITE_TRADVOL01 traditional volume into an NSS logical volume in the WHITESRV1_NSSPOOL01 storage pool, you would enter this command at the server console:
VCU WHITE_TRADVOL01 WHITE_NSSPOOL01
After the conversion has completed, the VCU screen displays the results of the conversion and asks whether you want to rename the volume. If you want to keep the original volume name for the traditional volume, respond with N. If you want to keep the original volume name for the new NSS volume, enter Y. The traditional volume is renamed with _OLD appended to the original volume name (WHITE_TRADVOL01_OLD). The new NSS logical volume keeps the original volume name and is associated with the existing volume object in eDirectory.
Because this feature violates our naming syntax, you might want to rename the new NSS volume by dropping the TRAD from the name and adding NSS. You should restart the NetWare 6 server to ensure that the volume converted properly. After you’ve verified that the conversion was a success, you can remove the traditional volume and return the empty disk space to your storage pool of choice.
TIP
After you’ve copied traditional volume data to a logical volume in NetWare 6, you cannot access the new NSS volume using previous versions of NetWare. This is particularly problematic if the traditional volume was being used for legacy users and applications.
The syntax for VCU.NLM is as follows:
VCU /p /l /i /d /r traditional_volume nss_pool [ds_container] [ds_volume]
The following is a list of attributes supported by the VCU conversion utility:
![]() /p—Do not print directory filenames.
/p—Do not print directory filenames.
![]() /l—Do not write errors to a log file. By default, the conversion log file is placed in the root of the new NSS volume and given the name ERROR.OUT.
/l—Do not write errors to a log file. By default, the conversion log file is placed in the root of the new NSS volume and given the name ERROR.OUT.
![]() /i—Keep the COMPRESS_FILE_IMMEDIATELY_BIT file intact.
/i—Keep the COMPRESS_FILE_IMMEDIATELY_BIT file intact.
![]() /d—If the conversion process is successful, delete the original traditional volume. Remember that the new NSS volume retains the name of the traditional volume, which means that you might want to rename the new volume after the fact.
/d—If the conversion process is successful, delete the original traditional volume. Remember that the new NSS volume retains the name of the traditional volume, which means that you might want to rename the new volume after the fact.
TIP
VCU.NLM will return an error if you use the /d attribute to delete the original traditional volume at the end of the conversion process. This is because the traditional volume has a hidden system file that cannot be copied or deleted. Don’t worry about this error; it will not affect your users’ ability to use the new NSS volume.
![]() /r—Keep the original volume name for the new logical volume name.
/r—Keep the original volume name for the new logical volume name.
![]() ds_container—Designate the original volume of the eDirectory container.
ds_container—Designate the original volume of the eDirectory container.
![]() ds_volume—If this parameter is specified, VCU uses this name to rename or delete the original volume’s eDirectory object. Otherwise, VCU uses servername_originalVolName as the default eDirectory name.
ds_volume—If this parameter is specified, VCU uses this name to rename or delete the original volume’s eDirectory object. Otherwise, VCU uses servername_originalVolName as the default eDirectory name.
This completes our lesson in traditional volume creation and conversion. I hope that you’ve gained an appreciation for the value of traditional NetWare volumes as a legacy companion for NetWare 6’s new NSS file system. Now let’s complete the NSS configuration lesson with a detailed discussion of NSS storage pool expansion.
After you’ve created an advanced network storage system for your users, something amazing happens—they start filling it up with data. Pretty soon you’ll need to employ another NSS configuration trick: expansion. As storage demands grow, you’ll need to expand NSS storage space on your server. This is accomplished in three different ways:
![]() Increase the number of logical volumes in a storage pool—Storage pools are the primary data layer between NetWare volumes and multiple storage devices. As you learned earlier, storage pools are configured for a specific size and serve multiple volumes. In addition, a pool can contain many partitions, but a partition can be included in only one pool. As a CNE, you can create up to 255 logical volumes in a given storage pool.
Increase the number of logical volumes in a storage pool—Storage pools are the primary data layer between NetWare volumes and multiple storage devices. As you learned earlier, storage pools are configured for a specific size and serve multiple volumes. In addition, a pool can contain many partitions, but a partition can be included in only one pool. As a CNE, you can create up to 255 logical volumes in a given storage pool.
![]() Overbook the storage pool—Overbooking is NSS synergy: The whole is greater than the sum of its parts. This feature enables you to configure the sum of the sizes of each volume in the storage pool to exceed the pool size. For example, you might have users assigned to volumes with a limited amount of space. You can assign volumes that collectively exceed the pool size if not all the users fill up their volumes.
Overbook the storage pool—Overbooking is NSS synergy: The whole is greater than the sum of its parts. This feature enables you to configure the sum of the sizes of each volume in the storage pool to exceed the pool size. For example, you might have users assigned to volumes with a limited amount of space. You can assign volumes that collectively exceed the pool size if not all the users fill up their volumes.
NSS can also borrow space from other volumes in the same pool as long as those volumes are not filled to the limit. Although overbooking is an efficient NSS storage feature, you should use it cautiously because volumes can prematurely run out of disk space when storage pools are overbooked. To view pool information at the server console, enter NSS /Space.
![]() Increase the size of a storage pool—If a storage pool isn’t large enough to accommodate users’ needs, you can increase the size of the pool by adding more storage devices without having to re-create the pool or its volumes. To increase the size of a storage pool, you can use any of the following utilities: ConsoleOne, Remote Manager, and/or NSSMU. In ConsoleOne, you use the Media Properties page for the host Server object. In Remote Manager, you use the Expand Pool menu within the Partition Management link of Volumes. Finally, in the NSS Management Utility (NSSMU), you press F3 from the Pools menu.
Increase the size of a storage pool—If a storage pool isn’t large enough to accommodate users’ needs, you can increase the size of the pool by adding more storage devices without having to re-create the pool or its volumes. To increase the size of a storage pool, you can use any of the following utilities: ConsoleOne, Remote Manager, and/or NSSMU. In ConsoleOne, you use the Media Properties page for the host Server object. In Remote Manager, you use the Expand Pool menu within the Partition Management link of Volumes. Finally, in the NSS Management Utility (NSSMU), you press F3 from the Pools menu.
This completes our lesson in NSS configuration. In this lesson, you learned how to configure NSS volume in three simple steps: creating an NSS partition, creating an NSS pool, and creating an NSS logical volume. In addition, we explored traditional volume configuration and learned how to expand a storage pool using ConsoleOne, Remote Manager, and NSSMU.
After you’ve configured NSS and created one or more NSS logical volumes, users can take advantage of this new, exciting file system. Of course, that means you’ll have to learn more about how to perform some basic NSS management tasks. Fortunately, that’s the next lesson in this chapter.
TIP
Refer to Lab Exercise 3.3, “Configuring NSS,” (in Chapter 3) to brush up on your NSS configuration skills.
Test Objectives Covered:
![]() Mount a DOS Partition as an NSS Volume
Mount a DOS Partition as an NSS Volume
![]() Restore a Deleted Logical Volume
Restore a Deleted Logical Volume
![]() Resolve Common NSS Errors
Resolve Common NSS Errors
As the network administrator, you’re responsible for maintaining the server’s file system on a day-to-day basis. This involves ensuring that the file system is well organized, easily accessible to network users, and contains adequate storage space.
In this penultimate NSS lesson, you’ll hone your file system management skills by exploring various procedures within the following three categories:
![]() NSS file management—We’ll explore NSS file system management at the most granular level: from the file’s point of view. In this section, you’ll learn how to enable the File Snapshot feature, limit users’ disk space boundaries with the user space restrictions feature, and restrict file storage capacity within a specific directory using the directory space restrictions feature.
NSS file management—We’ll explore NSS file system management at the most granular level: from the file’s point of view. In this section, you’ll learn how to enable the File Snapshot feature, limit users’ disk space boundaries with the user space restrictions feature, and restrict file storage capacity within a specific directory using the directory space restrictions feature.
![]() NSS volume management—You’ll learn some time-proven techniques for managing NSS volumes and storage pools. In this section, you’ll learn how to rebuild NSS storage pools and volumes, delete NSS storage pools and volumes, restore or purge deleted logical volumes, and mount a DOS partition as an NSS volume.
NSS volume management—You’ll learn some time-proven techniques for managing NSS volumes and storage pools. In this section, you’ll learn how to rebuild NSS storage pools and volumes, delete NSS storage pools and volumes, restore or purge deleted logical volumes, and mount a DOS partition as an NSS volume.
![]() NSS troubleshooting—You’ll gain some valuable expertise in NSS troubleshooting by solving three complex problems. This scenario-based approach will serve you well if users start panicking over lost network data.
NSS troubleshooting—You’ll gain some valuable expertise in NSS troubleshooting by solving three complex problems. This scenario-based approach will serve you well if users start panicking over lost network data.
Files represent the bottom level of the NSS file system food chain. This granular storage unit hosts user data and/or network applications. This is where our NSS management lesson begins. Most NSS file management tasks focus on disk space usage and reliability. Specifically, NetWare 6 administrators must be able to
![]() Enable File Snapshot
Enable File Snapshot
![]() Configure user space restrictions
Configure user space restrictions
![]() Configure directory space restrictions
Configure directory space restrictions
![]() Enable the Transaction Tracking System (TTS) on logical volumes
Enable the Transaction Tracking System (TTS) on logical volumes
File Snapshot is an NSS backup reliability feature that supports third-party backup utilities. When you enable File Snapshot on a volume, NSS keeps an original copy of all open files. This allows the backup utility to copy information about each individual file, including owner, creation date and time, and modification date and time.
NSS provides the following methods for enabling File Snapshot at the volume level:
![]() To enable File Snapshot for an NSS volume, enter the following NSS command at the server console:
To enable File Snapshot for an NSS volume, enter the following NSS command at the server console:
NSS /FileCopyOnWrite={volume name}
![]() To enable File Snapshot for all NSS volumes, enter the following NSS command at the server console:
To enable File Snapshot for all NSS volumes, enter the following NSS command at the server console:
NSS /FileCopyOnWrite=all
![]() Use the Volume Creation Wizard and select File Snapshot when the volume is created.
Use the Volume Creation Wizard and select File Snapshot when the volume is created.
To disable File Snapshot, enter the following NSS command at the server console:
NSS /NoFileCopyOnWrite
After you’ve enabled File Snapshot on your volumes, you must deactivate and then reactivate and remount them. This helps to ensure that there are no open files without a snapshot.
If disk space becomes a scarce commodity, consider restricting volume space usage. NSS enables you to restrict volume space according to two criteria: by user and/or by directory.
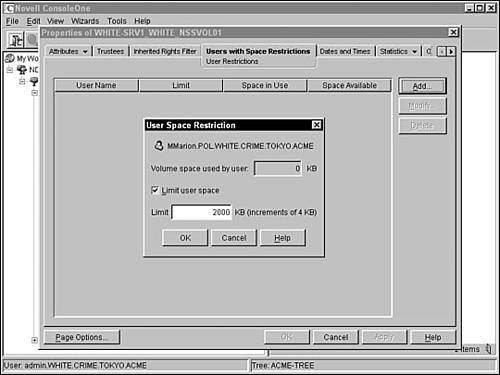
User space restrictions are beneficial for networks that have a large number of users, such as students or contractors. These restrictions must be set independently for each volume. To do so by using ConsoleOne, right-click the volume on the browser screen and select Properties from the pop-up menu that appears. Next, select Attributes and NSS Attributes. Finally, when the NSS Attributes window appears, select User Space Restrictions and you’ll be greeted with a screen similar to Figure 12.13.

In the Volume Properties page (shown in Figure 12.13), select the Users with Space Restrictions tab and click Add. When the Select Object dialog box appears, browse to and select the context containing the user, select the user, and click OK. When the User Space Restriction dialog box appears, make sure that the Limit User Space check box is marked, enter the correct size (in 4KB increments) in the Limit field, and then click OK. Finally, select Apply to save the user space restriction.
In addition to restricting disk space at the user level, you can configure limitations for directories and their subdirectories. To limit the total size of a directory, activate ConsoleOne and authenticate as your Admin user. Next, browse to the directory you want to establish restrictions for in the browser screen, right-click it, and select Properties. When the Properties dialog box appears, click the Facts page tab (as shown in Figure 12.14). When the Facts page appears, mark the Restrict Size check box and then enter the correct size (in increments of 4KB) in the Limit field. Finally, select Apply to save the directory space restriction.
The TTS protects database applications by backing out incomplete transactions caused by a system failure. This is available on either all traditional or all NSS logical volumes on the same server. When your server stores both traditional and logical volumes, TTS works only on traditional volumes by default.
If you want to use TTS on logical volumes instead, you must add the DISABLE TTS command to the AUTOEXEC.NCF file and restart your server.
Then enable TTS on each logical volume that you want it on by entering the following at the server console:
NSS/TRANSACTION=volume_name
NSS logical volumes represent the highest level of the user-accessible file system. In fact, volumes are a transition point between the two NetWare 6 directory trees: file system and eDirectory. This is because each volume is represented by two objects: a logical collection of disk space in the file system and a Volume object in the eDirectory tree.
Because of this special distinction, volume management is a critical aspect of your NSS management responsibilities. As you know, NSS volumes are hosted inside storage pools. Therefore, we must include storage pools in our lesson of volume management. The following are the four main procedures that encompass NSS volume management:
![]() Rebuild NSS logical volumes
Rebuild NSS logical volumes
![]() Delete NSS logical volumes
Delete NSS logical volumes
![]() Restore or purge deleted NSS logical volumes
Restore or purge deleted NSS logical volumes
![]() Mount a DOS partition as an NSS logical volume
Mount a DOS partition as an NSS logical volume
Remember, volume management encompasses more than just NSS logical volumes. In this section, we’ll explore storage pool management as well.
To repair NSS storage pools and logical volumes, NetWare 6 includes two NSS console commands:
![]() VERIFY—Checks the file system integrity of an NSS pool by searching for inconsistent data blocks or other errors. VERIFY performs a read-only assessment of your storage pool before you perform the REBUILD process.
VERIFY—Checks the file system integrity of an NSS pool by searching for inconsistent data blocks or other errors. VERIFY performs a read-only assessment of your storage pool before you perform the REBUILD process.
![]() REBUILD—After you’ve verified the file system integrity of your storage pool, you can use REBUILD to correct severe storage pool and logical volume errors. Before you run REBUILD, you must deactivate all target storage pools and volumes and make sure that that users don’t have access to them during the rebuilding process. After REBUILD has been activated, it copies errors and transactions into a file named SYS:/{volume name}.RLF. Every time you use REBUILD to rebuild an NSS logical volume, its previous error file is overwritten.
REBUILD—After you’ve verified the file system integrity of your storage pool, you can use REBUILD to correct severe storage pool and logical volume errors. Before you run REBUILD, you must deactivate all target storage pools and volumes and make sure that that users don’t have access to them during the rebuilding process. After REBUILD has been activated, it copies errors and transactions into a file named SYS:/{volume name}.RLF. Every time you use REBUILD to rebuild an NSS logical volume, its previous error file is overwritten.
TIP
One word of warning: Use REBUILD only as a last resort. If you use it to recover from data corruption, you could lose your data!
To run VERIFY on a specific NSS storage pool, enter the following command at the server console:
NSS /POOLVERIFY={pool name}
During the VERIFY process, NSS automatically dismounts all volumes within the pool. When VERIFY is complete, a results screen appears (as shown in Figure 12.15). Make sure to remount all the pool’s volumes at the conclusion of the VERIFY process by typing MOUNT ALL at the server console.

To perform a REBUILD on a specific NSS storage pool, enter the following NSS command at the server console:
NSS /POOLREBUILD={pool name}
During the REBUILD process, NSS automatically dismounts all logical volumes in the pool. A status screen appears (as shown in Figure 12.16) while the storage pool and all of its host volumes are being rebuilt. After the REBUILD process has been completed, make sure to mount all the storage pool’s volumes by typing MOUNT ALL at the server console.
As a network administrator, you have the power to delete anything that you create, but be aware that user data may be at stake. When you delete an NSS logical volume or a traditional volume from a storage pool, the pool and its host partition are still intact. This enables you to reassign the volume space to another storage pool or volume. Fortunately, NSS includes a restore feature that enables you to recover deleted data within two days of its deletion.
To delete an NSS storage pool or logical volume in ConsoleOne, simply browse to the appropriate Server object, right-click it, and select Properties. Next, select Media and NSS Pools (or Logical Volumes). Finally, select a specific storage pool or logical volume and click Delete. It’s that easy. Oops! What happens if you accidentally delete the wrong volume? That’s where the NSS restore feature comes in. Let’s take a closer look.
NSS can help you recover from volume management mistakes. If you accidentally delete a logical volume, the NSS restore feature enables you to undelete it for a specified amount of time—this time is called the purge delay period. You must retrieve the logical volume before the delay time elapses; otherwise, the volume will be automatically purged from the system and you’ll be unable to restore it.
TIP
NSS REBUILD is not equivalent to the traditional VREPAIR utility. Although these two utilities seem to accomplish roughly the same task, they go about it in very different ways.
The default setting for the purge delay period is two days (or 172,800 seconds). You can change the purge delay period by entering the following NSS command at the server console:
NSS /LogicalVolumePurgeDelay={delay period in seconds}
Remember that the Purge Delay parameter is lost if the server is restarted. To make this change permanent, you must add the command to the server’s AUTOEXEC.NCF file.
You can also manually restore or purge a deleted logical volume by using ConsoleOne. To do so, browse to the appropriate Server object, right-click it, and select Properties. Next, select Media and NSS Pools. Finally, in the Deleted Volumes window, select one of the following options:
![]() Purge—Immediately purges all deleted volumes
Purge—Immediately purges all deleted volumes
![]() Prevent Purge/Allow Purge—Halts the volume purging process completely
Prevent Purge/Allow Purge—Halts the volume purging process completely
![]() Salvage—Restores the deleted volume that you have chosen
Salvage—Restores the deleted volume that you have chosen
![]() Refresh—Rescans the logical volumes that have been deleted and updates the list
Refresh—Rescans the logical volumes that have been deleted and updates the list
NSS enables you to mount existing DOS partitions as NSS logical volumes. With this feature, users can gain access to the files stored on the server’s local C: drive. To accomplish this, simply load the following module at the NetWare 6 server console:
LOAD DOSFAT.NSS
It’s as simple as that. After DOSFAT.NSS has been loaded, DOS partitions on the server are automatically mounted and made available as NSS logical volumes. The displayed volume name is DOSFAT_x, where x is the drive letter (for example, DOSFAT_C). The new logical volume is fully functional. Some of its features include support for long filenames that use the Windows 95/98 method, NetWare trustee rights via eDirectory security, and client or server utilities that manage NetWare volumes.
This completes our lesson in NSS volume management. In fact, it completes our studies in fundamental NSS management procedures. So, we’re done then, right? Wrong! We have one more lesson to go. Before we complete this chapter, we must journey into the mysterious land of NSS troubleshooting. After all, managing NSS volumes is the easy part. How things are handled when the storage system goes awry is the true mettle of a NetWare 6 CNE.
After you’ve configured and managed your NetWare 6 storage system, it’s time to focus on keeping it running—NSS troubleshooting. The purpose of troubleshooting is to determine the cause of a given problem and to implement a timely solution. Remember that a problem is not considered solved until it no longer negatively affects your users. From an NSS perspective, this means the problem is solved when user data is safe. And because data is the primary purpose of networking, NSS troubleshooting is one of your most important tasks.
In this section, we’ll explore three of the most common NSS problems and provide some time-proven solutions:
![]() NSS does not recognize a device
NSS does not recognize a device
![]() NSS does not allow you to create a storage pool or logical volume
NSS does not allow you to create a storage pool or logical volume
![]() NSS does not allow you to compress a file
NSS does not allow you to compress a file
Let’s troubleshoot.
NSS does not recognize a specific storage device in Media Manager. Remember that NSS can use only what the Media Manager recognizes.
To solve this problem, you must first determine whether NetWare recognizes the storage device at all. To do so, enter the following two commands at the NetWare 6 server console:
Scan for new devices
List devices
If the problematic storage device isn’t listed or is shown as an unbound object, the device is likely malfunctioning or the proper .CDM device driver has not been loaded. If the storage device seems to be operating properly, the problem might be caused by a missing device driver. Make sure that the appropriate board driver (*.HAM) and device driver (*.CDM) are loaded.
This condition may occur as a result of any of the following three reasons:
![]() Your host storage devices might not have enough free space to create more storage pools or logical volumes. In this case, you should check for free space using ConsoleOne and/or add another storage device to the NetWare 6 server.
Your host storage devices might not have enough free space to create more storage pools or logical volumes. In this case, you should check for free space using ConsoleOne and/or add another storage device to the NetWare 6 server.
![]() All NSS logical volumes might not be part of the same storage pool. Remember that logical volumes must exist within an NSS storage pool. Before you create each logical volume, make sure that its host pool exists. If not, create a new one.
All NSS logical volumes might not be part of the same storage pool. Remember that logical volumes must exist within an NSS storage pool. Before you create each logical volume, make sure that its host pool exists. If not, create a new one.
![]() NSS might not own the free space you need to create a new storage pool. In this case, you must move up one layer in the NSS food chain and create an NSS partition for your new storage pools and logical volumes.
NSS might not own the free space you need to create a new storage pool. In this case, you must move up one layer in the NSS food chain and create an NSS partition for your new storage pools and logical volumes.
Remember that file compression must be activated at the volume level when the volume is created. However, you can enable file compression on an existing NSS logical volume. To do so by using ConsoleOne, browse to the appropriate Server object, right-click it, and select Properties. Next, choose Media and NSS Logical Volumes. Highlight the specific volume you’re interested in and select Properties, Attributes, NSS Attributes. At this point, ConsoleOne will return a screen similar to the one shown in Figure 12.10. Simply select the Compression option and click OK.
Now that you’re a certifiable NSS storage expert, it’s time to pump it up a notch—RAID! This is going to be a lot of fun, so hold on tight—the ride is about to begin.
Test Objectives Covered:
![]() Implement RAID 0 with NSS
Implement RAID 0 with NSS
![]() Configure Partition Mirroring and Duplexing in NSS
Configure Partition Mirroring and Duplexing in NSS
Redundant Array of Independent Disks (RAID) is used industrywide as a method for storing the same data in different places on multiple hard drives. Six different levels of RAID provide varying degrees of value, depending on the number of disks involved and the features enabled.
Because the array of independent disks appears as a single hard drive, RAID systems appear fundamentally transparent to users. The two primary benefits provided by RAID are
![]() Increased disk performance—By reading and writing data across multiple disks, data I/O processes can be dispersed and balanced, significantly improving the performance of your storage system.
Increased disk performance—By reading and writing data across multiple disks, data I/O processes can be dispersed and balanced, significantly improving the performance of your storage system.
![]() Increased fault tolerance—Several RAID configurations support data redundancy on multiple hard drives. This creates a significant level of fault tolerance. For example, if one disk in the array fails, another disk, containing the same data, can take over.
Increased fault tolerance—Several RAID configurations support data redundancy on multiple hard drives. This creates a significant level of fault tolerance. For example, if one disk in the array fails, another disk, containing the same data, can take over.
Until now, RAID required one or more special disk controllers as well as firmware to perform multiple file writes across an array of independent disks. Fortunately, NetWare 6 provides an integrated software capability for emulating RAID hardware. NSS software supports two of the six levels defined by RAID: RAID level 0 (data striping) and RAID level 1 (disk mirroring). In this section, we’ll explore these two software RAID configurations and you’ll learn how to create a software RAID level 0 array.
Generally speaking, RAID is any disk subsystem architecture that combines two or more standard physical drives into a single logical storage unit. RAID is necessary because hard disks slowly wear out over time. In fact, every hard disk has an associated mean time before failure (MTBF). RAID can be implemented in one of two ways:
![]() Hardware RAID makes a disk array look like a single disk to the network operating system. Hardware RAID offers simplified management, better performance, and more configuration options. The main drawback is the cost. Hardware RAID involves buying multiple expensive drives and disk controllers.
Hardware RAID makes a disk array look like a single disk to the network operating system. Hardware RAID offers simplified management, better performance, and more configuration options. The main drawback is the cost. Hardware RAID involves buying multiple expensive drives and disk controllers.
![]() Software RAID is a set of operating system modules that work together with management utilities to implement RAID within the NetWare server. These modules are layered between the low-level disk drivers and the file system. Software RAID is less expensive than hardware RAID because it is built into the NetWare 6 operating system. On the downside, software RAID requires more complicated management, relies on server CPU performance, and offers many fewer configuration options.
Software RAID is a set of operating system modules that work together with management utilities to implement RAID within the NetWare server. These modules are layered between the low-level disk drivers and the file system. Software RAID is less expensive than hardware RAID because it is built into the NetWare 6 operating system. On the downside, software RAID requires more complicated management, relies on server CPU performance, and offers many fewer configuration options.
As an industry standard, RAID supports eleven configuration levels. Each level represents a different approach and has its own advantages and disadvantages. Note that that these levels are independent standards; that is, level 0 is not the worst, nor is level 53 the best. Each level has its own niche. Review Table 12.2 to find the right RAID level for you.


Software RAID level 0 is also known as data striping. Striping is the process of sequentially writing data across multiple disks in a RAID array (up to eight segments on each RAID array). With NSS, this process occurs at the software level instead of relying on RAID controller hardware. Data striping requires that you partition each drive into units ranging from 512 bytes (small stripe) up to several megabytes (large stripe). These stripes are interleaved and addressed in order. By definition, the RAID stripe size is the amount of data that the file system places on a disk before moving to the next disk. The stripe size depends on the application for which the array is being used. The following are two examples of how small and large data stripe sizes operate in the REAL WORLD:
![]() Small stripe size—If your RAID system holds large files, such as graphics or digital video, the stripes should be small (around 512 bytes). A small stripe size ensures that a single file spans as many disks as possible. This increases disk performance.
Small stripe size—If your RAID system holds large files, such as graphics or digital video, the stripes should be small (around 512 bytes). A small stripe size ensures that a single file spans as many disks as possible. This increases disk performance.
![]() Large stripe size—If your system stores small files, such as word processing documents, the stripes should be large (up to 1MB). A large stripe size ensures that each file will be stored on its own disk.
Large stripe size—If your system stores small files, such as word processing documents, the stripes should be large (up to 1MB). A large stripe size ensures that each file will be stored on its own disk.
NSS enables you to configure software RAID level 0 for both logical and traditional volumes. To create a software RAID 0 array using ConsoleOne, follow these simple steps:
1. Start ConsoleOne on a NetWare 6 workstation or server.
2. In ConsoleOne, browse to your Server object, right-click it, and select Properties. Next, select Media and RAID Devices. A screen similar to Figure 12.17 should appear.

3. In the Media RAID Devices window (shown in Figure 12.17), select New to create a new RAID array. The Create RAID Device window should appear.
4. In the Create RAID Device window, enter the size that each RAID segment will use from each hard disk in the array. A RAID segment is the amount of disk space used on a given independent drive. Because data striping writes files across multiple disks, the total amount of space available in the RAID array is calculated as follows: RAID segment size (MB) multiplied by the number of disks in the RAID array. For example, a RAID array with four disks and a 1000MB segment size will yield a total of 4GB of disk space for users. In addition to defining the RAID segment size, you have to mark all the devices that will be grouped into this RAID array. When you’re done, select Next.
5. The final RAID configuration window asks for the stripe size and RAID type. Although the default stripe size is 64KB, you can choose another size from the predefined list (choices range from 4KB to 256KB). The RAID type should be set to RAID 0. When you’re done, select Finish.
RAID level 1 is known as disk mirroring. Disk mirroring stores the same data on separate disks using the same controller channel. This RAID feature improves fault tolerance by keeping a real-time backup of all files on a secondary disk.
NSS supports software RAID level 1 (mirroring) on both logical and traditional volumes. The following is a list of requirements for mirroring disk partitions in NetWare 6:
![]() Mirrored partitions must be of the same partition type. That is, NSS partitions mirror to NSS partitions and traditional partitions mirror to traditional partitions. Mirrored partitions must also be the same size. One trick: You can adjust the Hot Fix redirection size to make the data area identical on different-sized partitions in the mirror group.
Mirrored partitions must be of the same partition type. That is, NSS partitions mirror to NSS partitions and traditional partitions mirror to traditional partitions. Mirrored partitions must also be the same size. One trick: You can adjust the Hot Fix redirection size to make the data area identical on different-sized partitions in the mirror group.
![]() You can mirror only partitions. If you want to mirror an entire storage pool, you must mirror all the partitions that the pool resides on. Mirroring must be enabled when you create a partition. You cannot enable mirroring after a partition has been created. To do so, you must re-create the partition.
You can mirror only partitions. If you want to mirror an entire storage pool, you must mirror all the partitions that the pool resides on. Mirroring must be enabled when you create a partition. You cannot enable mirroring after a partition has been created. To do so, you must re-create the partition.
![]() If one partition in a mirrored pair has been marked shareable for clustering, the other partition in the pair must also be marked shareable.
If one partition in a mirrored pair has been marked shareable for clustering, the other partition in the pair must also be marked shareable.
This completes our lesson in configuring RAID with NSS. In this section, you learned how to increase your network’s fault tolerance with eleven different levels of RAID. Wow. Fortunately, NetWare 6 enables you to put a virtual toe in the water with software RAID level 0 and level 1.
Of course, RAID is only the beginning. The storage future is SANs and NAS. Confused? Check them out in the final advanced lesson of this chapter.
Test Objective Covered:
![]() Describe Storage Area Networks and Network Attached Storage
Describe Storage Area Networks and Network Attached Storage
Storage Area Network (SANs) and Network Attached Storage (NAS) are new storage technologies that enable you to optimize and centralize your data storage as well as provide the benefits of RAID performance and reliability. These solutions are quickly replacing traditional server-attached storage configurations. Like NSS and iFolder, NAS is moving away from the server and into distributed eDirectory.
The acronyms SAN and NAS are sometimes confused, but you must become familiar with how they work if you’re going to become a NetWare 6 storage engineer. In fact, one of NetWare’s greatest reliability features, Novell Cluster Services, relies on SAN technology. We’ll explore NCS in more depth later in Chapter 14.
Let’s take a quick look at the architecture and benefits of SANs and NAS.
Just as a LAN or WAN is a type of network, a SAN is also a type of network architecture. Except that, in this case, the distributed devices are not workstations but are high-volume, block-oriented data storage devices. A SAN is a separate network for storage located between the LAN and central storage devices. Because the SAN is not part of the LAN, it isn’t slowed down by normal network traffic on the LAN.
A SAN must be viewed in a different light than a traditional network. Although a traditional LAN uses TCP/IP, a SAN relies on higher-performance storage protocols: Fiber Channel and small computer systems interface (SCSI).
The components of a typical SAN are
![]() Fiber Channel or SCSI connection to the LAN
Fiber Channel or SCSI connection to the LAN
![]() Master backup servers
Master backup servers
![]() Media backup servers
Media backup servers
![]() RAID devices
RAID devices
![]() Tape libraries
Tape libraries
The benefits of using a SAN include centralized storage management and a very high level of fault tolerance. In addition, SANs provide dynamic and scalable storage from a pool of devices with high-volume data transfers. This gives your network the capability to add storage without downtime or disruption.
Whereas SAN is a type of network, NAS is a product that allows clients to access files directly. Because it’s dedicated to storage, NAS allows for much quicker file access than a general-purpose server.
The NAS hardware, often referred to as a NAS appliance, is usually located between the application servers and the file system on the LAN. As such, it relies on typical network protocols such as TCP/IP. Keep in mind that all NAS appliances store and retrieve files more quickly than file servers; therefore network traffic does affect their performance.
One of the main benefits of using an NAS appliance is that it is self-contained and dedicated to data storage. This makes NAS appliances very easy to add to existing LANs. In addition, NAS is scalable and supports a large number of appliance, platforms, and networks over long distances.
Consider the following tips when implementing a SAN or a NAS:
![]() SANs and NAS are not mutually exclusive. You can use both together. Wow!
SANs and NAS are not mutually exclusive. You can use both together. Wow!
![]() Because of the complexity of implementing a SAN, you should consider having a dedicated storage management system to support it. And a dedicated storage engineer (CNE) while you’re at it.
Because of the complexity of implementing a SAN, you should consider having a dedicated storage management system to support it. And a dedicated storage engineer (CNE) while you’re at it.
![]() The line between the capabilities of SANs and NAS are beginning to blur. Many SAN implementations now employ NAS as part of the solution.
The line between the capabilities of SANs and NAS are beginning to blur. Many SAN implementations now employ NAS as part of the solution.
![]() Don’t mix NetWare 5.x and NetWare 6 servers on the same SAN.
Don’t mix NetWare 5.x and NetWare 6 servers on the same SAN.
![]() SAN and NAS significantly reduce the overall cost of storage compared to traditional server-centric storage.
SAN and NAS significantly reduce the overall cost of storage compared to traditional server-centric storage.
![]() SANs can use a new protocol called Internet SCSI (iSCSI). iSCSI is used to send SCSI information over IP networks. It’s mainly used to transfer storage information over long distances. This allows for location-independent data storage and management.
SANs can use a new protocol called Internet SCSI (iSCSI). iSCSI is used to send SCSI information over IP networks. It’s mainly used to transfer storage information over long distances. This allows for location-independent data storage and management.
![]() SANs are the cornerstone of Novell Clustering Services. We’ll explore more in Chapter 14.
SANs are the cornerstone of Novell Clustering Services. We’ll explore more in Chapter 14.
Congratulations! You’ve successfully traversed the new NetWare 6 storage system known as Novell Storage Services. NSS is a huge improvement over the traditional file system. However, with this increased sophistication comes a ton of complexity in architecture, configuration, and management.
Fortunately, you have CNE for NetWare 6 Study Guide to teach you what you need to know.
In this lesson, we explored the detailed architecture of NSS and you learned about two new storage layers: NSS storage deposits and NSS storage pools. In addition, we discovered fifteen impressive NSS features in five different categories. Some of the most interesting features you learned in this chapter include overbooking, file flushing, clustering, data shredding, and software RAID support.
With the NSS architecture firmly planted in our collective minds, we turned our attention to the three steps of NSS volume configuration. In step 1, you learned how to create an NSS partition and hot fix redirection area using ConsoleOne. Then, in step 2, you created a storage pool within an existing partition and configured its free space boundaries. Finally, in step 3, you created the NSS logical volume itself within the storage pool and enabled a plethora of attribute settings.
In the third lesson, “Managing NSS,” you learned some time-proven procedures for file management, volume management and NSS troubleshooting. We ended the chapter on a high note with a quick preview of our storage future: RAID, SANs, and NAS.
Please keep this one important lesson in mind: Data is the ultimate purpose of networking. As a network administrator, you’re the trusted keeper of all your users’ data. Be sure to take this responsibility very seriously.
Now that you’re a certifiable NSS storage expert, it’s time to explore NetWare 6’s innovative new Internet-based storage tool: iFolder. The next chapter covers iFolder from every conceivable angle: configuration, management, and troubleshooting. This is going to be a lot of fun, so hold on tight—the ride is about to get even faster!