
This chapter covers the following testing objectives for Novell Course 575: Novell eDirectory Design and Implementation:
![]() Evaluate Your eDirectory Design
Evaluate Your eDirectory Design
![]() Install eDirectory and Build a Tree
Install eDirectory and Build a Tree
![]() Merge Two Directory Trees
Merge Two Directory Trees
Welcome to step 3—eDirectory implementation. This is prime time!
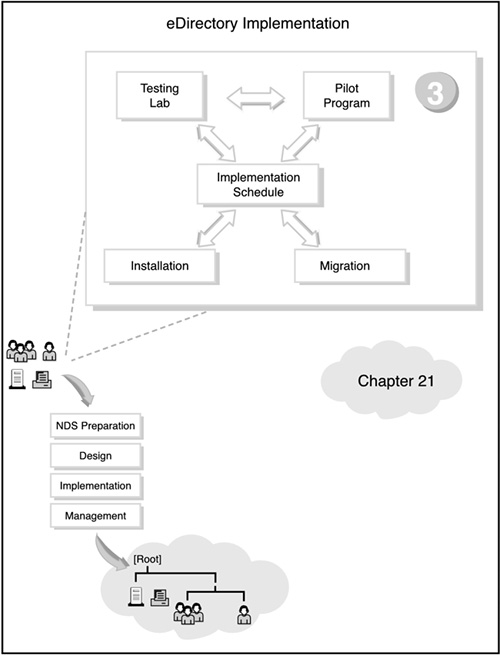
If you’re feeling a little restless from all the preparing, planning, and designing in the preceding three chapters, this chapter is for you. As you can see in Figure 21.1, all the initial action of step 3 centers on the implementation schedule. This schedule outlines the rollout of NetWare 6 installation, upgrade, and migration. But before you can implement NetWare 6 for ACME in a production environment, you should test it in a more controlled pilot program.
eDirectory implementation transcends all the other eDirectory design tasks because it gives you the opportunity to build your eDirectory tree. After you’ve designed an eDirectory tree, you must install the servers, build the tree, place the resources, and implement a user environment plan (UEP).
Data gathering is an important part of eDirectory implementation. For example, the following eDirectory design inputs should help you execute your eDirectory merging and partition management tasks: a company organizational chart, a physical network layout map, a network resource lists, background information, and a workflow diagram.
Following are the four phases of eDirectory implementation:
![]() Phase 1: Building the eDirectory tree—In Chapter 19, “Novell eDirectory Tree Design,” you learned how to create a preliminary eDirectory tree design. The top layers should be location based and the bottom layers should be function based. This layout optimizes your administrative approach, login scripts, bindery services, and container sizes. The design of the container structure should resemble the shape of a pyramid, with most of the containers at the bottom and fewer containers at the top. During the first phase of eDirectory implementation, you get an opportunity to build the design using ConsoleOne and iManager.
Phase 1: Building the eDirectory tree—In Chapter 19, “Novell eDirectory Tree Design,” you learned how to create a preliminary eDirectory tree design. The top layers should be location based and the bottom layers should be function based. This layout optimizes your administrative approach, login scripts, bindery services, and container sizes. The design of the container structure should resemble the shape of a pyramid, with most of the containers at the bottom and fewer containers at the top. During the first phase of eDirectory implementation, you get an opportunity to build the design using ConsoleOne and iManager.
![]() Phase 2: Managing eDirectory partitions—During the installation of the first server in an eDirectory tree, the first partition is created for you (that is, the [Root] partition). When your network servers are up and running, you can use ConsoleOne to make additional partitions and to distribute them as replicas. For example, each geographic site should be contained in its own separate partition. In Chapter 5, “NetWare 6 eDirectory Management,” you learned how to create, to move, and to merge partitions. You also learned how to add and to remove replicas, and how to change eDirectory replica types.
Phase 2: Managing eDirectory partitions—During the installation of the first server in an eDirectory tree, the first partition is created for you (that is, the [Root] partition). When your network servers are up and running, you can use ConsoleOne to make additional partitions and to distribute them as replicas. For example, each geographic site should be contained in its own separate partition. In Chapter 5, “NetWare 6 eDirectory Management,” you learned how to create, to move, and to merge partitions. You also learned how to add and to remove replicas, and how to change eDirectory replica types.
![]() Phase 3: Merging eDirectory trees—In many cases, you may need to merge multiple eDirectory trees into a unified network (that is, a single tree) before you can perform the remaining implementation tasks. The process of merging two eDirectory trees is relatively simple. The implications of merging two eDirectory trees, however, can be dramatic. Therefore, careful planning and execution are critical. In the final section of this chapter, “Merging eDirectory Trees,” we will study detailed eDirectory merging considerations and step-by-step instructions.
Phase 3: Merging eDirectory trees—In many cases, you may need to merge multiple eDirectory trees into a unified network (that is, a single tree) before you can perform the remaining implementation tasks. The process of merging two eDirectory trees is relatively simple. The implications of merging two eDirectory trees, however, can be dramatic. Therefore, careful planning and execution are critical. In the final section of this chapter, “Merging eDirectory Trees,” we will study detailed eDirectory merging considerations and step-by-step instructions.
![]() Phase 4: Implementing a User Environment Plan—Finally, you should implement a user environment plan to manage how users will access eDirectory resources on your new network. Specifically, you should create ZENworks objects to manage the user’s desktop environment, standardize the file system structure, implement network security measures, create login scripts for client accessibility, and provide access for mobile users. We tackled this topic in great depth in the preceding chapter (Chapter 20, “Novell eDirectory Accessibility Design”).
Phase 4: Implementing a User Environment Plan—Finally, you should implement a user environment plan to manage how users will access eDirectory resources on your new network. Specifically, you should create ZENworks objects to manage the user’s desktop environment, standardize the file system structure, implement network security measures, create login scripts for client accessibility, and provide access for mobile users. We tackled this topic in great depth in the preceding chapter (Chapter 20, “Novell eDirectory Accessibility Design”).
In this chapter, we’ll explore ACME’s full eDirectory rollout, including its testing lab, pilot program, and implementation schedule. Then you’ll learn how to merge separate eDirectory trees into one unified network. Are you ready for action?!
Test Objectives Covered:
![]() Evaluate Your eDirectory Design
Evaluate Your eDirectory Design
![]() Install eDirectory and Build a Tree
Install eDirectory and Build a Tree
After you’ve prepared, planned, and designed ACME’s eDirectory tree, it’s time to roll it out to the world. This can be accomplished by using the following roadmap:
![]() ACME testing lab—eDirectory implementation begins with five different experiments: hardware installation, eDirectory implementation, testing login scripts, testing applications, and testing backup and restore procedures. Then you’ll get an opportunity to practice eDirectory merging and partition management—all offline.
ACME testing lab—eDirectory implementation begins with five different experiments: hardware installation, eDirectory implementation, testing login scripts, testing applications, and testing backup and restore procedures. Then you’ll get an opportunity to practice eDirectory merging and partition management—all offline.
![]() ACME pilot program—Next, you should create a bridge between the controlled testing lab and the uncontrolled production environment. Take it slowly.
ACME pilot program—Next, you should create a bridge between the controlled testing lab and the uncontrolled production environment. Take it slowly.
![]() ACME implementation schedule—The heart and soul of eDirectory implementation is the implementation schedule. This 10-part matrix is your blueprint for ACME success.
ACME implementation schedule—The heart and soul of eDirectory implementation is the implementation schedule. This 10-part matrix is your blueprint for ACME success.
That’s eDirectory rollout in a nutshell. Let’s take a closer look, starting with the ACME testing lab.
It all starts in the offline laboratory. The testing lab is a completely open environment where you can get comfortable and creative with eDirectory implementation. For example, you can perform the following tasks:
![]() Install NetWare 6 a bunch of times
Install NetWare 6 a bunch of times
![]() Design and build the ACME eDirectory tree
Design and build the ACME eDirectory tree
![]() Test the eDirectory compatibility of existing and new applications
Test the eDirectory compatibility of existing and new applications
![]() Merge multiple trees
Merge multiple trees
![]() Manage eDirectory partitions and replicas
Manage eDirectory partitions and replicas
![]() Run login scripts
Run login scripts
![]() Invent a new flavor of silicon-based ice cream
Invent a new flavor of silicon-based ice cream
This kind of experience is invaluable—it can’t be taught. The lessons you learn in the lab help you avoid major mistakes during the pilot and full-blown implementations. The lab experience enables you to learn how NetWare 6 operates within a subset of ACME. More importantly, the lab is a safe haven where you can experiment with strange modifications and view the effect of these changes on the eDirectory tree.
Your lab should consist of at least four nodes: two NetWare 6 servers and two workstations. The servers and adapter cards should be similar to the hardware that will be used in your network environment. If you’re planning to upgrade your hardware, use the new hardware in your lab environment. If possible, each NetWare 6 server should exceed the minimum hardware requirements recommended by Novell.
For the ACME site, lab testing is being handled at the NORAD facility in the Labs division. This facility evaluates all new software and hardware before deploying them in the production network. Figure 21.2 shows the ACME lab being used for testing NetWare 6 for the entire ACME tree installation.
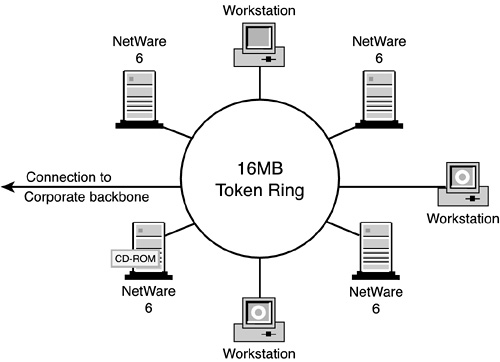
The ACME testing lab shown in Figure 21.2 has four dedicated NetWare 6 servers and three workstations for running the Novell and third-party utilities. Also, because the ACME network is primarily token ring, we have a token ring concentrator in the lab to connect the servers and workstations. All file servers have a CD-ROM drive, as well as sufficient disk and memory capacity. The lab ring also has a connection to the corporate backbone located in the Labs division of NORAD.
The purpose of any laboratory is to run experiments. ACME’s testing lab is no different. ACME scientists are performing five interesting, new experiments even as we speak:
![]() Experiment 1—Hardware installation
Experiment 1—Hardware installation
![]() Experiment 2—eDirectory implementation
Experiment 2—eDirectory implementation
![]() Experiment 3—Testing login scripts
Experiment 3—Testing login scripts
![]() Experiment 4—Testing applications
Experiment 4—Testing applications
![]() Experiment 5—Testing backup and restore procedures
Experiment 5—Testing backup and restore procedures
After you’ve completed all the testing lab experiments, you must take them into the real world. This involves a comprehensive pilot program.
Now you’re almost ready for prime time. Before you can attack the ACME implementation head-on, you should consider testing your lab results on a small branch of the overall tree. The pilot program serves as a dress rehearsal before you move into full-scale migration.
In ACME’s case, the pilot program will accomplish the following:
![]() Give the project team a chance to practice its implementation procedures
Give the project team a chance to practice its implementation procedures
![]() Provide a live blueprint for full-scale client and server migration
Provide a live blueprint for full-scale client and server migration
![]() Provide more accurate feedback for application compatibility
Provide more accurate feedback for application compatibility
![]() Give insight into how users react to eDirectory and the new logical network resources
Give insight into how users react to eDirectory and the new logical network resources
![]() Gather valuable performance data for fine-tuning partitioning, replica, and time synchronization designs
Gather valuable performance data for fine-tuning partitioning, replica, and time synchronization designs
We’ll start in the OU=LABS container because the scientists are more sympathetic to our experiments. In this case, we’ll migrate three pilot servers (LABS-SRV1, R&D-SRV1, and WHI-SRV1), two HP printers, a print server (R&D-PS1), and all the administrative users under OU=LABS. This includes AEinstein, LDaVinci, CDarwin, MCurie, INewton, CBabbage, and Ada.
Refer to task 9 of the ACME implementation matrix later in this chapter for more details. Speaking of schedules, let’s stay on track and move forward to the center of eDirectory implementation: the schedule.
The ACME implementation schedule is a detailed blueprint for eDirectory rollout. It provides granular, measurable tasks that you can perform during ACME implementation. The main focus of the implementation schedule is the tasks and their associated subtasks. These become the focus of your implementation matrix.
As you can see from the dates in Table 21.10 later in the chapter, we’ve included a significant cushion in the rollout schedule. Even though the project theoretically takes only 21 weeks, the 21 weeks doesn’t take into account scheduling conflicts, traveling, and Murphy’s Law. So, add another 25% to the total duration, and we should finish the ACME implementation on September 28, 2007. No sweat. Now all we have to do is just do it!
Test Objectives Covered:
![]() Evaluate Your eDirectory Design (continued)
Evaluate Your eDirectory Design (continued)
![]() Install eDirectory and Build a Tree (continued)
Install eDirectory and Build a Tree (continued)
The ACME implementation matrix is where all the action is. It’s the center of attention, a blueprint for success, another road map for saving the world. More important, it’s your friend.
Make one, learn it, use it!!
Your implementation matrix should provide detailed, measurable tasks that you can perform during the life of the ACME implementation. You should also include a detailed timeline with key milestones. In addition, the schedule establishes the proper timing and helps to organize all the eDirectory implementation tasks.
The schedule also helps you track the status of the project, and can provide immediate feedback to your staff and management. A well-planned implementation schedule will not only help you manage and track the status of the NetWare 6 project, but can also be used to set deadlines for each task. Let’s be honest; these things can go on forever.
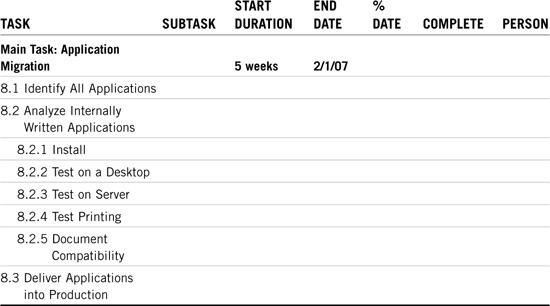
The implementation matrix consists primarily of a set of charts—each with a task description, a list of its subtasks, guidelines, duration, start and end dates, percent completion, and task lead (team member). If possible, the schedule should also show the interdependencies of the tasks, measure the progress, review the work, and produce reports for management. Finally, be sure to update the chart daily, weekly, and monthly—until the project is finished.
Here’s a quick preview of the ten tasks in ACME’s implementation matrix:
![]() Task 1—Project scope
Task 1—Project scope
![]() Task 2—Training
Task 2—Training
![]() Task 3—eDirectory implementation
Task 3—eDirectory implementation
![]() Task 4—Security and auditing
Task 4—Security and auditing
![]() Task 5—Client migration
Task 5—Client migration
![]() Task 6—Server migration
Task 6—Server migration
![]() Task 7—Printing migration
Task 7—Printing migration
![]() Task 8—Application migration
Task 8—Application migration
![]() Task 9—Pilot program
Task 9—Pilot program
![]() Task 10—Rollout!
Task 10—Rollout!
Now let’s build ACME’s implementation matrix together. We’ll discuss each task in depth, and create a task-oriented timing chart. Remember, these charts are the road maps for ACME’s success.
Please take them very seriously—we have!
TIP
To get more experience building network-oriented implementation projects, consider taking CompTIA’s IT Project+ certification. In fact, it is required for Master CNE re-certification.
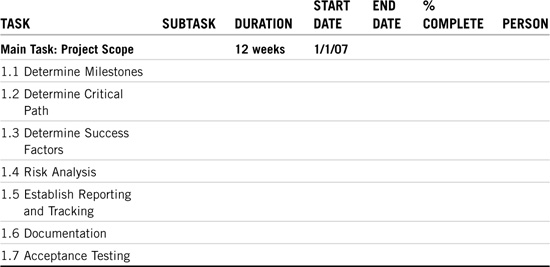
It all starts with the project scope. This establishes the boundaries of ACME’s eDirectory implementation. This is strictly a planning stage—it doesn’t involve any action. It does, however, continue throughout the first half of the project.
You must continually assess the scope of your implementation and make subtle adjustments as needed. This involves scheduling, task orientation, documentation, and acceptance testing. ACME’s project scope implementation matrix is shown in Table 21.1. But before we explore this first schedule, let’s review some of its key components:
![]() Task and Subtask—A detailed description of each task and its associated subtasks, usually in outline form.
Task and Subtask—A detailed description of each task and its associated subtasks, usually in outline form.
![]() Duration—The actual time it takes to complete the task. The duration is calculated according to an eight-hour workday and five-day work-week, and is always less than the difference between the start and end dates. This is because of organizational concerns, scheduling conflicts, and Murphy’s Laws.
Duration—The actual time it takes to complete the task. The duration is calculated according to an eight-hour workday and five-day work-week, and is always less than the difference between the start and end dates. This is because of organizational concerns, scheduling conflicts, and Murphy’s Laws.
![]() Start Date—When the task begins, according to the calendar. This shows interdependencies between tasks because some tasks start after others. But most are staggered (that is, they happen at the same time).
Start Date—When the task begins, according to the calendar. This shows interdependencies between tasks because some tasks start after others. But most are staggered (that is, they happen at the same time).
![]() End Date—When the task finishes. This is usually greater than the start date plus the duration.
End Date—When the task finishes. This is usually greater than the start date plus the duration.
![]() %Complete—An ongoing meter of task progress.
%Complete—An ongoing meter of task progress.
![]() Person—Whoever is in charge of the task and accountable for the schedule.
Person—Whoever is in charge of the task and accountable for the schedule.
Table 21.1 is a template for all 10 of your implementation matrices aka Gantt charts. Fill in the information as needed.
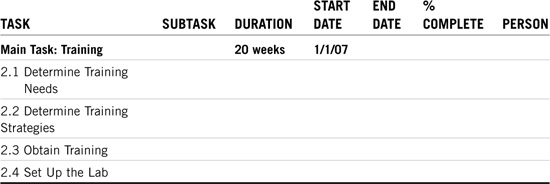
“Knowledge is nourishment for the mind.”
This has never been more obvious than with ACME and eDirectory implementation. Do not skimp on training. This is one of the most critical tasks in the entire process. As with project scope, training occurs throughout the life of the project. As a matter of fact, training occurs before, during, and after the ACME implementation.
Because some of the later tasks are dependent on training, we’ll start this task first—on January 1, 2007. During the training phase, you need to train your administrators, users, and the project team. The training task also involves lab testing.
Here are some excellent sources for NetWare 6 training:
![]() Novell advanced technical training—Numerous courses are available for NetWare 6 alone. Surf the Web to www.novell.com/training/pep/att/def.html.
Novell advanced technical training—Numerous courses are available for NetWare 6 alone. Surf the Web to www.novell.com/training/pep/att/def.html.
![]() Colleges and universities—Many formal institutions now offer certified NetWare 6 training courses.
Colleges and universities—Many formal institutions now offer certified NetWare 6 training courses.
![]() Novell Press books—Novell’s CNA Study Guide for NetWare 6 and Novell’s CNE Study Guide for NetWare 6 are just a few of the titles you’ll find useful. Surf the Web to www.novell.com/training/books.
Novell Press books—Novell’s CNA Study Guide for NetWare 6 and Novell’s CNE Study Guide for NetWare 6 are just a few of the titles you’ll find useful. Surf the Web to www.novell.com/training/books.
![]() Novell Application Notes—Novell’s monthly technical journal for network design, implementation, administration, and integration.
Novell Application Notes—Novell’s monthly technical journal for network design, implementation, administration, and integration.
eDirectory implementation transcends all the other tasks in the sense that it occurs continually. After you’ve designed the eDirectory tree (refer to Chapter 19), you must install the servers (refer to Chapters 1, “NetWare 6 Installation,” and 2, “NetWare 6 Upgrade and Migration”) and, finally, put the resources in place and manage the tree. This is where we build on the eDirectory partition/replica management duties we discussed in Chapter 5.
The following are some estimated time frames for each of ACME’s eDirectory implementation subtasks:
![]() Create eDirectory Naming Standard—4 days
Create eDirectory Naming Standard—4 days
![]() Design eDirectory Tree—2 days
Design eDirectory Tree—2 days
![]() Design and Implement Partitions and Replicas—3 days
Design and Implement Partitions and Replicas—3 days
![]() Design and Implement Time Synchronization—2 days
Design and Implement Time Synchronization—2 days
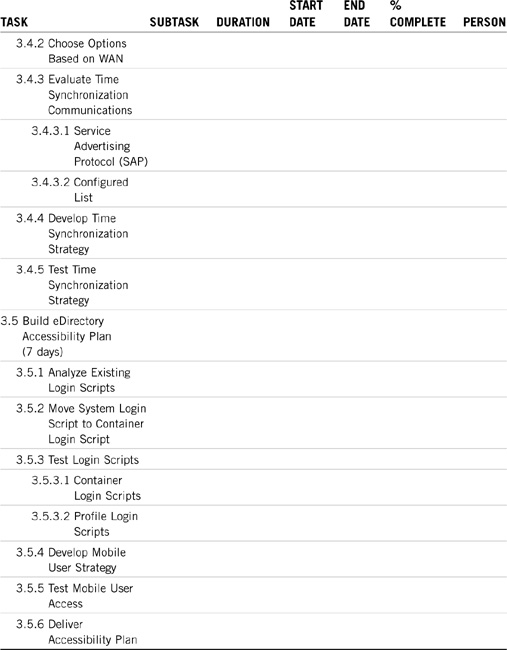
![]() Develop eDirectory Accessibility Plan—7 days
Develop eDirectory Accessibility Plan—7 days
Remember that these aren’t consecutive calendar days—they’re durations. The real calendar time will be much longer. Refer to Chapters 5, 19, and 20 for in-depth discussions of these subtasks. For now, see Table 21.3 for ACME’s eDirectory implementation matrix. Notice that it occurs one month after training begins. You’ll have to learn this stuff before you can schedule it.


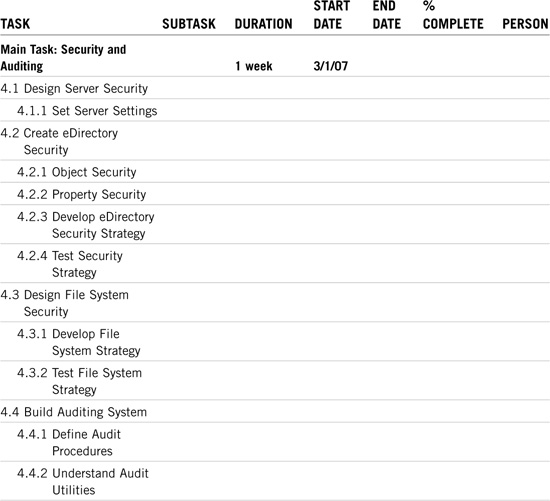
Security and auditing are very important parts of the eDirectory implementation. After you’ve established the tree guidelines, you’ll need to concentrate on securing it. See Novell’s CNA Study Guide for NetWare 6 for more details.
Note that migrating users don’t have to worry about file system security—it should already be in place. You should, however, test the security first. See Table 21.4 for ACME’s security and auditing matrix.

The next two tasks represent the Big Two of the implementation tasks: client migration and server migration. After all, users depend on NetWare 6 clients and the eDirectory tree depends on NetWare 6 servers.
Let’s take a closer look.
Client migration is the first of two critical implementation tasks; server migration is the other. In Chapters 1, “NetWare 6 Installation,” and 4, “NetWare 6 Client Management,” you discovered how to install eDirectory client/server resources. Now let’s take a moment to learn NetWare 6’s five-step client migration strategy:
1. Assess existing network clients—During the first step of client migration, you’ll need to assess the current state of clients throughout your network. Survey the client operating systems (including version numbers) and determine whether they’re compatible with eDirectory and NetWare 6. Finally, assess each user’s level of networking expertise. Determine the effect of new client software on each user’s daily routine. The most important goal of this step is to gain an appreciation for the client diversity within your network. Speaking of diversity, refer to Chapter 4, “NetWare 6 Client Management,” for an overview of Novell support for diverse clients —NFAP (Novell File Access Pack).
2. Determine migration strategy—The next step is to determine your overall client migration strategy. This involves a number of client compatibility issues from protocol to performance. After you’ve addressed all these issues, you can start to formulate a client migration strategy. During the migration or installation of the new client software, test different methods for the best efficiency. Try running the setup utility over the network or from a batch file at your workstation. Also consider an automated strategy for upgrades from the server. For example, when the user logs in to a NetWare 6 server, the automated program could download the required programs to the user’s workstation—this is called Automatic Client Upgrade (ACU).
3. Share new client software with administrators—After you’ve determined what your client migration strategy will be, be sure to share the results with distributed administrators. If you have a lab, train the administrators on migrating typical workstation configurations. This brings me to an important point: During client migration, consider moving the entire client team and other IS staff members to the new software first. This will enable them to become familiar with the technology. Then, when you migrate the users, your administrators will already have personal experience with the system. When the administrators are comfortable with the new client migration strategy, you’re well on your way to NetWare 6 nirvana.
4. User training—Now it’s time to review step 1 again. Go back to your user assessment and break the users into three different categories: Really Smart, Average, and Clueless. Based on these different levels, you can customize a user training strategy. Really Smart users can be left alone, but Average and Clueless clients require a great deal more attention. Also consider the workstation as the main point of network interface for users. During the training process, consider all types of training—email messages, paper handouts, quick-reference cards, classroom training, and online courses. After you’ve trained your users, you’re ready for step 5.
5. Upgrade clients—Schedule the migration of your workstations during a period that’s long enough to migrate a given selected set of users. You might need to schedule this process during a weekend. Obviously, the more people involved in the migration, the faster it will go. The client team should plan for about 15 minutes per workstation to complete the installation of the latest client software. The team should also combine all necessary changes into a single visit to each workstation.
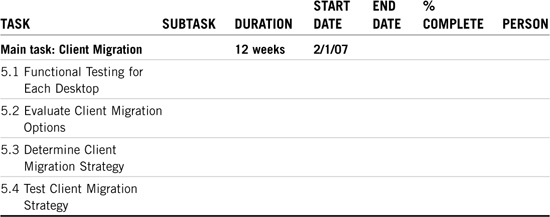
Table 21.5 shows ACME’s client migration matrix. You’ll need a little training to get the client migration started, so you’ll see that we’re waiting a month after the training time line. This process could start at the same time as eDirectory implementation because the latest Novell Client supports NetWare 3.x, NetWare 4.x, NetWare 5.x, and NetWare 6.
It’s a great place to start.
So, how long will it take? Consider the following calculation for ACME:
2,000 workstations × 15 minutes per workstation = 30,000 minutes
30,000 minutes = 500 hours = 62.5 workdays = 12.5 weeks
Even though we’ve calculated a duration of 12.5 weeks, it could take up to four calendar months to visit every workstation. Have Fun.
The second of the Big Two implementation tasks focuses on the NetWare 6 server. This is the Big Kahuna! The server houses eDirectory, stores the users’ files, and provides a gateway to the cyber-frontier. For all these reasons, you should take great care in server migration.
The server team should consider the following functions in preparing for the migration of each NetWare 6 server:
![]() Apply the corporate eDirectory naming standard while objects are still in older NetWare 3 binderies. eDirectory does not support different object types having the same name. By contrast, the binderies in previous versions of NetWare do support different object types with the same name. For example, in NetWare 3, a Group object called HP4SI and a print queue called HP4SI have the same name because they’re different object types. In NetWare 6, you cannot have any leaf object with the same name in the same container. This conflict must be resolved before the migration of the server to NetWare 6.
Apply the corporate eDirectory naming standard while objects are still in older NetWare 3 binderies. eDirectory does not support different object types having the same name. By contrast, the binderies in previous versions of NetWare do support different object types with the same name. For example, in NetWare 3, a Group object called HP4SI and a print queue called HP4SI have the same name because they’re different object types. In NetWare 6, you cannot have any leaf object with the same name in the same container. This conflict must be resolved before the migration of the server to NetWare 6.
![]() Clean up the binderies and delete users and other objects that are no longer in use. Take this opportunity to remove security and access privileges that are no longer required. Users who have left the company or are no longer using that server should be removed.
Clean up the binderies and delete users and other objects that are no longer in use. Take this opportunity to remove security and access privileges that are no longer required. Users who have left the company or are no longer using that server should be removed.
![]() Make a complete backup of your servers before beginning a migration. Some companies have individuals in an Operations group who are responsible for backups. The server team should work with this group to ensure that a recent backup has been performed on any server that’s about to be migrated.
Make a complete backup of your servers before beginning a migration. Some companies have individuals in an Operations group who are responsible for backups. The server team should work with this group to ensure that a recent backup has been performed on any server that’s about to be migrated.
![]() If you’re migrating multiple NetWare 2 or NetWare 3 servers into a single NetWare 6 server, the server team should check for users with accounts on the multiple servers. Migrating multiple servers and duplicate users will present you with several challenges during migration to NetWare 6.
If you’re migrating multiple NetWare 2 or NetWare 3 servers into a single NetWare 6 server, the server team should check for users with accounts on the multiple servers. Migrating multiple servers and duplicate users will present you with several challenges during migration to NetWare 6.
![]() Delete old files and applications from the file system. Doing so frees up disk space for other purposes. You might discover many old, unused, and duplicated applications that are wasting disk space.
Delete old files and applications from the file system. Doing so frees up disk space for other purposes. You might discover many old, unused, and duplicated applications that are wasting disk space.
Examine Table 21.6 for ACME’s Server Migration Matrix. This is the most time-consuming aspect of eDirectory implementation because it involves most of the other implementation tasks. At ACME, we’ll be migrating a total of 52 servers, three of which will be part of the earlier pilot program—leaving us with 49 servers. It takes about 1.5 days per server, when you know what you’re doing. So, here’s the math:
49 servers × 1.5 days = 74 days = 15 weeks

Also, notice that the server migration starts 1.5 months after the client migration. This is because of two factors. First, the eDirectory implementation must be completed before we can begin (4 weeks after 2/1/07). Second, we have to wait for the procedures from the pilot program (15 days more). That puts us at 3/15/07.
The ACME printing team is responsible for designing the printing strategies for NetWare 6. All the print software and hardware should be tested for compatibility. This includes connections of more than 250 users. The printing strategies should also encompass printing in a mixed environment—NetWare 3 and NetWare 4 queue-based printing and NetWare 6 NDPS.
Table 21.7 contains ACME’s printing migration matrix. This process depends entirely on the server migration tasks. Printing implementation takes roughly two hours per server:
52 servers × 2 hours per server = 104 hours = 13 days = 2.5 weeks
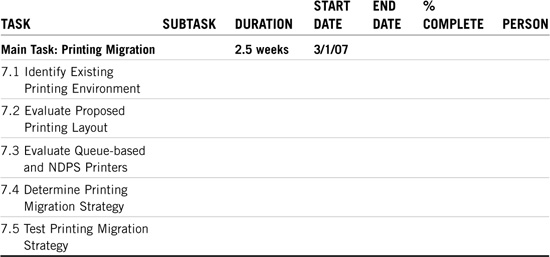
We’ll begin implementing printing with the very first pilot server; therefore, this process starts on 3/1/07.
The application project team is responsible for performing compatibility testing for applications running on both NetWare 6 servers and clients. There are several issues to deal with during the compatibility testing, including
![]() Bindery-based software programs
Bindery-based software programs
![]() eDirectory-aware applications
eDirectory-aware applications
![]() Connections of more than 250 users
Connections of more than 250 users
![]() Novell Client compatibility
Novell Client compatibility
This group is also responsible for the migration and implementation of existing applications into the new NetWare 6 production environment. NetWare 6 and ZENworks solve most of your application delivery problems with the Novell Application Launcher (NAL). This special workstation management tool enables you to distribute network-based applications to users’ workstations and manage the applications as objects in the eDirectory tree. Users then access the applications assigned to them using the Application Launcher window or application explorer.
Refer to Table 21.8 for ACME’s application migration matrix. Note that the actual migration of the applications occurs during the server migration phase—the duration of which is included in the 15-week estimate for task 6.
In this section, we’ll estimate the duration of compatibility pretesting. This task also occurs before client and server migration. It takes roughly one day to test each application, and ACME has 24 different applications. Therefore, compatibility pretesting will take approximately five weeks. We’d better start as soon as we can. Note: The client migration may overlap with application pre-testing.
The pilot program is a very important precursor to server migration. It enables you to test the implementation procedures on a few live production servers. The goal here is to establish procedures and blueprints for the remainder of the server migrations.
It usually takes twice as much time to perform a pilot migration as a regular migration. This is because you’re working on your first couple of servers and you’re documenting every step. This means that it will take us two weeks to adequately migrate the three Labs pilot servers.

Well, we finally made it!
This is the last leg of a very exhausting race. The rollout matrix is an overview of the entire project. It includes project scope, training, eDirectory, resource migration, and the pilot program.
As you can see in Table 21.10, we’ve included a significant cushion in the rollout matrix. Even though the project will theoretically take only 21 weeks, that doesn’t factor in scheduling conflicts, traveling, and Murphy’s Laws. So, add another 25% to the total duration, and we should finish the ACME implementation on September 28, 2007. No sweat. Now all we have to do is—just do it!

Ready, set, roll out.
Wow, that’s a lot of work! I can feel a very large “workquake” approaching. We’re going to be very busy over the next eight months. It’s a good thing we’re attacking this ACME WAN together.
This completes step 3. As you can see, eDirectory implementation centers on the implementation matrix. It truly is a road map for ACME success.
Now take a deep breath! Relax. This study guide is almost over...whew. But first, before we tackle the final chapter, I want to spend a few moments discussing eDirectory merging. Merging eDirectory trees is one of the most traumatic and challenging activities you’ll ever face as a CNE. And it is almost always required during eDirectory implementation.
Are you ready for more action?
Test Objective Covered:
![]() Merge Two Directory Trees
Merge Two Directory Trees
Merging eDirectory trees is one of your greatest challenges—and accomplishments—as a NetWare 6 eDirectory CNE. Therefore, you should approach it with a healthy balance of paranoia and excitement.
The eDirectory merge process is accomplished by using a NetWare 6 utility called DSMERGE (see Figure 21.3). This utility enables you to combine multiple trees (two at a time) into a single, cohesive eDirectory network. DSMERGE provides an important level of design flexibility by enabling network engineers to merge existing trees after the organization has agreed on a single eDirectory design. As a result, distributed departments can implement eDirectory early and then merge into the parent tree at a later date.
To merge two eDirectory trees, perform these four steps:
In this final lesson, we’ll study the detailed steps of the eDirectory merge process. But first, we must discuss the design implications of combining two existing eDirectory trees. Remember, paranoia is your friend!
During the eDirectory merge process, you need to identify a source tree and a target tree. In Figure 21.4, UN-TREE (United Nations) represents the source tree and ACME-TREE is the target. You also need to identify a source server in the UN-TREE (for DSMERGing) and a target server in the ACME-TREE. (Note: It’s imperative that each server contain a master replica of its host [Root] partition.)

After the merge, the resulting eDirectory tree structure will probably look very different from the original structure. Therefore, you might experience a variety of naming problems in login scripts and workstation name contexts. The following are planning guidelines to help you minimize the negative effects associated with merging two eDirectory trees:
![]() Choose the source and target eDirectory trees carefully. Typically, the source tree should be the one with fewer objects directly under the Tree Root.
Choose the source and target eDirectory trees carefully. Typically, the source tree should be the one with fewer objects directly under the Tree Root.
![]() Identify the full name and password for a User object with Supervisor [S] object rights at the tree root of both the source tree and the target tree.
Identify the full name and password for a User object with Supervisor [S] object rights at the tree root of both the source tree and the target tree.
![]() Modify the source and target eDirectory trees so that they follow the same first-level container structure.
Modify the source and target eDirectory trees so that they follow the same first-level container structure.
![]() At the time of the eDirectory merge, make sure that the names of the first-level containers in both trees are unique.
At the time of the eDirectory merge, make sure that the names of the first-level containers in both trees are unique.
TIP
There’s an important relationship between the Tree Root object and the [Root] partition. The Tree Root is the highest point in the eDirectory tree. The [Root] partition is the first default partition created during server installation. It contains the Tree Root object. Of course, both of these are mostly unrelated to partition root objects. Clear, huh?
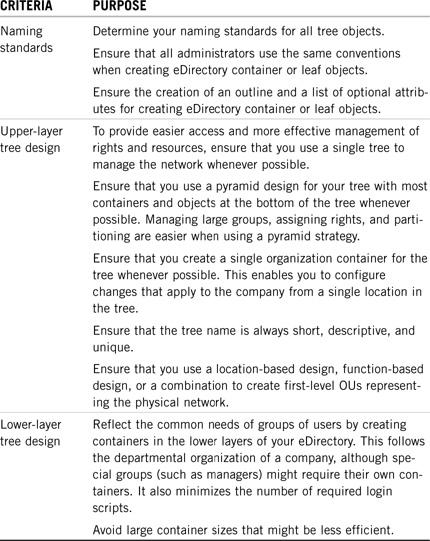
To ensure that your eDirectory tree design is as effective as possible before merging, you should evaluate the overall tree design, the design of the upper layers of your tree, and the design of the lower layers of your tree. Table 21.11 provides criteria you should use to evaluate your overall eDirectory tree design.
During the merge process, the master replica of the [Root] partition on the target server becomes the master replica of the new, combined [Root] partition. Any servers in the target tree that held replicas of the old target tree [Root] partition are given a replica of the new [Root] partition.
In addition, the source server loses the master replica of its old [Root] partition and is given a read/write replica of the new [Root] partition. Any servers in the source tree (except for the source server) that held a replica of the old source tree root lose their replica, and they do not receive a replica of the new [Root] partition. Therefore, you need to manually distribute replicas of the new [Root] partition to any servers in the source tree (other than the source server) that need a replica of the new [Root] partition. (Refer to Figure 21.4 earlier in this chapter.)
Finally, all first-level containers in the source tree [Root] partition become independent partition roots in the new tree. Although all servers in the source tree (except for the source server) that held a replica of the source tree [Root] partition lose their replica of the source tree [Root] partition, they gain replicas of the new first-level partitions in the new tree. Subordinate reference replicas for the new partitions under the new tree root are added to servers holding replicas of the new tree root.
Table 21.12 provides criteria you should use to evaluate your eDirectory partitioning and replication strategy.

Because so much of object placement in your eDirectory tree relies on company needs or administrative preference, this is probably one of the most difficult areas to evaluate. Table 21.13 provides criteria that you should use to evaluate the placement of objects in your eDirectory tree.

Whether an effective eDirectory design meets the users’ needs is the ultimate criteria. Each of the previously mentioned criteria directly influences the user and administrator environment. To determine whether your eDirectory design meets user and administrator needs, ask yourself the following:
![]() What administrative roles are needed?
What administrative roles are needed?
![]() What user roles are needed?
What user roles are needed?
![]() What information stored in eDirectory do users need access to?
What information stored in eDirectory do users need access to?
![]() Do login scripts simplify user information access?
Do login scripts simplify user information access?
![]() How will I secure the information for local users?
How will I secure the information for local users?
![]() How will I secure the information for mobile users?
How will I secure the information for mobile users?
![]() Does this security inhibit user efficiency in an unnecessary way?
Does this security inhibit user efficiency in an unnecessary way?
![]() Which applications do users need?
Which applications do users need?
![]() Are the applications used across the WAN? Do users need a specific browser or operating system to use the applications?
Are the applications used across the WAN? Do users need a specific browser or operating system to use the applications?
![]() Does the eDirectory design allow for growth?
Does the eDirectory design allow for growth?
This is a doozy.
In addition to replica distribution changes, the eDirectory merge process also involves security implications. During the merge, the access control list (ACL) of the source tree root is discarded, but the ACL of the target Tree Root is maintained. The only source tree root rights that are kept belong to the source tree User object that performed the merge (typically Admin).
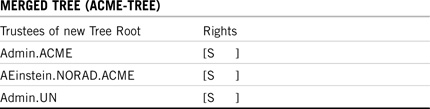
Examine Figure 21.4 (earlier), Table 21.14, and Table 21.15 for an example of eDirectory merging security considerations. In the example, the source tree administrative user (Admin.UN) gains Supervisor [S] rights to the new tree root—but all other source tree root trustees lose their rights (such as RKennedy.DC.UN).

Before you begin merging the two trees, you need to create a plan to compensate for trustee rights that are automatically discarded during the merge. One solution, of course, is that prior to the merge, you can assign appropriate trustees the rights they need to containers below the tree root in the source tree. Another solution is to grant these trustee rights immediately after the merge.
Okay, that’s enough scary stuff. By now, you should be sufficiently paranoid about the intense ramifications of merging eDirectory trees. Now, let’s get our hands dirty and tackle steps 1 though 4.
Before merging two eDirectory trees, you need to perform a series of preparation tasks:
![]() Identify the appropriate tools—Before you begin, make sure that you have access to the following eDirectory merging tools: an eDirectory backup utility (to back up eDirectory), TIMESYNC or NTP commands (to change time synchronization parameters), the Schema Manager component of iMonitor (to confirm that the schemas are synchronized), the DSMERGE utility, iMonitor or DSREPAIR (to confirm that the tree has been synchronized after the merge has been completed), and NetWare Administrator (to customize the consolidated tree). Also, ConsoleOne and iManager are great consolidated utilities for accomplishing most of these tasks.
Identify the appropriate tools—Before you begin, make sure that you have access to the following eDirectory merging tools: an eDirectory backup utility (to back up eDirectory), TIMESYNC or NTP commands (to change time synchronization parameters), the Schema Manager component of iMonitor (to confirm that the schemas are synchronized), the DSMERGE utility, iMonitor or DSREPAIR (to confirm that the tree has been synchronized after the merge has been completed), and NetWare Administrator (to customize the consolidated tree). Also, ConsoleOne and iManager are great consolidated utilities for accomplishing most of these tasks.
![]() Document your plan—To ensure a complete and effective merging strategy, draw a diagram of each of the following: each tree to be merged, the merged tree structure, the partition and replication strategy, and the object placement strategy. Also document your user environment needs.
Document your plan—To ensure a complete and effective merging strategy, draw a diagram of each of the following: each tree to be merged, the merged tree structure, the partition and replication strategy, and the object placement strategy. Also document your user environment needs.
![]() Back up the eDirectory Trees—Next, you must back up both eDirectory trees. Even though the merge is theoretically protected from catastrophic failure by NetWare TTS (pre NSS) or NSS, you should still perform a full backup of each eDirectory tree before beginning the merge. Also, be sure to verify your backups before you begin. As a result, you’re assured of having an up-to-date copy of each eDirectory tree, in case something goes wrong during the merge.
Back up the eDirectory Trees—Next, you must back up both eDirectory trees. Even though the merge is theoretically protected from catastrophic failure by NetWare TTS (pre NSS) or NSS, you should still perform a full backup of each eDirectory tree before beginning the merge. Also, be sure to verify your backups before you begin. As a result, you’re assured of having an up-to-date copy of each eDirectory tree, in case something goes wrong during the merge.
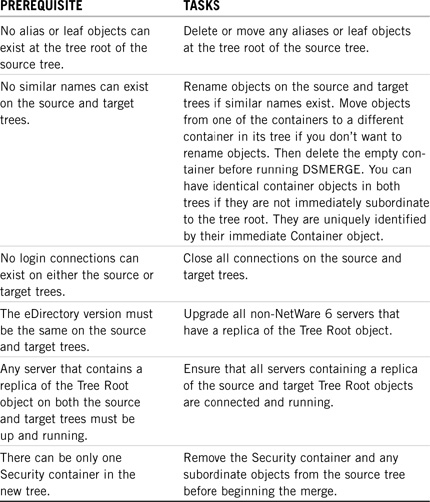
Table 21.16 shows some prerequisites that must be met prior to implementing the merge.
You still aren’t fully prepared. The following are a couple of synchronization issues that must be tackled:
![]() Synchronize the schemas—The preliminary check phase of DSMERGE helps ensure that the server running DSMERGE holds a replica of the [Root] partition. If it cannot find a replica of [Root], the operation aborts. It’s imperative that both trees use the same schema. (The schema defines object classes and rules of containment.) If one tree contains a modified schema or if different versions of eDirectory are represented, use DSREPAIR to update the schemas before merging the trees. Note: You might need to update the schema from the source eDirectory tree to the target eDirectory tree and from the target eDirectory tree to the source eDirectory tree.
Synchronize the schemas—The preliminary check phase of DSMERGE helps ensure that the server running DSMERGE holds a replica of the [Root] partition. If it cannot find a replica of [Root], the operation aborts. It’s imperative that both trees use the same schema. (The schema defines object classes and rules of containment.) If one tree contains a modified schema or if different versions of eDirectory are represented, use DSREPAIR to update the schemas before merging the trees. Note: You might need to update the schema from the source eDirectory tree to the target eDirectory tree and from the target eDirectory tree to the source eDirectory tree.
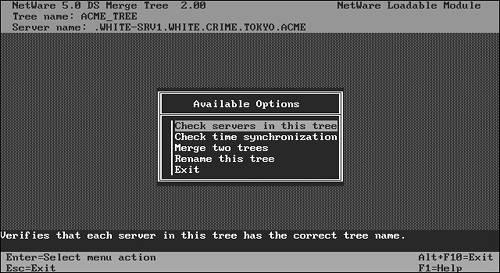
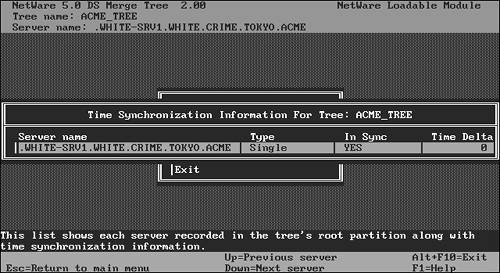
![]() Establish time synchronization—Finally, you must ensure that both trees are synchronized and that they reference the same time source. After DSMERGE has been loaded on the source server, you can initiate time synchronization, as shown in Figure 21.5. DSMERGE checks the time status of all servers participating in the DSMERGE, including the server name, eDirectory version, and time synchronization status. If there is a time delta between a NetWare 6 server and the local server running DSMERGE, the difference is shown onscreen in hours, minutes, and seconds.
Establish time synchronization—Finally, you must ensure that both trees are synchronized and that they reference the same time source. After DSMERGE has been loaded on the source server, you can initiate time synchronization, as shown in Figure 21.5. DSMERGE checks the time status of all servers participating in the DSMERGE, including the server name, eDirectory version, and time synchronization status. If there is a time delta between a NetWare 6 server and the local server running DSMERGE, the difference is shown onscreen in hours, minutes, and seconds.
After you’ve verified the status and synchronization of both the source and target NetWare 6 servers, you can follow these steps to perform the eDirectory merge:
1. At the source server console, enter the following:
DSMERGE
2. Then, to confirm that the source server’s time is synchronized, select Check Time Synchronization.
3. Next, select Merge Two Trees.
4. Finally, to merge the two trees, select Yes.
When the DSMERGE process completes, you’ll have a single tree with a common tree root.
If you plan to perform additional partition operations after the merge, you’ll first need to confirm that the eDirectory tree is stable. You’ll experience problems with the eDirectory database when processes relating to your network partitions and replicas are not complete before you begin other operations. One way to verify that the eDirectory tree is stable enough for additional partition activity is to confirm that the Replica State is On for all replicas on both source and target servers. You can accomplish this by using iMonitor or DSREPAIR.
To view the replica status in iMonitor, locate the source server in the eDirectory tree and then highlight it. On the right side of the screen, a list appears that contains the replicas on the designated server, as well as the status of each replica.
To view the replica state of a server in DSREPAIR, perform the following steps:
1. At the source server, enter the following:
DSREPAIR
2. Next, select the Advanced Options menu.
3. Then select Replica and Partition Operations.
4. Finally, verify that the Replica State is On.
You can also use ConsoleOne to verify that partitioning and replication processes are complete and that they are stable. Select View, Partition and Replica View. The right pane of the ensuing screen provides you with information about each partition and replica. If the status reads In Transition, it means the replica is still synchronizing information and, because of that, the partition cannot be considered stable. If the status reads On, this means the replica has completed all processes (the partition is stable). You are then free to perform additional partitioning and replication tasks. Keep in mind that these tasks can also be performed using DSTrace and/or iMonitor.
After the eDirectory merge has been confirmed, you might need to perform one or more of the following tasks in order to finalize the new eDirectory tree structure:
![]() Confirm the new tree name—To ensure that all servers in the tree are configured to support the new tree, you must confirm the tree name. On the server in the source tree that contains a replica of the root partition, enter DSMERGE. The select Check Servers in This Tree. This provides you with a status of every server in the tree and the name of the tree it is servicing.
Confirm the new tree name—To ensure that all servers in the tree are configured to support the new tree, you must confirm the tree name. On the server in the source tree that contains a replica of the root partition, enter DSMERGE. The select Check Servers in This Tree. This provides you with a status of every server in the tree and the name of the tree it is servicing.
![]() Check new partitions—DSMERGE eliminates existing partitions and reassigns new partitions when the merge is complete. The new partitions are created by default around location or departmental OUs. If the result is many small partitions, you might want to merge those partitions. You can do this from ConsoleOne by selecting View, Partition and Replication View. Select Merge Partitions and follow the prompts to complete the partition merge.
Check new partitions—DSMERGE eliminates existing partitions and reassigns new partitions when the merge is complete. The new partitions are created by default around location or departmental OUs. If the result is many small partitions, you might want to merge those partitions. You can do this from ConsoleOne by selecting View, Partition and Replication View. Select Merge Partitions and follow the prompts to complete the partition merge.
![]() Create the final eDirectory tree structure—To complete the eDirectory design, you might need to create, move, delete, or rename containers using ConsoleOne. For more information, refer to Chapter 5.
Create the final eDirectory tree structure—To complete the eDirectory design, you might need to create, move, delete, or rename containers using ConsoleOne. For more information, refer to Chapter 5.
![]() Create and implement a new replica strategy—The previous replica implementations on both the target and source trees are no longer valid. Implement a new replica strategy to ensure more efficient data synchronization as it pertains to the network.
Create and implement a new replica strategy—The previous replica implementations on both the target and source trees are no longer valid. Implement a new replica strategy to ensure more efficient data synchronization as it pertains to the network.
![]() Set up eDirectory administration rights—During a merge, the source tree administrative object that performed the merge ends up with Supervisor [S] object rights to the tree root of the new eDirectory tree. This trustee assignment might not be appropriate. Also, the other users in the source eDirectory tree who previously had rights to the tree root of the source tree will not have such rights to the tree root of the new tree. One method of handling this problem is to write down a list of the trustees of the source tree root before the merge and then re-create those assignments to the new tree root (if desired) after the merge. Another method is to grant trustees of the source Tree Root object rights to the containers immediately below the tree root before the merge. Your organization’s eDirectory administration style (that is, centralized or distributed) will influence the method you choose.
Set up eDirectory administration rights—During a merge, the source tree administrative object that performed the merge ends up with Supervisor [S] object rights to the tree root of the new eDirectory tree. This trustee assignment might not be appropriate. Also, the other users in the source eDirectory tree who previously had rights to the tree root of the source tree will not have such rights to the tree root of the new tree. One method of handling this problem is to write down a list of the trustees of the source tree root before the merge and then re-create those assignments to the new tree root (if desired) after the merge. Another method is to grant trustees of the source Tree Root object rights to the containers immediately below the tree root before the merge. Your organization’s eDirectory administration style (that is, centralized or distributed) will influence the method you choose.
![]() Correct login scripts—After the merge, commands in login scripts might be invalid because resources are no longer in the same context. Edit and debug Container, Profile, and User login scripts, as needed.
Correct login scripts—After the merge, commands in login scripts might be invalid because resources are no longer in the same context. Edit and debug Container, Profile, and User login scripts, as needed.
![]() Correct bindery services commands—After the merge, you might need to edit the AUTOEXEC.NCF file of each eDirectory server to correct errors in bindery services context naming.
Correct bindery services commands—After the merge, you might need to edit the AUTOEXEC.NCF file of each eDirectory server to correct errors in bindery services context naming.
![]() Update workstation parameters—After the merge, you might need to modify client parameters to identify the correct resources in their new context. For example, Name Context and Preferred Tree parameters will need to be changed. Consider creating an Alias object structure of the original tree as an interim solution to the name context challenge.
Update workstation parameters—After the merge, you might need to modify client parameters to identify the correct resources in their new context. For example, Name Context and Preferred Tree parameters will need to be changed. Consider creating an Alias object structure of the original tree as an interim solution to the name context challenge.
Done!
This completes eDirectory merging—wow! This is one of the most critical and complex operations that you’ll ever encounter as a network engineer. Good stuff.
Believe it or not, that pretty much completes our eDirectory design and implementation journey. During this adventure, we expanded our NetWare 6 LAN into the realm of global eDirectory connectivity and we mastered the three steps in building a network:
In the first step, we gathered ACME data and built a project team. Then, in the second step, we constructed ACME’s eDirectory tree with the help of naming standards, tree design guidelines, partitioning, time synchronization, and resource accessibility. Finally, in the third step, covered in this chapter, we built a testing lab and rolled out eDirectory using a ten-task implementation schedule.
Wow...are we having fun yet?! Sure. Now there’s only one chapter left: eBusiness! In the ultimate few pages of the CNE Study Guide for NetWare 6, we’ll re-live this eDirectory adventure from an eBusiness point-of-view. Don’t worry, it will go a lot faster the second time around!