
Chapter 3 NetWare 6 Server Management
This chapter covers the following testing objectives for Novell Course 3004: Novell Network Management:
![]() Use NetWare Remote Manager
Use NetWare Remote Manager
![]() Identify What iMonitor Is and How to Use It
Identify What iMonitor Is and How to Use It
![]() Use iMonitor to Diagnose and Repair eDirectory Problems
Use iMonitor to Diagnose and Repair eDirectory Problems
![]() Set Up and Configure NSS
Set Up and Configure NSS
![]() Monitor, Manage, and Rebuild NSS Storage Space
Monitor, Manage, and Rebuild NSS Storage Space
![]() Set Up SMS for SBCON and NWBACK32
Set Up SMS for SBCON and NWBACK32
![]() Back Up Data with SBCON and NWBACK32
Back Up Data with SBCON and NWBACK32
![]() Restore Data with SBCON and NWBACK32
Restore Data with SBCON and NWBACK32
Novell is directing the construction of the world’s central information superhighway with the help of you, me, and thousands of other electronic transit workers (orange vest optional). NetWare 6 further revolutionizes Novell’s oneNet strategy with the introduction of Web-enabled administration tools, highly scalable networking protocols, and multiprocessor support. Implementing these components makes your job easier and provides your users with more reliable network access. Welcome to anytime, anywhere advanced administration via NetWare 6.
As a network administrator, it’s your responsibility to focus on the NetWare 6 network to ensure that it stays fine-tuned and in peak condition. In Chapter 1, “NetWare 6 Installation,” and Chapter 2, “NetWare 6 Upgrade and Migration,” we began our NetWare 6 CNE journey by building the cornerstone of your network—the NetWare 6 server. Now it’s time to supercharge the network.
This chapter focuses on three key areas related to managing your NetWare 6 server:
![]() Managing NetWare 6 remotely—NetWare 6 provides several utilities that enable you to manage your network even when you’re off site. This discussion tackles Remote Manager, iManager, and iMonitor.
Managing NetWare 6 remotely—NetWare 6 provides several utilities that enable you to manage your network even when you’re off site. This discussion tackles Remote Manager, iManager, and iMonitor.
![]() NetWare 6 Storage Services (NSS)—One of the greatest demands you’ll face is the need for more storage, larger files, more efficient file management, and faster volume mounting speeds. NSS is the answer. NSS is a file storage system that enables you to configure, mount, and maintain large volumes.
NetWare 6 Storage Services (NSS)—One of the greatest demands you’ll face is the need for more storage, larger files, more efficient file management, and faster volume mounting speeds. NSS is the answer. NSS is a file storage system that enables you to configure, mount, and maintain large volumes.
![]() Storage Management Systems (SMS)—SMS is actually a combination of related services that facilitate the storage and retrieval of data to and from NetWare 6 servers and workstations. We’ll take a look at those services as well as some strategies and procedures for using them.
Storage Management Systems (SMS)—SMS is actually a combination of related services that facilitate the storage and retrieval of data to and from NetWare 6 servers and workstations. We’ll take a look at those services as well as some strategies and procedures for using them.
We have a lot of ground to cover, so let’s get started.
NetWare 6 has broken down the walls of the IT server room. As a result, you’re no longer trapped in the dungeon of server console administration. In fact, NetWare 6 includes three very powerful management utilities that enable you to securely administer your network anytime, anywhere:
![]() Remote Manager—Previously known as the NetWare Management Portal, this utility provides all the functionality available at the server console from a Web browser.
Remote Manager—Previously known as the NetWare Management Portal, this utility provides all the functionality available at the server console from a Web browser.
![]() iMonitor—Provides monitoring and diagnostic capability to all servers in your eDirectory tree from a Web browser. Furthermore, iMonitor enables you to manage your eDirectory tree from almost any platform, including NetWare, Windows NT/2000, Solaris, Linux, and Tru64 Unix. iMonitor uses Access Control List (ACL) and HTTPS technology to ensure secure transactions.
iMonitor—Provides monitoring and diagnostic capability to all servers in your eDirectory tree from a Web browser. Furthermore, iMonitor enables you to manage your eDirectory tree from almost any platform, including NetWare, Windows NT/2000, Solaris, Linux, and Tru64 Unix. iMonitor uses Access Control List (ACL) and HTTPS technology to ensure secure transactions.
![]() iManager—A Web-based browser tool that will eventually provide the same management capabilities as NetWare Administrator and ConsoleOne. (NetWare 6 includes a prerelease version of iManager.)
iManager—A Web-based browser tool that will eventually provide the same management capabilities as NetWare Administrator and ConsoleOne. (NetWare 6 includes a prerelease version of iManager.)
TIP
Although iManage was the name of the product prior to Service Pack 1, the term iManager is used in both the official Novell courseware and on the certification exam.
In this lesson, we’ll learn how to use these three anytime, anywhere administration tools to break the shackles of server-based management. Now let’s start with the most robust of the three: Remote Manager.
Test Objective Covered:
![]() Use NetWare Remote Manager
Use NetWare Remote Manager
Remote Manager was known as the NetWare Management Portal in earlier versions of NetWare. I like to call it NORM (Novell Remote Manager). This is the most robust of the three anytime, anywhere management utilities offered by NetWare 6. You can use Remote Manager to monitor your server’s health, to change the configuration of your server, and to perform diagnostic and debugging tasks.
To use Remote Manager, you must meet the following minimum system requirements:
![]() Operating system—NetWare 5.1 or later.
Operating system—NetWare 5.1 or later.
![]() Browser—Remote Manager supports one of the following three browsers: Netscape 4.5 (or later), Internet Explorer 5 (or later), or the NetWare browser (available from the server console). In addition, you must have SSL (Secure Sockets Layer) enabled on your browser.
Browser—Remote Manager supports one of the following three browsers: Netscape 4.5 (or later), Internet Explorer 5 (or later), or the NetWare browser (available from the server console). In addition, you must have SSL (Secure Sockets Layer) enabled on your browser.
![]() NLMs—PORTAL.NLM and HTTPSTK.NLM. Fortunately, both of these Remote Manager NLMs are loaded by default from AUTOEXEC.NCF.
NLMs—PORTAL.NLM and HTTPSTK.NLM. Fortunately, both of these Remote Manager NLMs are loaded by default from AUTOEXEC.NCF.
To access Remote Manager from any of the browsers in the preceding list, simply enter the following in the Address field:
https://{server IP address}:2200
This URL launches the NetWare 6 Web Manager (shown in Figure 3.1). The Web Manager contains links to all of NetWare 6’s Web-enabled utilities. Next, select the server that you want to administer from the Remote Manager list. Accept the SSL certificate by choosing Yes, and log in as Admin when Remote Manager asks you to authenticate.

The NetWare 6 Remote Manager window is shown in Figure 3.2. This screen is organized into five different management frames:
![]() Health indicator frame—In the upper-left corner of the Remote Manager window is an overall server health indicator. This graphic also links you to a server-health monitoring page. The health indicator represents your server’s condition using one of four colors: green (good health), yellow (marginal health), red (requires administrator response), and black (communication with the server has been lost and it might be down).
Health indicator frame—In the upper-left corner of the Remote Manager window is an overall server health indicator. This graphic also links you to a server-health monitoring page. The health indicator represents your server’s condition using one of four colors: green (good health), yellow (marginal health), red (requires administrator response), and black (communication with the server has been lost and it might be down).
![]() Header frame—At the top center of the Remote Manager window, the header frame contains general information about the server. It also provides links to the following management pages: Volumes, Health Monitor, Configuration, and Exit.
Header frame—At the top center of the Remote Manager window, the header frame contains general information about the server. It also provides links to the following management pages: Volumes, Health Monitor, Configuration, and Exit.
![]() Navigation frame—On the left side of the Remote Manager window, the navigation frame lists general tasks that you can perform. In addition, it provides an outline form to grant quick access to specific management tasks.
Navigation frame—On the left side of the Remote Manager window, the navigation frame lists general tasks that you can perform. In addition, it provides an outline form to grant quick access to specific management tasks.
![]() Main content frame—In the center of the Remote Manager window is the main content frame. This context-sensitive frame lists details for the highlighted navigation option. The main content frame is where you’ll perform most of your advanced remote management tasks.
Main content frame—In the center of the Remote Manager window is the main content frame. This context-sensitive frame lists details for the highlighted navigation option. The main content frame is where you’ll perform most of your advanced remote management tasks.
![]() Online help frame—In the top-right corner of the Remote Manager window, you can access online help by clicking on the Novell icon.
Online help frame—In the top-right corner of the Remote Manager window, you can access online help by clicking on the Novell icon.

In this section, you’ll learn how to perform the following administration tasks by using Remote Manager:
![]() Diagnosing server problems
Diagnosing server problems
![]() Managing servers
Managing servers
![]() Managing applications
Managing applications
![]() Managing server hardware
Managing server hardware
![]() Managing eDirectory
Managing eDirectory
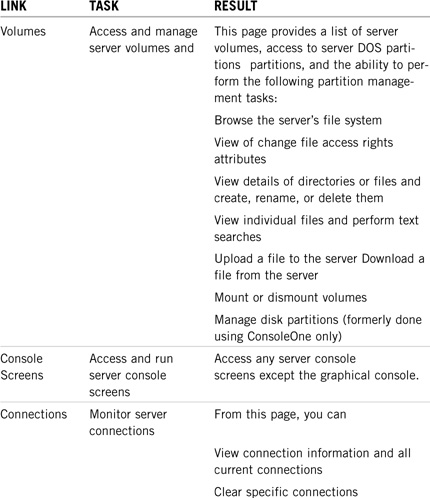
Remote Manager enables you to diagnose server problems using the Health Monitor link from the main page. Generally, Remote Manager enables you to monitor the health of servers by viewing the status for all known components, troubleshoot when server health is in question (such as red or yellow conditions on a component), and run a report comparing the configuration of two servers. Table 3.1 shows a list of the most popular server diagnostic tasks available in Remote Manager.

The primary purpose of Remote Manager is to manage NetWare servers. As you saw in Figure 3.2, the Manage Server link is the king of the hill. Within this tool, you can accomplish a variety of critical server management tasks, including accessing the file system, maintaining SET parameters, restarting the server, building server groups, accessing other servers, and monitoring NetWare licenses.
Table 3.2 lists the most popular server management tasks available in Remote Manager.


TIP
Remote Manager enables you to create server groups for efficient multiserver monitoring. By selecting the Server Group link in the navigation bar, you can scan the network and designate all or some of its servers as members of a group. After servers have been assigned to a group, you can monitor server health on the entire group of servers, rather than just one.
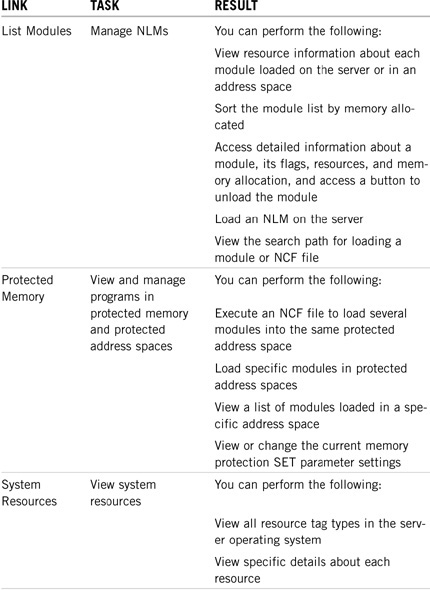
Remote Manager enables you to manage server applications using the List Modules and Protected Memory links from the main page. Table 3.3 lists the most popular application management tasks available in Remote Manager.
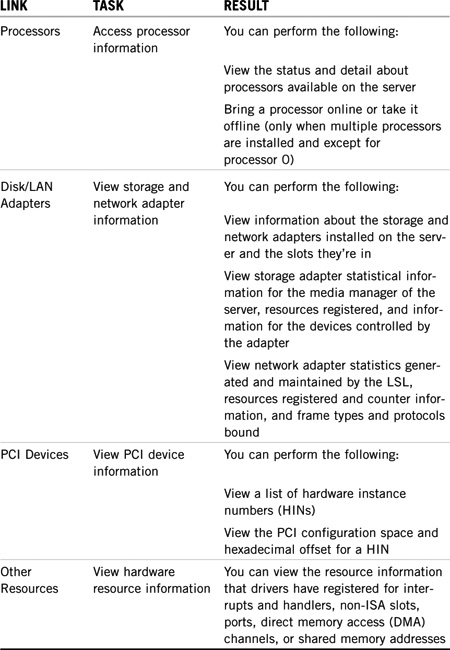
Remote Manager enables you to manage server hardware using the Processors and Disk/LAN Adapters links from the main page. Table 3.4 lists the most popular server hardware management tasks available in Remote Manager.
Remote Manager enables you to manage eDirectory remotely using the specific eDirectory links available from the main page. Table 3.5 lists the most popular eDirectory management tasks available in Remote Manager.

That completes our comprehensive lesson in NetWare 6 anytime, anywhere management with Remote Manager. This Web-based advanced administration tool enables you to remotely perform almost every task that you could if you were sitting at the server console. Now let’s continue our NetWare 6 remote management lesson with Novell’s Internet-savvy iMonitor tool.
In this lab exercise, you’ll perform these tasks:
![]() Install Remote Manager
Install Remote Manager
![]() Advanced Administration with Remote Manager
Advanced Administration with Remote Manager
In this lab exercise, you’ll need these components:
![]() LABS-SRV1 server created in Lab Exercise 2.1
LABS-SRV1 server created in Lab Exercise 2.1
![]() WHITE-SRV1 server created in Lab Exercise 2.2
WHITE-SRV1 server created in Lab Exercise 2.2
![]() Workstation running Windows 95/98 or Windows NT/2000
Workstation running Windows 95/98 or Windows NT/2000
![]() A NetWare 6 Operating System CD
A NetWare 6 Operating System CD
Perform the following tasks at the WHITE-SRV1 server console:
1. Mount the CD drive as a volume:
a. Place the NetWare 6 Operating System CD in the server’s CD drive.
b. At the server console prompt, enter CDROM.
2. On the NetWare 6 GUI screen, select Novell, Install.
3. When the Installed Products window appears, select Add.
4. When the Source Path window appears:
![]() Browse to the root of the CD.
Browse to the root of the CD.
![]() Select PRODUCT.INI.
Select PRODUCT.INI.
![]() Select OK.
Select OK.
5. When the Source Path window reappears, select OK.
6. Wait while files are copied and the Installation Wizard is installed.
7. When the Components window appears:
a. Select Clear All.
b. Mark the following check boxes:
![]() NDS iMonitor Services
NDS iMonitor Services
![]() NetWare Remote Manager
NetWare Remote Manager
![]() NetWare Web Manager
NetWare Web Manager
![]() Novell Modular Authentication Services
Novell Modular Authentication Services
![]() eDirectory iManage Service, and then select Next
eDirectory iManage Service, and then select Next
8. If prompted, authenticate to eDirectory as admin.
9. When the LDAP Configuration window appears, select Allow Clear Text Passwords, and then select Next.
10. When the eDirectory iManage Install Options window appears, select Next, Finish. Wait while files are copied.
11. When the Installation Complete window appears, select Close.
12. Restart your server.
Perform the following tasks at your administrative workstation:
1. Access Remote Manager:
a. Open Internet Explorer.
b. In the address field, enter your server’s IP address. If you’re using the IP addresses in this book, enter
https://192.168.1.81:2200
TIP
At times, various Security Alert windows might appear, indicating that you are about to view (or leave) a secure Internet connection. Select OK or Yes as appropriate.
c. When the NetWare Web Manager window appears, in the NetWare Remote Manager field, select WHITE-SRV1.
d. When the Connect To window appears, authenticate as admin (using the full distinguished name).
e. You’ll notice that you are redirected to Remote Manager’s secure port of 8009.
2. Use the server console screen to view SWAP file information and load MONITOR.NLM.
a. In the navigation frame on the left side of the screen, under Manage Server, select Console Screens.
b. In the main content frame, under Current Screens, select Console Screens.
c. When the WHITE_SRV1 - NWScreen_Applet – Microsoft Internet Explorer Window appears, select Screen List.
d. When the Select Screen to View prompt appears, view the system console by entering 1.
e. At the console prompt, enter SWAP and review the swap file information that’s displayed.
f. At the console prompt, enter MONITOR. Try various menu options to get the feel of running MONITOR via Remote Manager. When you’re done, exit the MONITOR utility.
g. At the console prompt, feel free to try other NLMs to demonstrate the functionality of running console screens via Remote Manager.
h. Close the Console Screens window.
3. View NLMs loaded on the server.
a. In the navigation frame on the left side of the screen, under Manage Applications, select List Modules.
b. When the NetWare Loadable Modules Information window appears:
![]() You’ll notice that modules can be sorted based on a particular parameter by selecting the appropriate heading.
You’ll notice that modules can be sorted based on a particular parameter by selecting the appropriate heading.
![]() To view the loaded modules that are using the most server memory, select Alloc Memory.
To view the loaded modules that are using the most server memory, select Alloc Memory.
![]() To resort loaded modules by name, select Name.
To resort loaded modules by name, select Name.
4. Use remote server access.
a. In the navigation frame on the left side of the screen, scroll down to Access Other Servers and then select Managed Server List.
b. In the main content frame, under NetWare Remote Manager Servers, select the LABS-SRV1 server.
c. If necessary, authenticate as admin.
d. Explore links on the remote server.
e. When you’re finished, in the navigation frame on the left side of the screen, under Access Other Servers, select Managed Server List.
f. In the main content frame, under NetWare Remote Manager Servers, select WHITE-SRV1.
5. View interrupts and network board information.
a. In the navigation frame on the left side of the screen, under Manage Hardware, select Other Resources, Interrupts.
b. When the Hardware Resources/Interrupts window appears in the main content frame, view the interrupt information.
c. In the navigation frame on the left side of the screen, under Manage Hardware, select Disks/LAN Adapters.
d. When the Hardware Adapters window appears in the main content frame, in the NetWare Adapters section, select the first network board in your server, and view the network board information.
6. Build a server monitoring group.
a. In the navigation frame on the left side of the screen, scroll to Use Server Groups and select Build Group.
b. When the Server Group Selection window appears in the main content frame, choose Select All.
c. In the main content frame, select Build Server Group.
d. When the Server Group Operations window appears in the main content frame, save the group to a file for later use by selecting Save Group File.
e. In the field presented, enter SYSSYSTEMMYGROUP.CFG, and then select Save.
7. Copy MYGROUP.CFG to a local drive.
TIP
You should copy your group files to your local hard drive or to a floppy disk for portability reasons. With the group config file saved on a local drive or on a floppy disk, you can access that server group (without building it again) regardless of what server you’re authenticated to.
a. When the Server Group File window appears in the main content frame, in the navigation frame on the left, under Manage Server, select Volumes.
b. When the Volume Management window appears in the main content frame, browse to SYS:SYSTEM.
c. Right-click MYGROUP.CFG and select Save Target As.
d. When the Save As dialog box appears, in the Save As Type field, select All Files, and then save MGROUP.CFG at the root of your local hard drive (for example, C:).
e. When the Download Complete dialog box appears, indicating that the download is complete, select Close.
8. Load the server group file.
a. In the navigation frame on the left side of the screen, under Use Server Groups, select Load Group File
b. When the Server Group File window appears in the main content frame, select Browse.
c. When the Choose File dialog box appears, browse to C:, select MYGROUP.CFG, and then select Open.
d. When the Server Group File window reappears in the main content frame, select Build Server Group.
e. When the Server Group Operations window appears in the main content frame, select Multiple Server Health Monitor.
f. When the Server Health Monitor window appears, view the server group monitoring page.
g. Close your browser window.
9. Explore Remote Manager from the user’s perspective.
a. Open Windows Explorer.
b. Create a USERS directory:
![]() Browse to volume SYS.
Browse to volume SYS.
![]() Create a folder named Users.
Create a folder named Users.
c. Execute ConsoleOne.
d. Create a new user called User1.
![]() Right-click the WHITE container
Right-click the WHITE container
![]() Select New, User.
Select New, User.
e. When the New User dialog box appears, enter the following information:
![]() Name: User1
Name: User1
![]() Surname: User1
Surname: User1
![]() Select Create Home Directory.
Select Create Home Directory.
![]() In the Path field, navigate to SYS:Users, and then select OK.
In the Path field, navigate to SYS:Users, and then select OK.
f. Select OK to create the User1 user.
g. When the Set Password dialog box appears
![]() In the New Password field, enter acme.
In the New Password field, enter acme.
![]() In the Confirm Password field, enter acme.
In the Confirm Password field, enter acme.
![]() Select Set Password.
Select Set Password.
h. From your workstation, open Internet Explorer and access Remote Manager.
i. When the Connect To window appears, authenticate as User1 (using the full distinguished name).
![]() Username: User1.white.crime.tokyo.acme
Username: User1.white.crime.tokyo.acme
![]() Password: acme
Password: acme
j. Notice the change in the view presented and compare the functionality of the new user to that of admin.
k. Close your browser windows.
Test Objectives Covered:
![]() Identify What iMonitor Is and How to Use It
Identify What iMonitor Is and How to Use It
![]() Use iMonitor to Diagnose and Repair eDirectory Problems
Use iMonitor to Diagnose and Repair eDirectory Problems
iMonitor is Novell’s latest anytime, anywhere server monitoring and diagnostic tool. iMonitor is affectionately known as Simon because it is launched at the NetWare 6 server console by using NDSIMON.NLM. iMonitor enables you to monitor and diagnose all servers in your eDirectory tree—regardless of platform. All you have to do is point your Web browser at the server’s 8008 port and NetWare 6 takes over from there.
In addition, iMonitor is very secure. It uses the eDirectory ACL to deliver frame tools based on the user’s administrative rights. Furthermore, iMonitor redirects HTTP communications to the secure HTTPS port 8009 after you authenticate and log in. And if you’re running eDirectory on other supported networking platforms (Windows NT/2000, Solaris, Linux, and Tru64), the default HTTP port is 80 and the secure authentication port is 81 on HTTPS.
TIP
For secure iMonitor operations on Unix platforms (such as Linux, Solaris, and Tru64), you must create a Key Material object (KMO) in the host server’s context.
To run iMonitor, you and your network must meet the following minimum requirements:
![]() Browser—iMonitor supports Internet Explorer 4 (or later), Netscape 4.06 (or later), and the NetWare browser (available from the server console).
Browser—iMonitor supports Internet Explorer 4 (or later), Netscape 4.06 (or later), and the NetWare browser (available from the server console).
![]() Platform—iMonitor can run on any of these networking platforms: NetWare 5 support pack 5 (or later), NetWare 5.1 support pack 1 (for SSL support), Windows NT/2000, Linux, Solaris, and Tru64 Unix.
Platform—iMonitor can run on any of these networking platforms: NetWare 5 support pack 5 (or later), NetWare 5.1 support pack 1 (for SSL support), Windows NT/2000, Linux, Solaris, and Tru64 Unix.
![]() eDirectory—iMonitor requires eDirectory version 8.5 (or above) on the host server. However, you can monitor all versions of eDirectory from NetWare 4.11 (or later), Windows NT/2000, and Solaris/Linux/Unix. NetWare 6 and Support Pack 1 are based on eDirectory version 8.6.
eDirectory—iMonitor requires eDirectory version 8.5 (or above) on the host server. However, you can monitor all versions of eDirectory from NetWare 4.11 (or later), Windows NT/2000, and Solaris/Linux/Unix. NetWare 6 and Support Pack 1 are based on eDirectory version 8.6.
To use iMonitor, you must first ensure that the appropriate application is running on your eDirectory server. When using NetWare, NDSIMON.NLM is automatically placed in AUTOEXEC.NCF; therefore, it is launched upon server startup. If you’re using Windows NT/2000, the iMonitor service automatically loads upon eDirectory startup. Last, but not least, Unix servers require the following manual command at the server console to activate iMonitor:
NDSIMONITOR –1
When the iMonitor application is running on your eDirectory server, it’s time to access all its great features by using a compatible Web browser. Simply enter the following URL in your browser’s address field to access the iMonitor main page:
http://{server IP address}:8008/nds-summary
For security reasons, iMonitor requires at least basic eDirectory authentication via the [Public] object. When you authenticate as [Public], the browser is redirected to secure HTTPS port 8009. For access to all iMonitor features, you must login as a user with full administrative rights.
TIP
You can also access the iMonitor main page from a link provided in the Remote Manager navigation frame.
Figure 3.3 shows the iMonitor main page. It consists of three main frames:
![]() Navigation frame—This frame sits at the top of Figure 3.3 and provides access to all of iMonitor’s feature and nonfeature-related icons.
Navigation frame—This frame sits at the top of Figure 3.3 and provides access to all of iMonitor’s feature and nonfeature-related icons.
![]() Assistant frame—On the left side of Figure 3.3, the assistant frame lists additional navigation aids that help you drill down on data in the main content frame.
Assistant frame—On the left side of Figure 3.3, the assistant frame lists additional navigation aids that help you drill down on data in the main content frame.
![]() Main content frame—On the right side of Figure 3.3 is the main content frame. This is where iMonitor lists all of your server’s monitoring and diagnostic statistics as well as additional navigation links.
Main content frame—On the right side of Figure 3.3 is the main content frame. This is where iMonitor lists all of your server’s monitoring and diagnostic statistics as well as additional navigation links.

Now let’s take a closer look at iMonitor’s two most functional frames: navigation and assistant. Simon says, “Study.”
The navigation frame is This frame at the top of every iMonitor Web page. This is your launching pad for iMonitor features. In addition, the navigation frame displays your user identity and the name of the server you’re currently monitoring.
As you saw in Figure 3.3, the navigation frame buttons are divided into two groups: the left group includes three nonfeature items (help, login/logout, and home NetWare manager) and the right group contains the seven feature-oriented buttons. Here’s a brief description of the 10 navigation frame icons:
![]() Help—Links you to a context-sensitive online help page regarding the data displayed in the main content frame.
Help—Links you to a context-sensitive online help page regarding the data displayed in the main content frame.
![]() Login/Logout—Enables you to authenticate as a different user or to close your iMonitor session. Remember that as long as any Web browser window is open, your iMonitor session remains active.
Login/Logout—Enables you to authenticate as a different user or to close your iMonitor session. Remember that as long as any Web browser window is open, your iMonitor session remains active.
![]() Home NetWare Manager—Links you back to the Remote Manager main page.
Home NetWare Manager—Links you back to the Remote Manager main page.
![]() Agent Summary—In iMonitor, the term agent refers to the DS Agent providing eDirectory services on the host server. The Agent Summary link provides a snapshot view of the health of your eDirectory servers (including synchronization information, agent process status, and the total servers known to your eDirectory database).
Agent Summary—In iMonitor, the term agent refers to the DS Agent providing eDirectory services on the host server. The Agent Summary link provides a snapshot view of the health of your eDirectory servers (including synchronization information, agent process status, and the total servers known to your eDirectory database).
![]() Agent Configuration—Provides access to the primary eDirectory monitoring and diagnostic tools. The Agent Configuration page varies depending on the version of eDirectory that you’re using. The Agent Configuration page (shown in Figure 3.4) provides these eDirectory tools:
Agent Configuration—Provides access to the primary eDirectory monitoring and diagnostic tools. The Agent Configuration page varies depending on the version of eDirectory that you’re using. The Agent Configuration page (shown in Figure 3.4) provides these eDirectory tools:

![]() Agent Information—Displays This frame This frame DS agent–specific information (including server name, IP address, time synchronization, and so on).
Agent Information—Displays This frame This frame DS agent–specific information (including server name, IP address, time synchronization, and so on).
![]() Partitions—Displays a list of existing partitions.
Partitions—Displays a list of existing partitions.
![]() Replication Filters—Displays all filtered replicas configured for this specific DS agent.
Replication Filters—Displays all filtered replicas configured for this specific DS agent.
![]() Agent Triggers—Initiates the background processes listed in the main content frame.
Agent Triggers—Initiates the background processes listed in the main content frame.
![]() Background Process Settings—Enables you to temporarily change the intervals for running background processes.
Background Process Settings—Enables you to temporarily change the intervals for running background processes.
![]() Agent Synchronization—Displays all inbound and outbound synchronization traffic for the specified DS agent.
Agent Synchronization—Displays all inbound and outbound synchronization traffic for the specified DS agent.
![]() Schema Synchronization—Displays all inbound and outbound schema synchronization traffic.
Schema Synchronization—Displays all inbound and outbound schema synchronization traffic.
![]() Database Cache—Enables you to configure and monitor the eDirectory database cache settings.
Database Cache—Enables you to configure and monitor the eDirectory database cache settings.
![]() Login Settings—Enables you to customize the time between login updates or disable the queuing of login updates.
Login Settings—Enables you to customize the time between login updates or disable the queuing of login updates.
![]() Trace Configuration—This button provides access to NetWare’s DSTRACE eDirectory debug utility. DSTRACE was originally written as a debug utility for developers and it monitors replicas as they communicate with each other on the network. You can use DSTRACE for a variety of eDirectory management tasks (as discussed in Chapter 5, “NetWare 6 eDirectory Management”).
Trace Configuration—This button provides access to NetWare’s DSTRACE eDirectory debug utility. DSTRACE was originally written as a debug utility for developers and it monitors replicas as they communicate with each other on the network. You can use DSTRACE for a variety of eDirectory management tasks (as discussed in Chapter 5, “NetWare 6 eDirectory Management”).
![]() Repair—Enables you to view problems with your eDirectory database and back up or clean them as needed. Remember that you must be logged in as Administrator (or Console Operator) to access this iMonitor tool.
Repair—Enables you to view problems with your eDirectory database and back up or clean them as needed. Remember that you must be logged in as Administrator (or Console Operator) to access this iMonitor tool.
![]() DirXML Summary—Displays monitoring statistics for the DirXML drivers running in your eDirectory tree.
DirXML Summary—Displays monitoring statistics for the DirXML drivers running in your eDirectory tree.
![]() Reports—Enables you to configure and display eDirectory and server reports. This tool also enables you to run your own customized reports. These reports are very useful when you’re preparing to run major eDirectory operations.
Reports—Enables you to configure and display eDirectory and server reports. This tool also enables you to run your own customized reports. These reports are very useful when you’re preparing to run major eDirectory operations.
![]() Search—Enables This frame you to search the eDirectory tree for objects, classes, and attributes.
Search—Enables This frame you to search the eDirectory tree for objects, classes, and attributes.
The assistant frame occupies the left side of iMonitor’s main page. This frame lists nine additional navigation aids that help you monitor and diagnose information in the Main Content frame. Furthermore, these tools are context sensitive, meaning their appearance is dictated by the state of the server you’re monitoring. A brief description of the nine assistant frame tools (displayed on the left side of Figure 3.3) follows:
![]() Agent Synchronization—Displays the number and type of replicas present on this server and the length of time that has passed since they were synchronized. In addition, you can view the number of errors for each replica type. If the Agent Synchronization Summary doesn’t appear, there are no replicas you can view based on the security level you used while entering iMonitor.
Agent Synchronization—Displays the number and type of replicas present on this server and the length of time that has passed since they were synchronized. In addition, you can view the number of errors for each replica type. If the Agent Synchronization Summary doesn’t appear, there are no replicas you can view based on the security level you used while entering iMonitor.
![]() Known Servers—Displays a list of servers present in the eDirectory database hosted by the iMonitor server. You can further filter this list by showing all servers in the eDirectory or only the servers in a given replica ring.
Known Servers—Displays a list of servers present in the eDirectory database hosted by the iMonitor server. You can further filter this list by showing all servers in the eDirectory or only the servers in a given replica ring.
![]() Schema—Displays a list of attribute and class definitions for the eDirectory schema.
Schema—Displays a list of attribute and class definitions for the eDirectory schema.
![]() Agent Configuration—Displays the Agent Configuration page shown in Figure 3.4.
Agent Configuration—Displays the Agent Configuration page shown in Figure 3.4.
![]() Trace Configuration—Provides access to the Novell DSTRACE eDirectory debug utility by using the same link as the Trace Configuration button in the Navigation frame.
Trace Configuration—Provides access to the Novell DSTRACE eDirectory debug utility by using the same link as the Trace Configuration button in the Navigation frame.
![]() Agent Health—Displays a general summary of your server’s health. See Figure 3.5 for more information.
Agent Health—Displays a general summary of your server’s health. See Figure 3.5 for more information.

![]() Agent Process Status—Displays one or more of the following background process status errors: schema synchronization (this process synchronizes modifications made to schema data among all replicas in eDirectory), obituary processing (this process uses ID numbers to ensure that name collisions do not occur during eDirectory operations), external reference/DRL (this process ensures that each external reference is accurate), limber (this process ensures that all server information is correct), and repair (this process removes a corrupted database and regenerates it based on the master replica).
Agent Process Status—Displays one or more of the following background process status errors: schema synchronization (this process synchronizes modifications made to schema data among all replicas in eDirectory), obituary processing (this process uses ID numbers to ensure that name collisions do not occur during eDirectory operations), external reference/DRL (this process ensures that each external reference is accurate), limber (this process ensures that all server information is correct), and repair (this process removes a corrupted database and regenerates it based on the master replica).
![]() Agent Activity—Displays eDirectory traffic patterns, verbs, and requests to help you identity potential system bottlenecks. In addition, the Agent Activity assistant enables you to identify which requests are attempting to obtain Data InfoBase (DIB) locks.
Agent Activity—Displays eDirectory traffic patterns, verbs, and requests to help you identity potential system bottlenecks. In addition, the Agent Activity assistant enables you to identify which requests are attempting to obtain Data InfoBase (DIB) locks.
![]() Error Index—Displays information about all errors found on eDirectory servers. Each error listed is linked to a description that contains an explanation, possible cause, and troubleshooting scenarios.
Error Index—Displays information about all errors found on eDirectory servers. Each error listed is linked to a description that contains an explanation, possible cause, and troubleshooting scenarios.
That completes our lesson in NetWare 6 anytime, anywhere server monitoring via iMonitor. This Web browser tool provides you with a central portal for some of NetWare 6’s most advanced server and eDirectory management tools, including DSTRACE, DSREPAIR, agent configuration, and the Novell Support Connection. Believe it or not, iMonitor is only the beginning. The real future of NetWare 6 advanced administration lies in a tool called iManager.
Simon says, “Use iManager!”
iManage; therefore, I am.
Welcome to the future of Novell management. iManager is an anytime, anywhere advanced administration utility that enables you to perform almost all the eDirectory management tasks typically handled by NetWare Administrator and/or ConsoleOne. iManager is platform independent and Web browser–based. Furthermore, iManager enables you to customize its capabilities based on preassigned or customized admin roles.
With iManager, the future is now. To run iManager, you must meet the following minimum system requirements:
![]() Browser—iManager supports Internet Explorer 5 service pack 2 (or later) and Netscape 4.6 (or later).
Browser—iManager supports Internet Explorer 5 service pack 2 (or later) and Netscape 4.6 (or later).
![]() Platform—iManager runs on these network platforms: NetWare 5 support pack 4 (or later), NetWare 5.1 (for secure SSL support), and NetWare 6.
Platform—iManager runs on these network platforms: NetWare 5 support pack 4 (or later), NetWare 5.1 (for secure SSL support), and NetWare 6.
![]() eDirectory—iManager requires eDirectory version 8.5 (or later).
eDirectory—iManager requires eDirectory version 8.5 (or later).
You can access iManager from the NetWare 6 Web Manager portal (shown in Figure 3.1). To access this page from a compatible browser, enter HTTPS://{server IP address}:2200 in the Address field.
The iManager Main Page (shown in Figure 3.6) consists of the following three functional frames:
![]() Header frame—Occupies the top center of Figure 3.6. The header frame contains the following five buttons: Home (returns to the iManager home page), Exit (closes your iManager session and returns you to the iManager login page), Roles and Tasks (displays the roles and tasks that you’ve been assigned, and controls the links provided in the navigation frame), Configure (enables you to set up RBS, manage administrative roles, and modify the owners of the rbsCollection container), and Help (provides access to general iManager online help).
Header frame—Occupies the top center of Figure 3.6. The header frame contains the following five buttons: Home (returns to the iManager home page), Exit (closes your iManager session and returns you to the iManager login page), Roles and Tasks (displays the roles and tasks that you’ve been assigned, and controls the links provided in the navigation frame), Configure (enables you to set up RBS, manage administrative roles, and modify the owners of the rbsCollection container), and Help (provides access to general iManager online help).
![]() Navigation frame—Occupies the left side of Figure 3.6. The navigation frame contains links that pertain to the button chosen in the header frame. In Figure 3.6, for example, the Roles and Tasks button displays the following navigation links: DHCP management, DNS management, eDirectory administration, iPrint management, and license management.
Navigation frame—Occupies the left side of Figure 3.6. The navigation frame contains links that pertain to the button chosen in the header frame. In Figure 3.6, for example, the Roles and Tasks button displays the following navigation links: DHCP management, DNS management, eDirectory administration, iPrint management, and license management.
![]() Main content frame—Occupies the right side of Figure 3.6. The main content frame is your advanced administration playground for eDirectory and server management.
Main content frame—Occupies the right side of Figure 3.6. The main content frame is your advanced administration playground for eDirectory and server management.

iManager depends on administrative roles to customize its interface. Furthermore, this facility is controlled by a new eDirectory feature called Role-Based Services (RBS). To prepare iManager for role-based administration, you must first accomplish these two configuration steps:
Let’s take a closer look at these two steps and learn how to configure iManager for role-based administration. Remember that the future is now.
iManager uses RBS to control administrative access to eDirectory and server functions. RBS is a special extension of the eDirectory schema that occurs automatically when you install NetWare 6. However, if you want to use iManager on an existing NetWare 5.x server, you must first extend the eDirectory schema to support RBS.
The first task in configuring RBS is to extend the eDirectory Schema (this is done automatically during NetWare 6 installation). This Schema extension modifies eDirectory to support six new RBS objects (as shown in Figure 3.7).

To extend an existing NetWare 5.x eDirectory schema for RBS, launch iManager and authenticate as the admin user. From the Header frame, select Configure and from the Navigation frame, select Extend Schema from under the Role-Based Services setup link. At this point, iManager will automatically extend the schema for RBS. When the confirmation message appears, select OK to complete the extension.
The new extended eDirectory supports six objects for RBS. The following is an explanation of the function of each of these new RBS objects (shown in Figure 3.7):
![]() rbsCollection—This eDirectory container object holds all iManager RBS objects. Therefore, this container should be located at the highest possible point in the tree. By default, this container is named Role-Based Services. However, you can change the name during NetWare 6 installation or during the NetWare 5.x schema extension we just performed.
rbsCollection—This eDirectory container object holds all iManager RBS objects. Therefore, this container should be located at the highest possible point in the tree. By default, this container is named Role-Based Services. However, you can change the name during NetWare 6 installation or during the NetWare 5.x schema extension we just performed.
TIP
Only one rbsCollection container should be created per wide-area network (WAN) link because role assignments across WAN links create considerable bandwidth overhead. Furthermore, administrative users should be assigned to administrative roles that are stored in the rbsCollection container that’s geographically closest to them.
![]() rbsRole—There is an rbsRole object for each administrative role added to eDirectory. The rbsRole object is also a container, stored in the rbsCollection container, and it holds the rbsScope object.
rbsRole—There is an rbsRole object for each administrative role added to eDirectory. The rbsRole object is also a container, stored in the rbsCollection container, and it holds the rbsScope object.
![]() rbsScope—The rbsScope object is created and deleted dynamically by iManager. It describes how administrative role privileges will flow through the eDirectory tree. In summary, the rbsScope defines which portion of the tree a particular rbsRole can manage. Although this object appears in the tree, you should not modify it.
rbsScope—The rbsScope object is created and deleted dynamically by iManager. It describes how administrative role privileges will flow through the eDirectory tree. In summary, the rbsScope defines which portion of the tree a particular rbsRole can manage. Although this object appears in the tree, you should not modify it.
![]() rbsModule—The rbsModule object is also a container, stored in the rbsCollection container, and it holds two RBS objects: rbsTask and rbsBook.
rbsModule—The rbsModule object is also a container, stored in the rbsCollection container, and it holds two RBS objects: rbsTask and rbsBook.
![]() rbsTask—Each administrative role is made up of several tasks, and each task is represented by an rbsTask object. As a result, iManager task information is stored in eDirectory and is easily distributed.
rbsTask—Each administrative role is made up of several tasks, and each task is represented by an rbsTask object. As a result, iManager task information is stored in eDirectory and is easily distributed.
![]() rbsBook—The rbsBook object is a central administrative catalog for all roles and tasks assigned to a given user. Each rbsBook object is made up of several task pages that allow users to perform all assigned roles and tasks from one central place.
rbsBook—The rbsBook object is a central administrative catalog for all roles and tasks assigned to a given user. Each rbsBook object is made up of several task pages that allow users to perform all assigned roles and tasks from one central place.
The second task is configuring RBS is to create the rbsCollection container. This will become the top level of your administrative hierarchy. From the iManager Configure page, select the Role-Based Service Setup link and choose Create rbsCollection. In the Name field, enter the name of the rbsCollection container. Remember that by default, it’s called Role-Based Service. You might want to consider something more descriptive, such as RBS_WHITE. This naming syntax will enable you to track the host container for the beginning of RBS administrative hierarchy.
Next, in the Container field, browse to and select the container where you would like it to be created. In our example, that would be the WHITE container. Create the container by selecting OK. When the object has been created, select OK to complete the rbsCollection creation process.
After you’ve created the rbsCollection container, you must choose which administrative roles or plug-ins it will support. From the iManager Configure page, select the Role-Based Services Setup link and choose Install Plug-In. Next, choose from a list of five different administrative role categories: DHCP, DNS, eDirectory, iPrint, and Licensing.
Now let’s learn how to assign these new roles to administrative users. That’s step 2 of iManager configuration.
The Roles and Tasks button in the iManager header frame provides access to five administrative roles links in the navigation frame. These five links hold seven default iManager roles. These seven roles are the cornerstone of Novell’s new anytime, anywhere advanced administration strategy: DHCP Management, DNS Management, eDirectory Container, eDirectory Group, eDirectory User, iPrint Management, and Licensing.
Let’s take a moment to explore the five iManager role categories listed on the left side of Figure 3.6:
We’ll discuss these categories in alphabetical order, as they are listed in the iManager navigation frame.
iManager supports extensive DHCP configuration capabilities by using the DHCP Management role. With this role, you can accomplish these DHCP management tasks:
![]() DNS/DHCP scope settings—Create the DNS/DHCP Locator object and the administrative scope.
DNS/DHCP scope settings—Create the DNS/DHCP Locator object and the administrative scope.
![]() Global DHCP configuration—Set global DHCP preferences and import/export a DHCP configuration.
Global DHCP configuration—Set global DHCP preferences and import/export a DHCP configuration.
![]() DHCP server management—Create, delete, and modify the DHCP Server object. You can also view the DHCP audit/event logs and start or stop DHCP services at the server level.
DHCP server management—Create, delete, and modify the DHCP Server object. You can also view the DHCP audit/event logs and start or stop DHCP services at the server level.
![]() Subnet pool management—Create, delete, and modify the Subnet Pool object.
Subnet pool management—Create, delete, and modify the Subnet Pool object.
![]() Subnet management—Create, delete, and modify the Subnet object.
Subnet management—Create, delete, and modify the Subnet object.
![]() Address range management—Create, delete, and modify the SAR (Subnet Address Range) object.
Address range management—Create, delete, and modify the SAR (Subnet Address Range) object.
![]() IP address management—Create, delete, and modify IP addresses.
IP address management—Create, delete, and modify IP addresses.
iManager enables you to perform a number of DNS configuration tasks by using the DNS Management role. The following is a brief description of the DNS tasks you can perform by using this iManager role:
![]() DNS/DHCP scope settings—Just as with the DHCP Management role, you can create the DNS/DHCP Locator object and the administrative scope.
DNS/DHCP scope settings—Just as with the DHCP Management role, you can create the DNS/DHCP Locator object and the administrative scope.
![]() DNS server management—You can create, delete, and modify the DNS Server object. In addition, you can import zone master files to eDirectory and export eDirectory data in to a master file. Finally, the DNS management role enables you to start and stop DNS services using iManager.
DNS server management—You can create, delete, and modify the DNS Server object. In addition, you can import zone master files to eDirectory and export eDirectory data in to a master file. Finally, the DNS management role enables you to start and stop DNS services using iManager.
![]() Zone management—You can create, delete, and modify forward or reverse Zone objects.
Zone management—You can create, delete, and modify forward or reverse Zone objects.
![]() Resource record management—You can create, delete, and modify RRSet objects.
Resource record management—You can create, delete, and modify RRSet objects.
TIP
For more information regarding NetWare 6 DNS/DHCP management, refer to Chapter 6, “NetWare 6 IP Services.”
RBS supports three eDirectory management roles that you can use to customize iManager administration. Here’s a brief description of each of these eDirectory roles:
![]() Container management—This eDirectory role enables users to create Organization and Organizational Unit containers in the eDirectory tree.
Container management—This eDirectory role enables users to create Organization and Organizational Unit containers in the eDirectory tree.
![]() Group management—This eDirectory role enables users to create Group objects in the eDirectory tree. Fortunately, this role does not allow users to modify existing Group objects.
Group management—This eDirectory role enables users to create Group objects in the eDirectory tree. Fortunately, this role does not allow users to modify existing Group objects.
![]() User management—This eDirectory role enables users to create other User objects in the eDirectory tree. Fortunately, this role does not allow users to modify existing User objects.
User management—This eDirectory role enables users to create other User objects in the eDirectory tree. Fortunately, this role does not allow users to modify existing User objects.
The iPrint management role in iManager enables you to perform nine tasks: create printer; create manager; create broker; delete NDPS object; enable iPrint access; manage printer; manage print service manager; manage broker; and remote print manager configuration. For more information about iPrint, see Chapter 6, “NetWare 6 IP Services.”
The Licensing role in iManager enables you to perform four tasks:
![]() Install license—Enables users to add licenses to those areas of the tree for which they have administrative privileges.
Install license—Enables users to add licenses to those areas of the tree for which they have administrative privileges.
![]() Move license—Enables users to move licenses from one context or container to another.
Move license—Enables users to move licenses from one context or container to another.
![]() Delete license—Enables users to remove licenses from the tree. This is a particularly dangerous task because it has far-reaching implications.
Delete license—Enables users to remove licenses from the tree. This is a particularly dangerous task because it has far-reaching implications.
![]() Manage license properties—Enables users to view the number of installed licenses, monitor the licenses in use, determine when licenses were installed, and revoke license allocation to users who do not need network access. This is also a very dangerous capability if abused.
Manage license properties—Enables users to view the number of installed licenses, monitor the licenses in use, determine when licenses were installed, and revoke license allocation to users who do not need network access. This is also a very dangerous capability if abused.
To assign any of these iManager roles to administrative users, select Configure from the header frame in iManager. Next, expand the Role Management link in the navigation frame and choose Modify Role. The Modify Role window should appear in the main content frame (as shown in Figure 3.8). Choose a particular administrative role and select the Members icon. Then, in the Object name field, browse to and select an administrative user. Then choose Add. Mark the box next to the Administrative User object.
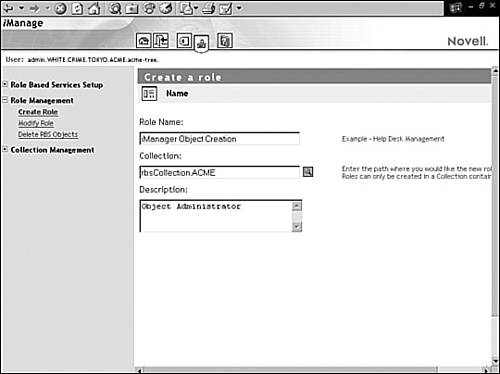
Next, in the Name field, browse to and select the user you’ll be assigning roles to. Then choose Add. Finally, in the Scope field, browse to and select the container where you want this administrative user to perform this role. Then choose Add. When the role assignment has been made, you can complete the process by clicking OK.
Congratulations! You’ve successfully traversed NetWare 6’s hot new anytime, anywhere advanced administration utilities. In this lesson, you learned all about Remote Manager (previously the NetWare Management Portal), iMonitor (affectionately known as Simon), and iManager (the future of Novell management). Now you’re well armed to tackle even the most perplexing advanced administration tasks. Be very careful how you wield such power.
Now let’s put our newly acquired skills to the ultimate test by configuring NetWare 6 DNS/DHCP services. This is where the rubber literally meets the information superhighway.
In this lab exercise, you’ll perform these tasks:
![]() Monitor with iMonitor
Monitor with iMonitor
![]() Create Users with iManager
Create Users with iManager
![]() Create Roles with iManager
Create Roles with iManager
In this lab exercise, you’ll need these components:
![]() WHITE-SRV1 server created in Lab Exercise 2-2
WHITE-SRV1 server created in Lab Exercise 2-2
![]() Workstation running Windows 95/98 or Windows NT/2000
Workstation running Windows 95/98 or Windows NT/2000
![]() A NetWare 6 Operating System CD
A NetWare 6 Operating System CD
Perform the following tasks at your administrative workstation.
1. Verify that NDSIMON.NLM is loaded on your server.
a. Open Internet Explorer.
b. In the address field, enter your server’s IP address. If you’re using the IP addresses in this book, enter
https://192.168.1.81:2200
c. When the NetWare Web Manager window appears, in the NetWare Remote Manager field, select WHITE-SRV1.
d. When the Connect To window appears, authenticate as Admin (using the full distinguished name).
e. In the navigation frame on the left side of the screen, under Manage Server, select Console Screens.
f. In the main content frame, under Current Screens, select Console Screens.
TIP
If an error occurs indicating that the page cannot be displayed, click the >> button near the top left of the screen until the console prompt appears.
g. When the WHITE_SRV1 - NWScreen_Applet – Microsoft Internet Explorer Window appears, select Screen List.
h. When the Select Screen to View prompt appears, view the system console by entering 1 and pressing the Enter key.
i. From your console screen applet, enter EDIT AUTOEXEC.NCF.
j. Scroll down and verify that NDSIMON.NLM is present in the file and that it has not been commented out.
k. Close the Console Screen applet.
2. To launch iMonitor, in the navigation frame on the left side of the screen, scroll to Manage eDirectory and then select NDS iMonitor.
3. Use the iMonitor TRACE feature.
a. When the Agent Summary window appears, select Trace Configuration from the Assistant (left frame).
b. When the Trace Configuration page appears, in the DSTrace Options field and in addition to those tasks already selected, select the following:
![]() NCP Client
NCP Client
![]() Streams
Streams
c. From the top of the Trace Configuration page, select Submit.
d. In the Trace History field, select the View icon (magnifying glass).
e. Scroll down to the bottom of the DSTRACE output.
TIP
Because your home network has no production activity, DSTRACE output is limited in its usefulness. However, in a true production environment, DSTRACE is a valuable tool.
4. Use iMonitor to determine whether replicas are synchronized:
a. From the Assistant frame on the left side of the screen, select Agent Health.
b. In the Health Check field, select Partition/Replication.
c. In the Health Check: Partition field, select Replica Synchronization.
d. Note the Partition Synchronization Status and the Replica Status.
5. Use iMonitor to view eDirectory background process schedules and run DSREPAIR.
a. From the navigation frame (top of the page), select the Repair icon (the wrench icon).
b. In the NDS Repair Switches section, select Run in Unattended Mode.
c. Select Start Repair and wait a few seconds while DSREPAIR runs.
d. Select the browser’s Refresh option.
e. Under Downloads at the top of the assistant frame on the left side of the screen, select DSREPAIR.HTM.
f. View the DSREPAIR log file, and then close your browser.
Perform the following tasks at your administrative workstation:
1. Open NetWare 6 Web Manager.
a. Open Internet Explorer.
b. In the address field, enter your server’s IP address. If you’re using the IP addresses in this book, enter
https://192.168.1.81:2200
c. When the NetWare Web Manager window appears, in the eDirectory iManage field, select WHITE-SRV1.
2. When the Login screen appears, authenticate as Admin.
3. In the Navigation frame along the top of the screen, verify that the Roles and Tasks icon is selected.
4. In the left frame, expand eDirectory Administration, and then select Create Object.
5. In the Available Classes field, select User, and then select Next.
6. In the Create User section, provide the following:
a. In the UserName field, enter User2.
b. In the Last Name field, enter User2.
c. In the context field, browse to the WHITE container.
d. Select OK to select the WHITE container.
7. When a message appears indicating that the new user has been created, select OK.
Perform the following tasks at your administrative workstation:
1. Create an administration role.
a. In the header frame along the top of the screen, select the Configure icon (person sitting at desk).
b. In the left frame, expand Role Management.
c. Select Create Role.
d. In the Role Name field, enter iManager Object Creation.
e. To the right of the Search field, select the Search icon (magnifying glass).
f. In the Start Search In field, enter ACME, and then select Search.
g. In the Results field, select the Role Based Service.ACME object.
h. The Create a Role section will reappear in the main content frame. In the Description field, enter Object Administrator and then select Next (lower-right corner).
i. When the Tasks section appears in the main content frame
![]() In the All Tasks field, select Create Objects.
In the All Tasks field, select Create Objects.
![]() Select the arrow pointing toward the Assigned Tasks field.
Select the arrow pointing toward the Assigned Tasks field.
![]() Select Next.
Select Next.
j. When the Associate Object section appears in the main content frame, in the Object Name field, browse to User2 (which is located in White.Crime.Tokyo.ACME), and then select OK (upper-right corner).
k. When the Associate Objects section reappears in the main content frame, select Add, and then select Next.
l. When the Set Scope section appears in the main content field:
![]() Mark the check box next to User2.WHITE.CRIME.TOKYO.acme.
Mark the check box next to User2.WHITE.CRIME.TOKYO.acme.
![]() In the Scope Name field, browse to the WHITE container, select Add, and then select Next.
In the Scope Name field, browse to the WHITE container, select Add, and then select Next.
m. When the Summary section appears in the main content frame, note the summary information and then select Done.
n. In the header frame on the top of the screen, select the Exit icon (open door).
o. If an Autocomplete dialog box appears, select No.
p. When the Login window appears, in the Login field, enter User2, and then select Login.
q. In the left frame, expand iManager Object Creation and note that you can only create objects.
r. In the header frame along the top of the screen, select Exit and then log in as Admin.
2. Modify an existing iManager administrative role.
a. In the header frame along the top of the screen, select Configure.
b. In the left frame, expand Role Management.
c. Select Modify Role. In the right frame, a list of installed roles and tasks will appear.
d. Scroll to the iManager Object Creation.Role-Based Service.ACME field, and select the first Tasks icon (magnifying glass).
e. When the Modify Tasks section appears, in the All Tasks field, select Delete Objects; next, select the arrow pointing toward the Assigned Tasks field; then select OK. This gives all members of the Object Administrator role the ability to add and remove objects.
f. In the header frame at the top of the screen, select Exit.
g. When the Login screen appears, authenticate as User2 (no password).
h. In the left frame, expand iManager Object Creation and note that this user can create and delete objects.
i. In the header frame at top of the screen, select Exit.
In addition to the traditional file system, NetWare 6 includes a powerful new high-performance file storage and access technology known as Novell Storage Services (NSS). NSS is the default storage and file system for NetWare 6. It is used to create, store, and maintain both traditional and NSS volumes, and is compatible with DOS, Macintosh, Unix, and long name spaces. As a network administrator, you must be well versed in both traditional and NSS file-system management.
In the following three sections of this chapter, you’ll learn how to manage NetWare 6 NSS with the help of the following lessons:
![]() Understanding NSS—NSS is a 64-bit file storage system that provides NetWare 6 networks with larger storage capacity, more efficient file management, and faster volume-mounting speeds. NSS architecture is much more complex than the traditional file system. It relies on the following five different hierarchical components: storage devices, storage deposits, partitions, storage pools, and volumes. In the first NSS lesson, we’ll explore this complex architecture in detail.
Understanding NSS—NSS is a 64-bit file storage system that provides NetWare 6 networks with larger storage capacity, more efficient file management, and faster volume-mounting speeds. NSS architecture is much more complex than the traditional file system. It relies on the following five different hierarchical components: storage devices, storage deposits, partitions, storage pools, and volumes. In the first NSS lesson, we’ll explore this complex architecture in detail.
![]() Configuring NSS—Although NSS is installed and configured, by default, during NetWare 6 installation, you might have to configure specific features after installation. NSS configuration is actually simpler than its architecture suggests. In the second NSS lesson, you’ll learn how to prepare the file system for NSS, how to create NSS volumes, and how to create traditional NetWare volumes.
Configuring NSS—Although NSS is installed and configured, by default, during NetWare 6 installation, you might have to configure specific features after installation. NSS configuration is actually simpler than its architecture suggests. In the second NSS lesson, you’ll learn how to prepare the file system for NSS, how to create NSS volumes, and how to create traditional NetWare volumes.
![]() Managing NSS—After you’ve configured NSS and created one or more NSS volumes, you can take advantage of the new NSS file system. Of course, this means that you’ll have to become an NSS management pro. In the third and final NSS lesson of this chapter, we’ll explore file-management tasks and volume-management tasks.
Managing NSS—After you’ve configured NSS and created one or more NSS volumes, you can take advantage of the new NSS file system. Of course, this means that you’ll have to become an NSS management pro. In the third and final NSS lesson of this chapter, we’ll explore file-management tasks and volume-management tasks.
Now let’s explore Novell’s twenty-first–century file system, starting with the basic architecture.
Test Objective Covered:
![]() Set Up and Configure NSS
Set Up and Configure NSS
As network users and applications have become more sophisticated in the twenty-first century, so has their insatiable appetite for storage. One of the greatest demands you’ll face is the need for more storage, larger files, more efficient file management, and faster volume mounting speeds. NSS is the answer.
NSS is a 64-bit file storage system that enables you to configure, mount, and maintain large volumes. NSS is best suited for networks that need to store and maintain large volumes, numerous files, or large databases. Does that sound like your network?
In this first lesson, we’ll explore the sophisticated NSS architecture. But before we dive into the NSS architecture, let’s summarize the differences between NetWare 6 NSS and the traditional file system.
NSS is an extension of the traditional NetWare file system. In NSS, storage devices are organized into storage deposits, and partitions are organized into storage pools. Table 3.6 compares key NSS improvements to NetWare’s traditional file system.

Unfortunately, there’s a downside to this wonderful NSS story. With all its power, NSS does not support the following two features:
![]() Block suballocation
Block suballocation
![]() Auditing
Auditing
Despite these current limitations, you’ll want to use NSS as your primary (and maybe exclusive) file system in NetWare 6. NSS provides you with the advances of high storage capacity and increased data access performance.
NSS is designed to make use of storage space regardless of its location. To accomplish this, Novell has added additional abstraction layers to file system management. As shown in Figure 3.9, the primary architecture differences between NSS and the traditional file system focus on two abstraction layers: storage deposits and storage pools. NSS also supports logical volumes that enable you to add storage devices to your system without having to create new volumes. NSS architecture consists of five interface layers that work together to present multiple storage devices as a single, cohesive file system to users. The five layers are illustrated in Figure 3.9 and described in the following list:
![]() Storage devices—NSS storage devices are simply hardware components that store NetWare data as electronic bits. Storage devices include hard drives, CD-ROM drives, and offline storage media (such as tape devices). The beauty of NSS is that storage devices are organized independently from volumes, and can therefore be added and removed from your network without adversely affecting volume architecture. Of course, data files that reside on storage devices that have been removed are no longer available to users.
Storage devices—NSS storage devices are simply hardware components that store NetWare data as electronic bits. Storage devices include hard drives, CD-ROM drives, and offline storage media (such as tape devices). The beauty of NSS is that storage devices are organized independently from volumes, and can therefore be added and removed from your network without adversely affecting volume architecture. Of course, data files that reside on storage devices that have been removed are no longer available to users.
![]() Storage deposits—Storage deposits are effectively free space. NSS gathers free space from unpartitioned areas of storage devices or available free space inside existing NetWare volumes. When NSS removes free space from a NetWare volume, the traditional file system acknowledges the reduction in free space and identifies the storage deposit as a file. Storage deposits are further organized into partitions.
Storage deposits—Storage deposits are effectively free space. NSS gathers free space from unpartitioned areas of storage devices or available free space inside existing NetWare volumes. When NSS removes free space from a NetWare volume, the traditional file system acknowledges the reduction in free space and identifies the storage deposit as a file. Storage deposits are further organized into partitions.
![]() Partitions—Partitions are pieces of storage deposits that have been configured for a specific operating system. In the case of NSS, partitions are typically configured for NetWare. Partitions are further organized into NSS storage pools.
Partitions—Partitions are pieces of storage deposits that have been configured for a specific operating system. In the case of NSS, partitions are typically configured for NetWare. Partitions are further organized into NSS storage pools.
![]() Storage pools—A storage pool is a specific amount of file system space that is obtained from one or more storage devices. Storage pools are created after partitions but before NSS logical volumes. After a pool has been created, you can add storage devices to your server without affecting the volume hierarchy. Storage pools are the primary logical abstraction layer between NetWare volumes and multiple storage devices. Storage pools are further organized into volumes.
Storage pools—A storage pool is a specific amount of file system space that is obtained from one or more storage devices. Storage pools are created after partitions but before NSS logical volumes. After a pool has been created, you can add storage devices to your server without affecting the volume hierarchy. Storage pools are the primary logical abstraction layer between NetWare volumes and multiple storage devices. Storage pools are further organized into volumes.
![]() Volumes—NSS supports three types of volumes: logical volumes, traditional volumes, and read-only volumes. Logical volumes are new to NetWare 6. They’re subsets of NSS storage pools that can be set to a specific size or allowed to grow dynamically according to the amount of physical space that you have in your pool. A single volume cannot be larger than its host storage pool because all NSS logical volumes must reside in a single pool. By default, NetWare 6 creates a storage pool named SYS and an equally sized logical volume named SYS:. Traditional volumes are also supported in NetWare 6, but do not reference storage pools. Instead, traditional volumes must be created directly as subsets of partitions, as shown in Figure 3.9. Read-only volumes are physical file system objects that reference CD-ROM storage devices. The cool thing about NSS is that it supports multiple volume types simultaneously.
Volumes—NSS supports three types of volumes: logical volumes, traditional volumes, and read-only volumes. Logical volumes are new to NetWare 6. They’re subsets of NSS storage pools that can be set to a specific size or allowed to grow dynamically according to the amount of physical space that you have in your pool. A single volume cannot be larger than its host storage pool because all NSS logical volumes must reside in a single pool. By default, NetWare 6 creates a storage pool named SYS and an equally sized logical volume named SYS:. Traditional volumes are also supported in NetWare 6, but do not reference storage pools. Instead, traditional volumes must be created directly as subsets of partitions, as shown in Figure 3.9. Read-only volumes are physical file system objects that reference CD-ROM storage devices. The cool thing about NSS is that it supports multiple volume types simultaneously.
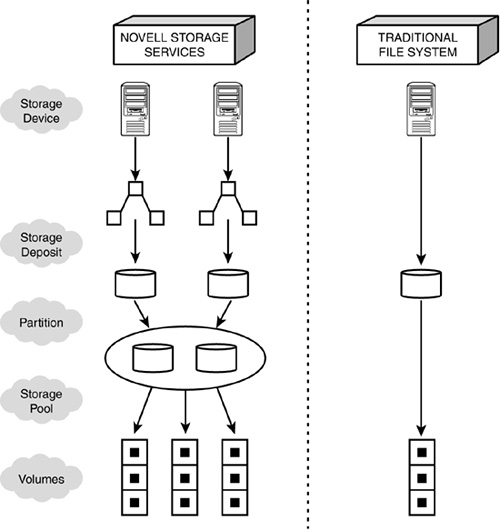
Clearly, NSS is much more complex than the traditional file system. The good news is that most of its architecture is transparent to users. The storage pool layer enables you to add and subtract storage devices without affecting the file system hierarchy. This is a critical improvement over the fixed architecture found in earlier versions of NetWare.
This completes our lesson in the basic architecture of NSS. As you’ve learned, this new storage technology is a huge improvement over the traditional NetWare file system. The good news is that most of this sophistication is transparent to users. The bad news is that network administrators must learn much more about how to configure and manage this new architecture. Fortunately, that’s the subject of our next lesson.
Test Objective Covered:
![]() Set Up and Configure NSS (continued)
Set Up and Configure NSS (continued)
Configuring Novell Storage Services (NSS) is much simpler than its architecture suggests. All you have to do is design the NSS volume to identify its intended purpose and then create it. Well...it’s not actually that easy. In fact, before you can create an NSS volume, you must first create a partition and a storage pool. It’s a three-step process, as you’ll learn in just a moment.
Although NSS is installed and configured by default during NetWare 6 installation, you may end up configuring additional volumes after the fact. You should follow the same general planning strategies for NSS volumes that apply to creating traditional volumes. In this lesson, we’ll explore the three steps necessary to configure NSS volumes. In addition, you’ll learn how to configure traditional volumes, how to convert traditional volumes to NSS, and how to install software RAID using NSS. In summary, the four sections of this lesson are
![]() “NSS Preparation”
“NSS Preparation”
![]() “NSS Volume Configuration”
“NSS Volume Configuration”
![]() “Traditional Volume Configuration”
“Traditional Volume Configuration”
![]() “NSS Software RAID Configuration”
“NSS Software RAID Configuration”
Before you can configure NSS partitions, storage pools, and volumes, you must ensure that your server meets these minimum system requirements:
![]() A server running NetWare 6
A server running NetWare 6
![]() At least 10MB of free space to create an NSS storage pool and logical volume
At least 10MB of free space to create an NSS storage pool and logical volume
![]() Sixty percent of server cache buffers available
Sixty percent of server cache buffers available
Of all these NSS system requirements, server cache buffers are the trickiest. By default, NSS uses 60% of the server’s cache buffers to temporarily store data files in RAM. By default, each cache buffer consumes 4KB of server memory.
The good news is you can change the NSS cache buffer allocation at any time by using either integers (with a range from 256 to 1,048,576 cache buffers) or percentages (calculated as a percentage of server cache buffers). You should adjust your NSS cache buffer allocation according to the number of NSS volumes on your server. If most volumes on the server are NSS volumes, consider allocating a larger cache buffer pool—say 80%. Doing so optimizes server performance and leaves sufficient cache buffers available for non-NSS tasks.
As a network administrator, you can configure NSS cache buffer allocation in one of three ways:
![]() MONITOR—You can use the MONITOR server utility as shown in Figure 3.10 to configure the NSS cache buffer allocation. Simply choose Server Parameters and Novell Storage Services. The Cache Buffer Allocation parameter will then appear.
MONITOR—You can use the MONITOR server utility as shown in Figure 3.10 to configure the NSS cache buffer allocation. Simply choose Server Parameters and Novell Storage Services. The Cache Buffer Allocation parameter will then appear.
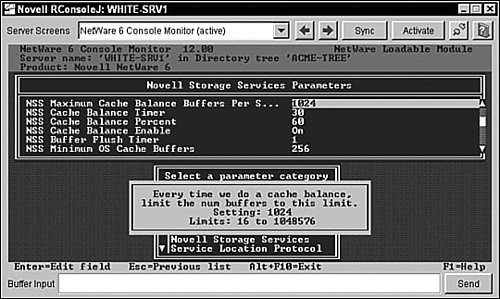
![]() NSS console commands—You can use the following NSS console commands to allocate NSS cache buffers at the server console:
NSS console commands—You can use the following NSS console commands to allocate NSS cache buffers at the server console:
NSS /MinBufferCacheSize={value}
NSS /CacheBalance={value}
The minimum buffer cache size range is from 256 to 1,048,576. The cache balance range is from 1% to 99%.
![]() SET console commands—You can use the following SET console commands to allocate NSS cache buffers at the server console:
SET console commands—You can use the following SET console commands to allocate NSS cache buffers at the server console:
SET NSS MINIMUM CACHE BUFFERS={value}
SET NSS CACHE BALANCE PERCENT={value}
The minimum cache buffer size range is from 256 to 1,048,576. The cache balance percent range is from 1% to 99%.
After you’ve set the NSS cache buffers appropriately at the server console and met the minimum system requirements, it’s time to configure your NSS volumes.
If you want to create an NSS volume from existing server disk space, you need to watch out for one particular caveat: Physical hard disk space might already be allocated to existing DOS or NetWare partitions. Remember that NSS volumes are created from storage pools, which are created from NSS partitions. Later in this lesson, you’ll learn how to convert existing traditional volumes to NSS volumes and how to mount DOS partitions as NSS volumes.
In this section, you’ll learn how to create an NSS volume from free server disk space (that is, storage deposits). NSS volume configuration is a three-step process:
As you recall from our NSS architecture discussion earlier in the chapter, NSS partitions are the grandparents of NSS volumes. Therefore, NSS partition configuration is the first step in creating an NSS volume. Follow these simple steps to create an NSS partition:
1. Start ConsoleOne at a NetWare 6 workstation or server. At the server, you must immediately authenticate as Admin (or an equivalent user with Admin privileges).
2. In ConsoleOne, browse to your Server object, right-click it, and select Properties. Next, select Media and then select Partitions. A screen similar to Figure 3.11 should appear.

3. In the Media Partitions window (shown in Figure 3.11), select New. Then the Create a New Partition window should appear, as shown in Figure 3.12.

4. In the Create a New Partition window (shown in Figure 3.12), select a media device from the Device ID list on the left side of the screen. After you’ve made your selection, the New Partition form requires the following five configuration details:
![]() Type—Select the type of partition you want to create (either NSS or traditional). In the case of an NSS volume, select the NSS partition type.
Type—Select the type of partition you want to create (either NSS or traditional). In the case of an NSS volume, select the NSS partition type.
![]() Size—Enter the size of the partition in bytes (B), kilobytes (KB), megabytes (MB), or gigabytes (GB).
Size—Enter the size of the partition in bytes (B), kilobytes (KB), megabytes (MB), or gigabytes (GB).
![]() Hot Fix—Mark the Hot Fix box to activate NSS’s Hot Fix Error Correction feature. Next, enter the size of the Hot Fix reserve as either a fixed integer or percentage.
Hot Fix—Mark the Hot Fix box to activate NSS’s Hot Fix Error Correction feature. Next, enter the size of the Hot Fix reserve as either a fixed integer or percentage.
![]() Mirror—Mark the Mirror box to activate the NSS mirroring feature. You can choose to create a new mirror or add this NSS partition to an existing mirror group.
Mirror—Mark the Mirror box to activate the NSS mirroring feature. You can choose to create a new mirror or add this NSS partition to an existing mirror group.
![]() Label—Enter an optional label for this NSS partition. A naming syntax you might want to use is as follows: {server}_NSSPARTITION{number} . Using this strategy, the first NSS partition in the WHITE-SRV1 server would be named WHITE_NSSPART01.
Label—Enter an optional label for this NSS partition. A naming syntax you might want to use is as follows: {server}_NSSPARTITION{number} . Using this strategy, the first NSS partition in the WHITE-SRV1 server would be named WHITE_NSSPART01.
5. To complete the form and create the NSS partition, select OK.
If NSS partitions are the grandparents of NSS volumes, storage pools are the parents. After you’ve created your NSS partition, it’s time to subdivide it into storage pools.
Follow these simple steps to create a storage pool within your new NSS partition:
1. Start ConsoleOne at a NetWare 6 workstation or server. At the server, you must immediately authenticate as Admin (or an equivalent user with Admin privileges).
2. In ConsoleOne, browse to your Server object, right-click it, and select Properties. Next, select Media and then select NSS Pools. A screen similar to Figure 3.13 should appear.
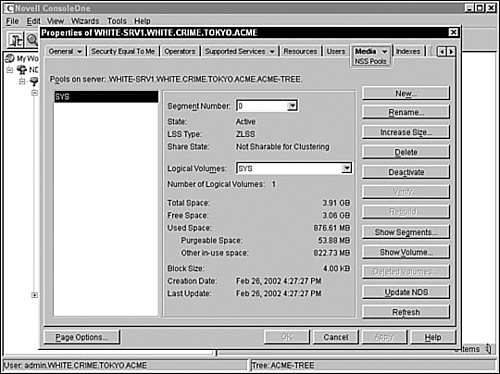
3. Select New in the NSS Pools window (shown in Figure 3.13) to create a new storage pool. The Create a New Pool window should appear.
4. In the Create a New Pool window, enter a name for the new storage pool and then select Next. The storage pool name should be at least 2 characters and no more than 15 characters. Pool names can contain the following characters: A through Z, 0 through 9, and _*@#$%&[]. The pool name cannot begin or end with an underscore (“_”) and cannot contain multiple underscores. You should use the same naming syntax for storage pools that you use for NSS partitions. For example, the first storage pool on the WHITE-SRV1 server could be named WHITE_NSSPOOL01.
5. After you’ve named the new storage pool, ConsoleOne responds with the Storage Information window (as shown in Figure 3.14). In this step, you must select the existing NSS partition or unpartitioned free space that you want to use for the storage pool. In the Used column, enter the amount of space you want to allocate from each NSS partition and select Next. Remember, a single storage pool can group disk space from multiple NSS partitions.

6. In the Attribute Information window, select Activate on Creation. This activates your storage pool and any logical volumes when you create the pool.
7. Select Finish to create your NSS storage pool and to return to the NSS Pools window of ConsoleOne.

At last, we’ve made it to the target of this lesson: NSS volumes. After you’ve created a host storage pool, you can create any number of logical volumes within it. Remember that each NSS logical volume can be fixed in size or configured to expand according to the space available in the storage pool. Of course, the size of a single volume cannot exceed the size of the storage pool. Finally, remember NSS is compatible with DOS, Macintosh, Unix, and long-name spaces.
Follow these simple steps to create a logical NSS volume within the new storage pool:
1. Start ConsoleOne at the NetWare 6 workstation or server. At the server, you must immediately authenticate as Admin (or an equivalent user with Admin privileges).
2. In ConsoleOne, browse to your Server object, right-click it, and select Properties. Next, select Media and NSS Logical Volumes. A screen similar to Figure 3.15 should appear.
3. In the NSS Logical Volumes window, select New (shown in Figure 3.15) to create a new volume. The Create a New Logical Volume window should appear. Notice from the figure that the default host pool is SYS. This storage pool is created by default when you install NetWare 6.
4. In the Create a New Logical Volume window, enter a name for the volume and then select Next. This name should be at least 2 characters and no more than 15 characters. Logical names can contain the following characters: A through Z, 0 through 9, and _*@#$%&[]. The name cannot begin or end with an underscore (“_”) and cannot contain multiple underscores. You should use the same naming syntax for logical volumes that you used for storage pools. For example, the first NSS volume on the WHITE-SRV1 server could be named WHITE_NSSVOL01.
5. Next, the Volume Storage Information window will appear (as shown in Figure 3.16). This window lists all storage pools that are available to host your new NSS volume and their available disk space. Select the storage pool where you want to create the volume and input the volume size in the Volume Quota (MB) field. If you want the volume size to expand dynamically, mark Allow Volume Quota to Grow to the Pool Size. Select Next to continue.

6. The Volume Attribute Information window will appear (as shown in Figure 3.17).

7. On the screen shown in Figure 3.17, you’ll select the attribute settings to use with your new NSS logical volume. The attributes shown are
![]() Backup—Indicates whether the volume should be backed up. Mark this box if the volume contains data that you want to back up using third-party backup software. Consult your vendor to ensure compatibility with NetWare 6 NSS.
Backup—Indicates whether the volume should be backed up. Mark this box if the volume contains data that you want to back up using third-party backup software. Consult your vendor to ensure compatibility with NetWare 6 NSS.
![]() Compression—Activates file compression for the logical volume. If you choose not to activate compression at this time, you’ll have to re-create the volume later to activate it.
Compression—Activates file compression for the logical volume. If you choose not to activate compression at this time, you’ll have to re-create the volume later to activate it.
![]() Data Shredding—Activates the data shredding security feature, which scrambles any data that you delete from the volume. Enter the number of times you want the data shredder to scramble your deleted files (from 1 to 7).
Data Shredding—Activates the data shredding security feature, which scrambles any data that you delete from the volume. Enter the number of times you want the data shredder to scramble your deleted files (from 1 to 7).
![]() Directory Quotas—Activate this feature to restrict the amount of space a directory can use. The directory restriction settings are configured elsewhere in ConsoleOne.
Directory Quotas—Activate this feature to restrict the amount of space a directory can use. The directory restriction settings are configured elsewhere in ConsoleOne.
![]() Flush Files Immediately—Activates the file flushing feature, which improves volume reliability but decreases server performance. Refer to the “NSS Features” section earlier in this chapter for more information.
Flush Files Immediately—Activates the file flushing feature, which improves volume reliability but decreases server performance. Refer to the “NSS Features” section earlier in this chapter for more information.
![]() Migration—Activates the data migration feature for this volume.
Migration—Activates the data migration feature for this volume.
![]() Modified File List (MFL)—Activates the MFL tracking list for incremental backups. Consult your backup software vendor to ensure compatibility with NetWare 6 NSS.
Modified File List (MFL)—Activates the MFL tracking list for incremental backups. Consult your backup software vendor to ensure compatibility with NetWare 6 NSS.
![]() Salvage Files—Activates the file salvage feature that tracks deleted files and enables you to retrieve them until the space is needed for other data.
Salvage Files—Activates the file salvage feature that tracks deleted files and enables you to retrieve them until the space is needed for other data.
![]() File Snapshot—Activates the NSS snapshot feature at the file level. This allows a backup utility to capture a snapshot of the last closed version of every file. Please refer to the “NSS Features” section earlier in this chapter for more information.
File Snapshot—Activates the NSS snapshot feature at the file level. This allows a backup utility to capture a snapshot of the last closed version of every file. Please refer to the “NSS Features” section earlier in this chapter for more information.
![]() User Space Restrictions—Activates the user space restrictions feature on this volume. User space restrictions can be configured later using ConsoleOne.
User Space Restrictions—Activates the user space restrictions feature on this volume. User space restrictions can be configured later using ConsoleOne.
![]() On Creation—You can choose to activate this volume as soon as you create it and/or mount this volume as soon as you create it.
On Creation—You can choose to activate this volume as soon as you create it and/or mount this volume as soon as you create it.
8. Select Finish in the Volume Attribute Information window to complete the form and create your new NSS logical volume.
This completes the three-step NSS volume configuration process. After you’ve created the NSS family tree (partition grandparent, storage pool parent, and NSS logical volume), users can take advantage of the exciting new NSS file system. Of course, that’s not to say that there’s anything wrong with the traditional NetWare file system. In fact, there are many times when you might want to fall back on the traditional method of storing data files.
Now let’s take a step back in time and learn how to configure traditional NetWare volumes.
The traditional NetWare file system is much simpler than NSS, but lacks many of NSS’s sophisticated features. As you saw in Figure 3.9, the traditional file system architecture is composed of storage devices, partitions, and volumes. Traditional volumes are further organized into directories and files—just as with the NSS file system.
Although NSS is the default file system in NetWare 6, you might want to maintain traditional partitions and volumes on your server for legacy applications and users. Before you create traditional NetWare volumes, however, you should keep these caveats in mind:
![]() The NetWare 6 version of NWCONFIG is incompatible with traditional volumes. You must use ConsoleOne or Remote Manager to create, modify, and rename traditional volumes.
The NetWare 6 version of NWCONFIG is incompatible with traditional volumes. You must use ConsoleOne or Remote Manager to create, modify, and rename traditional volumes.
![]() The NetWare 6 versions of VERIFY and REBUILD are incompatible with traditional volumes. You must use VREPAIR to fix traditional volumes.
The NetWare 6 versions of VERIFY and REBUILD are incompatible with traditional volumes. You must use VREPAIR to fix traditional volumes.
![]() You cannot create traditional volumes within an NSS storage pool.
You cannot create traditional volumes within an NSS storage pool.
![]() NetWare 6 traditional volumes cannot be mounted on servers running previous versions of NetWare. However, legacy NetWare servers can back up data from NetWare 6 traditional volumes.
NetWare 6 traditional volumes cannot be mounted on servers running previous versions of NetWare. However, legacy NetWare servers can back up data from NetWare 6 traditional volumes.
Even with these shortcomings, NetWare 6 traditional volumes provide an excellent bridge to cross the chasm from legacy NetWare servers to NSS. The following are the steps for creating a traditional volume using NetWare 6:
1. Start ConsoleOne at a NetWare 6 workstation or server. Then authenticate as admin (or an equivalent user with Admin privileges).
2. In ConsoleOne, browse to your Server object, right-click it, and select Properties. Next, select Media and then select Traditional Volumes. A screen similar to Figure 3.18 should appear.

3. To create a traditional volume, select New in the Media Traditional Volumes window (shown in Figure 3.18). The Create a New Traditional Volume window should appear.
4. In the Create a New Traditional Volume window, enter a name for the traditional volume and then select Next. This name should be at least 2 characters and no more than 15 characters. Logical names can contain the following characters: A through Z, 0 through 9, and _*@#$%&[]. The name cannot begin or end with an underscore (“_”) and cannot contain multiple underscores. You should use the same naming syntax for traditional volumes that you used for NSS logical pools. For example, the first traditional volume on the WHITE-SRV1 server could be named WHITE_TRADVOL01.
5. The Traditional Volume Storage Information window should appear. Select an existing partition (or unpartitioned space) to host the traditional volume. In the Used column, enter a size for the volume and select Next.
6. The Traditional Volume Attribute Information window will appear (as shown in Figure 3.19). This window enables you to configure the following traditional volume attributes:
![]() Block Size—Select a block size for data partitioning within the traditional volume. The default block size is determined by NetWare according to the overall volume size. The range is from 4KB to 64KB.
Block Size—Select a block size for data partitioning within the traditional volume. The default block size is determined by NetWare according to the overall volume size. The range is from 4KB to 64KB.
![]() Compression—Mark this box to activate file compression for your new traditional volume. File compression increases available disk space by automatically compressing inactive files. Users can save up to 63% of the server’s disk space when file compression is activated.
Compression—Mark this box to activate file compression for your new traditional volume. File compression increases available disk space by automatically compressing inactive files. Users can save up to 63% of the server’s disk space when file compression is activated.
![]() Migration—Mark this box to activate the migration feature on the new traditional volume. Data migration provides near-line storage by automatically transferring inactive files from your traditional volume to a tape drive or optical disk. Data migration is part of NetWare’s High Capacity Storage System (HCSS).
Migration—Mark this box to activate the migration feature on the new traditional volume. Data migration provides near-line storage by automatically transferring inactive files from your traditional volume to a tape drive or optical disk. Data migration is part of NetWare’s High Capacity Storage System (HCSS).
![]() Suballocation—Mark this box to activate block suballocation on your new traditional volume. Block suballocation increases available disk space by storing portions of multiple files in a single disk allocation block. This feature solves the inherent problem of wasted disk space by dividing partially used disk blocks into 512-byte suballocation blocks.
Suballocation—Mark this box to activate block suballocation on your new traditional volume. Block suballocation increases available disk space by storing portions of multiple files in a single disk allocation block. This feature solves the inherent problem of wasted disk space by dividing partially used disk blocks into 512-byte suballocation blocks.
![]() Mount Volume on Creation—Mark this box to mount the new traditional volume after the volume has been created.
Mount Volume on Creation—Mark this box to mount the new traditional volume after the volume has been created.

7. Select Finish in the Volume Attribute Information window to complete the form and to create your new NSS volume.
Now that you’ve created a traditional volume in NetWare 6, your server is fully prepared to accept new and old user data. Because traditional volumes have limitations, many network administrators prefer to stick with a single, more sophisticated file system—NSS. Fortunately, NetWare 6 includes VCU.NLM, a utility to convert traditional NetWare volumes to NSS logical volumes. Keep in mind, though, VCU only converts existing volumes; it doesn’t create new ones.
The VCU.NLM conversion utility is not an in-place tool. It simply copies the data and directory structure from a traditional volume to an NSS logical volume in an existing storage pool. Therefore, you must have enough available disk space to transition from one volume to another. VCU affects server performance, so you should consider performing volume conversions only when server demands are low (such as late in the evening).
To convert a traditional volume, load VCU.NLM at the NetWare 6 server console and specify the following two pieces of information: traditional volume name and host NSS storage pool. For example, to convert the WHITE_TRADVOL01 traditional volume into an NSS logical volume in the WHITESRV1_NSSPOOL01 storage pool, you would enter this command at the server console:
VCU WHITE_TRADVOL01 WHITESRV1_NSSPOOL01
When the conversion is complete, the VCU screen displays the results of the conversion and asks whether you want to rename the volume. If you want to keep the original volume name for the traditional volume, respond with N.
If you want to keep the original volume name for the new NSS volume, enter Y. The traditional volume is renamed with _OLD appended to the original volume name (WHITE_TRADVOL01_OLD). The new NSS logical volume keeps the original volume name and is associated with the existing volume object in eDirectory.
Because this feature violates our naming syntax, you might want to rename the new NSS volume by dropping the TRAD from the name and adding NSS. You should restart the NetWare 6 server to ensure that the volume converted properly. After you’ve verified that the conversion was a success, you can remove the traditional volume and return the empty disk space to your storage pool of choice.
TIP
After you’ve copied traditional volume data to a logical volume in NetWare 6, you cannot access the new NSS volume using previous versions of NetWare. This is particularly problematic if the traditional volume was being used for legacy users and applications.
The syntax for VCU.NLM is as follows:
VCU /p /l /i /d /r traditional_volume nss_pool [ds_container] [ds_volume]
The following is a list of attributes supported by the VCU conversion utility:
![]() /p—Do not print directory filenames.
/p—Do not print directory filenames.
![]() /l—Do not write errors to a log file. By default, the conversion log file is placed in the root of the new NSS volume and given the name ERROR.OUT.
/l—Do not write errors to a log file. By default, the conversion log file is placed in the root of the new NSS volume and given the name ERROR.OUT.
![]() /i—Keep the COMPRESS_FILE_IMMEDIATELY_BIT file intact.
/i—Keep the COMPRESS_FILE_IMMEDIATELY_BIT file intact.
![]() /d—If the conversion process is successful, delete the original traditional volume. Remember that the new NSS volume retains the name of the traditional volume, which means that you might want to rename the new volume after the fact.
/d—If the conversion process is successful, delete the original traditional volume. Remember that the new NSS volume retains the name of the traditional volume, which means that you might want to rename the new volume after the fact.
TIP
VCU.NLM will return an error if you use the /d attribute to delete the original traditional volume at the end of the conversion process. This is because the traditional volume has a hidden system file that cannot be copied or deleted. Don’t worry about this error; it will not affect your users’ ability to use the new NSS volume.
![]() /r—Keep the original volume name for the new logical volume name.
/r—Keep the original volume name for the new logical volume name.
![]() ds_container—Designate the original volume of the eDirectory container.
ds_container—Designate the original volume of the eDirectory container.
![]() ds_volume—If this parameter is specified, VCU uses this name to rename or delete the original volume’s eDirectory object. Otherwise, VCU uses servername_originalVolName as the default eDirectory name.
ds_volume—If this parameter is specified, VCU uses this name to rename or delete the original volume’s eDirectory object. Otherwise, VCU uses servername_originalVolName as the default eDirectory name.
This completes our lesson in traditional volume creation and conversion. I hope that you’ve gained an appreciation for the value of traditional NetWare volumes as a legacy companion for NetWare 6’s new NSS file system.
This completes our lesson in NSS configuration. In this section, you learned how to configure an NSS volume in three simple steps: creating an NSS partition, creating an NSS pool, and creating an NSS logical volume. In addition, we explored traditional volume configuration and learned about the two levels of RAID that can be achieved using NSS software RAID. After you’ve configured NSS and created one or more NSS logical volumes, users can take advantage of this new, exciting file system. Of course, that means that you’ll have to learn more about how to perform some basic NSS management tasks. Fortunately, that’s the topic of the next lesson.
In this exercise, you’ll learn to
![]() Create an NSS Partition
Create an NSS Partition
![]() Create a Storage Pool
Create a Storage Pool
![]() Create NSS Volumes
Create NSS Volumes
In this lab exercise, you’ll need the WHITE-SRV1 server created in Lab Exercise 2.2 with 2+GB free (that is, unassigned) disk space.
1. At the WHITE-SRV1 server console GUI screen, execute ConsoleOne. If necessary, authenticate as Admin.
2. When the ConsoleOne window appears
![]() Browse to WHITE-SRV1.
Browse to WHITE-SRV1.
![]() Right-click WHITE-SRV1 and select Properties from the drop-down menu.
Right-click WHITE-SRV1 and select Properties from the drop-down menu.
3. When the Properties of WHITE-SRV1 window appears, select the Media tab.
4. When the Media page appears, select the Partitions subtab from the drop-down menu on the Media tab.
5. When the Partitions page appears, select New.
6. When the Create a New Partition window appears
![]() In the Type field, verify that NSS is selected.
In the Type field, verify that NSS is selected.
![]() In the Size field, enter 2, and then verify that GB is selected from the drop-down menu to the right.
In the Size field, enter 2, and then verify that GB is selected from the drop-down menu to the right.
![]() Verify that Hot Fix is selected.
Verify that Hot Fix is selected.
![]() In the Label field, enter WHITE_NSSPART01.
In the Label field, enter WHITE_NSSPART01.
![]() Select OK.
Select OK.
1. When the Media page reappears, select the NSS Pools subtab from the drop-down menu on the Media tab.
2. When the NSS Pools page appears, select New.
3. When the Create a New Pool window appears, enter WHITE_NSSPOOL01 in the Name field and then select Next.
4. When the Create Pool: WHITE_NSSPOOL01—Storage Information window appears, select the WHITE_NSSPART01 you created in step 1, and then select Next.
5. When the Create Pool: WHITE_NSSPOOL01—Attribute Information window appears, verify that Activate on Creation is selected, and then select Finish.
1. When the Media page reappears, select the NSS Logical Volumes subtab from the drop-down menu on the Media tab.
2. When the NSS Logical Volumes page appears, select New.
3. When the Create a New Logical Volume window appears, enter WHITE_NSSDATA in the Name field, and then select Next.
4. When the Create Logical Volume: WHITE_NSSDATA - Storage Information window appears
![]() Select the WHITE_NSSPOOL01 you created in step 2.
Select the WHITE_NSSPOOL01 you created in step 2.
![]() Select Allow Volume Quota to Grow to the Pool Size.
Select Allow Volume Quota to Grow to the Pool Size.
![]() Select Next.
Select Next.
5. When the Create Logical Volume: WHITE_NSSDATA - Attribute Information window appears
![]() Verify that Backup is selected.
Verify that Backup is selected.
![]() Select Compression.
Select Compression.
![]() Select Data Shredding.
Select Data Shredding.
![]() Select Directory Quotas.
Select Directory Quotas.
![]() Select Flush Immediately.
Select Flush Immediately.
![]() Select Modified File List (MFL).
Select Modified File List (MFL).
![]() Verify that Salvage Files is selected.
Verify that Salvage Files is selected.
![]() Select User Space Restrictions.
Select User Space Restrictions.
![]() In the On Creation section, verify that Activate is selected.
In the On Creation section, verify that Activate is selected.
![]() In the On Creation section, verify that Mount is selected.
In the On Creation section, verify that Mount is selected.
![]() Select Finish.
Select Finish.
6. When the NSS Logical Volumes page reappears, close the Properties of WHITE-SRV1 window by selecting Cancel.
7. Verify that the volume was created and mounted by entering VOLUMES at the server console prompt.
Test Objective Covered:
![]() Monitor, Manage, and Rebuild NSS Storage Space
Monitor, Manage, and Rebuild NSS Storage Space
As the network administrator, you’re responsible for maintaining the server’s file system on a day-to-day basis. This involves ensuring that the file system is well organized, easily accessible to network users, and contains adequate storage space.
In this final NSS lesson, you’ll hone your file system management skills by exploring various procedures within the following two categories:
![]() NSS file management—We’ll explore NSS file system management at the most granular level—from the file’s point of view. In this section, you’ll learn how to enable the file snapshot feature, limit users’ disk space boundaries with the user space restrictions feature, and restrict file storage capacity within a specific directory using the directory space restrictions feature.
NSS file management—We’ll explore NSS file system management at the most granular level—from the file’s point of view. In this section, you’ll learn how to enable the file snapshot feature, limit users’ disk space boundaries with the user space restrictions feature, and restrict file storage capacity within a specific directory using the directory space restrictions feature.
![]() NSS volume management—You’ll learn some time-proven techniques for managing NSS volumes and storage pools. In this section, you’ll learn how to rebuild NSS storage pools and volumes, delete NSS storage pools and volumes, restore or purge deleted logical volumes, and mount a DOS partition as an NSS volume.
NSS volume management—You’ll learn some time-proven techniques for managing NSS volumes and storage pools. In this section, you’ll learn how to rebuild NSS storage pools and volumes, delete NSS storage pools and volumes, restore or purge deleted logical volumes, and mount a DOS partition as an NSS volume.
Files represent the bottom level of the NSS file system food chain. This granular storage unit hosts user data and/or network applications. This is where our NSS management lesson begins. Most NSS file management tasks focus on disk space usage and reliability. Specifically, NetWare 6 administrators must be able to
![]() Enable file snapshot
Enable file snapshot
![]() Configure user space restrictions
Configure user space restrictions
![]() Configure directory space restrictions
Configure directory space restrictions
![]() Enable Transaction Tracking System (TTS) on logical volumes
Enable Transaction Tracking System (TTS) on logical volumes
File snapshot is an NSS backup reliability feature that supports third-party backup utilities. When you enable file snapshot on a volume, NSS keeps an original copy of all open files. This allows the backup utility to copy information about each individual file, including owner, creation date and time, and modification date and time.
NSS provides the following methods for enabling file snapshot at the volume level:
![]() To enable file snapshot for an NSS volume, enter the following NSS command at the server console:
To enable file snapshot for an NSS volume, enter the following NSS command at the server console:
NSS /FileCopyOnWrite={volume name}
![]() To enable file snapshot for all NSS volumes, enter the following NSS command at the server console:
To enable file snapshot for all NSS volumes, enter the following NSS command at the server console:
NSS /FileCopyOnWrite=all
![]() Use the Volume Creation Wizard and select File Snapshot when the volume is created.
Use the Volume Creation Wizard and select File Snapshot when the volume is created.
To disable file snapshot, enter the following NSS command at the server console:
NSS /NoFileCopyOnWrite
After you’ve enabled file snapshot on your volumes, you must deactivate and then reactivate and remount them. This helps to ensure that there are no open files without a snapshot.
If disk space becomes a scarce commodity, consider restricting volume space usage. NSS enables you to restrict volume space according to two criteria: by user and/or by directory.
User space restrictions are beneficial for networks that have a large number of users, such as students or contractors. These restrictions must be set independently for each volume. To do so by using ConsoleOne, right-click the volume on the browser screen and select Properties from the pop-up menu that appears. Next, select Attributes and then NSS Attributes. Finally, when the NSS Attributes window appears, select User Space Restrictions and you’ll be greeted with a screen similar to Figure 3.20.

In the Volume Properties page (shown in Figure 3.20), select the Users with Space Restrictions tab and click Add. When the Select Object dialog box appears, browse to and select the context containing the user, select the user, and click OK. When the User Space Restriction dialog box appears, make sure that the Limit User Space check box is marked, enter the correct size in the Limit (in 4KB increments) field, and then click OK. Finally, select Apply to save the user space restriction.
In addition to restricting disk space at the user level, you can configure limitations for directories and their subdirectories. To limit the total size of a directory, activate ConsoleOne and authenticate as your Admin user. Next, browse to the directory you want to establish restrictions for in the browser screen, right-click it, and select Properties. When the Properties dialog box appears, click the Facts page tab (as shown in Figure 3.21). When the Facts page appears, mark the Restrict Size check box and then enter the correct size in the Limit field (in increments of 4KB). Finally, select Apply to save the directory space restriction.
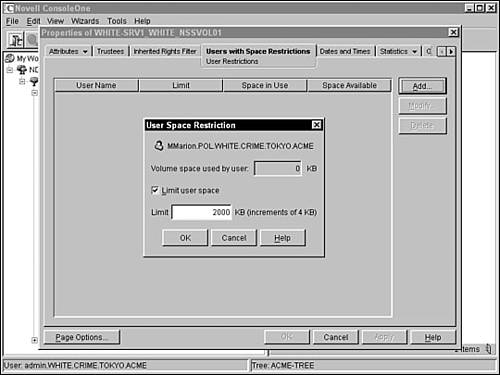
The Transaction Tracking System (TTS) protects database applications by backing out incomplete transactions caused by a system failure. This is available on either all traditional or all NSS logical volumes on the same server. When your server stores both traditional and logical volumes, TTS works by default only on traditional volumes.
If you want to use TTS on logical volumes instead, you must add the DISABLE TTS command to the AUTOEXEC.NCF file and restart your server. Then enable TTS on each logical volume you want it on by entering the following at the server console:
NSS/TRANSACTION=volume_name
NSS logical volumes represent the highest level of the user-accessible file system. In fact, volumes are a transition point between the two NetWare 6 directory trees: file system and eDirectory. This is because each volume is represented by two objects: a logical collection of disk space in the file system and a Volume object in the eDirectory tree.
Because of this special distinction, volume management is a critical aspect of your NSS management responsibilities. As you know, NSS volumes are hosted inside storage pools. Therefore, we must include storage pools in our lesson of volume management. Following are the four main procedures that encompass NSS volume management:
![]() Rebuild NSS logical volumes
Rebuild NSS logical volumes
![]() Delete NSS logical volumes
Delete NSS logical volumes
![]() Restore or purge deleted NSS logical volumes
Restore or purge deleted NSS logical volumes
![]() Mount a DOS partition as an NSS logical volume
Mount a DOS partition as an NSS logical volume
Remember, volume management encompasses more than just NSS logical volumes. In this section, we’ll explore storage pool management as well.
To repair NSS storage pools and logical volumes, NetWare 6 includes two NSS console commands:
![]() VERIFY—Checks the file system integrity of an NSS pool by searching for inconsistent data blocks or other errors. VERIFY performs a read-only assessment of your storage pool before you perform the REBUILD process.
VERIFY—Checks the file system integrity of an NSS pool by searching for inconsistent data blocks or other errors. VERIFY performs a read-only assessment of your storage pool before you perform the REBUILD process.
![]() REBUILD—After you’ve verified the file system integrity of your storage pool, you can use REBUILD to correct severe storage pool and logical volume errors. Before you run REBUILD, you must deactivate all target storage pools and volumes and make sure that users don’t have access to them during the rebuilding process. After it has been activated, REBUILD copies errors and transactions into a file named SYS:/{volume name}.RLF. Every time you use REBUILD to rebuild an NSS logical volume, its previous error file is overwritten.
REBUILD—After you’ve verified the file system integrity of your storage pool, you can use REBUILD to correct severe storage pool and logical volume errors. Before you run REBUILD, you must deactivate all target storage pools and volumes and make sure that users don’t have access to them during the rebuilding process. After it has been activated, REBUILD copies errors and transactions into a file named SYS:/{volume name}.RLF. Every time you use REBUILD to rebuild an NSS logical volume, its previous error file is overwritten.
TIP
One word of warning: Only use REBUILD as a last resort. If you use it to recover from data corruption, you can lose your data!
To run VERIFY on a specific NSS storage pool, enter the following command at the server console:
NSS /POOLVERIFY={pool name}
During the VERIFY process, NSS dismounts all volumes within the pool automatically. When VERIFY is complete, a results screen appears (as shown in Figure 3.22). Make sure to remount all the pool’s volumes at the conclusion of the VERIFY process by typing MOUNT ALL at the server console.

To perform a REBUILD on a specific NSS storage pool, enter the following NSS command at the server console:
NSS /POOLREBUILD={pool name}
During the REBUILD process, NSS dismounts all logical volumes in the pool automatically. A status screen appears (as shown in Figure 3.23) while the storage pool, and all its host volumes, are being rebuilt. When the REBUILD process is complete, make sure to mount all the storage pool’s volumes by typing MOUNT ALL at the server console.

As a network administrator, you have the power to delete anything that you create, but be aware that user data might be at stake. When you delete an NSS logical volume (or a traditional volume) from a storage pool, the pool and its host partition are still intact. This enables you to reassign the volume space to another storage pool or volume. Fortunately, NSS includes a restore feature that enables you to recover deleted data within two days of its deletion.
To delete an NSS storage pool or logical volume in ConsoleOne, simply browse to the appropriate Server object, right-click it, and select Properties. Next, select Media and NSS Pools (or Logical Volumes). Finally, select a specific storage pool or logical volume and click Delete. It’s that easy. Oops! What happens if you accidentally delete the wrong volume? That’s where the NSS restore feature comes in. Let’s take a closer look.
NSS will help you recover from volume management mistakes. If you accidentally delete a logical volume, the NSS restore feature enables you to “undelete” it for a specified amount of time—this is called the purge delay period. You must retrieve the logical volume before the delay time elapses; otherwise, the volume will be automatically purged from the system and you will be unable to restore it.
TIP
NSS REBUILD is not equivalent to the traditional VREPAIR utility. Although these two utilities seem to accomplish roughly the same task, they go about it in very different ways.
The default setting for the purge delay period is 4 days (or 345,600 seconds). You can change the purge delay period by entering the following NSS command at the server console:
NSS /LogicalVolumePurgeDelay={delay period in seconds}
Remember that the Purge Delay parameter is lost if the server is restarted. To make this change permanent, you must add the command to the server’s AUTOEXEC.NCF file.
You can also manually restore or purge a deleted logical volume by using ConsoleOne. To do so, browse to the appropriate Server object, right-click it, and select Properties. Next, select Media and NSS Pools. Finally, in the Deleted Volumes window, select one of the following options:
![]() Purge—Immediately purges all deleted volumes
Purge—Immediately purges all deleted volumes
![]() Prevent Purge/Allow Purge—Halts the volume purging process completely
Prevent Purge/Allow Purge—Halts the volume purging process completely
![]() Salvage—Restores the deleted volume that you have chosen
Salvage—Restores the deleted volume that you have chosen
![]() Refresh—Rescans the logical volumes that have been deleted and updates the list
Refresh—Rescans the logical volumes that have been deleted and updates the list
NSS enables you to mount existing DOS partitions as NSS logical volumes. With this feature, users can gain access to the files stored on the server’s local C: drive. To accomplish this, simply load the following module at the NetWare 6 server console:
LOAD DOSFAT.NSS
It’s as simple as that. After DOSFAT.NSS is loaded, DOS partitions on the server are automatically mounted and made available as NSS logical volumes. The volume name displayed is DOSFAT_x, where x is the drive letter (for example, DOSFAT_C). The new logical volume is fully functional, including support for long filenames using the Windows 95/98 method, NetWare trustee rights via eDirectory security, and any client or server utility that manages NetWare volumes.
Congratulations! You’ve successfully traversed the new NetWare 6 storage system known as Novell Storage Services. NSS is a huge improvement over the traditional file system. However, with this increased sophistication comes a ton of complexity in architecture, configuration, and management. In this lesson, we explored the detailed architecture of NSS and learned how to configure and manage it. Now that you’ve mastered Novell storage management with NSS, let’s continue this theme with a backup lesson using Storage Management Services (SMS). Go team!!!
Test Objectives Covered:
![]() Set Up SMS for SBCON and NWBACK32
Set Up SMS for SBCON and NWBACK32
![]() Back Up Data with SBCON and NWBACK32
Back Up Data with SBCON and NWBACK32
![]() Restore Data with SBCON and NWBACK32
Restore Data with SBCON and NWBACK32
Storage Management Services (SMS) is a combination of related services that facilitate the storage and retrieval of data to and from NetWare 6 servers and workstations. The SMS backup process involves a host server, a target file system or eDirectory, and a controlling workstation (see Figure 3.24):
![]() Host server—The SMS host server is where the backup program and storage device reside. (Note: SMS is a backup engine rather than an application. This means that it requires a front-end backup/restore application on the host server to communicate with modules on target devices.) You can use the SBCON software that’s included with NetWare 6 or any third-party backup software that is SMS compliant.
Host server—The SMS host server is where the backup program and storage device reside. (Note: SMS is a backup engine rather than an application. This means that it requires a front-end backup/restore application on the host server to communicate with modules on target devices.) You can use the SBCON software that’s included with NetWare 6 or any third-party backup software that is SMS compliant.
![]() Target—The SMS target is a NetWare workstation or server that contains a file system or eDirectory Directory that needs to be backed up. Target service agents (TSAs) are resident programs that run on each target server or workstation. In conjunction with an SMS-compliant backup engine, such as NetWare SBCON, these agents enable data from a specific workstation or server to be backed up and restored.
Target—The SMS target is a NetWare workstation or server that contains a file system or eDirectory Directory that needs to be backed up. Target service agents (TSAs) are resident programs that run on each target server or workstation. In conjunction with an SMS-compliant backup engine, such as NetWare SBCON, these agents enable data from a specific workstation or server to be backed up and restored.
![]() Workstation—The SMS workstation is a NetWare 6 client that provides a GUI interface for configuring the backup sessions and for submitting instructions to the host server. This workstation is normally a Windows 95/98 or Windows NT machine running the NWBACK32.EXE program.
Workstation—The SMS workstation is a NetWare 6 client that provides a GUI interface for configuring the backup sessions and for submitting instructions to the host server. This workstation is normally a Windows 95/98 or Windows NT machine running the NWBACK32.EXE program.
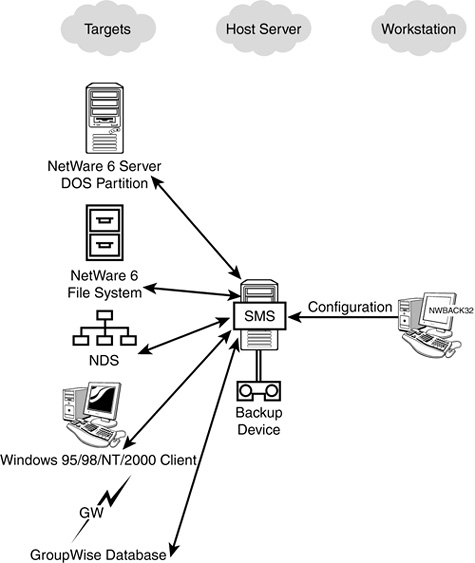
The SMS server application reads the file system or eDirectory data from the target device (using TSA instructions) and sends it to a storage medium (such as a DOS read/write disk, tape, or optical drive). SMS supports the following types of information: NetWare 6 file system, NetWare 6 server DOS partition, eDirectory, Windows 95/98/Me and Windows NT/2000/XP workstation file systems, and GroupWise databases.
Before delving too far into the world of SMS, you should first have a good grasp of the major components of SMS and some common terms used when discussing network backups and restores. SMS includes the following components:
![]() Storage management engine (SME)—This is the backup program that communicates with the network clients to back up and restore information. NetWare 6 includes two SMEs: SBCON and NWBACK32.
Storage management engine (SME)—This is the backup program that communicates with the network clients to back up and restore information. NetWare 6 includes two SMEs: SBCON and NWBACK32.
![]() Target service agent (TSA)—A software module that understands how to scan, read, and write target data. The TSA packages data from the target. (Recall that a target is any NetWare 6 server, workstation, or service that has a TSA loaded. This is where the backup source material resides.) The TSA then presents the data to the SME in a generic form, which allows one SME to interact with many types of TSAs. Table 3.7 shows the TSAs provided by NetWare 6.
Target service agent (TSA)—A software module that understands how to scan, read, and write target data. The TSA packages data from the target. (Recall that a target is any NetWare 6 server, workstation, or service that has a TSA loaded. This is where the backup source material resides.) The TSA then presents the data to the SME in a generic form, which allows one SME to interact with many types of TSAs. Table 3.7 shows the TSAs provided by NetWare 6.
![]() Storage management data requester (SMDR)—This component communicates between the SME and the TSA.
Storage management data requester (SMDR)—This component communicates between the SME and the TSA.
![]() Storage device interface—This component passes information between the SME and the storage device.
Storage device interface—This component passes information between the SME and the storage device.
![]() Device drivers—These control the behavior of the storage devices.
Device drivers—These control the behavior of the storage devices.

The following are some backup/restore terms you should be familiar with:
![]() Data set—A collection of related data records on a computer-readable medium (such as a hard disk or a tape). When using an SME such as SBCON, you can configure data sets to back up or restore specific data.
Data set—A collection of related data records on a computer-readable medium (such as a hard disk or a tape). When using an SME such as SBCON, you can configure data sets to back up or restore specific data.
![]() Parent—A data set that may have subordinate data sets (that is, other parents or children). In NetWare 6, for example, a parent would be a directory, subdirectory, container, server, or eDirectory.
Parent—A data set that may have subordinate data sets (that is, other parents or children). In NetWare 6, for example, a parent would be a directory, subdirectory, container, server, or eDirectory.
![]() Child—A data set that has no subordinates. In NetWare 6, a child would be a file or a leaf object.
Child—A data set that has no subordinates. In NetWare 6, a child would be a file or a leaf object.
![]() Subset—A specific portion of a data set that you want to back up or restore. The SMEs included with NetWare 6 enable you to designate subsets of data by using exclude and include options.
Subset—A specific portion of a data set that you want to back up or restore. The SMEs included with NetWare 6 enable you to designate subsets of data by using exclude and include options.
![]() Exclude—These backup options enable you to back up most of the file system structure or eDirectory tree structure while omitting only a small part.
Exclude—These backup options enable you to back up most of the file system structure or eDirectory tree structure while omitting only a small part.
![]() Include—These backup options enable you to specify small parts of the file system structure data that you want backed up.
Include—These backup options enable you to specify small parts of the file system structure data that you want backed up.
To back up and restore NetWare servers and workstations, you can use the backup software that comes with NetWare 6 (SBCON and NWBACK32) or use a third-party program that is SMS compliant.
SBCON is a series of NLMs that run on the host NetWare server. This program processes the job, creates a session, establishes communications with distributed targets, and conducts the data backup or restore. SBCON includes the following three modules:
![]() User interface—Running on a NetWare 6 server, the user interface is an NLM that creates a job and submits it to the eDirectory queue.
User interface—Running on a NetWare 6 server, the user interface is an NLM that creates a job and submits it to the eDirectory queue.
![]() Q Manager (QMAN)—This component takes the job from the eDirectory queue and facilitates multiple job loading, among other features. Loading QMAN automatically loads the backup engine. The user interface can be loaded after you load QMAN.
Q Manager (QMAN)—This component takes the job from the eDirectory queue and facilitates multiple job loading, among other features. Loading QMAN automatically loads the backup engine. The user interface can be loaded after you load QMAN.
![]() Backup engine—This is the component that processes and completes the job.
Backup engine—This is the component that processes and completes the job.
NWBACK32 is a Windows-based program that runs on the administrative backup/restore workstation (see Figure 3.25). NWBACK32 configures backup/restore jobs and submits them to the eDirectory queue.

NetWare provides four basic strategies for backing up and restoring data (follow along in Figure 3.26):
![]() Full—The full backup option is the most thorough. During a full backup, all data is copied, regardless of when, or whether, it was previously backed up. Although this option is the most time-consuming, it provides fast and easy restores because you have to restore only the latest full backup. (Note: During a full backup, the Modify (or Archive) bit of each file is cleared.)
Full—The full backup option is the most thorough. During a full backup, all data is copied, regardless of when, or whether, it was previously backed up. Although this option is the most time-consuming, it provides fast and easy restores because you have to restore only the latest full backup. (Note: During a full backup, the Modify (or Archive) bit of each file is cleared.)
![]() Incremental—The incremental option backs up only those files that have changed since the last backup. To restore all system data, you must restore the last full backup and every incremental backup since then, in chronological order. (Note: During an incremental backup, the Modify bit of each file is cleared.)
Incremental—The incremental option backs up only those files that have changed since the last backup. To restore all system data, you must restore the last full backup and every incremental backup since then, in chronological order. (Note: During an incremental backup, the Modify bit of each file is cleared.)
![]() Differential—The differential backup strategy backs up all data that has been modified since the last full backup. This strategy often provides the best balance of efficiency and performance because it minimizes the number of restore sessions. The main improvement with the differential strategy is in the state of the Modify bit—it is not cleared. As a result, all the files that have changed since the last full backup are copied each time. (Note: Because the Modify bit is cleared during an incremental backup, be sure that you never perform an incremental backup between differential backups.)
Differential—The differential backup strategy backs up all data that has been modified since the last full backup. This strategy often provides the best balance of efficiency and performance because it minimizes the number of restore sessions. The main improvement with the differential strategy is in the state of the Modify bit—it is not cleared. As a result, all the files that have changed since the last full backup are copied each time. (Note: Because the Modify bit is cleared during an incremental backup, be sure that you never perform an incremental backup between differential backups.)
![]() Custom—The Custom strategy enables you to specify which files are backed up and to designate whether or not the Modify bit of each file is cleared.
Custom—The Custom strategy enables you to specify which files are backed up and to designate whether or not the Modify bit of each file is cleared.

Table 3.8 shows a comparison of the three NetWare backup/restore strategies. You might find one of the following three combinations useful:
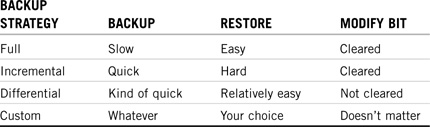
![]() Every day—differential
Every day—differential
![]() Once a week on Friday—full
Once a week on Friday—full
![]() Once a month—custom
Once a month—custom
You can combine these three backup strategies into a custom SMS plan for your organization. Here are a few ideas:
![]() Full backup during every backup session
Full backup during every backup session
![]() Full backup combined with incremental backups
Full backup combined with incremental backups
![]() Full backup combined with differential backups
Full backup combined with differential backups
When you’re choosing a backup strategy, consider the time required by each method to back up the data and the time required by each method to restore the data. An efficient balance of backup and restore duration provides you with an excellent solution to NetWare 6 workstation and server fault tolerance.
Now that you’ve learned the fundamental architecture of SMS and chosen our ideal backup strategy, it’s time for action! Let’s take a closer look at SMS backup/restore procedures.
We’ll begin our configuration of SMS by setting things up for SBCON and NWBACK32. Follow these steps:
1. Load the tape device driver or driver interface on the host server.
![]() Device drivers are placed in the STARTUP.NCF file when NetWare 6 is installed. The following are the commands that should appear in the STARTUP.NCF file:
Device drivers are placed in the STARTUP.NCF file when NetWare 6 is installed. The following are the commands that should appear in the STARTUP.NCF file:
LOAD PATH controller_device_driver_name
LOAD PATH storage_device_driver_name
![]() From NWCONFIG, select Driver Options, and then Configure Disk and Storage Device Drivers. You can select Discover and Load Additional Drivers and, if the drivers exist, they will be loaded. Alternately, you can select Additional Driver, and then select a driver from the displayed list.
From NWCONFIG, select Driver Options, and then Configure Disk and Storage Device Drivers. You can select Discover and Load Additional Drivers and, if the drivers exist, they will be loaded. Alternately, you can select Additional Driver, and then select a driver from the displayed list.
![]() If you’ve added an external device, or if you’ve loaded HAM drivers, enter the following at the server console:
If you’ve added an external device, or if you’ve loaded HAM drivers, enter the following at the server console:
LIST DEVICES
![]() Enter the following at the system console to register the storage device with the system:
Enter the following at the system console to register the storage device with the system:
SCAN FOR NEW DEVICES
TIP
If you load the drivers from STARTUP.NCF or NWCONFIG, you don’t need to use the SCAN FOR NEW DEVICES command.
2. Load the appropriate TSAs by using the commands shown in Table 3.9: Keep in mind that TSAs can be loaded and unloaded as needed to conserve server RAM. If the TSAs remain on the system, SMDR is loaded when NetWare SBCON is activated.
3. Load the NetWare SMS NLMs on the host server by entering the following command:
SMSSTART
NLMs such as TSA600.NLM, TSAPROXY.NLM, and SMDR.NLM are loaded with default configuration values.

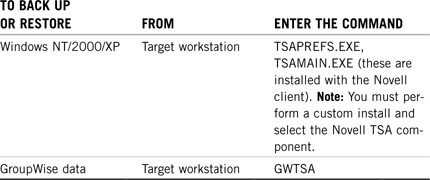
REAL WORLD
When loading TSAs during a backup or restore procedure, keep the following guidelines in mind:
![]() When backing up the eDirectory database, load TSANDS.NLM once on the server with a replica of the largest partition.
When backing up the eDirectory database, load TSANDS.NLM once on the server with a replica of the largest partition.
![]() When backing up the file system, load TSA600.NLM for its server and on every server to be backed up.
When backing up the file system, load TSA600.NLM for its server and on every server to be backed up.
![]() When backing up workstations, load the appropriate TSA on the workstation.
When backing up workstations, load the appropriate TSA on the workstation.
You can also place the commands in the server’s STARTUP.NCF file, and in the workstation’s NET.CFG file, AUTOEXEC.BAT file (for DOS), or Startup folder (for OS/2.
You’re now ready to start and exit SBCON and NWBACK32. Let’s start with SBCON by following these steps:
1. From the server console, enter the following command:
SBCON
2. When the NetWare Backup/Restore dialog appears, perform backup and restore tasks.
3. When you finish using SBCON, you must exit SBCON and unload SMS modules to free memory on your host server or target. Exit SBCON by pressing Esc until you reach the main menu. Press Esc and select Yes.
4. Unload the SMS modules at the prompt by entering the following command:
SMSSTOP
TIP
If you receive a warning that says an NLM is being used by another NLM, consider keeping the module loaded. Otherwise, your server might abend.
Now let’s start and exit NWBACK32 by following these steps:
1. From your workstation, log in to the desired eDirectory tree.
2. (Conditional) If this is the first time you’ve used NWBACK32, do the following:
![]() Log in to the server that’s running the backup engine and enter your username and password.
Log in to the server that’s running the backup engine and enter your username and password.
![]() Enter the name of the eDirectory tree you’ll use to back up and restore data.
Enter the name of the eDirectory tree you’ll use to back up and restore data.
![]() Enter the SMDR context that you created during server creation.
Enter the SMDR context that you created during server creation.
![]() Enter the SMDR group context that you created during server creation.
Enter the SMDR group context that you created during server creation.
3. Run NWBACK32.EXE (located in SYS:PUBLIC).
![]() Browse to SYS:PUBLIC
Browse to SYS:PUBLIC
![]() Double-click NWBACK32.EXE
Double-click NWBACK32.EXE
4. In NWBACK32, specify the information that will be backed up (or restored) from the target server and the location where the information will be backed up. Also, select the type of backup you will perform (full, incremental, differential, or custom).
5. Set the schedule and rerun interval. Finally, complete the configuration by providing a description for the session.
6. Submit the job, insert the media, and proceed with the backup. Add tapes (or other media) as required.
7. When you finish using NWBACK32, you must exit NWBACK32 and unload SMS modules to free memory on your host server or target. Exit NWBACK32 by selecting File and then Exit.
8. Unload the SMS modules at the prompt by entering the following command:
SMSSTOP
In addition to the data files created during a backup of files and directories, a log and corresponding error files also are created on the host server for each backup and restore job. You should be familiar with these log and error files, where they are located, and how to access them from SBCON and NWBACK32.
By default, log and error files for a backup session are stored in a directory such as SYS:SYSTEMTSALOG. You can create your own directory for the log and error files as long as it resides on the host server. Log and error files for a restore session are stored in the SYS:SYSTEMTSARESTORE directory. You cannot modify the location for those files.
Log files contain the following information:
![]() Session date and time, along with a description you enter
Session date and time, along with a description you enter
![]() Target from where the data was backed up
Target from where the data was backed up
![]() Target that was backed up and the location on the server where the data was restored to during a restore session
Target that was backed up and the location on the server where the data was restored to during a restore session
![]() Media set identification information
Media set identification information
![]() Area of the file system that was backed up or restored
Area of the file system that was backed up or restored
![]() Names of the files that were backed up or restored
Names of the files that were backed up or restored
![]() Numerical location of the data on the storage media
Numerical location of the data on the storage media
Error files contain the following information:
![]() List of errors that occurred during a backup or restore session
List of errors that occurred during a backup or restore session
![]() Session date and time, along with a description you entered
Session date and time, along with a description you entered
![]() Target from where the data was backed up
Target from where the data was backed up
![]() Target that was backed up and the location on the server where the data was restored to during a restore session
Target that was backed up and the location on the server where the data was restored to during a restore session
![]() Media set identification information
Media set identification information
![]() Area of the file system that was backed up or restored
Area of the file system that was backed up or restored
![]() Number of parents and children backed up or restored
Number of parents and children backed up or restored
![]() Names of the files that were not backed up or restored, along with error messages or information
Names of the files that were not backed up or restored, along with error messages or information
![]() Skipped data sets (that is, any file that is open when a session begins is not backed up or restored)
Skipped data sets (that is, any file that is open when a session begins is not backed up or restored)
You can access log and error files through the SBCON main menu by using the Log File Administration option. To access these files through Windows 95/98, 2000/NT, you can use the NWBACK32 Report menu and select Session or Error.
SBCON and NWBACK32 keep a list of all log and error files. This list includes the description you enter for the session, the date and time you started a backup session (or, in the case of a delayed session, the time the session was scheduled), and the name of the target the data was backed up from.
Now, what would all this knowledge amount to without a bit of guidance? Let’s review some general SMS guidelines just for safekeeping.
Before performing a backup or a restore, ensure that you meet the following guidelines:
![]() Load the NetWare backup/restore software on the NetWare server on which the backup device is attached (that is, the host). Keep in mind that SMS operates on the server, not the workstation like most backup software systems.
Load the NetWare backup/restore software on the NetWare server on which the backup device is attached (that is, the host). Keep in mind that SMS operates on the server, not the workstation like most backup software systems.
![]() Verify that you have enough disk space on the host server’s SYS: volume for temporary files and log files. 1MB should be sufficient.
Verify that you have enough disk space on the host server’s SYS: volume for temporary files and log files. 1MB should be sufficient.
![]() Confirm that the designated media has enough storage space. Be aware that security can be compromised if the scheduled backup session does not fit on the media. If the data doesn’t fit, you’ll be prompted to insert another tape (or other medium) when the first one is full. If another medium is not inserted, the backup will not finish and the program will not terminate. To reduce this risk, set Append to No, attend the backup so that you can insert the next tape, or use a tape loader backup device.
Confirm that the designated media has enough storage space. Be aware that security can be compromised if the scheduled backup session does not fit on the media. If the data doesn’t fit, you’ll be prompted to insert another tape (or other medium) when the first one is full. If another medium is not inserted, the backup will not finish and the program will not terminate. To reduce this risk, set Append to No, attend the backup so that you can insert the next tape, or use a tape loader backup device.
![]() Limit access to the NetWare SBCON NLMs to maintain the security of your NetWare 6 server and to ensure data integrity.
Limit access to the NetWare SBCON NLMs to maintain the security of your NetWare 6 server and to ensure data integrity.
![]() Remember that the error and backup log files display both the DOS-equivalent name and the name space (such as FTAM, DOS, Macintosh, or OS/2) used to create the directory or file.
Remember that the error and backup log files display both the DOS-equivalent name and the name space (such as FTAM, DOS, Macintosh, or OS/2) used to create the directory or file.
![]() Monitor the size of NetWare SBCON temporary files. These temporary files may become quite large if there are extended attributes or linked Unix files.
Monitor the size of NetWare SBCON temporary files. These temporary files may become quite large if there are extended attributes or linked Unix files.
![]() Do not mount or dismount volumes or unload drivers during a backup session. You might corrupt data or abend the host server.
Do not mount or dismount volumes or unload drivers during a backup session. You might corrupt data or abend the host server.
![]() The backup administrator will need Read and File Scan [RF] access rights to the directories and files that she plans to back up. The administrator will also need additional rights (that is, [RWCEMF]) for restoring data.
The backup administrator will need Read and File Scan [RF] access rights to the directories and files that she plans to back up. The administrator will also need additional rights (that is, [RWCEMF]) for restoring data.
![]() The backup administrator will need the Browse [B] object right and Read [R] property right to the entire tree for backing up eDirectory information. He will also need the Create [C] eDirectory right to the tree for restoring eDirectory data.
The backup administrator will need the Browse [B] object right and Read [R] property right to the entire tree for backing up eDirectory information. He will also need the Create [C] eDirectory right to the tree for restoring eDirectory data.
![]() The backup administrator must know the password on all servers that act as hosts and targets. In addition, the backup administrator must know the password to a workstation if a password has been used with the target software.
The backup administrator must know the password on all servers that act as hosts and targets. In addition, the backup administrator must know the password to a workstation if a password has been used with the target software.
![]() Create an electronic label for the storage medium before backing up data. If the medium does not have an electronic label, SBCON displays a message indicating that the medium cannot be identified.
Create an electronic label for the storage medium before backing up data. If the medium does not have an electronic label, SBCON displays a message indicating that the medium cannot be identified.
![]() If you’re using a tape storage medium and appending a backup session to a set of two or more tapes, use the tape having the maximum space first.
If you’re using a tape storage medium and appending a backup session to a set of two or more tapes, use the tape having the maximum space first.
![]() Exit all utilities before unloading drivers. If you unload a manually loaded driver before exiting the backup utility, the host server might abend.
Exit all utilities before unloading drivers. If you unload a manually loaded driver before exiting the backup utility, the host server might abend.
TIP
Study the SMS guidelines carefully. Pay particular attention to the management of log files, name space, and SMS volumes. Also, remember the backup administrator security requirements for eDirectory backup ([BR]), eDirectory restore ([BCR]), file system backup ([RF]), and file system restore ([RWCEMF]).
There you have it! That wasn’t so hard, was it? In this section, we explored the fundamental architecture, backup strategies, and detailed steps of NetWare 6 SMS backup and restore. After you’ve completed these procedures, you’ll find a certain peace of mind in knowing that your server and workstations are protected.
Vro-o-o-o-m!
In this chapter, we focused on the NetWare 6 server as a vehicle for cruising the information superhighway. We learned a little about server console management, and a lot about how to supercharge the server using Remote Manager, iMonitor, and iManager. In addition, we explored two powerful file system and backup strategies: Novell Storage Services (NSS) and Storage Management Services (SMS).
Now what? As I said earlier, “This is only the beginning.” In the next chapter, we’ll continue this advanced management journey with a discussion of advanced NetWare 6 client management.