
Chapter 17 Novell eDirectory Troubleshooting
This chapter covers the following testing objectives for Novell Course 3005: Advanced Novell Network Management:
![]() Identify eDirectory Databases and Processes
Identify eDirectory Databases and Processes
![]() Identify eDirectory Troubleshooting Steps
Identify eDirectory Troubleshooting Steps
![]() Identify Partition and Replication Placement Design
Identify Partition and Replication Placement Design
![]() Use iMonitor Reports to Obtain Server and eDirectory Information
Use iMonitor Reports to Obtain Server and eDirectory Information
![]() Perform Health Checks
Perform Health Checks
NetWare 6 introduces eDirectory 8.7, the greatest version to date of Novell’s world-class directory service.
eDirectory is the world’s leading directory service. It provides a unifying, cross-platform infrastructure for managing, securing, accessing, and developing all major components of your network. eDirectory scales to the largest network environments, including the Internet. Because it is based on the X.500 standard, eDirectory supports LDAP, HTTP, and the Java programming environment.
eDirectory can store and manage zillions of objects in a seamless ballet of communications. It also provides the foundation network service for all NetWare servers and network resources. In fact, after network communications, eDirectory is the most fundamental network service offered by NetWare 6.
When you make changes to eDirectory, the changes are replicated throughout the entire eDirectory tree. The size of your eDirectory tree, the number of servers, and the number of replicas you have determine the time it takes to distribute these changes.
With all this in mind, I’m sure you’ll agree that eDirectory health is one of your key responsibilities as a Novell CNE (Certified Novell Engineer). In this final chapter of Part II, we’ll develop an eDirectory maintenance plan to help you ensure the health of your eDirectory. This maintenance plan will accomplish two important goals: eDirectory performance and eDirectory reliability. In fact, we’ll develop our own eDirectory troubleshooting model with eight simple steps to guarantee the peaceful co-existence of eDirectory and users.
Here’s a preview of what’s in store:
![]() “Understanding eDirectory 8.7”—First, we’ll begin with a brief lesson in the architecture of eDirectory 8.7 and compare it to its predecessor, Novell Directory Services (NDS). Novell has added a few improvements to eDirectory 8.7 that you haven’t seen yet in eDirectory 8.6. Then we’ll identify several eDirectory processes that might need attention after network changes or migration. The future is now!
“Understanding eDirectory 8.7”—First, we’ll begin with a brief lesson in the architecture of eDirectory 8.7 and compare it to its predecessor, Novell Directory Services (NDS). Novell has added a few improvements to eDirectory 8.7 that you haven’t seen yet in eDirectory 8.6. Then we’ll identify several eDirectory processes that might need attention after network changes or migration. The future is now!
![]() “Novell eDirectory Troubleshooting Model”—Next, we’ll tackle Novell’s other great troubleshooting model: eDirectory. With this eight-step doozy, you’ll be able to identify eDirectory problems, implement solutions, and document everything. In addition, you’ll learn some procedures for avoiding repeat performances.
“Novell eDirectory Troubleshooting Model”—Next, we’ll tackle Novell’s other great troubleshooting model: eDirectory. With this eight-step doozy, you’ll be able to identify eDirectory problems, implement solutions, and document everything. In addition, you’ll learn some procedures for avoiding repeat performances.
![]() “Troubleshooting eDirectory with iMonitor”—In the final lesson of this chapter, we’ll explore a comprehensive eDirectory maintenance plan to help ensure the health of your directory. eDirectory troubleshooting is accomplished in two steps: diagnosis and repair. We’ll begin with a thorough diagnosis of eDirectory using iMonitor. Then, after we’ve diagnosed the Directory, we’ll repair it—also using iMonitor.
“Troubleshooting eDirectory with iMonitor”—In the final lesson of this chapter, we’ll explore a comprehensive eDirectory maintenance plan to help ensure the health of your directory. eDirectory troubleshooting is accomplished in two steps: diagnosis and repair. We’ll begin with a thorough diagnosis of eDirectory using iMonitor. Then, after we’ve diagnosed the Directory, we’ll repair it—also using iMonitor.
As you can see, there’s a lot to learn in this chapter. When it’s all done, you’ll be an accomplished eDirectory engineer. So, let’s get started at the beginning: understanding eDirectory 8.7.
Test Objective Covered:
![]() Identify eDirectory Databases and Processes
Identify eDirectory Databases and Processes
eDirectory 8.7 is a highly scalable, high-performing, secure directory service. Along with replication and partitioning capabilities, eDirectory provides the basic foundation for multiplatform networking. eDirectory also includes cryptography services to protect confidential data; it natively supports LDAP 3 over SSL (Secure Sockets Layer).
Earlier versions of eDirectory were called Novell Directory Services (NDS). At first glance, eDirectory appears to have the same underlying architecture as eDirectory. That is, a distributed, object-oriented database organized as a hierarchical tree. Upon closer inspection, however, you’ll find that eDirectory 8.7 is built on a much more sophisticated database structure than earlier versions of NDS.
Let’s take a closer look at the underlying architectural differences between NDS and eDirectory, starting with NDS.
NDS was first introduced in NetWare 4. Prior to NetWare 4, NetWare operating systems relied on a server-centric model in which each NetWare server had its own flat-file database for tracking network resources (called the bindery). The bindery consisted of three files: one that held object information, one that held property information, and one that held value information.
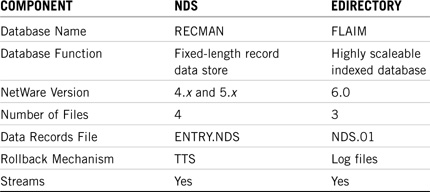
NDS offered a gigantic leap forward by evolving the server-centric model into a network-centric model. In this architecture (shown in Figure 17.1), the NetWare 4 operating system relies on four data files and multiple streams files located in a hidden directory on the server’s SYS: volume. This database is referred to as the RECMAN database.

The four files that make up the NDS architecture in Figure 17.1 perform these functions:
![]() PARTITIO.NDS—The partition database contains a list of database partitions including system, schema, external reference, and bindery.
PARTITIO.NDS—The partition database contains a list of database partitions including system, schema, external reference, and bindery.
![]() ENTRY.NDS—The object database contains records for each object in a given server’s replicas.
ENTRY.NDS—The object database contains records for each object in a given server’s replicas.
![]() VALUE.NDS—The attribute database contains property values for each object in ENTRY.NDS.
VALUE.NDS—The attribute database contains property values for each object in ENTRY.NDS.
![]() BLOCK.NDS—The block database contains overflow data for the attribute database.
BLOCK.NDS—The block database contains overflow data for the attribute database.
NDS streams files are named with hexadecimal characters (0–9, A–F) and hold information such as print job configurations and login scripts. Earlier versions of NDS used Novell’s Transaction Tracking System (TTS) to ensure that database transactions were either completed or backed out in the event of a system failure.
eDirectory 8.7 improves on NDS’ fixed-length record data store model by introducing a highly scalable indexed database called the FLAIM (FLexible and Adaptable Information Manager). The FLAIM database uses three different types of files instead of four, but still relies on streams files for print job configurations and login scripts. Check out the eDirectory 8.7 architecture in Figure 17.2.

The following is a description of the three different types of files that make up eDirectory’s FLAIM database:
![]() NDS.DB—The control file is the centerpiece of the eDirectory architecture. This file contains the rollback log and is used to abort incomplete transactions.
NDS.DB—The control file is the centerpiece of the eDirectory architecture. This file contains the rollback log and is used to abort incomplete transactions.
![]() NDS.01—The primary database file contains all records and indexes found on a given server. When this data file reaches 2GB in size, NDS.02 is created for the remaining data. New files are then created as necessary to keep database files from growing beyond 2GB. This allows the database files to remain scalable while retaining their quick search capabilities.
NDS.01—The primary database file contains all records and indexes found on a given server. When this data file reaches 2GB in size, NDS.02 is created for the remaining data. New files are then created as necessary to keep database files from growing beyond 2GB. This allows the database files to remain scalable while retaining their quick search capabilities.
![]() NDS*.LOG—The transaction log file acts as a roll-forward log to reapply completed transactions that might not have been fully written to disk because of a system interruption.
NDS*.LOG—The transaction log file acts as a roll-forward log to reapply completed transactions that might not have been fully written to disk because of a system interruption.
eDirectory streams files perform the same function as they do in NDS and have an .NDS extension. However, unlike NDS, eDirectory does not use TTS; instead, it uses log files to back out and roll forward transactions in the event of a system failure. See Table 17.1 for a summary of the differences between eDirectory and NDS architecture.
TIP
The primary eDirectory database file, NDS.01, includes a number of indexes to enhance performance. First, it includes attribute substring indexes for the CN and uniqueID fields. Second, it includes attribute indexes for the Object Class and dc fields. Finally, it includes attribute indexes for positioning that include strings beginning with CN, uniqueID, Given Name, and Surname.
The eDirectory architecture described here provides an exceptional foundation for all of eDirectory 8.7’s new features and benefits. The following is a brief list of some of eDirectory’s greatest new advancements:
![]() eDirectory 8.7 can be implemented on any of these operating system platforms: NetWare, Windows NT, Windows 2000, Windows 2003, Linux, Solaris, and Tru64 Unix. Client libraries and LDAP tools are available for Linux, Solaris, and Tru64 Unix. LDAP support provides an open structure for integration with applications that are written to the LDAP standard.
eDirectory 8.7 can be implemented on any of these operating system platforms: NetWare, Windows NT, Windows 2000, Windows 2003, Linux, Solaris, and Tru64 Unix. Client libraries and LDAP tools are available for Linux, Solaris, and Tru64 Unix. LDAP support provides an open structure for integration with applications that are written to the LDAP standard.
![]() The Index Manager tool enables you to manage database indexes easily. The Filtered Replica Configuration Wizard makes it simple to create filtered replicas.
The Index Manager tool enables you to manage database indexes easily. The Filtered Replica Configuration Wizard makes it simple to create filtered replicas.
![]() The eDirectory Import/Export Wizard enables you to import and export LDIF files and to perform a server-to-server data migration.
The eDirectory Import/Export Wizard enables you to import and export LDIF files and to perform a server-to-server data migration.
![]() eDirectory includes a merge utility that enables you to merge one directory tree into another or to graft one tree onto another.
eDirectory includes a merge utility that enables you to merge one directory tree into another or to graft one tree onto another.
![]() iMonitor provides monitoring and diagnostic capabilities for all servers in your eDirectory tree from a Web browser.
iMonitor provides monitoring and diagnostic capabilities for all servers in your eDirectory tree from a Web browser.
When you make changes to eDirectory, you should make sure that all the critical eDirectory processes are complete, and verify that all is well in the eDirectory kingdom. The following are three important eDirectory processes that are affected by network changes and migration:
![]() Time synchronization—Time synchronization is very important to eDirectory. All servers in a tree must be synchronized to the same time source. If they aren’t, collisions will occur when objects are being synchronized in replicas. Synchronizing time across the network enables you to maintain consistent time stamps. The most common time stamp problem is with synthetic time. Synthetic time occurs when an eDirectory object has a modification time stamp that’s ahead of current network time. If the period between the current time and the synthetic time is small, this problem will correct itself. However, if the period is large, you might have to resolve the problem manually.
Time synchronization—Time synchronization is very important to eDirectory. All servers in a tree must be synchronized to the same time source. If they aren’t, collisions will occur when objects are being synchronized in replicas. Synchronizing time across the network enables you to maintain consistent time stamps. The most common time stamp problem is with synthetic time. Synthetic time occurs when an eDirectory object has a modification time stamp that’s ahead of current network time. If the period between the current time and the synthetic time is small, this problem will correct itself. However, if the period is large, you might have to resolve the problem manually.
![]() Schema synchronization—Schema synchronization ensures that the schema is consistent across all partitions in the eDirectory tree and that all schema changes are updated across the network. By default, the schema is automatically synchronized every four hours. Schema synchronization is required whenever a change is made to the schema. For example, when you add a new class, modify an attribute definition, or delete a schema definition, this information must be distributed. The following DSTRACE command forces schema synchronization to occur manually:
Schema synchronization—Schema synchronization ensures that the schema is consistent across all partitions in the eDirectory tree and that all schema changes are updated across the network. By default, the schema is automatically synchronized every four hours. Schema synchronization is required whenever a change is made to the schema. For example, when you add a new class, modify an attribute definition, or delete a schema definition, this information must be distributed. The following DSTRACE command forces schema synchronization to occur manually:
SET DSTRACE=ON
SET DSTRACE=+SCHEMA
SET DSTRACE=*S
![]() Replica synchronization—Replica synchronization refers to the process of copying data among the replicas of a partition. A partition is synchronized if all its replicas contain the same information. If one replica has a more current version of a piece of data than the other replicas, it propagates this data to the other replicas. Receiving 0 errors for replica synchronization indicates that your directory is healthy.
Replica synchronization—Replica synchronization refers to the process of copying data among the replicas of a partition. A partition is synchronized if all its replicas contain the same information. If one replica has a more current version of a piece of data than the other replicas, it propagates this data to the other replicas. Receiving 0 errors for replica synchronization indicates that your directory is healthy.
This completes our architectural lesson of eDirectory 8.7. I hope that you’ve gained an appreciation for the sophisticated directory services platform that eDirectory 8.7 provides for your NetWare 6 network. Now that you understand how it’s built, you’re ready for the eight-step eDirectory troubleshooting model.
Test Objective Covered:
![]() Identify eDirectory Troubleshooting Steps
Identify eDirectory Troubleshooting Steps
In Chapter 10, “NetWare 6 Troubleshooting Fundamentals,” we discussed the NetWare troubleshooting model. This six-step model provided us with a great game plan for troubleshooting and resolving network problems. Together, we explored quick fixes, data gathering, diagnostic tools, problem isolation, testing, and documentation.
This is your chance to expand this model to troubleshoot eDirectory problems. However, unlike LAN and server problems, the key to troubleshooting eDirectory is to be patient. eDirectory uses its database processes to verify, validate, and distribute data. Most often, if given time, eDirectory will correct itself.
If eDirectory does not correct itself, it’s time for the eight-step eDirectory troubleshooting model:
![]() Step 1: Identify the scope of the problem
Step 1: Identify the scope of the problem
![]() Step 2: Determine the cause of the problem
Step 2: Determine the cause of the problem
![]() Step 3: List possible solutions to the problem
Step 3: List possible solutions to the problem
![]() Step 4: Assess possible solutions
Step 4: Assess possible solutions
![]() Step 5: Implement a solution
Step 5: Implement a solution
![]() Step 6: Verify that the problem is resolved
Step 6: Verify that the problem is resolved
![]() Step 7: Document the resolution to the problem
Step 7: Document the resolution to the problem
![]() Step 8: Avoid repeating the problem
Step 8: Avoid repeating the problem
Let’s take a closer look.
Before you can resolve a problem, you need to know the extent of the problem. This occurs during the data-gathering phase of troubleshooting. During this phase, you should develop a detailed list of problems, including symptoms and affected users. Symptoms of eDirectory problems can show themselves in many ways. They can appear on their own as error or warning messages on the server console or within utilities, or they can appear when a user attempts to log in but cannot authenticate.
Next, try to determine whether the problem is unique to a single user, a particular group of users, or all network users. Also, attempt to ascertain when and under what conditions the symptoms occur. Determine whether the problem is communications related (for example, if the problem only occurs during peak LAN utilization periods). You can use a protocol analyzer (such as LANalyzer for Windows) to track network bandwidth and to uncover communications-related anomalies.
Finally, determine whether it’s an eDirectory-specific problem. eDirectory problems can appear as error codes when you attempt to perform an eDirectory operation or while performing a proactive eDirectory health check. The following are examples of eDirectory problems:
![]() Time synchronization issues
Time synchronization issues
![]() Synchronization issues
Synchronization issues
![]() eDirectory version problems
eDirectory version problems
![]() Improperly moved/removed servers
Improperly moved/removed servers
![]() Inconsistent object/database
Inconsistent object/database
![]() Agent process errors
Agent process errors
![]() Performance issues
Performance issues
To help you assess the scope of an eDirectory problem, record the following information: the symptom (what happened that tells you there might be a problem); the eDirectory error number; the partition, replica, server, or object with the error; and the servers holding the partition, replica, server, or object with the error. The following are some log files that will help you define the scope:
![]() Server personal log (SYS:SYSTEM/NRMUSERS.LOG)—Used to enter and track changes made to the server or to track server performance.
Server personal log (SYS:SYSTEM/NRMUSERS.LOG)—Used to enter and track changes made to the server or to track server performance.
![]() System error log (SYS:SYSTEM/SYS$LOG.ERR)—Used to view alert messages and system operation information sent to the system console and logger screens.
System error log (SYS:SYSTEM/SYS$LOG.ERR)—Used to view alert messages and system operation information sent to the system console and logger screens.
![]() Abend log (SYS:SYSTEM/ABEND.LOG)—Used to view information about all server abends. As we learned in the previous chapter, this abend log can be submitted to Novell for additional assistance.
Abend log (SYS:SYSTEM/ABEND.LOG)—Used to view information about all server abends. As we learned in the previous chapter, this abend log can be submitted to Novell for additional assistance.
![]() Server health log (SYS:SYSTEM/HEALTH.LOG)—Used to view all changes in the health status of the server. Using this report along with several of the health statistics and trend reports can be useful in diagnosing server problems.
Server health log (SYS:SYSTEM/HEALTH.LOG)—Used to view all changes in the health status of the server. Using this report along with several of the health statistics and trend reports can be useful in diagnosing server problems.
Each of these log files starts automatically when you start your server, and each can help you address problems.
After you’ve gathered all the required diagnostic data, your next task is to use the information you gathered, along with background knowledge you have of eDirectory, to determine whether the problem is a result of operating system, application software, equipment, or user error.
eDirectory usually reports errors or has problems because a condition exists that prevents an eDirectory process from completing properly. Not all eDirectory issues are obvious, and an eDirectory error code might be only a symptom of the real issue.
To determine the cause of the problem, do the following:
![]() Determine whether the problem is an eDirectory problem or something else, such as an unattached cable.
Determine whether the problem is an eDirectory problem or something else, such as an unattached cable.
![]() Carefully analyze the information gathered about your eDirectory problem. Determine what eDirectory process is having a problem and why.
Carefully analyze the information gathered about your eDirectory problem. Determine what eDirectory process is having a problem and why.
![]() Use eDirectory research resources to provide insight into what the real problem might be.
Use eDirectory research resources to provide insight into what the real problem might be.
After you’ve determined what process is having the problem and why, you can formulate a solution to the problem. That’s step 3.
After you’ve determined the source of the problem, your next step is to develop a troubleshooting plan of attack. The best approach typically includes a combination of intuition and methodology. First, you should use your intuition to identify the two or three most likely causes of the problem (that is, hypotheses), as well as to determine how long it will take to fix or eliminate each cause. Potential costs to keep in mind include technician time, parts, and equipment downtime.
There are often several ways to resolve an eDirectory problem. You might even find multiple support documents recommending different solutions to the same eDirectory error. eDirectory utilities also might suggest multiple ways to solve an eDirectory error.
Before taking any action to resolve an eDirectory error, you should
![]() Gather and list possible solutions—Access Knowledgebase at support.novell.com to gather information regarding your problem and possible solutions to the problem.
Gather and list possible solutions—Access Knowledgebase at support.novell.com to gather information regarding your problem and possible solutions to the problem.
![]() List the repercussions of each action—Listing the repercussions of each action is critical because the problem can often be made worse if the wrong solution is applied. For example, if the first solution you try is to remove and reinstall eDirectory, you’ll probably lose some data.
List the repercussions of each action—Listing the repercussions of each action is critical because the problem can often be made worse if the wrong solution is applied. For example, if the first solution you try is to remove and reinstall eDirectory, you’ll probably lose some data.
After you’ve listed possible solutions to your eDirectory problem, assess the solutions based on the following:
![]() The likelihood that it will solve your problem
The likelihood that it will solve your problem
![]() How easy or hard the solution is to implement
How easy or hard the solution is to implement
![]() What effect the implementation process will have on users
What effect the implementation process will have on users
![]() Whether the solution will have a destructive effect on the eDirectory tree
Whether the solution will have a destructive effect on the eDirectory tree
To assess possible solutions, you must have a clear understanding of eDirectory, the problem you are facing, the solution, and the ramifications of applying the solution. Assessing the possible solutions might involve deciding between contradicting solutions from various sources. Ask co-workers and others what actions they would take. If possible, test the solutions in a lab environment before implementing them. Check out Chapter 21, “Novell eDirectory Implementation,” for more information.
After you’ve developed your troubleshooting plan, the next step is to execute it. Step 5 utilizes the following scientific approach:
![]() Break your plan (or each hypothesis) into small, easily testable components.
Break your plan (or each hypothesis) into small, easily testable components.
![]() Test each component by changing only one thing at a time. Otherwise, you won’t know which change solved the problem.
Test each component by changing only one thing at a time. Otherwise, you won’t know which change solved the problem.
![]() After you’ve finished testing each component, document your results, return the component to its original state, and then move on to the next test.
After you’ve finished testing each component, document your results, return the component to its original state, and then move on to the next test.
![]() Watch for blind spots (which occur when the tester does not realize something that’s obvious). If you suspect a blind spot, try consulting a trusted colleague or take a break and think of something else.
Watch for blind spots (which occur when the tester does not realize something that’s obvious). If you suspect a blind spot, try consulting a trusted colleague or take a break and think of something else.
![]() If the plan is unsuccessful, access additional resources, such as the Novell Support Connection Web site at support.novell.com.
If the plan is unsuccessful, access additional resources, such as the Novell Support Connection Web site at support.novell.com.
The tools used to implement a solution are often the same tools used to diagnose the problem. Allow enough time for your actions to resolve the problem. eDirectory takes time to synchronize changes throughout the network. So, even after you fix a problem, you might still see symptoms of a problem until eDirectory synchronizes.
Even when you find and resolve an eDirectory problem, it isn’t actually fixed until the user (and/or the user’s manager) is satisfied. Although some users will be happy just knowing that the problem has been solved, others will want a detailed explanation of the problem and solution and training on how the network should work versus how it currently is working.
Also, verification that a problem has truly been fixed can be dependent on the nature of the problem. Some solutions, for example, might have to be monitored for hours (or days) to ensure success. To verify that an eDirectory problem has been resolved, you should
![]() Use the eDirectory diagnostic tools to check the status of eDirectory.
Use the eDirectory diagnostic tools to check the status of eDirectory.
![]() Attempt to repeat the actions that revealed the eDirectory problem. If the eDirectory problem revealed itself while you were attempting an eDirectory operation, attempt that operation again to see whether it can be successfully accomplished. If the problem was revealed through an eDirectory utility, run the same utility and see whether the problem occurs again.
Attempt to repeat the actions that revealed the eDirectory problem. If the eDirectory problem revealed itself while you were attempting an eDirectory operation, attempt that operation again to see whether it can be successfully accomplished. If the problem was revealed through an eDirectory utility, run the same utility and see whether the problem occurs again.
![]() Continue to monitor eDirectory.
Continue to monitor eDirectory.
Documentation is a critical but often overlooked step in the eDirectory troubleshooting model. Although solving a problem is important, many network problems reoccur. That means those who do not learn from history are destined to repeat it. Whenever you discover a solution to a problem, record the problem and solution in your problem resolution log. Conversely, whenever a problem arises, one of the first sources you should consult is the problem resolution log. If you don’t use a problem resolution log, now is a good time to start.
Novell Remote Manager has a user-friendly interface to the NRMUSERS.LOG file—the server maintenance log. NRMUSERS.LOG enables you to
The final step in the process is to avoid repeating it! You should
![]() Document the problem and the solution
Document the problem and the solution
![]() Establish procedures and policies to ensure that people who administer or use the eDirectory tree will do so in a consistent, approved, and established manner
Establish procedures and policies to ensure that people who administer or use the eDirectory tree will do so in a consistent, approved, and established manner
![]() Take precautions, such as restricting access to servers
Take precautions, such as restricting access to servers
That completes Novell’s eDirectory troubleshooting model. I hope that you are now a well-trained doctor of eDirectory medicine. To summarize the model, step 1 involves gathering data and identifying the scope of the problem. Next, step 2 provides some possible causes and step 3 provides a plan to isolate problems and lists solutions. In step 4, you assess the solutions and in step 5 you execute your plan. Then, in steps 6 and 7, you ensure user satisfaction and document your resolution, respectively. Finally, in step 8, you take the greatest proactive troubleshooting leap forward by NOT repeating the problem again.
Now, it’s time for action. Let’s troubleshoot eDirectory with iMonitor. Go team!
Test Objectives Covered:
![]() Identify Partition and Replication Placement Design
Identify Partition and Replication Placement Design
![]() Use iMonitor Reports to Obtain Server and eDirectory Information
Use iMonitor Reports to Obtain Server and eDirectory Information
![]() Perform Health Checks
Perform Health Checks
Welcome to eDirectory troubleshooting action!
iMonitor is Novell’s latest anytime, anywhere server monitoring and diagnostic tool. iMonitor enables you to monitor and repair all servers in your eDirectory tree—regardless of platform. All you have to do is point your Web browser at the server’s 8008 port and NetWare 6 takes over from there.
In Chapter 5, “NetWare 6 eDirectory Management,” we explored iMonitor from an eDirectory maintenance point of view. Now it’s time to explore this great Web-based tool from an eDirectory troubleshooting perspective.
To use iMonitor, you must first ensure that the appropriate application is running on your eDirectory server. When using NetWare 6, NDSIMON.NLM is automatically placed in AUTOEXEC.NCF; therefore, it is launched on server startup. If you’re using Windows NT/2000, the iMonitor service automatically loads on eDirectory startup. And last but not least, Unix servers require the following manual command at the server console to activate iMonitor:
NDSIMONITOR -1
When the iMonitor application is running on your eDirectory server, it’s time to access all of its great features by using a compatible Web browser. Simply enter the following URL in your browser’s address field to access the iMonitor main page:
https://{server IP address}:8008/nds-summary
Figure 17.3 shows the iMonitor main page. It consists of three main frames: the navigation frame (sits at the top of Figure 17.3 and provides access to all of iMonitor’s feature- and nonfeature-related icons), the assistant frame (on the left side; the assistant frame lists additional navigation aids that help you drill down on data in the main content frame), and the main content frame (on the right side; lists all of your server’s monitoring and diagnostic statistics as well as additional navigation links).

In this final troubleshooting lesson, we’ll explore the following four eDirectory troubleshooting components within iMonitor:
![]() eDirectory reporting—This is the data-gathering phase of eDirectory troubleshooting. With iMonitor, you can view several server and eDirectory status reports, including Object Statistics, Service Advertising, and Agent Health.
eDirectory reporting—This is the data-gathering phase of eDirectory troubleshooting. With iMonitor, you can view several server and eDirectory status reports, including Object Statistics, Service Advertising, and Agent Health.
![]() eDirectory health checks—Next, you should conduct regular, proactive eDirectory health checks for time synchronization, partition continuity, background processes, schema synchronization, and distributed reference links.
eDirectory health checks—Next, you should conduct regular, proactive eDirectory health checks for time synchronization, partition continuity, background processes, schema synchronization, and distributed reference links.
![]() eDirectory tracing—In addition, you can use the Trace Configuration link in iMonitor to access the local server’s DS Trace debug utility. This feature provides three critical categories of information: DS Trace Options, Trace Line Prefixes, and Trace History.
eDirectory tracing—In addition, you can use the Trace Configuration link in iMonitor to access the local server’s DS Trace debug utility. This feature provides three critical categories of information: DS Trace Options, Trace Line Prefixes, and Trace History.
![]() eDirectory repair—After you’ve diagnosed an eDirectory problem, it’s time to repair it. Not surprisingly, this is accomplished using the Repair wrench icon at the top of iMonitor. This page enables you to view problems with your eDirectory database and backup or clean them as needed.
eDirectory repair—After you’ve diagnosed an eDirectory problem, it’s time to repair it. Not surprisingly, this is accomplished using the Repair wrench icon at the top of iMonitor. This page enables you to view problems with your eDirectory database and backup or clean them as needed.
That’s eDirectory troubleshooting in a nutshell. Let’s get started with eDirectory reporting.
eDirectory troubleshooting begins with data gathering.
With iMonitor, you can view several server and eDirectory status reports, including: Object Statistics, Service Advertising, and Agent Health. In the Agent Summary screen, the icon at the left of the server address shows the status of your server. The color of the signal light represents the server status: green means the server is functioning properly, yellow indicates a problem, and red signifies that communication is not happening.
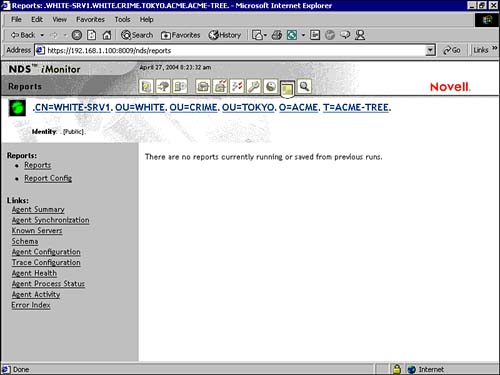
From the iMonitor home page, select the Reports option (as shown in Figure 17.4). When you select the Report icon, you’ll notice that there are two report options: Reports and Report Config. Reports is the default setting and it shows the reports you’ve generated. The first time you use the Report feature, you’ll get a message that no reports have been run for this server. After you’ve generated your first report, each time you select the Reports option, the reports you’ve run will appear.
In eDirectory 8.7, Report Config lists all your server reports, including the following preconfigured reports:
![]() Server Information—This report searches the entire tree, communicates with every NetWare core protocol server it can find, and reports errors. You can use this report to diagnose time synchronization and limber problems. (I’ll explain limber in the next section.) You can also use this report to verify communication with all other servers from this server’s perspective or to determine whether a server has been improperly removed. If you select this report in the Configuration page, the server can also generate DS Agent Health information for every server in the tree.
Server Information—This report searches the entire tree, communicates with every NetWare core protocol server it can find, and reports errors. You can use this report to diagnose time synchronization and limber problems. (I’ll explain limber in the next section.) You can also use this report to verify communication with all other servers from this server’s perspective or to determine whether a server has been improperly removed. If you select this report in the Configuration page, the server can also generate DS Agent Health information for every server in the tree.
![]() Obituary Listing—This report lists all obituaries on this server. Obituaries are attributes applied to an eDirectory object. There are 11 obituary types, such as move, rename, and so on.
Obituary Listing—This report lists all obituaries on this server. Obituaries are attributes applied to an eDirectory object. There are 11 obituary types, such as move, rename, and so on.
![]() Object Statistics—This report evaluates the objects in a given scope and generates lists of objects matching the requested criteria. The criteria can include such things as future time, unknown objects, renamed objects, counts of base classes, containers, aliases, and external references.
Object Statistics—This report evaluates the objects in a given scope and generates lists of objects matching the requested criteria. The criteria can include such things as future time, unknown objects, renamed objects, counts of base classes, containers, aliases, and external references.
![]() Service Advertising—This report lists all directories and servers known to this server through SLP (Service Location Protocol) or SAP (Service Advertising Protocol).
Service Advertising—This report lists all directories and servers known to this server through SLP (Service Location Protocol) or SAP (Service Advertising Protocol).
![]() Agent Health—This report gathers health information for this server. We will discuss this report in greater depth in the next section.
Agent Health—This report gathers health information for this server. We will discuss this report in greater depth in the next section.
![]() Custom Report—You can also create a customized report and/or scheduled events. Scheduled events are reports that run automatically at a pre-defined time.
Custom Report—You can also create a customized report and/or scheduled events. Scheduled events are reports that run automatically at a pre-defined time.
When you run a report, you can configure iMonitor to save a specified number of the same report. For example, the default setting for the Obituary Listing report is to keep the last five occurrences of the report.
That completes eDirectory troubleshooting, Phase 1—data gathering. Now, let’s continue with proactive health checks—also known as eDirectory diagnosis.
eDirectory troubleshooting is accomplished in two steps: diagnosis and repair. There are a number of server-based tools that you can run independently to gather information on the health of eDirectory. But iMonitor enables you to gather all of this information from a single location.
You can use iMonitor to perform the same tasks you might have performed previously using the tools DS Trace, DS Repair, DS Browse, and NDS Manager. As a general guideline, if your system is constantly changing, use iMonitor to verify eDirectory’s health status weekly. If your system hasn’t had changes, you should verify health status monthly.
The Agent Health link (shown in Figure 17.5) displays the general summary of your server’s eDirectory health. From this initial dialog box, you can obtain information regarding the health of the server’s agent, partitions, and replica rings. First and foremost, you should start with the agent’s health. When you click on the link shown in Figure 17.5, iMonitor will return an update on the following four items:
![]() One Successful Time Sync—If the agent has never successfully synchronized, no data appears. On the other hand, if synchronization has been successful, the result is always displayed as green. When problems are suspected, the Results button displays yellow. A red button means that a severe problem might exist.
One Successful Time Sync—If the agent has never successfully synchronized, no data appears. On the other hand, if synchronization has been successful, the result is always displayed as green. When problems are suspected, the Results button displays yellow. A red button means that a severe problem might exist.
![]() Time Delta Tolerance—You can view the difference in time between iMonitor and a remote server (in seconds). A negative integer in the Current column indicates that iMonitor’s time is ahead of the server’s time. If the time difference is less than five seconds, no warning is displayed. If the time difference is 5–10 seconds off, a caution is displayed. If the time is off by more than 10 seconds, a warning is displayed.
Time Delta Tolerance—You can view the difference in time between iMonitor and a remote server (in seconds). A negative integer in the Current column indicates that iMonitor’s time is ahead of the server’s time. If the time difference is less than five seconds, no warning is displayed. If the time difference is 5–10 seconds off, a caution is displayed. If the time is off by more than 10 seconds, a warning is displayed.
![]() DS Loaded—Reports whether the eDirectory is loaded on this server.
DS Loaded—Reports whether the eDirectory is loaded on this server.
![]() DS Open—Reports the state of the directory. An Open directory indicates that the database is open and accepting requests. A Closed directory indicates that the database is closed and no requests can be accepted.
DS Open—Reports the state of the directory. An Open directory indicates that the database is open and accepting requests. A Closed directory indicates that the database is closed and no requests can be accepted.
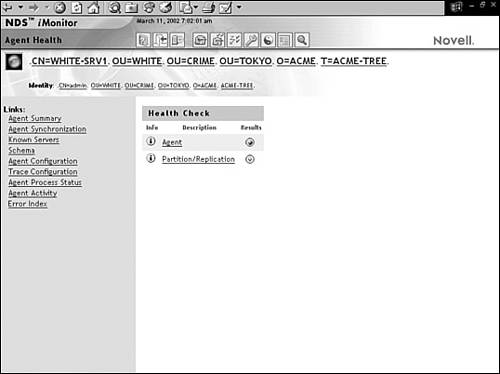
In addition, you can check the status of your server’s partitions by choosing the Partition/Replication link in Figure 17.5. This diagnosis screen provides detailed object information for each partition stored on the server. In addition, you can select Replica Synchronization to display the replica status for each replica in the ring. When you have fewer than three replicas (for fault tolerance), the Results button displays red, indicating that there might be a potential problem with synchronization.
A complete health check includes the following five eDirectory processes:
![]() eDirectory Revision—If your version or revision level of eDirectory is outdated, download the latest software patch from support.novell.com. This health check can be accessed using the Agent Configuration link in iMonitor.
eDirectory Revision—If your version or revision level of eDirectory is outdated, download the latest software patch from support.novell.com. This health check can be accessed using the Agent Configuration link in iMonitor.
![]() Time Synchronization—Time stamps are assigned to each eDirectory object and property. They ensure the correct order for object and property updates. Refer to Chapter 5 for more information. Using time stamps, eDirectory determines which replicas need to be synchronized. For synchronization to happen properly, all eDirectory servers must maintain accurate time. This health check can be accessed using the Agent Configuration link in iMonitor.
Time Synchronization—Time stamps are assigned to each eDirectory object and property. They ensure the correct order for object and property updates. Refer to Chapter 5 for more information. Using time stamps, eDirectory determines which replicas need to be synchronized. For synchronization to happen properly, all eDirectory servers must maintain accurate time. This health check can be accessed using the Agent Configuration link in iMonitor.
![]() Partition Continuity—Partition continuity ensures that all replicas for a partition can be updated properly with eDirectory changes. This health check can be accessed using the Agent Synchronization link in iMonitor.
Partition Continuity—Partition continuity ensures that all replicas for a partition can be updated properly with eDirectory changes. This health check can be accessed using the Agent Synchronization link in iMonitor.
![]() Background Processes—eDirectory changes are replicated in background processes. The following background process should be checked: schema synchronization status, obituaries, and distributed reference links (DRLs). In eDirectory, DRLs are placeholders that contain information about entries that the server doesn’t hold. These are also referred to as external references. This health check can be accessed using the Agent Process Status link in iMonitor.
Background Processes—eDirectory changes are replicated in background processes. The following background process should be checked: schema synchronization status, obituaries, and distributed reference links (DRLs). In eDirectory, DRLs are placeholders that contain information about entries that the server doesn’t hold. These are also referred to as external references. This health check can be accessed using the Agent Process Status link in iMonitor.
![]() Limber Status—This process ensures that all server information, such as server IP address and server name, is correct. You can use the Agent Configuration link or DSTRACE to trigger a limber status check.
Limber Status—This process ensures that all server information, such as server IP address and server name, is correct. You can use the Agent Configuration link or DSTRACE to trigger a limber status check.
Let’s explore these five critical health checks by using the following three iMonitor links: Agent Configuration, Agent Synchronization, and Agent Process Status.
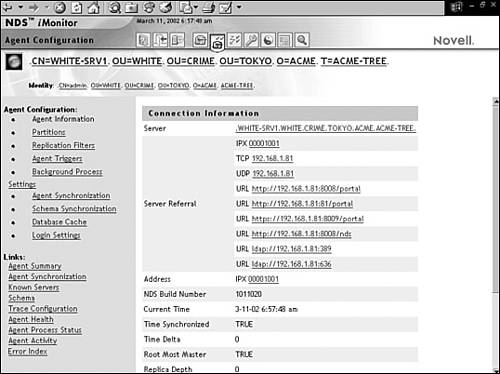
The Agent Configuration link provides access to the primary eDirectory monitoring and diagnostic tools. The Agent Configuration page varies depending on the version of eDirectory that you are using. The Agent Configuration page (shown in Figure 17.6) provides these eDirectory tools:
![]() Agent Information—Displays DS Agent–specific information (including server name, IP address, time synchronization, and so on).
Agent Information—Displays DS Agent–specific information (including server name, IP address, time synchronization, and so on).
![]() Partitions—Displays a list of existing partitions.
Partitions—Displays a list of existing partitions.
![]() Replica Filters—Displays all filtered replicas configured for this specific DS Agent.
Replica Filters—Displays all filtered replicas configured for this specific DS Agent.
![]() Agent Triggers—Initiates the background processes listed in the main content frame. This option also enables you to initiate a limber status check.
Agent Triggers—Initiates the background processes listed in the main content frame. This option also enables you to initiate a limber status check.
![]() Background Process Settings—Enables you to temporarily change the intervals for running background processes.
Background Process Settings—Enables you to temporarily change the intervals for running background processes.
![]() Agent Synchronization—Displays all inbound and outbound synchronization traffic for the specified DS agent.
Agent Synchronization—Displays all inbound and outbound synchronization traffic for the specified DS agent.
![]() Schema Synchronization—Displays all inbound and outbound schema synchronization traffic.
Schema Synchronization—Displays all inbound and outbound schema synchronization traffic.
![]() Database Cache—Enables you to configure and monitor the eDirectory database cache settings.
Database Cache—Enables you to configure and monitor the eDirectory database cache settings.
![]() Login Settings—Enables you to customize the time between login updates or disable the queuing of login updates.
Login Settings—Enables you to customize the time between login updates or disable the queuing of login updates.
The Agent Synchronization link in iMonitor displays the number and type of replicas present on this server and the length of time that has passed since they were synchronized. In addition, you can view the number of errors for each replica type.
One of the key statistics shown in Figure 17.7 is the Maximum Ring Delta. This statistic lists the amount of data that might not be successfully synchronized to all replicas in the ring. For example, if a user has changed his login script within the past 30 minutes and the Maximum Ring Delta has a 45-minute allocation, that user’s login might not be successfully synchronized. If the Maximum Ring Delta is listed as Unknown, it means that the transitive synchronized vector is inconsistent. Ouch. Basically, the Maximum Ring Delta cannot be calculated because a replica/partition operation is in progress.
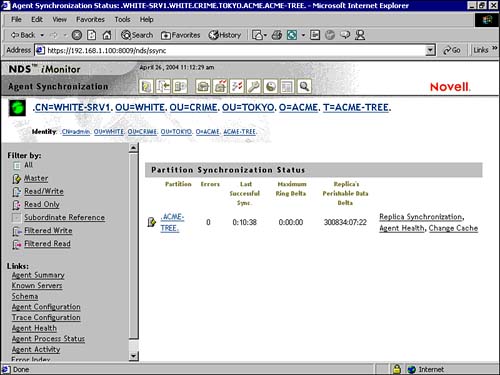
Another interesting report on this page (refer to Figure 17.7) is the Replica’s Perishable Data Delta. This is the amount of time since this server last synchronized the selected partition.
The Agent Process Status link in iMonitor (shown in Figure 17.8) displays the health of several background processes, including
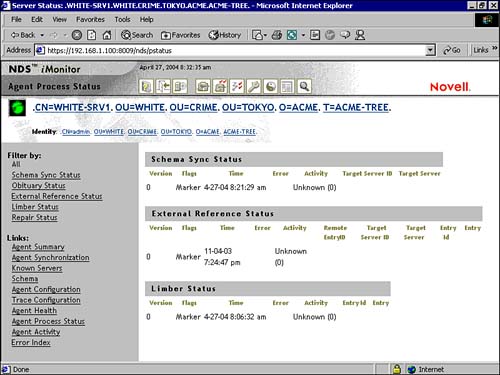
Problems with these processes appear as error codes. Use the health report discussed earlier to get further detail regarding solutions for these eDirectory problems.
That completes the first phase of eDirectory diagnosis. Now, let’s explore another diagnostic tool within iMonitor: DS Tracing.
The Trace Configuration link in iMonitor (shown in Figure 17.9) provides access to the local server’s DS Trace debug utility. This feature is available for only the local iMonitor server. If you need to access trace options on another server, you must switch to the iMonitor running on that device. In addition, you must be the Administrator or a Console Operator of the server to access these DS Trace options. For this reason, you’ll be asked to enter your username and password to authenticate before Figure 17.9 will appear.

The Trace Configuration page in Figure 17.9 includes three main categories of information:
![]() DS Trace Options—DS Trace Options apply to the events on the local DS agent where the trace is initiated. These options show errors, potential problems, and other information about how eDirectory is performing on the local server. Turning on DS Options can increase CPU usage and might reduce your system’s performance. Therefore, you should use Trace Configuration only periodically for diagnostic purposes.
DS Trace Options—DS Trace Options apply to the events on the local DS agent where the trace is initiated. These options show errors, potential problems, and other information about how eDirectory is performing on the local server. Turning on DS Options can increase CPU usage and might reduce your system’s performance. Therefore, you should use Trace Configuration only periodically for diagnostic purposes.
![]() Trace Line Prefixes—Trace Line Prefixes enable you to choose which pieces of data are added to the beginning of any trace line. These prefixes include Time Stamp, Thread ID, and Option Tag strings.
Trace Line Prefixes—Trace Line Prefixes enable you to choose which pieces of data are added to the beginning of any trace line. These prefixes include Time Stamp, Thread ID, and Option Tag strings.
![]() Trace History—Trace History displays a list of trace runs. A trace run is any sequence in which you start and stop a trace. Each trace run log is identified by the period of time during which the trace data was gathered. As I’m sure you’ve guessed, the information you see on this screen depends on the trace options you select.
Trace History—Trace History displays a list of trace runs. A trace run is any sequence in which you start and stop a trace. Each trace run log is identified by the period of time during which the trace data was gathered. As I’m sure you’ve guessed, the information you see on this screen depends on the trace options you select.
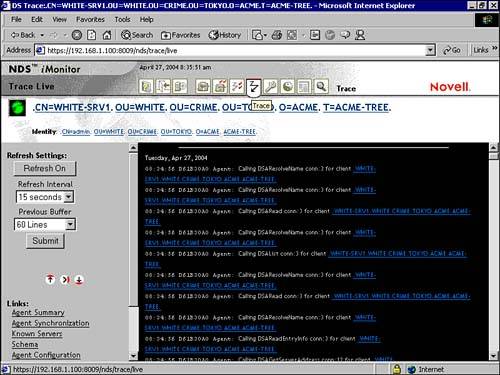
To initiate a DS trace, first specify the trace options in the Trace Configuration link and then select Trace On. Next, select Agent Triggers in the Agent Configuration link. A new Trace icon appears in the navigation bar of iMonitor. Finally, select Submit and the DS trace begins for the chosen processes.
When you click on the new Trace icon in the navigation bar, the current agent process appears (as shown in Figure 17.10). This DS Trace screen presents you with a plethora of valuable eDirectory health data, including process starting point and destination, time stamps, synchronization details, and error statistics.
That completes our comprehensive review of iMonitor’s eDirectory diagnosis capabilities. Of course, any good eDirectory maintenance engineer can tell you that diagnosis is only the first half of the story. Now, let’s explore step 2: eDirectory Repair.
After you’ve diagnosed an eDirectory problem, it’s time to repair it. Not surprisingly, this is accomplished using the Repair wrench icon at the top of iMonitor. When you click on the wrench, you’re presented with the repair screen shown in Figure 17.11.
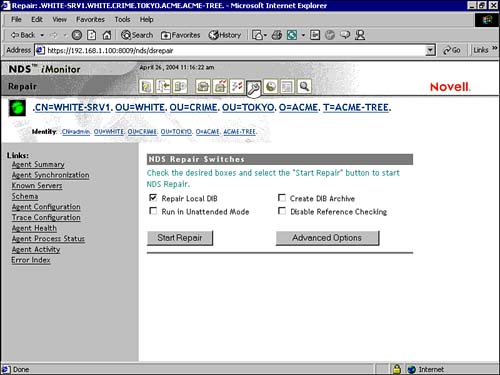
As with the Trace Configuration page, you must be an Administrator or Console Operator to access the eDirectory Repair page. This page enables you to view problems with your eDirectory database and backup or clean them as needed. Some of the repair parameters shown in Figure 17.11 are
![]() Repair Replica—Enables you to repair the selected replica
Repair Replica—Enables you to repair the selected replica
![]() Repair Single Object—Enables you to resolve all inconsistencies with a selected object
Repair Single Object—Enables you to resolve all inconsistencies with a selected object
![]() Repair Local DIB—Enables you to correct or repair inconsistencies in the eDirectory database, check partition and replication information, and/or make changes to the DIB when necessary
Repair Local DIB—Enables you to correct or repair inconsistencies in the eDirectory database, check partition and replication information, and/or make changes to the DIB when necessary
![]() Run In Unattended Mode—Enables you to perform repair operations on the eDirectory database automatically, while you lounge on the beach in some exotic locale
Run In Unattended Mode—Enables you to perform repair operations on the eDirectory database automatically, while you lounge on the beach in some exotic locale
![]() Create DIB Archive—Enables you to create a copy of the eDirectory database for troubleshooting purposes
Create DIB Archive—Enables you to create a copy of the eDirectory database for troubleshooting purposes
![]() Disable Reference Checking—Enables you to turn off the check for external reference objects so that you can locate specific replicas containing specific objects.
Disable Reference Checking—Enables you to turn off the check for external reference objects so that you can locate specific replicas containing specific objects.
![]() Report Move Obits (Advanced)—Enables you to remove the Obituary attribute from objects in the database
Report Move Obits (Advanced)—Enables you to remove the Obituary attribute from objects in the database
![]() Repair Network Address (Advanced)—Enables you to repair the server’s network address in replica rings and Server objects in the database
Repair Network Address (Advanced)—Enables you to repair the server’s network address in replica rings and Server objects in the database
![]() Repair Volume Object (Advanced)—Enables you to check all mounted volumes on the server for valid Volume object trustee assignments
Repair Volume Object (Advanced)—Enables you to check all mounted volumes on the server for valid Volume object trustee assignments
![]() Repair Volume Object and Do Trustee Check (Advanced)—Performs a more advanced volume check with a more comprehensive security analysis
Repair Volume Object and Do Trustee Check (Advanced)—Performs a more advanced volume check with a more comprehensive security analysis
![]() Support Options (Advanced)—Provides additional functionality when troubleshooting with Novell Technical Support
Support Options (Advanced)—Provides additional functionality when troubleshooting with Novell Technical Support
You can use an iMonitor Schedule Report to initiate repairs at specified intervals. Novell does not recommend scheduling regular eDirectory repairs unless your organization has a policy requiring them. Also, remember that when you run eDirectory repair from a server, it affects only parts of the database stored on that server. To fix the entire database, you must run the utility on each server that contains replicas of the partitions that are affected.
Congratulations! You made it ... you survived NetWare 6 Medical School!
In this final chapter of Part II, we discussed the eDirectory troubleshooting model to help ensure the health of eDirectory. This model focused on two important goals: eDirectory performance and eDirectory reliability. In fact, we experienced iMonitor, one last time, from a troubleshooting point of view. Wow, what a ride.
And that completes Part II of the CNE Study Guide for NetWare 6.
In the previous seven chapters, we shifted our focus from advanced management to advanced troubleshooting. Together, we tackled NetWare 6 migration, advanced storage management, iFolder troubleshooting, high availability with NCS, server troubleshooting, and advanced eDirectory management. In addition, we built a medical bag full of troubleshooting tools and gained some preventative medicine skills for network optimization.
That’s all there is to it! Remember that in this study guide we’re expanding well beyond mere administration tasks into the realm of engineering. Now it’s time to blast off, warp speed ahead, to Part III: “Novell eDirectory Design and Implementation” (Novell Course 575). In Part III, we’ll expand our NetWare 6 LAN into the realm of global eDirectory connectivity. We’ll master the first three steps in saving the Net—namely, eDirectory preparation, eDirectory design, and eDirectory implementation.
See you there!!