
Chapter 2 NetWare 6 Upgrade and Migration
This chapter covers the following testing objectives for Novell Course 3004: Novell Network Management:
![]() Review NetWare 6 operating system requirements
Review NetWare 6 operating system requirements
![]() Upgrade network and server hardware
Upgrade network and server hardware
![]() Prepare the network for the migration or upgrade
Prepare the network for the migration or upgrade
![]() Create an upgrade or migration plan
Create an upgrade or migration plan
![]() Perform an in-place upgrade
Perform an in-place upgrade
![]() Perform a migration
Perform a migration
![]() Perform post-migration or post-upgrade tasks
Perform post-migration or post-upgrade tasks
In the first leg of our adventurous NetWare 6 CNE journey, you explored the top 20 features of Novell’s most Internet-savvy network operating system, and strolled through the five phases of NetWare 6 Installation. If you learned anything in Chapter 1, “NetWare 6 Installation,” you should have learned...
If you build it, they will come!
But what if you’re already running NetWare 4 or 5? I’m sure a lot of you are. Then what? Fortunately, NetWare 6 includes two cool options for you:
![]() NetWare 6 upgrade—You can install NetWare 6 on the same machine without losing any existing files. This type of upgrade is called an in-place upgrade. You can upgrade to NetWare 6 from either NetWare 5.x or NetWare 4.x.
NetWare 6 upgrade—You can install NetWare 6 on the same machine without losing any existing files. This type of upgrade is called an in-place upgrade. You can upgrade to NetWare 6 from either NetWare 5.x or NetWare 4.x.
![]() NetWare 6 migration—NetWare 6 includes an elaborate migration utility, not surprisingly called the NetWare Migration Wizard. This GUI migration tool enables you to upgrade NetWare 4, 5, or 6 servers across the wire to NetWare 6. However, the destination server must be running NetWare 5.0, 5.1, or 6. Furthermore, you can even migrate Windows NT servers to NetWare 6—very cool! In this case, Windows NT users and groups are added to eDirectory, and shared folders are placed in the NetWare 6 file system (with rights intact). Cool, huh?!
NetWare 6 migration—NetWare 6 includes an elaborate migration utility, not surprisingly called the NetWare Migration Wizard. This GUI migration tool enables you to upgrade NetWare 4, 5, or 6 servers across the wire to NetWare 6. However, the destination server must be running NetWare 5.0, 5.1, or 6. Furthermore, you can even migrate Windows NT servers to NetWare 6—very cool! In this case, Windows NT users and groups are added to eDirectory, and shared folders are placed in the NetWare 6 file system (with rights intact). Cool, huh?!
So, which NetWare 6 evolution option is best for you? Your choice depends on a number of factors, such as the operating system you’re currently running, the hardware you have, and which NetWare 6 features you plan to use (such as iPrint, iManager, and Novell Cluster Services). Of course, you could always choose to install NetWare 6 using the from-scratch installation process covered in the previous chapter. That was fun!
In this chapter, we’ll explore the detailed steps of NetWare 6 upgrade and migration. Before we do, however, we must take a quick look at some important upgrade setup tasks—namely, minimum system requirements and network preparation with Deployment Manager.
It’s time to begin...
Test Objectives Covered:
![]() Review NetWare 6 operating system requirements
Review NetWare 6 operating system requirements
![]() Upgrade network and server hardware
Upgrade network and server hardware
![]() Prepare the network for the migration or upgrade
Prepare the network for the migration or upgrade
NetWare 6 can be installed, upgraded, and migrated in a variety of different ways by using a plethora of different tools. In Chapter 1, we discovered the NetWare 6 installation method. Now we’ll explore NetWare 6 upgrade and migration.
Before you begin upgrading and migrating to NetWare 6, you’ll need to perform a variety of preliminary tasks, including identifying (and satisfying) any minimum system requirements, backing up your existing servers, preparing the network for eDirectory 8.6, and updating the Certificate Authority (CA) object.
In this section, we’ll cover the following pre-upgrade tasks:
![]() Minimum system requirements
Minimum system requirements
![]() Data backup
Data backup
![]() Network preparation
Network preparation
![]() Certificate Authority (CA) update
Certificate Authority (CA) update
It always pays to be prepared!
TIP
When performing the lab exercises in this guide, it’s imperative that you use a nonproduction server (that is, a practice server) in an isolated eDirectory tree. You should use nonproduction workstations as well. Remember that I’m here to help improve your life, not to make it more difficult!
Before you upgrade or migrate to NetWare 6, you should ensure that minimum hardware, software, and configuration requirements have been met (or exceeded). The following is a detailed review of each of these NetWare 6 system requirements. (We also discussed these in depth in Chapter 1.)
The minimum hardware requirements for a NetWare 6 server are listed here. Remember that these are just minimum requirements—the recommended values are considerably higher (as shown in parentheses):
![]() A server-class PC with a Pentium II or later processor. (Two-way Pentium III 700MHz or later processors are recommended for multiple-processor machines. In fact, NetWare 6 supports up to 32 processors. Wow!). Alternately, you can be running an AMD Athelon (K7) or later processor.
A server-class PC with a Pentium II or later processor. (Two-way Pentium III 700MHz or later processors are recommended for multiple-processor machines. In fact, NetWare 6 supports up to 32 processors. Wow!). Alternately, you can be running an AMD Athelon (K7) or later processor.
![]() A Super VGA (or higher) resolution display adapter.
A Super VGA (or higher) resolution display adapter.
![]() 256MB of RAM (512MB recommended).
256MB of RAM (512MB recommended).
![]() A DOS partition of at least 200MB and 35MB of available space (1GB recommended).
A DOS partition of at least 200MB and 35MB of available space (1GB recommended).
TIP
A quick method for calculating the appropriate size of the DOS partition is to add the total amount of server RAM to the minimum amount of disk space required. Because 200MB is the minimum amount of available disk space required, a server with 2048MB of RAM would theoretically have an optimum DOS partition size of 2248MB (2048MB + 200MB = 2248MB). Using this strategy enables you to do a core dump to the disk drive if required for troubleshooting purposes.
![]() 2GB available space outside the DOS partition for the SYS: volume (4GB recommended).
2GB available space outside the DOS partition for the SYS: volume (4GB recommended).
![]() One (or more) network boards.
One (or more) network boards.
![]() A bootable CD drive.
A bootable CD drive.
![]() (Optional) A USB, PS/2, or serial mouse (a mouse is recommended).
(Optional) A USB, PS/2, or serial mouse (a mouse is recommended).
If you aren’t satisfied with meeting the minimum requirements for your hardware, you should consider some upgrades. Keep the following in mind:
![]() Network infrastructure—Keeping costs in mind, consider purchasing network hardware that provides the fastest network speed that is financially feasible. For example, although a 10 Mbps Ethernet implementation might get you by, the cost of upgrading network boards, wiring, hubs, or switches to support 100 Mbps Ethernet could be worth the gain in network speed.
Network infrastructure—Keeping costs in mind, consider purchasing network hardware that provides the fastest network speed that is financially feasible. For example, although a 10 Mbps Ethernet implementation might get you by, the cost of upgrading network boards, wiring, hubs, or switches to support 100 Mbps Ethernet could be worth the gain in network speed.
![]() Server hardware—If you’re planning to upgrade or migrate to NetWare 6, this might be a good time to upgrade your server hardware as well. NetWare 6 places a heavy load on your CPU, RAM, network boards, and hard disks.
Server hardware—If you’re planning to upgrade or migrate to NetWare 6, this might be a good time to upgrade your server hardware as well. NetWare 6 places a heavy load on your CPU, RAM, network boards, and hard disks.
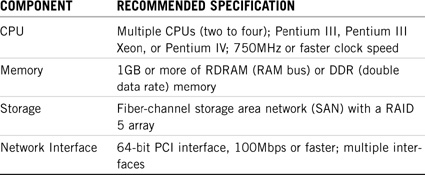
If you’re considering hardware upgrades, Table 2.1 might point you in the right direction.
The minimum software requirements for NetWare 6 include some or all of the following, depending on your network configuration:
![]() A NetWare 6 Operating System CD
A NetWare 6 Operating System CD
![]() A NetWare 6 License/Cryptography disk
A NetWare 6 License/Cryptography disk
![]() (Conditional) DOS 3.3 or later (if the server doesn’t boot from CD)
(Conditional) DOS 3.3 or later (if the server doesn’t boot from CD)
![]() (Conditional) DOS CD drivers (if the server doesn’t boot from CD)
(Conditional) DOS CD drivers (if the server doesn’t boot from CD)
![]() (Conditional) Client connection utilities (optional; for installing from a network):
(Conditional) Client connection utilities (optional; for installing from a network):
![]() (Conditional) Novell Client for DOS and Windows 3.1x (optional; for installing from a NetWare server running Internetwork Packet eXchange [IPX])
(Conditional) Novell Client for DOS and Windows 3.1x (optional; for installing from a NetWare server running Internetwork Packet eXchange [IPX])
![]() (Conditional) IP Server Connection utility (optional; for installing from a NetWare server running IP only)
(Conditional) IP Server Connection utility (optional; for installing from a NetWare server running IP only)
To run an upgrade of your network, the servers must be running one of the following operating systems:
![]() NetWare 5.1 with Support Pack 2 or later
NetWare 5.1 with Support Pack 2 or later
![]() NetWare 5 with Support Pack 6 or later
NetWare 5 with Support Pack 6 or later
![]() NetWare 4.2 with Support Pack 8 or later
NetWare 4.2 with Support Pack 8 or later
![]() NetWare 4.11 with Support Pack 8 or later
NetWare 4.11 with Support Pack 8 or later
The minimum configuration requirements for NetWare 6 include one or all of the following, depending on your network configuration:
![]() The Supervisor right at the Tree Root of the eDirectory tree
The Supervisor right at the Tree Root of the eDirectory tree
![]() The Supervisor right to the container where the server will be installed
The Supervisor right to the container where the server will be installed
![]() The Read right to the Security container object for the eDirectory tree
The Read right to the Security container object for the eDirectory tree
![]() Network communication parameters required for connecting to the Internet:
Network communication parameters required for connecting to the Internet:
![]() IP address
IP address
![]() IP address of a domain name server
IP address of a domain name server
![]() Subnet mask
Subnet mask
![]() Name of your domain
Name of your domain
![]() Default gateway/router IP address
Default gateway/router IP address
![]() Network board and storage device properties (such as interrupt and port address, if not included with NetWare)
Network board and storage device properties (such as interrupt and port address, if not included with NetWare)
TIP
For IP addresses and domain names, contact your system administrator and/or Internet service provider (ISP). For network board and storage device information, contact the hardware manufacturer. Finally, there are nifty tools available for gathering this network configuration data yourself. Check them out later in Chapter 15, “Novell Troubleshooting Tools,” of this study guide.
After all hardware, software, and configuration requirements have been met, you’re just about ready to roll. But first, you must back up your source server and prepare the network for NetWare 6. In the next two sections, you’ll learn how to back up servers and prepare the network for eDirectory 8.6.
Before upgrading to a new version of NetWare, you should always make two or more complete, verified backups of both eDirectory data and file system data on your server. You can use either an integrated NetWare solution or third-party software to back up your data.
TIP
Before using a third-party backup program, verify that it is fully SMS compliant. (If you use an SMS-compliant backup program such as ARCserve, trustee information will be backed up.)
NetWare 4, 5, and 6 contain a server backup feature called Storage Management Services (SMS). SMS consists of a set of programs that are both operating system independent and hardware independent. These programs enable you to back up and restore data across the network by using SBACKUP, SBCON, and/or NWBACK32. SMS can back up servers, workstations, or other services to media (such as tape, optical disk, or jukebox) for offsite storage. Examples of targets that can be backed up by using SMS include the file system, eDirectory, binderies, cluster-enabled pools, or hard disks on individual workstations.
SMS takes a snapshot copy of the data you select, stores a copy on tape (or other media), and then enables you to retrieve the data at a later time in case of a natural disaster, hardware failure, corrupted data, accidentally deleted data, or incorrectly changed data.
Even if you plan to use a third-party program to back up your data, you should be familiar with the procedures for using SMS to back up (and restore) data on NetWare 4, 5, and NetWare 6 servers.
Before you back up your NetWare 5 server by using SMS, you should ensure that your system meets (or exceeds) all the SBACKUP system requirements, including NetWare 5 server with SMS installed, 3MB of available RAM (minimum), a host server with enough memory to run NetWare and connected clients, a target server, and, ultimately, a backup device. To use SMS to back up data on a NetWare 5 server, perform these steps:
1. Start at the server console. Load the device drivers for your controller and storage devices. If you load HAM drivers or add an external device, enter the following at the server console prompt: LIST DEVICES. Then load the appropriate target service agents (TSAs).
2. Load the Storage Management Engine and backup software on the server. Begin by entering LOAD SMDR at the console. Accept the default or add an SMDR context by pressing Enter. Then enter the full context of your username and provide your administrative password.
3. Type the following commands at the console to activate SBACKUP:
LOAD TSA500
LOAD SMSDI
LOAD QMAN
LOAD SBSC
LOAD SBCON
4. After the NLMs are loaded, select Main Menu, Job Administration, Backup at the main menu. Next, choose the NetWare server running your backup or restore TSA by selecting Target Service. Enter the target username and password (if prompted) for the target.
5. You’ll need to select what you want to back up, press the Enter key, and then press Insert. On the NetWare server screen, select the volumes and files you want to back up, and then press Esc. In the Description field, enter a descriptive name for the backup session, and select Device/Media Name. Then choose Advanced Options, Append Session. Finally, save your options and continue with the backup by pressing Enter. You can return to the main Menu by pressing Esc repeatedly.
To restore backed up data to a NetWare 5 server, perform these steps:
1. Start at the server console. Load the device drivers for your controller and storage devices. Next, load the appropriate TSAs. Finally, load SBACKUP.
2. At the main menu, select Job Administration, Restore. Then choose Target Service, NetWare Server Running Your Backup and Restore Target Service Agent. When you’re prompted for the target username, enter your network administrator username and context (if required) for the target. If prompted, enter the password for the target.
3. In the Description field, enter a descriptive name for the session. Select the device and media to restore. In the Device/Media Name field, press Enter and decide where you want to restore from. Then select the session to restore.
4. Finally, to make the selected restore, select Advanced Options, and complete the Advanced Restore Options form. Press Esc and answer the prompt at the Submit Job screen to begin the restore session. To view the activity log screen, press Alt+Esc. To return to the Main Menu, press Esc repeatedly.
Before you use SMS to backup your NetWare 4 server, you should ensure that your system meets (or exceeds) all the SBACKUP system requirements, including NetWare 4 server with SMS installed, 3MB of available RAM (minimum), a host server with enough memory to run NetWare and connected clients, a target server, and, ultimately, a backup device.
To use SMS to back up data on a NetWare 4 server, perform these steps:
1. Start at the server console. Load the device drivers for controller and storage devices. Then load SBACKUP.NLM and the appropriate TSA files. On the host server, load the SBACKUP.NLM.
2. From the Main Menu, choose Backup. Select a target for the data you want to back up. Next, choose the Backup/Restore Target Services Running on <Target Name> listing. Select the TSA you want to use. Then provide the username and password for the target you want to back up.
3. Select the device that you want to back up. Choose Type of Backup and highlight the type of backup you want to perform. Enter a description of the backup session. Save the description and continue with the backup by pressing F10.
4. Finally, specify when you want the backup to start by setting the date and time for the backup to begin. Press F10, and save your changes by pressing Enter.
Before you attempt to restore data to a NetWare 4 server by using SBACKUP, you should ensure that you’ve met all the prerequisite system requirements: You must have Supervisor (or equivalent) rights, you need to know the username and password for the target server (or workstation) that you want to restore the data to, and you must be intimately familiar with the file structure of the data you’re restoring.
To restore backed-up data to a NetWare 4 server, perform these steps:
1. At the server console, load SBACKUP. From the Main menu, select Restore. Select the target that you want to restore the data to, and enter the appropriate username and password.
2. Specify how you want the date to restore. Then start the restore by pressing F10. When you’re done, you can view the error log to determine whether any files weren’t restored.
Good job. Your safety nets are now complete. With multiple server backups in a safe place, it’s time to shift your focus to network preparation. Next stop, eDirectory schema.
BRAIN SNACK
Let me tell you a little story. Maybe you’ve heard it before. It’s about this little girl named Alice, who traveled through the looking glass. Are you with me, here? When Alice entered the Forest of Forgetfulness, she didn’t forget everything—only certain things. She often forgot her name, and the one thing she was most likely to forget was the day of the week.
Now, the Lion and the Unicorn were frequent visitors to the forest—strange creatures. The Lion lies on Mondays, Tuesdays, and Wednesdays, and tells the truth on the other days of the week. The Unicorn, on the other hand, lies on Thursdays, Fridays, and Saturdays, but tells the truth on the other days of the week. One day Alice met the Lion and the Unicorn resting under a tree. They made the following statements:
![]() Lion: Yesterday was one of my lying days.
Lion: Yesterday was one of my lying days.
![]() Unicorn: Yesterday was one of my lying days.
Unicorn: Yesterday was one of my lying days.
From these two statements, Alice (who was a very bright girl) was able to deduce the day of the week. Can you?
Before you can install, upgrade, or migrate NetWare 6 and eDirectory 8.6 to any servers in an existing network, you must update the host eDirectory schema. A convenient way to do so is to use NetWare Deployment Manager, which is located in the root of the NetWare 6 Operating System CD. This utility helps you to ensure that the latest version of eDirectory is running on all your servers.
The following is a summary of the steps required to prepare your network to use NetWare Deployment Manager to install, upgrade, or migrate NetWare 6. This process needs to be performed only once per network:
1. Install the Novell Client and NICI Client
2. Update eDirectory with Deployment Manager
3. Prepare the Network for eDirectory 8.6
4. Update the Certificate Authority (CA) Object
Ready, set, deploy!
To use NetWare Deployment Manager, you must have the latest Novell Client and NICI client on both your primary and secondary administrative workstations. The following are the steps for installing the Novell Client for Windows:
1. Exit any applications that you’re running to clear off your workstation. Then, download the appropriate Novell Client from the Novell Web site at download.novell.com.
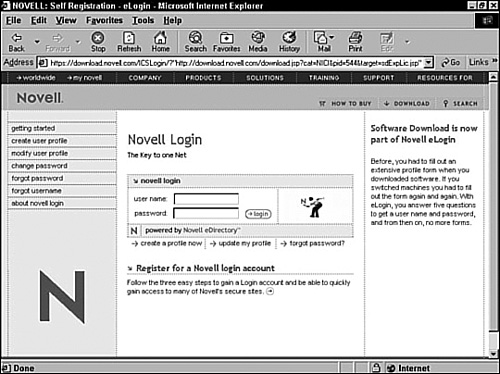
2. Next, select the appropriate Novell Client file from the Novell Web site. Make sure to create a Novell eLogin account for future downloads. Refer to Figure 2.1 for more information. When you’ve finished saving the file, expand it and continue with the next step.
3. To install the Novell Client, locate and execute the appropriate Windows setup file. When the Novell Client for Windows License Agreement appears, review the agreement, and then select Yes to agree to its terms and conditions. Then select Custom at the Welcome to Novell Client for Windows Install screen (as shown in Figure 2.2) and click Next.

4. When the Protocol Preference window appears (as seen in Figure 2.3), verify that IP and IPX is selected, and then select Next.

5. When the Login Authenticator window appears, verify that NDS (NetWare 4.x or Later) is selected, and then select Next. At the Novell Client for Windows Optional Components window (see Figure 2.4), verify that no products are selected, and then select Install. Wait while the installation program builds a driver information database.

6. At this point, the installation program will ask you to insert the Windows Operating System CD into your workstation. Then a series of Copying Files dialog boxes will appear. Each time you’re prompted for the location of a file, indicate the appropriate location, and then select OK.
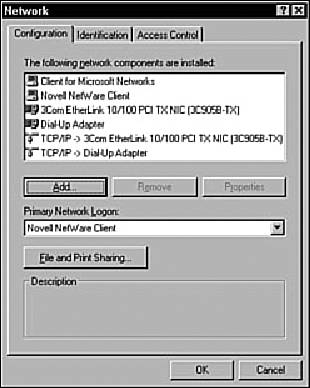
7. Finally, wait while the installation program removes the existing Novell Client (if one exists), builds the driver information database, and installs the new Novell Client. Then, when the Control Panel Network dialog box appears (as shown in Figure 2.5), verify that the Novell Client has been installed, and then select OK to close the Network dialog box.
TIP
If you encounter any errors during the Novell Client installation process, you can install the client manually on the Configuration tab of the Network icon in the Windows Control Panel.
In addition to the Novell Client, you’ll be required to activate NICI strong encryption on your workstation in order to use NetWare Deployment Manager. This is required to ensure that your data files are secure as they traverse the network from source to target server.
Follow these short and simple steps to install the appropriate NICI client on both of your administrative workstations:
1. Exit any applications that you are running to clear off your workstation. Then, download the appropriate NICI Client from the Novell Web site at download.novell.com.
2. Next, select the appropriate NICI Client file (Version 2.0.2 or later) from the Novell Web site. Make sure to use your new eLogin account (as shown in Figure 2.1 earlier). When you’ve saved the file, expand it and continue with the next step.
3. To install the NICI Client, follow the prompts on the screen.
Now it’s time for NetWare Deployment Manager—a fabulous tool! Before you can upgrade a server to NetWare 6 in an existing network, you must update eDirectory and prepare the network. All this magic is accomplished using NetWare Deployment Manager.
Follow these steps to update eDirectory using Deployment Manager:
1. Insert the NetWare 6 Operating System CD into the workstation’s CD-ROM drive, and log in to your network from a Windows workstation as a user with Supervisor rights.
2. Execute NetWare Deployment Manager (NWDEPLOY.EXE) from the root of the CD-ROM and select the Network Preparation folder to expand it. Choose Step 2: View and Update NDS Versions (as shown in Figure 2.6).

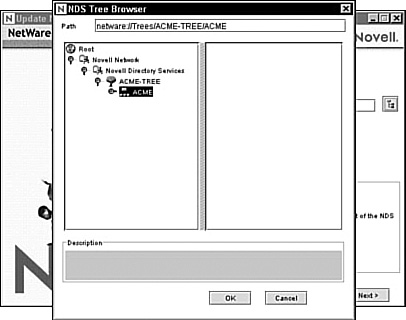
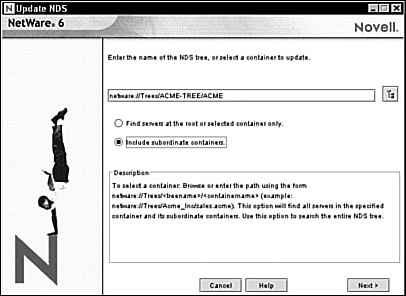
3. Select Browse when the Update NDS window appears. Then navigate to your tree and select the topmost container under your tree (such as ACME, shown in Figure 2.7). Select OK to continue.
4. If a Login Dialog window appears, authenticate as a user with Supervisor rights. Then, when the Update NDS window appears, select Include Subordinate Containers (as shown in Figure 2.8). At this point, you’ll notice that eDirectory detects which servers need to be updated and lists them in the Server column. Select the servers you want to update, and then select Next. Wait while the files are copied. Then, when you are prompted to reload eDirectory for the changes to take effect, select Next. Finally, click Exit to complete the update process.
During the NetWare 6 upgrade process, you’ll need to install a new version of eDirectory. However, before you can do that, you’ll need to modify the existing network schema. This way, when a new NetWare 6 server is installed, the same version of eDirectory will be used throughout the network.
To update the schema to eDirectory 8.6, you must have Administrative rights to the eDirectory tree. Follow these steps to prepare the network for eDirectory 8.6:
1. Insert the NetWare 6 Operating System CD into the workstation’s CD-ROM drive, and log in to your network from a Windows workstation as a user with Supervisor rights.
2. Execute NetWare Deployment Manager (NWDEPLOY.EXE) from the root of the CD-ROM and select the Network Preparation folder to expand it. Choose Step 3: Prepare for NDS eDirectory (as shown in Figure 2.9).

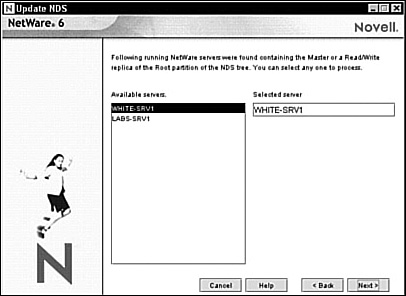
3. Select Browse when the Update NDS window appears. Then navigate to your tree, select it, and click Next. When the Available Servers field appears, select a server that contains a Master or Read/Write replica of the root partition (as shown in Figure 2.10). Then select Next. Finally, click Exit to complete your eDirectory preparation.
That’s it! All finished. You’ve successfully prepared the network for NetWare 6 installation, upgrade, and/or migration. In this section, you learned how to update the eDirectory schema using NetWare Deployment Manager. Now let’s complete our network preparation tasks by updating the Certificate Authority (CA) object.
The Novell Certificate Server ensures secure data transmissions between servers and workstations over your network. This NetWare 6 service is required for Web-related products such as Novell Lightweight Directory Access Protocol (LDAP), NetWare Web Server, and the NetWare Management Portal. It also enables you to mint, issue, and manage digital certificates by creating a Security container object and an Organizational Certificate Authority (CA) object.
If the network doesn’t already have an Organizational CA object, the first NetWare 6 server automatically creates and physically stores the Security container object and Organizational CA object for the entire eDirectory tree. Both objects are created at, and must remain at, the tree root of the eDirectory tree.
Novell delivered a base-level PKI (public key cryptography) with NetWare 5.0. As such, you must update your NetWare 5.0 PKI Services to a Novell Certificate Server CA object. Fortunately, this applies only to NetWare 5.0 servers. The NetWare 5.1 CA is updated during the NetWare 6 Upgrade process.
To update your network to use the new Novell Certificate Server, you must satisfy these minimum requirements:
![]() You must install the most recent version of Novell Certificate Server.
You must install the most recent version of Novell Certificate Server.
![]() To create the organizational CA and complete the NetWare upgrade, you must have the Supervisor right at the tree root of the eDirectory tree. You must also have the Supervisor right in the Security container, or at the tree root of the tree if the Security container does not exist.
To create the organizational CA and complete the NetWare upgrade, you must have the Supervisor right at the tree root of the eDirectory tree. You must also have the Supervisor right in the Security container, or at the tree root of the tree if the Security container does not exist.
![]() If you plan to use the Novell Certificate Server 2.20 ConsoleOne snap-in (available with NetWare 6) you need client NICI 1.5.4 (or later) installed on the workstation where you run ConsoleOne. Refer to the “Step 1: Install the Novell Client and NICI Client” section earlier in this chapter for more details.
If you plan to use the Novell Certificate Server 2.20 ConsoleOne snap-in (available with NetWare 6) you need client NICI 1.5.4 (or later) installed on the workstation where you run ConsoleOne. Refer to the “Step 1: Install the Novell Client and NICI Client” section earlier in this chapter for more details.
Follow these steps to update your network for the new Novell Certificate Server:
1. First, determine which server in your network is acting as the Organizational CA. By default, the Organizational CA’s object is stored in the Security container. Using ConsoleOne, double-click the Organizational CA object, and choose the General tab.
2. On the server acting as the CA, verify that it is running Novell Certificate Server 2.0 or later. From the server console, enter NWCONFIG, and select Product Options. Next, choose VIEW/Configure/Remove Installed Products. Look for the PKIS entry; if there is no entry, or if you do not see 2.0.0 or later, install Novell Certificate Server 2.0 (or later) before continuing. You can find it on Novell’s Web site.
3. Check for the existence of security-related objects and establish the proper eDirectory rights for creating and operating the CA. If the KAP container or the W0 object does not exist (the KAP container is in the Security container, and the W0 object is in the KAP container), the installation of the first NetWare 6 (or NetWare 5.1) server will create it for you. Furthermore, the first NetWare 6 installation or upgrade will create the Organizational CA as well.
The server acting as the CA must remain operational during the installation or upgrade of NetWare 5.1 or NetWare 6 servers into this tree. Furthermore, if the CA object, KAP container, and the W0 object exist, you’ll need the following eDirectory rights to upgrade NetWare:
![]() Read entry rights to the NDSPKI:Private Key attribute of the Organizational CA’s object
Read entry rights to the NDSPKI:Private Key attribute of the Organizational CA’s object
![]() Supervisor right to the W0 object
Supervisor right to the W0 object
![]() Supervisor right to the server’s container
Supervisor right to the server’s container
Well, there you have it! We’ve satisfied the minimum system requirements, backed up our source and destination servers, prepared the network, and updated the Certification Authority (CA). Now can we get started?! Not yet. First we need a plan.
Test Objective Covered:
![]() Create an upgrade or migration plan.
Create an upgrade or migration plan.
To guard against upgrade or migration failures, you need two lines of defense: two verified backups and a solid upgrade or migration plan. We’ve already taken care of the backups, so now let’s concentrate on the plan.
Think of creating a solid plan of attack in the following steps:
![]() Step 1: Determine a server strategy
Step 1: Determine a server strategy
![]() Step 2: Determine an eDirectory strategy
Step 2: Determine an eDirectory strategy
![]() Step 3: Create a flow of events
Step 3: Create a flow of events
![]() Step 4: Assign roles and responsibilities
Step 4: Assign roles and responsibilities
Ready, set, plan!
As you learned at the beginning of this chapter, when upgrading an existing NetWare 4 or 5 server to NetWare 6, you can either choose an in-place upgrade or an across-the-wire migration:
![]() In-place upgrade—During an in-place upgrade, you use the NetWare 6 Operating System CD to install NetWare 6 on top of the existing version of NetWare on the same server.
In-place upgrade—During an in-place upgrade, you use the NetWare 6 Operating System CD to install NetWare 6 on top of the existing version of NetWare on the same server.
![]() Across-the-wire migration—Using this option, you first install a generic NetWare 6 server. You then use the NetWare Migration Wizard to migrate the eDirectory tree and the file system from the original source server to the newly installed destination server. During this process, the NetWare 6 server name is replaced by the name of the source server, and the eDirectory tree is replaced by the source server’s tree.
Across-the-wire migration—Using this option, you first install a generic NetWare 6 server. You then use the NetWare Migration Wizard to migrate the eDirectory tree and the file system from the original source server to the newly installed destination server. During this process, the NetWare 6 server name is replaced by the name of the source server, and the eDirectory tree is replaced by the source server’s tree.
Table 2.2 shows some advantages and disadvantages of the in-place upgrade and the across-the-wire migration.

After you’ve identified your server strategy, you must next address your eDirectory strategy. Once again, you have two choices:
![]() Top-down upgrade—In this first choice, you will first upgrade or migrate the server that holds the master replica of the root partition of your eDirectory tree. Then you can upgrade or migrate subsequent servers in order down the tree. When you reach the bottom of the tree, your upgrade or migration is complete. Although this approach can be easy to plan and organize, you do have an added risk of potential problems. Because you update the master replica of the Root partition of the tree first, you might introduce errors during the process that could propagate throughout the tree. This is a bad thing.
Top-down upgrade—In this first choice, you will first upgrade or migrate the server that holds the master replica of the root partition of your eDirectory tree. Then you can upgrade or migrate subsequent servers in order down the tree. When you reach the bottom of the tree, your upgrade or migration is complete. Although this approach can be easy to plan and organize, you do have an added risk of potential problems. Because you update the master replica of the Root partition of the tree first, you might introduce errors during the process that could propagate throughout the tree. This is a bad thing.
![]() Bottom-up upgrade—In this second choice, you will upgrade or migrate noncritical servers at the bottom of the eDirectory tree first. When complete, you upgrade or migrate servers in order up the tree. The last server to be upgraded or migrated is the server holding the master replica of the root partition. Obviously, errors introduced during this process are less likely to be propagated to the entire tree, and synchronization issues are isolated. However, this strategy requires far more complex planning.
Bottom-up upgrade—In this second choice, you will upgrade or migrate noncritical servers at the bottom of the eDirectory tree first. When complete, you upgrade or migrate servers in order up the tree. The last server to be upgraded or migrated is the server holding the master replica of the root partition. Obviously, errors introduced during this process are less likely to be propagated to the entire tree, and synchronization issues are isolated. However, this strategy requires far more complex planning.
Hmmm...is the glass half empty or half full? Are you having trouble choosing? Then let’s take a look at what steps are involved for both strategies. Then we can measure the differences between the two. Maybe that will clear things up for you.
Keep in mind that later in this chapter we’ll perform an upgrade and migration in detail. The following ten steps simply provide some context for planning purposes:
1. Complete a directory services health check as discussed later in Part II of this CNE Study Guide.
2. Run a full, unattended repair on your existing eDirectory tree by using the DSREPAIR.NLM program.
3. Create and verify a full backup of your eDirectory tree.
4. Apply any firmware updates that might be available from your hardware vendor.
5. Plan where you will locate licenses in the new tree. Refer to the discussion in the section “Managing NLS” in Chapter 1 and follow the guidelines presented there.
6. Identify the server(s) in your network that hold the master replica(s) of the root partition for your tree. If you haven’t done so already, create a full file system backup of this server and verify the backup.
7. Perform the upgrade or migration.
8. When the upgrade or migration is complete, allow eDirectory to normalize for a period of time (which will depend on the strategy you use). This allows the schema to synchronize throughout the network. This could take anywhere from a couple of hours to a couple of days, depending on the size of the network.
9. Use the DSTRACE.NLM program to verify that the schema has properly synchronized. At the server console, enter the following commands:
SET DSTRACE=ON
SET DSTRACE=+SCHEMA
SET DSTRACE=*SS
Now switch to the Directory Services Trace screen and check for the following message:
SCHEMA: All Processed = YES.
10. For a top-down strategy, repeat this process for each server in the tree, working from the top of the tree to the bottom.
For a bottom-up strategy, repeat this process for each server in the tree that holds a replica, working from the bottom of the tree to the top.
When complete, repeat this process for any servers in the three that don’t hold a replica. Be sure to start with the least-critical servers and progress to those that are more important.
There, now that clears things up, right? No time to waste. Now we must create a flow of events.
Sometimes, using project planning software makes this much easier. To complete this phase of your planning, follow these steps:
1. Identify in detail every task that must be performed
2. Identify those tasks that must be performed in a specific order
3. Identify those tasks that can be performed concurrently with other tasks
4. Determine which tasks cannot be started until other tasks are completed
5. Determine which tasks must start at the same time
6. Determine which tasks must end at the same time
7. Assign an amount of time required to complete each task on your list
Now that you’ve identified what must be done, you must identify who is going to do it. That’s your final planning step.
To assign roles and responsibilities for the tasks outlined in step 3, follow these steps:
1. Identify the roles required to complete the project (for example, backup specialist, eDirectory specialist, NetWare specialist, or hardware specialist).
2. Assign individuals to these roles.
3. Assign the roles to the tasks identified in step 3. Be careful not to overcommit your resources, which could delay the completion of the project.
4. Arrange the tasks based on the order to be completed, how long it will take to complete them, and who will complete them.
Now that you’ve satisfied all the NetWare 6 upgrade and migration requirements, and you’ve come up with a rock-solid plan, it’s time to begin building the NetWare 6 server. In the rest of this chapter, we’ll explore the detailed steps of both of these advanced NetWare 6 installation options—NetWare 6 upgrade and NetWare 6 migration.
Ready, set, upgrade!
BRAIN SNACK
Look, there’s that mischievous Alice again. She’s trying to figure out when to believe the Lion. He says he’ll help her escape from this crazy world. On what days of the week is it possible for the Lion to make the following two statements:
![]() I lied yesterday.
I lied yesterday.
![]() I will lie again tomorrow.
I will lie again tomorrow.
Please help Alice find her way home.
Test Objective Covered:
![]() Perform an in-place upgrade
Perform an in-place upgrade
I have good news and I have bad news:
![]() Good news: The NetWare 6 upgrade process closely resembles the NetWare 6 installation steps we covered in the previous chapter.
Good news: The NetWare 6 upgrade process closely resembles the NetWare 6 installation steps we covered in the previous chapter.
![]() Bad news: The NetWare 6 upgrade process occurs on an existing Novell server with all of its eDirectory information, shared data, and internal problems.
Bad news: The NetWare 6 upgrade process occurs on an existing Novell server with all of its eDirectory information, shared data, and internal problems.
Fortunately, this study guide will train you to handle the ups and downs of NetWare 6 upgrade. The in-place nature of NetWare 6’s upgrade process is both a benefit and a curse. It’s a benefit in that it enables you to upgrade existing eDirectory and user files to NetWare 6 on the same machine. It’s a curse in that it provides limited recovery if (or when) something goes wrong.
In this section, we’ll explore all 18 steps of the NetWare 6 upgrade process in great depth. Please follow this discussion carefully because it could mean the difference between a speedy NetWare 6 server and a useless hunk of silicon. And if this journey isn’t enough for you, you can always check out the detailed step-by-step ACME walk-through at the end of this section—it’s called “Lab Exercise 2.1: Upgrade NetWare 5.1 to NetWare 6.” Here’s a brief roadmap of the major steps that occur during each of the five upgrade phases:
![]() Phase I: choosing the correct NetWare 6 settings—You’ll prepare the server, execute the INSTALL.BAT file, accept the license agreements, and load the core NetWare operating system. Then you’ll select a plethora of general NetWare 6 settings, including upgrade type, server settings, and regional settings.
Phase I: choosing the correct NetWare 6 settings—You’ll prepare the server, execute the INSTALL.BAT file, accept the license agreements, and load the core NetWare operating system. Then you’ll select a plethora of general NetWare 6 settings, including upgrade type, server settings, and regional settings.
![]() Phase II: upgrading storage to NetWare 6—You’ll install and configure NetWare 6 storage devices by selecting an appropriate platform support module and/or HotPlug support module (if applicable), and configuring storage adapter(s), storage device(s), and network board(s).
Phase II: upgrading storage to NetWare 6—You’ll install and configure NetWare 6 storage devices by selecting an appropriate platform support module and/or HotPlug support module (if applicable), and configuring storage adapter(s), storage device(s), and network board(s).
![]() Phase III: upgrading the server and network—You’ll configure the file system and review existing network protocols.
Phase III: upgrading the server and network—You’ll configure the file system and review existing network protocols.
![]() Phase IV: setting up DNS and eDirectoryg—You’ll expand beyond the server to establish domain name settings and to configure your directory tree. This phase encompasses the following three steps: configure Domain Name Service (DNS), configure eDirectory, and license the NetWare 6 server.
Phase IV: setting up DNS and eDirectoryg—You’ll expand beyond the server to establish domain name settings and to configure your directory tree. This phase encompasses the following three steps: configure Domain Name Service (DNS), configure eDirectory, and license the NetWare 6 server.
![]() Phase V: completing the upgrade—You’ll complete the NetWare 6 upgrade process by (optionally) installing additional network products, installing Novell Certificate Server, and customizing final upgrade parameters.
Phase V: completing the upgrade—You’ll complete the NetWare 6 upgrade process by (optionally) installing additional network products, installing Novell Certificate Server, and customizing final upgrade parameters.
Every great adventure begins with a single step—yours starts with phase I.
In phase I, you will prepare the server, execute the INSTALL.BAT file, accept the license agreements, and load the core NetWare operating system. Following that, you’ll select a plethora of general NetWare 6 settings including upgrade type, server settings, and regional settings. Let’s get started.
Before you do anything, you must back up all the data from your source upgrade computer to an offline storage media. Also, make sure that you install the latest NetWare service pack. Refer to the “Before You Begin” section earlier for more information.
NetWare 6 can be upgraded from the server’s local CD drive or from upgrade files located elsewhere on the network. To access the NetWare 6 upgrade files, perform these steps:
1. Install the DOS CD driver for the computer’s CD drive onto the DOS partition. (The DOS CD driver should be obtained from the CD drive manufacturer.) After you’ve installed the driver, verify that the logical filename of the CD drive specified in the computer’s CONFIG.SYS and AUTOEXEC.BAT files is not CDROM or CDINST.
2. Verify that the CONFIG.SYS file contains the following parameters: FILES=50 and BUFFERS=30.
3. (Conditional) If you plan to upgrade NetWare 6 from upgrade files located on a network, install the Novell Client for DOS and Windows 3.1x or IP Server Connection utility located on the NetWare 6 Novell Client CD, as appropriate.
4. (Conditional) If you plan to upgrade NetWare 6 from upgrade files located on a network, don’t forget to copy the files to the desired server. Also, verify that you have the appropriate security rights to access them.
The following NetWare applications also require that you prepare their files prior to upgrading:
![]() IBM WebSphere Application for NetWare—For servers running IBM WebSphere Application Server for NetWare, you must migrate existing Web applications by using the migration utility included with NetWare 6. This utility migrates WebSphere Web applications to Tomcat applications.
IBM WebSphere Application for NetWare—For servers running IBM WebSphere Application Server for NetWare, you must migrate existing Web applications by using the migration utility included with NetWare 6. This utility migrates WebSphere Web applications to Tomcat applications.
![]() ZENworks for Servers—For servers running ZENworks for Servers, you must install the ZENworks for Servers Support Pack prior to upgrading the server to NetWare 6. You can get this support pack and related information from Novell Technical Support at support.novell.com.
ZENworks for Servers—For servers running ZENworks for Servers, you must install the ZENworks for Servers Support Pack prior to upgrading the server to NetWare 6. You can get this support pack and related information from Novell Technical Support at support.novell.com.
Finally, be sure your DOS partition is large enough to hold both the system files and a memory core dump (200MB recommended). If the DOS partition doesn’t have enough space, you cannot upgrade.
To begin the NetWare 6 upgrade process, insert the NetWare 6 Operating System CD into the CD drive (or log in to the network if you’ve stored the NetWare 6 upgrade files on an existing server), and enter the following command at the prompt:
INSTALL
Notice that the upgrade program displays the initial screens in text mode. Auto-detected and/or default settings appear on each screen. You can either accept the auto-detected and default settings or modify them to meet your requirements. To navigate a text screen, use the arrow keys on your keyboard. To select a menu choice, highlight the desired option and press Enter. To toggle between predetermined values in a field, highlight the field, and then press Enter to toggle to the next value. See the bottom of each screen for further information.
At the beginning of the upgrade process, you’re asked to agree to the terms and conditions contained in the NetWare 6 Novell Software License Agreement. Press F10 or select Accept License Agreement, as appropriate, to indicate that you’ve read the agreement and accept its terms and conditions. The appropriate choice will depend on the method you used to start the upgrade program.
The upgrade program then checks the server’s first hard disk to verify that it has a valid boot partition and adequate disk space. When a screen appears indicating that a valid boot partition has been found, select Continue with Existing Partition.
When the JReport Runtime License Agreement screen appears, press F10 to indicate that you’ve read the agreement and accept its terms and conditions.
When the Welcome to the NetWare Server Installation screen appears, you’re given the opportunity to select the installation type (express or custom) and the installation method (new server, upgrade, or pre-migration). The default installation type is express and the default installation method is upgrade. Let’s take a closer look at each of these options.
The NetWare 6 installation methods available on the screen include
![]() New Server—Installs a new server from scratch. Creates a new NetWare partition for the SYS: volume but does not delete system partitions or other partitions (such as DOS, Unix, or Windows). Refer to Chapter 1 for more details.
New Server—Installs a new server from scratch. Creates a new NetWare partition for the SYS: volume but does not delete system partitions or other partitions (such as DOS, Unix, or Windows). Refer to Chapter 1 for more details.
![]() Upgrade—Upgrades a NetWare 4 or NetWare 5 server to NetWare 6. This option retains all original server data such as partitions, volumes, directory structures, and files.
Upgrade—Upgrades a NetWare 4 or NetWare 5 server to NetWare 6. This option retains all original server data such as partitions, volumes, directory structures, and files.
![]() Pre-Migration—Uses the Migration Wizard to migrate data from an existing (source) server to a new (destination) NetWare 6 server.
Pre-Migration—Uses the Migration Wizard to migrate data from an existing (source) server to a new (destination) NetWare 6 server.
Review the values listed on this screen and modify them as necessary. In Lab Exercise 2.1, you’ll perform a NetWare 6 custom upgrade.
The Server Settings screen appears next, listing the following default values:
![]() Load Server at Reboot: Yes
Load Server at Reboot: Yes
![]() Server Set Parameters: Edit
Server Set Parameters: Edit
![]() Backup Startup Directory (Optional): C:NWSERVER.OLD
Backup Startup Directory (Optional): C:NWSERVER.OLD
Some information you might want to keep in mind regarding these options includes
![]() Load Server at Reboot—If you select Yes (default), the AUTOEXEC.BAT and CONFIG.SYS files are copied and renamed with a .00x extension. The original AUTOEXEC.BAT and CONFIG.SYS files are then updated so that the NetWare operating system automatically loads when the server boots. If you select No, the AUTOEXEC.BAT and CONFIG.SYS files are not updated.
Load Server at Reboot—If you select Yes (default), the AUTOEXEC.BAT and CONFIG.SYS files are copied and renamed with a .00x extension. The original AUTOEXEC.BAT and CONFIG.SYS files are then updated so that the NetWare operating system automatically loads when the server boots. If you select No, the AUTOEXEC.BAT and CONFIG.SYS files are not updated.
![]() Server SET Parameters—SET parameters might need to be modified for device drivers such as network boards or storage devices in order to complete the installation. SET parameters are saved in the server’s STARTUP.NCF file.
Server SET Parameters—SET parameters might need to be modified for device drivers such as network boards or storage devices in order to complete the installation. SET parameters are saved in the server’s STARTUP.NCF file.
![]() Backup Startup Directory (Optional): C:NWSERVER.OLD—Location to save old C:NWSERVER startup files.
Backup Startup Directory (Optional): C:NWSERVER.OLD—Location to save old C:NWSERVER startup files.
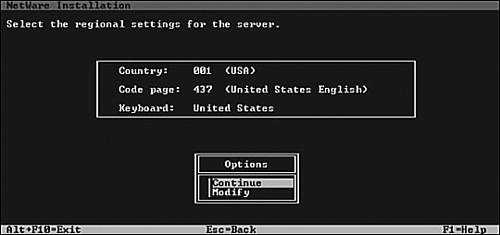
The Regional Settings screen appears next, as shown in Figure 2.11. Regional settings are used to customize server language and keyboard settings. If you’re located in the United States, the default values are as follows:
![]() Country: 001 (USA)
Country: 001 (USA)
![]() Code Page: 437 (United States English)
Code Page: 437 (United States English)
![]() Keyboard: United States
Keyboard: United States
The upgrade program then copies a number of server boot files from the CD to the C:NWSERVER startup directory. These include files such as SERVER.EXE, disk drivers, NWCONFIG.NLM, NWSNUT.NLM, VREPAIR.NLM, and other NetWare loadable modules (NLMs).
This completes the first five steps of NetWare 6 upgrade and phase I. Now, we will continue with platform support and NetWare storage in phase II.
In phase II, you’ll install and configure NetWare 6 storage devices by selecting an appropriate platform support module and/or HotPlug support module (if applicable), and configuring storage adapter(s), storage device(s), and network board(s).
Figure 2.12 shows the first of three driver screens. This one lists the platform and support modules (which have been auto-detected wherever possible):
![]() Platform support module—A platform support module (PSM) driver can be loaded to optimize the performance of servers with multiple processors and other configurations. If a PSM is not detected, your computer probably does not need one. If a platform support module driver is detected on a computer that does not contain multiple processors, the driver can be allowed to load without adversely affecting performance. Platform support modules typically have a .PSM filename extension. Note: New Intel single processor servers must have the PSM loaded in order to optimize performance.
Platform support module—A platform support module (PSM) driver can be loaded to optimize the performance of servers with multiple processors and other configurations. If a PSM is not detected, your computer probably does not need one. If a platform support module driver is detected on a computer that does not contain multiple processors, the driver can be allowed to load without adversely affecting performance. Platform support modules typically have a .PSM filename extension. Note: New Intel single processor servers must have the PSM loaded in order to optimize performance.
![]() HotPlug support module—PCI HotPlug technology allows storage adapters and network boards to be inserted and removed while the computer is powered on. If a PCI HotPlug module is not detected, your computer probably does support the technology (and thus, does not need one). PCI HotPlug modules typically have an .NLM extension.
HotPlug support module—PCI HotPlug technology allows storage adapters and network boards to be inserted and removed while the computer is powered on. If a PCI HotPlug module is not detected, your computer probably does support the technology (and thus, does not need one). PCI HotPlug modules typically have an .NLM extension.
![]() Storage adapters—Storage adapters require a software driver called a host adapter module (HAM) to communicate with the computer (host). Because a single storage adapter can control more than one type of storage device, only one HAM might be required. Various types of storage adapters, such as integrated drive electronics (IDE) and small computer system interface (SCSI), might be auto-detected. If a particular storage adapter is not detected, choose the appropriate driver from the list or load it from a manufacturer-provided disk. Verify that properties such as interrupt, port value, and slot do not conflict with any other device in the computer. Host adapter modules typically have a .HAM extension.
Storage adapters—Storage adapters require a software driver called a host adapter module (HAM) to communicate with the computer (host). Because a single storage adapter can control more than one type of storage device, only one HAM might be required. Various types of storage adapters, such as integrated drive electronics (IDE) and small computer system interface (SCSI), might be auto-detected. If a particular storage adapter is not detected, choose the appropriate driver from the list or load it from a manufacturer-provided disk. Verify that properties such as interrupt, port value, and slot do not conflict with any other device in the computer. Host adapter modules typically have a .HAM extension.

The second driver screen lists storage devices. Storage devices require a software driver, called a custom device module (CDM) to communicate with the storage adapter that controls it. Each type of storage device requires a separate CDM. The Upgrade Wizard auto-detects many types of storage devices, such as SCSI/IDE drives, CD-ROM drives, and tape drives. If a storage device is not detected, choose the appropriate driver from the list provided or load it from a manufacturer-provided disk. Custom device modules typically have a .CDM extension.
The third driver screen lists the network drivers and a plethora of NLMs:
![]() Network boards—Network boards require a software driver called a LAN driver to communicate with the network. The upgrade program auto-detects many types of network boards. If a particular network board is not detected, choose the appropriate driver from the list provided or load it from a manufacturer-provided disk. To edit the properties of the network board, it must be installed and configured properly. Verify that properties such as interrupt, port value, and slot do not conflict with any other device in your server. LAN drivers typically have a .LAN extension.
Network boards—Network boards require a software driver called a LAN driver to communicate with the network. The upgrade program auto-detects many types of network boards. If a particular network board is not detected, choose the appropriate driver from the list provided or load it from a manufacturer-provided disk. To edit the properties of the network board, it must be installed and configured properly. Verify that properties such as interrupt, port value, and slot do not conflict with any other device in your server. LAN drivers typically have a .LAN extension.
![]() NetWare loadable modules—Some servers and network configurations require that you load an NLM before completing the server upgrade. (For example, if you’re installing the server in a token ring environment, you might need to load ROUTE.NLM.) If required, add the appropriate NLM to the NetWare Loadable Modules field.
NetWare loadable modules—Some servers and network configurations require that you load an NLM before completing the server upgrade. (For example, if you’re installing the server in a token ring environment, you might need to load ROUTE.NLM.) If required, add the appropriate NLM to the NetWare Loadable Modules field.
When you select Continue, the Upgrade Wizard copies system files to the SYS: volume.
TIP
If you’re installing NetWare 6 from the network, you’ll be prompted to reconnect to the network. To continue the upgrade, you must authenticate with the same User object and password that you used at the beginning of the upgrade process.
This completes the next three steps of NetWare 6 upgrade and phase II. Now, we’ll venture into a whole new world: GUI installation screens and phase III.
Welcome to the GUI portion of NetWare 6 upgrade!
In phase III, you’ll review existing network protocols. In this stage, you’ll leave the boring text-mode world and switch to a GUI interface. Although a mouse is recommended, you can use keystrokes to navigate through the upgrade program screens. Remember that the Num Lock (number lock) key must be activated in order for cursor movements to be enabled on the keypad.
At this point, the Upgrade Wizard copies a number of files to the server hard drive (called the preparatory file copy process). A Java Virtual Machine (JVM) is created on the server and the GUI portion of the Upgrade Wizard is loaded. This step might take a while, so feel free to go have a cup of Java while you wait. Ha, ha.
Some technologies (such as SSL and certificate generation) require the use of cryptography. If the Encryption screen appears, insert the NetWare 6 License/Cryptography disk into the computer’s disk drive. On the disk, browse to the License directory, select the .NFK file, and then select OK.
If the Encryption screen appears and you don’t select an .NFK file, you won’t be able to install NetWare 6! Fortunately, the .NFK included with this CNE Study Guide will keep you running for several months.
The NetWare 6 file system consists of partitions, volumes, and free space. In this step, you’re given the option of creating additional NetWare partitions and volumes using available free space. For example, you can divide a large disk into two or more volumes or distribute a single volume over more than one disk.
You can create two different types of NetWare 6 volumes:
![]() NSS volumes—NSS is an advanced file system technology that’s designed for the management of large volumes, large files, name spaces, and complex storage devices. It significantly reduces the amount of time required to mount large volumes. This is the default volume type.
NSS volumes—NSS is an advanced file system technology that’s designed for the management of large volumes, large files, name spaces, and complex storage devices. It significantly reduces the amount of time required to mount large volumes. This is the default volume type.
![]() Traditional volumes—Traditional volumes are not recommended and should be used only if you require the use of technologies such as block suballocation, NFS (Network File System), FTP, VREPAIR, or file locks.
Traditional volumes—Traditional volumes are not recommended and should be used only if you require the use of technologies such as block suballocation, NFS (Network File System), FTP, VREPAIR, or file locks.
If a Configure File System dialog box appears, review the information listed. To create an additional volume, choose one of the displayed free space icons and select Create.
TIP
Although an NSS SYS: volume is recommended for most server installations, you can create a traditional SYS: volume during step 10. If all available space has been allocated to the SYS: volume, you will not be prompted for additional NetWare server file system information. If this is the case, skip to “Step 11: View Network Protocols.”
If the New Volume dialog box appears, type the name of the new volume in the Volume Name field, provide a size in the Space to Use field, and select Apply to Volume. When you’ve finished, select OK. The Configure File System screen then reappears, listing the new volume. Repeat the process, as necessary, to create additional volumes.
In addition, the size of an existing volume can be increased, but not decreased, by using the Free Space option within the Configure File System screen. In the Space to Use field, enter the new size of the volume, select Apply to Volume, and select OK. To decrease the size of an existing volume, you must delete and re-create it. To delete a volume, highlight it in the Configure File System screen and then choose Delete.
TIP
Volume names can consist of 2 to 15 characters. Valid characters include A through Z, 0 through 9, and !, -, @, #, $, %, &, (, and ). A volume name cannot begin with an underscore (_) or contain two or more consecutive underscores.
If the Mount Volumes dialog box appears, indicate whether to mount all volumes when the server reboots at the end of the upgrade process or whether to mount all volumes now. The default choice (Yes) establishes that all volumes will be mounted when the server reboots. You would typically need to mount all volumes now only if you plan to install additional products and services (such as documentation) on volumes other than SYS:.
At this point, the Protocols dialog box appears. This screen displays the network protocols that are currently configured.
NetWare 6 can be configured to process IP network packets and/or traditional IPX packets. If desired, both protocols can be assigned to a single network board. This allows the server to communicate using both IP and IPX. In fact, your NetWare 6 server can be configured in any of the following ways:
![]() IP Only—The IP Only protocol configuration forces your NetWare 6 server and all its workstations to communicate using IP only. The IP protocol choice also causes the server to automatically bind the Ethernet_II frame type to the corresponding internal NIC.
IP Only—The IP Only protocol configuration forces your NetWare 6 server and all its workstations to communicate using IP only. The IP protocol choice also causes the server to automatically bind the Ethernet_II frame type to the corresponding internal NIC.
![]() IP with IPX Compatibility Mode—When the IP protocol is selected, passive support for IPX is also provided. If an IPX request arrives at the server, NetWare 6 processes the request. This passive support for IPX is called compatibility mode and it must be enabled manually using the Advanced tab.
IP with IPX Compatibility Mode—When the IP protocol is selected, passive support for IPX is also provided. If an IPX request arrives at the server, NetWare 6 processes the request. This passive support for IPX is called compatibility mode and it must be enabled manually using the Advanced tab.
![]() IPX Only—You can also configure your NetWare 6 server for IPX (Novell’s traditional communications protocol) to facilitate legacy NetWare IPX applications. If IPX, but not IP, is installed on your server, it will actively process IPX packets and ignore packets using other protocols, such as IP. This is not a good idea because many new NetWare 6 network features require the more advanced IP protocol.
IPX Only—You can also configure your NetWare 6 server for IPX (Novell’s traditional communications protocol) to facilitate legacy NetWare IPX applications. If IPX, but not IP, is installed on your server, it will actively process IPX packets and ignore packets using other protocols, such as IP. This is not a good idea because many new NetWare 6 network features require the more advanced IP protocol.
![]() IP and IPX—If you have network clients or applications that require both IP and IPX, you can install multiple protocols simultaneously. Fortunately, both IP and IPX protocols can be bound to a single server NIC. In this configuration, the server processes IP requests using IP, and IPX requests using IPX. This solution is elegant in its simplicity!
IP and IPX—If you have network clients or applications that require both IP and IPX, you can install multiple protocols simultaneously. Fortunately, both IP and IPX protocols can be bound to a single server NIC. In this configuration, the server processes IP requests using IP, and IPX requests using IPX. This solution is elegant in its simplicity!
TIP
To configure the IP protocol, you must be familiar with and know the IP address, the subnet address, and the router (gateway) address. The upgrade utility uses default frame types of Ethernet_802.2 (if no frame types are detected while installing IPX) and Ethernet_II (for IP).
This completes the middle three steps of NetWare 6 upgrade and phase III. Now, it’s time to venture outside the cozy confines of our server and into the exciting world of Domain Name Service and eDirectory.
In phase IV, you’ll expand beyond the server to establish domain name settings and configure the eDirectory tree. This stage encompasses the following three steps: configure Domain Name Service (DNS), configure eDirectory, and license the NetWare 6 server.
Let’s start with enhanced IP address management via DNS.
Earlier, I mentioned that the IP protocol identifies servers and workstations by their unique four-part IP addresses. These addresses are complex and difficult for humans to track. Fortunately, your NetWare 6 server can maintain a list of simple, readable names that match all the IP addressed devices on your network. This capability is known as Domain Name Service, and the corresponding NetWare 6 application is called DNS Server.
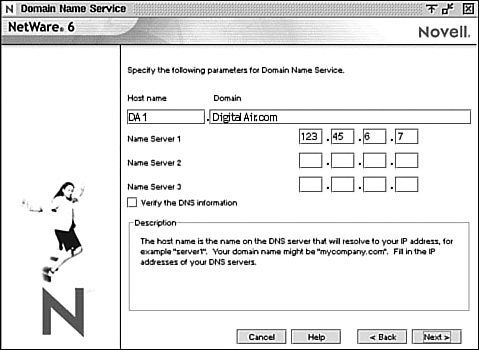
To provide DNS services from your NetWare 6 server, you must configure the following information in Figure 2.13:
![]() Host computer—The simple, readable name on the DNS server that matches your NetWare server’s name or the name you have bound to the internal server NIC. You can set up the host computer name on the DNS server to use the NetWare server name.
Host computer—The simple, readable name on the DNS server that matches your NetWare server’s name or the name you have bound to the internal server NIC. You can set up the host computer name on the DNS server to use the NetWare server name.
![]() Domain name—The hierarchical name that represents the organization of your network, such as acme.com. Typically, you should use the information provided by your network administrator. In many cases, it is the name of the server’s host Organization object in the NDS/eDirectory tree.
Domain name—The hierarchical name that represents the organization of your network, such as acme.com. Typically, you should use the information provided by your network administrator. In many cases, it is the name of the server’s host Organization object in the NDS/eDirectory tree.
![]() Domain name server—The IP address of the DNS server that maintains the list containing this NetWare server’s simple, readable name and IP address. For more information, contact your network administrator or ISP. If your NetWare 6 server is providing DNS services, this would be its own IP address.
Domain name server—The IP address of the DNS server that maintains the list containing this NetWare server’s simple, readable name and IP address. For more information, contact your network administrator or ISP. If your NetWare 6 server is providing DNS services, this would be its own IP address.
When the Login to NDS screen appears, log in to the tree as Admin, using the full distinguished name and password.
At this point, the Upgrade Wizard checks for duplicate tree names and installs NDS/eDirectory. When the NDS Summary screen appears (see Figure 2.14), write the values you supplied for the following parameters and store it in a safe place for future reference:
![]() NDS/eDirectory tree name
NDS/eDirectory tree name
![]() Server context
Server context
![]() Administrator name
Administrator name
![]() Administrator password you entered on previous screen
Administrator password you entered on previous screen

Novell Licensing Services has been enhanced in NetWare 6 to support two different models for distributing valid license certificates to network users and services:
![]() Server connection license (SCL) model—In the SCL model, users are granted access to network resources and services based on the server they are logged in to. This means that each user must obtain an available license for every server that hosts a resource that they need.
Server connection license (SCL) model—In the SCL model, users are granted access to network resources and services based on the server they are logged in to. This means that each user must obtain an available license for every server that hosts a resource that they need.
![]() User access license (UAL) model—In NetWare 6, Novell licensing has evolved beyond the server to focus on the network as a whole. This new model is known as user access licensing (UAL). In the UAL model, User objects receive a permanent license unit that allows them to access network services at any time and from any workstation attached to the network. This greatly simplifies Novell license management.
User access license (UAL) model—In NetWare 6, Novell licensing has evolved beyond the server to focus on the network as a whole. This new model is known as user access licensing (UAL). In the UAL model, User objects receive a permanent license unit that allows them to access network services at any time and from any workstation attached to the network. This greatly simplifies Novell license management.
When you install or upgrade to NetWare 6, the wizard installs the UAL model by default. To add license certificates and/or upgrade to UAL, you must use iManager after the installation or upgrade. Fortunately, UAL and SCL can coexist on the same network. In this scenario, NetWare delivers the appropriate license certificate type based on the location of the resource—NetWare 6 servers share a single UAL certificate, whereas NetWare 5 servers deliver an SCL certificate for each server.
We’ll use the NetWare 6 Upgrade Wizard to license the NetWare 6 server (as shown in Figure 2.15). When the Licenses dialog box appears, insert the NetWare license disk in the floppy drive and select the appropriate license file. Be sure to use a unique license disk, and make sure that you actually browse to and select the license file, instead of just listing the drive letter (a common mistake).

When you select the license file, you’ll notice that the type of license appears in the Description section, such as NetWare 6 Server, Plus Fifty User Connections. Select OK to return to the Licenses screen, and Next to continue to step 15.
NetWare 6 must have a valid software license in order to function as a server. You can install the license from the NetWare 6 License/Cryptography disk or browse to a directory that contains a valid NetWare 6 license. In addition, you can choose to install NetWare 6 without a license by marking the Install without Licenses check box in Figure 2.15. In this scenario, the unlicensed server will allow only two user connections.
If an MLA License Certificate context screen appears, select the NDS context where you would like the MLA server-based license certificate and connection license certificate installed. These MLA certificates are valid for all servers and users located at the selected eDirectory context and below. You might want to install these MLA license certificates high in the tree so that they will be available to more servers and users.
TIP
If you’re using a demo version of the NetWare 6 Operating System CD (that is, one that does not have an associated license disk), use the license file in the preselected directory on the CD. If you can’t locate the license file, mark the Install Without Licenses check box, although you might experience problems with some features, such as Novell Distributed Print Services (NDPS), that use multiple connections.
This completes the three trickiest steps of NetWare 6 upgrade and phase IV. Now, it’s time for the home stretch: completing the upgrade in phase V.
Finally, in phase V, you’ll complete the NetWare 6 upgrade adventure by installing additional network products, installing Novell Certificate Server, and customizing final upgrade parameters.
Let’s continue by installing some additional network products. Some of my personal favorites are Novell Native File Access Pack (NFAP), NetWare Web Access, and iPrint.
Near the end of the upgrade process, you’ll be given the opportunity to install a variety of additional network products. These products provide enhanced server and network functionality, including Internet printing, Web access services, Domain Name Service, and advanced Novell auditing.
TIP
Some products can be installed using the NetWare Deployment Manager only after the server upgrade is complete.
Toward the end of the NetWare 6 upgrade process, the Components dialog box appears, enabling you to select from the following list of additional network products (see Figure 2.16):
![]() iPrint/NDPS
iPrint/NDPS
![]() NetWare Enterprise Web Server
NetWare Enterprise Web Server
![]() NetWare FTP Server
NetWare FTP Server
![]() NetWare Web Search
NetWare Web Search
![]() Novell DNS/DHCP Services
Novell DNS/DHCP Services
![]() WAN Traffic Manager Services
WAN Traffic Manager Services
![]() Novell Native File Access Pack (selected by default)
Novell Native File Access Pack (selected by default)
![]() Novell Advanced Audit Service (selected by default)
Novell Advanced Audit Service (selected by default)
![]() NetWare Web Access
NetWare Web Access

If you rest your cursor on an installation option, a description of the accompanying product is displayed at the bottom of the screen. Mark the check box of each product you want to install. If a product requires a supporting component, the check box of the supporting product will be selected automatically. Also, always be sure that your server has enough disk space and system memory to accommodate the products you want to install.
Novell Certificate Server ensures secure data transmissions between servers and workstations over your network. Only one Organizational CA object can exist in an eDirectory tree. After the Organizational CA object has been created on a server, it cannot be moved to another server. Deleting and re-creating an Organizational CA object will invalidate any certificates associated with the Organizational CA—so you must make sure that the server hosting the Organizational CA object is very reliable.
To create the Security container and Organizational CA objects, you must be logged in as a user with the Supervisor right to the tree root of the eDirectory tree. In the Novell Certificate Server Objects installation screen (shown in Figure 2.17), mark the appropriate check boxes. The Upgrade Wizard will give the Organizational CA a default name based on the server name. Select Next to create the Novell Certificate Server objects and continue.

TIP
In this study guide, we’ll explore each of the additional network products listed earlier. However, we won’t cover their installation and configuration in this chapter. Because many of these products are complex, we’ll devote entire sections of the guide to their proper configuration in subsequent chapters. Stay tuned!
When the Summary screen appears (as shown in Figure 2.18), review the NetWare 6 products that are ready to be installed. When you’re satisfied with the list of products, select Customize to access the upgrade customization screen. Check it out.

You can enhance the basic NetWare 6 upgrade with some additional configurations by using the Product Customization dialog box. As you can see in Figure 2.19, the NetWare 6 upgrade process provides you with a plethora of customizable categories, including the core NetWare operating system, file system, protocols, time synchronization, Novell Directory Services, and additional products and services.
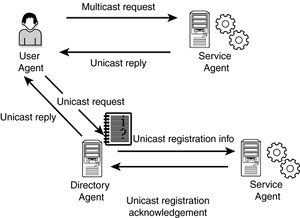
To customize your upgrade, browse the tree to find the first NetWare 6 component that you want to modify, select the component, and select Configure. When you’ve finished customizing your selections, select OK to return to the Summary screen.
On the Summary screen, select Finish to complete the upgrade process. Yeah!
The Upgrade Wizard then performs the main file copy. (This step might take a while.) When the file copy finishes, the Installation Complete window appears. Select View Log or View Readme, if desired. Next, remove the NetWare 6 License/Cryptography disk from the floppy disk drive (if you used one), the NetWare 6 Operating System CD from the CD-ROM drive (if applicable), and select Yes to restart your server (as shown in Figure 2.20).
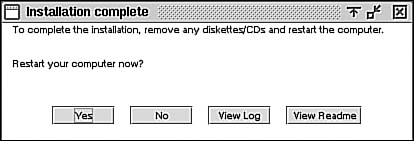
Congratulations—you’ve done it! You’ve successfully traversed the five phases and 18 steps of NetWare 6 upgrade! Now it’s time to use your new server to help save the Net! Check out the step-by-step challenges awaiting you in Lab Exercise 2.1.
In this lab exercise, you’ll perform these tasks:
![]() Part I: Install NetWare 5.1 on WHITE-SRV1
Part I: Install NetWare 5.1 on WHITE-SRV1
![]() Part II: Install the latest NetWare 5.1 Support Pack
Part II: Install the latest NetWare 5.1 Support Pack
![]() Part III: Prepare the server to be Upgraded
Part III: Prepare the server to be Upgraded
![]() Part IV: Perform an in-place upgrade to NetWare 6
Part IV: Perform an in-place upgrade to NetWare 6
![]() Part V: Complete post-upgrade tasks
Part V: Complete post-upgrade tasks
In this lab exercise, you’ll need the following components:
![]() The server hardware used in Lab Exercise 1.1. In this exercise, you’ll overwrite the NetWare 6 operating system with NetWare 5.1.
The server hardware used in Lab Exercise 1.1. In this exercise, you’ll overwrite the NetWare 6 operating system with NetWare 5.1.
![]() Two workstations running Windows 95/98 or Windows NT/2000 that (meet or exceed) the minimum hardware requirements for a NetWare 6 administrative workstation. These should be the workstations that you plan to use as your primary administrative workstations for the lab exercises in this book.
Two workstations running Windows 95/98 or Windows NT/2000 that (meet or exceed) the minimum hardware requirements for a NetWare 6 administrative workstation. These should be the workstations that you plan to use as your primary administrative workstations for the lab exercises in this book.
![]() A Microsoft Windows Operating System CD-ROM (that matches the Windows operating system that is running on the primary administrative workstation).
A Microsoft Windows Operating System CD-ROM (that matches the Windows operating system that is running on the primary administrative workstation).
![]() A Microsoft Windows Operating System CD-ROM (that matches the Windows operating system that is running on the secondary administrative workstation).
A Microsoft Windows Operating System CD-ROM (that matches the Windows operating system that is running on the secondary administrative workstation).
![]() Internet access for the workstations.
Internet access for the workstations.
![]() A NetWare 6 Operating System CD.
A NetWare 6 Operating System CD.
![]() (Optional) A NetWare 5.1 License/Cryptography disk containing a server license.
(Optional) A NetWare 5.1 License/Cryptography disk containing a server license.
![]() A NetWare 6 License/Cryptography disk containing both server and user licenses. This is the one you used in Lab Exercise 1.1.
A NetWare 6 License/Cryptography disk containing both server and user licenses. This is the one you used in Lab Exercise 1.1.
Perform the following tasks at the WHITE-SRV1 server console:
1. Using the parameters in Table 2.3, install NetWare 5.1 on the WHITESRV1 server. During the installation process:
![]() Install the server as a new server, not as an upgrade! In other words, you’re going to overwrite the NetWare 6 operating system with NetWare 5.1.
Install the server as a new server, not as an upgrade! In other words, you’re going to overwrite the NetWare 6 operating system with NetWare 5.1.
![]() Do remove and re-create the DOS partition.
Do remove and re-create the DOS partition.
![]() Do remove and re-create the NetWare partition and SYS: volume.
Do remove and re-create the NetWare partition and SYS: volume.
![]() Overwrite any newer files (even though you would not normally do so in real life).
Overwrite any newer files (even though you would not normally do so in real life).
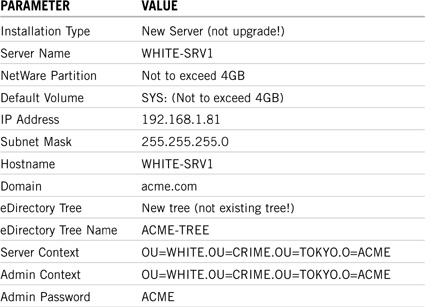
Perform the following step on your primary administrative workstation:
1. Download the Latest NetWare 5.1 Support Pack. You will not be allowed to upgrade your NetWare 5.1 server to NetWare 6 unless the NetWare 5.1 Support Pack 2 (or later) is installed on your server. In this lab exercise, we’ll use the most recent Support Pack provided by Novell at the time of printing.
a. Normally, you would carefully back up any existing data on the server. Because you are using a practice (that is, nonproduction) server for this lab exercise, however, you can skip this step.
b. Log in to your network as Admin.
c. Create a directory on WHITE-SRV1 volume SYS called SP.
d. Create a drive mapping that maps S: to the SP directory.
e. Next, launch Internet Explorer, and access the Novell Web site at support.novell.com/servlet/filedownload/pub/nw51sp6.exe/.
f. Download the nw51sp6.exe file from the Web site to the SP directory on your server.
g. Access a DOS prompt on your workstation:
![]() Select Start, Programs, MS-DOS Prompt.
Select Start, Programs, MS-DOS Prompt.
![]() When the DOS prompt appears, switch to the S: drive.
When the DOS prompt appears, switch to the S: drive.
![]() At the DOS prompt, explode the file by entering nw51sp6. (Note: It might take a while for the file extraction to begin. It will be even longer for the files to be extracted. Feel free to take a break at this point.)
At the DOS prompt, explode the file by entering nw51sp6. (Note: It might take a while for the file extraction to begin. It will be even longer for the files to be extracted. Feel free to take a break at this point.)
![]() When the files explosion process is complete, enter EXIT to exit the DOS prompt. Perform the following step at the WHITE-SRV1 server console.
When the files explosion process is complete, enter EXIT to exit the DOS prompt. Perform the following step at the WHITE-SRV1 server console.
2. Install the Latest NetWare 5.1 Support Pack.
a. At the WHITE-SRV1 prompt, launch NWCONFIG.
b. When the Configuration Options window appears, select Product Options, Install a Product Not Listed.
c. To specify the source path, press F3.
d. When the Specify a Directory Path field appears, specify the following path:
SYS:SPNW51SP6
e. Wait while the Support Pack files are installed.
f. When the Novell Terms and Conditions screen appears, read the information on the screen, and then press Esc.
g. When the Do You Accept the License Agreement window appears, select Yes.
h. Next, the program will help you upgrade JVM and verify that you’ve reviewed the NW51_ISS.TXT file. When the License Agreement for JReport Runtime screen appears, read the information on the screen, and then press Esc.
i. When the Do You Accept the ConsoleOne Reporting Tool License Agreement window appears, select Yes.
j. When a message appears, indicating that the NetWare Support Pack Version 5.1.6 is about to be installed, press Enter to continue. (Note: It might take a while for the support pack files to be installed. Feel free to take a break at this point.)
k. When the Backup Files Replaced by NetWare Support Pack window appears, select Yes.
l. When the Do You Want to Update the Storage/LAN/PSM/WAN Drivers Currently in Use window appears, select Yes.
m. When the Reboot the Server After Copying Files window appears, select Yes.
n. When a warning screen appears, indicating that the Installed Products and Services will now be shut down, press Enter. Then wait for the files to copy.
o. When the Enter Destination Path for Backup Files window appears, leave the default of SYS:SYSTEMBACKSP6 and press Enter. Then wait for the files to copy.
p. Then you’ll be prompted to log in as Admin. After you’ve authenticated, a message will indicate that the system is backing up files and that it can take approximately 5 to 15 minutes. Wait while this occurs.
q. After the support pack installation is complete, allow the server to reboot.
r. If the Auto Purge feature is not set on your server, you might want to manually purge the volume to free disk space.
Perform the following step at the WHITE-SRV1 server console:
1. Run DSREPAIR.
a. At the server prompt, enter DSREPAIR.
![]() In the Available Options menu, select Unattended Full Repair. Wait until the repair process is complete. Note the number of errors and then press Enter to acknowledge the message. If any errors occurred, review the log file that appears on the screen, press Esc to exit the log file, and repeat the process until it runs without errors.
In the Available Options menu, select Unattended Full Repair. Wait until the repair process is complete. Note the number of errors and then press Enter to acknowledge the message. If any errors occurred, review the log file that appears on the screen, press Esc to exit the log file, and repeat the process until it runs without errors.
![]() In Available Options menu, select Time Synchronization. When the log file appears, review the log file to determine whether any errors occurred, and then press Esc. If any errors occur, attempt to troubleshoot the problems.
In Available Options menu, select Time Synchronization. When the log file appears, review the log file to determine whether any errors occurred, and then press Esc. If any errors occur, attempt to troubleshoot the problems.
![]() In the Available Options menu, select Report Synchronization Status. When the log file appears, review the log file to determine whether any errors occurred, and then press Esc. If any errors occur, attempt to troubleshoot the problems.
In the Available Options menu, select Report Synchronization Status. When the log file appears, review the log file to determine whether any errors occurred, and then press Esc. If any errors occur, attempt to troubleshoot the problems.
b. Exit DSREPAIR.
Perform the following step on your primary administrative workstation:
2. Run Deployment Manager.
a. Insert the NetWare 6 Operating System CD into the workstation’s CD drive.
a. Log in to the network as admin.
c. Launch NetWare Deployment Manager (NWDEPLOY.EXE), which is located in the root of the NetWare 6 Operating System CD.
![]() Select Start, Run.
Select Start, Run.
![]() When the Run dialog box appears, select Browse.
When the Run dialog box appears, select Browse.
![]() When the Browse dialog box appears, browse to the NetWare 6 Operating System CD.
When the Browse dialog box appears, browse to the NetWare 6 Operating System CD.
![]() Select NWDEPLOY (which is located in the root of the CD), and select Open.
Select NWDEPLOY (which is located in the root of the CD), and select Open.
![]() When the Run dialog box reappears, select OK.
When the Run dialog box reappears, select OK.
d. When the Select Product window appears, double-click the Network Preparation folder to expand it.
e. Under Network Preparation, select Step 3: Prepare for NDS eDirectory 8.6.
f. When the Update NDS window appears, select the Browse button to the right of the text field.
g. When the NDS Tree Browser window appears
![]() Expand Novell Network.
Expand Novell Network.
![]() Expand Novell Directory Services.
Expand Novell Directory Services.
![]() Select ACME-TREE.
Select ACME-TREE.
![]() Select OK.
Select OK.
h. If a Login dialog window appears, authenticate as Admin
![]() In the Username field, enter admin.
In the Username field, enter admin.
![]() In the User Password field, enter acme.
In the User Password field, enter acme.
![]() In the Tree field, verify that ACME-TREE is listed.
In the Tree field, verify that ACME-TREE is listed.
![]() In the User Context field, enter
In the User Context field, enter
WHITE.CRIME.TOKYO.ACME.
![]() Select OK.
Select OK.
i. When the Update NDS window appears, verify that NETWARE://Trees/ACME-TREE is listed, and then select Next.
j. When the next Update NDS window appears, your server to be upgraded should be listed. Verify that the WHITE-SRV1 server appears in both the Available Servers and Selected Server fields, and then select Next.
k. When the next Update NDS window appears, verify that it indicates that the eDirectory tree is prepared for eDirectory 8.6. If so, select Exit.
l. On WHITE-SRV1, wait until the following message appears at the console prompt: NDSEM-5.0-009: Process Completed. (Be patient. It might take a while for this message to appear!) This also verifies that eDirectory on WHITE-SRV1 was prepared for eDirectory 8.6.
m. On your workstation, close Deployment Manager by selecting Cancel.
n. When the Exit window appears, select Yes.
Perform the following steps at the WHITE-SRV1 server console:
1. Prepare the server. Ensure that the server to be upgraded is prepared for NetWare 6.
2. Begin the upgrade.
a. Insert the NetWare 6 Operating System CD into the server’s CD drive.
b. At the server console prompt, enter INSTALL SERVER. Watch the server console screen while the server reboots.
c. When prompted, select one of the following:
![]() To install IDE CD drivers, press I.
To install IDE CD drivers, press I.
![]() To install SCSI CD drivers, press S.
To install SCSI CD drivers, press S.
![]() To install both IDE and SCSI drivers, press B.
To install both IDE and SCSI drivers, press B.
d. When the Welcome to NetWare Server Installation screen appears, select Accept License Agreement. This indicates that you’ve read the agreement and accept its terms and conditions. Num Lock (number lock) must be on in order for cursor movements to be enabled on the keypad.
e. When a screen appears indicating that a valid boot partition was detected on the computer’s hard disk, select Continue with Existing Partition.
f. When the JReport Runtime License Agreement screen appears, press F10 to indicate that you’ve read the agreement and accept its terms and conditions.
3. Select the upgrade type. When the Welcome to the NetWare Server Installation screen appears, perform these tasks:
![]() In the Is This an Express Install or a Custom Install? field, press Enter to switch the value from Express to Custom.
In the Is This an Express Install or a Custom Install? field, press Enter to switch the value from Express to Custom.
![]() In the Is This a New Server, Upgrade, or Pre-Migration? field, verify that Upgrade is selected.
In the Is This a New Server, Upgrade, or Pre-Migration? field, verify that Upgrade is selected.
![]() Select Continue.
Select Continue.
4. Specify the server settings. When the Server Settings screen appears, you’ll notice that the following default values are listed:
![]() Load Server at Reboot: Yes
Load Server at Reboot: Yes
![]() Server Set Parameters: Edit
Server Set Parameters: Edit
![]() Backup Startup Directory (Optional): C:NWSERVER.OLD
Backup Startup Directory (Optional): C:NWSERVER.OLD
Select Continue
5. Select the regional settings. When the Regional Settings screen appears, you’ll notice that default values are listed for the country code, code page, and keyboard type. If you are located in the United States, the default values are
![]() Country: 001 (USA)
Country: 001 (USA)
![]() Code Page: 437 (United States English)
Code Page: 437 (United States English)
![]() Keyboard: United States
Keyboard: United States
Review the values listed on this screen and modify them if necessary. Then select Continue.
Allow the files to copy. If advised that a target file is newer than the one on the CD, select Never Overwrite Newer Files.
6. Select platform support. A device driver screen appears, listing auto-detected drivers for the following parameters:
![]() Platform support module
Platform support module
![]() HotPlug support module
HotPlug support module
![]() Storage adapters
Storage adapters
Review the values listed on this screen and modify them if necessary. Then select Continue.
Allow the files to copy.
7. Select Storage Devices. A device driver screen appears, listing auto-detected drivers for storage devices.
Review the values listed on this screen and modify them if necessary. Then select Continue. Allow the files to copy.
8. Select Network Boards and NLMs. A device driver screen appears, listing auto-detected drivers for network board(s) and allowing you to (optionally) specify NLMs.
Review the values listed on this screen and modify them if necessary. Then select Continue.
Next, the installation program copies a number of files to the server (called the preparatory file copy process). The installation program then loads the GUI-based Installation Wizard, at which point the installation interface switches from being text based to graphic based.
9. Enable Cryptography (Conditional).
10. Configure the NetWare server file system. When the Configure File System screen appears, review the information on the screen, and then click Next.
11. View network protocols. When the Protocols screen appears, you’ll notice that the existing IP address and subnet mask values are displayed. Review the values listed on this screen and modify them if necessary. Then select Next.
12. Configure DNS.
a. When the Domain Name Service screen appears, perform these tasks:
![]() In the Host Name field, verify that WHITE-SRV1 is listed.
In the Host Name field, verify that WHITE-SRV1 is listed.
![]() In the Domain field, enter acme.com.
In the Domain field, enter acme.com.
![]() Leave the Name Server fields empty.
Leave the Name Server fields empty.
![]() Select Next.
Select Next.
b. When the Warning screen appears, perform these tasks:
![]() Read the warning indicating that because you have not configured Domain Name Service, you will obtain limited functionality from products that require this service.
Read the warning indicating that because you have not configured Domain Name Service, you will obtain limited functionality from products that require this service.
![]() Select OK to acknowledge the warning.
Select OK to acknowledge the warning.
c. When the Login to NDS screen appears, perform these tasks:
![]() Select browse.
Select browse.
![]() When the Browse Users dialog box appears, navigate to and select the admin User object, and then select OK.
When the Browse Users dialog box appears, navigate to and select the admin User object, and then select OK.
d. When the Login to NDS screen reappears
![]() In the Name (Full NDS Context) field, verify that the full distinguished name of the admin User object is listed.
In the Name (Full NDS Context) field, verify that the full distinguished name of the admin User object is listed.
![]() In the Password field, enter acme.
In the Password field, enter acme.
![]() Select OK.
Select OK.
e. When the Summary screen appears, review the information on the screen, and then select Next.
13. Configure eDirectory (conditional). Note: This screen will probably not appear because eDirectory already exists on the source server.
14. License the NetWare 6 Server.
a. When the Licenses screen appears, perform one of the following tasks:
![]() Insert the NetWare 6 Cryptography/License disk into the floppy drive. (Be sure to use a unique license disk.) Select the appropriate server license file. Make sure that you actually browse to and select the server license file, instead of just listing the drive letter (a common mistake). If you click the filename, you’ll notice that the type of license appears in the Description section.
Insert the NetWare 6 Cryptography/License disk into the floppy drive. (Be sure to use a unique license disk.) Select the appropriate server license file. Make sure that you actually browse to and select the server license file, instead of just listing the drive letter (a common mistake). If you click the filename, you’ll notice that the type of license appears in the Description section.
![]() If you are using a demo version of the NetWare 6 Operating System CD (that is, a version that does not have an associated license disk), use the license file in the NETWARE6/ LICENSE/DEMO directory on the CD. If you can’t locate a license file, mark the Install Without Licenses check box. Unfortunately, you might experience problems with features like NDPS, which use multiple connections.
If you are using a demo version of the NetWare 6 Operating System CD (that is, a version that does not have an associated license disk), use the license file in the NETWARE6/ LICENSE/DEMO directory on the CD. If you can’t locate a license file, mark the Install Without Licenses check box. Unfortunately, you might experience problems with features like NDPS, which use multiple connections.
b. Click Next.
15. Install additional network products. When the Components screen appears, select Clear All, and then select Next.
16. Install Novell Certificate Server.
a. When the Novell Certificate Server 2.21 Objects screen appears, review the information on the screen, and then select Next.
b. When the LDAP Configuration screen appears, select Allow Clear Text Passwords, and then select Next.
c. When the eDirectory iManage Install Options screen appears, select Next.
17. Customize the upgrade and finish.
a. When the Summary screen appears, review the list of NetWare 6 products to be installed, and then select Finish to complete the upgrade process.
b. The installation program then performs the main file copy and displays the server console screen. (This step might take a while.)
c. When the copying is complete, the Installation Complete window appears. Follow these steps:
![]() Remove any CDs or floppy disks from your computer drives.
Remove any CDs or floppy disks from your computer drives.
![]() Select Yes to reboot the computer.
Select Yes to reboot the computer.
Perform the following steps at the WHITE-SRV1 server console:
1. To ensure that all your trustees are restored, manually run the backlink process at WHITE-SRV1 server prompt:
SET DSTRACE=ON
SET DSTRACE=+BLINK
SET DSTRACE=*B
2. Switch to Directory Services screen and verify that backlink has completed.
3. Enter RESET SERVER. Wait while the WHITE-SRV1 server restarts.
Perform the following steps on your primary administrative workstation:
4. Log into the network as Admin.
5. Insert the NetWare 6 License/Cryptography CD into the workstation’s floppy disk drive.
6. Launch NetWare Administrator.
a. Select Start, Run.
b. When the Run dialog box appears, select Browse.
c. When the Browse dialog box appears, browse to WHITE-SRV1SYS:PUBLICWIN32.
d. Select NWADMIN32, and then select Open.
e. When the Run dialog box reappears, select OK.
7. Install user licenses on WHITE-SRV1.
a. When the Welcome to NetWare Administrator window appears, select Close.
b. Verify that the WHITE Organizational object is selected.
c. In the main menu, select Tools, Novell Licensing Services, Add Licenses.
d. When the Add a License Certificate dialog box appears, verify that License File is selected, and then select OK.
e. When the Select a License Certificate file dialog box appears, browse to your license disk.
f. In the root of your (WHITE-SRV1) License/Cryptography disk, select the user license (.NLF), and then select Open. For example, A:license-number.NLF.
g. When the Add Certificates from an Envelope dialog box appears, select Add.
h. When the License Installation Report dialog box appears, verify that the user licenses were successfully installed, and then select Close.
Test Objective Covered:
![]() Perform a migration
Perform a migration
![]() Perform post-migration or post-upgrade tasks
Perform post-migration or post-upgrade tasks
NetWare 6 migration is the ultimate achievement in nerdiness. It is probably the most popular installation method for NetWare 6. After all, there are already millions of NetWare servers out there—no one wants to start from scratch. With migration, you can simply transfer eDirectory information and data files to a new NetWare 6 eDirectory village. The beauty of this system is that you don’t have to repopulate it.
The NetWare 6 Migration uses an across-the-wire method for transferring eDirectory information and data from one server to another across the LAN. It requires three machines, each with specific hardware/software requirements:
![]() A source server running NetWare 4.11, 4.2, 5.0, 5.1, and/or 6
A source server running NetWare 4.11, 4.2, 5.0, 5.1, and/or 6
![]() A destination server running NetWare 5.0, 5.1, and/or 6
A destination server running NetWare 5.0, 5.1, and/or 6
![]() A Windows 98 or Windows NT/2000 workstation running the appropriate Novell Client
A Windows 98 or Windows NT/2000 workstation running the appropriate Novell Client
The NetWare 6 migration method is the safest upgrade/migration option because the source server—also known as an escape pod—remains intact. You can also use it to migrate all or selected information (which is particularly useful when dealing with sensitive data files). Furthermore, this multifaceted migration option enables you to consolidate multiple source servers to a single NetWare 6 machine.
So, how does it work? Good question. All of this fancy across-the-wire footwork is made possible by the NetWare Migration Wizard. Here’s a quick preview of the NetWare 6 migration steps we’ll explore in this section:
![]() Step 1: Getting started
Step 1: Getting started
![]() Step 2: Create a migration project
Step 2: Create a migration project
![]() Step 3: Volume and configuration file migration
Step 3: Volume and configuration file migration
![]() Step 4: eDirectory migration
Step 4: eDirectory migration
![]() Step 5: Migration cleanup
Step 5: Migration cleanup
In step 1, you jump-start the migration process by preparing the source/target servers and installing the NetWare Migration Wizard. Then, in step 2, you can create your Migration Project. The Migration Project is a database wizard that stores your migration configuration settings. In steps 3 and 4, you actually perform the across-the-wire migration using the data you configured in the Migration Project database. Finally, the migration ends with some simple housekeeping cleanup chores in step 5.
Now, that wasn’t so bad...was it? So, let’s migrate our old, cranky NetWare 5.1 server into a NetWare 6 supermachine.
NetWare 6 migration is serious business. As such, it requires some careful preparation and you’ll need to accomplish some important pre-migration preparation tasks before you can get started (floppy diskette required). Here’s a quick preview:
![]() Source server preparation—The NetWare 6 migration process requires that you prepare both the source and destination servers in unique ways. In this first step, you’ll learn how to prepare the source server with ConsoleOne, name space, and DSREPAIR.
Source server preparation—The NetWare 6 migration process requires that you prepare both the source and destination servers in unique ways. In this first step, you’ll learn how to prepare the source server with ConsoleOne, name space, and DSREPAIR.
![]() Destination server preparation—Then we will shift our focus to the destination server. This server must be installed into a temporary eDirectory tree and prepared for all the exciting new information it is about to receive.
Destination server preparation—Then we will shift our focus to the destination server. This server must be installed into a temporary eDirectory tree and prepared for all the exciting new information it is about to receive.
![]() Verify the migration client—Finally, you’ll need to verify the Novell Client version running on your migration client. This can be accomplished in a number of ways.
Verify the migration client—Finally, you’ll need to verify the Novell Client version running on your migration client. This can be accomplished in a number of ways.
Let’s explore step 1 in more detail. Ready, set, prepare!
NetWare 6 migration requires two types of preparation: Source and Destination. In the Source server preparation phase, you’ll perform a variety of server housekeeping tasks on the NetWare 4 or 5 server that hosts all your valuable files, volumes, and eDirectory information.
Let’s start with a closer look at the source-server preparation checklist:
![]() Use ConsoleOne to verify that you have the Supervisor right to the source server’s file system and to the source server itself.
Use ConsoleOne to verify that you have the Supervisor right to the source server’s file system and to the source server itself.
![]() Update the source server with the latest NetWare support pack. Updates are available at support.novell.com.
Update the source server with the latest NetWare support pack. Updates are available at support.novell.com.
![]() Ensure that the source server can communicate with the destination server. If you’re using IPX, enter Display Servers at the server console to ensure the source server is listed. If you’re running IP, enter Display SLP Services at the server console to ensure the source server is listed.
Ensure that the source server can communicate with the destination server. If you’re using IPX, enter Display Servers at the server console to ensure the source server is listed. If you’re running IP, enter Display SLP Services at the server console to ensure the source server is listed.
![]() Apply the NW6NSS3C patch to update the version of NSS.
Apply the NW6NSS3C patch to update the version of NSS.
![]() (Conditional) If you’re migrating data from NetWare 4, make sure that the source server’s volumes are running long-name space support on all volumes to be copied. To add long-name space support to a NetWare 4.11 or NetWare 4.2 volume, enter the following at the server console:
(Conditional) If you’re migrating data from NetWare 4, make sure that the source server’s volumes are running long-name space support on all volumes to be copied. To add long-name space support to a NetWare 4.11 or NetWare 4.2 volume, enter the following at the server console:
LOAD LONG
ADD NAME SPACE LONG TO volume name
![]() Load DSREPAIR and run the following options:
Load DSREPAIR and run the following options:
![]() Unattended Full Repair
Unattended Full Repair
![]() Time Synchronization
Time Synchronization
![]() Report Synchronization Status
Report Synchronization Status
![]() Back up eDirectory and all data.
Back up eDirectory and all data.
Next, you must prepare the destination server. This machine is the new computer that will receive the data from the source server. As such, it must be installed into a temporary, separate eDirectory tree. After the data has been migrated from the source server to the destination server, the destination server reboots and the Migration Wizard modifies the destination server’s AUTOEXEC.NCF file to include the source server’s name and internal IPX number or server ID. You don’t have to modify these manually.
Let’s continue with a closer look at the destination server preparation checklist:
![]() Use ConsoleOne to verify that you have the Supervisor right to the destination server’s file system and to the server itself.
Use ConsoleOne to verify that you have the Supervisor right to the destination server’s file system and to the server itself.
![]() Be sure that you have created a temporary eDirectory tree with a temporary eDirectory tree name. The temporary name and temporary eDirectory tree name must not be the same as the source server’s name or eDirectory tree name; otherwise, the destination server cannot assume the identity of the source server after the migration.
Be sure that you have created a temporary eDirectory tree with a temporary eDirectory tree name. The temporary name and temporary eDirectory tree name must not be the same as the source server’s name or eDirectory tree name; otherwise, the destination server cannot assume the identity of the source server after the migration.
![]() During installation, create volumes on the destination server that are the same size as, or larger than, volumes on the source server. Volume names on the destination server must be the same as the volume names on the source server.
During installation, create volumes on the destination server that are the same size as, or larger than, volumes on the source server. Volume names on the destination server must be the same as the volume names on the source server.
![]() If migrating from NetWare 4, install and configure IPX. IPX must be bound to the destination server for the migration to work. (You can remove IPX after completing the migration.) IP addresses for the source server are not migrated. Instead, you manually change them during migration.
If migrating from NetWare 4, install and configure IPX. IPX must be bound to the destination server for the migration to work. (You can remove IPX after completing the migration.) IP addresses for the source server are not migrated. Instead, you manually change them during migration.
![]() Install the destination server with the NetWare operating system that you are migrating to, and make sure you’ve installed the Pre-Migration installation type. In this case, you’re probably migrating to NetWare 6.
Install the destination server with the NetWare operating system that you are migrating to, and make sure you’ve installed the Pre-Migration installation type. In this case, you’re probably migrating to NetWare 6.
![]() Make sure that the destination server’s time is equal to or later than the source server’s time. This prevents critical time synchronization errors during migration.
Make sure that the destination server’s time is equal to or later than the source server’s time. This prevents critical time synchronization errors during migration.
TIP
The NetWare Migration Wizard migrates compressed volumes. If you are migrating compressed volumes to uncompressed volumes, Migration Wizard decompresses the volumes during migration. The decompression process is CPU and time intensive, so allow enough time to complete the operation. Make sure that you have room on the uncompressed volume to accommodate the source volumes after they’re decompressed.
Finally, you’ll need to verify the Novell Client version that is running on your migration client. The NetWare Migration Wizard can run from either a Windows 98 or Windows NT/2000/XP workstation. If you’re using a Windows 98 workstation, be sure that it’s running the Novell Client for Windows 98 version 3.3 (or higher).
You can determine which version of the client software is running on your Windows 98 workstation by using any of these three methods:
![]() Hold down the Alt key while double-clicking the Windows 98 Network Neighborhood icon. Select the Novell Client, and then click Properties.
Hold down the Alt key while double-clicking the Windows 98 Network Neighborhood icon. Select the Novell Client, and then click Properties.
![]() Double-click the Network icon in the Windows 98 Control Panel. Select the Novell Client, and then click Properties.
Double-click the Network icon in the Windows 98 Control Panel. Select the Novell Client, and then click Properties.
![]() If you’re running the Novell NetWare 6 Client, right-click the N icon near the right end of the Windows 98 toolbar, which is located at the bottom of your screen, by default. Select the Novell Client Properties option from the popup window that appears.
If you’re running the Novell NetWare 6 Client, right-click the N icon near the right end of the Windows 98 toolbar, which is located at the bottom of your screen, by default. Select the Novell Client Properties option from the popup window that appears.
A Windows NT/2000 client must be running the Novell Client for Windows NT version 4.8 (or higher). The client version should be listed on the title bar of the Login dialog box. If these methods don’t work, you’ll probably need to upgrade your client software. Refer to the first lesson of this chapter for detailed steps.
That’s all there is to it. Consider your three migration machines prepared. Now it’s time to move on to the actual migration process, beginning with the Migration Project.
During the first few steps of the NetWare 6 Migration process, you’ll need to create and implement a Migration Project. A Migration Project is a database wizard that stores your migration configuration settings. First, we’ll create a Migration Project using the NetWare Migration Wizard. Download and install Migration Wizard from the NetWare 6 Operating System CD or from the NetWare section of the Novell Software Downloads Web site. You can also gain valuable migration knowledge at the NetWare 6 Migration Wizard documentation site (as shown in Figure 2.21). Then run Migration Wizard on your migration workstation from the following default location: Start, Programs, Novell, NetWare Migration Wizard, NetWare Migration Wizard.

Next, read the Welcome screen, click OK, and select Create a New Project from the Novell NetWare Migration Wizard Startup window (as shown in Figure 2.22).
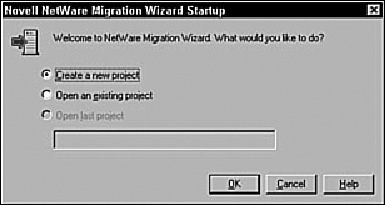
After you’ve launched a new migration project, you must select the source server type. You have a variety of choices (as shown in Figure 2.23) from NetWare 4 to Windows NT. Click OK when you’re ready to continue.
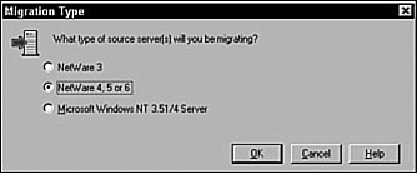
Next, name the project something descriptive (such as WHITE-SRV1 Migration in our example in Figure 2.24). The filename should follow Windows 98 and Windows NT/2000 long filename conventions. In other words, it can be up to 255 characters long and can include any character but these: : * ? < > | “ /. In addition, you’ll need to choose a place to save the project database. By default, Migration Wizard saves all projects to C:PROGRAM FILESNOVELLNETWARE MIGRATION WIZARD (as shown in Figure 2.24).

Now it’s time to select your source and destination migration servers. First, navigate to the correct tree, and select your source server from the graphical window in Figure 2.25. Then select your destination server in the same way (as shown in Figure 2.26). In our example, the source server is WHITE-SRV1 and the destination server is WHITE-SRV2.
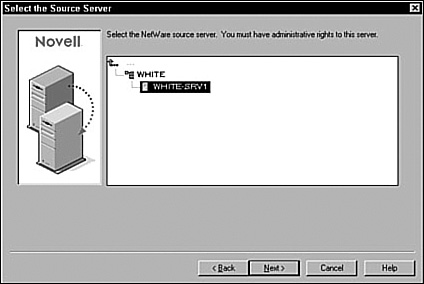
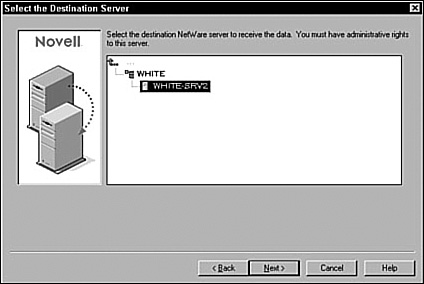
Finally, save your project and access the Project Window by selecting Create. All finished. That was easy. Now let’s jump into action by implementing our new project—starting with volumes and configuration files.
After you’ve created your NetWare 6 Migration Project, the Project Window magically appears. Check it out in Figure 2.27. The Project Window is a checklist (with associated buttons) for the four main tasks of NetWare 6 migration:
![]() Copy volumes—Copy volumes from the source server to the destination server. You can copy a volume as many times as needed.
Copy volumes—Copy volumes from the source server to the destination server. You can copy a volume as many times as needed.
![]() Edit configuration files—Compare the configuration files between the source and destination servers. You can edit the destination configuration files.
Edit configuration files—Compare the configuration files between the source and destination servers. You can edit the destination configuration files.
![]() Begin NDS migration—After you complete the preceding tasks, migrate NDS file from the source server to the destination server. The source server will be brought down and the destination server restarted.
Begin NDS migration—After you complete the preceding tasks, migrate NDS file from the source server to the destination server. The source server will be brought down and the destination server restarted.
![]() Finish NDS migration—Upgrade the schema, fix volume objects, and restore trustees to the destination server after it has restarted.
Finish NDS migration—Upgrade the schema, fix volume objects, and restore trustees to the destination server after it has restarted.
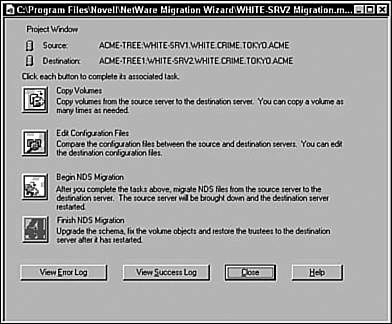
Let’s continue our migration journey with the first two tasks: copying volumes and editing configuration files.
First, in the Migration Project Window, you’ll click the Copy Volumes button. When you do, the Migration Wizard backs up your directory and file trustees and saves them in files located on the source and the destination server. Once the migration is complete, the Wizard restores the trustee rights.
TIP
When you’re copying volumes during migration, you don’t need to copy all volumes at the same time. The Migration Wizard enables you to select volumes to copy now and copy other volumes later by reopening the project file. Remember that open files are not migrated.
To start the volume copying process, simply choose each volume name from the list provided and then select Yes or No (see Figure 2.28). If you have big volumes or slow LAN connections, or if you want to reconfigure your data by putting existing directories into different folders on the destination server, consider using a backup tape to copy your volumes. However, don’t restore the source server’s SYS directories because these were already created during the destination server’s NetWare 6 installation process.
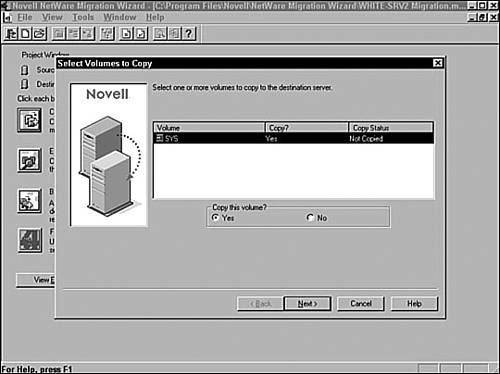
Next, you’ll need to decide whether you want to copy the source server’s SYS directories to the destination server’s SYS:SYS.MIG directory. For safety reasons, Migration Wizard never overwrites the SYS directories on the destination server. If there are files in the source server’s SYS directories that you want to use on the destination server, copy them from SYS:SYS.MIG into the appropriate SYS directory on the destination server at the end of the migration.
At this point, the Migration Wizard will ask you how you want to resolve duplicate filenames between the source and destination servers. You can choose one of the following options (also shown in Figure 2.29):
![]() Don’t copy over existing files
Don’t copy over existing files
![]() Copy the source file if it is newer
Copy the source file if it is newer
![]() Always copy the source file
Always copy the source file
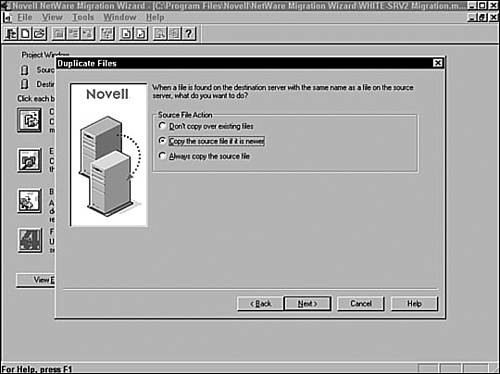
Now it’s time for action. Next, the Migration Wizard will ask whether you want to copy volumes while users are logged in. Remember, the wizard cannot copy open files. Therefore, you might want to choose Disable Login to ensure that all your users’ data are available for copying. Finally, the wizard will prompt you to authenticate with your source and destination username and password (as shown in Figure 2.30) to resolve any critical (denoted by a red circle with a white X) and noncritical (denoted by a yellow triangle) errors. When you’ve performed all the volume copying configuration tasks, you can actually perform the data migration by clicking the Migrate button. Yeah!
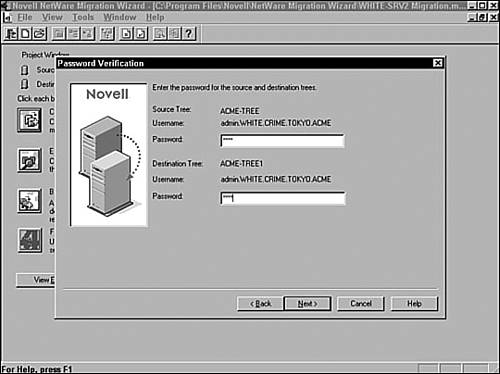
In the second task to be done from the Migration Project Window, you’ll click the Edit Configuration Files button. When you do, the Migration Wizard displays the source server and destination server configuration files (with .NCF and .CFG extensions). These files contain default LOAD statements and parameters. If you’re editing the AUTOEXEC.NCF file, make sure that the file is closed before you migrate your eDirectory database.
To edit a specific configuration file, simply choose it and select Edit File. Then copy and paste the commands from the configuration file on the source server to the corresponding configuration file on the destination server. When you’ve finished modifying your configuration file, select Save & Close.
TIP
If you intend to change the IP address on your destination server to be the same as the IP address of your source server, edit your configuration files and change the IP address in two places: AUTOEXEC.NCF and HOSTS. Furthermore, if you use INETCFG to assign IP addresses, change the IP addresses after the migration is complete.
Now you’ve completed the first half of the Project Migration journey. And, your life is about to get a lot more interesting. Next, we’ll migrate the most critical NetWare 6 component of all: eDirectory. Go team!
After you’ve finished migrating the data volumes and configuration files, it’s time to tackle eDirectory. During this step, the source server is brought down and the destination server is restarted. Furthermore, the destination server takes on the source server’s name and place in your network. Pretty cool, huh? The following is a preview of the changes that Migration Wizard makes to the destination server’s AUTOEXEC.NCF file:
![]() The server name changes to the name of the source server.
The server name changes to the name of the source server.
![]() The time zone is changed to the time zone in the source server’s AUTOEXEC.NCF file.
The time zone is changed to the time zone in the source server’s AUTOEXEC.NCF file.
![]() The server ID changes to the IPX internal network number or server ID in the source server’s AUTOEXEC.NCF file.
The server ID changes to the IPX internal network number or server ID in the source server’s AUTOEXEC.NCF file.
![]() The default time server type is changed to the value stored in the source server’s AUTOEXEC.NCF file.
The default time server type is changed to the value stored in the source server’s AUTOEXEC.NCF file.
![]() The bindery context is changed to the bindery context stored in source server’s AUTOEXEC.NCF file.
The bindery context is changed to the bindery context stored in source server’s AUTOEXEC.NCF file.
Let’s continue on the Project Migration journey.
Your third task using the Migration Project Window is to click the Begin NDS Migration button. When you do, the Migration Wizard requests licensing information and then updates the source server’s schema to include the eDirectory classes of the default applications that are installed on the destination server. If you select No to update the schema, Migration Wizard will compare the source and destination schemas instead. This comparison helps you to determine how to extend your schema manually. Click Yes to continue.
Next, the wizard will ask you whether your eDirectory tree is healthy. This screen is a simple reminder to run DSREPAIR prior to migration. The Migration Wizard does not prevent you from continuing if you haven’t run DSREPAIR; however, the migration might not complete successfully if your eDirectory tree is unhealthy. Click Yes to continue.
If you’re migrating from NetWare 4 running Border Manager, or NetWare 5, or NetWare 6, you’ll be prompted to copy and transfer the NICI configuration files from the source server to the destination server. Begin this process by selecting Copy NLM. When you see the confirmation message, click OK to continue. Then NICI will be automatically configured.
Now it’s time for action. Next, the Migration Wizard will delete all user connections (except yours) to the source and destination servers. Click Next to continue. Finally, the wizard will prompt you to authenticate with your source and destination username and password and resolve any critical (denoted by a red circle with a white X) and noncritical (denoted by a yellow triangle) errors. When you’ve performed all the eDirectory migration tasks, you can actually perform the migration by clicking the Migrate button.
Next, you’ll click the Finish NDS Migration button in the Migration Project Window. When you do, the Migration Wizard displays the Continue NDS Migration window. Make sure to validate that the former destination server has restarted, that it has the identity of the source server, and that licensing is installed before you continue.
Next, you must ensure that eDirectory is synchronized on all servers in the tree. To check eDirectory synchronization status, enter DSREPAIR at the server console and run the Report Synchronization Status and Time Synchronization options. If the destination server does not contain a read/write or master replica, you must check eDirectory synchronization by running DSREPAIR on another server in the eDirectory tree that has one of these replicas.
Then, at the end of the NetWare 6 Migration, verify that you’ve completed these tasks by selecting Yes. Finally, authenticate to the source tree, resolve any critical and/or noncritical errors, and, complete the migration by clicking Continue.
At this point, the Migration Complete dialog box appears. Click View Success Log and review the information listed. Click the close button (X) to close the window. Again, the Migration Complete dialog box reappears. Click Done.
That’s all there is to it!
You’re all finished. The NetWare 6 migration process was a success.
However, you can’t run outside and play just yet. First, you must perform some post-migration cleanup chores, namely
![]() Modify login scripts and printing configurations.
Modify login scripts and printing configurations.
![]() Check migrated user and file information.
Check migrated user and file information.
![]() Check third-party applications.
Check third-party applications.
![]() Upgrade Novell clients.
Upgrade Novell clients.
![]() Run DSREPAIR on the destination server and select Unattended Full Repair.
Run DSREPAIR on the destination server and select Unattended Full Repair.
![]() Reinstall applications that have files or NLMs associated with these SYS directories: SYSTEM, PUBLIC, MAIL, ETC, and NETBASIC.
Reinstall applications that have files or NLMs associated with these SYS directories: SYSTEM, PUBLIC, MAIL, ETC, and NETBASIC.
![]() If your destination server is running NetWare 5.1 instead of NetWare 6, you might see warnings referring to SMS, LDAP, Novell Certificate Server, or NetWare Management Portal. Ignore the warnings and reinstall the products after eDirectory has been migrated.
If your destination server is running NetWare 5.1 instead of NetWare 6, you might see warnings referring to SMS, LDAP, Novell Certificate Server, or NetWare Management Portal. Ignore the warnings and reinstall the products after eDirectory has been migrated.
![]() Install the latest NetWare Support Pack. This ensures the latest code. The latest support packs are available at the Novell Support Web site.
Install the latest NetWare Support Pack. This ensures the latest code. The latest support packs are available at the Novell Support Web site.
![]() Upgrade any NSS volumes that existed on the original server so that they will be compatible with the version of NSS included with NetWare 6. Complete the following steps for each NSS volume:
Upgrade any NSS volumes that existed on the original server so that they will be compatible with the version of NSS included with NetWare 6. Complete the following steps for each NSS volume:
1. Enter the following at the command prompt:
NSS/ZLSSVOLUMEUPGRADE=All
2. Enter the following at the server console:
SET NLS SEARCH TYPE
3. Ensure that the value for NLS SEARCH TYPE is 0. If not, enter the following at the server console:
SET NLS SEARCH TYPE = 0
4. Enter the following at the server console:
SET STORE NETWARE 5 CONN SCL MLA USAGE IN NDS
5. Ensure that the value is set for OFF. If not, enter the following at the server console:
SET STORE NETWARE 5 CONN SCL MLA USAGE IN NDS = OFF
6. Enter the following at the server console:
FLUSH CDBE
Now you’re finished—you somehow pulled it off. The NetWare 6 migration was a little trickier than the Installation and/or Upgrade methods, but certainly more entertaining. Migration is the most popular NetWare 6 installation method because it supports the millions of NetWare servers already in existence. Could you imagine the hassle of rebuilding these operating systems from scratch? No thanks, it’s not for us.
Congratulations! You did it! You passed Advanced Nerdiness 101 with flying colors.
Now you’re a certified member of NLM (Nerd Liberation Movement)—what an honor. We’ve been through a lot together today. In this chapter, we built on the foundation of NetWare 6 installation with two more exciting options:
![]() NetWare 6 upgrade—You learned how to transform boring NetWare 4 and 5 servers into magnificent, sparkling Internet-savvy NetWare 6 roadsters. We evolved existing NetWare servers to NetWare 6 without purchasing additional equipment. With the NetWare 6 Upgrade, all eDirectory information and data stayed right where it was—on the NetWare partition. This was all accomplished with 5 magical phases and 18 time-proven steps.
NetWare 6 upgrade—You learned how to transform boring NetWare 4 and 5 servers into magnificent, sparkling Internet-savvy NetWare 6 roadsters. We evolved existing NetWare servers to NetWare 6 without purchasing additional equipment. With the NetWare 6 Upgrade, all eDirectory information and data stayed right where it was—on the NetWare partition. This was all accomplished with 5 magical phases and 18 time-proven steps.
![]() NetWare 6 migration—We built a NetWare 6 “escape pod” by migrating existing servers to NetWare 6 across the wire. The graphical NetWare Migration Wizard enabled us to customize migration information and consolidate multiple servers to a single NetWare 6 machine. It doesn’t get any more exciting than this. And just think—it was all accomplished with five simple steps.
NetWare 6 migration—We built a NetWare 6 “escape pod” by migrating existing servers to NetWare 6 across the wire. The graphical NetWare Migration Wizard enabled us to customize migration information and consolidate multiple servers to a single NetWare 6 machine. It doesn’t get any more exciting than this. And just think—it was all accomplished with five simple steps.
So, there you have it. As an official member of NLM, you can install, upgrade, and migrate servers anywhere in the world. This is a good thing because NetWare 6 spans the globe. Now we’re ready to take our new NetWare 6 supercomputer to the next level. After all, you can’t cruise the worldwide information superhighway without a supercharged roadster.
Ready, set, burn rubber!
In this lab exercise, you’ll perform these tasks in the following five phases:
![]() Part I: Getting started
Part I: Getting started
![]() Part II: Create a Migration Project
Part II: Create a Migration Project
![]() Part III: Volume and configuration file migration
Part III: Volume and configuration file migration
![]() Part IV: eDirectory migration
Part IV: eDirectory migration
![]() Part V: Migration cleanup
Part V: Migration cleanup
In this lab exercise, you will need these components:
![]() The WHITE-SRV1 server from Lab Exercise 2.1. (This will be the migration source server.)
The WHITE-SRV1 server from Lab Exercise 2.1. (This will be the migration source server.)
![]() A (second) server-class computer that meets (or exceeds) the minimum requirements for running the NetWare 6 operating system. Refer to the “Hardware Requirements” section in Chapter 1 for additional details. (This will become the migration destination server, with a temporary server name of WHITE-SRV2, in a temporary tree called ACME-TREE1.)
A (second) server-class computer that meets (or exceeds) the minimum requirements for running the NetWare 6 operating system. Refer to the “Hardware Requirements” section in Chapter 1 for additional details. (This will become the migration destination server, with a temporary server name of WHITE-SRV2, in a temporary tree called ACME-TREE1.)
![]() An administrative workstation running Windows 98 or Windows NT 4/2000 that meets (or exceeds) the minimum hardware requirements for a NetWare 6 administrative workstation.
An administrative workstation running Windows 98 or Windows NT 4/2000 that meets (or exceeds) the minimum hardware requirements for a NetWare 6 administrative workstation.
![]() A NetWare 6 Operating System CD.
A NetWare 6 Operating System CD.
![]() A unique NetWare 6 License/Cryptography disk (that is different from the one you used to install the WHITE-SRV1 server).
A unique NetWare 6 License/Cryptography disk (that is different from the one you used to install the WHITE-SRV1 server).
Let’s start by preparing the source server.
Perform these tasks on your primary administrative workstation:
1. Use ConsoleOne to verify that the admin User object has Supervisor rights to the source Server object (that is, WHITE-SRV1) and its file system.
2. Install the latest NetWare 6 service pack on WHITE-SRV1 (because it is a NetWare 6 server). Refer to Lab Exercise 2.1 for detailed instructions on how to download and install a NetWare Service Pack.
3. Because the source server is not a NetWare 4 server, you don’t have to worry about adding long-name space support to the volumes.
4. Load DSREPAIR with the following options:
![]() Unattended Full Repair
Unattended Full Repair
![]() Time Synchronization
Time Synchronization
![]() Report Synchronization Status
Report Synchronization Status
![]() Verify that each test finishes with no errors. Refer to Lab Exercise 2.1 for more detailed instructions on running these tests.
Verify that each test finishes with no errors. Refer to Lab Exercise 2.1 for more detailed instructions on running these tests.
5. Back up eDirectory and all server data. Because you’re using a nonproduction (that is, “practice”) server, you can skip this step.
Perform these tasks at the WHITE-SRV2 (destination) server console:
1. Use ConsoleOne to verify that the admin User object will have Supervisor rights to the source Server object (that is, WHITE-SRV2) and its file system.
2. Use the parameters in Table 2.4 to install NetWare 6 on the WHITESRV2 server. During the installation process

![]() Do remove and re-create the DOS partition.
Do remove and re-create the DOS partition.
![]() Do remove and re-create the NetWare partition and SYS: volume.
Do remove and re-create the NetWare partition and SYS: volume.
![]() During the installation process, make sure that you create volumes on the destination server that are the same as, or larger than, the volumes on the source server.
During the installation process, make sure that you create volumes on the destination server that are the same as, or larger than, the volumes on the source server.
![]() Verify that the date/time on the destination server is equal to or later than the source server’s time. (This prevents critical time synchronization errors during migration.)
Verify that the date/time on the destination server is equal to or later than the source server’s time. (This prevents critical time synchronization errors during migration.)
![]() Overwrite any newer files (even though you would normally not do so in real life).
Overwrite any newer files (even though you would normally not do so in real life).
![]() Add user licenses to the destination eDirectory tree.
Add user licenses to the destination eDirectory tree.
![]() Don’t install any optional products.
Don’t install any optional products.
![]() Add Support Pack 1 (or later) to WHITE-SRV2 to match the schema version on WHITE-SRV1.
Add Support Pack 1 (or later) to WHITE-SRV2 to match the schema version on WHITE-SRV1.
The NetWare Migration Wizard is not installed during the NetWare 6 installation process. To install the program, perform these tasks on your primary administrative workstation:
1. Insert the NetWare 6 Operating System CD-ROM into the workstation’s CD-ROM drive.
2. Exit any Windows applications that are running on your workstation.
3. Launch the Upgrade Wizard installation program.
a. Select Start, Run.
b. When the Run dialog box appears, select Browse.
c. When the Browse dialog box appears, navigate to the CD drive, and then select the PRODUCTSMGRTWZDMGRTWZD.EXE self-extracting executable and select Open. (In some cases, your file might be PRODUCTSUPGRDWZDUPGRDWZD.EXE).
d. When the Run dialog box reappears, select OK to execute the file.
e. Wait while the files are extracted.
f. Wait while the InstallShield Wizard is prepared.
4. When the Choose Setup Language dialog box appears, leave English as the language, and then select OK.
5. When the Welcome dialog box appears, select Next.
6. When the Software License Agreement appears, review the agreement, then select Yes to accept its terms and conditions.
7. When the Choose Destination Location dialog box appears, leave the default location and select Next.
8. When the Setup Complete dialog box appears, select Finish.
9. Select Start, Programs, Novell NetWare Migration Wizard, NetWare Migration Wizard. When the About Novell NetWare Migration Wizard window appears, review the information on the screen, and then select OK.
10. When the Novell NetWare Migration Wizard Startup window appears, verify that Create a New Project is selected, and then select OK.
11. When the Migration Type window appears, verify that NetWare 4, 5, or 6 is selected, and then select OK.
12. When the Create Project: Setup Tasks dialog box appears, select View Setup Tasks.
13. When your default Web browser launches and takes you to the Migration Wizard 6 online documentation Web site.
a. Select Migration Data from NetWare 4, 5, or 6 and make sure that you’ve completed the system and software requirements in the “Meet System and Software Requirements” section earlier in this chapter.
b. Close your browser.
14. When the Create Projects: Setup Tasks window reappears, select Next.
15. When the Novell NetWare Migration Wizard Startup window appears, do the following:
a. In the Project filename field, enter WHITE-SRV1 Migration.
b. Leave the default location in the Location field. (By default, the Migration Wizard saves all projects to the C:PROGRAM FILESNOVELLNETWARE MIGRATION WIZARD directory.)
c. Select Next.
16. When the Select the Source NDS Tree window appears, verify that ACME-TREE is selected, and then select Next.
17. When the Select the Source Server window appears, select the WHITE-SRV1 server, and then select Next.
18. When the Select the Destination NDS Tree window appears, verify that ACME-TREE1 is selected.
19. When a Novell Login window appears, do the following:
![]() In the Username field, enter admin.
In the Username field, enter admin.
![]() In the Password field, enter acme.
In the Password field, enter acme.
![]() Select the browse button to the right of the Server field. When the Server window appears, select WHITE-SRV2, and then select OK, and finally, Next.
Select the browse button to the right of the Server field. When the Server window appears, select WHITE-SRV2, and then select OK, and finally, Next.
20. When the Select the Destination Server window appears, select WHITE-SRV2, and then choose Next.
When the Create Project dialog box appears, select Create. Now we will begin upgrading volumes and configuration files.
1. When the Project window appears, select Copy Volumes.
2. When the Select Volumes to Copy dialog box appears, do the following:
![]() Verify that volume SYS is selected.
Verify that volume SYS is selected.
![]() In the Copy This Volume section, verify that Yes is selected.
In the Copy This Volume section, verify that Yes is selected.
![]() Select Next.
Select Next.
3. When the Copy SYS Directories dialog box appears, leave the defaults and select Next.
4. When the Duplicate Files dialog box appears, leave the default of Copy the Source File if it is Newer, and then select Next.
5. When the Disable Login Dialog box appears, select Disable Login, and then select Next.
6. When the Password Verification window appears, in both Password fields, enter acme, and then select Next.
7. When the Error Resolution window appears, resolve any critical errors or warnings. (Red circles with a white X denote critical errors; yellow triangles denote noncritical ones.) When you’re done resolving errors, select Next.
8. When the Ready to Copy Files dialog box appears, select Migrate.
9. When the Backing Up the Trustees dialog box appears, allow the process to continue.
10. When the Copy Volumes Status dialog box appears, do the following:
a. Select View Error Log.
a. Select View Success Log.
b. Select Done.
Now you’re ready for eDirectory migration. This is the fun part. Let’s start by executing our new Migration Project.
1. In the Project window, select Begin NDS Migration.
2. When the Migrate NDS dialog box appears, back up all volumes that you are not planning to migrate and complete the following tasks before continuing:
![]() Verify that all volume data migrated successfully.
Verify that all volume data migrated successfully.
![]() Verify that all critical errors from the file copy have been resolved.
Verify that all critical errors from the file copy have been resolved.
![]() Verify that the servers in your source tree are in time sync and that eDirectory is synchronized, and then select Next.
Verify that the servers in your source tree are in time sync and that eDirectory is synchronized, and then select Next.
3. Insert the NetWare 6 License/Cryptography disk into the floppy drive. Browse to the path containing the license. Select the license, and then select Next.
4. When the Update Schema dialog box appears, verify that Yes is selected, and then select Next.
5. When the Verify Novell Directory Services Tree dialog box appears, select Yes to verify that your source server is functioning correctly, and then select Next.
6. If the Copy NICI Configuration Files dialog box appears, select Copy NLM, and then select Next.
7. When the NUWNICI.NLM Copied dialog box appears, indicating that the NUWNICI.NLM file was copied from the source server to the destination server, select OK, and then select Next.
8. When the Copy NICI Configuration Files (Continued) dialog box appears, follow the onscreen directions to copy the NICI files from the source server to the destination server. (If NICI errors appear when eDirectory is attempting to load or when you copy the NICI files, confirm that PKI.NLM loads on the destination server.)
9. When the Delete Connections dialog box appears, delete all user connections to the source and destination server (except, of course, your own), and then select Next.
10. When the Password Verification dialog box appears, enter the passwords for the source and destination trees, and then select Next.
11. When the Migrate NDS Verification Results window appears, resolve any critical errors or warnings on the Migrate NDS Verification Results window, and then select Next.
12. When the Ready to Migrate NDS dialog box appears, select Migrate. When the migration is done, the source server is brought down and the destination server reboots and assumes the name and identify of the source server.
13. The Migration Wizard modifies the following lines in the destination server’s AUTOEXEC.NCF:
![]() The server name is changed to the name of the source server.
The server name is changed to the name of the source server.
![]() The time zone is changed to the time zone found in the source server’s AUTOEXEC.NCF file.
The time zone is changed to the time zone found in the source server’s AUTOEXEC.NCF file.
![]() The server ID changes to the IPX internal net value or server ID stored in the source server’s AUTOEXEC.NCF file.
The server ID changes to the IPX internal net value or server ID stored in the source server’s AUTOEXEC.NCF file.
![]() The default time server type is changed to the value found in the source server’s AUTOEXEC.NCF file.
The default time server type is changed to the value found in the source server’s AUTOEXEC.NCF file.
![]() The bindery context is changed to the bindery context located in the source server’s AUTOEXEC.NCF file.
The bindery context is changed to the bindery context located in the source server’s AUTOEXEC.NCF file.
14. When the Migrate NDS Verification Results dialog box appears, view the Error Log and Success Log, and then select Done.
15. Check the destination server and verify that it has restarted and taken on the name of the source server.
16. Reboot your workstation and log in to the former destination server.
17. To ensure that all your trustees have been restored, do the following:
a. Manually run the backlink process at WHITE-SRV1 server prompt:
SET DSTRACE=ON
SET DSTRACE=+BLINK
SET DSTRACE=*B
b. Switch to the Directory Services screen and verify that backlink has completed.
c. Repeat this process until no more user or group objects appear in the backlinked list on the Directory Services screen.
d. Enter RESET SERVER. Wait while the WHITE-SRV1 server restarts.
1. To complete the NDS migration process, start the Migration Wizard and select Open Last Project. Click OK. In the Project window, select Finish NDS Migration.
2. When the Continue NDS Migration window appears, do the following:
a. Verify that the following occurred:
![]() The former destination server restarted and assumed the name and identity of the source server.
The former destination server restarted and assumed the name and identity of the source server.
![]() Licensing has been installed.
Licensing has been installed.
![]() The DSREPAIR verifies that eDirectory is synchronized on all servers in the tree.
The DSREPAIR verifies that eDirectory is synchronized on all servers in the tree.
b. To confirm that you have completed the tasks listed in step a, select Yes, and then select Next.
c. When the Password Verification dialog box appears, enter acme, and then select Next.
d. Resolve any errors or warnings, and then select Next.
e. When the Ready to Continue Migrate NDS dialog box appears, select Continue to finish the eDirectory migration process. The Migration Wizard restores the file trustees and updates the Volume objects in the tree.
f. When the Migrate NDS Results dialog box appears, view its contents, and select Done to continue.
Once you complete the NetWare 6 migration process, clean up the servers with the following steps:
1. Perform any of the following postmigration procedures that are applicable:
![]() Run DSREPAIR on the former destination server and select UnAttended Full Repair.
Run DSREPAIR on the former destination server and select UnAttended Full Repair.
![]() Verify that user information migrated successfully.
Verify that user information migrated successfully.
![]() Upgrade all NSS volumes.
Upgrade all NSS volumes.
![]() Reinstall applications that have files or NLMs associated with the following SYS: directories: SYSTEM, PUBLIC, MAIL, ETC, and NETBASIC.
Reinstall applications that have files or NLMs associated with the following SYS: directories: SYSTEM, PUBLIC, MAIL, ETC, and NETBASIC.
![]() Install the latest NetWare support pack. Make sure that both servers are running the same Support Pack. As of this writing, that would be Support Pack 3.
Install the latest NetWare support pack. Make sure that both servers are running the same Support Pack. As of this writing, that would be Support Pack 3.
2. Use the parameters in Table 2.5 to reinstall NetWare 6 on the former destination server. During the installation process
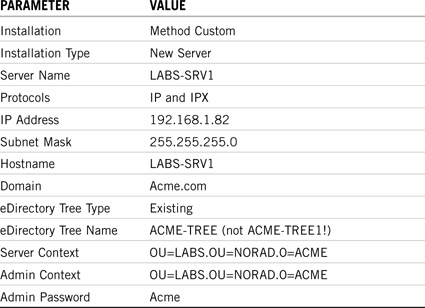
![]() Do remove and re-create the DOS partition.
Do remove and re-create the DOS partition.
![]() Do remove and re-create the NetWare partition and SYS: volume.
Do remove and re-create the NetWare partition and SYS: volume.
![]() Don’t overwrite any newer files.
Don’t overwrite any newer files.
![]() Don’t install any optional products.
Don’t install any optional products.
REAL WORLD
Wasn’t that fun?! This concludes the NetWare 6 installation, upgrade, and migration exercises in Chapters 1 and 2, “NetWare 6 Upgrade and Migration.” Now you should have two NetWare 6 servers with various degrees of configuration on them. To continue with the remaining hands-on exercises in this Study Guide, I highly recommend that you rebuild both servers from scratch. Use the instructions in Lab Exercise 1.1 (in Chapter 1) and the ACME eDirectory tree presented in Chapters 18 and 19 to build the following two NetWare 6 servers:
![]() LABS-SRV1 in NORAD of ACME
LABS-SRV1 in NORAD of ACME
![]() WHITE-SRV1 in TOKYO of ACME
WHITE-SRV1 in TOKYO of ACME
Have fun!