
Chapter 1 NetWare 6 Installation
This first chapter of Part I covers the following testing objectives for Novell Course 3004: Novell Network Management:
![]() Prepare Your Existing Network
Prepare Your Existing Network
![]() Prepare Your Server for NetWare 6
Prepare Your Server for NetWare 6
![]() Install NetWare 6
Install NetWare 6
![]() Identify How Server and User Licensing Works
Identify How Server and User Licensing Works
![]() Identify Key NLS Components
Identify Key NLS Components
![]() Manage License Certificates in the eDirectory Tree
Manage License Certificates in the eDirectory Tree
![]() Install NLS Certificates and View NetWare Usage
Install NLS Certificates and View NetWare Usage
NetWare 6 is the most Internet-savvy network operating system Novell has ever produced. In fact, NetWare 6 is the catalyst of Novell’s OneNet vision. In this capacity, it offers anytime, anywhere access to the following critical network services: filing (iFolder), printing (iPrint), interoperability (NFAP—Native File Access Pack), network management (iManager), and directory services (eDirectory).
The mission of NetWare 6 is to extend the reach of local network services to the users who need them—to boldly serve files and printers where no one has served them before—to provide nonstop access to networked resources as the platform of OneNet. Simply stated, Novell has stripped the i from Internet and placed it on the front of seemingly every NetWare 6 utility: iFolder, iPrint, iManager, and iDirectory (oops, I mean eDirectory).
With this companion, CNE Study Guide for NetWare 6, you’ll extend your CNE adventure beyond NetWare 4 and 5 into the Websavvy world of NetWare 6. This is not your run-of-the-mill network operating system. NetWare 6 is a full-fledged Internetwork operating system. As such, it seamlessly and securely connects geographically separated portions of your network (including users and printers) via TCP/IP and the Internet.
Let’s start off with a quick review of the top 20 new and enhanced features in NetWare 6. Then we’ll tackle NetWare 6 Installation.
Whether you’re an aspiring CNE or just want to surf the Net using NetWare 6, you’ll want to become intimately familiar with all of NetWare’s new and updated features. In this section, we’ll explore 20 exciting features organized into two main categories:
![]() New NetWare 6 features—Novell offers seven completely new Web-based features in NetWare 6 including iFolder, iPrint, iManager, NetWare Web Access, Native File Access Pack, NetStorage, and NetDrive.
New NetWare 6 features—Novell offers seven completely new Web-based features in NetWare 6 including iFolder, iPrint, iManager, NetWare Web Access, Native File Access Pack, NetStorage, and NetDrive.
![]() Updated NetWare 6 features—Novell has enhanced 13 of the most popular tools from previous versions of NetWare, including eDirectory, Migration Wizard, Novell Clustering Services, NSS, and NetWare Remote Manager.
Updated NetWare 6 features—Novell has enhanced 13 of the most popular tools from previous versions of NetWare, including eDirectory, Migration Wizard, Novell Clustering Services, NSS, and NetWare Remote Manager.
Let’s get started with the seven coolest new features offered by NetWare 6.
Again, Novell has pioneered new ground in the world of networking. The new features available in NetWare 6 provide administrators all over the world with an enhanced toolkit of Internet-savvy filing, printing, and network management utilities. (Just don’t forget the i.)
Following is a brief description of the seven most exciting new Web-based features included with NetWare 6:
![]() Novell iPrint—Novell iPrint is a powerful Web-based printing tool that enables mobile users to print from a variety of remote locations to a plethora of printing devices via the Internet. Users simply point, click, and print from any Web browser. One of the greatest features of iPrint is a map utility that enables you to select printers from a geographic-oriented Web page. With this feature, printers are represented as icons on a map—with all the complex redirection management handled in the background and transparent to the users. This feature, called the iPrint Map Designer, is illustrated in Figure 1.1. We explored iPrint in great depth in Chapter 9 of CNA Study Guide for NetWare 6.
Novell iPrint—Novell iPrint is a powerful Web-based printing tool that enables mobile users to print from a variety of remote locations to a plethora of printing devices via the Internet. Users simply point, click, and print from any Web browser. One of the greatest features of iPrint is a map utility that enables you to select printers from a geographic-oriented Web page. With this feature, printers are represented as icons on a map—with all the complex redirection management handled in the background and transparent to the users. This feature, called the iPrint Map Designer, is illustrated in Figure 1.1. We explored iPrint in great depth in Chapter 9 of CNA Study Guide for NetWare 6.
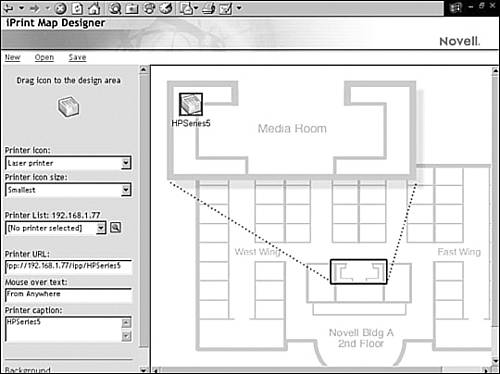
![]() NetWare Web Access—This Java servlet application built into NetWare 6 is based on Novell’s award-winning Portal Services. With the NetWare Web Access product, administrators can create a secure Web-based portal, enabling users to access network resources from anywhere in the world via a simple Web browser—no more clients! Customized content is delivered to users through gadgets—Java windows to specific content on Web pages within the portal. Gadgets communicate with back-end systems to gather all the specific data that users need. This is all accomplished with a single sign-on. You’ll build your own NetWare Web Access portal in Chapter 7, “NetWare 6 Internet Services.”
NetWare Web Access—This Java servlet application built into NetWare 6 is based on Novell’s award-winning Portal Services. With the NetWare Web Access product, administrators can create a secure Web-based portal, enabling users to access network resources from anywhere in the world via a simple Web browser—no more clients! Customized content is delivered to users through gadgets—Java windows to specific content on Web pages within the portal. Gadgets communicate with back-end systems to gather all the specific data that users need. This is all accomplished with a single sign-on. You’ll build your own NetWare Web Access portal in Chapter 7, “NetWare 6 Internet Services.”
![]() Novell Native File Access Pack—NetWare 6 includes native support for Macintosh, Linux, and Unix clients...finally! The Novell Native File Access Pack (NFAP) included with NetWare 6 allows Macintosh, Linux, Windows, and Unix workstations to access and store files on NetWare servers without having to install additional Novell client software. Unfortunately, this doesn’t apply to CNEs because many of the non-Web management tools still require a workstation-based client. Sorry!
Novell Native File Access Pack—NetWare 6 includes native support for Macintosh, Linux, and Unix clients...finally! The Novell Native File Access Pack (NFAP) included with NetWare 6 allows Macintosh, Linux, Windows, and Unix workstations to access and store files on NetWare servers without having to install additional Novell client software. Unfortunately, this doesn’t apply to CNEs because many of the non-Web management tools still require a workstation-based client. Sorry!
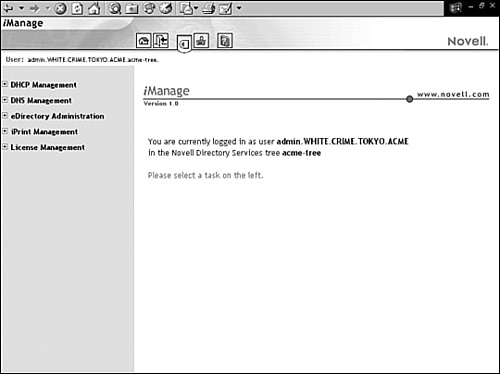
![]() Novell iManager—iManager represents the future of Novell Web-based network management. NetWare 6 includes the first release of iManager that enables you to manage network resources, eDirectory objects, printing devices, Novell licensing, and DNS/DHCP services through a Web browser (see Figure 1.2). iManager accomplishes this feat by assigning eDirectory administration roles and tasks to specific users. iManager will eventually replace traditional platform–specific utilities such as NetWare Administrator and ConsoleOne. You’ll learn how to manage NetWare 6 services using iManager in Chapter 3, “NetWare 6 Server Management.”
Novell iManager—iManager represents the future of Novell Web-based network management. NetWare 6 includes the first release of iManager that enables you to manage network resources, eDirectory objects, printing devices, Novell licensing, and DNS/DHCP services through a Web browser (see Figure 1.2). iManager accomplishes this feat by assigning eDirectory administration roles and tasks to specific users. iManager will eventually replace traditional platform–specific utilities such as NetWare Administrator and ConsoleOne. You’ll learn how to manage NetWare 6 services using iManager in Chapter 3, “NetWare 6 Server Management.”
![]() Novell iFolder—iFolder is the first of three new Internet-based Novell storage solutions introduced in NetWare 6 and is the user interface component of Novell’s new storage strategy. iFolder is a file storage and management tool that enables users to access applications and data via a Java-enabled Web browser. In a nutshell, iFolder is a central, Web-based storage server that provides automatic, secure, and transparent synchronization of your files. We covered this tool in great depth in Chapter 5 of CNA Study Guide for NetWare 6.
Novell iFolder—iFolder is the first of three new Internet-based Novell storage solutions introduced in NetWare 6 and is the user interface component of Novell’s new storage strategy. iFolder is a file storage and management tool that enables users to access applications and data via a Java-enabled Web browser. In a nutshell, iFolder is a central, Web-based storage server that provides automatic, secure, and transparent synchronization of your files. We covered this tool in great depth in Chapter 5 of CNA Study Guide for NetWare 6.
![]() Novell NetStorage—NetStorage is the second component of Novell’s extensive new Internet-based storage strategy. NetStorage serves as a bridge between your company’s protected Novell storage devices and the Internet. This is the critical back-end component of Novell iFolder. NetStorage provides a platform for secure file access from any Web browser or Microsoft Web Folders.
Novell NetStorage—NetStorage is the second component of Novell’s extensive new Internet-based storage strategy. NetStorage serves as a bridge between your company’s protected Novell storage devices and the Internet. This is the critical back-end component of Novell iFolder. NetStorage provides a platform for secure file access from any Web browser or Microsoft Web Folders.
![]() Novell NetDrive—NetDrive is the third and final component of Novell’s Internet-based storage strategy. NetDrive enables users to map file system drives to Web servers or FTP servers using a simple Internet connection (no client required). Using NetDrive, you can perform all the same file operations on Web and FTP servers that you now perform using Windows Explorer.
Novell NetDrive—NetDrive is the third and final component of Novell’s Internet-based storage strategy. NetDrive enables users to map file system drives to Web servers or FTP servers using a simple Internet connection (no client required). Using NetDrive, you can perform all the same file operations on Web and FTP servers that you now perform using Windows Explorer.
This completes our brief overview of new features in NetWare 6. Yet this is only the beginning. There are almost twice as many updated and enhanced features coming up. Let’s check them out.
In addition to all the great new features, NetWare 6 includes updated and enhanced versions of some of your favorite Novell tools, including eDirectory, Migration, Novell Clustering Services, NSS, and NetWare Remote Manager.
Following is a brief review of these many enhanced NetWare 6 CNE features in five different categories:
![]() eDirectory—eDirectory is the new, enhanced incarnation of Novell Directory Services (eDirectory). NetWare 6 is built on the foundation of eDirectory Version 8.6. In fact, this new eDirectory can span multiple network environments including NetWare, Windows NT/2000/XP, Solaris, Linux, and Unix. This improved version of eDirectory provides better replication and partitioning capabilities for these Directory-enabled services: automated business-relationship management, supply-chain management, virtual private networks (VPNs), electronic wallets, automated notification and provisioning systems, and some of today’s most popular electronic storefronts. We’ll dedicate Chapter 5, Chapter 17, and Part III to this wonder of science.
eDirectory—eDirectory is the new, enhanced incarnation of Novell Directory Services (eDirectory). NetWare 6 is built on the foundation of eDirectory Version 8.6. In fact, this new eDirectory can span multiple network environments including NetWare, Windows NT/2000/XP, Solaris, Linux, and Unix. This improved version of eDirectory provides better replication and partitioning capabilities for these Directory-enabled services: automated business-relationship management, supply-chain management, virtual private networks (VPNs), electronic wallets, automated notification and provisioning systems, and some of today’s most popular electronic storefronts. We’ll dedicate Chapter 5, Chapter 17, and Part III to this wonder of science.
![]() NetWare 6 migration—There are two enhanced NetWare 6 features that apply to migration: NetWare Migration Wizard and Novell Licensing Services. Fortunately, Novell has dramatically improved the NetWare Migration Wizard in NetWare 6. In addition, Novell Licensing Services has shifted from a server-based model to a network-based model called User Access Licensing (UAL). The new NetWare 6 Migration Wizard enables you to migrate network data and resources from NetWare 3, NetWare 4, NetWare 5, NetWare 6, and Windows NT to a server running NetWare 5 or NetWare 6. In NetWare 6, Novell Licensing Services has evolved beyond the server to focus on the network as a whole. In the new UAL model, User objects receive a permanent license unit that allows them to access network services at any time and from any workstation attached to the network.
NetWare 6 migration—There are two enhanced NetWare 6 features that apply to migration: NetWare Migration Wizard and Novell Licensing Services. Fortunately, Novell has dramatically improved the NetWare Migration Wizard in NetWare 6. In addition, Novell Licensing Services has shifted from a server-based model to a network-based model called User Access Licensing (UAL). The new NetWare 6 Migration Wizard enables you to migrate network data and resources from NetWare 3, NetWare 4, NetWare 5, NetWare 6, and Windows NT to a server running NetWare 5 or NetWare 6. In NetWare 6, Novell Licensing Services has evolved beyond the server to focus on the network as a whole. In the new UAL model, User objects receive a permanent license unit that allows them to access network services at any time and from any workstation attached to the network.
![]() Novell storage management and clustering—Earlier, we previewed three new NetWare 6 storage strategies centered on the Internet: iFolder, NetStorage, and NetDrive. Novell has also made significant improvements to the following three storage services from earlier versions of NetWare: NSS, NCS, and SMS. Novell Storage Services (NSS) is an integrated file storage and management system that was first introduced in earlier versions of NetWare. NSS has been improved to better integrate with Novell Clustering Services (supporting 255 volumes) and provide default support for the SYS: volume. Novell Cluster Services (NCS) is a high-availability clustering solution that enables you to configure up to 32 NetWare servers into a multimode cluster where network resources can be dynamically transferred from server to server on the fly. Storage Management Services (SMS) has been the NetWare backup strategy of choice for almost a decade. In NetWare 6, SMS has been enhanced to provide superior performance and support for cluster resources.
Novell storage management and clustering—Earlier, we previewed three new NetWare 6 storage strategies centered on the Internet: iFolder, NetStorage, and NetDrive. Novell has also made significant improvements to the following three storage services from earlier versions of NetWare: NSS, NCS, and SMS. Novell Storage Services (NSS) is an integrated file storage and management system that was first introduced in earlier versions of NetWare. NSS has been improved to better integrate with Novell Clustering Services (supporting 255 volumes) and provide default support for the SYS: volume. Novell Cluster Services (NCS) is a high-availability clustering solution that enables you to configure up to 32 NetWare servers into a multimode cluster where network resources can be dynamically transferred from server to server on the fly. Storage Management Services (SMS) has been the NetWare backup strategy of choice for almost a decade. In NetWare 6, SMS has been enhanced to provide superior performance and support for cluster resources.
![]() Novell Network Management—Network management is the name of the game, and NetWare 6 offers the most advanced toolkit ever. In addition to iManager, the coolest new Web-based management utility on the market, NetWare 6 offers improved versions of the following network management services: Novell Remote Manager Network Time Management, Novell DNS/DHCP Services, Novell Certificate Server, and NMAS. We’ll spend most of our time in Part I studying Novell network management for CNEs.
Novell Network Management—Network management is the name of the game, and NetWare 6 offers the most advanced toolkit ever. In addition to iManager, the coolest new Web-based management utility on the market, NetWare 6 offers improved versions of the following network management services: Novell Remote Manager Network Time Management, Novell DNS/DHCP Services, Novell Certificate Server, and NMAS. We’ll spend most of our time in Part I studying Novell network management for CNEs.
![]() NetWare Web Services—Novell has based its future on Web integration. In fact, almost every tool, utility, application, and service offered by NetWare 6 uses NetWare Web Services. Fortunately, Novell has put a great deal of effort into improving and enhancing its previous Web capabilities. And Novell has solicited some help from its friends at The Apache Group. Here’s a brief preview of the critical pieces of Novell’s enhanced NetWare 6 Web Services puzzle (see Chapter 7 for more details): NetWare Web Manager, NetWare Enterprise Web Server, NetWare FTP Server, NetWare Web Search Server, Apache Web Server for NetWare, Tomcat Servlet Engine for NetWare, and WebDAV.
NetWare Web Services—Novell has based its future on Web integration. In fact, almost every tool, utility, application, and service offered by NetWare 6 uses NetWare Web Services. Fortunately, Novell has put a great deal of effort into improving and enhancing its previous Web capabilities. And Novell has solicited some help from its friends at The Apache Group. Here’s a brief preview of the critical pieces of Novell’s enhanced NetWare 6 Web Services puzzle (see Chapter 7 for more details): NetWare Web Manager, NetWare Enterprise Web Server, NetWare FTP Server, NetWare Web Search Server, Apache Web Server for NetWare, Tomcat Servlet Engine for NetWare, and WebDAV.
BRAIN SNACK
Welcome to the First of many well-deserving Brain Snacks.
I’m in a giving mood; it must be Christmas. I have three gifts for you—small, medium, and large. Each gift is wrapped with a different color paper that’s red, green, or silver. In addition, I’ve placed a different color bow on each package: red, green, or gold. To earn your gifts, describe the wrapping and bow combination for each present. Here are some clues:
![]() The small gift has a green bow.
The small gift has a green bow.
![]() The large gift is the only one that matches.
The large gift is the only one that matches.
Remember, puzzles help stretch your imagination. But whatever you do, don’t pull a frontal lobe!
That does it! This completes our quick review of NetWare 6’s Top 20 new and enhanced features. As you can see, we’ll all be managing the network in style very soon. But first we must install it!
NetWare 6 can be installed in a variety of ways using a plethora of different installation, upgrade, and migration methods. In this chapter, we’ll focus on the straight-forward NetWare 6 installation method for a new server.
NetWare 6 installation is an exciting adventure consisting of five distinct phases, each with multiple, sequential steps. Following is a brief introduction to the five main installation phases:
![]() Phase I: Choosing the Correct NetWare 6 Settings
Phase I: Choosing the Correct NetWare 6 Settings
![]() Phase II: Installing NetWare 6 Storage
Phase II: Installing NetWare 6 Storage
![]() Phase III: Installing the Server and Network
Phase III: Installing the Server and Network
![]() Phase IV: Setting Up DNS and eDirectory
Phase IV: Setting Up DNS and eDirectory
![]() Phase V: Completing the Installation
Phase V: Completing the Installation
Before you tackle this great adventure, let’s begin with some initial preparation tasks.
Test Objectives Covered:
![]() Prepare Your Existing Network
Prepare Your Existing Network
![]() Prepare Your Server for NetWare 6
Prepare Your Server for NetWare 6
![]() Install NetWare 6
Install NetWare 6
Before you begin the NetWare 6 installation process, you’ll have to perform a variety of preliminary tasks, including identifying (and satisfying) any prerequisite requirements, updating your existing network (if applicable), and preparing the computer to be used as a server. In this section, we’ll cover these preinstallation tasks:
![]() Hardware and software requirements
Hardware and software requirements
![]() Network preparation
Network preparation
![]() Server preparation
Server preparation
It always pays to be prepared!
TIP
When performing the lab exercises in this guide, it’s imperative that you use a nonproduction server (that is, a practice server) in an isolated eDirectory tree. You should use nonproduction workstations as well. Remember, we’re here to help improve your life, not to make it more difficult!
Before you install NetWare 6, you should ensure that minimum hardware, software, and configuration requirements have been met (or exceeded). A detailed discussion of each of these NetWare 6 installation requirements follows.
The minimum hardware requirements for a NetWare 6 server are given in the following list. Keep in mind that these are just minimum requirements; the recommended values are considerably higher (as shown in parentheses).
![]() A server-class PC with a Pentium Pro or later processor. (Two or more Pentium III 700MHz or later processors are recommended for multiple processor machines. In fact, NetWare 6 supports up to 32 processors. Wow!)
A server-class PC with a Pentium Pro or later processor. (Two or more Pentium III 700MHz or later processors are recommended for multiple processor machines. In fact, NetWare 6 supports up to 32 processors. Wow!)
![]() A Super VGA or higher-resolution display adapter.
A Super VGA or higher-resolution display adapter.
![]() 256MB of RAM (RDRAM system with 1GB or more of memory recommended).
256MB of RAM (RDRAM system with 1GB or more of memory recommended).
![]() A DOS partition of at least 200MB and 200MB available space (1GB recommended).
A DOS partition of at least 200MB and 200MB available space (1GB recommended).
TIP
A quick method for calculating the appropriate size of the DOS partition is to add the total amount of server RAM to the minimum amount of disk space required. Because 200MB is the minimum amount of available disk space required, a server with 2048MB of RAM theoretically has an optimum DOS partition size of 2248MB (2048MB + 200MB = 2248MB). By using this strategy, you’ll be able to do a core dump to the disk drive if required for troubleshooting purposes.
![]() 2GB available space outside the DOS partition for the SYS: volume (4GB recommended on a SCSI or EIDE hard drive)
2GB available space outside the DOS partition for the SYS: volume (4GB recommended on a SCSI or EIDE hard drive)
![]() (Optional) A RAID 5 array and Fiber Channel Storage Area Network (SAN)
(Optional) A RAID 5 array and Fiber Channel Storage Area Network (SAN)
![]() One (or more) network boards
One (or more) network boards
![]() A CD drive
A CD drive
![]() (Optional) A USB, PS/2, or serial mouse (a mouse is recommended)
(Optional) A USB, PS/2, or serial mouse (a mouse is recommended)
The minimum software requirements for NetWare 6 include some or all of the following, depending on your network configuration:
![]() A NetWare 6 Operating System CD
A NetWare 6 Operating System CD
![]() A NetWare 6 License/Cryptography disk
A NetWare 6 License/Cryptography disk
![]() (Conditional) DOS 3.3 or later (if the server does not boot from CD)
(Conditional) DOS 3.3 or later (if the server does not boot from CD)
![]() (Conditional) DOS CD drivers (if the server does not boot from CD)
(Conditional) DOS CD drivers (if the server does not boot from CD)
![]() (Conditional) Client connection utilities (optional; for installing from a network):
(Conditional) Client connection utilities (optional; for installing from a network):
![]() (Conditional) Novell Client for DOS and Windows 3.1x (optional; for installing from a NetWare server running Internetwork Packet eXchange [IPX])
(Conditional) Novell Client for DOS and Windows 3.1x (optional; for installing from a NetWare server running Internetwork Packet eXchange [IPX])
![]() (Conditional) IP Server Connection utility (optional; for installing from a NetWare server running Internet Protocol [IP] only)
(Conditional) IP Server Connection utility (optional; for installing from a NetWare server running Internet Protocol [IP] only)
The minimum configuration requirements for NetWare 6 include one or all of the following, depending on your network configuration:
![]() The Supervisor right at the tree root of the eDirectory tree
The Supervisor right at the tree root of the eDirectory tree
![]() The Supervisor right to the container where the server will be installed
The Supervisor right to the container where the server will be installed
![]() The Read right to the Security container object for the eDirectory tree
The Read right to the Security container object for the eDirectory tree
![]() Network configuration parameters required for connecting to the Internet:
Network configuration parameters required for connecting to the Internet:
![]() IP address
IP address
![]() IP address of a domain name server
IP address of a domain name server
![]() IP address of the default gateway
IP address of the default gateway
![]() Subnet mask
Subnet mask
![]() Name of your domain
Name of your domain
![]() Network board and storage device properties (such as interrupt and port address, if not automatically detected by NetWare)
Network board and storage device properties (such as interrupt and port address, if not automatically detected by NetWare)
TIP
For IP addresses and domain names, contact your system administrator and/or Internet service provider (ISP). For network board and storage device information, contact the hardware manufacturer. Finally, there are nifty tools available for gathering this network configuration data yourself.
After all hardware, software, and configuration requirements have been met, you’re just about ready to roll. But first, you must prepare your network for NetWare 6. In the next two sections, you’ll learn how to prepare both your network and your server for the wonders of NetWare 6.
In this chapter, we’ll focus on installing NetWare 6 on a new server in a new eDirectory tree. If you instead install NetWare 6 on a new server that will be integrated into an existing eDirectory tree, you must first update eDirectory using the NetWare Deployment Manager utility (included with NetWare 6).
The following is a summary of the tasks required to prepare your network for NetWare 6 using NetWare Deployment Manager:
1. Log in to your existing network from a Windows 95/98 or Windows NT/2000/XP workstation as a user with the Supervisor right.
TIP
If you’re prompted to log into the network while using NetWare Deployment Manager, either enter the server name or click Details and specify the IP address.
2. Execute NetWare Deployment Manager (NWDEPLOY.EXE), which is located on the NetWare 6 Operating System CD.
3. Double-click the Network Preparation folder and review the Overview section.
4. Back up any server data and eDirectory data to another computer or offline storage media using the instructions in the Back Up Data section.
5. Update eDirectory, as required, by executing the View and Update NDS Version program. Select Browse when the Update NDS window appears. Then navigate to your tree and select the topmost container. If a Login dialog appears, authenticate as Admin (with Supervisor eDirectory rights to the Tree Root) and select Include Subordinate Containers. When you’re done, your eDirectory tree will be thoroughly updated. Good job!
6. Extend the network schema by executing the Prepare for NDS eDirectory 8.6 program.
After your network has been updated, you’ll have to prepare your server for the NetWare 6 operating system.
NetWare 6 is a robust operating system. As such, you should make sure that your servers are prepared for the challenge. In this section, you’ll learn about the two most critical server preparation targets: DOS partition and DOS configuration files.
NetWare 6 requires a DOS partition for initial booting and loading of the NetWare operating system. The DOS partition hosts NetWare startup and server files. Refer to the “Hardware Requirements” section for more information about how to determine an appropriate size for the DOS partition. To create and format a DOS partition for NetWare 6, perform these tasks:
1. Back up all data to another computer or offline storage media.
2. Determine which of the following three methods you’ll use to install NetWare 6:
a. If you’re installing NetWare 6 from a nonbootable CD, boot the server with DOS 3.3 (or later) and then insert the NetWare 6 Operating System CD. Then continue with step 3.
b. If you’re installing NetWare 6 from a bootable CD, insert the NetWare 6 Operating System CD and turn on your server. Follow the onscreen prompts to create and format the DOS partition. Skip to the later section titled “Phase I: Choosing the Correct NetWare 6 Settings” later in this chapter.
c. If you’re installing NetWare 6 from a network drive, boot the server with DOS 3.3 (or later) and navigate to the directory containing the NetWare 6 installation files. Then continue with step 3.
TIP
If you plan to boot the computer from the NetWare 6 Operating System CD, verify that the computer’s ROM boot order specifies the CD before the hard disk. Do not boot from the NetWare 6 Operating System CD if the computer has an existing DOS partition that is a FAT32 partition. The DOS version included on the NetWare 6 Operating System CD does not recognize FAT32 partitions, and is therefore unable to write to them. (Consult the NetWare 6 documentation for further information.)
3. If you’re booting from a DOS boot disk, execute the DOS FDISK utility at the command prompt. If the computer already has an operating system installed (such as Windows), use FDISK to remove the hard drive partitions and the operating system.
4. After you’ve deleted existing partitions, use FDISK to create a primary DOS partition and make it active. Allow the computer to restart.
5. Format the DOS partition and transfer system files to it by changing to drive A and entering Format C: /s.
NetWare 6 can be installed from the server’s local CD drive or from installation files located elsewhere on the network. To access the NetWare 6 installation files, perform the following tasks:
1. Install the DOS CD driver for the computer’s CD drive onto the DOS partition. (The DOS CD driver should be obtained from the CD drive manufacturer.)
2. Edit your CONFIG.SYS file to load the CD driver.
3. Edit your AUTOEXEC.BAT file to load the Microsoft CD Extensions driver (MSCDEX.EXE).
4. After you’ve installed the driver, verify that the logical filename of the CD drive specified in the computer’s CONFIG.SYS and AUTOEXEC.BAT files is not CDROM or CDINST.
5. Next, verify that the CONFIG.SYS file contains these parameters:
FILES=50
BUFFERS=30
6. (Conditional) If you plan to install NetWare 6 from installation files located on a network, install the Novell Client for DOS and Windows 3.1x or IP Server Connection utility located on the NetWare 6 Novell Client CD, as appropriate.
7. (Conditional) If you plan to install NetWare 6 from installation files located on a network, don’t forget to copy the files to the desired server! Also, verify that you have the appropriate security rights to access them.
After you’ve identified and satisfied any hardware, software, and configuration requirements; updated your existing network (if applicable); and prepared the computer you plan to use as a server, you’re ready to begin the actual NetWare 6 installation process.
Yeah!!!
As you learned earlier, NetWare 6 installation consists of five distinct phases, each with multiple, sequential steps. Following is a more detailed roadmap of the major steps that occur during each of the five installation phases:
![]() Phase I: Choosing the Correct NetWare 6 Settings—In phase I, you’ll get things started by executing the INSTALL.BAT file, accepting the license agreements, and loading the core NetWare operating system. Then you’ll select a plethora of general NetWare 6 settings, including installation type, server address settings, regional parameters, mouse type, and video mode.
Phase I: Choosing the Correct NetWare 6 Settings—In phase I, you’ll get things started by executing the INSTALL.BAT file, accepting the license agreements, and loading the core NetWare operating system. Then you’ll select a plethora of general NetWare 6 settings, including installation type, server address settings, regional parameters, mouse type, and video mode.
![]() Phase II: Installing NetWare 6 Storage—In phase II, you’ll install and configure NetWare 6 storage devices by selecting an appropriate platform support module, configuring storage device(s) and network board(s), and creating a NetWare partition and SYS: volume.
Phase II: Installing NetWare 6 Storage—In phase II, you’ll install and configure NetWare 6 storage devices by selecting an appropriate platform support module, configuring storage device(s) and network board(s), and creating a NetWare partition and SYS: volume.
![]() Phase III: Installing the Server and Network—In phase III, you’ll establish server and network parameters by naming the server, installing the NetWare file system, and configuring network protocol(s).
Phase III: Installing the Server and Network—In phase III, you’ll establish server and network parameters by naming the server, installing the NetWare file system, and configuring network protocol(s).
![]() Phase IV: Setting Up DNS and eDirectory—In phase IV, you’ll expand beyond the server to establish domain name settings and to build an eDirectory tree. This stage encompassed the following four steps: set up the Domain Name Service (DNS), set the server time zone, configure eDirectory, and license the NetWare server.
Phase IV: Setting Up DNS and eDirectory—In phase IV, you’ll expand beyond the server to establish domain name settings and to build an eDirectory tree. This stage encompassed the following four steps: set up the Domain Name Service (DNS), set the server time zone, configure eDirectory, and license the NetWare server.
![]() Phase V: Completing the Installation—Finally, in phase V, you’ll complete the NetWare 6 installation process by installing additional network products, configuring the Novell Certificate Server, configuring LDAP (optional), and customizing final installation parameters.
Phase V: Completing the Installation—Finally, in phase V, you’ll complete the NetWare 6 installation process by installing additional network products, configuring the Novell Certificate Server, configuring LDAP (optional), and customizing final installation parameters.
Every great adventure begins with a single step—yours starts with phase I.
Test Objective Covered:
![]() Install NetWare 6 (continued)
Install NetWare 6 (continued)
In phase I, you’ll get things started by executing the INSTALL.BAT file, accepting the license agreements, and loading the core NetWare operating system. Then you’ll select a plethora of general NetWare 6 settings, including installation type, server address settings, regional parameters, mouse type, and video mode.
To begin the NetWare 6 installation process, insert the NetWare 6 Operating System CD into the CD drive (or log in to the network if you’ve stored the NetWare 6 installation files on an existing server), and enter the following command at the prompt:
INSTALL
You’ll notice that the installation program displays the initial screens in text mode. Autodetected and/or default settings appear on each screen. You can either accept the autodetected and default settings or you can modify them to meet your requirements. To navigate a text screen, use the arrow keys on your keyboard. To select a menu choice, highlight the desired option and press Enter. To toggle between predetermined values in a field, highlight the field and then press Enter to toggle to the next value. See the bottom of each screen for further information.
TIP
The NetWare 6 installation program is available in several languages. If you have an international version of the program, a NetWare Installation screen eventually appears, giving you the opportunity to select the language to be used during installation. Later in the installation process, you’ll be given the opportunity to install other language options, such as the language for the operating system and for the Admin user. Also note that whichever language the Admin user selects becomes the default language for all the objects he or she creates.
At the beginning of the installation process, you’re asked to agree to the terms and conditions contained in the NetWare 6 Novell Software License Agreement. Press F10=Accept License Agreement, as appropriate, to indicate that you’ve read the agreement and accept its terms and conditions. (The appropriate choice will depend on the method you used to start the installation program.)
The installation program then checks the server’s first hard disk to verify that it has a valid boot partition and adequate disk space. When a screen appears indicating that a valid boot partition has been found, select Continue with Existing Partition.
When the JReport Runtime License Agreement screen appears, press F10 to indicate that you’ve read the agreement and accept its terms and conditions.
TIP
NetWare 6 contains two license agreements: the NetWare 6 Novell Software License Agreement and the JReport Runtime License Agreement. The first agreement is a binding contract between you and Novell for use of the NetWare 6 operating system. The second agreement gives you permission to use the following two Java components with NetWare 6: JReport Engine Bean and JReport Result Viewer Bean.
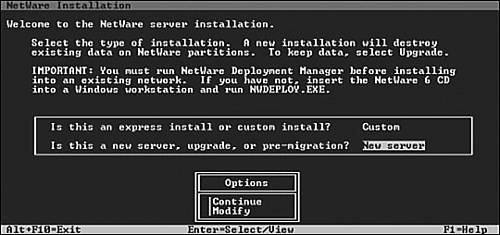
When the Welcome to the NetWare Server Installation screen appears (see Figure 1.3), you’re given the opportunity to select the installation type (Express or Custom) and the installation method (New Server, Upgrade, or Pre-Migration). The default installation type is Express and the default installation method is New Server. Let’s take a closer look at each of these options.
The Express installation option autodetects drivers, uses default settings, and installs default software programs, including
![]() SYS Volume Size:4GB (any remaining disk space is left as free space)
SYS Volume Size:4GB (any remaining disk space is left as free space)
![]() LAN and Disk Drivers:autodiscovered and loaded
LAN and Disk Drivers:autodiscovered and loaded
![]() Default Products Installed:
Default Products Installed:
![]() Novell Distributed Print Services (NDPS)
Novell Distributed Print Services (NDPS)
![]() NetWare Administration Server
NetWare Administration Server
![]() Novell Advanced Audit Services
Novell Advanced Audit Services
![]() Country Code: 1
Country Code: 1
![]() Codepage: 437
Codepage: 437
![]() Video Mode: SVGA (or VGA) Plug and Play
Video Mode: SVGA (or VGA) Plug and Play
![]() Keyboard: United States
Keyboard: United States
![]() Mouse: auto-discovered and loaded
Mouse: auto-discovered and loaded
The Custom installation option enables you to select advanced configuration parameters. This option can be used to install NetWare 6 on a new computer (which is the method described in this chapter) or to upgrade an existing computer running NetWare 4 or NetWare 5.
The NetWare 6 installation methods shown in Figure 1.3 include
![]() New Server—Installs a new server from scratch. Creates a new NetWare partition for the SYS: volume but does not delete system partitions or other partitions (such as DOS, Unix, or Windows). If you select the Express Installation option, you can skip to the “Step 10: Name the Server” section later in this chapter.
New Server—Installs a new server from scratch. Creates a new NetWare partition for the SYS: volume but does not delete system partitions or other partitions (such as DOS, Unix, or Windows). If you select the Express Installation option, you can skip to the “Step 10: Name the Server” section later in this chapter.
![]() Upgrade—Upgrades a NetWare 4 or NetWare 5 server to NetWare 6. This option retains all original server data such as partitions, volumes, directory structures, and files.
Upgrade—Upgrades a NetWare 4 or NetWare 5 server to NetWare 6. This option retains all original server data such as partitions, volumes, directory structures, and files.
![]() Pre-Migration—Prepares the destination NetWare 6 server for migration from an older source server at a later date by using the NetWare migration wizard.
Pre-Migration—Prepares the destination NetWare 6 server for migration from an older source server at a later date by using the NetWare migration wizard.
Review the values listed on this screen and modify them as necessary. At the end of this chapter, we’ll perform a NetWare 6 custom installation from scratch.
The Server Settings screen appears next, listing the following default values:
![]() Server ID Number: (random number up to eight hexadecimal digits)
Server ID Number: (random number up to eight hexadecimal digits)
![]() Load Server at Reboot: Yes
Load Server at Reboot: Yes
![]() Server Set Parameters: Edit
Server Set Parameters: Edit
Some of the information that you might want to keep in mind regarding these options includes
![]() Server ID Number—This is a unique number that identifies the server on the network. It functions like an internal IPX number and can be up to eight hexadecimal digits in length. You might want to replace this randomly generated number with a specific one in either of the following situations:
Server ID Number—This is a unique number that identifies the server on the network. It functions like an internal IPX number and can be up to eight hexadecimal digits in length. You might want to replace this randomly generated number with a specific one in either of the following situations:
![]() Filtered environment—In a filtered environment, you might find it convenient to assign each server an easily recognizable server ID number. In such an environment, routers between network segments are configured to forward only data that is originated by certain computer addresses. Data sent from other computer addresses is not forwarded to other segments.
Filtered environment—In a filtered environment, you might find it convenient to assign each server an easily recognizable server ID number. In such an environment, routers between network segments are configured to forward only data that is originated by certain computer addresses. Data sent from other computer addresses is not forwarded to other segments.
![]() Numbering scheme—You might find it useful to develop a numbering scheme that identifies servers by location, organization, or another characteristic. For example, you might want to designate that all servers in building A begin with 0101, all servers in building B begin with 0102, and so on. Keep in mind that the hexadecimal server ID number supports alpha characters from A through F, so you might want to create word schemes in addition to numbering schemes.
Numbering scheme—You might find it useful to develop a numbering scheme that identifies servers by location, organization, or another characteristic. For example, you might want to designate that all servers in building A begin with 0101, all servers in building B begin with 0102, and so on. Keep in mind that the hexadecimal server ID number supports alpha characters from A through F, so you might want to create word schemes in addition to numbering schemes.
TIP
Later in the NetWare 6 installation process, you’ll be given the opportunity to select which protocol(s) to install. If you select IP but not IPX, the SERVER ID reference is removed from the AUTOEXEC.NCF file and is not used. If you want to add IPX at a later date, you’ll need to add the SERVERID 8_digit_number command after the SERVERNAME command in the server’s AUTOEXEC.NCF file.
![]() Load Server at Reboot—If you select Yes (the default), the AUTOEXEC.BAT and CONFIG.SYS files are copied and renamed with a .00x extension. The original AUTOEXEC.BAT and CONFIG.SYS files are then updated so that the NetWare operating system automatically loads when the server boots. If you select No, the AUTOEXEC.BAT and CONFIG.SYS files are not updated.
Load Server at Reboot—If you select Yes (the default), the AUTOEXEC.BAT and CONFIG.SYS files are copied and renamed with a .00x extension. The original AUTOEXEC.BAT and CONFIG.SYS files are then updated so that the NetWare operating system automatically loads when the server boots. If you select No, the AUTOEXEC.BAT and CONFIG.SYS files are not updated.
![]() Server SET Parameters—SET parameters might need to be modified for device drivers such as network boards or storage devices in order to complete the installation. SET parameters are saved in the server’s STARTUP.NCF file.
Server SET Parameters—SET parameters might need to be modified for device drivers such as network boards or storage devices in order to complete the installation. SET parameters are saved in the server’s STARTUP.NCF file.
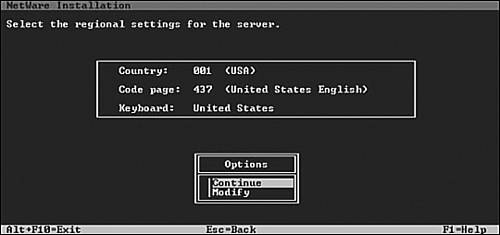
The Regional Settings screen appears next, as shown in Figure 1.4. Regional settings are used to customize server language and keyboard settings. If you’re located in the United States, the default values are as follows:
![]() Country: 001 (USA)
Country: 001 (USA)
![]() Code Page: 437 (United States English)
Code Page: 437 (United States English)
![]() Keyboard: United States
Keyboard: United States
During the next few steps, the Installation Wizard attempts to automatically detect certain types of hardware devices and to load the appropriate drivers. Other drivers must be selected manually.
Figure 1.5 shows the first of three consecutive driver screens. This first screen lists the server’s autodetected mouse type and video mode parameters. Following is a brief description of each:
![]() Mouse Type—Although the installation program supports USB, PS/2, and serial mouse types, a mouse isn’t required (although one is recommended). Optionally, you can use the keyboard’s arrow keys to control pointer movement. The default is Auto (auto-discovered and loaded).
Mouse Type—Although the installation program supports USB, PS/2, and serial mouse types, a mouse isn’t required (although one is recommended). Optionally, you can use the keyboard’s arrow keys to control pointer movement. The default is Auto (auto-discovered and loaded).
![]() Video Mode—The installation program is optimized to work with video display hardware that’s VESA 2 compliant. Because the installation program does not attempt to autodetect the video mode, you’ll have to select the appropriate setting manually. The default is SVGA 800×600 or 640×480.
Video Mode—The installation program is optimized to work with video display hardware that’s VESA 2 compliant. Because the installation program does not attempt to autodetect the video mode, you’ll have to select the appropriate setting manually. The default is SVGA 800×600 or 640×480.
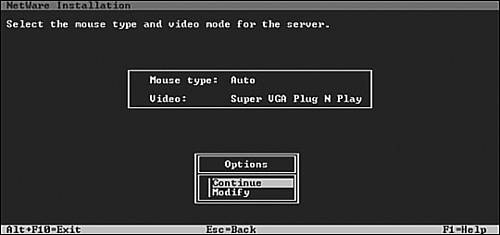
Review the values listed on this screen and modify them as necessary.
The Installation program then copies a number of server boot files from the CD to the C:NWSERVER startup directory. These include files such as SERVER. EXE, disk drivers, NWCONFIG.NLM, NWSNUT.NLM, VREPAIR.NLM, and other NetWare Loadable Modules (NLMs).
This completes the first six steps of NetWare 6 installation and phase I. Now we move on to platform support and NetWare storage.
Test Objective Covered:
![]() Install NetWare 6 (continued)
Install NetWare 6 (continued)
In phase II, we’ll install and configure NetWare 6 storage devices by selecting an appropriate platform support module, configuring storage device(s) and network board(s), and creating a NetWare partition and the SYS: volume.
Let’s continue our installation adventure with step 7.
TIP
If you get stuck with a slot conflict for a storage or network adapter, you should use the Alt+Esc key combination to jump to the console and determine which slot Novell is detecting. This detected slot isn’t always displayed on the Installation screen.
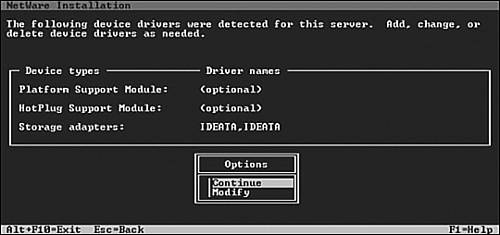
Figure 1.6 shows the second of three driver screens. This one lists the platform and support modules (which have been autodetected, wherever possible):
![]() Platform support module—A platform support module (PSM) driver can be loaded to optimize the performance of servers with multiple processors and other configurations. If a PSM isn’t detected, your computer probably doesn’t need one. If a platform support module driver is detected on a computer that doesn’t contain multiple processors, the driver can be allowed to load without adversely affecting performance. Platform support modules typically have a .PSM filename extension. Note: Always make sure to use the latest PSM driver with today’s new servers (even if the driver is still in beta). Also, some of the newer servers will take a performance hit if you don’t use the right PSM driver.
Platform support module—A platform support module (PSM) driver can be loaded to optimize the performance of servers with multiple processors and other configurations. If a PSM isn’t detected, your computer probably doesn’t need one. If a platform support module driver is detected on a computer that doesn’t contain multiple processors, the driver can be allowed to load without adversely affecting performance. Platform support modules typically have a .PSM filename extension. Note: Always make sure to use the latest PSM driver with today’s new servers (even if the driver is still in beta). Also, some of the newer servers will take a performance hit if you don’t use the right PSM driver.
![]() HotPlug support module—PCI HotPlug technology allows storage adapters and network boards to be inserted and removed while the computer is powered on. If a PCI HotPlug module isn’t detected, your computer probably does not support the technology (and, thus, does not need one). PCI HotPlug modules typically have an .NLM extension.
HotPlug support module—PCI HotPlug technology allows storage adapters and network boards to be inserted and removed while the computer is powered on. If a PCI HotPlug module isn’t detected, your computer probably does not support the technology (and, thus, does not need one). PCI HotPlug modules typically have an .NLM extension.
![]() Storage adapters—Storage adapters require a software driver called a host adapter module (HAM) to communicate with the computer (host). Because a single storage adapter can control more than one type of storage device, only one HAM might be required. Various types of storage adapters, such as integrated drive electronics (IDE) and small computer system interface (SCSI), might be autodetected. If a particular storage adapter isn’t detected, choose the appropriate driver from the list, or load it from a manufacturer-provided disk. Verify that properties such as interrupt, port value, and slot do not conflict with any other device in the computer. Host adapter modules typically have a .HAM extension.
Storage adapters—Storage adapters require a software driver called a host adapter module (HAM) to communicate with the computer (host). Because a single storage adapter can control more than one type of storage device, only one HAM might be required. Various types of storage adapters, such as integrated drive electronics (IDE) and small computer system interface (SCSI), might be autodetected. If a particular storage adapter isn’t detected, choose the appropriate driver from the list, or load it from a manufacturer-provided disk. Verify that properties such as interrupt, port value, and slot do not conflict with any other device in the computer. Host adapter modules typically have a .HAM extension.
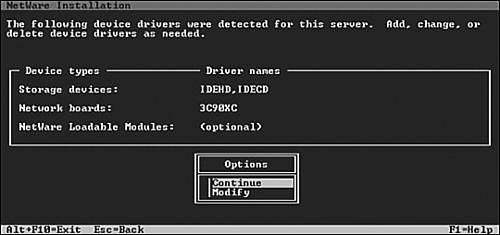
As you can see in the example in Figure 1.7, the third and final driver screen lists the following storage devices, network boards, and NLMs:
![]() Storage Devices—Storage devices require a software driver, called a custom device module (CDM), to communicate with the storage adapter that controls it. Each type of storage device requires a separate CDM. The Installation Wizard autodetects many types of storage devices, such as SCSI/IDE drives, CD-ROM drives, and tape drives. If a storage device isn’t detected, choose the appropriate driver from the list provided or load it from a manufacturer-provided disk. Custom device modules typically have a .CDM extension.
Storage Devices—Storage devices require a software driver, called a custom device module (CDM), to communicate with the storage adapter that controls it. Each type of storage device requires a separate CDM. The Installation Wizard autodetects many types of storage devices, such as SCSI/IDE drives, CD-ROM drives, and tape drives. If a storage device isn’t detected, choose the appropriate driver from the list provided or load it from a manufacturer-provided disk. Custom device modules typically have a .CDM extension.
![]() Network boards—Network boards require a software driver called a LAN driver to communicate with the network. The installation program autodetects many types of network boards. If a particular network board isn’t detected, choose the appropriate driver from the list provided or load it from a manufacturer-provided disk. To edit the properties of the network board, it must be installed and configured properly. Verify that properties such as interrupt, port value, and slot do not conflict with any other device in your server. LAN drivers typically have a .LAN extension.
Network boards—Network boards require a software driver called a LAN driver to communicate with the network. The installation program autodetects many types of network boards. If a particular network board isn’t detected, choose the appropriate driver from the list provided or load it from a manufacturer-provided disk. To edit the properties of the network board, it must be installed and configured properly. Verify that properties such as interrupt, port value, and slot do not conflict with any other device in your server. LAN drivers typically have a .LAN extension.
![]() NetWare-loadable modules—Some servers and network configurations require that you load an NLM before completing the server installation. (For example, if you’re installing the server in a token ring environment, you might need to load ROUTE.NLM.) If required, add the appropriate NLM to the NetWare Loadable Modules field.
NetWare-loadable modules—Some servers and network configurations require that you load an NLM before completing the server installation. (For example, if you’re installing the server in a token ring environment, you might need to load ROUTE.NLM.) If required, add the appropriate NLM to the NetWare Loadable Modules field.
After the device drivers have been installed, you need to create the SYS: volume and parent NetWare partition. A partition is a logical section of physical storage that’s used to divide a large storage region into smaller, more manageable sections.
Each partition typically corresponds with an operating system, such as NetWare, Unix, or DOS. A single storage device can contain up to four partitions. Each partition can be divided into smaller sections called volumes. An NSS partition can contain up to 255 volumes.
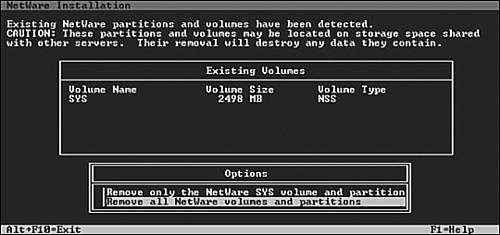
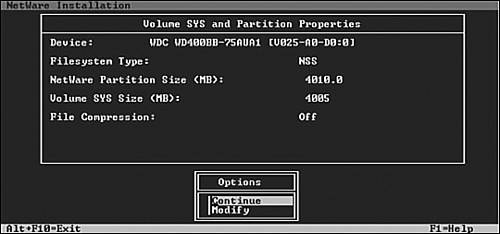
During step 9, the NetWare 6 installation program checks whether a SYS: volume already exists (from a previous installation). If one is found, you’ll be prompted to select one of the following options (as shown in Figure 1.8):
![]() Replace Volume SYS and Its NetWare Partition—This option removes the entire NetWare partition containing the existing SYS: volume. Any volume that is part of the NetWare partition that contains the SYS: volume is also removed (even if the volume spans to other NetWare partitions). If you want to retain the existing SYS: volume rather than replacing it, you can exit the NetWare 6 installation program and perform a NetWare 6 upgrade.
Replace Volume SYS and Its NetWare Partition—This option removes the entire NetWare partition containing the existing SYS: volume. Any volume that is part of the NetWare partition that contains the SYS: volume is also removed (even if the volume spans to other NetWare partitions). If you want to retain the existing SYS: volume rather than replacing it, you can exit the NetWare 6 installation program and perform a NetWare 6 upgrade.
![]() Remove All NetWare Volumes and NetWare/NSS Partitions—This option removes all NetWare volumes and all NetWare and NSS partitions. Both of the options remove only NetWare partitions. Other types of partitions, such as DOS, Unix, and system/utility partitions, are not removed. Any data on a volume that is removed is lost.
Remove All NetWare Volumes and NetWare/NSS Partitions—This option removes all NetWare volumes and all NetWare and NSS partitions. Both of the options remove only NetWare partitions. Other types of partitions, such as DOS, Unix, and system/utility partitions, are not removed. Any data on a volume that is removed is lost.
Next, the installation program displays a storage creation screen similar to Figure 1.9. If your hard disk is large enough, the installation program uses the following defaults:
![]() File System Type: NSS
File System Type: NSS
![]() NetWare Partition Size (MB): 4010.0
NetWare Partition Size (MB): 4010.0
![]() Volume SYS: Size (MB): 4005
Volume SYS: Size (MB): 4005
![]() File Compression: Off
File Compression: Off
By default, the NetWare 6 installation program creates the SYS: volume as an NSS volume, rather than a traditional volume. This has many advantages. See Chapter 3 for more information about NSS volumes.
TIP
Traditional volumes should be used only if you require block suballocation, data migration, Network File System (NFS), File Transfer Protocol (FTP), VREPAIR, or file locks. If you want to create a traditional SYS: volume rather than an NSS volume, press F5 on the Volume SYS and Partition Properties screen.
If you plan to have additional volumes on this partition, decrease the size of the SYS: volume, as necessary, to leave room for the other volume(s). It’s probably a good idea to create one or more additional volumes for your data to keep it separate from your NetWare operating system files. Doing so also makes it easier to restrict access to specific directories or files.
If you choose to modify the defaults, remember that NetWare 6 requires 2GB for the SYS: volume (4GB recommended). To modify the SYS: volume size, select Modify from the Options box shown in Figure 1.9. Then choose the appropriate storage device (SEAGATE ST32550N, for example), select the NetWare Partition Size field, and backspace over the current size. Input the new size into the Volume SYS Size (MB): field. Save the settings and continue by pressing F10. If desired, additional volumes can be created later in the installation process or after the installation is complete using ConsoleOne.
When you select Continue, the NetWare 6 installation program creates a NetWare partition and SYS: volume using the parameters you specified. The Installation Wizard then copies system files to the new SYS: volume.
TIP
If you’re installing NetWare 6 from the network, you’ll be prompted to reconnect to the network. To continue the installation, you must authenticate with the same User object and password that you used at the beginning of the installation process.
This completes the next three steps of NetWare 6 installation and phase II. Now we’ll venture into a whole new world: GUI installation screens.
Test Objective Covered:
![]() Install NetWare 6 (continued)
Install NetWare 6 (continued)
Welcome to the GUI portion of NetWare 6 installation!
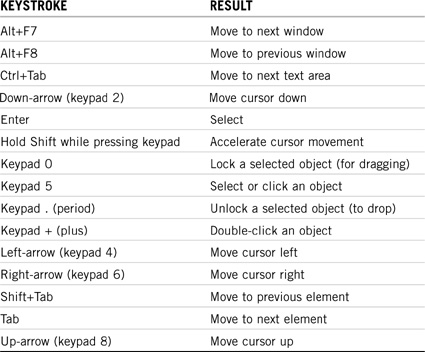
In phase III, you’ll name the server, install the NetWare file system, and install network protocols. In this stage, you’ll leave the boring text-mode world and switch to a GUI Java interface. Although a mouse is recommended, you can use keystrokes to navigate through installation program screens as shown in Table 1.1. Remember that the NumLock (number lock) key must be activated in order for cursor movements to be enabled on the keypad.
At this point, the Installation Wizard copies a number of files to the server hard drive (called the preparatory file copy process). A Java Virtual Machine (JVM) is created on the server and the GUI portion of the Installation Wizard is loaded. This step might take a while, so feel free to go have a cup of Java while you wait.
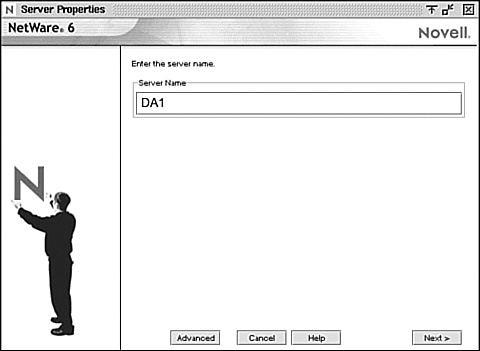
When the Server Properties dialog box appears (see Figure 1.10), type the server name in the Server Name field. The name should consist of 2 to 47 characters (including letters, numbers, hyphens, and/or underscores—but no spaces). The first character cannot be a period. Don’t forget that each server in your eDirectory tree must have a unique name. The server name should also be different than the one that will be used for the eDirectory tree name later in the process.
![]() Server Language—Designates which language to use for the server console and to display errors.
Server Language—Designates which language to use for the server console and to display errors.
![]() Admin Language—Designates which language to use when the network administrator User object logs into the network. Any eDirectory objects created by this user will use this language as well.
Admin Language—Designates which language to use when the network administrator User object logs into the network. Any eDirectory objects created by this user will use this language as well.
![]() Additional Server Languages—Designates which other languages that the server and client utilities can be displayed in.
Additional Server Languages—Designates which other languages that the server and client utilities can be displayed in.
Some technologies (such as SSL and certificate generation) require the use of cryptography. If the Encryption screen appears, as shown in Figure 1.11, insert the NetWare 6 License/Cryptography disk into the computer’s disk drive. On the disk, browse to the License directory, select the .NFK file, and then click OK.
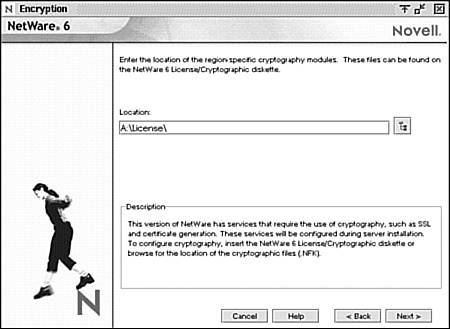
If the Encryption screen appears and you don’t select an .NFK file, you won’t be able to install NetWare 6! Of course, you could always use the .NFK included with this CNE study guide!
The NetWare 6 file system consists of partitions, volumes, and free space. In step 9, you created a NetWare partition that contains the default SYS: volume. In this step, you’re given the option of creating additional NetWare partitions and volumes by using available free space. For example, you can divide a large disk into two or more volumes, or distribute a single volume over more than one disk.
You can create two different types of NetWare 6 volumes:
![]() NSS volumes—NSS is an advanced file system technology that’s designed for the management of large volumes, large files, name spaces, and complex storage devices. It significantly reduces the amount of time required to mount large volumes. This is the default volume type.
NSS volumes—NSS is an advanced file system technology that’s designed for the management of large volumes, large files, name spaces, and complex storage devices. It significantly reduces the amount of time required to mount large volumes. This is the default volume type.
![]() Traditional volumes—Traditional volumes are not recommended and should be used only if you require the use of technologies such as block suballocation, data migration, NFS (Network File System), FTP, VREPAIR, or file locks. If a Configure File System dialog box appears (see Figure 1.12), review the information listed. To create an additional volume, choose one of the displayed Free Space icons and click Create.
Traditional volumes—Traditional volumes are not recommended and should be used only if you require the use of technologies such as block suballocation, data migration, NFS (Network File System), FTP, VREPAIR, or file locks. If a Configure File System dialog box appears (see Figure 1.12), review the information listed. To create an additional volume, choose one of the displayed Free Space icons and click Create.

TIP
Although an NSS SYS: volume is recommended for most server installations, you can create a traditional SYS: volume during step 12. If all available space has been allocated to the SYS: volume, you won’t be prompted for additional NetWare server file system information. If this is the case, skip to the “Step 13: Install Network Protocols” section later in this chapter.
If the New Volume dialog box appears (see Figure 1.13), type the name of the new volume in the Volume Name field, provide a size in the Space to Use field, and click Apply to Volume. When you’re done, click OK. The Configure File System screen then reappears, listing the new volume. Repeat the process, as necessary, to create additional volumes.
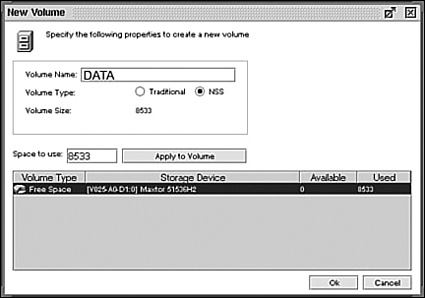
In addition, the size of an existing volume can be increased, but not decreased, by using the Free Space option within the Configure File System screen. In the Space to Use field, enter the new size of the volume, select Apply to Volume, and click OK. To decrease the size of an existing volume, you must delete and re-create it. To delete a volume, highlight it in the Configure File System screen and choose Delete.
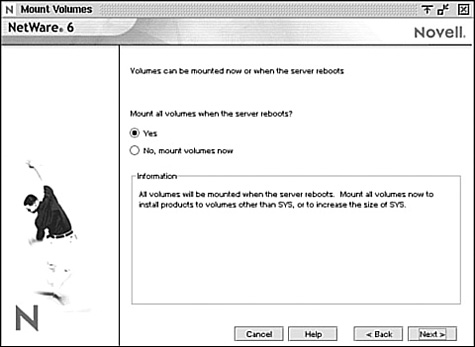
If the Mount Volumes dialog box appears, indicate whether to mount all volumes when the server reboots at the end of the installation process or whether to mount all volumes now (as shown in Figure 1.14). The default choice (Yes) establishes that all volumes will be mounted when the server reboots. You would typically need to mount all volumes now only if you plan to install additional products and services (such as documentation) on volumes other than SYS:.
At this point, the Protocols dialog box appears, as shown in Figure 1.15. This screen asks you to specify the network protocol(s) that need to be bound to each server network interface card (NIC).
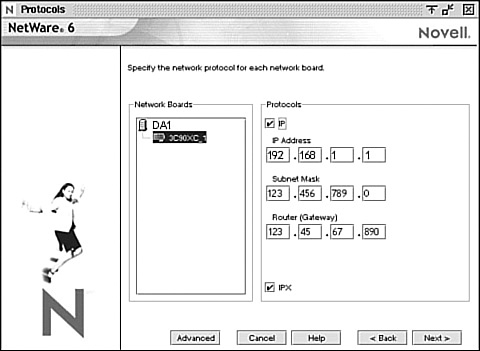
NetWare 6 can be configured to process IP network packets and/or traditional IPX packets. If desired, both protocols can be assigned to a single network board. This allows the server to communicate using both IP and IPX.
In fact, your NetWare 6 server can be configured in any of these ways:
![]() IP Only
IP Only
![]() IP with IPX Compatibility Mode
IP with IPX Compatibility Mode
![]() IPX Only
IPX Only
![]() IP and IPX
IP and IPX
The IP protocol allows your network to communicate with other IP networks, including the Internet. To use IP, you’ll have to configure the following IP address information:
![]() IP address—The IP address identifies each device on the network, including your server and all workstations attached to it. The address consists of 32 bits, which are represented as decimal values separated by periods, such as 192.168.1.81 (the default IP address used in this guide). If your server will connect to the Internet, you must obtain a unique IP address from your corporate information technology (IT) department or ISP.
IP address—The IP address identifies each device on the network, including your server and all workstations attached to it. The address consists of 32 bits, which are represented as decimal values separated by periods, such as 192.168.1.81 (the default IP address used in this guide). If your server will connect to the Internet, you must obtain a unique IP address from your corporate information technology (IT) department or ISP.
![]() Subnet mask—The subnet mask enables you to partition your network into smaller networks (in much the same way that disk partitions divide hard drives into smaller, more manageable units).
Subnet mask—The subnet mask enables you to partition your network into smaller networks (in much the same way that disk partitions divide hard drives into smaller, more manageable units).
Dividing your network into smaller networks enables network routers to filter and reduce the network activity seen by any of the nodes. However, dividing your network and using several network addresses might not be appropriate on a large network that needs to appear to network administrators as a single network.
![]() Router (gateway)—The router (or gateway) IP address is the physical address of the router that connects two disparate networks together, such as your LAN and the Internet. You can enter a specific router (gateway) address or you can rely on the network to automatically find the nearest router. If you specify the address, remember that the router must exist on your network segment.
Router (gateway)—The router (or gateway) IP address is the physical address of the router that connects two disparate networks together, such as your LAN and the Internet. You can enter a specific router (gateway) address or you can rely on the network to automatically find the nearest router. If you specify the address, remember that the router must exist on your network segment.
The IP Only protocol configuration forces your NetWare 6 server and all its workstations to communicate using IP only. The IP protocol choice also causes the server to automatically bind the ETHERNET_II frame type to the corresponding internal NIC.
When the IP protocol is selected, passive support for IPX is also provided. If an IPX request arrives at the server, NetWare 6 processes the request. This passive support for IPX is called Compatibility mode and it must be activated manually to provide service for applications that require IPX. You can do so by typing LOAD SCMD at the server console and pressing the Enter key.
TIP
IP can be installed without IPX Compatibility mode enabled. If IPX Compatibility mode is disabled, the server processes IP packets only. Applications that require IPX will not function properly. You can also disable Compatibility mode by removing the LOAD SCMD command from the server’s AUTOEXEC.NCF file.
You can also configure your NetWare 6 server for IPX (Novell’s traditional communications protocol) to facilitate legacy NetWare IPX applications. If IPX, but not IP, is installed on your server, it will actively process IPX packets and ignore packets using other protocols, such as IP. This isn’t a good idea because many new NetWare 6 network features require the more advanced IP protocol.
During NetWare 6 installation, existing IPX frame types will be detected in one of the following configurations:
![]() Single IPX frame type—If a single frame type is detected, it will be installed.
Single IPX frame type—If a single frame type is detected, it will be installed.
![]() Multiple IPX frame types—If multiple frame types are detected, you’ll be prompted to choose the frame types that you want to install.
Multiple IPX frame types—If multiple frame types are detected, you’ll be prompted to choose the frame types that you want to install.
![]() No IPX frame types—If no frame types are detected, ETHERNET_802.2 will be installed by default.
No IPX frame types—If no frame types are detected, ETHERNET_802.2 will be installed by default.
TIP
A frame type represents the structure of a data packet sent over an Ethernet network. NetWare supports four different IPX frame types: ETHERNET_II (AppleTalk Phase I, DEC, or TCP/IP networks), ETHERNET 802.3 (older NetWare networks), ETHERNET 802.2 (NetWare 4.x or later networks), and ETHERNET_SNAP (AppleTalk Phase II networks).
If you have network clients or applications that require both IP and IPX, you can install multiple protocols simultaneously. Fortunately, both IP and IPX protocols can be bound to a single server NIC. In this configuration, the server processes IP requests using IP and IPX requests using IPX. This solution is elegant in its simplicity!
To configure the IP protocol, follow these simple steps:
1. In the Network Boards pane on the left, verify that your NIC is highlighted. If not, click the icon to highlight it.
2. In the Protocols section on the right, mark the IP check box.
3. In the IP Address field, enter the IP address.
4. In the Subnet Mask field, enter the subnet mask.
5. (Optional) In the Router (Gateway) field, enter the router (gateway) address.
To configure the IPX protocol, follow these simple steps:
1. In the Network Boards pane on the left, verify that your NIC is highlighted. If not, click the icon to highlight it.
2. In the Protocols section on the right, mark the IPX check box. You’ll notice that there is an Advanced button on the Protocols installation form. This button enables you to configure a number of protocol-related parameters, such as IPX frame types, IPX compatibility settings, and SNMP or SLP information.
TIP
To configure the IP protocol, you must be familiar with and know the IP address, the subnet address, and the router (gateway) address. The Installation utility uses default frame types of ETHERNET_802.2 (if no frame types are detected while installing IPX) and ETHERNET_II (for IP).
This completes the middle four steps of NetWare 6 installation and phase III. Now it’s time to venture outside the cozy confines of our server and into the exciting world of Domain Name Services and eDirectory.
Test Objective Covered:
![]() Install NetWare 6 (continued)
Install NetWare 6 (continued)
In phase IV, you’ll expand beyond the server to establish domain name settings to build an eDirectory tree. This stage encompasses the following four steps: set up the DNS, set the server time zone, configure eDirectory, and license the NetWare server.
Let’s start with enhanced IP address management via the Domain Name Service.
Earlier I mentioned that the IP protocol identifies servers and workstations by their unique four-part IP addresses. These addresses are complex and difficult for humans to track. Fortunately, your NetWare 6 server can maintain a list of simple, readable names that match all the IP addressed devices on your network. This capability is known as Domain Name Services, and the corresponding NetWare 6 application is called DNS Server.
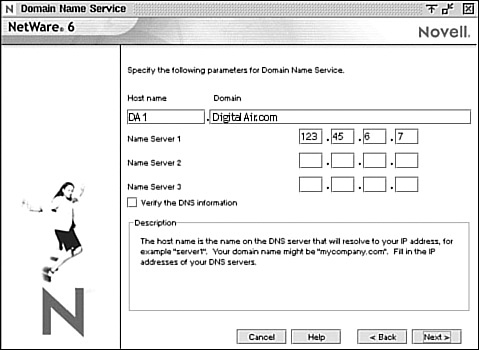
To provide DNS services from your NetWare 6 server, you must configure the following information in Figure 1.16:
![]() Host name—The simple, readable name on the DNS server that matches your NetWare server’s name (or the name you’ve bound to the internal server NIC). Set up the host computer name on the DNS server to use the NetWare server name.
Host name—The simple, readable name on the DNS server that matches your NetWare server’s name (or the name you’ve bound to the internal server NIC). Set up the host computer name on the DNS server to use the NetWare server name.
![]() Domain Name—The hierarchical name that represents the organization of your network, such as acme.com. Typically, you should use the name of the server’s host Organization object in the eDirectory tree.
Domain Name—The hierarchical name that represents the organization of your network, such as acme.com. Typically, you should use the name of the server’s host Organization object in the eDirectory tree.
![]() Domain Name Server—The IP address of the DNS server that maintains the list containing this NetWare server’s simple, readable name and IP address. For more information, contact your network administrator or ISP. If your NetWare 6 server is providing DNS services, this would be its own IP address.
Domain Name Server—The IP address of the DNS server that maintains the list containing this NetWare server’s simple, readable name and IP address. For more information, contact your network administrator or ISP. If your NetWare 6 server is providing DNS services, this would be its own IP address.
The server time and time zone are important for synchronizing network events throughout the eDirectory tree. Advanced time synchronization settings are available by selecting the Advanced button on the Time Zone screen. These advanced parameters include Time Server Type (for configuring primary and secondary time servers) and Time Source (for configuring a specific time source for your server).
In step 15, the Time Zone dialog box appears, as shown in Figure 1.17. Choose the correct time zone for your server and make sure that the Allow System to Adjust for Daylight Saving Time check box is marked (if appropriate).
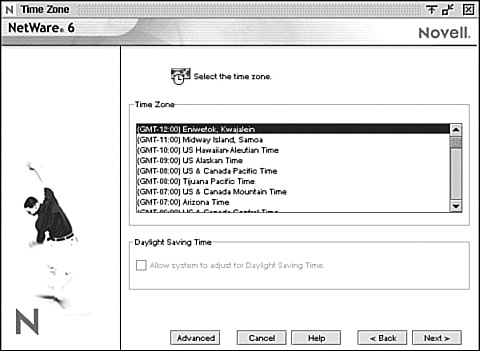
This is probably one of the most important steps in the entire NetWare 6 installation process. At the beginning of step 16, the first NDS Install dialog box appears, as displayed in Figure 1.18. If this is the first NetWare server in your eDirectory tree, select New eDirectory Tree. Remember that the resources available in the new tree will not be available to users who are logged in to a different tree.
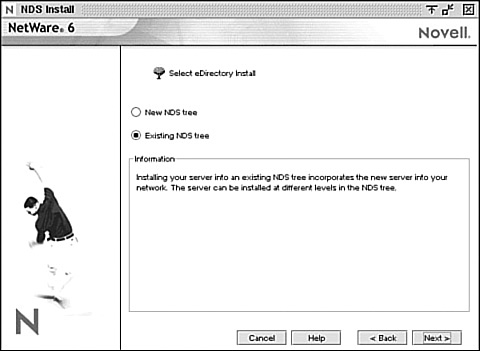
Next, a second NDS Install screen appears, similar to the example in Figure 1.19. If this is a new tree (which it should be because you’re using a nonproduction server as you follow along in this guide), complete these steps:
1. Enter the tree name in the Tree Name field. This is usually the topmost container name of your tree followed by the term -TREE.
2. Do not type the server location in the Context for Server Object field. Instead, you need to build the context by using the browse button to the right of the Context for Server Object field.
3. In the Administrator Information section, enter the leaf name of the Admin User object in the Admin Name field, if you want it to be something other than admin.
4. If you want it to be different than the context of the Server object, enter the context for the Admin User object in the Admin Context field.
5. Enter the password for the Admin User object in the Password and Retype Password fields. Keep track of this information for future reference. If you lose any of the Admin configuration details, your life will become very complicated.

If you chose to install the server in an existing tree (rather than creating a new tree), you’ll be asked to provide three critical pieces of information: the tree name (if there’s more than one tree available), the Admin username, and the Admin password. The server can be installed in any Organization (O) or Organizational Unit (OU) container in the eDirectory tree where you have the Supervisor right. This is why you must provide the Admin username and password to add your server to an existing tree.
Now that you’ve created a new eDirectory tree or installed the server into an existing eDirectory tree, the NetWare Server object and Volume objects will be installed in the container you specified. If you’ve created a new eDirectory tree, a user (default name Admin) with the Supervisor right to the eDirectory tree will be created in the same eDirectory container as the NetWare Server object.
At this point, the Installation Wizard checks for duplicate tree names and installs eDirectory. When the NDS Summary screen appears (see Figure 1.20), write down the values you supplied for the following parameters and store them in a safe place for future reference:
![]() NDS Tree Name:
NDS Tree Name:
![]() Server Context:
Server Context:
![]() Administrator name:
Administrator name:
![]() Administrator password you entered on previous screen:
Administrator password you entered on previous screen:
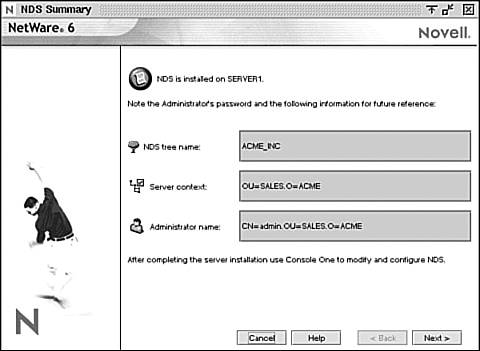
In step 17, we’ll use the NetWare 6 Installation Wizard to license the NetWare 6 server (as shown in Figure 1.21). When the Licenses dialog box appears, insert the NetWare license disk in the disk drive and select the appropriate license file. Be sure to use a unique license disk, and make sure that you actually browse for and select the license file, instead of just listing the drive letter (a common mistake).

When you click the license file, you’ll notice that the type of license appears in the Description section, such as NetWare 6 Server+50 User Connections. Click OK to return to the Licenses screen, and Next to continue to step 18. Note: We’ll discuss Novell License Services in much greater depth later in this chapter.
NetWare 6 must have a valid server license and user connection license to function as a server. You can install the license from the NetWare 6 License/Cryptography disk or browse to a directory that contains a valid NetWare 6 license. In addition, you can choose to install NetWare 6 without a license by marking the Install Without Licenses check box in Figure 1.21. In this scenario, the unlicensed server will allow only two user connections.
If an MLA License Certificate context screen appears, select the eDirectory context where you would like the MLA server-based license certificate and connection license certificate installed. (See the section, “Novell Licensing Services,” later in this chapter for a complete discussion of MLA certificates.) These MLA certificates are valid for all servers and users located at the selected eDirectory context and below. You might want to install these MLA license certificates high in the tree so that they’ll be available to more servers and users.
TIP
If you’re using a demo version of the NetWare 6 Operating System CD (that is, one that doesn’t have an associated license disk), use the license file in the preselected directory on the CD. If you can’t locate the license file, mark the Install Without Licenses check box, although you might experience problems with some features, such as NDPS, that use multiple connections.
This completes the four trickiest steps of NetWare 6 installation and phase IV. Now it’s time for the home stretch: completing the installation in phase V.
Test Objective Covered:
![]() Install NetWare 6 (continued)
Install NetWare 6 (continued)
Finally, in phase V, you’ll complete the NetWare 6 installation adventure by installing additional network products, configuring the Novell Certificate Server, and customizing final installation parameters.
Let’s continue by installing some additional network products. Some of my personal favorites are Novell Native File Access Pack, NetWare Web Access, and iPrint.
Near the end of the installation process, you’ll be given the opportunity to install a variety of additional network products. These products provide enhanced server and network functionality, including Internet printing, WebAccess services, Domain Name Services, and advanced Novell auditing.
TIP
Some products can only be installed using the NetWare Deployment Manager after the server installation has been completed.
Toward the end of the NetWare 6 installation process, the Components dialog box appears, enabling you to select from the following list of additional network products (see Figure 1.22):
![]() iPrint/NDPS
iPrint/NDPS
![]() iFolder Storage Services
iFolder Storage Services
![]() NetWare Enterprise Web Server
NetWare Enterprise Web Server
![]() NetWare FTP Server
NetWare FTP Server
![]() NetWare Web Search
NetWare Web Search
![]() Novell DNS/DHCP Services
Novell DNS/DHCP Services
![]() WAN Traffic Manager Services
WAN Traffic Manager Services
![]() Novell Native File Access Pack (selected by default)
Novell Native File Access Pack (selected by default)
![]() Novell Advanced Audit Service (selected by default)
Novell Advanced Audit Service (selected by default)
![]() NetWare WebAccess
NetWare WebAccess
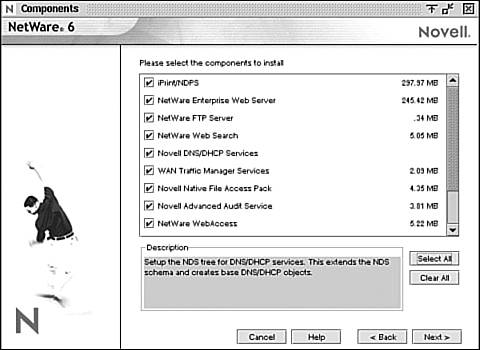
If you rest your cursor on an installation option, a description of the accompanying product is displayed at the bottom of the screen. Mark the check box of each product you want to install. If a product requires a supporting component, the check box of the supporting product will automatically be selected. Also, always make sure that your server has enough disk space and system memory to accommodate the products you want to install.
TIP
In this study guide, we’ll explore most of the additional network products shown in the earlier list. However, we won’t cover their installation and configuration in this chapter. Because many of these products are complex, we’ll devote entire sections of the guide to their proper configuration in subsequent chapters. Stay tuned!
The Novell Certificate Server ensures secure data transmissions between servers and workstations over your network. This NetWare 6 service is required for Web-related products such as NetWare Web Manager and NetWare Enterprise Web Server. It also enables you to mint, issue, and manage digital certificates by creating a Security container object and an Organizational Certificate Authority (CA) object.
If the network doesn’t already have an Organizational CA object, the first NetWare 6 server automatically creates and physically stores the Security container object and Organizational CA object for the entire eDirectory tree. Both objects are created at, and must remain, at the tree root of the eDirectory tree.
Only one Organizational CA object can exist in an eDirectory tree. After the Organizational CA object has been created on a server, it cannot be moved to another server. Deleting and re-creating an Organizational CA object invalidates any certificates associated with the Organizational CA—you must make sure that the server hosting the Organizational CA object is very reliable.
To create the Security container and Organizational CA objects, you must be logged in as a user with the Supervisor right to the Tree Root of the eDirectory tree. In the Novell Certificate Server Objects installation screen (shown in Figure 1.23), mark the appropriate check boxes. The Installation Wizard will give the Organizational CA a default name based on the server name. Click Next to create the Novell Certificate Server objects and continue.
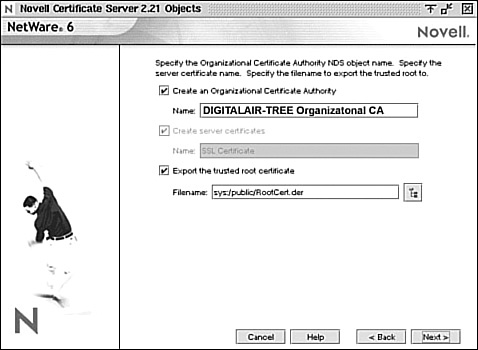
When the Summary screen appears (as shown in Figure 1.24), review the NetWare 6 products that are ready to be installed. When you’re satisfied with the list of products, click Customize to access the installation customization screen. Check it out.
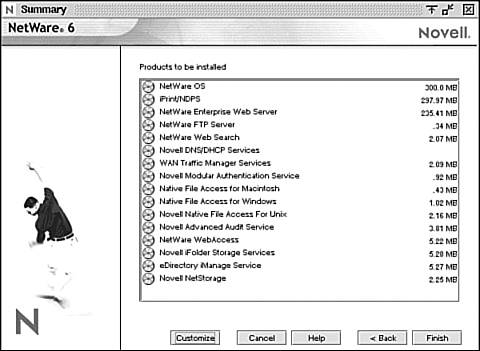
TIP
If the Organizational CA object already exists on the network, the installation program finds and references the server that holds it. The installation program then accesses the Security container and creates a Server Certificate object. To access the Security container and to create a Server Certificate object, you must be logged in as a user with the Read right to the existing Security container object.
You can enhance the basic NetWare 6 installation with some additional configurations by using the Product Customization dialog box. As shown in Figure 1.25, the NetWare 6 installation process provides you with a plethora of customizable categories, including the core NetWare operating system, file system, protocols, time synchronization, Novell Directory Services, and additional products and services.
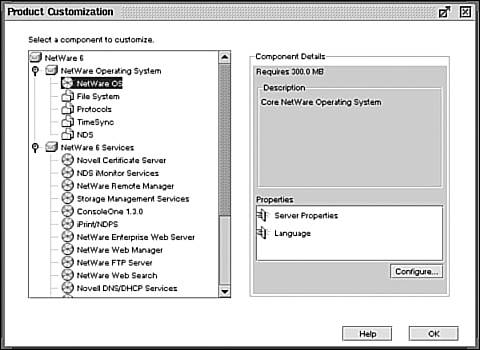
To customize your installation, browse the tree to find the first NetWare 6 component you want to modify, select the component, and click Properties. When you’ve finished customizing your selections, click OK to return to the Summary screen.
On the Summary screen, click Finish to complete the installation process. Yaayyy!
The Installation Wizard then performs the main file copy (this step might take a while). When the file copy has finished, the Installation Complete window appears. Select View Log or View Readme, if desired. Next remove the NetWare 6 License/Cryptography disk from the disk drive (if you used one), the NetWare 6 Operating System CD from the CD-ROM drive (if applicable), and click Yes to restart your server (as shown in Figure 1.26).
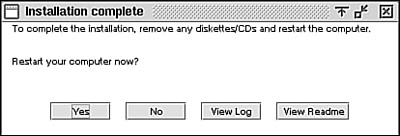
Congratulations—you’ve done it! You’ve successfully traversed the five phases and 21 steps of NetWare 6 installation! Now it’s time to use your new server to help save the Net! Check out the step-by-step challenges awaiting you in Lab Exercise 1.1. After you’ve completed the exercise, we’ll take a more detailed look at Novell Licensing Services.
Welcome to ACME— “A Cure for Mother Earth.” In this first CNE exercise, we’ll begin our ACME mission by installing the very first NetWare 6 server, WHITE-SRV1, in the Crime Fighting division of Tokyo’s headquarters. Before you tackle this exercise, please take moment to review the “ACME Mission Briefing” in Appendix D.
When you’re ready, you’ll need the following components to install NetWare 6 on ACME’s WHITE-SRV1 server:
![]() A server-class computer that meets (or exceeds) the minimum requirements for running the NetWare 6 operating system. Refer to the “Hardware Requirements” section earlier in this chapter for additional details.
A server-class computer that meets (or exceeds) the minimum requirements for running the NetWare 6 operating system. Refer to the “Hardware Requirements” section earlier in this chapter for additional details.
![]() A bootable CD drive.
A bootable CD drive.
![]() A NetWare 6 Operating System CD.
A NetWare 6 Operating System CD.
In this lab exercise, you’ll build the WHITE-SRV1 server from scratch by using the parameters in Table 1.2.

TIP
You must complete this exercise before performing the lab exercises in Chapter 2. Make sure that you use a nonproduction server (that is, a practice server) in an isolated tree for all exercises in this guide!
a. Carefully back up any existing data on this computer. Remember, existing data will be destroyed while performing the steps in this lab exercise.
b. Insert the NetWare 6 Operating System CD into the server’s CD drive.
c. Reboot the computer. The NetWare 6 installation program (INSTALL.BAT) executes automatically.
REAL WORLD
If this is the first time you’ve attempted the installation, you’ll see a couple of screen prompts. When prompted, press I to install NetWare. When prompted, select one of the following:
![]() To install from the server’s IDE CD drive, press I.
To install from the server’s IDE CD drive, press I.
![]() To install from the server’s SCSI CD drive, press S.
To install from the server’s SCSI CD drive, press S.
2. Accept the License Agreement
a. When the Welcome to NetWare Server Installation screen appears, select Accept License Agreement. This indicates that you’ve read the agreement and accept its terms and conditions. NumLock (number lock) must be on for cursor movements to be enabled on the keypad.
b. When a screen appears indicating whether a suitable boot partition was detected, verify that you want to create a new boot partition by selecting Create a New Boot Partition.
c. If a screen appears indicating that a NetWare partition has been detected, select Remove Existing NetWare Partition.
d. When the First Hard Disk screen appears, review the information on the screen and then select Continue.
e. When a warning appears indicating that creating a new boot partition will remove all data, volumes, and partitions on the first drive, select Continue.
f. When a message appears indicating that a new boot partition has been created and that the computer must reboot to recognize the new partition, press any key. Allow the computer to reboot.
g. Wait while the DOS boot partition is formatted. When the JReport Runtime License Agreement screen appears, press F10 to indicate that you’ve read the agreement and accept its terms and conditions.
3. Select the Installation Type. When the Welcome to the NetWare Server Installation screen appears, perform these tasks:
![]() Read the warning indicating that you must run NetWare Deployment Manager before installing into an existing network. Because this will be a standalone server, you don’t need to perform this task.
Read the warning indicating that you must run NetWare Deployment Manager before installing into an existing network. Because this will be a standalone server, you don’t need to perform this task.
![]() In the Is This an Express Install or a Custom Install? field, press Enter to switch the value from Express to Custom.
In the Is This an Express Install or a Custom Install? field, press Enter to switch the value from Express to Custom.
![]() In the Is This a New Server, Upgrade, or Pre-Migration? field, verify that New Server is selected.
In the Is This a New Server, Upgrade, or Pre-Migration? field, verify that New Server is selected.
![]() Select Continue.
Select Continue.
4. Specify the Server Settings. When the Server Settings screen appears, you’ll notice that the following default values are listed:
![]() Server ID Number: (random number)
Server ID Number: (random number)
![]() Load Server at Reboot: Yes
Load Server at Reboot: Yes
![]() Server Set Parameters: Edit
Server Set Parameters: Edit
Review the values listed on this screen and modify them if necessary. Then select Continue.
5. Select the Regional Settings. When the Regional Settings screen appears, you’ll notice that default values are listed for the country code, code page, and keyboard type. If you’re located in the United States, the default values are the following:
![]() Country: 001 (USA)
Country: 001 (USA)
![]() Code Page: 437 (United States English)
Code Page: 437 (United States English)
![]() Keyboard: United States
Keyboard: United States
Review the values listed on this screen and modify them if necessary. Then select Continue.
6. Select the Mouse Type and Video Mode. The mouse type and video mode screen appears, listing the following parameters:
![]() Mouse Type
Mouse Type
![]() Video Mode
Video Mode
Review the values listed on this screen and modify them if necessary. Then select Continue.
The installation program then automatically copies a number of server boot files from the CD to the C:NWSERVER startup directory. These include files such as SERVER.EXE, disk drivers, NWCONFIG.NLM, NWSNUT. NLM, VREPAIR.NLM, and other NLMs.
7. Select Platform Support. The first disk driver screen appears, listing autodetected drivers for the following parameters:
![]() Platform Support Module
Platform Support Module
![]() HotPlug Support Module
HotPlug Support Module
![]() Storage Adapters
Storage Adapters
Review the values listed on this screen and modify them if necessary. Then select Continue.
8. Select a Storage Device and Network Board. The next device driver screen appears, listing autodetected drivers for the following parameters:
![]() Storage Devices
Storage Devices
![]() Network Boards
Network Boards
![]() NetWare Loadable Modules
NetWare Loadable Modules
Review the values listed on this screen, including frame types, and modify them if necessary. Then select Continue. Allow the files to copy.
9. Create a NetWare Partition and SYS: Volume. On the Volume SYS and Partition Properties screen:
![]() Select Modify.
Select Modify.
![]() On the NetWare Partition Size line, press Enter.
On the NetWare Partition Size line, press Enter.
![]() Delete the existing value and enter 2500. Then press Enter again.
Delete the existing value and enter 2500. Then press Enter again.
![]() Save the settings by pressing F10.
Save the settings by pressing F10.
![]() Select Continue.
Select Continue.
Next the installation program copies a number of files to the server (called the preparatory file copy process). The installation program then loads the GUI-based Installation Wizard, at which point the installation interface switches from being text based to graphics based.
10. Name the Server. When the Server Properties screen appears, perform these tasks:
![]() In the Server Name field, enter WHITE-SRV1.
In the Server Name field, enter WHITE-SRV1.
![]() Click Next.
Click Next.
11. Enable Cryptography (Conditional). If the Encryption screen appears, perform these tasks:
a. Click the browse button to the right of the Location field.
b. To select an .NFK file, perform one of the following tasks:
![]() If you have a NetWare 6 License/Cryptography disk, insert the disk in the server’s disk drive. Browse to and select the .NFK file on the disk. Then click OK to return to the Encryption screen.
If you have a NetWare 6 License/Cryptography disk, insert the disk in the server’s disk drive. Browse to and select the .NFK file on the disk. Then click OK to return to the Encryption screen.
![]() If you don’t have a NetWare 6 License/Cryptography disk (for example, because you’re using a demo version of the CD), navigate to your CD. Expand the following folders, in order: NetWare 6, License, and Demo. Browse to and select the .NFK file. Then click OK to return to the Encryption screen.
If you don’t have a NetWare 6 License/Cryptography disk (for example, because you’re using a demo version of the CD), navigate to your CD. Expand the following folders, in order: NetWare 6, License, and Demo. Browse to and select the .NFK file. Then click OK to return to the Encryption screen.
c. When the Encryption screen reappears, click Next.
12. Install the NetWare Server File System. If the Configure File System screen appears, review the information on the screen, and then click Next. Follow the instructions on the subsequent screen to mount server volumes.
13. Install Network Protocols. When the Protocols screen appears, perform these tasks to configure the IP protocol:
![]() In the Network Boards pane on the left, verify that your network board is highlighted. If it isn’t highlighted, click it.
In the Network Boards pane on the left, verify that your network board is highlighted. If it isn’t highlighted, click it.
![]() In the Protocols section on the right, mark the IP check box.
In the Protocols section on the right, mark the IP check box.
![]() In the IP Address field, enter the IP address. If your server isn’t connected to the Internet, use 192.168.1.81.
In the IP Address field, enter the IP address. If your server isn’t connected to the Internet, use 192.168.1.81.
![]() In the Subnet Mask field, enter the subnet mask. If your server isn’t connected to the Internet, use the default of 255.255.255.0.
In the Subnet Mask field, enter the subnet mask. If your server isn’t connected to the Internet, use the default of 255.255.255.0.
![]() (Optional) In the Router (Gateway) field, enter the router (gateway) address. If your server is not connected to the Internet, leave the Router field empty.
(Optional) In the Router (Gateway) field, enter the router (gateway) address. If your server is not connected to the Internet, leave the Router field empty.
![]() Click Next.
Click Next.
14. Set Up DNS
a.When the Domain Name Service screen appears, perform these tasks:
![]() In the Host Name field, enter WHITE-SRV1.
In the Host Name field, enter WHITE-SRV1.
![]() In the Domain Name field, enter ACME.com.
In the Domain Name field, enter ACME.com.
![]() Leave the Name Server fields empty.
Leave the Name Server fields empty.
![]() Click Next.
Click Next.
b.When the Warning screen appears, perform these tasks:
![]() Read the warning indicating that because you haven’t configured Domain Name Service, you’ll obtain limited functionality from products that require this service.
Read the warning indicating that because you haven’t configured Domain Name Service, you’ll obtain limited functionality from products that require this service.
![]() Click OK to acknowledge the warning.
Click OK to acknowledge the warning.
15. Set the Server Time Zone
a. When the Time Zone screen appears, perform these tasks:
![]() In the Time Zone list box, click the appropriate time zone for where you’re currently located. Normally, you would choose the appropriate time zone for Tokyo, Japan, because that’s where this server is theoretically located. In this case, however, choosing your current time zone makes performing the lab exercises in this guide less confusing. Bottom line: Choose your home time zone so that time synchronization is correct.
In the Time Zone list box, click the appropriate time zone for where you’re currently located. Normally, you would choose the appropriate time zone for Tokyo, Japan, because that’s where this server is theoretically located. In this case, however, choosing your current time zone makes performing the lab exercises in this guide less confusing. Bottom line: Choose your home time zone so that time synchronization is correct.
![]() In the Daylight Saving Time section, verify that the Allow System to Adjust for Daylight Saving Time check box is marked, if appropriate.
In the Daylight Saving Time section, verify that the Allow System to Adjust for Daylight Saving Time check box is marked, if appropriate.
![]() Click Advanced.
Click Advanced.
b. When the Time Synchronization screen appears, select Single to designate this server as a single reference server, and then click OK.
c. When the Time Zone screen reappears, click Next.
16. Set Up eDirectory
a. When the first NDS Install screen appears, perform these tasks:
![]() Select New eDirectory Tree to install this server into a new eDirectory tree. Remember that the resources available in the new tree will not be available to users who are logged in to a different tree.
Select New eDirectory Tree to install this server into a new eDirectory tree. Remember that the resources available in the new tree will not be available to users who are logged in to a different tree.
![]() Click Next.
Click Next.
b. When the second eDirectory Install screen appears, perform these tasks:
![]() In the Tree Name field, enter ACME-TREE.
In the Tree Name field, enter ACME-TREE.
![]() Click the browse button to the right of the Context for Server Object field.
Click the browse button to the right of the Context for Server Object field.
TIP
Don’t try to save time by keying in the context for the Server object. Instead, build it by using the browse button. Failure to heed this warning might cause undesirable results. (Don’t say you weren’t warned!)
c. To create the ACME Organization object, perform these tasks:
![]() On the NDS Context Browser screen, verify that ACME-TREE is selected, and then click Add.
On the NDS Context Browser screen, verify that ACME-TREE is selected, and then click Add.
![]() When the New Container dialog box appears, enter ACME in the Container Name field.
When the New Container dialog box appears, enter ACME in the Container Name field.
![]() Verify that the Organization radio button is selected in the Container Type field.
Verify that the Organization radio button is selected in the Container Type field.
![]() Click OK.
Click OK.
d. To create the TOKYO Organizational Unit object, perform these tasks:
![]() When the NDS Context Browser screen reappears, verify that ACME is highlighted, and then click Add.
When the NDS Context Browser screen reappears, verify that ACME is highlighted, and then click Add.
![]() When the New Container dialog box appears, enter TOKYO in the Container Name field.
When the New Container dialog box appears, enter TOKYO in the Container Name field.
![]() Verify that the Organizational Unit radio button is selected in the Container Type field.
Verify that the Organizational Unit radio button is selected in the Container Type field.
![]() Click OK.
Click OK.
e. To create the CRIME Organizational Unit object, perform these tasks:
![]() When the NDS Context Browser screen reappears, verify that TOKYO is highlighted and click Add.
When the NDS Context Browser screen reappears, verify that TOKYO is highlighted and click Add.
![]() When the New Container dialog box appears, enter CRIME in the Container Name field.
When the New Container dialog box appears, enter CRIME in the Container Name field.
![]() Verify that the Organizational Unit radio button is selected in the Container Type field.
Verify that the Organizational Unit radio button is selected in the Container Type field.
![]() Click OK.
Click OK.
f. To create the WHITE Organizational Unit, perform these tasks:
![]() When the NDS Context Browser screen reappears, verify that CRIME is highlighted, and then click Add.
When the NDS Context Browser screen reappears, verify that CRIME is highlighted, and then click Add.
![]() When the New Container dialog box appears, enter WHITE in the Container Name field.
When the New Container dialog box appears, enter WHITE in the Container Name field.
![]() Verify that the Organizational Unit radio button is selected in the Container Type field, and then click OK.
Verify that the Organizational Unit radio button is selected in the Container Type field, and then click OK.
![]() Click OK.
Click OK.
g. When the NDS Install screen reappears, perform these tasks:
![]() In the Admin Name field, do not change the default value (that is, admin).
In the Admin Name field, do not change the default value (that is, admin).
![]() In the Admin Context field, do not change the default value (that is, OU=WHITE.OU=CRIME.OU=TOKYO.O=ACME).
In the Admin Context field, do not change the default value (that is, OU=WHITE.OU=CRIME.OU=TOKYO.O=ACME).
![]() In the Password field, enter ACME.
In the Password field, enter ACME.
![]() In the Retype Password field, enter ACME.
In the Retype Password field, enter ACME.
![]() Click Next.
Click Next.
At this point, the Installation Wizard checks for duplicate tree names and installs eDirectory. When the NDS Summary screen appears, write down the following information and store it in a safe place for future reference:
![]() eDirectory Tree Name: ACME-TREE
eDirectory Tree Name: ACME-TREE
![]() Server Context:
Server Context:
OU=WHITE.OU=CRIME.OU=TOKYO.O=ACME
![]() Administrator name: CN=admin.OU=WHITE.
Administrator name: CN=admin.OU=WHITE.
OU=CRIME.OU=TOKYO.O=ACME
Also write down the following information and store it in a safe place for future reference:
![]() Administrator Password: ACME
Administrator Password: ACME
Then click Next.
17. License the NetWare Server
a. When the Licenses screen appears, perform one of the following tasks:
![]() Insert the NetWare 6 Cryptography/License disk into the floppy drive. (Be sure to use a unique license disk.) Select the appropriate license file. Make sure that you actually browse to and select the license file instead of just listing the drive letter (a common mistake). If you click the filename, you’ll notice that the type of license appears in the Description section.
Insert the NetWare 6 Cryptography/License disk into the floppy drive. (Be sure to use a unique license disk.) Select the appropriate license file. Make sure that you actually browse to and select the license file instead of just listing the drive letter (a common mistake). If you click the filename, you’ll notice that the type of license appears in the Description section.
![]() If you’re using a demo version of the NetWare 6 Operating System CD (that is, a version that doesn’t have an associated license disk), use the license file in the NETWARE6/LICENSE/DEMO directory on the CD. If you can’t locate a license file, mark the Install Without Licenses check box. Unfortunately, you might experience problems with some features, such as NDPS, that use multiple connections.
If you’re using a demo version of the NetWare 6 Operating System CD (that is, a version that doesn’t have an associated license disk), use the license file in the NETWARE6/LICENSE/DEMO directory on the CD. If you can’t locate a license file, mark the Install Without Licenses check box. Unfortunately, you might experience problems with some features, such as NDPS, that use multiple connections.
b. Click Next.
18. Install Network Products. When the Components screen appears, perform these tasks:
![]() Mark Clear All.
Mark Clear All.
![]() Click Next.
Click Next.
19. Install Novell Certificate Server
a. Follow these steps when the Novell Certificate Server 2.21 Objects screen appears:
![]() Review the onscreen information. The defaults should be fine.
Review the onscreen information. The defaults should be fine.
![]() Click Next.
Click Next.
b. When the Organizational CA Warning screen appears, perform these tasks:
![]() Read the onscreen information.
Read the onscreen information.
![]() Click OK to acknowledge the warning.
Click OK to acknowledge the warning.
c. When the LDAP Configuration screen appears, mark Allow Clear Text Passwords and then click Next:
d. When the eDirectory iManage Install Options screen appears, click Next.
e. When the Summary screen appears, perform these tasks:
![]() Review the list of NetWare 6 products to be installed.
Review the list of NetWare 6 products to be installed.
![]() Click Customize to be allowed to customize various installation parameters.
Click Customize to be allowed to customize various installation parameters.
20. Customize the Installation
a. When the Product Customization screen appears, change the server ID number by performing these tasks:
![]() Expand NetWare Operating System.
Expand NetWare Operating System.
![]() Click NetWare OS.
Click NetWare OS.
![]() Click Configure.
Click Configure.
b. When the Advanced screen appears, perform these tasks:
![]() Click the Server Properties tab.
Click the Server Properties tab.
![]() In the Server ID Number field, delete the existing value and enter 1001.
In the Server ID Number field, delete the existing value and enter 1001.
c. When the Product Customization screen reappears, click OK to return to the Summary screen.
21. Complete the Server Installation
a. When the Summary screen appears, click Finish to complete the installation process.
b. The Installation program then performs the main file copy and displays the server console screen. This step might take a while.
c. When the copying is complete, the Installation Complete window appears. Follow these steps:
![]() Remove any CDs or disks from your computer drives.
Remove any CDs or disks from your computer drives.
![]() Click Yes to reboot the computer.
Click Yes to reboot the computer.
Now that you’ve successfully built your WHITE-SRV1 NetWare 6 server, it’s time to shift our focus to the Novell licensing model. After all, this is how Novell gets paid.
![]() Identify How Server and User Licensing Works
Identify How Server and User Licensing Works
![]() Identify Key NLS Components
Identify Key NLS Components
![]() Manage License Certificates in the eDirectory Tree
Manage License Certificates in the eDirectory Tree
![]() Install NLS Certificates and View NetWare Usage
Install NLS Certificates and View NetWare Usage
To license NetWare applications, Novell has created a whole new licensing engine called Novell Licensing Services (NLS). NLS helps you monitor and control the use of licensed software on your network. As a matter of fact, NetWare 6 itself is a licensed application. In addition to a server license, NetWare 6 requires a user license for each user who accesses the network and uses services provided by NetWare 6 servers. NetWare 6 requires the number of users connecting to the network to remain within the number of licenses provided by the NetWare software.
NLS has been enhanced in NetWare 6 to support two different models for distributing valid license certificates to network users and services: the Server Connection License Model (SCL) and the User Access Licensing Model (UAL).
Prior to the release of NetWare 6, Novell used the SCL model to regulate licensed usage of NetWare and its services. In the SCL model, users were granted access to network resources and services based on the server they’re logged in to. This meant that each user required an available license for every server that hosts a resource that the user needed. This caused a lot of work for a network administrator who had to estimate the number of connections that a user might need to determine the number of connection licenses required. Adding to the confusion, the network administrator had to account for the number of nonuser objects requiring connections to ensure a proper license unit count.
Novell required that SCLs be purchased in bundles (for example, a 100-license bundle provided 100 server connections on a single server). To remain in compliance with its licensing agreement, an organization had to remain within the prescribed number of server connections. This limited an organization’s capability to provide services on a server because a single user could, in fact, monopolize several connection licenses by using multiple drive mappings and print requests.
TIP
You can use iManager to release user licenses from the originally assigned user. This might be helpful when license units have been assigned to users who log in infrequently and you want to release the license to others who require more regular network access.
In NetWare 6, Novell licensing has evolved beyond the server to focus on the network as a whole. In the new UAL model, User objects receive a permanent license unit that allows them to access network services at any time and from any workstation attached to the network. This greatly simplifies Novell license management. After the first assignment of a user license to a User object, that license is reserved for that user as long as the user continues to authenticate to the network. After 90 days or more, if the user doesn’t log in to the network, the license is released and made available to the next user who requires a license agreement.
Unlike the SCL model, the administrator must only track the total number of User objects who will log in to the network. Although server licenses still are required, they don’t correspond to connections made and services requested by User and non-User objects. User licenses are not assigned to servers. The user licenses should be installed in or above the container in which the User objects that will use the licenses are installed.
When you install or upgrade to NetWare 6, the wizard installs the UAL model by default. To add license certificates and/or to upgrade to UAL, you must use iManager after the installation or upgrade. Fortunately, UAL and SCL can coexist on the same network. In this scenario, NetWare delivers the appropriate license certificate type based on the location of the resource.
NetWare 6 servers share a single UAL certificate, whereas NetWare 5 servers deliver an SCL certificate for each server. See Table 1.3 for a brief summary of the differences between the UAL and SCL licensing models.
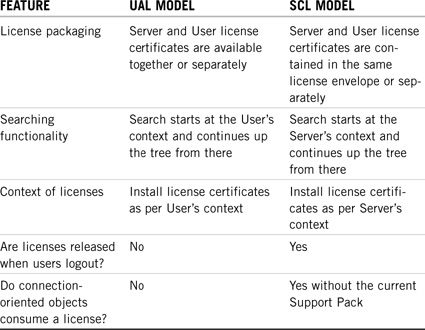
Because the UAL license model is usercentric, it’s possible for users to be denied access to the network when licenses are used up. UAL supports two different types of licenses:
![]() Retail licenses—These general-use license disks are sold through Novell distribution channels. When NetWare is purchased through this channel, it is called a Red Box product.
Retail licenses—These general-use license disks are sold through Novell distribution channels. When NetWare is purchased through this channel, it is called a Red Box product.
![]() License agreement licenses—These licenses are designed for large companies that require many user licenses. The companies sign a license agreement that stipulates the number of license units that can be used before more licenses must be purchased.
License agreement licenses—These licenses are designed for large companies that require many user licenses. The companies sign a license agreement that stipulates the number of license units that can be used before more licenses must be purchased.
Following are the three types of licensing agreements:
![]() Master license agreement (MLA)—A nonrestricted generic license that can be installed on many servers. All MLA servers report the same serial number and you can install this license certificate for as many connections as the license agreement allows. MLA licenses are ideal for global organizations. The purchases are set up between the organization and Novell to establish pricing, support services, and auditing responsibilities.
Master license agreement (MLA)—A nonrestricted generic license that can be installed on many servers. All MLA servers report the same serial number and you can install this license certificate for as many connections as the license agreement allows. MLA licenses are ideal for global organizations. The purchases are set up between the organization and Novell to establish pricing, support services, and auditing responsibilities.
![]() Corporate license agreement (CLA)—A restricted license, meaning that each server must have a unique base server license. In addition, one or more license can be installed per server. With this license, network administrators cannot change the name of the server in AUTOEXEC.NCF without causing licensing problems. CLA licenses are ideal for medium-to-large- size organizations. The purchases are set up between the organization and CLA resellers to establish pricing, support services, and auditing responsibilities.
Corporate license agreement (CLA)—A restricted license, meaning that each server must have a unique base server license. In addition, one or more license can be installed per server. With this license, network administrators cannot change the name of the server in AUTOEXEC.NCF without causing licensing problems. CLA licenses are ideal for medium-to-large- size organizations. The purchases are set up between the organization and CLA resellers to establish pricing, support services, and auditing responsibilities.
![]() Volume license agreement (VLA)—A restricted license just like CLA. VLA licenses are ideal for small-to-medium-size organizations. The purchases are set up between the organization and Novell resellers without a signed contract.
Volume license agreement (VLA)—A restricted license just like CLA. VLA licenses are ideal for small-to-medium-size organizations. The purchases are set up between the organization and Novell resellers without a signed contract.
The following steps describe how license service providers (LSPs) handle requests from NLS clients by interacting with the eDirectory database:
![]() Step 1—A licensing-enabled application issues a request for a license to the NLS client. For example, the NetWare 6 server can request a license on behalf of a workstation connecting to the server. This request is issued to the NLS client software running on the NetWare 6 server.
Step 1—A licensing-enabled application issues a request for a license to the NLS client. For example, the NetWare 6 server can request a license on behalf of a workstation connecting to the server. This request is issued to the NLS client software running on the NetWare 6 server.
![]() Step 2—The NLS client packages the request from the application and submits it to an LSP.
Step 2—The NLS client packages the request from the application and submits it to an LSP.
![]() Step 3—The LSP examines the request and determines whether it can respond with a license. The LSP accomplishes this by checking the eDirectory context of the requesting client for a specific NetWare license unit. If the requested resource is available, the LSP fills the request and delivers a license to the NLS client.
Step 3—The LSP examines the request and determines whether it can respond with a license. The LSP accomplishes this by checking the eDirectory context of the requesting client for a specific NetWare license unit. If the requested resource is available, the LSP fills the request and delivers a license to the NLS client.
![]() Step 4—However, if the LSP cannot fill the request, it searches for another resource. The LSP resource check begins at the next-higher context in the eDirectory tree and continues until it reaches the tree root. In our example, the LSP will begin its licensed search in the host server’s eDirectory context and “walk” up the tree looking for a server-based license certificate. This process is known as server connection licensing (SCL).
Step 4—However, if the LSP cannot fill the request, it searches for another resource. The LSP resource check begins at the next-higher context in the eDirectory tree and continues until it reaches the tree root. In our example, the LSP will begin its licensed search in the host server’s eDirectory context and “walk” up the tree looking for a server-based license certificate. This process is known as server connection licensing (SCL).
![]() Step 5—When the LSP finds a NetWare license unit, it returns a successful status to the NLS client. The NLS client then delivers the license to the requesting application and a connection to the server is allowed.
Step 5—When the LSP finds a NetWare license unit, it returns a successful status to the NLS client. The NLS client then delivers the license to the requesting application and a connection to the server is allowed.
This process relies on two main licensing components: LSP and NLS clients. An LSP is licensing software that you install and run on NetWare servers. This software is contained in the NLSLSP.NLM program running on a NetWare 4.11 (or later) server. An LSP provides the actual licensing service by handling requests from NLS clients and maintaining the license certificates stored within eDirectory.
When you install NLS on a NetWare server, NLS automatically installs the LSP software and creates an LSP object (NLS_LSP_servername) in the eDirectory tree. You can also use NetWare Deployment Manager to accomplish these two tasks after a NetWare 6 server installation. NetWare Deployment Manager also is the tool you use to install licenses that replace expired licenses on an active NetWare 6 server.
The host LSP server must have a writeable replica of each partition in order to serve License Certificate objects from eDirectory. This also applies to partitions that contain (or will contain) License Certificate objects. If a partition does not contain (or will not contain) a License Certificate object, that partition does not require a server running an LSP. This replica can be a Master or Read/Write replica. You can run LSPs on other servers without replicas as long as they can communicate with the LSP that has a writeable replica. As a result, the server with the writeable replica can make changes to the eDirectory database on the other server’s behalf.
In addition to an LSP, NLS relies on client software as an interface between licensing-enabled applications and the central LSP. An NLS client can run on either a workstation or a server. When you install NLS on a server, all files that enable an application to use NLS are copied to SYS:PUBLIC and SYS:SYSTEM.
NLS clients support 32-bit Windows and NLM platforms. The following shows how clients for Windows and NLM platforms communicate with the LSP:
![]() Windows—When a 32-bit Windows NLS client has an existing connection to a NetWare server running an LSP, the client communicates directly to the LSP. When the client does not have a connection to a server running an LSP, the client searches from the server’s context upward in the eDirectory tree for an LSP.
Windows—When a 32-bit Windows NLS client has an existing connection to a NetWare server running an LSP, the client communicates directly to the LSP. When the client does not have a connection to a server running an LSP, the client searches from the server’s context upward in the eDirectory tree for an LSP.
![]() NLM—An NLM client only examines the current connection. It does not search for an LSP.
NLM—An NLM client only examines the current connection. It does not search for an LSP.
Because NLS relies on eDirectory integration for storing license certificates, the following eDirectory Licensing objects are required: NLS_LSP objects, License Container objects, and License Certificate objects.
The LSP object is at the heart of Novell Licensing Services. By default, the NLS_LSP_servername object is created automatically when the eDirectory Schema is extended with SETUPNLS.NLM, or when you run iManager. LSP objects are created in the same context as the server running the LSP software. The LSP object stores the following configuration information about an LSP running on a server:
![]() Transaction database name
Transaction database name
![]() Whether to search to the partition root or to the root of the tree
Whether to search to the partition root or to the root of the tree
![]() Notifications concerning unlicensed access, service problems, or other associated data
Notifications concerning unlicensed access, service problems, or other associated data
NetWare 6 supports two different types of License Container objects: the Server License Container (Novell + NetWare 6Server + 600) and the Connection License Container (Novell + NetWare 6 User + 600). Each of these containers stores the license usage information for the previous 15 months. They can be moved up the tree to centralized licensing without moving the server object. By default, these objects are added to the eDirectory tree in the host server container when NetWare 6 is installed on the server. Finally, License Container objects appear as leaf objects in the eDirectory container, yet they can contain multiple License Certificate objects.
License Certificate objects are also created in eDirectory when the NetWare 6 server is installed. The icon representing a License Certificate object resembles a single sheet of paper because license certificates correspond to the printed license statement typically included in the packaging for software products. If you select a License Certificate object in iManager, you see the serial number or certificate name displayed.
License certificates are installed from files, with the following being some typical file extensions:
![]() .NLF—NetWare, BorderManager, and other Novell products
.NLF—NetWare, BorderManager, and other Novell products
![]() .CLS—NetWare for Small Business
.CLS—NetWare for Small Business
![]() .KEY—Activation keys
.KEY—Activation keys
From a security perspective, license certificates can either be secure or unsecure. Secure license certificates are digitally signed and cannot be modified. These license certificates usually come from a software vendor. On the other hand, metering certificates are nonsecure and are usually created by network administrators. For example, ZENworks functions as the NLS client and requests Metering Certificates on behalf of applications.
NLS creates a License Certificate object when you install license certificates for NLS-enabled applications or when you create metered certificates. When you install or create a license certificate, you choose the context for this object.
To fully grasp the functionality of NLS, you must fully understand some key terms, including the following:
![]() License unit—A license unit represents a component of a license certificate. When you purchase a product, you purchase one or more license units for it. However, the license unit (or a license certificate) is not the license itself. Licenses are specified in the license agreement.
License unit—A license unit represents a component of a license certificate. When you purchase a product, you purchase one or more license units for it. However, the license unit (or a license certificate) is not the license itself. Licenses are specified in the license agreement.
![]() Activation key—The activation key is a sequence of numbers and letters that enables you to complete the installation of a license certificate for a product you have purchased. Each license certificate requires an activation key, which is often contained in a file with the extension .KEY and included with the certificate. The combination of these files enables the activation key to be installed during installation. If the installation cannot locate the activation key, a prompt allows you to enter it manually.
Activation key—The activation key is a sequence of numbers and letters that enables you to complete the installation of a license certificate for a product you have purchased. Each license certificate requires an activation key, which is often contained in a file with the extension .KEY and included with the certificate. The combination of these files enables the activation key to be installed during installation. If the installation cannot locate the activation key, a prompt allows you to enter it manually.
![]() Envelope—An .NLF file that contains one or more license certificates is known as an envelope. Packaging multiple license certificates allows them to be distributed as a single file. You can install multiple license certificates at the same time with envelopes. The envelope can contain an embedded activation key for the license certificates.
Envelope—An .NLF file that contains one or more license certificates is known as an envelope. Packaging multiple license certificates allows them to be distributed as a single file. You can install multiple license certificates at the same time with envelopes. The envelope can contain an embedded activation key for the license certificates.
![]() Policy—Contained in a license certificate, a policy is an electronic representation of a term or condition in the license agreement. The terms and conditions of the license agreement determine which policy is in place. A policy is tied to a license certificate and a policy manager, not to the licensing service. It can be modified by changing or replacing the licensing certificate.
Policy—Contained in a license certificate, a policy is an electronic representation of a term or condition in the license agreement. The terms and conditions of the license agreement determine which policy is in place. A policy is tied to a license certificate and a policy manager, not to the licensing service. It can be modified by changing or replacing the licensing certificate.
![]() Stop policy—Stop is a type of policy in a license certificate. Three types of stop policies are a hard stop policy (which informs users that they’re out of compliance with the terms and conditions of the license agreement and prevents users from accessing a license unit), a soft stop policy (which informs users that they’re out of compliance, but allows them to continue using licensing units under certain conditions), and a no stop policy (which ignores situations in which no license units are available, but logs the noncompliance).
Stop policy—Stop is a type of policy in a license certificate. Three types of stop policies are a hard stop policy (which informs users that they’re out of compliance with the terms and conditions of the license agreement and prevents users from accessing a license unit), a soft stop policy (which informs users that they’re out of compliance, but allows them to continue using licensing units under certain conditions), and a no stop policy (which ignores situations in which no license units are available, but logs the noncompliance).
![]() Notification—A notification is a message informing the administrator about the licensing service or a problem concerning compliance with the licensing agreement. By default, whoever installs the license certificate is designated as the recipient of notifications. However, you can change, delete, and add objects that receive notifications, and multiple users (or groups) can receive notifications. The following are the two types of notification: system alert notifications (inform a designated person about an eDirectory communication error related to the licensing service, an eDirectory schema error related to the licensing service, or a transaction logging error) and out of compliance notifications (inform a designated person that the organization is out of compliance with the licensing agreement). Notifications are sent through the NetWare Broadcast utility and, optionally, through Simple Network Management Protocol (SNMP).
Notification—A notification is a message informing the administrator about the licensing service or a problem concerning compliance with the licensing agreement. By default, whoever installs the license certificate is designated as the recipient of notifications. However, you can change, delete, and add objects that receive notifications, and multiple users (or groups) can receive notifications. The following are the two types of notification: system alert notifications (inform a designated person about an eDirectory communication error related to the licensing service, an eDirectory schema error related to the licensing service, or a transaction logging error) and out of compliance notifications (inform a designated person that the organization is out of compliance with the licensing agreement). Notifications are sent through the NetWare Broadcast utility and, optionally, through Simple Network Management Protocol (SNMP).
![]() Unlicensed access—An allowance beyond the number of purchased licensed units is known as unlicensed access. Novell offers up to two grace logins in NetWare 6, which allows unlicensed server access on the server license certificates. This feature enables an administrator to continue to have access to a server even when all user licenses have been assigned. However, unlicensed access does not grant access. The terms and conditions of the license agreement specify how the product is to be used.
Unlicensed access—An allowance beyond the number of purchased licensed units is known as unlicensed access. Novell offers up to two grace logins in NetWare 6, which allows unlicensed server access on the server license certificates. This feature enables an administrator to continue to have access to a server even when all user licenses have been assigned. However, unlicensed access does not grant access. The terms and conditions of the license agreement specify how the product is to be used.
Now let’s delve into much more detail regarding NLS installation and management. The following licensing responsibilities will have a dramatic effect on the functionality of your NetWare 6 server.
NLS license management relies on eDirectory-integrated license certificates. These certificates include the license resources NLS needs to successfully respond to client requests. In this section, we’ll explore the following NLS management tasks:
![]() Managing licenses through eDirectory server objects—Like other services provided by NetWare 6, you manage NLS through objects in eDirectory and commands that run at startup. You use the License Container object and the License Certificate object to monitor license certificate usage. We’ll take a look at both.
Managing licenses through eDirectory server objects—Like other services provided by NetWare 6, you manage NLS through objects in eDirectory and commands that run at startup. You use the License Container object and the License Certificate object to monitor license certificate usage. We’ll take a look at both.
![]() Installing license certificates—Next we’ll learn a little bit more about how license units are contained within license certificates and/or licensing envelopes. In addition, we’ll learn how to use iManager to install license certificates.
Installing license certificates—Next we’ll learn a little bit more about how license units are contained within license certificates and/or licensing envelopes. In addition, we’ll learn how to use iManager to install license certificates.
![]() Using the NetWare Usage tool—Here we’ll learn how to use the NetWare usage tool to determine license compliance.
Using the NetWare Usage tool—Here we’ll learn how to use the NetWare usage tool to determine license compliance.
![]() Configure notifications and reports—When NLS generates notifications, they’re sent by default to the User object that installed the certificate. Using NetWare Administrator, you can change this designated person by modifying the License Container object’s Notify property page. In addition, you can use NetWare Administrator to create reports for all licensed units in a specific License Container.
Configure notifications and reports—When NLS generates notifications, they’re sent by default to the User object that installed the certificate. Using NetWare Administrator, you can change this designated person by modifying the License Container object’s Notify property page. In addition, you can use NetWare Administrator to create reports for all licensed units in a specific License Container.
![]() Troubleshooting server connection licensing—Finally, we’ll explore some guidelines for troubleshooting a variety of licensing problems.
Troubleshooting server connection licensing—Finally, we’ll explore some guidelines for troubleshooting a variety of licensing problems.
Let’s take a closer look at Novell Licensing Services management.
When a license certificate is installed, License Container objects (container objects that always hold License Certificate objects) are automatically created. You use iManager to view information about a license product container.
In iManager, select License Management and then Manage License Properties. Navigate to and select a license container, and then select OK. As shown in Figure 1.27, you see the following two property tabs for the License Container objects:
![]() General—This tab includes information related to the product (such as the publisher name, product name, and product version number) and the installed licenses (including the number of licenses installed, in use, and available). You use this tab to determine the licensed application version when troubleshooting licensing issues. Be sure that you have the same version of NLS running on network servers.
General—This tab includes information related to the product (such as the publisher name, product name, and product version number) and the installed licenses (including the number of licenses installed, in use, and available). You use this tab to determine the licensed application version when troubleshooting licensing issues. Be sure that you have the same version of NLS running on network servers.
![]() Units in Use—This tab is especially useful when tracking denials for licensing certificates. The information in this tab can help you identify who has established a connection and used a certificate in an environment where users are limited to a single connection. The Units in Use window displays usage information for each user connected to the network. When users connect to the network from various workstations and use a license, this tab helps you determine how many connections a user has established.
Units in Use—This tab is especially useful when tracking denials for licensing certificates. The information in this tab can help you identify who has established a connection and used a certificate in an environment where users are limited to a single connection. The Units in Use window displays usage information for each user connected to the network. When users connect to the network from various workstations and use a license, this tab helps you determine how many connections a user has established.
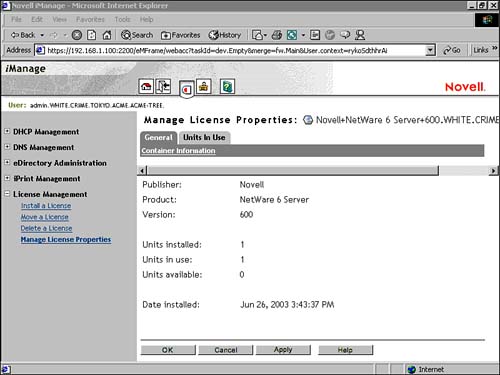
After you’ve installed distributed License Certificate objects into your eDirectory tree, NLS-aware applications will be able to use them for user and service authentication. NLS adds a License Container object (if one doesn’t exist) and places the License Certificate object in that container. When licenses are installed during NetWare 6 installation, server license certificates are created in the Novell+NetWare 6 Server+600 container in the same context as the server.
In addition, you might need to perform the following license certificate management tasks:
![]() Create a metering certificate—Metering certificates enable you to track usage of applications even though they aren’t NLS-enabled. By using metering certificates, you can enable users to continue using these applications while you track and manage the software licenses associated with them. For example, you can configure ZENworks as an NLS client for applications that aren’t NLS-enabled, and it can request NLS units on behalf of those applications. To create metering certificates within NetWare Administrator, use the following menu options: Tools @@> Novell Licensing Services @@> Add Licenses @@> License Metering.
Create a metering certificate—Metering certificates enable you to track usage of applications even though they aren’t NLS-enabled. By using metering certificates, you can enable users to continue using these applications while you track and manage the software licenses associated with them. For example, you can configure ZENworks as an NLS client for applications that aren’t NLS-enabled, and it can request NLS units on behalf of those applications. To create metering certificates within NetWare Administrator, use the following menu options: Tools @@> Novell Licensing Services @@> Add Licenses @@> License Metering.
![]() Move or delete a license certificate—You can move License Certificate objects from one context to another in the eDirectory tree or you can delete them by using iManager. From the iManager home page, select License Management. To move or delete a License Certificate object, you simply browse to the object you want to move or delete and follow the onscreen prompts.
Move or delete a license certificate—You can move License Certificate objects from one context to another in the eDirectory tree or you can delete them by using iManager. From the iManager home page, select License Management. To move or delete a License Certificate object, you simply browse to the object you want to move or delete and follow the onscreen prompts.
You can also use iManager to view information about a License Certificate object. Select License Management and then Manage License Properties. Navigate to and select a license container, and then select OK. You see the following three property tabs for the License Container objects:
![]() General—This tab provides information about the configuration of the certificate, including the publisher, product name, version, license identification number, units (installed, in use, and available), the installer, the date installed, and the date of expiration.
General—This tab provides information about the configuration of the certificate, including the publisher, product name, version, license identification number, units (installed, in use, and available), the installer, the date installed, and the date of expiration.
![]() Server Assignments—This tab enables you to determine which license certificate has been assigned to the server. You can allow only designated servers to grant requests for license units. This is known as a server assignment. You must assign servers to license certificates when using VLA licenses, CLA licenses, or those purchased through a retailer. Server assignments are automatic when licenses are installed during NetWare installation or when using iManager. However, MLA licenses do not require server assignments. When you’re configuring server assignments, remember that only one assignment can be made for each license certificate, and no other server is allowed to use the units from an assigned certificate.
Server Assignments—This tab enables you to determine which license certificate has been assigned to the server. You can allow only designated servers to grant requests for license units. This is known as a server assignment. You must assign servers to license certificates when using VLA licenses, CLA licenses, or those purchased through a retailer. Server assignments are automatic when licenses are installed during NetWare installation or when using iManager. However, MLA licenses do not require server assignments. When you’re configuring server assignments, remember that only one assignment can be made for each license certificate, and no other server is allowed to use the units from an assigned certificate.
TIP
Assigning a server to an MLA license certificate prevents all but the assigned server from using licenses from the certificate. When using unlimited MLA licensing, leave the Server Assignment field blank.
![]() Units in Use—The information in this tab can help you identify who has established a connection and used a certificate in an environment where users are limited to a single connection. The Units in Use window displays usage information for each user connected to the network. When users connect to the network from various workstations and use a license, this tab helps you determine how many connections a user has established.
Units in Use—The information in this tab can help you identify who has established a connection and used a certificate in an environment where users are limited to a single connection. The Units in Use window displays usage information for each user connected to the network. When users connect to the network from various workstations and use a license, this tab helps you determine how many connections a user has established.
After a NetWare 6 installation or upgrade, you can use iManager to manually install license certificates. With this web-based tool, you can install license certificates one at a time (using single certificates), or you can add multiple license certificates in an envelope:
![]() Single certificates—When a certificate for an NLS-aware application is installed (and no instances of other license certificates have been previously installed), NLS adds a License Container object to the eDirectory tree and a Single License Certificate object within that container. You select the context or location in the eDirectory tree for that License Container object. A License Container can include multiple license certificates, but they must be installed one at a time. Install these license certificates by accessing NLS and KEY files.
Single certificates—When a certificate for an NLS-aware application is installed (and no instances of other license certificates have been previously installed), NLS adds a License Container object to the eDirectory tree and a Single License Certificate object within that container. You select the context or location in the eDirectory tree for that License Container object. A License Container can include multiple license certificates, but they must be installed one at a time. Install these license certificates by accessing NLS and KEY files.
![]() Envelopes—An envelope is an .NLF file containing one or more license certificates. Envelopes also reside within License Container objects but enable you to install more than one license certificate at a time. For example, if you purchased a suite of four different NLS-aware applications, you can use an envelope to simultaneously install license certificates for all four products.
Envelopes—An envelope is an .NLF file containing one or more license certificates. Envelopes also reside within License Container objects but enable you to install more than one license certificate at a time. For example, if you purchased a suite of four different NLS-aware applications, you can use an envelope to simultaneously install license certificates for all four products.
When you add License Certificate objects to the eDirectory tree, you should plan their distribution intelligently. For example, some NetWare policies require that certificates be placed close to the requesting entity. This means you must place License Certificate objects in or above the same eDirectory context as the server you are licensing (that is, the server running NLSLSP.NLM).
Companies with complex eDirectory trees should place license certificates at the Organizational Unit level beneath tree root. On the other hand, smaller companies can place license certificates at the topmost container of the tree. If you want users in different contexts to use the same license certificate, place the certificate in a common container above the users’ context. Finally, if you are using a remote site and a WAN link, place a license certificate in the remote site’s context so that users and server-based applications can authenticate locally without crossing the WAN link. Except for licenses provided to large companies with license agreement contracts with Novell, a license cannot be installed in more than one container.
After a NetWare 6 installation or upgrade, you can use iManager to install license certificates. In iManager, click License Management, and then select Install License. Select a license file, which might be on a disk or CD. If an Activation Key window appears, use the online help facility to access the information you need.
To start, select the licenses to install. Because each server must have a server license associated with it, each license includes the user license and a server license. Install licenses one at a time if the licenses are to be installed in different contexts. If you choose to install a server license and one is already assigned to the server, the server license installation fails. In the Location field, select the context where you want the licenses installed.
When you’re installing a server base license, the Server Assignment field displays. In the Server Assignment field, enter the fully distinguished name of the server object you want to license installed to. The Activation Key field appears only if you’re required to provide the activation key to unlock a license. (Recall that some licenses will automatically retrieve this information for you.) You can enter the key as text or select an activation key to be read from a disk (the .KEY file).
License certificates for master license agreements (MLA) do not contain a server or a connection limit. When the first NetWare 6 server is installed into an eDirectory tree, the server-based license and connection license certificates are created in the same container as the NetWare 6 server. You can install and reinstall these certificates for as many connections as the terms and conditions of the License Agreement allow. For best performance, install the MLA license certificate in each partition that contains a NetWare 6 server. These multiple installations speed authentication by allowing users and servers to access local partitions of the eDirectory database.
During a typical NetWare 6 installation, the NICI Foundation Keys (.NFK) are automatically copied from the MLA license disk to the server. If you choose Install Without Licenses, you must manually copy the NFK files from the MLA license disk to each server. This cryptographic foundation key is stored on the MLA disk as a file named serial_number.NFK. To manually activate NICI features on an MLA server, copy this file from the MLA disk to the SYS:SYSTEM directory and rename it NICIFK” Remember to reboot the server in order for these changes to take effect.
The NetWare Usage tool included in the NetWare 6 Remote Manager enables you to determine whether your network is in compliance with your licensing agreement. To access the NetWare Usage tool, log in to the Remote Manager and select Usage Information from the NetWare Usage section at the bottom of the window pane on the left of the screen. Enter a time period for which you want to view usage statistics. As shown in Figure 1.28, this tool displays the number of users that logged in to the network over that specified period of time.
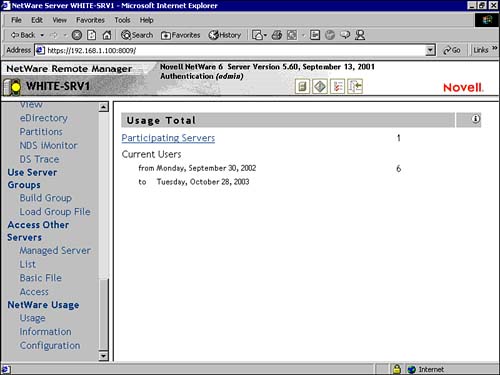
The NetWare Usage tool uses NWUSAGE.NLM and NLSRUP.NLM to gather usage information. Each server gathers information regarding authentication. The information is then saved in a database. A server is then assigned to the collection server, which gathers this information and displays it when NetWare Usage is accessed. You are allowed to specify the collection server.
You can configure the NetWare Usage tool to determine how it’s used on your network. From the NetWare Usage section at the bottom of the pane on the left of the screen, select Configuration. As you can see in Figure 1.29, you can then enter the following parameters:
![]() Collection server—The current collection server is displayed and you have the option of disabling automatic usage collection.
Collection server—The current collection server is displayed and you have the option of disabling automatic usage collection.
![]() Frequency—You can specify how often the usage information is sent to the collector server as well as how often the servers enroll with the collector.
Frequency—You can specify how often the usage information is sent to the collector server as well as how often the servers enroll with the collector.
![]() IP Ports—This option enables you to specify the ports on which the servers communicate.
IP Ports—This option enables you to specify the ports on which the servers communicate.
![]() Default date range—Here you specify a number of months.
Default date range—Here you specify a number of months.
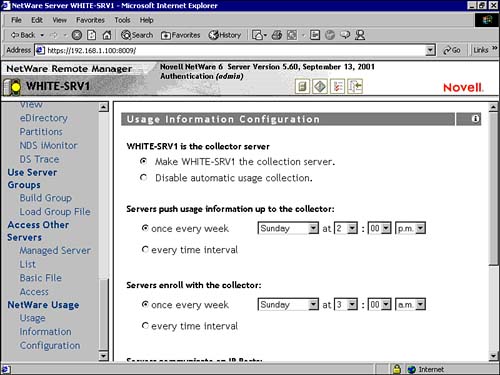
After you’ve configured your settings, you select the Update button at the bottom right of the page.
You can also set these parameters at the server console by entering the command NLSLRUP HELP. You’ll be presented with a list of commands for setting the configuration options.
When NLS generates notifications, they’re sent by default to the User object that installed the certificate. Using NetWare Administrator, you can change this designated person by modifying the License Container object’s Notify property page, as shown in Figure 1.30.
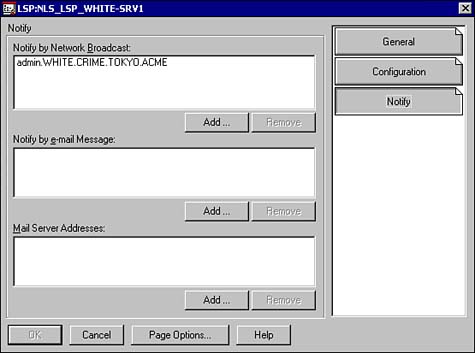
As mentioned previously, license certificate notifications are used to identify when a company is out of compliance concerning an NLS-aware application. The designated NLS administrator receives a notification when an application assigned to a license certificate attempts to exceed the available number of licenses. After notification, the administrator can then purchase and install more license certificates or resolve the issues that are related to the license agreement and its usage.
In addition to license certificate notifications, NLS includes a variety of license reports that track data about licensed and metering products. As an NLS administrator, you can create, use, and save these reports to help you monitor the usage of NLS-aware applications.
First, you can create NLS license reports for all license units used in a given context, a specific container, or within a single license certificate. The default reports provide data for the past 15 months. NetWare Administrator provides a license generation capability at the container level. Simply click a License Container object and access the Report Wizard by using the following menu options: Tools @@> Novell Licensing Services @@> Generate License Reports.
Next, you can save license reports in any of the following formats:
![]() Save Graph as Bitmap—This option enables you to save the data as a bitmap file with the .BMP extension. The Graph tab on the report enables you to view this data.
Save Graph as Bitmap—This option enables you to save the data as a bitmap file with the .BMP extension. The Graph tab on the report enables you to view this data.
![]() Save Summary as Text—This option enables you to save the data as a text file with the .TXT extension. The Summary tab on the report enables you to view this data.
Save Summary as Text—This option enables you to save the data as a text file with the .TXT extension. The Summary tab on the report enables you to view this data.
![]() Save Reloadable Data—You can use this option to save the data as a .DAT file. This provides a 15-month snapshot of the product’s usage on the network.
Save Reloadable Data—You can use this option to save the data as a .DAT file. This provides a 15-month snapshot of the product’s usage on the network.
![]() Save Tab-Delimited Data—This option enables you to save the data in a two-column tabbed format for import into a database or a spreadsheet application.
Save Tab-Delimited Data—This option enables you to save the data in a two-column tabbed format for import into a database or a spreadsheet application.
After you’ve installed and configured Novell Licensing Services, your attention should turn to keeping it running. The following are troubleshooting tips that help maintain longevity and continuity in your server connection licensing system:
![]() LSP placement—Some NLS clients might not have access to licensing services if LSP objects are not well placed in the eDirectory tree. Make sure to place the central LSP and its license certificates as close as practical to users but high enough in the eDirectory tree so that they’re accessible to everyone who needs them. Also, make sure that NLS servers don’t have to traverse slow WAN links to access license units.
LSP placement—Some NLS clients might not have access to licensing services if LSP objects are not well placed in the eDirectory tree. Make sure to place the central LSP and its license certificates as close as practical to users but high enough in the eDirectory tree so that they’re accessible to everyone who needs them. Also, make sure that NLS servers don’t have to traverse slow WAN links to access license units.
![]() Server beeps frequently—If your server beeps frequently, the server-based license might not be consuming a license unit. This can be caused by two problems: the license certificate is not installed or the server-based license certificate is not assigned to the Server object.
Server beeps frequently—If your server beeps frequently, the server-based license might not be consuming a license unit. This can be caused by two problems: the license certificate is not installed or the server-based license certificate is not assigned to the Server object.
![]() Error when you move a server object in the eDirectory tree—When you move a server in the eDirectory tree, you might need to move the license certificates along with it.
Error when you move a server object in the eDirectory tree—When you move a server in the eDirectory tree, you might need to move the license certificates along with it.
![]() Error when you use iManager to uninstall and reinstall eDirectory—If you uninstall eDirectory from a server and then reinstall it, you must run NWCONFIG.NLM to reinstall or move the license certificates. This is accomplished by using the following menu option: License Options @@> Set Up Licensing Services.
Error when you use iManager to uninstall and reinstall eDirectory—If you uninstall eDirectory from a server and then reinstall it, you must run NWCONFIG.NLM to reinstall or move the license certificates. This is accomplished by using the following menu option: License Options @@> Set Up Licensing Services.
![]() Error when you rename a server that’s using a Server +600 license certificate—When you rename a server, you need to make sure to change the server assignment on the License Certificate object so that it matches the new name of the server.
Error when you rename a server that’s using a Server +600 license certificate—When you rename a server, you need to make sure to change the server assignment on the License Certificate object so that it matches the new name of the server.
This completes our comprehensive discussion of Novell Licensing Services. As you’ve learned, this NetWare 6 security feature is flexible, comprehensive, and secure. In addition, it provides numerous configuration and management options via eDirectory integration and iManager.
Now that your new NetWare 6 server has been installed, configured, and licensed, it’s time to explore the often bizarre, but always fun, land of Netware 6 upgrade and migration.
It’s time to save the Net!