
Chapter 20 Novell eDirectory Accessibility and Printing Design
This chapter covers the following testing objectives for Novell Course 575: Novell eDirectory Design and Implementation:
![]() Perform a Needs Analysis
Perform a Needs Analysis
![]() Create a User Accessibility Needs Document
Create a User Accessibility Needs Document
![]() Create an Accessibility Guidelines Document
Create an Accessibility Guidelines Document
![]() Create an Administrative Strategies Document
Create an Administrative Strategies Document
![]() Design and Implement an eDirectory Print Services Strategy
Design and Implement an eDirectory Print Services Strategy
The goal of eDirectory accessibility design is to simplify user access to network resources. This is accomplished using client software, eDirectory objects, and login scripts. The client software provides the initial access to the network, whereas eDirectory objects and login scripts build a productive user environment.
One of the most challenging accessibility components in NetWare is printing. To solve this electronic enigma, you must get inside the mind of NetWare 6 printing. It’s not that printing itself is so puzzling. As a matter of fact, the concept of printing is fairly easy to comprehend: You click a button on the workstation, and a piece of paper comes out of the printer down the hall. No rocket science here. It’s true. The fundamental architecture of NetWare 6 printing is solid—rock solid.
So, why is it such a mystery? One word: users! It’s the users’ fault. They introduce so much complexity to printing, it’s a wonder the paper finds its way anywhere, let alone to the correct printer. And to make matters worse, users expect too much:
![]() Users want the page to be formatted correctly every time.
Users want the page to be formatted correctly every time.
![]() Users want their print jobs to arrive at the correct printer (when they don’t even know what that means).
Users want their print jobs to arrive at the correct printer (when they don’t even know what that means).
![]() Users always want their jobs to come out first.
Users always want their jobs to come out first.
So, how do you possibly satisfy the lofty expectations of your users while maintaining a rock-solid NetWare printing architecture? That’s one of the greatest mysteries of all. Fortunately, I’m on your side and you’re a NetWare 6 sleuth.
In this chapter, we’ll dedicate two sections and two lab exercises to designing queue-based and NDPS (Novell Distributed Print Services) print services. During this investigation, you’ll gain valuable insight into users’ expectations and discover some life-saving design and implementation tips.
Let’s start at the beginning...double-billed cap optional.
Test Objectives Covered:
![]() Perform a Needs Analysis
Perform a Needs Analysis
![]() Create a User Accessibility Needs Document
Create a User Accessibility Needs Document
![]() Create an Accessibility Guidelines Document
Create an Accessibility Guidelines Document
![]() Create an Administrative Strategies Document
Create an Administrative Strategies Document
In this section, you’ll learn how to build a user environment plan (UEP) that outlines how client configuration, eDirectory objects, and login scripts provide access to network resources. This is accomplished in three simple steps:
1. Perform a needs analysis for user accessibility—First, you must determine your users’ physical network, legacy, and application needs. The result of this step is a needs analysis document.
2. Develop accessibility guidelines—When you fully understand the needs of your users, you have to develop accessibility guidelines to meet such needs. The guidelines you develop should address how eDirectory objects are used to create the user environment.
3. Create an administrative strategies document for user accessibility—Finally, you’ll apply the accessibility guidelines to four distinct accessibility portals: ZENworks and client configurations, login scripts, file system and security, and mobile users.
So, you wanna be a CNE? Okay, let’s see what kind of accessibility engineer (AE) you are.
The first step in developing a UEP is to perform a needs analysis for user accessibility. This is accomplished by gathering key information about the users in your organization and their network needs. The following topics are included when analyzing users’ needs:
![]() Physical resource needs—First, you must gather user information related to physical network resource needs. This analysis includes network peripherals (such as printers, scanners, plotters, and so on) and network storage requirements. Also, you must consider the physical resource needs of remote and mobile users.
Physical resource needs—First, you must gather user information related to physical network resource needs. This analysis includes network peripherals (such as printers, scanners, plotters, and so on) and network storage requirements. Also, you must consider the physical resource needs of remote and mobile users.
![]() Legacy network services needs—If NetWare 3 resources exist anywhere on the network, consider creating guidelines for using bindery services. During your analysis, consider which applications and resources are bindery-based and who uses them. In addition, you should evaluate how many groups need bindery-based network resources and indicate specific contexts for bindery-based resources in your accessibility guidelines.
Legacy network services needs—If NetWare 3 resources exist anywhere on the network, consider creating guidelines for using bindery services. During your analysis, consider which applications and resources are bindery-based and who uses them. In addition, you should evaluate how many groups need bindery-based network resources and indicate specific contexts for bindery-based resources in your accessibility guidelines.
![]() Application needs—Finally, you must gather information about the types of applications and data files your users need. This includes shared applications, shared data needs, group application configurations, and client OS requirements (including Macintosh, DOS, Windows, OS/2, and Unix).
Application needs—Finally, you must gather information about the types of applications and data files your users need. This includes shared applications, shared data needs, group application configurations, and client OS requirements (including Macintosh, DOS, Windows, OS/2, and Unix).
After you’ve developed a needs analysis document, you should create accessibility guidelines. Those guidelines should address how eDirectory objects are used to create a productive user environment. The guidelines should also address how you’ll implement network security for restricting user access and how you plan to control user access through the manipulation of eDirectory objects.
The following are suggested eDirectory accessibility guidelines:
![]() Container Policy Package and User Policy Package objects—Specify where Container Policy Package and User Policy Package objects should be used. Place Container Policy Packages at the highest possible level of the tree without spanning a WAN and make sure that there is no more than one Container Policy Package for each geographic location. User Policy Packages, on the other hand, should be placed lower in the eDirectory tree so that they’re closer to the users who need them.
Container Policy Package and User Policy Package objects—Specify where Container Policy Package and User Policy Package objects should be used. Place Container Policy Packages at the highest possible level of the tree without spanning a WAN and make sure that there is no more than one Container Policy Package for each geographic location. User Policy Packages, on the other hand, should be placed lower in the eDirectory tree so that they’re closer to the users who need them.
![]() Application objects—Place Application objects close to the users who access them. If your network has multiple geographic locations connected by a WAN, create Application objects in the containers that represent the physical locations. If you have multiple application servers at one location, create Application objects for each application on each server.
Application objects—Place Application objects close to the users who access them. If your network has multiple geographic locations connected by a WAN, create Application objects in the containers that represent the physical locations. If you have multiple application servers at one location, create Application objects for each application on each server.
![]() Group objects—Use Group objects for accessibility only when all the group members exist in the same physical location. If you use global groups that span a WAN link, you’ll create considerable background synchronization traffic. Finally, ensure that Group objects never contain more than 1,500 members. Keep users assigned to the group within the same partition whenever possible. Also, use the natural grouping of containers instead of creating groups whenever possible.
Group objects—Use Group objects for accessibility only when all the group members exist in the same physical location. If you use global groups that span a WAN link, you’ll create considerable background synchronization traffic. Finally, ensure that Group objects never contain more than 1,500 members. Keep users assigned to the group within the same partition whenever possible. Also, use the natural grouping of containers instead of creating groups whenever possible.
![]() Alias objects—Identify which objects can and which cannot use an Alias object.
Alias objects—Identify which objects can and which cannot use an Alias object.
![]() Profile and user login scripts—If users with similar needs exist in separate containers, consider linking them with a profile login script. These scripts create an additional level of maintenance over container scripts, but they are easier to manage than user login scripts. Consider using user login scripts only in special cases such as mobile users.
Profile and user login scripts—If users with similar needs exist in separate containers, consider linking them with a profile login script. These scripts create an additional level of maintenance over container scripts, but they are easier to manage than user login scripts. Consider using user login scripts only in special cases such as mobile users.
![]() Organizational Role objects—Use Organizational Role objects (ORs) for administrative fault tolerance. Whenever you create a container administrator, use an OR and assign two members: the centralized Administrator User object and a backup administrator.
Organizational Role objects—Use Organizational Role objects (ORs) for administrative fault tolerance. Whenever you create a container administrator, use an OR and assign two members: the centralized Administrator User object and a backup administrator.
![]() Directory Map objects and drive mappings—Identify the names of Directory Map objects to be used throughout the organization and the data they represent. Also, implement drive-mapping naming conventions and standards for companywide applications.
Directory Map objects and drive mappings—Identify the names of Directory Map objects to be used throughout the organization and the data they represent. Also, implement drive-mapping naming conventions and standards for companywide applications.
![]() Security precautions—Identify companywide security practices and educate distributed administrators. For example, make sure that users always authenticate to a local replica and avoid granting users the [S] Supervisor object right to Server objects. Finally, use IRFs to create exclusive container administrators, when appropriate.
Security precautions—Identify companywide security practices and educate distributed administrators. For example, make sure that users always authenticate to a local replica and avoid granting users the [S] Supervisor object right to Server objects. Finally, use IRFs to create exclusive container administrators, when appropriate.
eDirectory accessibility is important because it defines all access points to network resources. To balance user accessibility and security, you’ll need to create an administrative strategies document for user accessibility.
The following four administrative strategies will help you create a productive, secure user environment:
![]() ZENworks and client configurations
ZENworks and client configurations
![]() Login scripts
Login scripts
![]() File system and security
File system and security
![]() Mobile users
Mobile users
Each of these is explored in detail in the following sections.
eDirectory accessibility design begins with the client. You should include administrative strategies for each of these strategic ZENworks objects. The strategies should answer the questions that follow each of the listed objects:
![]() Container Policy Package objects—Where should Container Policy Package objects be placed in the eDirectory tree? Which containers should they be associated with? Where should the search level be set? What should the search order be set to?
Container Policy Package objects—Where should Container Policy Package objects be placed in the eDirectory tree? Which containers should they be associated with? Where should the search level be set? What should the search order be set to?
![]() User Policy Package objects—Which operating systems will User Policy Package objects need to be created for? Where should they be placed in the eDirectory tree? Which eDirectory objects should User Policy Package objects be associated with? Will desktop preferences be enabled? Will user system policies be enabled?
User Policy Package objects—Which operating systems will User Policy Package objects need to be created for? Where should they be placed in the eDirectory tree? Which eDirectory objects should User Policy Package objects be associated with? Will desktop preferences be enabled? Will user system policies be enabled?
![]() Application objects—Which applications will be run from servers and which will be run from local hard disks? Where will Application objects be placed in the eDirectory tree? Which eDirectory objects will be associated with each application? What are the operating system and hardware requirements for each application?
Application objects—Which applications will be run from servers and which will be run from local hard disks? Where will Application objects be placed in the eDirectory tree? Which eDirectory objects will be associated with each application? What are the operating system and hardware requirements for each application?
In addition to ZENworks administration, Novell Client configuration can have an effect on your administrative strategies document. Consider including administrative strategies for determining name context, preferred servers and trees, and the first network drive.
The second step of user accessibility design involves login scripts. Traditionally, login scripts provide network and search drive-mapping capabilities, application support, and printer capturing. In addition, eDirectory login scripts enable you to set important environmental parameters for large groups of users. Four eDirectory objects contain a Login Script property: Organization, Organizational Unit, Profile, and User.
You should use your needs analysis document and accessibility guidelines to build an eDirectory login script strategy that automates the user environment and minimizes network administration. Refer to Chapters 4, “NetWare 6 Client Management,” and 5, “NetWare 6 eDirectory Management,” for more information regarding login script design.
To ease file system administration across the network, you should specify a standard file system structure that defines the following: number of volumes per server, application and data storage requirements, user data storage needs, and drive mapping guidelines.
You should also build a distributed team of security roles to support eDirectory and file system administration. The following is a list of the security roles that might be an integral part of your administrative strategies document:
![]() Enterprisewide administrator—Typically, an eDirectory tree has only one or two enterprisewide administrators with all object and file system rights starting at Tree Root. Furthermore, Admin should be controlled by another Organizational Role object in a hidden eDirectory container for fault-tolerance purposes.
Enterprisewide administrator—Typically, an eDirectory tree has only one or two enterprisewide administrators with all object and file system rights starting at Tree Root. Furthermore, Admin should be controlled by another Organizational Role object in a hidden eDirectory container for fault-tolerance purposes.
![]() Container administrator—To divide management of the eDirectory tree among network administrators, consider using an Organizational Role object with the name Container Admin for each secure container.
Container administrator—To divide management of the eDirectory tree among network administrators, consider using an Organizational Role object with the name Container Admin for each secure container.
Grant this Organizational Role object rights to manage the container where it’s located. The appropriate administrative user(s) can then be made occupants of the new role.
![]() Backup administrator—In addition, you should create a backup administrator user who has all the rights of the Container Admin Organization Role object discussed in the preceding paragraph, except that this administrator can’t change users of, add users to, or remove users from the role. The administrator should be able to install servers but should not be able perform any partitioning operations. The backup administrator should also have all file system rights to all volumes and servers within the container.
Backup administrator—In addition, you should create a backup administrator user who has all the rights of the Container Admin Organization Role object discussed in the preceding paragraph, except that this administrator can’t change users of, add users to, or remove users from the role. The administrator should be able to install servers but should not be able perform any partitioning operations. The backup administrator should also have all file system rights to all volumes and servers within the container.
![]() Server administrator—Next, you should create a server administrator for each distributed server. This manager should have all object rights within the server’s home container except Create [C] and Rename [R]. Also, make sure that the administrator can modify existing objects, passwords, group memberships, and login scripts. The server administrator should not be able to partition or install servers, however. Instead, give the server administrator file system rights to the SYSTEM, PUBLIC, and application directories.
Server administrator—Next, you should create a server administrator for each distributed server. This manager should have all object rights within the server’s home container except Create [C] and Rename [R]. Also, make sure that the administrator can modify existing objects, passwords, group memberships, and login scripts. The server administrator should not be able to partition or install servers, however. Instead, give the server administrator file system rights to the SYSTEM, PUBLIC, and application directories.
![]() Password administrator—One of the most troublesome user-management tasks is password administration. Consider creating distributed password administrators with limited property rights for User objects, passwords, groups, login scripts, and so on. Make sure that these managers do not have object rights to create objects, rename objects, install servers, or create partitions. In addition, password administrators do not require any file system rights.
Password administrator—One of the most troublesome user-management tasks is password administration. Consider creating distributed password administrators with limited property rights for User objects, passwords, groups, login scripts, and so on. Make sure that these managers do not have object rights to create objects, rename objects, install servers, or create partitions. In addition, password administrators do not require any file system rights.
![]() Special use administrator—Special use administrator Organizational Role objects can be created for department-specific servers not controlled by IS. These administrators should have only minimal rights to eDirectory objects (that is, they should only be able to assign group membership rights and should be able to modify passwords and login scripts). Make sure that these administrators do not have object rights to create objects, add or remove users from the role, install servers, or create partitions. They should, however, have all rights to the server file system(s) they manage.
Special use administrator—Special use administrator Organizational Role objects can be created for department-specific servers not controlled by IS. These administrators should have only minimal rights to eDirectory objects (that is, they should only be able to assign group membership rights and should be able to modify passwords and login scripts). Make sure that these administrators do not have object rights to create objects, add or remove users from the role, install servers, or create partitions. They should, however, have all rights to the server file system(s) they manage.
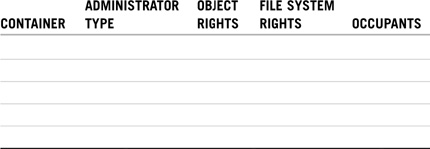
In addition to these administrative roles, you should also determine the default level of security for users. Table 20.1 shows some suggested default user account settings.

Mobile users offer the greatest challenge to accessibility design. As users wander throughout the network, they access the eDirectory tree and its resources in different ways. Knowing the types of access each user requires will help you set up specific user environments. Essentially, the definition of a traveling user can be broken into two types:
![]() Remote users—Remote users require network access from a laptop computer through dial-in lines. Remote users are normally self-contained (that is, all activity is restricted to their home container). Remote users require less accessibility design considerations than mobile users because they access the tree only for login authentication and access resources in their home container. In other words, they simply dial in to specific predetermined access points in the WAN and use their normal eDirectory context.
Remote users—Remote users require network access from a laptop computer through dial-in lines. Remote users are normally self-contained (that is, all activity is restricted to their home container). Remote users require less accessibility design considerations than mobile users because they access the tree only for login authentication and access resources in their home container. In other words, they simply dial in to specific predetermined access points in the WAN and use their normal eDirectory context.
![]() Mobile users—If a remote user travels to another office and plugs a laptop computer into the network, the user suddenly becomes a mobile user. Mobile users are more challenging because they travel from computer to computer and demand full access to local resources, as well as requiring access to their home server. In addition, some mobile users might maintain a separate computer at each network location. (Note: Users who carry laptop computers to a new location aren’t considered mobile users if they don’t need to access local network resources. If such users are content just to access their home resources across the network, they’re simply considered remote users.)
Mobile users—If a remote user travels to another office and plugs a laptop computer into the network, the user suddenly becomes a mobile user. Mobile users are more challenging because they travel from computer to computer and demand full access to local resources, as well as requiring access to their home server. In addition, some mobile users might maintain a separate computer at each network location. (Note: Users who carry laptop computers to a new location aren’t considered mobile users if they don’t need to access local network resources. If such users are content just to access their home resources across the network, they’re simply considered remote users.)
To support mobile users, you must solve one challenging problem: How do mobile users determine their context during login? The following are the six most popular solutions:
![]() Location profiles—By creating a location profile that contains information for a user’s specific location, you can allow a user to select this profile during login. The profile automatically sets up login information (such as the user’s name, server, tree, context, login script, and other applicable information) so that the user doesn’t have to enter this information. Location profiles are especially useful for users who log in from multiple places because they can have separate profiles for the office, home, laptop, or any other workstation they use.
Location profiles—By creating a location profile that contains information for a user’s specific location, you can allow a user to select this profile during login. The profile automatically sets up login information (such as the user’s name, server, tree, context, login script, and other applicable information) so that the user doesn’t have to enter this information. Location profiles are especially useful for users who log in from multiple places because they can have separate profiles for the office, home, laptop, or any other workstation they use.
![]() VPN client—By creating a virtual private network (VPN), you set up a dial-in client that uses the Point-to-Point Protocol (PPP) to connect to a slave or master VPN server. After the user has established a dial-in connection, the client has access to the networks protected by any member of the VPN. This way, the user can dial in directly to a server, or use an Internet service provider (ISP) connection through the Internet. Novell BorderManager supports both client-to-site VPNs (which use either a direct dial-in connection or an ISP connection through the Internet) and site-to-site VPNs (which support connections between multiple company departments using the company’s private network or the Internet, between multiple company sites using the Internet, or between multiple companies using the Internet). Site-to-site VPNs can be deployed with the VPN member on the border between the company’s private network and the public network, or with the VPN member behind a firewall that is on the border between the company’s private network and the public network.
VPN client—By creating a virtual private network (VPN), you set up a dial-in client that uses the Point-to-Point Protocol (PPP) to connect to a slave or master VPN server. After the user has established a dial-in connection, the client has access to the networks protected by any member of the VPN. This way, the user can dial in directly to a server, or use an Internet service provider (ISP) connection through the Internet. Novell BorderManager supports both client-to-site VPNs (which use either a direct dial-in connection or an ISP connection through the Internet) and site-to-site VPNs (which support connections between multiple company departments using the company’s private network or the Internet, between multiple company sites using the Internet, or between multiple companies using the Internet). Site-to-site VPNs can be deployed with the VPN member on the border between the company’s private network and the public network, or with the VPN member behind a firewall that is on the border between the company’s private network and the public network.
![]() Knowledgeable user login—This option requires user intervention. In this case, each mobile user can manually enter her name context into the computer before logging in. This implies that the user understands the complexities of eDirectory naming and context during login. If logging in from a DOS client, the user must know how to specify her context with LOGIN. If logging in from a Windows client, the user must know how to enter her context in the Context field of the GUI login window.
Knowledgeable user login—This option requires user intervention. In this case, each mobile user can manually enter her name context into the computer before logging in. This implies that the user understands the complexities of eDirectory naming and context during login. If logging in from a DOS client, the user must know how to specify her context with LOGIN. If logging in from a Windows client, the user must know how to enter her context in the Context field of the GUI login window.
![]() Alias object—This option does not require user intervention. In this case, a mobile user’s current context can be changed automatically with the help of an Alias object. If you have a small number of mobile users, you can create an Alias object in the Organization container for each mobile user that points to the user’s User object in his parent container. The value of this strategy is that it creates a simple context for each mobile user. All he needs to remember is his login name and the company abbreviation (that is, the name of the Organization object).
Alias object—This option does not require user intervention. In this case, a mobile user’s current context can be changed automatically with the help of an Alias object. If you have a small number of mobile users, you can create an Alias object in the Organization container for each mobile user that points to the user’s User object in his parent container. The value of this strategy is that it creates a simple context for each mobile user. All he needs to remember is his login name and the company abbreviation (that is, the name of the Organization object).
![]() Client configuration—This option does not require any user intervention. It simply involves setting the user’s Name Context and Preferred Server settings in the client properties screen of Windows 95/98 and Windows 2000/NT/XP workstations or in the NET.CFG file of DOS/Windows 3.1 workstations.
Client configuration—This option does not require any user intervention. It simply involves setting the user’s Name Context and Preferred Server settings in the client properties screen of Windows 95/98 and Windows 2000/NT/XP workstations or in the NET.CFG file of DOS/Windows 3.1 workstations.
![]() Login scripts—In addition to name context challenges, you must find a way to simultaneously point mobile users to local applications (on a local server) and remote data (on their home server). One strategy for accomplishing these tasks is to use sophisticated login script variables and the special environment variable NW_SITE. The following is an example of a special mobile login script created for JMadison. This container script exists in the .OU=FAC.OU=ADMIN.OU=RIO.O=ACME context:
Login scripts—In addition to name context challenges, you must find a way to simultaneously point mobile users to local applications (on a local server) and remote data (on their home server). One strategy for accomplishing these tasks is to use sophisticated login script variables and the special environment variable NW_SITE. The following is an example of a special mobile login script created for JMadison. This container script exists in the .OU=FAC.OU=ADMIN.OU=RIO.O=ACME context:
;********************************************************
; MOBILE CONTAINER LOGIN SCRIPT
; for OU=FAC.OU=ADMIN.OU=RIO.O=ACME
; Creation Date: 11/8/03
; Revisions:
;********************************************************
REM Do not execute default script
NO_DEFAULT
Write "Good %GREETING_TIME, %LOGIN_NAME"
REM Map PUBLIC drive to local server
MAP S16:=SYS:PUBLIC
REM Map F: drive to the user’s home server
MAP F:="HOME_DIRECTORY"
REM Map NetWare Drives according to the NW_SITE variable
IF <NW_SITE> == "NORAD" THEN BEGIN
MAP ROOT M:= NOR-SRV1SYS:MAIL
MAP ROOT W:= NOR-SRV1SYS:APPSWP
MAP ROOT Q:= NOR-SRV1SYS:APPSMSOFFICE
END
IF <NW_SITE> == "RIO" THEN BEGIN
MAP ROOT M:= RIO-SRV1SYS:MAIL
MAP ROOT W:= RIO-SRV1SYS:APPSWP
MAP ROOT Q:= RIO-SRV1SYS:APPS MSOFFICE
END
IF <NW_SITE> == "CAMELOT" THEN BEGIN
MAP ROOT M:= CAM-SRV1SYS:MAIL
MAP ROOT W:= CAM-SRV1SYS:APPSWP
MAP ROOT Q:= CAM-SRV1SYS:APPS MSOFFICE
END
IF <NW_SITE> == "TOKYO" THEN
BEGIN MAP ROOT M:= TOK-SRV1SYS:MAIL
MAP ROOT W:= TOK-SRV1SYS:APPSWP
MAP ROOT Q:= TOK-SRV1SYS:APPS MSOFFICE
END
IF <NW_SITE> == "SYDNEY" THEN BEGIN
MAP ROOT M:= SYD-SRV1SYS:MAIL
MAP ROOT W:= SYD-SRV1SYS:APPSWP
MAP ROOT Q:= SYD-SRV1SYS:APPS MSOFFICE
END
EXIT
TIP
Study the differences between remote and mobile users carefully. Specifically, remember that remote users access the network through dial-up lines, and they restrict their activity to resources in their own home container. Mobile users, on the other hand, are more challenging because they demand simultaneous access to both local applications and remote data.
Well, that completes your lesson in building a user environment plan (UEP). See Table 20.2 for some suggested mobile user strategies.

In this section, you learned how to design client configurations, place eDirectory objects, and plan login scripts for easy user access. Now you should be a certified Novell Accessibility Engineer (CAE)—or, not yet. First, you must tackle the next three lab exercises. Go for it!
In this exercise, you analyze the users’ accessibility needs by doing the following:
![]() Part I: Determine Physical Resource Needs
Part I: Determine Physical Resource Needs
![]() Part II: Determine Application Needs
Part II: Determine Application Needs
Using the ACME scenario in Chapter 18, “Novell eDirectory Preparation,” identify who needs access to each physical resource for the case company by completing the rows in Table 20.3.


In this exercise, you complete the accessibility guidelines template in Table 20.5 for ACME. Do the following:
1. In the Standard column, determine your standards for each topic by completing each sentence.
2. In the Security Issues column
a. Determine whether you’ve created any security issues because of your standards.
b. If you’ve created any security issues, describe the potential problems that result from your standard.

In this exercise, you complete the following tasks for ACME:
![]() Part I: Specify a Standard File System Structure
Part I: Specify a Standard File System Structure
![]() Part II: Specify Client Configurations
Part II: Specify Client Configurations
![]() Part III: Design a Strategy for Mobile Users
Part III: Design a Strategy for Mobile Users
![]() Part IV: Create Security Guidelines
Part IV: Create Security Guidelines
![]() Part V: Specify Common Login Scripts
Part V: Specify Common Login Scripts
Use the ACME scenario, your needs analysis from Lab Exercise 20.1, and the accessibility guidelines from Lab Exercise 20.2.
As a group, specify a standard file directory structure, standard drive mappings, Alias objects, and directory map objects for ACME.
1. Create a diagram of the file directory structure for the applications and user directories that will be standardized across the company.
2. Create standard drive mappings for the applications and user directories that will be standardized across the company.
3. Use Table 20.6 to record the placement of Alias objects.

4. Use Table 20.7 to record which directories need directory map objects created.


Review the mobile user strategy options and the ACME scenario. Then select the best strategy by completing the mobile user configuration template shown in Table 20.9.

Specify administrative roles and default user account security guidelines.
1. Using Table 20.10, record which containers will have container administrators, which type of administrators will be used, the rights they will have to eDirectory objects and the file system, and who will occupy the role.
2. Using Table 20.11, record the default security settings for user objects.

Review the user accessibility guidelines you created in Lab Exercise 20.2. Then fill in Table 20.12.

Test Objective Covered:
![]() Design and Implement an eDirectory Print Services Strategy
Design and Implement an eDirectory Print Services Strategy
Queue-based printing is the old way of doing things. Queue-based printing offers NetWare sleuths a simpler, less sophisticated alternative to NDPS. Queue-based printing is available in all versions of NetWare—NetWare 6 and all earlier. It was Novell’s first network-based printing system. Queue-based printing introduced the flexibility of sharing a printer over the network while maintaining centralized administrative control.
We’ll focus our attention in this section on queue-based printing setup, management, and troubleshooting. So, without any further ado, let’s get on with the show!
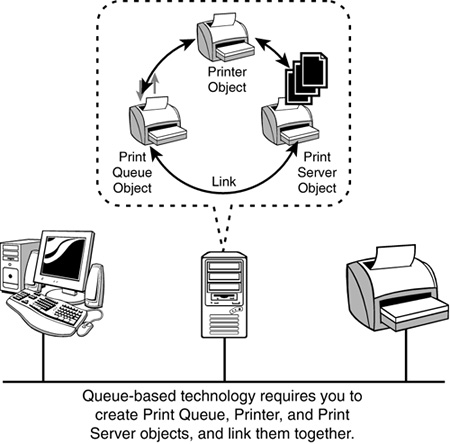
As with previous versions of NetWare, NetWare 6 does not have built-in printing services. These services aren’t available until you add them. To set up NetWare 6 printing, you’ll need to create three main NDS printing objects:
![]() Print queues
Print queues
![]() Print servers
Print servers
![]() Printers
Printers
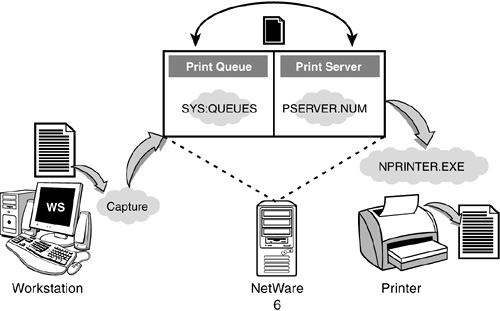
So, how does it work? As you can see in Figure 20.1, it all starts at the NetWare 6 workstation. Users print their documents from a client application to a print queue. A print queue is a shared directory on the file server disk that stores print jobs in the order in which they’re received. The print queue then lines up the various users’ documents and sends them to the appropriate printer when the time is right. The print server keeps track of print job priority and directs them from the queue to the appropriate network printer. Voilá!
In a transparent NetWare 6 printing environment, users print directly from their network application and the output magically appears on the printer down the hall. Although this level of magic seems trivial to them, it’s a nightmare for you, the CNE. It was worse in earlier versions of NetWare because users had to be aware of which print queue serviced their printer. Redirection commands were complex, and they had to redirect print jobs from local workstation ports to specific network print queues. Now you can see why it all breaks down.
NetWare 6 has dramatically simplified printing by using background queue management. This means users no longer have to print to queues; they can print directly to Printer objects. As a matter of fact, they don’t even need to know where the objects are stored, just the ones to which they want to print. Wow!
So, everything’s working fine and your users are happily printing along. Then zowie—the printer breaks! Oops, now what?
Printing management is your life. More than any other network resource, printing services requires constant attention. You’ll have to learn how to manage print queues, print servers, and printers. Fortunately, NetWare 6 provides a variety of powerful tools for just this type of emergency. Here’s how printing management works:
![]() Managing print queues—During your stint as a CNE, you’ll have to learn to manage a variety of print queue tasks, including controlling print queue workflow, managing print jobs in the queue, and controlling access to the print queue. Fortunately, Novell offers NetWare Administrator—it enables you to manage queues from within a graphical utility. One of the most important aspects of print queue management is what you do with the jobs when they’re there. NetWare Administrator provides two windows for this task: Print Queue Job List and Print Job Detail.
Managing print queues—During your stint as a CNE, you’ll have to learn to manage a variety of print queue tasks, including controlling print queue workflow, managing print jobs in the queue, and controlling access to the print queue. Fortunately, Novell offers NetWare Administrator—it enables you to manage queues from within a graphical utility. One of the most important aspects of print queue management is what you do with the jobs when they’re there. NetWare Administrator provides two windows for this task: Print Queue Job List and Print Job Detail.
![]() Managing the print server—While dealing with the print server on a daily basis, you’ll have to perform a variety of tasks, including viewing print server status, bringing down the print server, and assigning print server users and operators. Again, these tasks can be accomplished within the friendly GUI windows of NetWare Administrator. Be careful when you assign print server operators because they’re given power to control things any mortal user shouldn’t have access to.
Managing the print server—While dealing with the print server on a daily basis, you’ll have to perform a variety of tasks, including viewing print server status, bringing down the print server, and assigning print server users and operators. Again, these tasks can be accomplished within the friendly GUI windows of NetWare Administrator. Be careful when you assign print server operators because they’re given power to control things any mortal user shouldn’t have access to.
![]() Managing the printer—Logically, the printer is at the end of the road. When you perform routine printer management tasks, consider viewing and controlling the printer status and responding to printer error messages. The Printer Status window in NetWare Administrator enables you to perform numerous maintenance tasks, including changing service mode, mounting forms, stop/starting printers, selecting form feed, and stopping jobs. I predict you’ll spend a lot of time there.
Managing the printer—Logically, the printer is at the end of the road. When you perform routine printer management tasks, consider viewing and controlling the printer status and responding to printer error messages. The Printer Status window in NetWare Administrator enables you to perform numerous maintenance tasks, including changing service mode, mounting forms, stop/starting printers, selecting form feed, and stopping jobs. I predict you’ll spend a lot of time there.
So, there you have it—queue-based printing. That wasn’t so bad, was it? Yes! Wouldn’t life in the NetWare 6 universe be great without printing? Maybe, but without printers, there wouldn’t be paperwork, and without paperwork, you wouldn’t be reading this book. And without this book, you wouldn’t be a great CNE. And ultimately, without “CNE-ship,” you would be stuck in a musty office somewhere generating copious paperwork. So, I guess in some strange way, printing conquers bureaucracy.
As you just learned, the architecture of queue-based print services is based on the creation and linking of three components: printers, print queues, and print servers. As you can see in Figure 20.2, this places a great burden on the NetWare file server.
As you’ll soon see, queue-based printing is a wondrous five-step journey from the workstation to the network printer. First there’s data generation and then capturing. This process helps redirect the print job from local workstation ports to the centralized server hard drive. Next, the print job waits in a queue until the print server is ready for it. Then the print servers grab the job from the queue and send it along the wire to the correct printer. Finally, the printer prints the requested document. All the while, the user is holding his or her breath.
Even though the queue-based printing process might differ for different network environments, we can take a general look at how things work:
1. Print data is generated and transmitted.
2. Data is redirected to a network queue (called capturing).
3. Data is stored in a print queue.
4. Print data is transmitted to a printer station.
5. Printer formats the data and completes the print job.
Let’s take a closer look.
This step is straightforward enough. The application compiles the data entered by the user and passes it to a printer driver, which then generates the printer data.
After the print job has been assembled into small packets, the data is labeled and passed to a network board. From the network board, each packet is transmitted toward the print server that will store the data. A print queue is actually a directory on a server that stores print jobs while waiting to be printed. Let’s take a look first at how everything hooks up.
A printer usually is usually connected to a standalone computer with a cable plugged into the parallel (LPT) or serial (COM) port of the printer. An application running on the computer tells the computer that it wants to print a document. The application sends the data to a printer driver on the computer, which formats the data so the printer can understand it. When the computer is told to print a document, it sends the formatted data through the port to which the cable is attached. The printer receives the data through the port, interprets the data (according to the formatting so nicely performed by the printer driver), and finally prints the document.
In NetWare’s queue-based printing system, however, things work a bit differently. After the print job is sent from the computer, it’s redirected to a print queue. This redirection can be done using the CAPTURE utility, the NPRINT utility, or the network printing capabilities built into Windows.
Multiple users send their print jobs from multiple computers, all ending up in a single print queue. All documents are stored in and printed from the queue on a first-come, first-served basis. Therefore, rather than each individual user having a separate printer hooked up to each standalone computer, the print jobs are routed through the network to a centralized queue.
When the print job reaches the print server, the data is stripped of its label information and stored as a file on the server’s hard drive in the form of a print queue. After all the data has been received for a print job and has been stored, the file is closed and a filename is added to the queue associated with the destination printer.
The PSERVER.NLM software program in NetWare 6 is known as the print server. It runs on the NetWare server that takes the print jobs from the print queue and sends them to the printer. A print server is responsible for monitoring the print queue for data and, when it receives data, it sends that data to the printer.
This action is all based on print job parameters that include the sequence and priority of the individual print jobs. Parameters can be set to assign a high priority to a print job (which means it prints before other documents) or even to print at a specific time or a specific printer. Think of the print server as your network printing traffic cop.
The manner in which data is transmitted to a printer differs with different types of printer setup, as follows:
![]() Printer attached to a server—In this setup, the print server reads data from the print queue and passes it to the printer through the hardware port.
Printer attached to a server—In this setup, the print server reads data from the print queue and passes it to the printer through the hardware port.
![]() Printer attached to a workstation—Here, the print server reads the data first. It then passes it to the network board on the printer workstation. The printer workstation receives the data and passes it to the port driver or NPRINTER.
Printer attached to a workstation—Here, the print server reads the data first. It then passes it to the network board on the printer workstation. The printer workstation receives the data and passes it to the port driver or NPRINTER.
![]() Printer attached directly to the network—When it receives print job information, the print server starts reading data from the print queue. The print server then sends the data to the network board of the printer.
Printer attached directly to the network—When it receives print job information, the print server starts reading data from the print queue. The print server then sends the data to the network board of the printer.
All this traffic must be heading somewhere, and the final destination in this case is the printer. In NetWare, a Printer object represents the physical printer that’s attached to the network or our final destination. True to its unparalleled flexibility, NetWare allows one print queue for several network printers or several print queues for only one printer.
If you choose to use one print queue for several printers, the print server determines which printer is free and directs the job to that printer. If you choose to use several print queues for one printer, the print server decides (based on when it received the print job and the priority assigned to it) which job to send to the printer when.
When data arrives at the printer, it’s stored until enough data is accumulated and converted to complete a single printing cycle. In the case of a laser printer, a printing cycle consists of a full page, which means a printing cycle is completed each time a full page is printed. In the case of ink jet or dot matrix printers, a printing cycle consists of one pass of a print head across the page. The time required to complete a printing cycle is determined by the complexity of the data being processed. When the last printing cycle has completed, the print job has finished.
Pretty cool how that all ties together, huh? Let’s take a look now at how to set up a queue-based printer.
You have several options for setting up a network queue-based printer:
![]() You can connect a printer to a server using any connection type supported by the printer (such as the LPT and COM ports mentioned earlier). Use the PSERVER.NLM software program for this setup.
You can connect a printer to a server using any connection type supported by the printer (such as the LPT and COM ports mentioned earlier). Use the PSERVER.NLM software program for this setup.
![]() You can connect a printer to a client workstation using any LPT or COM port on the workstation. Use PSERVER.NLM (the print server) at the server and NPRINTER.EXE at the remote workstation if the workstation is running any operating system other than Windows 95. (If the workstation is running Windows 95/98, use NPTWIN95.EXE.)
You can connect a printer to a client workstation using any LPT or COM port on the workstation. Use PSERVER.NLM (the print server) at the server and NPRINTER.EXE at the remote workstation if the workstation is running any operating system other than Windows 95. (If the workstation is running Windows 95/98, use NPTWIN95.EXE.)
![]() You can connect a printer directly to the network by using an interface serviced by PSERVER.NLM (for example, JetDirect).
You can connect a printer directly to the network by using an interface serviced by PSERVER.NLM (for example, JetDirect).
![]() You can load NPRINTER.NLM on a remote computer running NetWare that the printer is attached to.
You can load NPRINTER.NLM on a remote computer running NetWare that the printer is attached to.
That’s all there is to it. Now it’s time to design a queue-based printing system for ACME. Check it out in Lab Exercise 20.4.
This exercise walks you though the design and implementation of a basic print system using the NetWare Administrator graphical interface. This assumes that you’ve already created ACME’s NDS tree. We’ll be working in the Crime Fighting department today. Seems appropriate, given that we’re trying to solve a mystery. Where’s Sherlock Holmes when you need him?
Here’s a preview:
![]() Part I: Create a Print Queue object
Part I: Create a Print Queue object
![]() Part II: Create a Printer object
Part II: Create a Printer object
![]() Part III: Create a Print Server object
Part III: Create a Print Server object
![]() Part IV: Load the print server
Part IV: Load the print server
![]() Part V: Install the physical printer
Part V: Install the physical printer
![]() Part VI: Prepare the NetWare 6 workstation
Part VI: Prepare the NetWare 6 workstation
![]() Part VII: Send a print job to the printer
Part VII: Send a print job to the printer
For the exercise, we’ll assume the following names:
![]() Print server:WHITE-PS1
Print server:WHITE-PS1
![]() Print queue:CANONBJ-PQ1
Print queue:CANONBJ-PQ1
![]() Printer:CANONBJ-P1
Printer:CANONBJ-P1
The following hardware and software are required for this exercise:
![]() A NetWare 6 server called WHITE-SRV1.WHITE.CRIME.TOKYO.ACME (which you should have previously installed using the directions found in Chapter 2, “NetWare 6 Upgrade and Migration”).
A NetWare 6 server called WHITE-SRV1.WHITE.CRIME.TOKYO.ACME (which you should have previously installed using the directions found in Chapter 2, “NetWare 6 Upgrade and Migration”).
![]() A workstation running the NetWare 6 Novell Client (that was in Chapter 4)
A workstation running the NetWare 6 Novell Client (that was in Chapter 4)
![]() A printer with a parallel cable
A printer with a parallel cable
First, we’ll create the Print Queue object.
1. Log in to the network as Admin, if you haven’t already done so.
2. Launch the NetWare Administrator utility.
3. Create the CANONBJ-PQ1 Print Queue object.
a. When the main NetWare Administrator screen appears, browse the tree to locate the WHITE Organizational Unit, and then click it to select it.
b. Press Insert.
c. When the New Object dialog box appears, double-click Print Queue.
d. When the Create Print Queue dialog box appears
![]() The Directory Service Queue radio button should be selected by default.
The Directory Service Queue radio button should be selected by default.
![]() Type the following in the Print Queue Name field:
Type the following in the Print Queue Name field:
CANONBJ-PQ1
![]() Click the browse button to the right of the Print Queue Volume field.
Click the browse button to the right of the Print Queue Volume field.
e. When the Select Object dialog box appears, double-click the WHITE-SRV1_SYS volume in the Available Objects list box.
f. When the Create Print Queue dialog box reappears
![]() Mark the Define Additional Properties check box.
Mark the Define Additional Properties check box.
![]() Click Create.
Click Create.
g. When the Print Queue: CANONBJ-PQ1 dialog box appears
![]() The Identification page should be displayed by default.
The Identification page should be displayed by default.
![]() Type the following in the Other Name field:
Type the following in the Other Name field:
MainQ
![]() Type the following in the Location field:
Type the following in the Location field:
Downtown
![]() All three check boxes in the Operator Flags section should be marked by default.
All three check boxes in the Operator Flags section should be marked by default.
4. Examine the default users.
a. Click the Users button.
b. When the Users page appears, determine which users are assigned as queue users and why.
5. Verify that the queue directory has been created.
a. Launch the Windows Explorer utility.
b. In the left pane, click the plus sign (+) in front of NetWare Servers@@>White-Srv1@@>Sys (this might be mapped as drive F:).
c. Where do you think print queues are located?
d. In the left pane, double-click on the QUEUES directory.
e. How many queue subdirectories are listed (that is, subdirectories with a .QDR extension)?
f. Exit the Windows Explorer utility.
6. In the NetWare Administrator utility, click OK to save your changes to the CANONBJ-PQ1 Print Queue object.
Next, we need to create the Printer object.
1. Create the CANONBJ-PQ1 Printer object.
a. Make sure that the WHITE Organizational Unit is highlighted.
b. Press Insert.
c. When the New Object dialog box appears, double-click Printer (Non NDPS).
d. When the Create Printer dialog box appears
![]() Type the following in the Printer Name field:
Type the following in the Printer Name field:
CANONBJ-P1
![]() Mark the Define Additional Properties check box.
Mark the Define Additional Properties check box.
![]() Click Create.
Click Create.
e. When the Printer (Non NDPS): CANONBJ-P1 dialog box appears, type the following in the Other Name field:
Booking Printer
2. Link the printer with the print queue.
a. Click the Assignments button.
b. When the Assignments page appears, click Add.
c. When the Select Object dialog box appears, double-click CANONBJ-PQ1 in the Available Objects list box.
3. Configure the Printer object.
a. When the Printer (Non NDPS): CANONBJ-P1 dialog box reappears, click the Configuration button.
b. When the Configuration page appears
![]() Notice that the default listed in the Printer Type field is Parallel.
Notice that the default listed in the Printer Type field is Parallel.
![]() Click Communication.
Click Communication.
c. When the Parallel Communication dialog box appears
![]() Select the appropriate port from the Port drop-down list. Typically, you will have attached your printer to the LPT1: port.
Select the appropriate port from the Port drop-down list. Typically, you will have attached your printer to the LPT1: port.
![]() In the Interrupts section, the Polled radio button should be selected by default.
In the Interrupts section, the Polled radio button should be selected by default.
![]() In the Connection Type section, the Manual Load (Remote from Print Server) radio button should be selected by default. This indicates that the printer is not attached to the file server that is acting as a print server.
In the Connection Type section, the Manual Load (Remote from Print Server) radio button should be selected by default. This indicates that the printer is not attached to the file server that is acting as a print server.
![]() Click OK.
Click OK.
4. Experiment with the notification feature.
a. When the Configuration page reappears, click the Notification button.
b. When the Notification pane appears:
![]() Unmark the Notify Print Job Owner check box.
Unmark the Notify Print Job Owner check box.
![]() Note what happens.
Note what happens.
![]() Mark the Notify Print Job Owner check box.
Mark the Notify Print Job Owner check box.
![]() Note what happens.
Note what happens.
5. Configure a supported printer cartridge.
a. Click the Features button.
b. When the Features page appears
Finally, it’s time to build the Print Server object.
1. Create the WHITE-PS1 Print Server object.
a. Make sure that the WHITE Organizational Unit is highlighted.
b. Press Insert.
c. When the New Object dialog box appears, double-click Print Server (Non NDPS).
d. When the Create Print Server dialog box appears
![]() Type the following in the Print Server Name field:
Type the following in the Print Server Name field:
WHITE-PS1
![]() Mark the Define Additional Properties check box.
Mark the Define Additional Properties check box.
![]() Click Create.
Click Create.
e. When the Print Server (Non NDPS): WHITE-PS1 dialog box appears
![]() The Identification page should be displayed by default.
The Identification page should be displayed by default.
![]() Click Change Password.
Click Change Password.
f. When the Change Password dialog box appears
![]() Type the following in the New Password field:
Type the following in the New Password field:
Secret
![]() Type the following in the Retype New Password field:
Type the following in the Retype New Password field:
Secret
![]() Click OK.
Click OK.
2. Assign printers to be managed.
a. Click the Assignments button.
b. When the Assignments page appears, click Add.
c. When the Select Object dialog box appears, double-click CANONBJ-P1.
3. Examine default print server users.
a. Click the Users button.
b. When the Users page appears, determine who is designated as a print server user and why.
4. Examine the default print server operator.
a. Click the Operator button.
b. When the Operator page appears, determine who is designed as a print server operator and why.
5. Enable auditing.
a. Click the Auditing Log button.
b. When the Auditing Log page appears, click Enable Auditing.
c. What field changes?
d. Click OK to save your changes to this Print Server object.
6. Examine the print layout.
a. Double-click the WHITE-PS1 Print Server object.
b. When the Print Server (Non NDPS): WHITE-PS1 dialog box appears, click the Print Layout (Non NDPS) button.
c. When the Print Layout page appears, note the exclamation point next to the print server. What do you think it means?
d. Click the print server to select it, and then click Status.
e. Note what you see.
f. Click Close to close the status window.
g. Click OK to return to the main NetWare Administrator browser screen.
Congratulations! You’ve built all the components needed for printing. Now all you have to do is find the right printer and load the print server. Ready, set, print.
1. Load the print server program
a. At the server console, make sure that you’re at the colon prompt. If not, press Alt+Esc repeatedly until you are.
b. Type the following to load the print server program on the file server and then press Enter:
PSERVER
c. When the next screen appears, WHITE.CRIME.TOKYO.ACME should be listed in the Enter Print Server Name box. Press Enter to accept this default.
d. When the next screen appears, select WHITE-PS1 in the Contents of Current Context box and press Enter.
e. What happens next?
f. Take steps to allow loading to continue.
2. Check the status of the CANONBJ-P1 printer.
a. When the Available Options menu appears, select Printer Status, and then press Enter.
b. In the Printer List, the CANONBJ-P1.WHITE.CRIME.TOKYO.ACME printer should be highlighted. Press Enter to select it.
c. Note the status of the printer.
d. Press Escape twice to return to the Available Options menu.
3. Check the status of the print server.
a. Choose Print Server Information from the Available Options menu.
b. When the Print Server Information and Status screen appears, you’ll notice that the Current Status field is highlighted by default. Press Enter to accept the default.
c. When the Print Server Status Options menu appears, select Unload and press Enter.
d. What happens?
1. Install a Windows 95/98 or Windows 2000/NT/XP printer driver.
a. Skip to step 2 if you’ve already installed a Windows printer driver for your printer.
b. Click Start, Settings, Printers.
c. When the Printers window appears, double-click the Add Printer icon.
d. When the first Add Printer Wizard dialog box appears, click Next.
e. When the next Add Printer Wizard dialog box appears, make sure that the Local Printer radio button is selected, and then click Next.
f. When the next Add Printer Wizard dialog box appears, the LPT1: port should be selected by default. Click Next to continue.
g. When the next Add Printer Wizard dialog box appears
![]() Select the manufacturer of your printer in the Manufacturers list box.
Select the manufacturer of your printer in the Manufacturers list box.
![]() Select the model of your printer in the Printers list box.
Select the model of your printer in the Printers list box.
![]() Click Next.
Click Next.
h. When the next Add Printer Wizard dialog box appears
![]() Change the default listed in the Printer Name field, if you want to do so.
Change the default listed in the Printer Name field, if you want to do so.
![]() If the choice is presented, mark the Yes radio box if you want Windows-based programs to use this printer as the default printer. If this is the first printer driver to be installed on this workstation, this printer will automatically be set as the default printer.
If the choice is presented, mark the Yes radio box if you want Windows-based programs to use this printer as the default printer. If this is the first printer driver to be installed on this workstation, this printer will automatically be set as the default printer.
![]() Click Next.
Click Next.
i. When the next Add Printer Wizard dialog box appears
![]() Printer sharing is defined as making a printer available to other users.
Printer sharing is defined as making a printer available to other users.
j. When the next Add Printer Wizard dialog box appears, you’ll be asked whether you want to print a test page. Make sure that the Yes (Recommended) radio button is selected, and then click Finish.
k. Load a Windows CD-ROM if instructed to do so, and then click OK.
l. Wait while the driver files are copied to your workstation.
m. If the test sheet prints correctly, click Yes.
n. If the test sheet does not print correctly, click No and troubleshoot the problem.
o. Click Finish to close the wizard.
2. Configure the Windows printer driver.
a. In the Printers window
![]() Right-click the printer driver for your printer.
Right-click the printer driver for your printer.
![]() Select Properties from the pop-up menu that appears.
Select Properties from the pop-up menu that appears.
b. When the Properties dialog box for your printer appears, click the Details tab.
c. When the Details page appears
![]() Select \WHITE-SRV1CANONBJ-PQ1 from the Print to the Following Port drop-down list.
Select \WHITE-SRV1CANONBJ-PQ1 from the Print to the Following Port drop-down list.
![]() Make sure that the appropriate printer driver is listed in the Print Using the Following Driver field.
Make sure that the appropriate printer driver is listed in the Print Using the Following Driver field.
![]() Click OK to save your changes.
Click OK to save your changes.
d. Click Close (X) to close the Printer dialog box.
3. Launch the NPRINTER.EXE program.
a. Click Start, Run.
b. When the Run dialog box appears
![]() Type the following in the Open field:
Type the following in the Open field:
Z: printer.exe
![]() Click OK.
Click OK.
c. When the Add Network Printer dialog box appears
![]() The NDS Printer radio button should be selected by default.
The NDS Printer radio button should be selected by default.
d. When the Select object dialog box appears, double-click the CANONBJ-P1 printer.
e. What happens?
f. Click OK to acknowledge the message.
g. On the file server, load the print server again.
h. On the workstation
![]() Try selecting the CANONBJ-P1 printer again. This time, it should work.
Try selecting the CANONBJ-P1 printer again. This time, it should work.
![]() The Activate Printer When Nprinter Manager Loads check box should be marked by default.
The Activate Printer When Nprinter Manager Loads check box should be marked by default.
![]() Click OK to save your changes.
Click OK to save your changes.
i. When the status screen appears, note the values in the Nprinter Status and Printer Status fields.
j. Click Close (X) to minimize the NetWare Nprinter Manager window.
k. An Nprinter dialog box will appear. It advises you that it is unloading the NetWare Nprinter Manager and indicates that currently running Nprinters will remain active. Click OK to acknowledge the message.
1. In NetWare Administrator
a. Click the Printer icon in the toolbar.
b. When the Print dialog box appears
![]() Make sure that the correct printer is selected.
Make sure that the correct printer is selected.
![]() Click OK.
Click OK.
2. A printout of the NDS tree should appear on your printer. If not, troubleshoot the problem.
3. When a NetWare broadcast message appears indicating that your print job has been printed, click Close to acknowledge the message.
Test Objective Covered:
![]() Design and Implement an eDirectory Print Services Strategy
Design and Implement an eDirectory Print Services Strategy
The second and final stop on our whirlwind tour of NetWare 6 print services design is NDPS. Now that you’ve examined the legacy queue-based printing system, it’s time to master Novell Distributed Print Services (NDPS)—the present and future of Novell printing. NDPS is the result of a joint development effort by Novell, Hewlett-Packard, and Xerox. It is designed to replace the traditional queue-based printing system found in earlier versions of NetWare—although the two can peacefully coexist together.
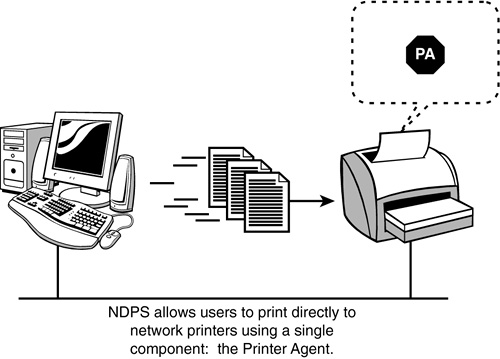
Bottom line: easier setup, better management, and more flexibility. Novell certainly hasn’t solved your printing problems entirely, but it has given you some great tools with NDPS. You no longer have to create, link, and manage Print Queue, Print Server, and Printer objects. NDPS combines these objects into one software entity, called a printer agent. Although NDPS does not require print queues, you can continue to use queue-based printers on your network because NDPS offers full backward compatibility.
Benefits of NDPS include the following:
![]() Improved overall network performance
Improved overall network performance
![]() Reduced network printing problems
Reduced network printing problems
![]() Reduced administration costs and management time
Reduced administration costs and management time
Additionally, Novell’s Web-based management tool, iManager, enables you to create, configure, and manage printers without having to go to the server console. Now we’re talking!
In this section, you learn about NDPS architecture and practice installing NDPS printing objects.
The architecture of Novell legacy queue-based print services is based on the creation and linking of three components: printers, print queues, and print servers. As you learned earlier in this chapter, that creates a circle of administrative responsibility for you and the NetWare operating system.
Setting up queue-based printing is often a complex task. To print, user data follows a wondrous journey from the workstation to the network printer. First, there is capturing. This process redirects the print job from a local workstation to the server hard drive containing the specified print queue. Next, the print job waits in the print queue until the print server is ready to handle the print job. Finally, the print server sends the print job to the correct printer.
NDPS combines the printer, print queue, and print server functions into a single entity, called a printer agent. The need to create print queues has been eliminated because users send print jobs directly to network printers. As you can see in Figure 20.3, the queue-based redirection complexity has been eliminated with printer agents transparently managing the entire printing journey.
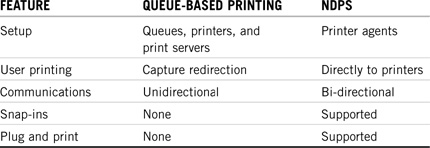
Now let’s take a quick look at some of the most obvious differences between queue-based printing and NDPS (follow along in Table 20.13).
![]() Setup—In queue-based printing systems, network administrators must create and link Print Queue, Printer, and Print Server objects. With NDPS, network administrators create printer agents instead.
Setup—In queue-based printing systems, network administrators must create and link Print Queue, Printer, and Print Server objects. With NDPS, network administrators create printer agents instead.
![]() User printing—In queue-based printing systems, the client must capture the printer port on the workstation and redirect the data to a server-based queue file. The file (that is, a print job) then waits in line until the print server sends it to the correct printer. With NDPS, a user simply submits a print job directly to a printer and the appropriate printer agent takes care of the rest. Also, printer drivers can automatically be installed on user workstations.
User printing—In queue-based printing systems, the client must capture the printer port on the workstation and redirect the data to a server-based queue file. The file (that is, a print job) then waits in line until the print server sends it to the correct printer. With NDPS, a user simply submits a print job directly to a printer and the appropriate printer agent takes care of the rest. Also, printer drivers can automatically be installed on user workstations.
![]() Communications—In queue-based printing systems, printing communications are unidirectional. Feedback consists of pop-up windows reporting a nonconfigurable set of events. With NDPS, communications are bi-directional. Network administrators can configure event notification utilizing the following methods: email (GroupWise), pop-up windows, and event logs. Third parties can also develop other mechanisms, such as the use of beepers and faxes. As a matter of fact, reported events are limited only by the printer’s capability. This provides a framework for more intelligent printers in the future.
Communications—In queue-based printing systems, printing communications are unidirectional. Feedback consists of pop-up windows reporting a nonconfigurable set of events. With NDPS, communications are bi-directional. Network administrators can configure event notification utilizing the following methods: email (GroupWise), pop-up windows, and event logs. Third parties can also develop other mechanisms, such as the use of beepers and faxes. As a matter of fact, reported events are limited only by the printer’s capability. This provides a framework for more intelligent printers in the future.
![]() Snap-ins—Queue-based printing systems don’t support add-ons or extensions from third-party companies. With NDPS, you can customize the capabilities of your printing system. In addition, Novell and other third-party manufacturers offer snap-in interfaces for enhanced printing.
Snap-ins—Queue-based printing systems don’t support add-ons or extensions from third-party companies. With NDPS, you can customize the capabilities of your printing system. In addition, Novell and other third-party manufacturers offer snap-in interfaces for enhanced printing.
![]() Plug and print—Queue-based printing systems don’t support automatic hardware detection or plug-and-print technology, meaning that you must create and configure Printer objects manually. With NDPS, plug-and-print options are available for installing public access printers. In addition, NDPS enables you to select common printer drivers and have them automatically downloaded and installed on each workstation. (Note: Plug-and-Print capabilities require an NDPS-aware printer. That is, a printer with the printer agent functionality embedded in its hardware.)
Plug and print—Queue-based printing systems don’t support automatic hardware detection or plug-and-print technology, meaning that you must create and configure Printer objects manually. With NDPS, plug-and-print options are available for installing public access printers. In addition, NDPS enables you to select common printer drivers and have them automatically downloaded and installed on each workstation. (Note: Plug-and-Print capabilities require an NDPS-aware printer. That is, a printer with the printer agent functionality embedded in its hardware.)
This completes our comparison of NDPS and legacy queue-based printing. Now, let’s take a moment to explore the two different NDPS printer types: public access and controlled access.
With NetWare 6, NDPS printers can be connected to the network in a variety of different ways:
![]() Network printers—These are attached directly to the network cable.
Network printers—These are attached directly to the network cable.
![]() Remote printers—These are attached to a workstation or remote file server using special software provided by NDPS.
Remote printers—These are attached to a workstation or remote file server using special software provided by NDPS.
![]() Local printers—These are attached directly to a server running NDPS.
Local printers—These are attached directly to a server running NDPS.
Regardless of the way you connect your printer to the network, it must be defined as one of two types: public access or controlled access. A public access printer is available without restriction to everyone on the network. A controlled access printer, on the other hand, has an associated eDirectory object and provides a tighter degree of administrative control and security.
Let’s take a closer look.
A public access printer is simply public. In other words, anyone on the network can use it without any restrictions. The following are important points to remember about a public access printer:
![]() It has no corresponding eDirectory object.
It has no corresponding eDirectory object.
![]() It provides plug-and-print capabilities.
It provides plug-and-print capabilities.
![]() It has no security.
It has no security.
![]() It limits job event notification.
It limits job event notification.
![]() It allows little administrative configuration.
It allows little administrative configuration.
A public access printer is created using the Printer Agent List tab of the NDPS Manager object. Because a public access printer is not represented in the eDirectory tree as an eDirectory object, it cannot be viewed using the browser in NetWare Administrator. It can, however, be managed using the Tools menu of ConsoleOne or the NDPS Manager object that the printer agent is associated with.

Controlled access printers are represented as objects in the eDirectory tree. Because of that, you can use NetWare Administrator to change printer values, restrict access, and set up event notification. Controlled access printers provide the following advantages over public access printers: They offer a full range of network security options, they offer a full range of event and status notification options, and they can be customized with a full range of printer configurations.
There are several ways to create a controlled access printer. First, you can create a new printer agent. This creates a corresponding NDPS Printer object automatically. Second, you can upgrade an existing NDPS Printer object to controlled status using ConsoleOne. Finally, you can convert a public access printer.
See Table 20.14 for a summary of the most important differences between public access and controlled access printers.
So, that’s the essence of printing. As you can see, NDPS offers a simplified journey from the user workstation to the printer down the hall. Now, let’s continue our exploration of NDPS by taking a close look at its detailed architecture.
As you just learned, NDPS offers important improvements over the Novell legacy queue-based printing architecture. First of all, the printer, print queue, and print server functions have been combined into a single logical entity, called a printer agent. This architecture ensures the scalability of NetWare 6 printing and enables you to print in any type of network environment. The NDPS scalability architecture also enables you to print to a variety of devices—ranging from simple dot-matrix printers to laser printers and large-scale production devices. Figure 20.4 illustrates the major components of the NDPS architecture:
![]() NDPS printer agent—This is the heart of NetWare 6 NDPS printing. A printer agent combines the functions previously performed by a printer, print queue, print server, and spooler into one intelligent, simplified entity.
NDPS printer agent—This is the heart of NetWare 6 NDPS printing. A printer agent combines the functions previously performed by a printer, print queue, print server, and spooler into one intelligent, simplified entity.
![]() NDPS manager—The NDPS manager is a logical entity used to create and manage printer agents. It is represented as an object in the eDirectory tree. The NDPS Manager object stores information used by NDPSM.NLM.
NDPS manager—The NDPS manager is a logical entity used to create and manage printer agents. It is represented as an object in the eDirectory tree. The NDPS Manager object stores information used by NDPSM.NLM.
![]() NDPS gateway—NDPS gateways enable you to support printing environments that include non-NDPS-aware printers and print systems that require jobs to be placed in queues. NDPS currently supports two types of gateways: the Novell gateway and third-party gateways. The Novell gateway is implemented through a print device subsystem (PDS) and a port handler (PH).
NDPS gateway—NDPS gateways enable you to support printing environments that include non-NDPS-aware printers and print systems that require jobs to be placed in queues. NDPS currently supports two types of gateways: the Novell gateway and third-party gateways. The Novell gateway is implemented through a print device subsystem (PDS) and a port handler (PH).
![]() NDPS broker—When NDPS is installed, the installation utility ensures that a Broker object is loaded on your network. An NDPS Broker provides three network support services not previously available in NetWare. Although these services are transparent, you should be aware of them in case a Broker decides to take a vacation. The three NDPS support services are Service Registry Services (SRS), Event Notification Services (ENS), and Resource Management Services (RMS).
NDPS broker—When NDPS is installed, the installation utility ensures that a Broker object is loaded on your network. An NDPS Broker provides three network support services not previously available in NetWare. Although these services are transparent, you should be aware of them in case a Broker decides to take a vacation. The three NDPS support services are Service Registry Services (SRS), Event Notification Services (ENS), and Resource Management Services (RMS).

Now let’s take a closer look at each of these four NDPS components and learn how they can be combined to create a powerful NDPS printing system.
A printer agent combines the functions previously performed by queue-based print queues, printers, and print servers into one intelligent, integrated entity. A printer has a one-to-one relationship with a printer agent. That means a printer agent cannot represent more than one printer, nor can more than one printer agent represent a printer. A printer agent can represent either a public access printer or a controlled access printer.
A printer agent can exist as software (running on a NetWare 6 server that represents a printer attached to a server or a network-attached printer) or firmware (embedded within a network-attached printer). In either case, a printer agent provides the following NDPS services:
![]() It manages print job processing and many operations performed by the physical printer (see Figure 20.5).
It manages print job processing and many operations performed by the physical printer (see Figure 20.5).

![]() It answers queries from network clients concerning print jobs, documents, or printer attributes (see Figure 20.6).
It answers queries from network clients concerning print jobs, documents, or printer attributes (see Figure 20.6).

![]() It generates event notification for job completion, printing problems, errors, or changes in the status of a print job, document, or printer (see Figure 20.7).
It generates event notification for job completion, printing problems, errors, or changes in the status of a print job, document, or printer (see Figure 20.7).

![]() It ensures the scalability of the printing environment, enabling you to print in LANs, WANs, and enterprise systems.
It ensures the scalability of the printing environment, enabling you to print in LANs, WANs, and enterprise systems.
![]() It enables you to print to a wide range of physical printing devices.
It enables you to print to a wide range of physical printing devices.
An NDPS Manager object (also referred to as the print service manager) is used to create and manage printer agents (see Figure 20.8). You must create an NDPS Manager object before creating server-based printer agents. The good news is that a single NDPS Manager object can control an unlimited number of printer agents (assuming, of course, that there is enough memory). A good rule of thumb is to create an NDPS Manager object for each server that hosts NDPS printers. Only one NDPS Manager is allowed per server, and only on servers configured to service print jobs. The only exception to this rule occurs when a server has a printer connected directly to it, in which case the NDPS Manager must be loaded on that server as well.

The NDPS Manager software runs on a NetWare 6 server as NDPSM.NLM. This NLM carries out instructions provided by the NDPS Manager object. As you can see in Figure 20.9, NDPSM.NLM can be loaded in one of two ways:
![]() Manually—You can manually load NDPSM.NLM at the server console by typing
Manually—You can manually load NDPSM.NLM at the server console by typing
LOAD NDPSM.NLM <NDPS Manager distinguished name>
For example,
LOAD NDPSM.NLM .NDPSMGR1.WHITE.CRIME.TOKYO.ACME
![]() Automatically—The NDPS Manager can also be loaded automatically by placing the LOAD command in the server’s AUTOEXEC.NCF file. This is the preferred method. Naturally, you’ll need to reboot the server for this change to take effect. If you don’t want to reboot the server, you can simply execute the command manually.
Automatically—The NDPS Manager can also be loaded automatically by placing the LOAD command in the server’s AUTOEXEC.NCF file. This is the preferred method. Naturally, you’ll need to reboot the server for this change to take effect. If you don’t want to reboot the server, you can simply execute the command manually.

Although you can perform some configuration and management tasks directly through the NDPS Manager console interface, NetWare Administrator is a much better tool for performing these tasks. See Figure 20.10 for a quick look at configuring an NDPS Manager object using NetWare Administrator.

An NDPS gateway is a collection of software that runs on the NDPS Broker server and ensures backward compatibility for non-NDPS-aware printers (that is, printers that aren’t equipped with embedded NDPS printer agents). You must select and configure an NDPS gateway whenever you create a printer agent.
One benefit of NDPS gateways is that they enable you to support printing environments using printers that are not NDPS-aware. Using an NDPS gateway, an NDPS client can do the following:
![]() Send print jobs to printers that are not NDPS-aware (that is, printers that aren’t equipped with embedded NDPS controllers)
Send print jobs to printers that are not NDPS-aware (that is, printers that aren’t equipped with embedded NDPS controllers)
![]() Send print jobs to non-NDPS printing systems (such as Unix, Macintosh, queue-based, and mainframe systems)
Send print jobs to non-NDPS printing systems (such as Unix, Macintosh, queue-based, and mainframe systems)
![]() Access print systems that require jobs to be placed in queues
Access print systems that require jobs to be placed in queues
![]() Query printer attributes, including Status
Query printer attributes, including Status
![]() Manage the printer
Manage the printer
In short, an NDPS gateway acts as a software bridge that directly links printer agents to NDPS printers. This is accomplished by translating NDPS instructions into device-specific commands. NDPS currently supports a number of manufacturer-specific and generic gateways:
![]() Manufacturer-specific gateways—These third-party gateways are developed by printer manufacturers to support printers that are connected directly to the network (see Figure 20.11). They’re developed to work with specific proprietary printers and, as such, can provide options not available for the generic Novell gateway. The following manufacturer-specific gateways are available for use with NetWare 6 and provide access to non-NDPS-aware printers: Axis, EpsonNet, Hewlett-Packard, Kyocera, Lexmark, Minolta, and Xerox.
Manufacturer-specific gateways—These third-party gateways are developed by printer manufacturers to support printers that are connected directly to the network (see Figure 20.11). They’re developed to work with specific proprietary printers and, as such, can provide options not available for the generic Novell gateway. The following manufacturer-specific gateways are available for use with NetWare 6 and provide access to non-NDPS-aware printers: Axis, EpsonNet, Hewlett-Packard, Kyocera, Lexmark, Minolta, and Xerox.

![]() Novell gateway—This is a generic gateway that provides NDPS support for devices without an embedded printer agent and printers that don’t have their own manufacturer-specific gateway (see Figure 20.12). The generic Novell gateway supports LPR/LPD (a Unix-based printing protocol used by network-attached printers in TCP/IP environments to service jobs submitted to print queues), Internet Printing Protocol (IPP), and local/remote printers (this includes those printers that are queue-based or those configured with Novell’s legacy Remote Printer protocol in IPX environments).
Novell gateway—This is a generic gateway that provides NDPS support for devices without an embedded printer agent and printers that don’t have their own manufacturer-specific gateway (see Figure 20.12). The generic Novell gateway supports LPR/LPD (a Unix-based printing protocol used by network-attached printers in TCP/IP environments to service jobs submitted to print queues), Internet Printing Protocol (IPP), and local/remote printers (this includes those printers that are queue-based or those configured with Novell’s legacy Remote Printer protocol in IPX environments).

An NDPS Broker is a special management component that provides three important services to the NetWare 6 printing architecture (explained later in this section). The broker is composed of two complementary parts: an eDirectory leaf object (NDPS Broker) and a server-based NLM (BROKER.NLM).
The good news is you don’t have to worry about creating your own NDPS Broker. When NDPS is installed for the first time in an eDirectory tree, the setup tool ensures that an NDPS Broker object is automatically created in the same container as the server upon which NDPS is being installed. If you install NDPS on subsequent servers, the Customize button presented at the end of the NetWare installation process enables you to install an additional broker (if necessary). An additional broker is created automatically only if you install NDPS on a server that’s more than three hops away from the nearest existing broker.
Furthermore, you don’t have to worry about activating an NDPS Broker that has been installed because it’s automatically loaded when NDPS is initialized. To do its job, an NDPS Broker must log in to the eDirectory tree and authenticate itself to the server.
So, what is an NDPS Broker’s job? Good question. An NDPS Broker downloads the printer driver to the workstation and provides three network support services (see Figure 20.13):
![]() Service Registry Services (SRS)—An NDPS Broker allows public access printers to advertise themselves to the network. This is important because it enables network administrators and users to find printers that aren’t represented by an NDPS Printer object. This service maintains information about device type, device name, device address, and other device-specific data, such as the printer manufacturer and model number.
Service Registry Services (SRS)—An NDPS Broker allows public access printers to advertise themselves to the network. This is important because it enables network administrators and users to find printers that aren’t represented by an NDPS Printer object. This service maintains information about device type, device name, device address, and other device-specific data, such as the printer manufacturer and model number.
![]() Event Notification Services (ENS)—An NDPS Broker enables printers to send users and operators customized notifications about printer events and print job status. ENS supports several delivery methods, including pop-up windows, log files, email, and programmatic (that is, relating to, resembling, or having a program).
Event Notification Services (ENS)—An NDPS Broker enables printers to send users and operators customized notifications about printer events and print job status. ENS supports several delivery methods, including pop-up windows, log files, email, and programmatic (that is, relating to, resembling, or having a program).
![]() Resource Management Services (RMS)—An NDPS Broker provides a central repository for printing resources. It enables you to install NDPS drivers, definition files, banners, and fonts in a central location, and then it enables you to automatically download them to clients, printers, or anyone else who needs them.
Resource Management Services (RMS)—An NDPS Broker provides a central repository for printing resources. It enables you to install NDPS drivers, definition files, banners, and fonts in a central location, and then it enables you to automatically download them to clients, printers, or anyone else who needs them.

In this chapter, we’ve been unraveling the mysteries of NetWare 6’s printing revolution—NDPS. So far, you’ve uncovered the fundamental features of NDPS and discovered how its architecture works. Table 20.15 provides a concise review of print service object placement with both queue-based and NDPS-based printing.

Wow, what a chapter! No matter how you slice it, eDirectory accessibility and tree design are complex and rewarding. And just think, this is just the first part of eDirectory design and implementation. There is more gut-wrenching, spine-tingling, hair-tugging fun to come. In Chapter 21, “Novell eDirectory Implementation,” we’ll explore eDirectory implementation.
Hold on tight!!
More fun at ACME! In this second print services design exercise, we’ll build an NDPS printing system for ACME. First, we’ll activate server-based NDPS printing with the creation of an NDPS Broker. If you accepted the defaults for optional components during the NetWare 6 installation process (refer to Chapter 1, “NetWare 6 Installation”), this occurred automatically. Second, we’ll create an NDPS Manager to support multiple printer agents. Third, we’ll create a public access printer and then convert it to a controlled access printer using NetWare Administrator.
Here’s a quick preview:
![]() Part I: Verify NDPS Broker Activation
Part I: Verify NDPS Broker Activation
![]() Part II: Create and Load an NDPS Manager
Part II: Create and Load an NDPS Manager
![]() Part III: Create a Public Access Printer
Part III: Create a Public Access Printer
![]() Part IV: Configure a Container for Automatic Printer Driver Download
Part IV: Configure a Container for Automatic Printer Driver Download
![]() Part V: Test a Public Access Printer Configuration on Your Workstation
Part V: Test a Public Access Printer Configuration on Your Workstation
![]() Part VI: Configure a Container to Remove a Printer Driver
Part VI: Configure a Container to Remove a Printer Driver
![]() Part VII: Convert a Public Access Printer to a Controlled Access Printer
Part VII: Convert a Public Access Printer to a Controlled Access Printer
To accomplish this ACME exercise, you need the following network hardware:
![]() A NetWare 6 server called WHITE-SRV1.WHITE.CRIME.TOKYO .ACME (which can be installed using the directions found in Chapter 1) with the NDPS component installed.
A NetWare 6 server called WHITE-SRV1.WHITE.CRIME.TOKYO .ACME (which can be installed using the directions found in Chapter 1) with the NDPS component installed.
![]() A workstation running either the NetWare 6 Novell Client for Windows 95/98/Me or NetWare 6 Novell Client for Windows NT/2000/XP (which can be installed using the directions found in Chapter 4), with the NDPS component installed.
A workstation running either the NetWare 6 Novell Client for Windows 95/98/Me or NetWare 6 Novell Client for Windows NT/2000/XP (which can be installed using the directions found in Chapter 4), with the NDPS component installed.
![]() A printer physically attached to your server (rather than your workstation). Also, you’ll need to determine the following information for your printer: printer type, gateway type, and printer driver.
A printer physically attached to your server (rather than your workstation). Also, you’ll need to determine the following information for your printer: printer type, gateway type, and printer driver.
Let’s get started.
1. Make sure that your printer is powered on. If it isn’t, perform the following tasks:
a. Do a normal shutdown/power-off of your NetWare 6 server.
b. Ensure that the printer has paper.
c. Turn the printer on and verify that it’s online.
d. Power on your server. Wait until the NetWare 6 operating system has finished loading on your server.
2. You’ll need to verify that an NDPS Broker has been loaded on the WHITE-SRV1 server. On your WHITE-SRV1 server console, press Alt+Esc until the NDPS Broker screen appears.
3. On the NDPS Broker screen, verify that the following three services are enabled:
a. Service Registry Service (SRS)
b. Event Notification Service (ENS)
c. Resource Management Service (RMS)
4. If the NDPS Broker isn’t running, use Alt+Esc to find the server console prompt. There, type the following and press Enter:
LOAD BROKER.NLM
1. On your workstation, log in to the tree as Admin, if you haven’t already done so.
2. Launch NetWare Administrator.
3. Right-click the WHITE container and then choose Create from the pop-up menu that appears.
4. When the New Object dialog box appears, scroll down and select NDPS Manager, and then click OK.
TIP
If NDPS Manager isn’t listed as an option, it probably means that the NDPS client function isn’t installed on your workstation. If so, you’ll need to perform a custom reinstall of the NetWare 6 Novell Client (refer to Chapter 4).
5. When the Create NDPS Manager Object dialog box appears, perform these tasks:
a. In the NDPS Manager Name field, enter the following:
NDPSMGR1
b. Click the Browse button to the right of the Resident Server field.
6. When the Select Object dialog box appears, follow these tasks:
a. Select WHITE-SRV1 in the left pane.
b. Click OK.
7. When the Create NDPS Manager Object dialog box reappears, follow these tasks:
a. Verify that WHITE-SRV1.WHITE.CRIME.TOKYO.ACME is listed in the Resident Server field.
b. Click the browse button to the right of the Database Volume field.
8. When the Select Volume dialog box appears, perform these tasks:
a. Verify that WHITE-SRV1_SYS.WHITE.CRIME.TOKYO.ACME is selected in the Volumes field.
b. Click OK.
9. When the Create NDPS Manager Object dialog box reappears, perform these tasks:
a. Verify that WHITE-SRV1_SYS.WHITE.CRIME.TOKYO.ACME is listed in the Database Volume field.
b. Click Create to create the NDPS Manager object.
10. When the main NetWare Administrator browser screen reappears, you’ll notice that the NDPS Manager object you just created (that is, NDPSMGR1) now appears in the tree. Next, you need to activate it at the server. You’ll also want to add the LOAD statement to the server’s AUTOEXEC.NCF file so that the LOAD statement automatically loads each time the server boots. Here’s how it works:
a. At the server console, press Alt+Esc until you get to a console prompt.
b. At the console prompt, type the following and press Enter:
EDIT AUTOEXEC.NCF
c. Insert the following command at the bottom of the file:
LOAD NDPSM.NLM .NDPSMGR1.WHITE.CRIME.TOKYO.ACME
d. Press Esc to save the file.
e. Verify that Yes is selected and then press Enter when asked whether you want to save SYS:SYSTEMAUTOEXEC.NCF.
f. Next, a screen appears. This screen gives you the opportunity to edit another file. Press Esc to exit this screen.
g. Verify that Yes is selected and then press Enter when asked whether to exit the EDIT utility.
11. Next, you’ll have to load the NDPS Manager manually on the server so that you don’t have to reboot the server to execute the command you just added to the AUTOEXEC.NCF file. To do so, type the following at the server console prompt and press Enter:
LOAD NDPSM.NLM .NDPSMGR1.WHITE.CRIME.TOKYO.ACME
A blank Printer Agent List screen then appears on the server console.
1. Return to your workstation. In NetWare Administrator, double-click the NDPSMGR1 object you just created.
2. The Identification page for the NDPS Manager object appears, by default. When it appears, perform these tasks:
a. Verify that the Version field has a version number in it.
b. Confirm that the Net Address field lists the network address for your server.
c. Verify that the Status section indicates that the NDPS Manager is active.
d. Click the Printer Agent List tab.
3. When the Printer Agent List page appears, click New.
4. When the Create Printer Agent dialog box appears, perform these tasks:
a. In the Printer Agent (PA) Name field, enter the following:
WhitePA1
b. Verify that the NDPS Manager object you created earlier (that is, NDPSMGR1.WHITE.CRIME.TOKYO.ACME) is listed in the NDPS Manager Name field.
c. Normally, you would select the appropriate gateway in the Gateway Type field. (For more details, refer to the documentation that comes with NetWare 6.) For the purposes of this exercise, however, select the Novell Gateway instead.
d. Click OK.
5. When the Configure Novell PDS for Printer Agent “WhitePA1” dialog box appears, perform these tasks:
a. In the Printer Type list box, select the appropriate printer driver for your printer.
b. In the Port Handler Type field, verify that Novell Port Handler is selected.
c. Click OK.
6. When the first Configure Port Handler for Printer Agent “WhitePA1” dialog box appears, perform these tasks:
a. In the Connection Type section, mark the Local (Physical Connection to Server) radio button.
b. In the Port Type section, verify that the LPT1 radio box is marked (assuming, of course, that your printer is attached to the LPT1: port on your server).
c. Click Next.
7. When the second Configure Port Handler for Printer Agent “WhitePA1” dialog box appears, perform these tasks:
a. In the Controller Type field, verify that Auto Select is selected.
b. In the Interrupts section, verify that the None (Polled Mode) radio button is marked.
c. Click Finish.
8. Wait for the printer agent to load.
9. When the Select Printer Drivers dialog box appears, perform these tasks:
a. Verify that the tab corresponding to your workstation platform is selected.
b. Confirm that the appropriate printer driver for your printer is selected.
c. Click Continue.
10. When the Information - NDPS v2.00 dialog box appears, perform these tasks:
a. Review the list of printer drivers to be installed.
b. Click OK.
11. When the Printer Agent List page reappears, perform these tasks:
a. Verify that the status of the WhitePA1 Printer Agent is Idle.
b. Click Cancel to return to the main NetWare Administrator browser screen.
1. In NetWare Administrator, right-click the WHITE container and then choose Details from the pop-up menu that appears.
2. When the Identification page for the WHITE Organizational Unit object appears, select the NDPS Remote Printer Management tab. (You might have to use the scrollbar to find it.)
3. When the NDPS Remote Printer Management page appears, perform these tasks:
a. Mark the Show the Results Window on Workstations check box.
b. Click the Add button below the Printers to Install to Workstations field.
4. When the Available Printers Options dialog box appears, perform these tasks:
a. In the Available Printers field, select the WhitePA1 printer.
b. Click OK.
5. When the NDPS Remote Printer Management page re-appears, perform these tasks:
a. In the Printers to Install to Workstations field, click WhitePA1 to select it.
b. (Optional) If this printer is the default printer for the users in this container, click Set as Default.
c. Click Update Driver.
6. A notice appears informing you that the driver for this printer will be copied to workstations the next time users log in.
a. Click OK to acknowledge the message.
b. Click OK to save your changes.
7. Exit the NetWare Administrator utility.
8. Restart your workstation.
1. Log back in to the tree as Admin.
a. Log into the tree as the Admin user.
b. Wait while NDPS modifies your printer setup. (This could take awhile.) Eventually, the NDPS Remote Printer Management dialog box displays a variety of messages, including one message advising you that Printer WhitePA1 is installed. Wait until the process has completed and then click Close to acknowledge the message.
c. If a printer driver license agreement appears, read the license agreement, and then click Accept to agree to its terms and conditions.
d. You’ll notice that a printer icon corresponding to the printer driver appears in the Printer folder of your Windows workstation.
2. Launch NetWare Administrator.
3. Click Object @@> Print Setup.
4. When the Print Setup dialog box appears, perform these tasks:
a. In the Printer section, open the pull-down box in the Name field and select WhitePA1.
b. Click OK.
5. On the main NetWare Administrator browser screen, click the Printer icon in the toolbar.
6. When the Print dialog box appears, perform these tasks:
a. Verify that WhitePA1 is listed in the Printer field.
b. Confirm that the Print in Two Columns check box is marked.
c. Select the print quality of your choice from the Print Quality drop-down list.
d. Click OK.
7. A printout of your eDirectory tree should appear on your printer. If this happens, congratulations—you’re now the proud owner of a new public access printer.
1. In NetWare Administrator, right-click the WHITE container and then choose Details from the pop-up menu that appears.
2. When the Identification page for the WHITE Organizational Unit object appears, select the NDPS Remote Printer Management page tab. (You might have to use the scrollbar to find it.)
3. When the NDPS Remote Printer Management page appears, perform these tasks:
a. Verify that the Show the Results Window on Workstations check box is marked.
b. Click the Add button under the Printers to Remove from Workstations field.
4. When the Available Printers Options dialog box appears, perform these tasks:
a. In the Available Printers field, click WhitePA1.
b. Click OK.
5. When the NDPS Remote Printer Management page reappears, perform these tasks:
a. You’ll notice that WhitePA1 has disappeared from the Printers to Install to Workstations field and has appeared in the Printers to Remove from Workstations field.
b. Click OK to save your changes.
6. Exit the NetWare Administrator utility.
8. Log back in to the tree as Admin.
a. Log in to the tree as the Admin user.
b. Wait while NDPS modifies your printer setup. (This could take awhile.) Eventually, the NDPS Remote Printer Management dialog box displays a series of messages. One of the messages advises you that Printer WhitePA1 has been removed. Wait until the process has completed and then click Close to acknowledge the message.
9. Verify that the printer is no longer installed on the workstation.
a. Click Start @@> Settings @@> Printers.
b. The WhitePA1 icon should no longer appear in the Printers window.
c. Click File @@> Close to close the window.
10. Delete the printer driver icon from the workstation.
a. From the Printer folder, click the printer driver icon corresponding to WhitePA1 to select the corresponding printer. (Hint: The icon name will list the printer driver name rather than WhitePA1.)
b. Press Delete to delete the icon.
c. Click Yes when asked if you’re sure that you want to delete the icon.
1. In NetWare Administrator, right-click the WHITE container and select Create from the pop-up menu that appears.
2. When the New Object dialog box appears, perform these tasks:
a. Click NDPS Printer.
b. Click OK.
3. When the Create NDPS Printer dialog box appears, perform these tasks:
a. In the NDPS Printer Name field, type the following:
WhiteP1
b. In the Printer Agent Source section, click the Public Access Printer radio button.
c. In the After Creating the NDPS Print Object section, mark the Define Additional Properties check box.
d. Click Create.
4. A Warning - NDPS v2.00 dialog box appears, advising you that converting a public access printer to an NDPS Printer object will require every client installation of this printer to be reinstalled. Click OK to acknowledge the warning.
5. When the Select Printer Agent dialog box appears, verify that WhitePA1 is selected, and then click OK.
6. Wait while NDPS creates the NDPS Printer object. When the Printer Control page for the WhiteP1 NDPS Printer object appears, click the Access Control tab.
7. When the Access Control page appears, perform these tasks:
a. By default, Admin is assigned as a Manager, Operator, and User (because you created this printer while logged on as Admin). You’ll notice that the printer’s home container (WHITE.CRIME.TOKYO.ACME) is designated as a User. This means that everyone in the WHITE container can use the new printer. Let’s restrict access to the Admin user.
b. In the Role field, click Users.
c. In the Current Users field, click
WHITE.CRIME.TOKYO.ACME.
d. Click Delete.
8. When the Delete Member dialog box appears, asking whether you want to delete this user, click OK to confirm.
9. In case something goes wrong with the new controlled access printer, you might want to notify the WhiteP1 Manager with a pop-up notification message. To activate this NetWare 6 feature
a. Click Managers in the Role field.
b. Click Admin.WHITE.CRIME.TOKYO.ACME in the Current Managers field.
c. Click Notification.
10. When the Notification dialog box appears, perform these tasks:
a. If your printer driver allows you to do so (some might not), set up pop-up notification parameters.
b. Click OK.
11. When the Access Control Page reappears, click OK to save your changes.
12. Exit NetWare Administrator.