
Chapter 5 NetWare 6 eDirectory Management
This chapter covers the following testing objectives for Novell Course 3004: Novell Network Management and Novell Course 575: Novell eDirectory Design and Implementation:
![]() Define eDirectory Replication and Synchronization (3004)
Define eDirectory Replication and Synchronization (3004)
![]() Understand eDirectory Partitioning and Replication (575)
Understand eDirectory Partitioning and Replication (575)
![]() Plan, Design, Implement a Partition and Replica Strategy (575)
Plan, Design, Implement a Partition and Replica Strategy (575)
![]() Identify Basic eDirectory Administrative Procedures (3004)
Identify Basic eDirectory Administrative Procedures (3004)
![]() Determine a WAN Traffic Manager Strategy for Your Tree (575)
Determine a WAN Traffic Manager Strategy for Your Tree (575)
![]() Identify eDirectory Recovery Steps (3004)
Identify eDirectory Recovery Steps (3004)
![]() Extend the eDirectory Schema (3004)
Extend the eDirectory Schema (3004)
![]() Redirect Resources in the Tree (3004)
Redirect Resources in the Tree (3004)
![]() Prepare for Upgrading to eDirectory 8.6 (3004)
Prepare for Upgrading to eDirectory 8.6 (3004)
![]() Use the eDirectory Import/Export Wizard to Manage LDIF Files (3004)
Use the eDirectory Import/Export Wizard to Manage LDIF Files (3004)
![]() Identify What iMonitor Is and How to Use It (3004)
Identify What iMonitor Is and How to Use It (3004)
![]() Use iMonitor to Diagnose and Repair eDirectory Problems (3004)
Use iMonitor to Diagnose and Repair eDirectory Problems (3004)
![]() Repair eDirectory Using iMonitor (3004)
Repair eDirectory Using iMonitor (3004)
![]() Maintain and Optimize eDirectory Using Cache Options (3004)
Maintain and Optimize eDirectory Using Cache Options (3004)
![]() Design and Implement a Time Synchronization Strategy (3004)
Design and Implement a Time Synchronization Strategy (3004)
![]() Design and Implement a Time Synchronization Strategy (575)
Design and Implement a Time Synchronization Strategy (575)
Welcome back to eDirectory!
Novell’s CNA Study Guide for NetWare 6 introduced you to a beautiful, powerful eDirectory. Now you’re back for more. In this chapter, we’re going to build on your fundamental eDirectory skills and explore advanced eDirectory design and management.
We’ll begin this challenging tour with a review of eDirectory replication and synchronization rules. Then we’ll break the tree into small little pieces (partitioning) and scatter them around the WAN (replica placement). Of course, design is only the beginning. After that, we’ll tackle a plethora of eDirectory management, implementation, and maintenance tasks. Finally, we’ll end the tour with a few words on time synchronization design.
In summary, this chapter is all about ACME’s partition boundaries, replica placement, synchronization management, and time design. Here’s what’s in store for us:
![]() “Understanding eDirectory Replication and Synchronization”—The first step in building an eDirectory maintenance plan is partitioning fundamentals. In addition, you must understand how to scatter partitions throughout the WAN using replication. eDirectory replication serves two purposes: fault tolerance and resource accessibility. Finally, you must learn how eDirectory replicas communicate, also known as eDirectory synchronization management.
“Understanding eDirectory Replication and Synchronization”—The first step in building an eDirectory maintenance plan is partitioning fundamentals. In addition, you must understand how to scatter partitions throughout the WAN using replication. eDirectory replication serves two purposes: fault tolerance and resource accessibility. Finally, you must learn how eDirectory replicas communicate, also known as eDirectory synchronization management.
![]() “Designing eDirectory Partitions”—Next, we’ll tackle ACME design with a brief review of eDirectory partitioning rules. You’ll learn various partition design guidelines and building boundaries for the top and bottom layers of our ACME tree. In the “Designing eDirectory Partitions” section, we’ll discuss seven important guidelines that affect the bottom layers of our partition strategy.
“Designing eDirectory Partitions”—Next, we’ll tackle ACME design with a brief review of eDirectory partitioning rules. You’ll learn various partition design guidelines and building boundaries for the top and bottom layers of our ACME tree. In the “Designing eDirectory Partitions” section, we’ll discuss seven important guidelines that affect the bottom layers of our partition strategy.
![]() “Placing eDirectory Replicas”—Then we’ll move on to replica design with a brief review of eDirectory’s four different replica types: master, read/write, read-only, and subordinate reference. Next, we’ll discover a variety of different reasons for placing ACME’s replicas intelligently, including fault tolerance, local distribution, bindery services, and improved name resolution.
“Placing eDirectory Replicas”—Then we’ll move on to replica design with a brief review of eDirectory’s four different replica types: master, read/write, read-only, and subordinate reference. Next, we’ll discover a variety of different reasons for placing ACME’s replicas intelligently, including fault tolerance, local distribution, bindery services, and improved name resolution.
![]() “Managing eDirectory Partitions and Replicas”—With our partitioning design under control, we’ll shift our focus to eDirectory management, implementation, and maintenance. In the fourth lesson, we’ll explore partition and replica management with the following hands-on tasks: adding eDirectory replicas, changing replica types, managing replica synchronization with WAN Traffic Manager, preventative maintenance, troubleshooting, extending the Schema, and redirecting resources in the eDirectory tree.
“Managing eDirectory Partitions and Replicas”—With our partitioning design under control, we’ll shift our focus to eDirectory management, implementation, and maintenance. In the fourth lesson, we’ll explore partition and replica management with the following hands-on tasks: adding eDirectory replicas, changing replica types, managing replica synchronization with WAN Traffic Manager, preventative maintenance, troubleshooting, extending the Schema, and redirecting resources in the eDirectory tree.
![]() “Implementing eDirectory 8.6”—Now that you know how to manage eDirectory, it’s time to learn how to implement eDirectory 8.6. In this lesson, I’ll arm you with two valuable action steps: step 1 is eDirectory integration (four tasks to prepare your network for eDirectory 8.6) and step 2 is the eDirectory Import/Export Wizard (create large groups of eDirectory objects from existing LDAP databases).
“Implementing eDirectory 8.6”—Now that you know how to manage eDirectory, it’s time to learn how to implement eDirectory 8.6. In this lesson, I’ll arm you with two valuable action steps: step 1 is eDirectory integration (four tasks to prepare your network for eDirectory 8.6) and step 2 is the eDirectory Import/Export Wizard (create large groups of eDirectory objects from existing LDAP databases).
![]() “Maintaining eDirectory with iMonitor”—In the eDirectory maintenance lesson, we’ll use iMonitor to tackle your eDirectory maintenance plan, including eDirectory diagnosis, repair, and optimization.
“Maintaining eDirectory with iMonitor”—In the eDirectory maintenance lesson, we’ll use iMonitor to tackle your eDirectory maintenance plan, including eDirectory diagnosis, repair, and optimization.
![]() “Designing Time Synchronization”—Finally, we’ll explore the following two time design environments: IPX-only and IP/IPX time synchronization. IPX-only time synchronization relies on four different time server types and the TIMESYNC.NLM utility. On the other hand, IP/IPX mixed networks negotiate time using TCP/IP and the Network Time Protocol (NTP).
“Designing Time Synchronization”—Finally, we’ll explore the following two time design environments: IPX-only and IP/IPX time synchronization. IPX-only time synchronization relies on four different time server types and the TIMESYNC.NLM utility. On the other hand, IP/IPX mixed networks negotiate time using TCP/IP and the Network Time Protocol (NTP).
So, there you have it—your future as an advanced eDirectory engineer. This is a very busy chapter because advanced eDirectory management is such important business. Today you’re going to learn all about it.
Let’s start at the beginning with an introduction to eDirectory replication and synchronization.
Test Objectives Covered:
![]() Define eDirectory Replication and Synchronization (3004)
Define eDirectory Replication and Synchronization (3004)
![]() Understand eDirectory Partitioning and Replication (575)
Understand eDirectory Partitioning and Replication (575)
NetWare 6’s eDirectory is the world’s leading directory service. It provides a unifying, cross-platform infrastructure for managing, securing, accessing, and developing all major components of your network. In fact, eDirectory scales to the largest network environment, including the Internet. And because it is based on the X.500 standard, eDirectory supports LDAP, HTTP, and the Java programming environment.
The following is a brief description of the key network benefits offered by NetWare 6’s eDirectory:
![]() Network administration—eDirectory simplifies network administration by using objects to represent any network resource, including physical devices, such as routers, switches, printers, and fax machines; software, such as databases and applications; and volumes in the network file system. Furthermore, you can move individual objects, groups, or entire branches of the eDirectory tree to different locations by using a simple drag-and-drop method. Finally, eDirectory network administration supports both centralized and distributed network control.
Network administration—eDirectory simplifies network administration by using objects to represent any network resource, including physical devices, such as routers, switches, printers, and fax machines; software, such as databases and applications; and volumes in the network file system. Furthermore, you can move individual objects, groups, or entire branches of the eDirectory tree to different locations by using a simple drag-and-drop method. Finally, eDirectory network administration supports both centralized and distributed network control.
![]() Network performance—eDirectory integrates entire enterprise network systems, consolidating company data into a single database. In addition, eDirectory enables multiple operating systems to run as if they were designed to work together.
Network performance—eDirectory integrates entire enterprise network systems, consolidating company data into a single database. In addition, eDirectory enables multiple operating systems to run as if they were designed to work together.
![]() Network security—With eDirectory authorization, authentication, and access control services, you can manage and secure the relationships and interactions between objects. In addition, eDirectory supports RSA encryption.
Network security—With eDirectory authorization, authentication, and access control services, you can manage and secure the relationships and interactions between objects. In addition, eDirectory supports RSA encryption.
![]() Network availability—eDirectory has a reliable track record spanning more than 10 years and well over 100 million users. eDirectory is renowned for its capability to prevent downtime by allowing network information to be stored and to be updated on multiple systems, including the 24/7 requirements of today’s large telecommunications and government agencies.
Network availability—eDirectory has a reliable track record spanning more than 10 years and well over 100 million users. eDirectory is renowned for its capability to prevent downtime by allowing network information to be stored and to be updated on multiple systems, including the 24/7 requirements of today’s large telecommunications and government agencies.
![]() Scalability—In eDirectory, User objects have the same network view and login procedure whether they’re logging in from their location workstation or from a different country. In addition, the eDirectory schema is extensible, so you can add any resource you need for network management or user accessibility. Finally, eDirectory supports rapid network growth through server migration, tree merging, and container scalability.
Scalability—In eDirectory, User objects have the same network view and login procedure whether they’re logging in from their location workstation or from a different country. In addition, the eDirectory schema is extensible, so you can add any resource you need for network management or user accessibility. Finally, eDirectory supports rapid network growth through server migration, tree merging, and container scalability.
The NetWare 6 eDirectory includes a segmentation strategy known as eDirectory partitioning. Partitioning breaks up an eDirectory tree into two or more logical divisions that can be separated and distributed, which makes dealing with eDirectory objects more manageable. Furthermore, copies of partitions can be distributed on multiple file servers in a strategy known as replication. eDirectory replicas increase network performance by decreasing the size of database files and by placing them closest to the users who need them, and increase fault tolerance because extra copies of the database are distributed throughout the network.
In this lesson, we’ll review the fundamentals of eDirectory partitioning, replication, and synchronization in preparation for the design, management, and maintenance tasks to come. Remember, a well-maintained eDirectory tree leads to a well-functioning network.
To fully understand partitioning and replication, you must be aware of the following Directory characteristics:
![]() The database contains data on all objects in the Directory tree, including object names, object security rights, and object property values. All network information, except server file systems, is stored in the Directory.
The database contains data on all objects in the Directory tree, including object names, object security rights, and object property values. All network information, except server file systems, is stored in the Directory.
![]() eDirectory uses the Directory database for access control to other objects in the network. eDirectory checks the Directory to make sure that you can view, manipulate, create, or delete resource objects.
eDirectory uses the Directory database for access control to other objects in the network. eDirectory checks the Directory to make sure that you can view, manipulate, create, or delete resource objects.
![]() eDirectory uses the Directory database for authentication (an important part of logging in).
eDirectory uses the Directory database for authentication (an important part of logging in).
![]() Except for Server and Volume objects, the Directory does not contain information about the file system.
Except for Server and Volume objects, the Directory does not contain information about the file system.
As you can see in Figure 5.1, eDirectory partitioning has been used to break up the ACME organization into three pieces:
![]() Partition A—Known as the [Root] partition because it is the only one that contains the Tree Root object.
Partition A—Known as the [Root] partition because it is the only one that contains the Tree Root object.
![]() Partition B—Known as the LABS partition because OU=LABS is the highest container object in the partition. In addition, Partition B is termed a parent of Partition C because the LABS organizational unit contains the R&D organizational unit.
Partition B—Known as the LABS partition because OU=LABS is the highest container object in the partition. In addition, Partition B is termed a parent of Partition C because the LABS organizational unit contains the R&D organizational unit.
![]() Partition C—Known as the R&D partition because OU=R&D is the highest Container object in the partition. In addition, Partition C is termed a child of Partition B because the R&D organizational unit is located in the LABS container.
Partition C—Known as the R&D partition because OU=R&D is the highest Container object in the partition. In addition, Partition C is termed a child of Partition B because the R&D organizational unit is located in the LABS container.

TIP
Keep in mind that size and number of partitions can significantly affect the synchronization and responsiveness of your network. Avoid creating partitions that are too large or that contain too many copies because host servers can take too long to synchronize, and managing replicas becomes more complex. On the other hand, avoid partitions that are too small. If a partition contains only a few objects, the access and fault-tolerance benefits might not be worth the time you invest in managing the partition.
Partitioning has many advantages because it enables you to separate the eDirectory tree into smaller segments. You can also increase network fault tolerance by placing copies of other partitions on local servers. This is known as replication, and network administrators can increase efficiency by placing a replica of the partition most frequently needed by users on a server that’s geographically close to the users.
NetWare 6 supports four types of eDirectory replicas:
![]() Master—A master replica is the original read/write copy of a partition that is created by default when you define the partition. A master replica contains a complete copy of the object data for the partition. Each partition may have only one master replica. A master replica can perform original requests for partition and object changes. If you want to redefine a partition boundary or join it with another, you must have access to the server that holds the master replica.
Master—A master replica is the original read/write copy of a partition that is created by default when you define the partition. A master replica contains a complete copy of the object data for the partition. Each partition may have only one master replica. A master replica can perform original requests for partition and object changes. If you want to redefine a partition boundary or join it with another, you must have access to the server that holds the master replica.
![]() Read/write—A read/write replica is a read/write copy of a partition. It contains a complete copy of the object data for the partition. Each partition can have multiple read/write replicas. When you modify objects in a read/write or master replica, those changes are propagated to all other replicas of the same partition. This process, known as replica synchronization, creates background traffic over network communication lines. Finally, a read/write replica can fill original requests for object changes, but it passes all partition change requests to the master replica. It cannot handle changes to partition boundaries—that requires a master replica.
Read/write—A read/write replica is a read/write copy of a partition. It contains a complete copy of the object data for the partition. Each partition can have multiple read/write replicas. When you modify objects in a read/write or master replica, those changes are propagated to all other replicas of the same partition. This process, known as replica synchronization, creates background traffic over network communication lines. Finally, a read/write replica can fill original requests for object changes, but it passes all partition change requests to the master replica. It cannot handle changes to partition boundaries—that requires a master replica.
![]() Read-only—A read-only replica is a read-only copy of a partition that contains a complete copy of the object data for the partition. These replicas are used only for searching the eDirectory tree and viewing objects. They cannot handle original change requests, which means that they cannot be used for login authentication. Instead, they pass on all such requests to read/write and master replicas.
Read-only—A read-only replica is a read-only copy of a partition that contains a complete copy of the object data for the partition. These replicas are used only for searching the eDirectory tree and viewing objects. They cannot handle original change requests, which means that they cannot be used for login authentication. Instead, they pass on all such requests to read/write and master replicas.
![]() Subordinate references—A subordinate reference a special type of replica that is created and maintained by eDirectory. It does not contain object data—it points to replicas that do, which facilitates tree connectivity.
Subordinate references—A subordinate reference a special type of replica that is created and maintained by eDirectory. It does not contain object data—it points to replicas that do, which facilitates tree connectivity.
Read/write replicas are the most popular replicas. Master replicas are created automatically during partitioning, and subordinate references flourish throughout the tree as needed. Read-only replicas, however, can be effective if you have many servers and few containers.
Because eDirectory is a distributed, replicated database, NetWare 6 servers continually share information and synchronize changes with each other. In addition, the eDirectory database is loosely consistent. Therefore, it requires time for replication and synchronization when major changes occur. The time required for a change to be replicated and synchronized depends on the type of change, the size of the partition, and the number of servers the partition is replicated on. Therefore, you should not assume that delays in replication and synchronization or an occasional Unknown object necessarily indicate problems in the database.
Figure 5.1 illustrates a simple, saturated replication scheme. As you can see, each server has a copy of each partition. This provides exceptional fault tolerance and accessibility, but synchronization might be a problem. In large environments, this scheme would not be practical because of synchronization delays. Replica updates take place automatically at specific intervals.
Some updates, such as changing a user’s password, are immediate (within ten seconds). Other updates, such as login updates, are synchronized every five minutes. Changes made to Figure 5.1, for example, would generate 27 replica updates—that’s 3×3×3. This is manageable. But consider what background traffic would look like with 50 servers and 20 different partitions—that is 9,536,743,164,062,000,000,000,000,000,000,000 updates every few minutes.
eDirectory synchronization is accomplished within a group of servers known as a replica ring. A replica ring is an internal system group that includes all servers that contain replicas of a given partition. In Figure 5.1, the replica ring for Partition A includes the following:
![]() Master: CN=ADMIN-SRV1
Master: CN=ADMIN-SRV1
![]() R/W: CN=LABS-SRV1
R/W: CN=LABS-SRV1
![]() R/W: CN=R&D-SRV1
R/W: CN=R&D-SRV1
eDirectory synchronization works differently for simple and complex changes. Simple changes, such as changing a user’s phone number, occur almost instantaneously because the replica information already exists on the affected servers, and only the modified information is sent to servers containing a replica that includes the User object.
Creating a partition is another example of a simple eDirectory change. When you create a partition, the system uses partition attributes to draw the new boundary of the partition. In this case, the replica information needed already exists on the affected servers.
Complex changes take more time. For example, joining two partitions on different servers will take time to synchronize throughout the network. During this process, eDirectory initiates a chain reaction of three synchronization events:
1. eDirectory determines where all the replicas of each partition (the replica ring) are stored.
2. eDirectory replicates the data of both partitions to all servers in the replica ring.
3. eDirectory completes the merge, at which point the affected servers have the composite information of both partitions.
eDirectory could have a problem synchronizing between IP-only and IPX-only networks because direct communications between servers is not normally allowed. To resolve this, NetWare 6 includes transitive synchronization. Transitive synchronization eliminates the requirement that all servers in a replica ring have to communicate and synchronize directly. Instead, target servers receive eDirectory updates through an intermediary server that uses both IP and IPX. Also, if the source server’s replica is more recent than the target server’s replica, the source server does not need to receive synchronization updates from the target server. This reduces synchronization traffic.
As eDirectory synchronizes partition replicas, it creates network traffic. If this traffic crosses WAN links unmanaged, it can increase costs and it can overload slow WAN links during high-use periods. Fortunately, NetWare 6 includes the WAN Traffic Manager (WTM) to help you manage synchronization traffic across WAN links (we’ll discuss WTM in more depth in the management lesson later in the chapter). The following is a list of the tasks that WTM performs, as well as tasks that it does not perform:
![]() WTM controls server-to-server traffic generated by eDirectory.
WTM controls server-to-server traffic generated by eDirectory.
![]() WTM can restrict traffic based on cost, time of day, and/or type of traffic.
WTM can restrict traffic based on cost, time of day, and/or type of traffic.
![]() WTM controls periodic events initiated by eDirectory, such as replica synchronization.
WTM controls periodic events initiated by eDirectory, such as replica synchronization.
![]() WTM does not control events initiated by network administrators or users.
WTM does not control events initiated by network administrators or users.
![]() WTM does not control non-eDirectory server-to-server traffic, such as time synchronization. Fortunately, we have Network Time Protocol to solve that problem.
WTM does not control non-eDirectory server-to-server traffic, such as time synchronization. Fortunately, we have Network Time Protocol to solve that problem.
TIP
Transitive synchronization isn’t necessary if you configure your IP-only network with IPX compatibility mode. Refer to Chapter 2, “NetWare 6 Upgrade and Migration,” for more information about migrating to dual-protocol stack support.
That completes our eDirectory partitioning, replication, and synchronization overview. Now let’s learn how to design an effective eDirectory partitioning strategy.
Test Objectives Covered:
![]() Plan, Design, Implement a Partition and Replica Strategy (575)
Plan, Design, Implement a Partition and Replica Strategy (575)
![]() Identify Basic eDirectory Administrative Procedures (3004)
Identify Basic eDirectory Administrative Procedures (3004)
The beauty of eDirectory is its scalability and flexibility. eDirectory is scalable because it enables you to make the database as small or large as you want. eDirectory is flexible because it enables you to store the database (or pieces of it) anywhere you want. Of course, all of these benefits require design, implementation, and management.
After the eDirectory tree has been properly designed (see Chapter 19, “Novell eDirectory Tree Design”), you can divide the Directory into small pieces (partitioning) and intelligently distribute them over the network (replica placement). eDirectory partitioning and replica design are some of the most important aspects of eDirectory planning because they directly affect your network’s performance, accessibility, and fault tolerance.
eDirectory partitions are logical divisions of the eDirectory tree (see Figure 5.2). Partitioning effectively splits the eDirectory database into sections that can be distributed to NetWare 6 servers throughout the network.
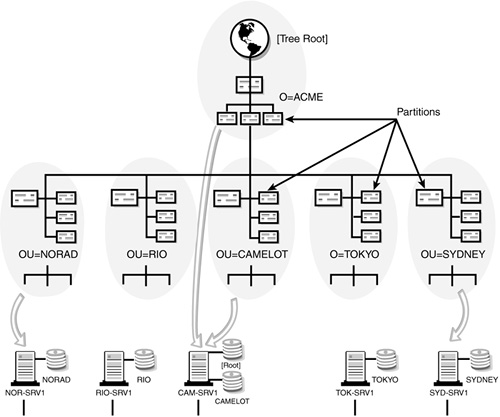
Furthermore, eDirectory partitioning enables you to selectively distribute eDirectory information near the users who need it.
The purpose of partitioning is to scale the eDirectory database across the NetWare 6 servers in your network. For example, in Figure 5.2, the NORAD partition and its object information are placed on the NOR-SRV1 server in NORAD. The same is true for all other location-based partitions. This enables you to keep local eDirectory information in each geographically separated location. In our example, Camelot is a special partition because it includes the tree root.
eDirectory partitioning follows these simple rules:
![]() Partitioning is hierarchical, meaning that the root-most partition is a parent to its subordinate children. When all the partitions in a tree are taken together, they form a hierarchical map back to the Tree Root object. Figure 5.2 illustrates the hierarchical partition map formed by ACME’s distributed locations. It also shows the parent-child relationship between O=ACME and its subcontainers.
Partitioning is hierarchical, meaning that the root-most partition is a parent to its subordinate children. When all the partitions in a tree are taken together, they form a hierarchical map back to the Tree Root object. Figure 5.2 illustrates the hierarchical partition map formed by ACME’s distributed locations. It also shows the parent-child relationship between O=ACME and its subcontainers.
![]() During installation of the initial NetWare 6 server in your Directory tree, the [Root] partition is created and a master copy (replica) of it is placed on the new server. In NetWare 6, the [Root] partition is the only partition created automatically by the installation program. No default partitioning occurs beyond this.
During installation of the initial NetWare 6 server in your Directory tree, the [Root] partition is created and a master copy (replica) of it is placed on the new server. In NetWare 6, the [Root] partition is the only partition created automatically by the installation program. No default partitioning occurs beyond this.
TIP
There is an important relationship between the Tree Root object and the [Root] partition. The Tree Root object is the highest point in the eDirectory tree. The [Root] partition is the first default partition created during server installation. It contains the Tree Root object. Of course, both of these are mostly unrelated to partition root objects. Clear, huh?
![]() Each partition must be named and requires a single container object as the top (or root) of the partition (not to be confused with the [Root] partition). The container object that’s used as the start of the partition is called the partition root object. Only one partition root object can exist for each partition and, by definition, it is the topmost container object. Examine Figure 5.3 for an example of what you should not do. Note: The reason that a partition could not be created containing only the NORAD and RIO containers is that the partition would not be a partition root because both of these containers exist at the same level in the eDirectory tree.
Each partition must be named and requires a single container object as the top (or root) of the partition (not to be confused with the [Root] partition). The container object that’s used as the start of the partition is called the partition root object. Only one partition root object can exist for each partition and, by definition, it is the topmost container object. Examine Figure 5.3 for an example of what you should not do. Note: The reason that a partition could not be created containing only the NORAD and RIO containers is that the partition would not be a partition root because both of these containers exist at the same level in the eDirectory tree.
![]() Partitioning occurs along the boundaries of container objects. A partition can include more than one container, but it cannot overlap another partition. An eDirectory object can exist in only one partition, and all leaf objects in a container are in the same partition as the container. Also, only eDirectory information (not file system data) can be stored in partitions.
Partitioning occurs along the boundaries of container objects. A partition can include more than one container, but it cannot overlap another partition. An eDirectory object can exist in only one partition, and all leaf objects in a container are in the same partition as the container. Also, only eDirectory information (not file system data) can be stored in partitions.
TIP
Make sure that you understand the definition of a partition (that is, a logical division of eDirectory). Study the hierarchical nature of eDirectory partitions and remember that only one partition is created automatically (during initial server installation). Also, know that the partition root object is the top-level container of a partition. Finally, study the rules of partition construction; that is, partitions cannot overlap each other, and partitions store eDirectory information but not file system data.
The primary reason for partitioning and replicating eDirectory is to increase user resource access and improve fault tolerance. In most cases, you should partition containers along the physical layout of the network. This coincides with the approach used in designing the upper layers of the eDirectory tree (refer to Figure 5.2, shown earlier in this chapter).
By default, no new partitions are created automatically beyond the first ([Root]) partition. This single partition strategy is recommended if your network has no WAN links and a small number of servers holding replicas. See Figure 5.4 for an illustration of ACME’s default partition strategy.
![The default [Root] partition for ACME.](http://imgdetail.ebookreading.net/system_admin/3/0789729814/0789729814__cne-for-netware__0789729814__graphics__05fig04.jpg)
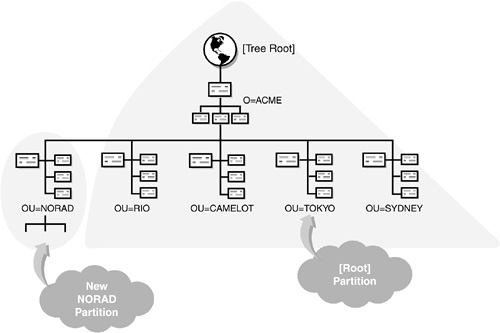
In many cases, your network will grow beyond the recommended limits just discussed. As a result, you’ll need to create and to implement a partitioning design. Creating a new partition under an existing parent is sometimes referred to as a partition split because the child simply splits away from underneath the parent’s control. In Figure 5.5, the NORAD child simply splits away from the [Root] partition. This operation is extremely fast because it doesn’t generate any traffic on your WAN. We’re simply dividing one database into two, with all the information staying on the same server that contained the original partition. This split operation will create a new child subordinate reference pointer on all the servers that had a copy of the parent partition.
The number one design consideration for partitioning is the physical layout of your network infrastructure—mostly the location of network servers. With this in mind, your main task is to partition the eDirectory database so that it localizes eDirectory information. The bottom line is keeping the NORAD information in NORAD, the RIO information in RIO, and so on. Figure 5.2 showed how the ACME tree has been partitioned along the lines of WAN communications. Note that in our example, the [Root] partition is small and includes only the Tree Root object and O=ACME. This recommendation will be discussed later when we address replication.
The primary reason for partitioning and replicating the eDirectory database is to increase efficiency for users and to create fault tolerance. In most cases, you should design partition boundaries around the physical layout of your network infrastructure. This coincides with the approach used in designing the upper and lower layers of the eDirectory tree. If your tree design is structured correctly, your partition strategy is generally easy to implement and maintain.
Follow these guidelines when partitioning the eDirectory tree:
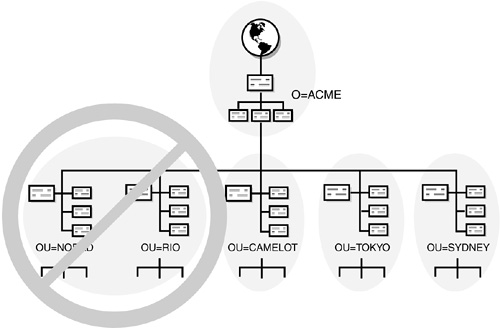
![]() Don’t span a WAN link or physical locations with a partition—This design guideline is important and should not be ignored. If you span a WAN link, it creates unnecessary eDirectory synchronization traffic between two or more locations. This is why you should partition the top layers according to location. See Figure 5.6 for an example of how not to partition the ACME tree.
Don’t span a WAN link or physical locations with a partition—This design guideline is important and should not be ignored. If you span a WAN link, it creates unnecessary eDirectory synchronization traffic between two or more locations. This is why you should partition the top layers according to location. See Figure 5.6 for an example of how not to partition the ACME tree.

![]() Keep the [Root] partition small—Typically, the first partition should include only the Tree Root object and the O=Organization container. Do not include any other subordinate containers in the partition with the Tree Root object because doing so will create unnecessary subordinate references.
Keep the [Root] partition small—Typically, the first partition should include only the Tree Root object and the O=Organization container. Do not include any other subordinate containers in the partition with the Tree Root object because doing so will create unnecessary subordinate references.
![]() Use the pyramid design for partitioning—You should design a small number of partitions at the top layers of the tree and more partitions as you move toward the bottom. If you’ve designed the tree based on a pyramid shape, as recommended, your partition design will naturally follow the tree design.
Use the pyramid design for partitioning—You should design a small number of partitions at the top layers of the tree and more partitions as you move toward the bottom. If you’ve designed the tree based on a pyramid shape, as recommended, your partition design will naturally follow the tree design.
![]() Partition the top layers according to location—Partition locally whenever possible. The topmost parent partitions should follow the location-based organizational units of your tree design.
Partition the top layers according to location—Partition locally whenever possible. The topmost parent partitions should follow the location-based organizational units of your tree design.
![]() Partition the bottom layers according to organization—The bottom layers of the tree should be partitioned only if there is a special requirement, such as if the partition is too large, if there are too many replicas of the same partition, or if there is a need to break out an administrative container.
Partition the bottom layers according to organization—The bottom layers of the tree should be partitioned only if there is a special requirement, such as if the partition is too large, if there are too many replicas of the same partition, or if there is a need to break out an administrative container.
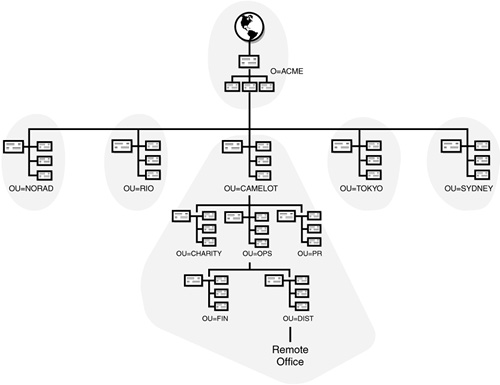
![]() Do not create a partition unless there is a local server—Do not create a partition (even if it includes a WAN link) if there is no local server on which to store the replica. This type of situation is common, for instance, if you have small remote offices that do not have servers on site. Refer to Figure 5.7 for an example.
Do not create a partition unless there is a local server—Do not create a partition (even if it includes a WAN link) if there is no local server on which to store the replica. This type of situation is common, for instance, if you have small remote offices that do not have servers on site. Refer to Figure 5.7 for an example.
![]() Smaller is better—A partition should typically have fewer than 3,500 objects. Maintain as few child partitions as possible (fewer than 35 child partitions per parent). Because most partition operations affect child partitions, minimize the number of children linked across unreliable WAN connections. Table 5.1 explains the advantages and disadvantages of creating smaller eDirectory partitions.
Smaller is better—A partition should typically have fewer than 3,500 objects. Maintain as few child partitions as possible (fewer than 35 child partitions per parent). Because most partition operations affect child partitions, minimize the number of children linked across unreliable WAN connections. Table 5.1 explains the advantages and disadvantages of creating smaller eDirectory partitions.
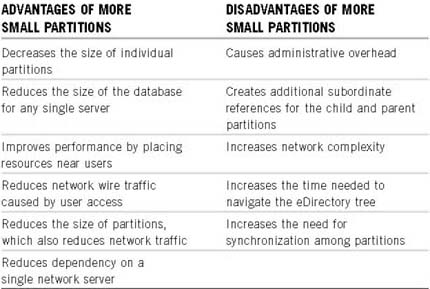
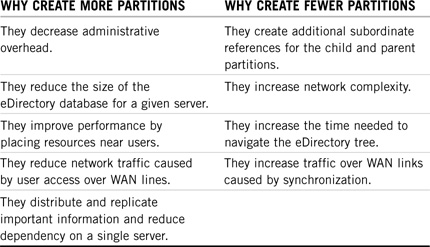
This completes our partition design for ACME. If you follow these partitioning guidelines at both the top and bottom layers, the eDirectory information always will remain close to the user and other leaf objects. Remember that location is the key when creating partition boundaries. Review Table 5.2 for a complete picture of eDirectory partition design.
TIP
These guidelines do not suggest that you partition every organizational unit in your tree. There is also such a thing as overpartitioning. Partition locally and further partition at remote sites only if necessary.
Very good. Now that we have ACME’s partition design in place, it’s time to spread them across the network—replica placement. This is the fun part. We get to distribute all the little pieces to ACME servers everywhere.
Test Objectives Covered:
![]() Plan, Design, Implement a Partition and Replica Strategy (575) (continued)
Plan, Design, Implement a Partition and Replica Strategy (575) (continued)
![]() Identify Basic eDirectory Administrative Procedures (continued)
Identify Basic eDirectory Administrative Procedures (continued)
After you’ve designed an eDirectory partitioning strategy, the next step is to distribute replicas for fault tolerance, network performance, and name resolution:
![]() Fault tolerance—Replication increases the availability of partitions by spreading multiple copies of various pieces of the eDirectory to distributed servers. This also increases reliability. For example, if a server holding a replica of a given partition goes down, you can simply use another copy (that is, a replica) for authentication and updates.
Fault tolerance—Replication increases the availability of partitions by spreading multiple copies of various pieces of the eDirectory to distributed servers. This also increases reliability. For example, if a server holding a replica of a given partition goes down, you can simply use another copy (that is, a replica) for authentication and updates.
![]() Network performance—Distributed replicas increase eDirectory and client performance by ensuring that users access eDirectory resource information locally. This level of eDirectory scalability is particularly important during authentication, eDirectory changes, directory searches, and eDirectory database access.
Network performance—Distributed replicas increase eDirectory and client performance by ensuring that users access eDirectory resource information locally. This level of eDirectory scalability is particularly important during authentication, eDirectory changes, directory searches, and eDirectory database access.
![]() Name resolution—Replication enhances name resolution by ensuring that users can walk the tree from child to parent replicas. To facilitate this process, eDirectory automatically creates subordinate reference replicas on every server that contains a parent replica, but not all the parent replica’s child replicas.
Name resolution—Replication enhances name resolution by ensuring that users can walk the tree from child to parent replicas. To facilitate this process, eDirectory automatically creates subordinate reference replicas on every server that contains a parent replica, but not all the parent replica’s child replicas.
Now let’s start our replica placement lesson with a brief review of the four eDirectory replica types.
eDirectory supports the following four different types of replicas:
![]() Master—Created automatically when you define a partition. Each partition can have only one master replica.
Master—Created automatically when you define a partition. Each partition can have only one master replica.
![]() Read/write—Placed automatically on the second and third server in a partition and manually on all subsequent servers that you specify.
Read/write—Placed automatically on the second and third server in a partition and manually on all subsequent servers that you specify.
![]() Read-only—Rarely used. Read-only replicas must be created manually.
Read-only—Rarely used. Read-only replicas must be created manually.
![]() Subordinate references—Automatically placed on servers that contain a parent replica, but not all the parent replica’s child replicas.
Subordinate references—Automatically placed on servers that contain a parent replica, but not all the parent replica’s child replicas.
Table 5.3 contains a detailed overview of these four eDirectory replica types and their corresponding characteristics.
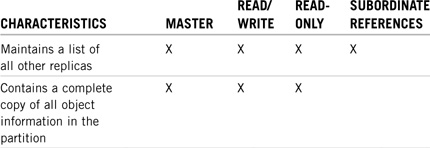


TIP
Carefully study the characteristics of the four eDirectory replica types in Table 5.3. Specifically, learn which replica types match the following characteristics: contains a complete copy of all eDirectory information for a partition (master, read/write, and read-only); is required for bindery services (master or read/write); and is not created automatically when servers are installed (read-only).
As you learned earlier in the chapter, eDirectory replication relies on the following basic rules:
![]() Replica list—When a partition is created, the partition root object receives a replica list. When changes are made to objects within a partition, those changes are sent to the other replicas on the list. The replica list (also called the replica ring) includes a list of all servers containing the replicas, the type of replica they hold, and each replica’s current state. All replicas, including subordinate references, contain a copy of the replica list. Furthermore, the replica list of a subordinate reference is used by the server to locate replicas of a child partition.
Replica list—When a partition is created, the partition root object receives a replica list. When changes are made to objects within a partition, those changes are sent to the other replicas on the list. The replica list (also called the replica ring) includes a list of all servers containing the replicas, the type of replica they hold, and each replica’s current state. All replicas, including subordinate references, contain a copy of the replica list. Furthermore, the replica list of a subordinate reference is used by the server to locate replicas of a child partition.
![]() Replica synchronization—The eDirectory directory is a loosely consistent database. As changes occur, all replicas of a partition do not always contain exactly the same information at every instant. For this reason, it’s imperative that each replica server synchronizes with the other servers in the replica list every few minutes. For instance, some changes (such as changes to a user’s password) are immediately sent to all servers on the list. Other less-critical changes (such as a user’s last login time) are collected locally for a short period of time before being sent to other servers on the replica list. Each type of replica participates in the synchronization process differently: master and read/write replicas initiate and receive updates, whereas read-only replicas only receive updates.
Replica synchronization—The eDirectory directory is a loosely consistent database. As changes occur, all replicas of a partition do not always contain exactly the same information at every instant. For this reason, it’s imperative that each replica server synchronizes with the other servers in the replica list every few minutes. For instance, some changes (such as changes to a user’s password) are immediately sent to all servers on the list. Other less-critical changes (such as a user’s last login time) are collected locally for a short period of time before being sent to other servers on the replica list. Each type of replica participates in the synchronization process differently: master and read/write replicas initiate and receive updates, whereas read-only replicas only receive updates.
![]() Transitive synchronization—eDirectory includes an additional level of synchronization complexity by supporting simultaneous access to IP-only and IPX-only networks. The problem with this scenario is that IP-only servers can’t synchronize directly with IPX-only servers. Fortunately, eDirectory includes a feature called transitive synchronization, which eliminates the requirement that all servers in a replica list be capable of directly synchronizing with each other. Instead, they communicate indirectly by using intermediary servers or IPX compatibility mode gateways.
Transitive synchronization—eDirectory includes an additional level of synchronization complexity by supporting simultaneous access to IP-only and IPX-only networks. The problem with this scenario is that IP-only servers can’t synchronize directly with IPX-only servers. Fortunately, eDirectory includes a feature called transitive synchronization, which eliminates the requirement that all servers in a replica list be capable of directly synchronizing with each other. Instead, they communicate indirectly by using intermediary servers or IPX compatibility mode gateways.
Well, that completes our quick lesson in the basics of eDirectory replication. The rules you’ve learned in this section are important because they describe the way servers replicate and synchronize. You must understand how replicas behave before you start copying ACME’s partitions throughout the network.
Now it’s your turn. Ready, set, replicate!
The first step in building an eDirectory replica placement plan is to explore the following two design considerations and their related issues:
![]() Installing NetWare servers—What happens to your replica plan when you install the first eDirectory server? More importantly, what happens when you install subsequent servers?
Installing NetWare servers—What happens to your replica plan when you install the first eDirectory server? More importantly, what happens when you install subsequent servers?
![]() Merging eDirectory trees—How does an eDirectory merge affect the replica plan of your source and target trees?
Merging eDirectory trees—How does an eDirectory merge affect the replica plan of your source and target trees?
These design considerations and their related issues are explored in the following sections.
The initial eDirectory partition in a tree is called the [Root] partition because it is the only one that includes the tree root (see Figure 5.8). This special partition is created when the initial NetWare 6 server is installed in an eDirectory tree. The master replica of the [Root] partition is placed on that server. The master replica of the [Root] can be removed at any time or changed to a read/write replica after other servers have been placed in the eDirectory tree. However, you must first upgrade an existing read/write replica to master status because there must always be a master replica of every partition.
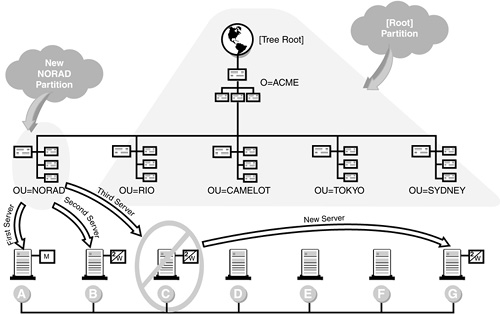
The following eDirectory partitioning and replication rules apply to all subsequent servers installed in the same eDirectory tree (follow along in Figure 5.8):
![]() When you install a new NetWare 6 server in an existing eDirectory tree, the server is automatically added to an existing partition. In other words, no new partition is created.
When you install a new NetWare 6 server in an existing eDirectory tree, the server is automatically added to an existing partition. In other words, no new partition is created.
![]() The second and third new servers installed in an existing partition receive read/write replicas of the host partition. The fourth and subsequent servers do not receive replicas. As you can see in Figure 5.8, new servers B and C receive read/write replicas, but D, E, and F don’t.
The second and third new servers installed in an existing partition receive read/write replicas of the host partition. The fourth and subsequent servers do not receive replicas. As you can see in Figure 5.8, new servers B and C receive read/write replicas, but D, E, and F don’t.
![]() When a new NetWare 6 server is added to an existing partition, eDirectory determines whether there are enough replicas for fault tolerance. If there aren’t at least one master and two read/write replicas of the partition, eDirectory places a read/write replica on the new server (see the example in Figure 5.8). For instance, suppose that the NORAD partition automatically places the master replica of itself on server A and read/write replicas on servers B and C. Assume that servers D through F hold no replicas. Next, suppose that you remove server C from the network. When you install server G, eDirectory discovers that there aren’t enough replicas for fault tolerance and automatically places a read/write replica on server G. Although server G isn’t the third server installed in the partition, it is the third server required for fault-tolerance purposes.
When a new NetWare 6 server is added to an existing partition, eDirectory determines whether there are enough replicas for fault tolerance. If there aren’t at least one master and two read/write replicas of the partition, eDirectory places a read/write replica on the new server (see the example in Figure 5.8). For instance, suppose that the NORAD partition automatically places the master replica of itself on server A and read/write replicas on servers B and C. Assume that servers D through F hold no replicas. Next, suppose that you remove server C from the network. When you install server G, eDirectory discovers that there aren’t enough replicas for fault tolerance and automatically places a read/write replica on server G. Although server G isn’t the third server installed in the partition, it is the third server required for fault-tolerance purposes.
![]() In all other cases, if you want a replica created on a server, you must add it manually using ConsoleOne.
In all other cases, if you want a replica created on a server, you must add it manually using ConsoleOne.
eDirectory merging has a dramatic effect on eDirectory partitioning and replication. During an eDirectory merge, you identify a source tree and a target tree. It is imperative that each of these servers contains a master replica of its host tree’s [Root] partition. In Chapter 21, “Novell eDirectory Implementation,” we’ll cover eDirectory merging in much greater depth. In summary, the following partitioning and replication changes occur during an eDirectory merge:
![]() During an eDirectory merge, the master replica of the target [Root] partition becomes the master replica of the new, combined [Root] partition. Any servers in the target tree that held replicas of the old [Root] partition are given replicas of the new [Root] partition.
During an eDirectory merge, the master replica of the target [Root] partition becomes the master replica of the new, combined [Root] partition. Any servers in the target tree that held replicas of the old [Root] partition are given replicas of the new [Root] partition.
![]() Only the source server that held a master replica of the source [Root] partition is given a read/write replica of the new [Root] partition. Any other servers in the source server’s original tree that held replicas of the old source [Root] lose their copies and do not receive copies of the new [Root] partition.
Only the source server that held a master replica of the source [Root] partition is given a read/write replica of the new [Root] partition. Any other servers in the source server’s original tree that held replicas of the old source [Root] lose their copies and do not receive copies of the new [Root] partition.
![]() All first-level containers in the source tree [Root] partition become independent partition roots in the new, combined tree. All other servers in the source server’s original tree that held a replica of the source tree root lose the [Root] replica, but they maintain replicas of the new first-level partitions—except, of course, the source server itself, which receives a read/write replica of the new [Root] partition.
All first-level containers in the source tree [Root] partition become independent partition roots in the new, combined tree. All other servers in the source server’s original tree that held a replica of the source tree root lose the [Root] replica, but they maintain replicas of the new first-level partitions—except, of course, the source server itself, which receives a read/write replica of the new [Root] partition.
![]() Any server containing a replica of the new [Root] partition receives subordinate references to child partitions of the new [Root] partition. The name of the new eDirectory tree is the name of the target server’s eDirectory tree.
Any server containing a replica of the new [Root] partition receives subordinate references to child partitions of the new [Root] partition. The name of the new eDirectory tree is the name of the target server’s eDirectory tree.
![]() The access control list (ACL) of the source tree root is discarded, and the ACL of the target tree root is kept. The only source tree root trustee assignments that survive are those that belong to the source User object that performed the merge (typically, Admin). This administrative user gains Supervisor rights to the new, combined tree root.
The access control list (ACL) of the source tree root is discarded, and the ACL of the target tree root is kept. The only source tree root trustee assignments that survive are those that belong to the source User object that performed the merge (typically, Admin). This administrative user gains Supervisor rights to the new, combined tree root.
Now that wasn’t so hard—was it?! Of course, we’ve only just begun. Next, we’re going to build on these design considerations and discover some valuable design strategies for placing eDirectory replicas.
Welcome to phase two of partition design—replica placement. The partitions we created in the previous section aren’t going to do us any good until we clone them. As a matter of fact, replica placement is one of your most important design responsibilities—for the many reasons outlined previously.
Your eDirectory replica placement plan should accomplish the following four goals:
![]() Fault tolerance—Attempt to eliminate any single point of failure in your eDirectory tree.
Fault tolerance—Attempt to eliminate any single point of failure in your eDirectory tree.
![]() Local distribution—Place replicas on local servers for efficiency and speed.
Local distribution—Place replicas on local servers for efficiency and speed.
![]() Bindery services—Bindery users and applications need access to a master or read/write replica of each container in a server’s bindery context.
Bindery services—Bindery users and applications need access to a master or read/write replica of each container in a server’s bindery context.
![]() Tree walking with subordinate references—Strategically distribute replicas to create bridges between separated containers for tree-walking purposes. Also, use a replica table to track automatic subordinate reference placement.
Tree walking with subordinate references—Strategically distribute replicas to create bridges between separated containers for tree-walking purposes. Also, use a replica table to track automatic subordinate reference placement.
Let’s take a closer look at replica placement for ACME.
The primary goal of replication is to eliminate any single point of failure in the entire eDirectory tree. Distributing multiple replicas of a partition increases the availability of object information if one of the servers should become unavailable. In Figure 5.9, the NORAD and CAMELOT partitions have been replicated to multiple servers within their locations. This provides fault tolerance for each partition. If one of the servers in the partition goes down, the information isn’t lost—it’s available from the other server.

For fault tolerance, the NetWare 6 server installation program automatically creates up to three eDirectory replicas for each partition. When you install additional servers into the eDirectory tree, eDirectory places on the first three servers a replica of the server’s home partition—a master and two read/write replicas. After that, you’re on your own.
For example, in Figure 5.10, the NORAD partition is automatically replicated as new servers are added. It starts with NOR-SRV1, and then NOR-CHR-SRV1, and finally LABS-SRV1. Notice that NOR-SRV1 gets a master replica. That’s because it was the first server installed into the NORAD partition. The others receive read/write replicas.

So, what happens when you decide to install a fourth server (R&D-SRV1) into the NORAD partition? Nothing! Remember, by default, eDirectory replicates only the partition on the first three servers. The first thing you should do is place a read/write NORAD replica on the new R&D-SRV1 server. This strategy only applies to the new server’s home partition. It doesn’t have any effect on other partitions in the tree. This is done for one simple purpose: fault tolerance of the eDirectory database. If you’re comfortable with where the three automatic replicas are placed, you don’t need to place any of your own.
As a general guideline, you should have at least a master and two read/write replicas of every partition, but never more than ten replicas of any partition except the [Root]. If you don’t have three servers in the same site, replicate the partition elsewhere. Just make sure that the eDirectory information is available somewhere, and that there’s never more than ten replicas of any partition except the [Root].
Always replicate a partition locally, near the users who need the resources defined in the partition. Don’t place replicas on servers across a WAN if a local server is available. If you follow these guidelines, the users will be able to retrieve their personal information from the nearest available server. The benefits of using this strategy are that it’s faster, more efficient, and more reliable than spanning partitions across a WAN link.
Figure 5.11 illustrates how a small remote office should be replicated. For this example only, assume that there’s a small remote site called OU=SLC connected to the NORAD hub. There’s only one server in the remote site, and it’s called SLC-SRV1. You should create a small partition and replicate the master to SLC-SRV1. You should also place a read/write replica of OU=SLC in the NORAD location, possibly on the master NOR-SRV1 server.

Ideally, you should place the replica that contains a user’s eDirectory information on the same server that stores the user’s Home directory. This might not always be possible, but doing so improves the user’s access to eDirectory objects and the speed of login authentication (a master or read/write replica is required).
You should also pay attention to WAN synchronization when placing replicas locally. As eDirectory synchronizes replica updates, it creates network traffic. If this traffic crosses WAN links unmanaged, it can increase costs and overload slow WAN links during high-use periods. Fortunately, NetWare 6 includes a synchronization management tool called WAN Traffic Manager (WTM), which we’ll discuss in the next lesson.
Finally, be sure to manage the number of replicas you create for any partition. The time cost of synchronization is greater when the servers in a replica ring are separated by relatively slow WAN links. Therefore, the limiting factor in creating multiple replicas is the amount of processing time and traffic required to synchronize them. As a general rule, you should never create more than 10 replicas for any partition or place more than 20 replicas on any server.
Bindery services has a big effect on replica placement. Each bindery user or application requires a master or read/write replica of its server’s bindery context in order to access eDirectory resources. The following is an example of the console command that can be used to set a server’s bindery context:
SET BINDERY CONTEXT=OU=PR.OU=NORAD.O=ACME
In Figure 5.12, the bindery users attached to NOR-PR-SRV1 can see only the eDirectory objects in the OU=PR.OU=NORAD.O=ACME container. Actually, they can’t see all the eDirectory objects, just the bindery-equivalent objects (such as servers, users, groups, printers, print queues, print servers, and profiles). In case you were wondering, the Profile eDirectory object was added to NetWare 6 as a bindery-equivalent object. Unfortunately, eDirectory-dependent eDirectory objects aren’t available to bindery users (such as Directory Maps, Organizational Roles, Computers, and Aliases).

Bindery services is also required during a NetWare 3.12 to NetWare 6 server upgrade. For example, when you upgrade a NetWare 3.12 server, a read/write replica of its home partition is placed on the new NetWare 6 server. This happens regardless of whether there are already three replicas of the partition.
Tree walking (also referred to as name resolution) is the mechanism used by eDirectory to find object information that is not stored on local servers. If the eDirectory information you need isn’t stored locally, the server must walk the eDirectory tree to find a server containing an appropriate replica. Every replica maintains a list of the other servers holding replicas of the same partition (called the replica ring).
The [Root] is probably the most troublesome name resolution replica because it stores information about every resource. Initially, replicas of the [Root] partition include the containers at the top of the eDirectory tree. For this reason, you should replicate the [Root] partition to all major hub sites in your network. Also, keep the [Root] partition small to avoid unnecessary subordinate reference replicas.
As we discussed earlier, you should use a replica table to track the automatic placement of subordinate references throughout the network. These pointers are automatically placed on servers that hold a parent replica, but not all the parent replica’s child replicas. A replica table consists of a matrix containing partition columns and server rows. To determine the location of subordinate references, simply compare the matrix in the replica table to a representation of the graphical eDirectory tree structure. If a server box holds a parent replica but not all the parent’s child replicas, that’s an indication that subordinate references have been created automatically.
This completes our discussion of eDirectory partition and replica design. In review, we can organize most network designs into two different classifications:
![]() Quick design—Most networks have few special needs. As a result, they can use a conservative approach to replica design.
Quick design—Most networks have few special needs. As a result, they can use a conservative approach to replica design.
![]() Advanced design—Some networks have special needs that require complex design strategies.
Advanced design—Some networks have special needs that require complex design strategies.
Now let’s learn how to manage eDirectory partitions and replicas using iMonitor and WTM.
Test Objectives Covered:
![]() Identify Basic eDirectory Administrative Procedures (continued)
Identify Basic eDirectory Administrative Procedures (continued)
![]() Determine a WAN Traffic Manager Strategy for Your Tree (575)
Determine a WAN Traffic Manager Strategy for Your Tree (575)
![]() Identify eDirectory Recovery Steps (3004)
Identify eDirectory Recovery Steps (3004)
![]() Extend the eDirectory Schema (3004)
Extend the eDirectory Schema (3004)
![]() Redirect Resources in the Tree (3004)
Redirect Resources in the Tree (3004)
eDirectory partition and replica management involves the daily tasks required to scale eDirectory. After you’ve created an eDirectory partitioning and replication design, you must master the following seven partition management skills:
![]() Managing eDirectory partitions—First, you must gain experience in managing basic eDirectory components, including creating, merging, and moving partitions. This is typically accomplished using iManager (which we’ll discuss in much great depth in later lessons).
Managing eDirectory partitions—First, you must gain experience in managing basic eDirectory components, including creating, merging, and moving partitions. This is typically accomplished using iManager (which we’ll discuss in much great depth in later lessons).
![]() Managing eDirectory replicas—Next, you’ll need to enhance your management skills to include adding eDirectory replicas and changing the replica type.
Managing eDirectory replicas—Next, you’ll need to enhance your management skills to include adding eDirectory replicas and changing the replica type.
![]() Managing WAN traffic—WAN Traffic Manager (WTM) enables you to manage replica synchronization traffic across WAN links. This is a critical eDirectory CNE skill because it forms the basis of your network optimization strategy.
Managing WAN traffic—WAN Traffic Manager (WTM) enables you to manage replica synchronization traffic across WAN links. This is a critical eDirectory CNE skill because it forms the basis of your network optimization strategy.
![]() Preventive maintenance—eDirectory maintenance begins with prevention, including partition security, backing up the Directory, maintaining a standard eDirectory version, monitoring SYS: volume space, and preparing the server for downtime.
Preventive maintenance—eDirectory maintenance begins with prevention, including partition security, backing up the Directory, maintaining a standard eDirectory version, monitoring SYS: volume space, and preparing the server for downtime.
![]() Troubleshooting eDirectory inconsistencies—Another important aspect of eDirectory maintenance is troubleshooting inconsistencies. This occurs when replicas cannot be synchronized or their shared information becomes dissimilar.
Troubleshooting eDirectory inconsistencies—Another important aspect of eDirectory maintenance is troubleshooting inconsistencies. This occurs when replicas cannot be synchronized or their shared information becomes dissimilar.
![]() Extending the eDirectory schema—As a CNE, you must ensure that your network’s schema matches the needs of your organization.
Extending the eDirectory schema—As a CNE, you must ensure that your network’s schema matches the needs of your organization.
Sometimes that means you’ll have to extend the schema to accommodate additional classes and attributes.
![]() Redirecting resources in the tree—Managing eDirectory objects involves creating, modifying, and manipulating them in the tree. One of the key responsibilities you’ll have as an eDirectory CNE is providing support for redirecting resources in the tree. This is accomplished by moving and aliasing eDirectory objects using ConsoleOne.
Redirecting resources in the tree—Managing eDirectory objects involves creating, modifying, and manipulating them in the tree. One of the key responsibilities you’ll have as an eDirectory CNE is providing support for redirecting resources in the tree. This is accomplished by moving and aliasing eDirectory objects using ConsoleOne.
That’s all there is to it—no sweat. We have quite a large hands-on eDirectory lesson ahead of us. Let’s get started with some basic management tasks.
eDirectory partition management involves the following three tasks:
![]() Creating partitions—Creating a new partition actually involves splitting a child partition from its parent. Partition splits normally occur on a single server because the parent partition already resides there. Therefore, splitting such a partition doesn’t generate any traffic and happens quickly.
Creating partitions—Creating a new partition actually involves splitting a child partition from its parent. Partition splits normally occur on a single server because the parent partition already resides there. Therefore, splitting such a partition doesn’t generate any traffic and happens quickly.
![]() Merging partitions—Merging is the opposite of splitting. Merging typically takes longer than splitting and generates a great deal of WAN traffic, depending on the physical location of all servers in both partitions’ replica rings. This is especially important if a WAN is involved. To merge partitions, each server holding a replica of the parent partition must have a copy of the child partition. In return, each server holding a copy of the child partition must have a copy of the parent partition. The merge operation attempts to move copies of either the parent or child partitions to the appropriate servers, as needed.
Merging partitions—Merging is the opposite of splitting. Merging typically takes longer than splitting and generates a great deal of WAN traffic, depending on the physical location of all servers in both partitions’ replica rings. This is especially important if a WAN is involved. To merge partitions, each server holding a replica of the parent partition must have a copy of the child partition. In return, each server holding a copy of the child partition must have a copy of the parent partition. The merge operation attempts to move copies of either the parent or child partitions to the appropriate servers, as needed.
![]() Moving partitions—eDirectory enables you to move entire subtrees from one location to another. This is accomplished by moving a container (which must be a partition root) along with its contents. After you’ve moved a container and its contents, each user in the old container must perform the following two tasks to adapt to his new home context: log in using his new distinguished name, and change the Name Context field in the Login window of his Novell Client workstation.
Moving partitions—eDirectory enables you to move entire subtrees from one location to another. This is accomplished by moving a container (which must be a partition root) along with its contents. After you’ve moved a container and its contents, each user in the old container must perform the following two tasks to adapt to his new home context: log in using his new distinguished name, and change the Name Context field in the Login window of his Novell Client workstation.
eDirectory replica management involves the following two operations (discussed later in this chapter):
![]() Adding replicas—Adding replicas is the method used to distribute partition copies throughout the network. When you add replicas to distributed servers, all the eDirectory data for that partition is copied from one server to another over the network. This operation causes significant network traffic.
Adding replicas—Adding replicas is the method used to distribute partition copies throughout the network. When you add replicas to distributed servers, all the eDirectory data for that partition is copied from one server to another over the network. This operation causes significant network traffic.
![]() Changing replica type—eDirectory also enables you to change a replica’s type. This is particularly important when you want to manage eDirectory partitions or authenticate to a local master or read/write replica of your home container. eDirectory makes it possible for you to upgrade or downgrade master, read/write, and read-only replicas.
Changing replica type—eDirectory also enables you to change a replica’s type. This is particularly important when you want to manage eDirectory partitions or authenticate to a local master or read/write replica of your home container. eDirectory makes it possible for you to upgrade or downgrade master, read/write, and read-only replicas.
When eDirectory synchronizes partition replicas, it creates network traffic. If this traffic crosses WAN links unmanaged, it can increase costs and overload slow WAN links during high-use periods. NetWare 6 includes the WAN Traffic Manager to help you manage synchronization traffic across WAN links in the following ways:
![]() WTM controls server-to-server traffic generated by eDirectory.
WTM controls server-to-server traffic generated by eDirectory.
![]() WTM controls periodic events initiated by eDirectory (such as replica synchronization).
WTM controls periodic events initiated by eDirectory (such as replica synchronization).
![]() WTM can restrict traffic based on cost, time of day, type of traffic, or a combination of these criteria.
WTM can restrict traffic based on cost, time of day, type of traffic, or a combination of these criteria.
However, WAN Traffic Manager does not perform the following tasks:
![]() WTM does not control events initiated by network administrators or users.
WTM does not control events initiated by network administrators or users.
![]() WTM does not control non-eDirectory server-to-server traffic, such as time synchronization. Fortunately, we have Network Time Protocol (NTP) to solve that problem.
WTM does not control non-eDirectory server-to-server traffic, such as time synchronization. Fortunately, we have Network Time Protocol (NTP) to solve that problem.
WAN Traffic Manager consists of the following three components:
![]() WTM.NLM—This resides in the SYS:SYSTEM directory on each server. Before eDirectory initiates server-to-server traffic, WTM.NLM reads a WAN traffic policy and determines whether that traffic will be sent.
WTM.NLM—This resides in the SYS:SYSTEM directory on each server. Before eDirectory initiates server-to-server traffic, WTM.NLM reads a WAN traffic policy and determines whether that traffic will be sent.
![]() WTM ConsoleOne snap-in files—These files create an interface to the WAN Traffic Manager from within ConsoleOne. ConsoleOne enables you to create or to modify policies, to create LAN Area objects, and to apply policies to LAN Area objects or to servers. When WAN Traffic Manager is installed, the schema is extended to include a LAN Area object and three new detail pages: LAN Area Membership, WAN Policies, and Cost. A LAN Area object enables you to administer WAN traffic policies for a group of servers. If you don’t create a LAN Area object, you can still manage each server’s WAN traffic individually.
WTM ConsoleOne snap-in files—These files create an interface to the WAN Traffic Manager from within ConsoleOne. ConsoleOne enables you to create or to modify policies, to create LAN Area objects, and to apply policies to LAN Area objects or to servers. When WAN Traffic Manager is installed, the schema is extended to include a LAN Area object and three new detail pages: LAN Area Membership, WAN Policies, and Cost. A LAN Area object enables you to administer WAN traffic policies for a group of servers. If you don’t create a LAN Area object, you can still manage each server’s WAN traffic individually.
![]() WAN traffic policies—These are rules that control the generation of eDirectory synchronization traffic. They’re stored as an eDirectory property value of each NetWare server or LAN Area object. For example, you might restrict eDirectory traffic over a WAN link during high-use times. This shifts high-bandwidth activities to off-hours. You might also limit replica synchronization traffic to times when telecommunication rates are low (thereby reducing costs). WAN Traffic Manager provides a number of policies that enable you to restrict traffic according to a variety of criteria, including time of day, cost, protocol, geographic area, spoofing, and traffic type.
WAN traffic policies—These are rules that control the generation of eDirectory synchronization traffic. They’re stored as an eDirectory property value of each NetWare server or LAN Area object. For example, you might restrict eDirectory traffic over a WAN link during high-use times. This shifts high-bandwidth activities to off-hours. You might also limit replica synchronization traffic to times when telecommunication rates are low (thereby reducing costs). WAN Traffic Manager provides a number of policies that enable you to restrict traffic according to a variety of criteria, including time of day, cost, protocol, geographic area, spoofing, and traffic type.
eDirectory maintenance begins with prevention. The following strategies will help you prevent eDirectory database inconsistencies (defined as dropped object links, Unknown objects, or general replica unavailability):
![]() Plan replica placement—You should always maintain at least three replicas of each partition for fault tolerance purposes. Having too many replicas, however, can cause excessive synchronization traffic and can increase the risk of database inconsistencies. You’ll probably want to distribute most replicas locally, with only a few distributed over WAN links.
Plan replica placement—You should always maintain at least three replicas of each partition for fault tolerance purposes. Having too many replicas, however, can cause excessive synchronization traffic and can increase the risk of database inconsistencies. You’ll probably want to distribute most replicas locally, with only a few distributed over WAN links.
![]() Regulate partition management rights—Partition operations (such as splitting and joining) can have a dramatic effect on eDirectory synchronization. For this reason, you’ll probably want to regulate who performs these operations and where they’re performed. One method of regulation is to limit who has Supervisor [S] eDirectory rights to the Partition Root object, which means granting only [BCDRI] privileges to container administrators. Another strategy is to limit partition operations to a single workstation at a time. This is useful because partitions lock as they are split and joined. As a result, you can perform only one such operation on a partition at a time.
Regulate partition management rights—Partition operations (such as splitting and joining) can have a dramatic effect on eDirectory synchronization. For this reason, you’ll probably want to regulate who performs these operations and where they’re performed. One method of regulation is to limit who has Supervisor [S] eDirectory rights to the Partition Root object, which means granting only [BCDRI] privileges to container administrators. Another strategy is to limit partition operations to a single workstation at a time. This is useful because partitions lock as they are split and joined. As a result, you can perform only one such operation on a partition at a time.
![]() Back up the directory—Backing up a server’s file system does not back up eDirectory. Therefore, you’ll need to design an effective strategy for backing up eDirectory data. Also, be sure to test your backups to make sure that the data can be restored properly. You should consider backing up eDirectory every day (or at least every week). You should also back up eDirectory before creating or merging a partition. Finally, you should consider restoring an eDirectory backup only if all other options have been exhausted (such as re-creating a damaged replica from another replica in its replica ring).
Back up the directory—Backing up a server’s file system does not back up eDirectory. Therefore, you’ll need to design an effective strategy for backing up eDirectory data. Also, be sure to test your backups to make sure that the data can be restored properly. You should consider backing up eDirectory every day (or at least every week). You should also back up eDirectory before creating or merging a partition. Finally, you should consider restoring an eDirectory backup only if all other options have been exhausted (such as re-creating a damaged replica from another replica in its replica ring).
![]() Maintain a standard eDirectory version—Each update of DS.NLM (the eDirectory module) fixes problems and increases functionality. When a new version of eDirectory is released, the new features aren’t available until all servers in a replica ring have been updated. You can use iMonitor to view the eDirectory version and update a server’s DS.NLM version. The source server is the one with the newest version, and the target is the one being updated.
Maintain a standard eDirectory version—Each update of DS.NLM (the eDirectory module) fixes problems and increases functionality. When a new version of eDirectory is released, the new features aren’t available until all servers in a replica ring have been updated. You can use iMonitor to view the eDirectory version and update a server’s DS.NLM version. The source server is the one with the newest version, and the target is the one being updated.
![]() Monitor SYS: volume space—The eDirectory database is stored in a hidden directory on the SYS: volume. If the SYS: volume fills up, TTS shuts down and the eDirectory database is closed to future changes. To avoid running out of disk space on the SYS: volume, consider the following guidelines: set minimum space requirements to receive a warning before SYS: runs out of space, store print queues and user files on other volumes, move the default virtual memory SWAP file off the SYS: volume, and control the size of audit data files. Also, don’t add replicas to full volumes, don’t disable TTS, and for NetWare 4.x servers, consider removing CD-ROM drives from replica servers because they create huge index files on the SYS: volume.
Monitor SYS: volume space—The eDirectory database is stored in a hidden directory on the SYS: volume. If the SYS: volume fills up, TTS shuts down and the eDirectory database is closed to future changes. To avoid running out of disk space on the SYS: volume, consider the following guidelines: set minimum space requirements to receive a warning before SYS: runs out of space, store print queues and user files on other volumes, move the default virtual memory SWAP file off the SYS: volume, and control the size of audit data files. Also, don’t add replicas to full volumes, don’t disable TTS, and for NetWare 4.x servers, consider removing CD-ROM drives from replica servers because they create huge index files on the SYS: volume.
![]() Prepare a server for downtime—If you must shut down a server for more than a few hours, use iManager to move replicas to other servers. If you want to shut down the server or WAN link for more than a few days, you should remove eDirectory from the server using NWCONFIG. Fortunately, the Directory is designed to withstand these problems, and replicas are resynchronized when the servers come back online and DS is reinstalled.
Prepare a server for downtime—If you must shut down a server for more than a few hours, use iManager to move replicas to other servers. If you want to shut down the server or WAN link for more than a few days, you should remove eDirectory from the server using NWCONFIG. Fortunately, the Directory is designed to withstand these problems, and replicas are resynchronized when the servers come back online and DS is reinstalled.
The first sign of eDirectory trouble is often an inconsistent database. This occurs when replicas of a partition cannot be synchronized, and the shared information becomes dissimilar or corrupted. Sometimes the inconsistency is temporary—for instance, when splitting or joining multiple partitions. Most of the time, however, the inconsistency represents a symptom of a larger problem.
Use the following signs to identify eDirectory inconsistencies:
![]() Client symptoms—The following client problems might indicate that replicas are out of synch: the client prompts for a password when none exists, client logins take much longer than they should, modifications to eDirectory disappear, previously assigned eDirectory rights disappear, and client problems are inconsistent and cannot be duplicated.
Client symptoms—The following client problems might indicate that replicas are out of synch: the client prompts for a password when none exists, client logins take much longer than they should, modifications to eDirectory disappear, previously assigned eDirectory rights disappear, and client problems are inconsistent and cannot be duplicated.
![]() Unknown objects—The presence of Unknown objects in the tree might indicate problems with synchronization. Unknown objects don’t always point to a problem, however. For example, objects can become Unknown during partition creation and merge operations. This is normal because the partition root is changing. Volume and Alias objects also become Unknown when their host objects are deleted.
Unknown objects—The presence of Unknown objects in the tree might indicate problems with synchronization. Unknown objects don’t always point to a problem, however. For example, objects can become Unknown during partition creation and merge operations. This is normal because the partition root is changing. Volume and Alias objects also become Unknown when their host objects are deleted.
![]() eDirectory error codes—The NetWare 6 server console displays eDirectory error messages whenever the server is unable to complete a synchronization process. These messages can be viewed in the file server error log, in iManager, or at the server console prompt by using the SET DSTRACE = ON command.
eDirectory error codes—The NetWare 6 server console displays eDirectory error messages whenever the server is unable to complete a synchronization process. These messages can be viewed in the file server error log, in iManager, or at the server console prompt by using the SET DSTRACE = ON command.
If the previously described repair procedures don’t solve your eDirectory inconsistency problems, you might need to remove the server from the eDirectory tree. Removing a server requires careful consideration because the server probably contains replicas and other essential references to eDirectory. In this situation, these references must be deleted so that the rest of the servers in the replica ring can synchronize properly.
To remove a server from eDirectory, you must first remove the Directory files from the server’s SYS: volume. This accomplishes several auxiliary tasks, including deleting associated Volume objects, solving replica placement problems, informing other servers in the replica ring that the server is being removed, and removing all essential eDirectory references from the server.
Follow these simple steps to remove a server from eDirectory:
1. Load NWCONFIG at the server console. Alternatively, you can load NWCONFIG with the DSREMOVE option to remove eDirectory from the server unconditionally.
2. Select Directory Options.
3. Select Remove Directory Services from This Server. A warning message will appear. Press the Enter key to close the window and continue.
4. Select Yes to confirm.
5. Log in to the server as Admin or any user with Supervisor rights to all replicas. You’ll receive a message that master replicas exist on this server. Press the Enter key to close the window.
6. If this is the only server in the eDirectory tree, you’re finished. You’ll receive a message confirming that eDirectory has been removed.
7. If this isn’t the only server in the eDirectory tree, you need to send the master replica to another server. Choose Do It Automatically if you want NWCONFIG to find an appropriate read/write replica and upgrade it. Otherwise, choose Designate Which Servers Yourself and choose the read/write replica manually.
Because the eDirectory files are stored on the SYS: volume, a hard disk crash involving a server’s SYS: volume is equivalent to losing eDirectory and the entire operating system. Recovering from this kind of crash can be tricky because the Directory wasn’t properly removed from the server prior to the failure.
Follow these procedures to recover from a server hard disk crash:
1. Determine replica status—Use iManager to document the replicas that were stored on this server. To do this, highlight the Server object from another server and document the replica list. If any of the replicas were masters, you’ll have to upgrade another read/write replica to master status in each case by using iManager.
2. Delete the Server object—Use iManager to delete the Server object from eDirectory that corresponds to this server.
3. Delete Volume objects—Use ConsoleOne to delete any Volume objects associated with this server.
4. Resolve eDirectory problems—Use iManager to resolve any outstanding eDirectory problems caused by the crash. Highlight the server’s home partition and activate Partition Continuity. If you receive a -625 eDirectory error, use the Repair menu.
5. Install NetWare 6—Install the new hard disk and NetWare 6 operating system. When the eDirectory Server Context screen appears, install the server in its original context.
6. Restore the replicas—Use iManager and your replica list from step 1 to replace all replicas (including masters) on the new server. This step might take a while, particularly in the case of extensive updates across WAN links.
7. Restore the file system—Use Storage Management Services (SMS) to restore the file system from tape or optical backup media.
8. Confirm the correct bindery context—Use the SET BINDERY CONTEXT = context_name command at the console prompt to restore the server’s bindery context.
The structure of eDirectory is governed by a set of rules collectively known as the eDirectory schema. These rules define the type of data, the syntax of the data, and the objects that eDirectory can contain. Schema rules fall into two broad categories:
![]() Object class definitions define the type of objects and the attributes of those objects.
Object class definitions define the type of objects and the attributes of those objects.
![]() Attribute definitions define the structure (syntax and constraints) of an attribute. Simply stated, the attribute value is actual content or data held in eDirectory objects.
Attribute definitions define the structure (syntax and constraints) of an attribute. Simply stated, the attribute value is actual content or data held in eDirectory objects.
As a CNE, you must ensure that your network’s schema matches the needs of your organization. The larger and more complex your network, the more likely it is that you’ll need to customize the schema. NetWare 6 provides a Schema Manager utility within the Tools menu of ConsoleOne. CNEs with Supervisor rights to the eDirectory tree can use the Schema Manager to perform several eDirectory management tasks, including
![]() View the schema—Schema Manager enables you to view a list of all object classes and attributes in the default and extended schema. To do so, simply choose Schema Manager from the Tools menu of ConsoleOne. A list of available classes and properties will appear. Double-click the class or property to view information about it.
View the schema—Schema Manager enables you to view a list of all object classes and attributes in the default and extended schema. To do so, simply choose Schema Manager from the Tools menu of ConsoleOne. A list of available classes and properties will appear. Double-click the class or property to view information about it.
![]() Create a class—Schema Manager enables you to extend the default schema by adding an object class using the Classes option. This magic is accomplished using the Create a Class Wizard in ConsoleOne.
Create a class—Schema Manager enables you to extend the default schema by adding an object class using the Classes option. This magic is accomplished using the Create a Class Wizard in ConsoleOne.
![]() Create an attribute—Schema Manager also enables you to extend the default schema by adding optional attributes to existing classes. This is accomplished using the Create an Attribute Wizard within the Attributes option of Schema Manager. Additional attributes are required when your organization’s information requires change or you’re preparing to merge eDirectory trees. After you’ve added optional attributes to a given class, these attributes will automatically appear whenever you create a new object within eDirectory. To set values for these additional attributes, use the Other Property page within ConsoleOne or iManager.
Create an attribute—Schema Manager also enables you to extend the default schema by adding optional attributes to existing classes. This is accomplished using the Create an Attribute Wizard within the Attributes option of Schema Manager. Additional attributes are required when your organization’s information requires change or you’re preparing to merge eDirectory trees. After you’ve added optional attributes to a given class, these attributes will automatically appear whenever you create a new object within eDirectory. To set values for these additional attributes, use the Other Property page within ConsoleOne or iManager.
![]() Delete classes and attributes—Schema Manager giveth and taketh away. You can also use this eDirectory tool to delete unused classes and/or attributes. These tasks are required after merging trees and resolving attribute differences. In addition, you might want to delete Schema object classes and attributes when these rules become obsolete.
Delete classes and attributes—Schema Manager giveth and taketh away. You can also use this eDirectory tool to delete unused classes and/or attributes. These tasks are required after merging trees and resolving attribute differences. In addition, you might want to delete Schema object classes and attributes when these rules become obsolete.
![]() Create an auxiliary class—Schema Manager enables you to get very specific about which object classes get extended and which don’t. Auxiliary Class is a set attribute that is added to a particular eDirectory object rather than to an entire class of objects. For example, you can extend the schema to include a Pager property Auxiliary Class for only those User objects that have pagers. This enables you to group specific users that can be easily identifiable in the eDirectory tree. To create auxiliary classes, you must select the Auxiliary Class flag when creating additional object classes.
Create an auxiliary class—Schema Manager enables you to get very specific about which object classes get extended and which don’t. Auxiliary Class is a set attribute that is added to a particular eDirectory object rather than to an entire class of objects. For example, you can extend the schema to include a Pager property Auxiliary Class for only those User objects that have pagers. This enables you to group specific users that can be easily identifiable in the eDirectory tree. To create auxiliary classes, you must select the Auxiliary Class flag when creating additional object classes.
Managing eDirectory objects involves creating, modifying, and manipulating them in the tree. Fortunately, NetWare 6 includes a Java-based administration browser to help: ConsoleOne. ConsoleOne is designed like a file manager utility with a left pane (where you browse containers) and right pane (where you manage network resources and eDirectory objects). Check it out in Figure 5.13.

As a Java-based GUI tool, ConsoleOne supports cross-platform compatibility from both the Novell Client workstation and NetWare 6 server. One of the key responsibilities you’ll encounter as an eDirectory CNE is providing support for redirecting resources in the tree. Moving and aliasing eDirectory objects accomplishes this.
As you’ll learn in Chapter 19, your eDirectory tree structure must follow a geographical or functional design. As such, changes in your organization’s structure will require modification to the eDirectory design. For example, when an employee, printer, server, or other resource is moved or changes function within the company, you must move the corresponding eDirectory object in the tree.
Resource redirection is accomplished in ConsoleOne by selecting the objects you want to move from the right pane of Figure 5.13. Next, right-click your selection and select Move. You can also create an Alias object in the old location by selecting Create an Alias for All Objects Being Moved. This allows applications that depend on the object’s original location to continue uninterrupted until you have a chance to update them.
Speaking of aliases, this is another important aspect of your life as an eDirectory CNE. The main purpose for creating an Alias object is to make things convenient for your users. Earlier we discussed that aliases can be left behind when moving objects from one location in the tree to another. In addition, you can use aliases to place resources closer to the users who access them. One perfect example is the Volume object. Server volumes are created by default in the same context as the server that hosts them. However, your users might need access to files in different containers. Placing volume aliases in distributed locations of the tree gives you easier control over rights assignments because you can use inheritance at the Container level. Remember, it’s our goal to make your life easier, not harder, as an eDirectory CNE.
Congratulations! You’ve successfully maintained, fixed, and extended your eDirectory tree. Fortunately, there are very few disasters you can’t recover from with NetWare 6. All you need is a quick wit and a really heavy book (preferably CNE Study Guide for NetWare 6).
This completes our lesson in eDirectory replication and synchronization management. These strategies should help you sleep better at night by decreasing the chances that something horrible will happen to your eDirectory tree. Now let’s continue our eDirectory management chapter with implementation and iMonitor.
Test Objectives Covered:
![]() Prepare for Upgrading to eDirectory 8.6 (3004)
Prepare for Upgrading to eDirectory 8.6 (3004)
![]() Use the eDirectory Import/Export Wizard to Manage LDIF Files (3004)
Use the eDirectory Import/Export Wizard to Manage LDIF Files (3004)
Now that you understand the fundamental architecture of the eDirectory tree, it’s time to explore how it works. As you manage network objects within eDirectory, pay particular attention to its treelike structure. A well-designed tree makes resource access and management much easier. The structure of the eDirectory tree is both organizational and functional. The location of an object in the tree can affect how users access it and how network administrators manage it.
In this lesson, you’ll learn how to implement eDirectory 8.6 in two simple steps:
![]() Step 1: eDirectory integration—You must complete four tasks to prepare your network for eDirectory 8.6.
Step 1: eDirectory integration—You must complete four tasks to prepare your network for eDirectory 8.6.
![]() Step 2: eDirectory Import/Export Wizard—You can use the eDirectory Import/Export Wizard to create large groups of eDirectory objects from existing LDAP databases.
Step 2: eDirectory Import/Export Wizard—You can use the eDirectory Import/Export Wizard to create large groups of eDirectory objects from existing LDAP databases.
Ready, set, go!
When you install NetWare 6, eDirectory 8.6 is installed by default. If you upgrade to NetWare 6 from an existing network, however, you must carefully complete the following four tasks to prepare your network for eDirectory 8.6:
1. Apply the latest support packs.
2. Update the eDirectory schema.
3. Configure the Novell Certificate Server.
4. Perform an eDirectory health check. Let’s explore step 1 in more depth, staring with support packs.
eDirectory 8.6 operates at the core of your network. Therefore, you should ensure that the latest NetWare support packs have been installed on all of your NetWare servers before you implement eDirectory 8.6. These updates can be downloaded from the Novell Web site at support.Novell.com.
eDirectory uses a mechanism called the schema to define the object naming structure for all network resources. The schema is distributed to all NetWare servers and follows specific rules. Think of the schema as the pulse of eDirectory 8.6.
Prior to installing NetWare 6 and updating your network to eDirectory 8.6, you must update your network’s eDirectory schema. This is easily accomplished using NetWare Deployment Manager (which is located in the root of the NetWare 6 Operating System CD). As you recall from Chapter 2, NetWare Deployment Manager is a graphical tool that guides you through the steps required to ensure that all of your servers are using the latest version of the eDirectory schema. The good news is that you have to complete this procedure only once!
Prior to installing NetWare 6 and upgrading your network to eDirectory 8.6, you must configure the Novell Certificate Server. The Novell Certificate Server enables you to mint, issue, and manage digital certificates from within eDirectory by using two key objects:
![]() Security container object—The Security container holds security-related objects for the eDirectory tree, including the Organizational CA object. This container physically resides at the very top of the eDirectory tree. The first server installed in eDirectory creates and stores the Security container.
Security container object—The Security container holds security-related objects for the eDirectory tree, including the Organizational CA object. This container physically resides at the very top of the eDirectory tree. The first server installed in eDirectory creates and stores the Security container.
![]() Organizational CA object—The Organizational CA object enables secure data transmissions. This object is stored inside the Security container and therefore also resides at the very top of the eDirectory tree. Only one Organizational CA object can exist in an eDirectory tree. After this object has been created, it should not be moved to another server. Deleting and re-creating an organizational CA invalidates any certificates associated with it.
Organizational CA object—The Organizational CA object enables secure data transmissions. This object is stored inside the Security container and therefore also resides at the very top of the eDirectory tree. Only one Organizational CA object can exist in an eDirectory tree. After this object has been created, it should not be moved to another server. Deleting and re-creating an organizational CA invalidates any certificates associated with it.
You must be running the latest version of Novell Certificate Server to implement eDirectory 8.6. To upgrade your network, follow these simple steps:
1. Identify the server that’s acting as the organizational CA—Use ConsoleOne to browse to your tree’s Security container. Double-click the organizational CA and select the General tab. The server acting as the CA is listed in the Host Server field.
2. Verify that the CA server is running Novell Certificate Server 2.0 or later—Move to the server that you identified in step 1. From the server console, execute NWCONFIG. Select Product Options, and then View/Configure/Remove Installed Products. Finally, look for the PKIS entry to validate the version of Novell Certificate Server that you’re running.
3. Verify that the necessary security-related objects exist in your Security container—Inside the Security container, you should find the following three security-related objects: a KAP container object, a W0 security object within the KAP container, and an Organizational CA object. If these objects don’t exist, the first NetWare 6 server will create them. The network administrator performing the installation, however, must have Supervisor rights in the Security container, as well as at the tree root of the eDirectory tree.
4. Establish the necessary eDirectory rights for operating the CA—To properly administer Novell Certificate Server, you must have Supervisor eDirectory rights to the W0 object and to the host server’s container. In addition, you must have Read entry rights to the NDSPKI: Private Key attribute of the organizational CA.
5. Download and install the client NICI on the ConsoleOne administrative workstation—The Client NICI can be downloaded from the Novell Web site at www.Novell.com/products/cryptograpy.
After you’ve successfully accomplished these five tasks, updated the directory schema, and applied the latest support packs, your network is ready to accommodate eDirectory 8.6. Ready, set, go!
After you’ve installed eDirectory 8.6 on your new network, you should run a health check on each NetWare server to ensure that the integration was successful.
TIP
Regular health checks will help keep your directory running smoothly and make upgrades and troubleshooting much easier. In fact, one of the most frequent problems encountered by Novell Technical Support engineers is caused by network administrators who fail to run a health check on their eDirectory tree after a new server has been installed.
A complete health check begins with verifying the version of eDirectory that you’re using. Every NetWare server on your network should be running the same version of DS.NLM. Next, you should check time synchronization because all object and property updates rely on consistent time stamps. You should then check partition continuity to ensure that all replicas of a partition are in sync. Finally, you should ensure that all eDirectory SET parameters are operating correctly.
The following are the detailed steps for the four most important eDirectory health checks, as well as a step-by-step guide to repairing the local database if anything goes wrong.
TIP
You must perform these health check procedures for every server in the eDirectory tree. You can start by performing the steps on the server holding the master replica for each partition (starting with the Tree partition) and working down the eDirectory tree.
Start at the NetWare server holding the master replica for the Tree partition. At the server console, execute DSREPAIR, and then select Time Synchronization to check the version of DS.NLM on each server synchronizing with this one. Also, verify that the time stamps are properly synchronized.
At the server console, enter the following DSTRACE commands to check server-to-server synchronization:
![]() SET DSTRACE=ON—Activates the trace screen for eDirectory transactions.
SET DSTRACE=ON—Activates the trace screen for eDirectory transactions.
![]() SET DSTRACE=+S—Permits you to view the synchronization of objects.
SET DSTRACE=+S—Permits you to view the synchronization of objects.
![]() SET DSTRACE=*H—Initiates synchronization between servers. Next, press Ctrl+Esc and select Directory Services from the Current Screens list to view the Directory Services Trace screen. If there are no errors, a message will indicate that All Processed=YES. This message should appear for each partition on this server.
SET DSTRACE=*H—Initiates synchronization between servers. Next, press Ctrl+Esc and select Directory Services from the Current Screens list to view the Directory Services Trace screen. If there are no errors, a message will indicate that All Processed=YES. This message should appear for each partition on this server.
In DSREPAIR, you can perform four different health check procedures to ensure that replicas are synchronizing correctly. Follow these simple procedures:
![]() Replica synchronization—Select Report Synchronization Status to view replica synchronization. A server must have a replica for this operation to work.
Replica synchronization—Select Report Synchronization Status to view replica synchronization. A server must have a replica for this operation to work.
![]() External references—In the Advanced Options menu, select Check External References. This option shows external references, obituaries, and the states of all servers in the backlink list for the obituaries.
External references—In the Advanced Options menu, select Check External References. This option shows external references, obituaries, and the states of all servers in the backlink list for the obituaries.
![]() Replica state—In the Advanced Options menu, select Replica and Partition Operations. Verify that the replica state is on.
Replica state—In the Advanced Options menu, select Replica and Partition Operations. Verify that the replica state is on.
![]() Replica ring—In the Advanced Options menu, select Replica and Partition Operations. Then choose a particular partition and select View Replica Ring. Verify that the servers holding replicas of that partition are on and correct.
Replica ring—In the Advanced Options menu, select Replica and Partition Operations. Then choose a particular partition and select View Replica Ring. Verify that the servers holding replicas of that partition are on and correct.
At the server console, enter the following DSTRACE commands to check the health of your eDirectory schema:
![]() SET DSTRACE=ON—Activates the trace screen for eDirectory transactions
SET DSTRACE=ON—Activates the trace screen for eDirectory transactions
![]() SET DSTRACE=+SCHEMA—Displays schema information
SET DSTRACE=+SCHEMA—Displays schema information
![]() SET DSTRACE=*SS—Initiates schema synchronization
SET DSTRACE=*SS—Initiates schema synchronization
At the server console, press Ctrl+Esc and select Directory Services from the Current Screens list to view the Directory Services Trace screen. If there are no errors, an All Processed=YES message will appear.
If you find errors in your eDirectory database after performing the health checks just described, you can attempt to repair the local database using DSREPAIR. This process might take a considerable amount of time and does lock the database during repair, so make sure that you perform the repair procedure after normal business hours.
In DSREPAIR,
1. Select the Advanced Options menu.
2. Choose Repair Local DS Database.
3. Mark the options on this page as follows:
Check Local References—Yes
Rebuild Operational Schema—Yes
All Other Options—No
This option locks the eDirectory database.
4. DSREPAIR displays a message stating that authentication cannot occur with this server when the eDirectory database is locked. Press F10 and select Yes.
5. When the repair process is complete, exit DSREPAIR. After you have completed all the eDirectory health checks and repaired the local database, you’re done. Now you can rest easy knowing that your eDirectory database is in the best possible condition it can be. And the good news is that you’re ready to begin populating your tree with users, servers, containers, and other network objects.
Now, let’s continue this exciting lesson with step 2 of eDirectory implementation: the eDirectory Import/Export Wizard.
REAL WORLD
After you’ve completed all the health check procedures just described, you’ll need to enter the following commands at the server console to turn off DSTRACE:
![]() SET DSTRACE=nodebug—Erases all DSTRACE SET commands
SET DSTRACE=nodebug—Erases all DSTRACE SET commands
![]() SET DSTRACE=+min—Sets DSTRACE to minimum settings
SET DSTRACE=+min—Sets DSTRACE to minimum settings
![]() SET DSTRACE=off—Turns off the DSTRACE screen
SET DSTRACE=off—Turns off the DSTRACE screen
If left running, DSTRACE uses server resources that can slow down critical procedures. So, when in doubt, turn it off.
In Chapter 2, you used the NetWare 6 migration process to move data from a NetWare 6 (source) server across the network to a new temporary (destination) NetWare 6 server. After the migration, the temporary NetWare 6 (destination) server assumed the identity of the source server. In this lab exercise, you’ll run the following types of tests to verify that the LABS-SRV1 server is operating properly after the migration:
In this lab exercise, you’ll need the following servers:
![]() LABS-SRV1 server created in Lab Exercise 2.2.
LABS-SRV1 server created in Lab Exercise 2.2.
![]() WHITE-SRV1 server created in Lab Exercise 2.2.
WHITE-SRV1 server created in Lab Exercise 2.2.
Complete the following tasks:
1. Verify that the LABS-SRV1 server is configured as a single reference time provider.
a. At the LABS-SRV1 server prompt, enter MONITOR.
b. When the Available Options menu appears, select Server Parameters.
TIP
If you hesitate too long when making your selection, you’ll notice that the General Information window automatically expands, and in the process hides the Available Options menu. If this occurs, simply press the Tab key to gain access to the Available Options menu.
c. When the Select a Parameter Category menu appears, select Time.
d. When the Time Parameters window appears
![]() Verify that the TIMESYNC Type is SINGLE.
Verify that the TIMESYNC Type is SINGLE.
![]() Verify that the Default Time Server Type is SINGLE.
Verify that the Default Time Server Type is SINGLE.
e. Exit MONITOR.
Complete the following tasks:
1. Check server-to-server synchronization:
a. At the LABS-SRV1 server console prompt, enter each of these commands:
SET DSTRACE=ON
SET DSTRACE=+S
SET DSTRACE=*H
TIP
At the server console, you can press Alt+Esc to toggle between screens or Ctrl+Esc to display a list of active screens.
b. Press Ctrl+Esc.
c. When the Current Screens menu appears, select Directory Services.
d. When the DSTRACE screen appears, review the information on the screen:
![]() If no errors were found, skip to step 2.
If no errors were found, skip to step 2.
![]() If any errors were found, try reentering the following commands at the server console prompt:
If any errors were found, try reentering the following commands at the server console prompt:
SET DSTRACE=+S
SET DSTRACE=*H
and then return to step 1b.
2. Check schema information:
a. At the LABS-SRV1 server console prompt, enter these commands:
SET DSTRACE=+SCHEMA
SET DSTRACE=*SS
b. Press Ctrl+Esc.
c. When the Current Screens menu appears, select Directory Services.
d. When the DSTRACE screen appears, verify that the following message is displayed: All Processed = YES.
3. Verify the DS.NLM version and check time synchronization:
a. At the LABS-SRV1 server console prompt, enter DSREPAIR.
b. When the Available Options menu appears, select Time Synchronization.
c. When the View Log File (Last Entry): “SYS:SYSTEMDSREPAIR. LOG” window appears:
![]() Verify that the DS.NLM version is 10110.20 or later.
Verify that the DS.NLM version is 10110.20 or later.
![]() Verify that time is synchronized.
Verify that time is synchronized.
d. Press Esc to return to the Available Options menu.
4. Check replica synchronization:
a. When the Available Options menu appears, select Report Synchronization Status.
b. When the View Log File (Last Entry): “SYS:SYSTEMDSREPAIR. LOG” window appears, verify that the replicas on all servers are synchronized up to time for each partition.
c. Press Esc to return to the Available Options menu.
5. Check external references:
a. When the Available Options menu appears, select Advanced Options Menu.
b. When the Advanced Options menu appears, select Check External References.
c. When the View Log File (Last Entry): “SYS:SYSTEMDSREPAIR. LOG” window appears, you’ll notice that no external references were checked.
d. Press Esc to return to the Advanced Options menu.
6. Check the replica state:
a. When the Advanced Options menu appears, select Replica and Partition Operations.
b. When the Replicas Stored on This Server window appears, verify that the replica state is on for all partitions.
c. Press Esc to return to the Advanced Options menu.
7. Check the replica ring:
a. In the Advanced Options menu, select Replica and Partition Operations.
b. When the Replicas Stored on This Server window appears, select the [Root] partition.
c. When the Replica Options, Partition: .[Root]. menu appears, select View Replica Ring.
d. When the Replicas of Partition .[Root]. window appears:
![]() Verify that the servers holding replicas of this partition are correct.
Verify that the servers holding replicas of this partition are correct.
![]() Verify that the replica state of the [Root] partition is On.
Verify that the replica state of the [Root] partition is On.
e. Press the Esc key three times to return to the Advanced Options menu.
8. Repair the local database:
a. When the Advanced Options menu appears, select Repair Local DS Database.
b. When the Repair Local Database Options window appears:
![]() In the Rebuild Operational Schema field, you’ll notice there is a warning indicating that you should not enable this option unless directed by Technical Support. Change the value to Yes anyway. To do so, press Y, and then press Enter.
In the Rebuild Operational Schema field, you’ll notice there is a warning indicating that you should not enable this option unless directed by Technical Support. Change the value to Yes anyway. To do so, press Y, and then press Enter.
![]() In the Repair All Local Replicas field, verify that Yes is displayed.
In the Repair All Local Replicas field, verify that Yes is displayed.
![]() Leave all other parameters on the page at their default settings.
Leave all other parameters on the page at their default settings.
![]() Press F10.
Press F10.
c. When the Repair Directory menu appears:
![]() Read the warning indicating that you have selected to lock the DB (DIB) database while the repair operating is running and that users will be prevented from logging in.
Read the warning indicating that you have selected to lock the DB (DIB) database while the repair operating is running and that users will be prevented from logging in.
![]() Select Yes to continue.
Select Yes to continue.
d. Wait while the repair operation proceeds.
e. When prompted that the repair is complete:
![]() In the Total Errors field, note the number of errors. It should be 0.
In the Total Errors field, note the number of errors. It should be 0.
NOTE
If errors were encountered, you might want to continue running Repair Local DS Database until no errors are displayed.
![]() Press the Enter key to continue.
Press the Enter key to continue.
f. When the View the Current Log File menu appears, select No.
g. When the Repair Local Database Options window appears:
![]() If errors were encountered in step 8e, press F10 to repeat the repair process.
If errors were encountered in step 8e, press F10 to repeat the repair process.
![]() If errors no were encountered in step 8e, exit DSREPAIR.
If errors no were encountered in step 8e, exit DSREPAIR.
9. Turn off DSTRACE. At the server console prompt, enter these commands:
Set DSTRACE=nodebug
Set DSTRACE=+min
Set DSTRACE=off
When your network is ready to accept eDirectory 8.6 objects, you can take advantage of Novell’s new eDirectory Import/Export Wizard to create large batches of objects with the press of a single button. The wizard uses the Novell Import/Conversion Export (ICE) engine installed with ConsoleOne. This engine enables you to convert LDAP Data Interchange Format (LDIF) files into eDirectory objects.
In this second eDirectory implementation lesson, you’ll learn how to use the eDirectory Import/Export Wizard to manage LDIF files. But let’s first review the basics of LDAP and LDIF.
TIP
The NetWare 6 installation program automatically copies two versions of the Novell Import/Conversion Export engine to your server: a Win32 version (ICE.EXE) and a NetWare version (ICE.NLM). On Linux, Solaris, and Tru64 Unix systems, ICE is included in the NDSadmutl package.
LDAP and LDIF combine to create the directory access file format used by the ICE engine to create large groups of eDirectory objects with the press of a single button.
LDAP is an Internet communications protocol based on the X.500 Directory Access Protocol (DAP). Fundamentally, LDAP allows client applications to access directory information running on a NetWare server. This is accomplished using an eDirectory service called LDAP Services for eDirectory, which is provided by NLDAP.NLM.
LDIF is a standard that defines an ASCII text file format that’s used to exchange data between LDAP-compliant directories. LDIF files are commonly used to build a directory database initially or to add a large number of entries to a directory all at once. In this case, we’re using LDIF files with the ICE engine to add a large number of network object entries to eDirectory with the press of a single button.
So, how do they work? LDIF files consist of one or more entries separated by a blank line. Each LDIF entry has an optional entry ID, a required distinguished name, one or more object classes, and multiple attribute definitions. You can specify object classes and attributes in any order.
Table 5.4 describes the LDIF fields used in the following example. This example accomplishes two tasks: it creates an Organization object named ACME, and then it creates a user named AEinstein in the ACME container.
dn: o=ACME
changetype: add
o: ACME
objectClass: organization
objectClass: ndsLoginProperties
objectClass: ndsContainerLoginProperties
objectClass: top
ACL: 2#entry#o=ACME#loginScript
ACL: 2#entry#o=ACME#printJobConfiguration
dn: cn=aeinstein,o=ACME
changetype: add
uid: aeinstein
otherGUID:: bsaWkLmDlk+Sdcy8z17PpA==
givenName: Albert
fullName: Albert Einstein
Language: ENGLISH
Title: Chief Scientist
sn: Einstein
ou: LABS
objectClass: inetOrgPerson
objectClass: organizationalPerson
objectClass: person
objectClass: ndsLoginProperties
objectClass: top
1: NORAD
cn: aeinstein
ACL: 2#subtree#cn=aeinstein,o=ACME#[All Attributes Rights]
ACL: 6#entry#cn=aeinstein,o=ACME#loginScript
ACL: 2#entry#[Public]#messageServer
ACL: 2#entry#[Root]#groupMembership
ACL: 6#entry#cn=aeinstein,o=ACME#printJobConfiguration
ACL: 2#entry#[Root]#networkAddress
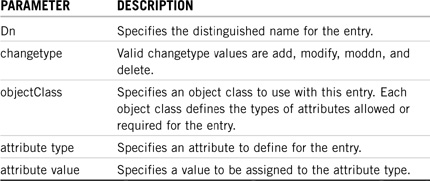
The eDirectory Import/Export Wizard is a snap-in utility built into ConsoleOne. The wizard uses ICE as an import/export engine to manage a collection of handlers that read from or write to LDIF files. For example, to import LDIF data into an LDAP directory, ICE uses an LDIF source handler to read the LDIF file and an LDAP destination handler to send the data to the correct LDAP directory server.
NOTE
ICE replaces BULKLOAD and UIMPORT that were included with previous versions of eDirectory. ICE supports a command-line interface in addition to the Import/Export Wizard.
As you can see in Figure 5.14, the ConsoleOne Import/Export Wizard supports three different tasks:
![]() Import data from LDIF files to an LDAP directory
Import data from LDIF files to an LDAP directory
![]() Export data from an LDAP directory to an LDIF file
Export data from an LDAP directory to an LDIF file
![]() Migrate data between LDAP servers
Migrate data between LDAP servers
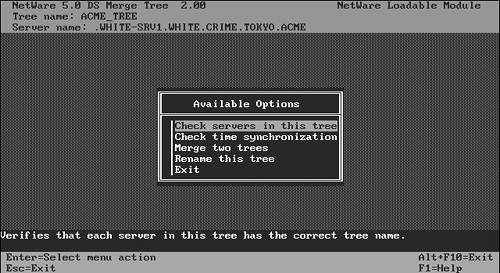
Whether you’re importing, exporting, or migrating LDIF data, the steps are nearly identical. The following is a step-by-step description of all three tasks and how to accomplish them by using the eDirectory Import/Export Wizard:
1. In ConsoleOne, select Wizards, and then select NDS Import/Export.
2. In the Select Task screen shown in Figure 5.14, choose Import, Export, or Migrate, depending on the task you want to accomplish.
3. Based on the task you chose in step 2, perform one of the following:
a. Import—Enter the name of the LDIF file that contains the data you want to import, select Next, and then specify the LDAP-complaint server where the data will be imported.
b. Export—Specify the LDAP-compliant server that holds the entries you want to export. Enter a DNS name or IP address.
c. Migrate—Specify the LDAP-complaint server that holds the entries you want to migrate. Enter a DNS name or IP address.
4. Regardless of the task you select, the wizard will ask you to fill out a form full of import/export options. Follow along in Table 5.5 as you complete the appropriate form. Select Next when you’re done.

5. Based on the option you chose in step 2, perform the appropriate task from the following list:
a. Import—Click Finish to begin the LDIF import.
b. Export—Specify the search criteria for the entries you want to export. These criteria include base DN, scope, filter, and search attributes. After you’ve specified the search criteria, select Next and enter the name of the LDIF file that will store the exported information. Finally, select Next and Finish to begin the LDIF export.
c. Migrate—Specify the search criteria for the entries you want to migrate, and then select Next and choose an LDAP server where the data will be migrated. Finally, select Next and Finish to migrate the LDIF data.
In addition to the standard synchronous protocol that ICE uses, you can also take advantage of the LDAP Bulk Update/Replication Protocol (LBURP). Excuse me.
LBURP allows ICE to send several update operations in a single request and to receive a response for all update operations in a single response. This asynchronous update processing guarantees that import/export requests are processed in the order specified and adds a tremendous amount of network efficiency to the overall system. LBURP lets ICE present data to the server as fast as the network connection will allow. In fact, if the network connection is fast enough, LBURP will keep the server busy processing update operations 100% of the time.
LBURP is enabled by default, but you can disable it during an LDIF import by using the Advanced Options screen shown in Figure 5.15. To enable or disable LBURP during an LDIF import, select or deselect the Use LBURP option in Figure 5.15. You can find the Advanced Options screen by selecting the Advanced tab on the LDAP Server Selection screen.
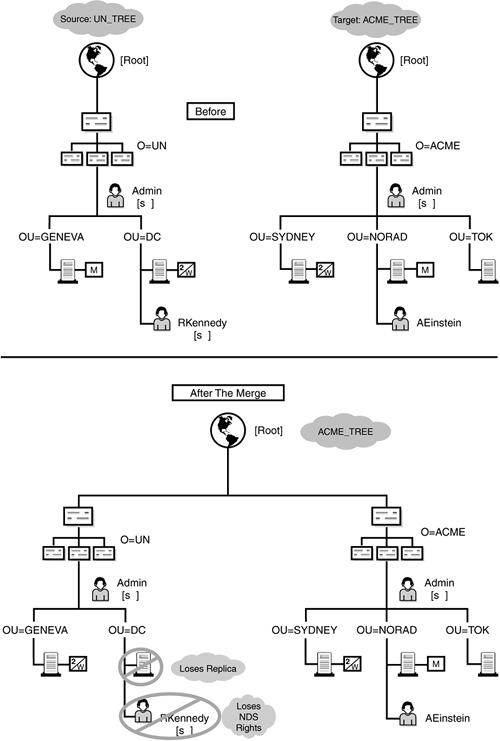
This completes our comprehensive lesson in eDirectory 8.6 implementation. In this two-step process, you learned how to integrate eDirectory 8.6 into an existing network and import large groups of eDirectory objects by using the eDirectory Import/Export Wizard. In step 1, you learned there are three important preintegration tasks that you must accomplish to prepare your network for eDirectory 8.6. In addition, you learned how to perform a variety of eDirectory health check procedures after your network has been updated. These procedures included a time synchronization check, server-to-server synchronization check, replica check, and schema check.
TIP
Because LBURP is relatively new, eDirectory servers prior to version 8.5 and most non-eDirectory LDAP servers do not support it. If you’re using the eDirectory Import/Export Wizard to import an LDIF file to one of these servers, you must disable the LBURP option in order for the import to work.
After eDirectory 8.6 was in place, we shifted our attention to the eDirectory Import/Export Wizard. This wizard uses an import/export engine called ICE to manage directory entries in LDIF format. You learned how to use the eDirectory Import/Export Wizard to import data from LDIF files to an LDAP directory, export data from an LDAP directory, and perform a data migration between two LDAP servers.
Congratulations, you’re an eDirectory 8.6 pro! Now it’s time to build a comprehensive maintenance plan. At this point, your attention shifts from building it to keeping it running.
Test Objectives Covered:
![]() Identify What iMonitor Is and How to Use It (3004)
Identify What iMonitor Is and How to Use It (3004)
![]() Use iMonitor to Diagnose and Repair eDirectory Problems (3004)
Use iMonitor to Diagnose and Repair eDirectory Problems (3004)
![]() Repair eDirectory Using iMonitor (3004)
Repair eDirectory Using iMonitor (3004)
![]() Maintain and Optimize eDirectory Using Cache Options (3004)
Maintain and Optimize eDirectory Using Cache Options (3004)
Welcome to NetWare 6 eDirectory maintenance!
As a NetWare 6 network engineer, you must appreciate the delicate balance of life on the network. After you’ve built the tree, it’s time to learn a little bit about maintaining it. So, what is tree maintenance all about? It involves a combination of tools, knowledge, and experience. In this lesson, you’ll learn how to diagnose and repair eDirectory problems with iMonitor.
iMonitor is Novell’s latest anytime, anywhere server monitoring and diagnostic tool. iMonitor enables you to monitor and repair all servers in your eDirectory tree—regardless of platform. All you have to do is point your Web browser at the server’s 8008 port and NetWare 6 takes over from there.
In addition, iMonitor is very secure. It uses the eDirectory ACL to deliver frame tools based on the user’s administrative rights. Furthermore, iMonitor redirects HTTP communications to the secure HTTPS port 8009 after you’ve authenticated and logged in. And if you’re running eDirectory on other supported networking platforms (Windows NT/2000/2003, Solaris, Linux, and Tru64), the default HTTP port is 8008 and 8010 and the secure authentication port is 81 on HTTPS.
Are you ready to continue your tour of the NetWare 6 tree? Let’s start with a primer of iMonitor, and then begin our hands-on diagnosis and repair lesson. Tour guide optional.
TIP
For secure iMonitor operations on Unix platforms (such as Linux, Solaris, and Tru64), you must create a Key Material Object (KMO) in the host server’s context.
To run iMonitor, you and your network must meet the following minimum requirements:
![]() Browser—iMonitor supports Internet Explorer 4 (or above), Netscape 4.06 (or above), and the NetWare browser (available from the server console).
Browser—iMonitor supports Internet Explorer 4 (or above), Netscape 4.06 (or above), and the NetWare browser (available from the server console).
![]() Platform—iMonitor can run on any of these networking platforms: NetWare 5 support pack 5 (or later), NetWare 6 support pack 1 (for SSL support), Windows NT/2000, Linux, Solaris, and Tru64 Unix.
Platform—iMonitor can run on any of these networking platforms: NetWare 5 support pack 5 (or later), NetWare 6 support pack 1 (for SSL support), Windows NT/2000, Linux, Solaris, and Tru64 Unix.
![]() eDirectory—iMonitor requires eDirectory version 8.5 (or above) on the host server. However, you can monitor all versions of eDirectory from NetWare 4.11 (or later), Windows NT/2000/2003, and Unix.
eDirectory—iMonitor requires eDirectory version 8.5 (or above) on the host server. However, you can monitor all versions of eDirectory from NetWare 4.11 (or later), Windows NT/2000/2003, and Unix.
To use iMonitor, you must first ensure that the appropriate application is running on your eDirectory server. When using NetWare, NDSIMON.NLM is automatically placed in AUTOEXEC.NCF; therefore, it is launched at server startup. If you’re using Windows NT/2000, the iMonitor service automatically loads at eDirectory startup. And last but not least, Unix servers require the following manual command at the server console to activate iMonitor:
NDSIMONITOR -1
When the iMonitor application is running on your eDirectory server, it’s time to access all of its great features by using a compatible web browser. Simply enter the URL http://{server IP address} :8008/nds-summary in your browser’s Address field to access the iMonitor main page.
For security reasons, iMonitor requires at least basic eDirectory authentication via the [Public] object. After you have been authenticated as [Public], the browser is redirected to secure HTTPS port 8009. For access to all iMonitor features, you must log in as a user with full administrative rights.
TIP
You can also access the iMonitor main page from a link provided in the Remote Manager navigation frame.
Figure 5.16 shows the iMonitor main page. It consists of three main frames:
![]() Navigation frame—This frame sits at the top of Figure 5.16 and provides access to all of iMonitor’s feature and nonfeature-related icons.
Navigation frame—This frame sits at the top of Figure 5.16 and provides access to all of iMonitor’s feature and nonfeature-related icons.
![]() Assistant frame—On the left side of Figure 5.16, the assistant frame lists additional navigation aids that help you drill down on data in the main content frame.
Assistant frame—On the left side of Figure 5.16, the assistant frame lists additional navigation aids that help you drill down on data in the main content frame.
![]() Main content frame—On the right side of Figure 5.16 is the main content frame. This is where iMonitor lists all of your server’s monitoring and diagnostic statistics as well as additional navigation links.
Main content frame—On the right side of Figure 5.16 is the main content frame. This is where iMonitor lists all of your server’s monitoring and diagnostic statistics as well as additional navigation links.

Now let’s take a closer look at iMonitor’s two most functional frames: navigation and assistant. Simon says, “Study.”
The navigation frame is at the top of every iMonitor Web page. This is your launching pad for iMonitor features. In addition, the navigation frame displays your user identity and the name of the server you’re currently monitoring. As you saw in Figure 5.16, the navigation frame buttons are divided into two groups: the left group includes three nonfeature items (help, login/logout, and home NetWare manager) and the right group contains the seven feature-oriented buttons. Here’s a brief description of these 10 Navigation frame icons:
![]() Help—Links you to a context-sensitive online help page regarding the data displayed in the main content frame.
Help—Links you to a context-sensitive online help page regarding the data displayed in the main content frame.
![]() Login/Logout—Enables you to authenticate as a different user or to close your iMonitor session. Remember that as long as any Web browser window is open, your iMonitor session remains active.
Login/Logout—Enables you to authenticate as a different user or to close your iMonitor session. Remember that as long as any Web browser window is open, your iMonitor session remains active.
![]() Home NetWare Manager—Links you back to the Remote Manager main page.
Home NetWare Manager—Links you back to the Remote Manager main page.
![]() Agent Summary—In iMonitor, the term agent refers to the DS agent providing eDirectory services on the host server. The Agent Summary link provides a snapshot view of the health of your eDirectory servers (including synchronization information, agent process status, and the total servers known to your eDirectory database).
Agent Summary—In iMonitor, the term agent refers to the DS agent providing eDirectory services on the host server. The Agent Summary link provides a snapshot view of the health of your eDirectory servers (including synchronization information, agent process status, and the total servers known to your eDirectory database).
![]() Agent Configuration—Provides access to the primary eDirectory monitoring and diagnostic tools. We’ll discuss this option in greater depth later in the chapter.
Agent Configuration—Provides access to the primary eDirectory monitoring and diagnostic tools. We’ll discuss this option in greater depth later in the chapter.
![]() Trace Configuration—This button provides access to NetWare’s DSTRACE eDirectory debug utility. DSTRACE was originally written as a debugging utility for developers, and it monitors replicas as they communicate with each other on the network. You can use DSTRACE for a variety of eDirectory management tasks.
Trace Configuration—This button provides access to NetWare’s DSTRACE eDirectory debug utility. DSTRACE was originally written as a debugging utility for developers, and it monitors replicas as they communicate with each other on the network. You can use DSTRACE for a variety of eDirectory management tasks.
![]() Repair—Enables you to view problems with your eDirectory database and backup or clean them as needed. Remember that you must be logged in as Administrator (or Console Operator) to access this iMonitor tool.
Repair—Enables you to view problems with your eDirectory database and backup or clean them as needed. Remember that you must be logged in as Administrator (or Console Operator) to access this iMonitor tool.
![]() DirXML Summary—Displays monitoring statistics for the DirXML drivers running in your eDirectory tree.
DirXML Summary—Displays monitoring statistics for the DirXML drivers running in your eDirectory tree.
![]() Reports—Enables you to configure and display eDirectory and server reports. This tool also enables you to run your own customized reports. These reports are very useful when you’re preparing to run major eDirectory operations.
Reports—Enables you to configure and display eDirectory and server reports. This tool also enables you to run your own customized reports. These reports are very useful when you’re preparing to run major eDirectory operations.
![]() Search—Enables you to search the eDirectory tree for objects, classes, and attributes.
Search—Enables you to search the eDirectory tree for objects, classes, and attributes.
The assistant frame occupies the left side of iMonitor’s main page. This frame lists nine additional navigation aids that help you monitor and diagnose information in the main content frame. Furthermore, these tools are context-sensitive, meaning their appearance is dictated by the state of the server you are monitoring. A brief description of the nine assistant frame tools (displayed on the left side of Figure 5.16) follows:
![]() Agent Synchronization—Displays the number and type of replicas present on this server and the length of time that has passed since they were synchronized. In addition, you can view the number of errors for each replica type. If the Agent Synchronization Summary doesn’t appear, there are no replicas you can view based on the security level you used while entering iMonitor.
Agent Synchronization—Displays the number and type of replicas present on this server and the length of time that has passed since they were synchronized. In addition, you can view the number of errors for each replica type. If the Agent Synchronization Summary doesn’t appear, there are no replicas you can view based on the security level you used while entering iMonitor.
![]() Known Servers—Displays a list of servers present in the eDirectory database hosted by the iMonitor server. You can further filter this list by showing all servers in the eDirectory or only the servers in a given replica ring.
Known Servers—Displays a list of servers present in the eDirectory database hosted by the iMonitor server. You can further filter this list by showing all servers in the eDirectory or only the servers in a given replica ring.
![]() Schema—Displays a list of attribute and class definitions for the eDirectory schema.
Schema—Displays a list of attribute and class definitions for the eDirectory schema.
![]() Agent Configuration—Displays the agent configuration. We’ll discuss this page in much more depth in the next section.
Agent Configuration—Displays the agent configuration. We’ll discuss this page in much more depth in the next section.
![]() Trace Configuration—Provides access to the Novell DSTRACE eDirectory debug utility by using the same link as the Trace Configuration button in the navigation frame. We’ll discuss this page in much more depth in the next section.
Trace Configuration—Provides access to the Novell DSTRACE eDirectory debug utility by using the same link as the Trace Configuration button in the navigation frame. We’ll discuss this page in much more depth in the next section.
![]() Agent Health—Displays a general summary of your server’s health. See Figure 5.17 later in this chapter for more information. We’ll discuss this page in much more depth in the next section.
Agent Health—Displays a general summary of your server’s health. See Figure 5.17 later in this chapter for more information. We’ll discuss this page in much more depth in the next section.
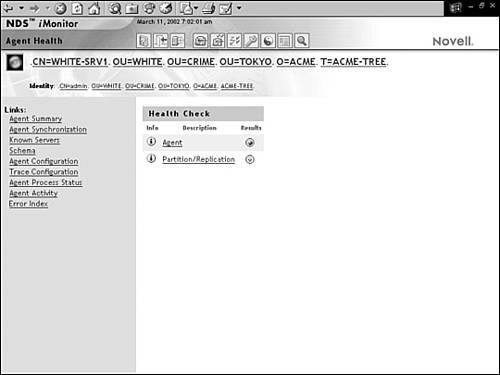
![]() Agent Process Status—Displays one or more of the following background process status errors: schema synchronization (this process synchronizes modifications made to schema data among all replicas in eDirectory), obituary processing (this process uses ID numbers to ensure that name collisions do not occur during eDirectory operations), external reference/DRL (this process ensures that each external reference is accurate), limber (this process ensures that all server information is correct), and repair (this process removes a corrupted database and regenerates it based on the Master Replica).
Agent Process Status—Displays one or more of the following background process status errors: schema synchronization (this process synchronizes modifications made to schema data among all replicas in eDirectory), obituary processing (this process uses ID numbers to ensure that name collisions do not occur during eDirectory operations), external reference/DRL (this process ensures that each external reference is accurate), limber (this process ensures that all server information is correct), and repair (this process removes a corrupted database and regenerates it based on the Master Replica).
![]() Agent Activity—Displays eDirectory traffic patterns, verbs, and requests to help you identity potential system bottlenecks. In addition, the Agent Activity assistant enables you to identify which requests are attempting to obtain DIB (Data InfoBase) locks.
Agent Activity—Displays eDirectory traffic patterns, verbs, and requests to help you identity potential system bottlenecks. In addition, the Agent Activity assistant enables you to identify which requests are attempting to obtain DIB (Data InfoBase) locks.
![]() Error Index—Displays information about all errors found on eDirectory servers. Each error listed is linked to a description that contains an explanation, possible cause, and troubleshooting scenarios.
Error Index—Displays information about all errors found on eDirectory servers. Each error listed is linked to a description that contains an explanation, possible cause, and troubleshooting scenarios.
That completes our quick overview of NetWare’s anytime, anywhere eDirectory maintenance tool—iMonitor. This Web browser tool provides you with a central portal for some of NetWare 6’s most advanced server and eDirectory management tools, including DSTRACE, DSREPAIR, agent configuration, and the Novell Support Connection.
Now let’s dive in deeper with some hands-on diagnosis and repair experience.
eDirectory maintenance is accomplished in two steps: diagnosis and repair. There are a number of server-based tools that you can run independently to gather information on the health of eDirectory. But iMonitor enables you to gather all of this information from a single location. In this first step, you’ll use the following four iMonitor links to diagnosis eDirectory problems:
![]() Agent Health
Agent Health
![]() Agent Configuration
Agent Configuration
![]() Agent Synchronization
Agent Synchronization
![]() Trace Configuration
Trace Configuration
Let’s take a closer look.
The Agent Health link (shown in Figure 5.17) displays the general summary of your server’s eDirectory health. From this initial dialog box, you can obtain information regarding the health of the server’s agent, partitions, and replica rings. First and foremost, you should start with agent’s health. When you click on the Agent link shown in Figure 5.17, iMonitor will return an update on the following four items:
![]() One Successful Time Sync—If the agent has never successfully synchronized, no data appears. On the other hand, if synchronization was successful, the result is always displayed as green. When problems are suspected, the Results button displays yellow. A red button means that a severe problem might exist.
One Successful Time Sync—If the agent has never successfully synchronized, no data appears. On the other hand, if synchronization was successful, the result is always displayed as green. When problems are suspected, the Results button displays yellow. A red button means that a severe problem might exist.
![]() Time Delta Tolerance—You can view the difference in time between iMonitor and a remote server (in seconds). A negative integer in the Current column indicates that iMonitor’s time is ahead of the server’s time. If the time difference is less than 5 seconds, no warning is displayed. If the time difference is 5–10 seconds off, a caution is displayed. If the time is off by more than 10 seconds, a warning is displayed.
Time Delta Tolerance—You can view the difference in time between iMonitor and a remote server (in seconds). A negative integer in the Current column indicates that iMonitor’s time is ahead of the server’s time. If the time difference is less than 5 seconds, no warning is displayed. If the time difference is 5–10 seconds off, a caution is displayed. If the time is off by more than 10 seconds, a warning is displayed.
![]() DS Loaded—Reports whether eDirectory is loaded on this server.
DS Loaded—Reports whether eDirectory is loaded on this server.
![]() DS Open—Reports the state of the directory. An Open directory indicates that the database is open and accepting requests. A Closed directory indicates that the database is closed and no requests can be accepted.
DS Open—Reports the state of the directory. An Open directory indicates that the database is open and accepting requests. A Closed directory indicates that the database is closed and no requests can be accepted.
In addition, you can check the status of your server’s partitions by choosing the Partition/Replication link in Figure 5.17. This diagnosis screen provides detailed object information for each partition stored on the server. In addition, you can select Replica Synchronization to display the replica status for each replica in the ring. When you have fewer than three replicas (for fault tolerance), the Results button displays red, indicating that there might be a potential problem with synchronization.
Finally, you can use the Health Check: Ring link in iMonitor to diagnose the viability of your server’s replica ring. This screen includes information such as the replica number, master replica identification, readable replica count, sub-reference count, total replica count, and replica states.
Replica state is vital to your eDirectory diagnosis tasks. An eDirectory replica can be in different states, depending on the partitioning or replication operations it’s undergoing. The different operations stem from adding or removing a replica, creating a partition, and/or merging an existing partition back with its parents. Look over Table 5.6 for a description of the nine different replica states supported by eDirectory.
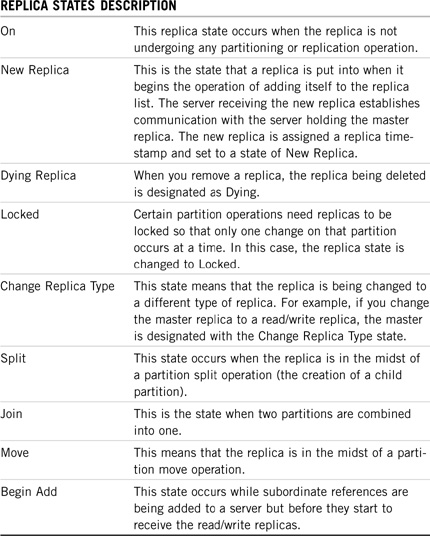
The Agent Configuration link provides access to the primary eDirectory monitoring and diagnostic tools. The Agent Configuration page varies depending on the version of eDirectory that you’re using. The Agent Configuration page (shown in Figure 5.18) provides these eDirectory tools:
![]() Agent Information—Displays DS agent–specific information (including server name, IP address, time synchronization, and so on)
Agent Information—Displays DS agent–specific information (including server name, IP address, time synchronization, and so on)
![]() Partitions—Displays a list of existing partitions
Partitions—Displays a list of existing partitions
![]() Replica Filters—Displays all filtered replicas configured for this specific DS agent
Replica Filters—Displays all filtered replicas configured for this specific DS agent
![]() Agent Triggers—Initiates the background processes listed in the main content frame
Agent Triggers—Initiates the background processes listed in the main content frame
![]() Background Process Settings—Enables you to temporarily change the intervals for running background processes
Background Process Settings—Enables you to temporarily change the intervals for running background processes
![]() Agent Synchronization—Displays all inbound and outbound synchronization traffic for the specified DS agent
Agent Synchronization—Displays all inbound and outbound synchronization traffic for the specified DS agent
![]() Schema Synchronization—Displays all inbound and outbound schema synchronization traffic
Schema Synchronization—Displays all inbound and outbound schema synchronization traffic
![]() Database Cache—Enables you to configure and monitor the eDirectory database cache settings
Database Cache—Enables you to configure and monitor the eDirectory database cache settings
![]() Login Settings—Enables you to customize the time between login updates or disable the queuing of login updates
Login Settings—Enables you to customize the time between login updates or disable the queuing of login updates

The Agent Synchronization link in iMonitor displays the number and type of replicas present on this server and the length of time that has passed since they were synchronized. In addition, you can view the number of errors for each replica type.
One of the key statistics shown in Figure 5.19 is the Maximum Ring Delta. This lists the amount of data that might not be successfully synchronized to all replicas in the ring. For example, if a user changed her login script within the past 30 minutes, and the maximum ring delta has a 45-minute allocation, the user’s login might not be successfully synchronized. If the Maximum Ring Delta is listed as Unknown, it means that the transitive synchronized vector is inconsistent. Ouch. Basically, the maximum ring delta cannot be calculated because a replica/partition operation is in progress.
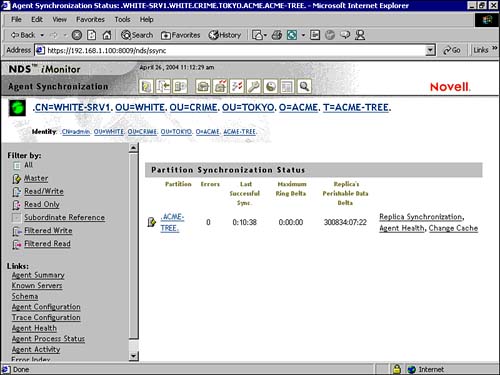
The Trace Configuration link in iMonitor (shown in Figure 5.20) provides access to the local server’s DS Trace debug utility. This feature is available only for the local iMonitor server. If you need to access trace options on another server, you must switch to the iMonitor running on that device. In addition, you must be the Administrator (or a Console Operator) of the server to access these DS Trace options. For that reason, you’ll be asked to enter your username and password to authenticate before Figure 5.20 appears.
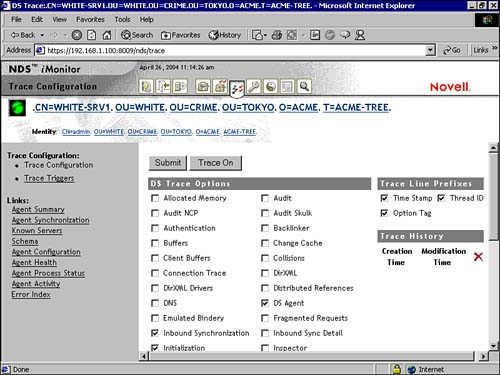
The Trace Configuration page in Figure 5.20 includes three main categories of information:
![]() DS Trace Options—DS trace options apply to the events on the local DS agent where the trace is initiated. These options show errors, potential problems, and other information about how eDirectory is performing on the local server. Turning on DS trace options can increase CPU usage and might reduce your system’s performance. Therefore, you should use the Trace Configuration page only periodically for diagnostic purposes.
DS Trace Options—DS trace options apply to the events on the local DS agent where the trace is initiated. These options show errors, potential problems, and other information about how eDirectory is performing on the local server. Turning on DS trace options can increase CPU usage and might reduce your system’s performance. Therefore, you should use the Trace Configuration page only periodically for diagnostic purposes.
![]() Trace Line Prefixes—Trace line prefixes enable you to choose which pieces of data are added to the beginning of any trace line. These prefixes include Time Stamp, Thread ID, and Option Tag strings.
Trace Line Prefixes—Trace line prefixes enable you to choose which pieces of data are added to the beginning of any trace line. These prefixes include Time Stamp, Thread ID, and Option Tag strings.
![]() Trace History—Trace History displays a list of trace runs. A trace run is any sequence in which you start and stop a trace. Each trace run log is identified by the period of time during which the trace data has been gathered. As I’m sure you’ve guessed, the information you see on this screen depends on the trace options that you select.
Trace History—Trace History displays a list of trace runs. A trace run is any sequence in which you start and stop a trace. Each trace run log is identified by the period of time during which the trace data has been gathered. As I’m sure you’ve guessed, the information you see on this screen depends on the trace options that you select.
That completes our comprehensive review of iMonitor’s eDirectory diagnosis capabilities. Of course, any good eDirectory maintenance engineer can tell you that diagnosis is only the first half of the story. Now, let’s explore step 2: eDirectory repair.
After you’ve diagnosed an eDirectory problem, it’s time to repair it. Not surprisingly, this is accomplished using the Repair wrench icon at the top of iMonitor. When you click on the wrench, you’re presented with the repair screen shown in Figure 5.21.
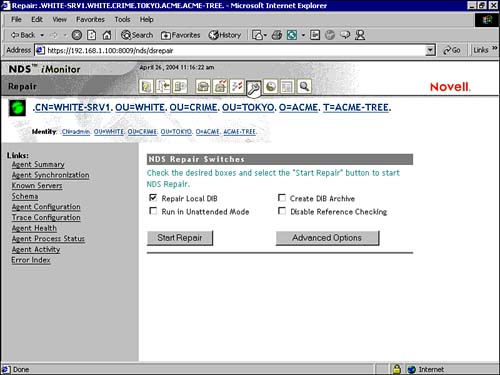
Like Trace Configuration, you must be an Administrator or Console Operator to access the eDirectory Repair page. This page enables you to view problems with your eDirectory database and back up or clean them as needed. Some of the repair parameters shown in Figure 5.21 are
![]() Repair Replica—Enables you to repair the selected replica.
Repair Replica—Enables you to repair the selected replica.
![]() Repair Single Object—Enables you to resolve all inconsistencies with a selected object.
Repair Single Object—Enables you to resolve all inconsistencies with a selected object.
![]() Repair Local DIB—Enables you to correct or repair inconsistencies in the eDirectory database, check partition and replication information, and make changes to the DIB when necessary.
Repair Local DIB—Enables you to correct or repair inconsistencies in the eDirectory database, check partition and replication information, and make changes to the DIB when necessary.
![]() Run In Unattended Mode—Enables you to perform repair operations on the eDirectory database automatically, while you lounge on the beach in some exotic locale.
Run In Unattended Mode—Enables you to perform repair operations on the eDirectory database automatically, while you lounge on the beach in some exotic locale.
![]() Create DIB Archive—Enables you to create a copy of the eDirectory database for troubleshooting purposes.
Create DIB Archive—Enables you to create a copy of the eDirectory database for troubleshooting purposes.
![]() Disable Reference Checking—Enables you to turn off the check for external reference objects so that you can locate specific replicas containing specific objects.
Disable Reference Checking—Enables you to turn off the check for external reference objects so that you can locate specific replicas containing specific objects.
![]() Report Move Obits (Advanced)—Enables you to remove the Obituary attribute from objects in the database.
Report Move Obits (Advanced)—Enables you to remove the Obituary attribute from objects in the database.
![]() Repair Network Address (Advanced)—Enables you to repair the server’s network address in replica rings and Server objects in the database.
Repair Network Address (Advanced)—Enables you to repair the server’s network address in replica rings and Server objects in the database.
![]() Repair Volume Object (Advanced)—Enables you to check all mounted volumes on the server for valid Volume object trustee assignments.
Repair Volume Object (Advanced)—Enables you to check all mounted volumes on the server for valid Volume object trustee assignments.
![]() Repair Volume Object and Do Trustee Check (Advanced)—Performs a more advanced volume check with a more comprehensive security analysis.
Repair Volume Object and Do Trustee Check (Advanced)—Performs a more advanced volume check with a more comprehensive security analysis.
![]() Support Options (Advanced)—Provides additional functionality when troubleshooting with Novell Technical Support.
Support Options (Advanced)—Provides additional functionality when troubleshooting with Novell Technical Support.
You can use an iMonitor Schedule Report to initiate repairs at specified intervals. Novell does not recommend scheduling regular eDirectory repairs unless your organization has a policy requiring them. Remember that when you run eDirectory repair from a server, it affects only parts of the database stored on that server. To fix the entire database, you must run the utility on each server that contains replicas of the partitions that are affected.
I hope that by now you can appreciate the sophistication of iMonitor—your favorite eDirectory tool. As a CNE, it’s your job to maintain and optimize eDirectory synchronization and performance. Now let’s complete our eDirectory 8.6 maintenance plan with a quick lesson in eDirectory caching.
The most significant setting that improves eDirectory performance is the cache. eDirectory 8.6 caches physical blocks from the server disk into file server memory using one of following two types of cache:
![]() Block cache—Block cache caches only physical blocks from the hard disk without any organization of the information contained in the block. This is the older cache type used by earlier versions of eDirectory. Block cache is most useful for update operations. It can also improve query performance by speeding up index searching.
Block cache—Block cache caches only physical blocks from the hard disk without any organization of the information contained in the block. This is the older cache type used by earlier versions of eDirectory. Block cache is most useful for update operations. It can also improve query performance by speeding up index searching.
![]() Entry cache—Entry cache is a new feature in eDirectory 8.6 that caches the logical directory structure of the eDirectory tree. By caching the logical structure of containers and objects, eDirectory can use this cache to quickly find and retrieve entries from memory. Entry cache is most useful for operations that browse the eDirectory tree by reading through entries (such as name resolution). Finally, entry cache can improve query performance by speeding up the retrieval of entries referenced from an index.
Entry cache—Entry cache is a new feature in eDirectory 8.6 that caches the logical directory structure of the eDirectory tree. By caching the logical structure of containers and objects, eDirectory can use this cache to quickly find and retrieve entries from memory. Entry cache is most useful for operations that browse the eDirectory tree by reading through entries (such as name resolution). Finally, entry cache can improve query performance by speeding up the retrieval of entries referenced from an index.
Although there is some redundancy between these two eDirectory cache types, each cache boosts performance for different types of operations. Earlier versions of eDirectory created multiple versions of blocks and entries in its cache for transaction integrity. eDirectory 8.5 (and prior) did not remove these blocks and entries from the cache when they were no longer needed. This caused considerable overhead in cache memory consumption. Fortunately, eDirectory 8.6 includes a background process that periodically browses the cache and cleans out older versions. The default browsing interval is 15 seconds.
The total available memory for eDirectory caching is shared between these two cache types. The default is an equal division. The more blocks and entries that can be cached, the better your overall Directory performance will be. The ideal strategy is to cache the entire database in both the entry and block caches (although this is impossible for large trees). In general, you should try to achieve a 1:1 ratio of block cache to eDirectory database size and a 1:2 or 1:4 ratio for entry cache. For best performance, do not exceed these ratios.
eDirectory 8.6 provides two default cache settings for controlling cache memory consumption:
![]() Dynamically Adjusting Limit—The dynamically adjusting limit causes eDirectory to periodically adjust its memory consumption in response to the needs of the network. In this option, you specify the limit as a percentage of available physical memory and eDirectory recalculates a new memory limit at fixed intervals. The new memory limit is the percentage of physical memory available at the time. Along with the percentage, you can set a maximum and minimum threshold as either the number of bytes to use or the number of bytes to leave available. The minimum threshold default is 16MB (8MB for entry cache and 8MB for block cache). The maximum threshold default is 4GB. With the dynamically adjusting limit, you can also specify the interval length (15 seconds by default). The shorter the interval, the more memory consumption is based on current conditions. However, shorter intervals aren’t necessarily better because the percentage recalculation will create more memory allocation and freeing.
Dynamically Adjusting Limit—The dynamically adjusting limit causes eDirectory to periodically adjust its memory consumption in response to the needs of the network. In this option, you specify the limit as a percentage of available physical memory and eDirectory recalculates a new memory limit at fixed intervals. The new memory limit is the percentage of physical memory available at the time. Along with the percentage, you can set a maximum and minimum threshold as either the number of bytes to use or the number of bytes to leave available. The minimum threshold default is 16MB (8MB for entry cache and 8MB for block cache). The maximum threshold default is 4GB. With the dynamically adjusting limit, you can also specify the interval length (15 seconds by default). The shorter the interval, the more memory consumption is based on current conditions. However, shorter intervals aren’t necessarily better because the percentage recalculation will create more memory allocation and freeing.
![]() Fixed Memory Limit—The fixed memory limit is the method used by earlier versions of eDirectory. In this cache memory consumption method, you can set a fixed memory limit in one of the following ways: fixed number of bytes (this is a set number of bytes assigned to the memory limit), percentage of physical memory (the percentage of physical memory at the interval becomes a fixed number of bytes), or percentage of available physical memory (the percentage of available physical memory at the interval becomes a fixed number of bytes).
Fixed Memory Limit—The fixed memory limit is the method used by earlier versions of eDirectory. In this cache memory consumption method, you can set a fixed memory limit in one of the following ways: fixed number of bytes (this is a set number of bytes assigned to the memory limit), percentage of physical memory (the percentage of physical memory at the interval becomes a fixed number of bytes), or percentage of available physical memory (the percentage of available physical memory at the interval becomes a fixed number of bytes).
You can use either of these two methods for controlling cache memory consumption, but you cannot use them at the same time because they’re mutually exclusive. The last method used always replaces prior settings. If the server you are installing into the tree does not have a replica, the default fixed memory limit is 16MB (with an even split between block and entry cache). However, if your server does contain a replica, the default memory is a dynamically adjusting limit of 51% of available server memory with a minimum threshold of 8MB per cache and a maximum threshold of keeping 24MB server memory available for other processes.
TIP
If the minimum and maximum threshold limits are not compatible when using the dynamically adjusting limit method, the minimum threshold limit is followed.
When using eDirectory on NetWare, you can use the DSTRACE utility at the server console to configure dynamically adjusting or fixed memory limits. You do not need to restart the server for the changes to take effect.
To set a fixed hard limit, enter the following DSTRACE command at the server console:
SET DSTRACE=!MB[memory in bytes]
The following is an example of setting a fixed hard limit of 8MB:
SET DSTRACE=!MB8388608
To set a calculated limit, enter the following DSTRACE command at the server console:
SET DSTRACE=!MHARD,%:[percent],
MIN:[bytes],MAX:[bytes],LEAVE:[bytes],NOSAVE
The following is an example of a calculated limit of 75% of total physical memory with a minimum of 16MB and an option indicating that these options should not be saved to the startup file:
SET DSTRACE=!MHARD,%:75,MIN:16777216,NOSAVE
To set a dynamically adjusting limit, enter the following DSTRACE command at the server console:
SET DSTRACE=!MDYN,%:[percent],
MIN:[bytes],MAX:[bytes],LEAVE:[bytes],NOSAVE
The following is an example of a dynamically adjusted limit of 75% of available memory with a minimum of 8MB:
SET DSTRACE=!MDYN,%:75,MIN:8388608
This completes our detailed lesson in configuring the eDirectory cache to tune database performance. As you’ve learned, this is the most significant setting that can be configured to improve eDirectory performance. In this lesson, you learned about the benefits of block and entry cache and how to distribute memory between these two cache types. In addition, you learned about two different default cache settings (dynamically adjusting and fixed memory) for controlling cache memory consumption. Now that’s what I call eDirectory fun.
Congratulations! Your eDirectory database has been integrated, maintained, and optimized. This completes our lessons in eDirectory 8.6 design, management, and maintenance. What’s left? Time!
In this chapter’s final lesson, “Designing Time Synchronization,” you’ll learn how to coordinate networkwide time synchronization via distributed time servers and the Network Time Protocol (NTP). Are you ready?!
Test Objectives Covered:
![]() Design and Implement a Time Synchronization Strategy (3004)
Design and Implement a Time Synchronization Strategy (3004)
![]() Design and Implement a Time Synchronization Strategy (575)
Design and Implement a Time Synchronization Strategy (575)
The final step in eDirectory design focuses on time synchronization. The time synchronization process attempts to coordinate and maintain consistent time for all servers in your eDirectory tree. No matter how you look at it, time controls everything. This is especially true in eDirectory. Time affects almost every aspect of NetWare 6:
![]() eDirectory Operations—Time synchronization sorts changes in the eDirectory database.
eDirectory Operations—Time synchronization sorts changes in the eDirectory database.
![]() File system—Time synchronization applies time stamps to file and directory operations.
File system—Time synchronization applies time stamps to file and directory operations.
![]() Messaging—Time synchronization applies time stamps to electronic messages.
Messaging—Time synchronization applies time stamps to electronic messages.
![]() Printing—Time synchronization controls print job flow and queue priorities.
Printing—Time synchronization controls print job flow and queue priorities.
![]() Resource access and security—Time synchronization manages network authentication, auditing, and access to eDirectory resources.
Resource access and security—Time synchronization manages network authentication, auditing, and access to eDirectory resources.
![]() Network applications—Time synchronization tracks when application files and data files are created, modified, archived, and deleted.
Network applications—Time synchronization tracks when application files and data files are created, modified, archived, and deleted.
In this lesson, you’ll learn how to design a time synchronization strategy in two environments:
![]() IPX network—To build an IPX-only time synchronization system, you’ll need to become intimately familiar with the four different time server types, learn a little more about time configuration, and master the subtleties of TIMESYNC.NLM.
IPX network—To build an IPX-only time synchronization system, you’ll need to become intimately familiar with the four different time server types, learn a little more about time configuration, and master the subtleties of TIMESYNC.NLM.
![]() IP and mixed IP/IPX networks—In IP-only and mixed IP/IPX networks, NetWare 6 servers negotiate time with each other using TCP/IP. This is accomplished using two time synchronization components: Network Time Protocol (NTP), which is an open IP standard that provides time stamps for synchronizing time servers by using external time sources; and TIMESYNC.NLM, a protocol-independent time-synchronization management tool.
IP and mixed IP/IPX networks—In IP-only and mixed IP/IPX networks, NetWare 6 servers negotiate time with each other using TCP/IP. This is accomplished using two time synchronization components: Network Time Protocol (NTP), which is an open IP standard that provides time stamps for synchronizing time servers by using external time sources; and TIMESYNC.NLM, a protocol-independent time-synchronization management tool.
The good news is that after NetWare 6 time synchronization has been configured, there’s little left to do...it just runs! Now let’s begin our interactive temporal journey with a detailed look at IPX time synchronization.
Time synchronization provides NetWare 6 servers with a mechanism for coordinating eDirectory time stamps. NetWare 6 uses TIMESYNC.NLM to coordinate time stamps between all servers on the network. TIMESYNC.NLM maintains each server’s Universal Time Coordinated (UTC) time stamp, also known as Greenwich Mean Time (GMT).
Local time for each server is calculated by applying (adding) the time zone and daylight saving time settings to the server’s UTC value. For example, if a server is located in the Mountain Standard time zone (NORAD), its UTC offset would be +7. This value is applied (as well as subtracting one hour for daylight saving time, if it is in effect) as an offset to standardize the server’s time to UTC. Therefore, each server, regardless of its geographic location, can be standardized to UTC time with the following command:
Local time +/- time zone offset from UTC - Daylight Savings Time offset
The TIME server console command displays the time zone string, status of daylight saving time (DST), activation status, time synchronization status (synchronized or not), and the current server time (in both UTC and local format). You should use this command periodically to check the status of your time servers (see Figure 5.22).
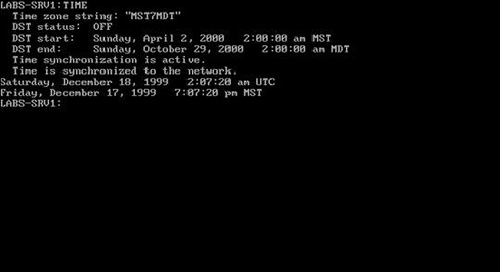
All NetWare servers are time servers of some type—either providers or consumers. Time providers provide time to time consumers, who simply accept time stamps from providers at regular intervals. IPX time synchronization supports the following four types of time servers (see Table 5.7 for complete descriptions):
![]() Single reference—A standalone time provider for the entire network. This is the default configuration for the first NetWare 6 server in an eDirectory tree, and it requires no intervention during installation. The main difference between a reference server and a single reference server is that a single reference server can raise its synchronization flag without confirming its time with any other time source. A single reference server should be used only at small sites with fewer than 30 servers and no WAN connections. In a single reference time configuration, all other servers are secondary time servers (that is, time consumers).
Single reference—A standalone time provider for the entire network. This is the default configuration for the first NetWare 6 server in an eDirectory tree, and it requires no intervention during installation. The main difference between a reference server and a single reference server is that a single reference server can raise its synchronization flag without confirming its time with any other time source. A single reference server should be used only at small sites with fewer than 30 servers and no WAN connections. In a single reference time configuration, all other servers are secondary time servers (that is, time consumers).
![]() Reference—Adds important stability to a primary time provider group. Both primary and reference time providers vote on network time—with reference servers getting 16 votes and primary servers getting only one vote. During each polling interval, all primary time servers converge 50% of the gap between their internal clocks and the network time, which is published by the reference time server. Although a reference time server participates in the voting process, it never adjusts its clocks. Because a reference server is the only server that does not adjust its internal clock, you should connect it to an external time source. Finally, you can define multiple reference servers on the same network, but they must be connected to the same external source.
Reference—Adds important stability to a primary time provider group. Both primary and reference time providers vote on network time—with reference servers getting 16 votes and primary servers getting only one vote. During each polling interval, all primary time servers converge 50% of the gap between their internal clocks and the network time, which is published by the reference time server. Although a reference time server participates in the voting process, it never adjusts its clocks. Because a reference server is the only server that does not adjust its internal clock, you should connect it to an external time source. Finally, you can define multiple reference servers on the same network, but they must be connected to the same external source.
![]() Primary—Primary time servers are the principal time providers because they distribute time to requesting secondary servers. Primary servers contact all other time providers and identify any discrepancies between the primary server’s local clock and the calculated network time. If there is a difference, the primary server adjusts its clock to 50% of the discrepancy during each polling loop.
Primary—Primary time servers are the principal time providers because they distribute time to requesting secondary servers. Primary servers contact all other time providers and identify any discrepancies between the primary server’s local clock and the calculated network time. If there is a difference, the primary server adjusts its clock to 50% of the discrepancy during each polling loop.
![]() Secondary—Secondary time servers rely on other sources to provide them with network time. A secondary server must contact a single reference, reference, or primary provider for the network time. A secondary server is the most prevalent type of time server on your network because most servers do not need to participate in time providing. By default, all servers except the initial server installed in an eDirectory tree are designated as secondary servers when they are installed. The first server in an eDirectory tree is defined as a single reference time provider.
Secondary—Secondary time servers rely on other sources to provide them with network time. A secondary server must contact a single reference, reference, or primary provider for the network time. A secondary server is the most prevalent type of time server on your network because most servers do not need to participate in time providing. By default, all servers except the initial server installed in an eDirectory tree are designated as secondary servers when they are installed. The first server in an eDirectory tree is defined as a single reference time provider.
Table 5.7 contains a summary of these four IPX time-server types and their capabilities.

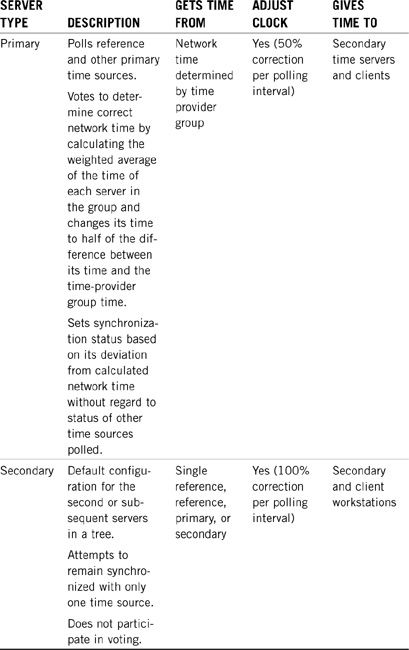
To transform a file server into an IPX time provider, you must use the SET console command or MONITOR.NLM menu utility. The following is an example of a time server SET command:
SET TIMESYNC TYPE = SINGLE REFERENCE
If your time servers become unsynchronized (that is, if server time is more than 2 seconds different from network time), the polling interval switches from every 10 minutes to every 10 seconds, until time is synchronized again.
However, if a single reference server is brought up with the wrong time, it won’t get synchronized because it doesn’t change its own time. Follow these simple steps to synchronize an erroneous Single Reference time server:
1. First, determine whether replica time stamps are ahead of actual time (causing an error in synchronization). To determine this, load DSREPAIR and choose Advanced Options @@> Replica and Partition Operations. Then highlight a particular replica, select Display Replica Information, and review the Timestamp value.
2. Next, type the following command at the server console: TIME. If the time on a single reference server is earlier than the actual time, set the time forward to the correct time. If the time on your single reference server is less than one week ahead of actual time, try one of the following two options: shut down the servers during off-business hours to allow actual time to catch up with the future time stamps, or avoid replica or partitioning operations until actual time catches up with the future time stamps.
3. If the server time stamp is more than one week ahead of the partition time, do not set the server time backward. This will generate synthetic time. Synthetic time occurs when the partition time stamp is in the future as compared to the server time. Because replica synchronization depends on time stamps, synthetic time can cause serious problems with eDirectory.
Time communication occurs in the following two instances: when time providers vote with each other, and when secondary time servers poll time providers for the correct time. IPX time servers can share synchronization information in one of two ways:
The SAP (Service Advertising Protocol) method is the default time communication design and, thus, requires no intervention. Both time providers and time consumers communicate using Service Advertising Protocol, by default. You should be aware that SAP causes a small amount of additional network traffic during time synchronization polling cycles. Also, SAP is self-configuring. That means there’s no protection against a misconfigured time server. In summary, time servers use SAP for the following:
![]() Reference, primary, and single reference time servers use SAP to announce their presence on the network.
Reference, primary, and single reference time servers use SAP to announce their presence on the network.
![]() Reference and primary servers use SAP to poll each other to determine the network time.
Reference and primary servers use SAP to poll each other to determine the network time.
![]() Secondary time servers use SAP to request temporal guidance (also known as time).
Secondary time servers use SAP to request temporal guidance (also known as time).
You can configure SAP in such a way that it filters intratree and intertree time polling by setting the Directory Tree parameter to ON. To allow time servers to find any server regardless of its tree, set the Directory Tree mode to OFF and SAP to ON.
The configured lists method provides much more flexibility for IPX time synchronization communications than the default method. A configured list enables you to specify which time server a server should contact. When you set SAP mode to OFF, or when you remove a time server from a tree that is using the configured lists method, you must update the configured lists on all IPX time servers accordingly.
The configured lists time communication design provides you with complete control of the time synchronization hierarchy. It also reduces SAP traffic on your network and provides direct server-to-server contact. In addition to MONITOR, you can also configure TIMESYNC.CFG by using SET commands at the server console.
If desired, you can use a configured list and activate SAP at the same time. Although this combination increases network traffic slightly, it provides fault tolerance in case the configured list method fails.
In IP and mixed IP/IPX networks, NetWare servers synchronize time with each other using TCP/IP. This is accomplished by using the following two time synchronization components:
![]() Network Time Protocol (NTP)—This is an open IP standard that provides time stamps for time synchronization by using external time sources. When TIMESYNC.NLM is loaded on an IP server, NTP becomes the time source for both IP and IPX servers. In this configuration, IPX servers must be configured as secondary servers.
Network Time Protocol (NTP)—This is an open IP standard that provides time stamps for time synchronization by using external time sources. When TIMESYNC.NLM is loaded on an IP server, NTP becomes the time source for both IP and IPX servers. In this configuration, IPX servers must be configured as secondary servers.
![]() TIMESYNC.NLM—This is the NetWare 6 time synchronization management tool, regardless of server protocol. TIMESYNC.NLM loads automatically when the server is installed.
TIMESYNC.NLM—This is the NetWare 6 time synchronization management tool, regardless of server protocol. TIMESYNC.NLM loads automatically when the server is installed.
NTP supports the following two types of time servers:
![]() Servers—Allow local servers to be synchronized to remote servers. Remote servers, however, cannot be synchronized to the local server. This NTP time server performs a similar function to Single Reference or Reference servers in the IPX time synchronization model.
Servers—Allow local servers to be synchronized to remote servers. Remote servers, however, cannot be synchronized to the local server. This NTP time server performs a similar function to Single Reference or Reference servers in the IPX time synchronization model.
![]() Peers—Allow the local server to synchronize its time with a remote server and vice versa. This is an ideal model for distributed time synchronization fault tolerance (such as IPX primary servers).
Peers—Allow the local server to synchronize its time with a remote server and vice versa. This is an ideal model for distributed time synchronization fault tolerance (such as IPX primary servers).
If you use TIMESYNC.NLM to sync with an NTP time source, configuration information is saved in the NetWare registry with other SET parameters.
When NTP is installed by using the older NTP.NLM utility, however, the NTP.CFG configuration file is created. This file specifies the IP time-server type and indicates where the server should go to find local time. By default, NTP.CFG specifies the local clock as 127.127.1.0. That means the local clock timer kicks in when all outside sources become unavailable.
You can change the NTP.CFG configuration of any of these sources by replacing the term server with peer. Also, note that NTP does not negotiate time the way primary servers do in the IPX model. Instead, NTP operates under the assumption that the time any NTP time server receives from an Internet time source is the correct time. As such, the NTP time server is forced to change its own time according to the time it receives, and all secondary servers in the NTP server’s replica list must change their time to match.
The first step in building an IPX time-synchronization design strategy is to determine whether the default settings are adequate. The following are your two design choices:
![]() Default:Single reference time server
Default:Single reference time server
![]() Custom:Time provider group
Custom:Time provider group
The first NetWare 6 server installed in an eDirectory tree is automatically configured as a single reference time server. By default, all subsequent servers are designated as secondary time servers. This design strategy is adequate as long as your network satisfies the following conditions:
![]() Single site
Single site
![]() Fewer than 30 servers
Fewer than 30 servers
![]() No IP servers or segments
No IP servers or segments
One benefit of the default strategy is that it’s simple and requires absolutely no advanced planning. Additionally, no configuration files are needed, and therefore the possibility of encountering errors during time synchronization is considerably minimized.
The default design strategy relies on a central file server with a trusted hardware clock (see Figure 5.23). Because it is the sole time provider, you should monitor its time frequently. If you’re unhappy with your first time provider, you can always redesignate another server as the single reference time server by using the MONITOR utility.
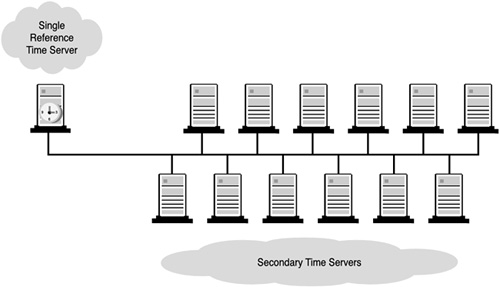
In summary, the following is a list of design considerations that you should keep in mind when using the single reference time synchronization design strategy:
![]() All network servers must contact the time server.
All network servers must contact the time server.
![]() A misconfigured server can disrupt the network, especially if you overcompensate for the error by repeatedly changing the server’s time.
A misconfigured server can disrupt the network, especially if you overcompensate for the error by repeatedly changing the server’s time.
![]() Some secondary servers might synchronize to an unsynchronized server, rather than to the authorized single reference time server.
Some secondary servers might synchronize to an unsynchronized server, rather than to the authorized single reference time server.
![]() One time source means a single point of failure. However, if a single reference time server goes down, a secondary time server can be set as the single reference time server by using a SET parameter.
One time source means a single point of failure. However, if a single reference time server goes down, a secondary time server can be set as the single reference time server by using a SET parameter.
![]() The single reference method might not be ideal for implementations with many sites connected by WAN links. The SAP process might involve more network traffic than is acceptable.
The single reference method might not be ideal for implementations with many sites connected by WAN links. The SAP process might involve more network traffic than is acceptable.
The custom time design strategy provides more fault tolerance, efficiency, and flexibility for large interconnected networks. In this scenario, the time provider group requires one reference time server and a minimum of two primary time servers. These three or more time providers form a time provider group that in turn provides time to secondary servers and clients.
The best custom approach is to organize your time providers according to geography, placing one time provider in each WAN hub. This configuration requires simple adjustments to the servers in the time provider group. In this case, one server will be designated as a reference time server and two to seven servers can be designated as primary time servers.
The selection of your reference server should be based on a centralized location within your WAN infrastructure. For example, the ACME WAN uses a hub-and-spoke design. CAMELOT is the central hub, so it will be the home of the reference server (see Figure 5.24). The primary servers are then distributed across the WAN links to each of the spoke locations.
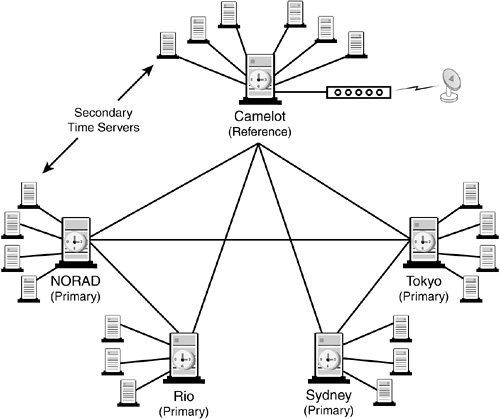
In addition, you should connect the reference server to an external time source to ensure highly accurate time. In summary, the following is a list of design considerations that you should keep in mind when using the time provider group design strategy:
![]() Customization requires careful planning, especially on a large network.
Customization requires careful planning, especially on a large network.
![]() Adding time sources usually requires that configuration files on several servers be updated.
Adding time sources usually requires that configuration files on several servers be updated.
![]() If you use a time provider group, at least one server must be designated as a reference time server and two servers must be designated as primary time servers.
If you use a time provider group, at least one server must be designated as a reference time server and two servers must be designated as primary time servers.
![]() These servers will poll assigned time providers in their time provider group to vote on the correct time.
These servers will poll assigned time providers in their time provider group to vote on the correct time.
![]() Whenever primary and reference time servers exist on a network, they must be able to contact each other for polling and voting.
Whenever primary and reference time servers exist on a network, they must be able to contact each other for polling and voting.
![]() If you use more than one reference time server, you must synchronize each reference time server with the same external time source (such as a radio clock, atomic clock, or Internet time).
If you use more than one reference time server, you must synchronize each reference time server with the same external time source (such as a radio clock, atomic clock, or Internet time).
![]() A server designated as a reference time server should be placed in a central location.
A server designated as a reference time server should be placed in a central location.
![]() You should spread the other servers in your time provider group around the network to control the flow of traffic that is generated when the secondary time servers request the time from their designated time source.
You should spread the other servers in your time provider group around the network to control the flow of traffic that is generated when the secondary time servers request the time from their designated time source.
![]() A time provider group should include a reference time server and a small number of primary time servers. All other time servers should be secondary time servers.
A time provider group should include a reference time server and a small number of primary time servers. All other time servers should be secondary time servers.
![]() Place each primary time server close to the secondary time servers that rely on it for network time. Also, make sure the primary time server has a reliable link to the appropriate reference time server.
Place each primary time server close to the secondary time servers that rely on it for network time. Also, make sure the primary time server has a reliable link to the appropriate reference time server.
![]() If your WAN infrastructure forces you to have more than seven primary time servers in a time provider group, implement additional time provider groups as necessary. Ensure that each reference time server is synchronized to the same external time source. In this case, designate all other servers as secondary time servers.
If your WAN infrastructure forces you to have more than seven primary time servers in a time provider group, implement additional time provider groups as necessary. Ensure that each reference time server is synchronized to the same external time source. In this case, designate all other servers as secondary time servers.
![]() Limit the number of time providers. The amount of traffic involved in time synchronization is small.
Limit the number of time providers. The amount of traffic involved in time synchronization is small.
In addition, you might want to consider using multiple time provider groups. This increases redundancy in worldwide operations. For example, ACME could implement this approach by creating three independent time provider groups and locating one independent time provider group each in NORAD, CAMELOT, and RIO (refer to Figure 5.24). This way, time is determined locally instead of traversing WAN links during every polling interval.
If you decide to use multiple time provider groups, make sure that the reference server in each group uses the same external clock. This will ensure a single (yet external) source of time convergence.
Your time is up! Congratulations, you have really finished ACME’s eDirectory design, management, and maintenance. Wow, it’s been a long and tough journey, but we made it to the end. eDirectory is such a wild and crazy universe!
Now it’s time to move beyond the NetWare 6 directory into a chapter full of NetWare 6 advanced IP administration tasks, including: configuring NetWare 6 to use DNS/DHCP and SLPv2.
Ready, set, take off!