Add two new attributes to Contact, and add them both to the primary identifier:
· Contact Id
· Email Address.
Create two dependent relationships:
Each Contact may Be Reached By one or more Contact Phone |
Each Contact must Market one and only one Contact Specialty |
Move the following attributes from Contact (by dragging them on the diagram):
Phone Number | to entity Contact Phone |
Specialty Description | to entity Contact Specialty |
Add each of these attributes to the entity primary key.
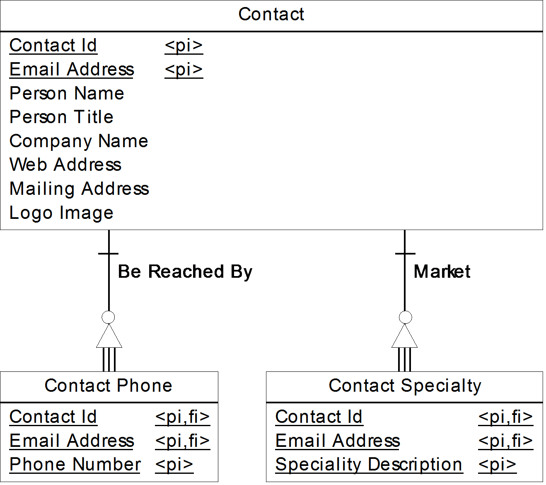
The result should look like the model shown in Figure 16.29.
Figure 16.29 Repeating groups moved to new entities
Now convert both relationships into entities, and make the changes necessary to make the model look like Figure 16.30. This includes replacing the attribute Mailing Address with five new attributes.
Figure 16.30 Contact data model with multi-valued data elements resolved, and therefore in 1NF

Second Normal Form
Remove the attribute Email Address from the primary key of Contact. Create a new alternate identifier in Contact, and include the attribute Email Address.
The result should look like the model shown in Figure 16.31.
Figure 16.31 Contact model in 2NF

Create two new entities, called Person and Company, and move the following attributes from Contact:
Person First Name | to entity Person |
Person Last Name | to entity Person |
Person Title | to entity Person |
Company Name | to entity Company |
Logo Image | to entity Company |
Create an inheritance, making Person a subtype of Contact, and add an inheritance link from Company to the same inheritance.
Add the following optional relationship:
Each Company may Employ one or more Person Each Person may Be Employed By at most one Company |
The result should look like the model shown in Figure 16.32.
Figure 16.32 Contact model in 2NF updated with Person Company relationship

Third Normal Form
Create a new entity called City, and move the following attributes to it from Contact:
Address Postal Code
Address City Name
Address State Province Code
Address Country Code.
Remove the word ‘Address’ from all the attribute names, and add Postal Code to the primary identifier of City.
Add the following optional relationship:
Each City may Be Location Of one or more Contact Each Contact may Be Located In at most one City |
Abstraction
Convert the relationship from Phone to Contact Phone into an entity – PowerDesigner will call this new entity Phone Used By Contact Phone. Rename the entity as Communication Medium, and carry out whatever changes are required to make the model look like the model shown in Figure 16.33. Remember to add the values shown in Table 16.6 to the attribute Communication Medium Type Code, or to the associated domain, if you have chosen to create one.
The result should now look like the model shown in Figure 16.33. Save the model – you will need it in Exercise 21.
Figure 16.33 Contact data model with Communication Medium

EXERCISE 19: Creating a Dimensional LDM in PowerDesigner
We’re the first to admit that transforming a Relational LDM into a Dimensional LDM is not rocket science, but it is vital that you understand the process, so we have provided detailed instructions in this exercise. Some of the material is new, so please don’t skip this!
Complete the Relational LDM
Open the Relational LDM you created in Exercise 11 in Chapter 13. Before transforming this into a Dimensional LDM, you need to complete it. First, create the domains shown in Table 16.8.
Table 16.8 Domains
Domain | Data Type | Length | Precision | List of Values |
Color Code | Characters | 1 |
| b=blue g=green |
Short Name | Characters | 20 |
|
|
Sugar or Wafer Indicator | Characters | 1 |
| S = Sugar |
Height | Number | 3 |
|
|
Ice Cream Container UPC | Number | 16 |
|
|
Standard Identifier | Number | 10 |
|
|
Standard Date | Date |
|
|
|
Standard Large Value | Number | 4 | 2 |
|
Now complete the Attributes using the information shown in Table 16.9.
Table 16.9 Attributes
Entity | Attribute Name | Domain | Description |
Color | Color Code | Color Code | The short name of one of the standard ice cream colors. |
Color | Color Name | Short Name | The full name of one of the standard ice cream colors. |
Ice Cream Cone | Ice Cream Cone Sugar or Wafer Indicator | Sugar or Wafer Indicator | Determines whether the ice cream cone is made of a sugar-based or wafer-based material. |
Ice Cream Container | Ice Cream Container Height | Height | The height, in millimeters, of the container. Used by inventory to determine how many containers can fit on a storage shelf. |
Ice Cream Container | Ice Cream Container Name | Short Name | The name our store employees use for communicating with consumers on what they would like to order. |
Ice Cream Container | Ice Cream Container UPC | Ice Cream Container UPC | A numeric code used to identify a specific product across the ice cream industry. |
Order | Order Number | Standard Identifier | The unique number assigned to each order placed by a consumer. It is a numeric sequence number that never repeats. |
Order | Order Placed Date | Standard Date | The date the order was placed. |
Order | Order Total Value | Standard Large Value | The total value of the order in the default national currency, including any applicable sales tax. |
Now add the Entity descriptions shown in Table 16.10.
Table 16.10 Entity descriptions
Entity | Description |
Color | A primary color within the spectrum of visible light. |
Ice Cream Cone | An edible container which can hold one or more ice cream scoops. |
Ice Cream Container | A holder of ice cream that is either edible, in the case of an ice cream cone, or recyclable, in the case of an ice cream cup. |
Ice Cream Cup | A recyclable container which can hold one or more ice cream scoops. |
Order | Also known as an ice cream sale, an order is when a consumer purchases one or more of our products in a single visit to our ice cream store. |
Order Line | A product purchased during a single visit to our ice cream store. |
Transform the Relational LDM into a Dimensional LDM
The next step is to transform the relational LDM in Figure 16.2 into the Dimensional LDM we saw in Figure 16.25, repeated below in Figure 16.34.
Figure 16.34 The target dimensional model

Using the Tools menu, generate a new LDM, called “Exercise 19”. Make sure you save the generation dependencies.
The only entity we need to keep in the new model is Ice Cream Container, effectively merging it with the two subtypes, and with the Color entity. Drag the additional attributes (check Figure 16.34 to see which attributes) from the Color and Ice Cream Cone entities before you delete them. Delete all other entities, and the inheritance.
Create the new entities and relationships shown in Figure 16.34, along with supporting domains. Remove any domains that are no longer used. To find unused domains, create a Dependency Matrix. The rows should contain Domains, the columns should contain Entity Attributes, and the Dependency should be Attributes. Click the Display Only Empty Rows tool. The rows in the matrix will now show only unused domains.
To check that all your attributes reference domains, create another Dependency Matrix, with Entity Attributes in the rows, and Domains in the columns; the dependency should be Domain. Click the Display Only Empty Rows tool. The rows in the matrix will now show only those attributes that do not reference a domain.
Add Entity and Attribute Stereotypes
Now you need to add some annotation to the diagram to indicate the Dimensions, Grain, Meter, and Measure. The simplest way to do this is to use Stereotypes. You could just type them in for each object, but it is very easy to create drop-down lists of values in the model extension you created earlier. Just follow these steps.
- Open the model extension Local Extensions via the Browser
- Right-click the Profile entry, and select Add Metaclasses. In the Metaclass Selection window, select Entity and Entity Attribute. See Figure 16.35.
Figure 16.35 Adding metaclasses

3. Two new entries will be created, called Entity and Entity Attribute. Now you can create the stereotypes for each one, as listed in Table 16.11. To create a stereotype, right-click one of the new entries, and select New|Stereotype. Change the name of the new stereotype. If you want to, you can create a category to group the dimensional stereotypes together. See Figure 16.36 for the final result.
Table 16.11 Stereotypes to be added to the extension
Entity | Attribute |
Dimension Meter | Dimensional Attribute Grain Measure |
Figure 16.36 The finished extension
|
Have you spotted the other stereotype? The ‘Relational Source’ entry is the link type you added earlier. To add more link types, add more stereotypes under the ExtendedDependency entry (Traceability Links used to be called Extended Dependencies).
|


You can save the model extension to a file or to the repository, so that it is available for re-use in other models.
It’s been a long, complex exercise, but the last task is finally here. Update the stereotype for entities and attributes (list reports and lists of objects are good for this) according to Table 16.12.
Table 16.12 Entity and attribute stereotypes
Entity | Attribute | Stereotype |
Date | Dimension | |
Date | Year Code | Dimensional Attribute |
Date | Month Code | Dimensional Attribute |
Date | Day of Week Name | Dimensional Attribute |
Ice Cream Container | Dimension | |
Ice Cream Container | Ice Cream Container Name | Dimensional Attribute |
Ice Cream Container | Ice Cream Container Height | Dimensional Attribute |
Ice Cream Container | Ice Cream Cone Sugar or Wafer Indicator | Dimensional Attribute |
Ice Cream Container | Ice Cream Cup Color Name | Dimensional Attribute |
Ice Cream Sales | Meter | |
Ice Cream Sales | Ice Cream Container UPC | Grain |
Ice Cream Sales | Date | Grain |
Ice Cream Sales | Sales Value Amount | Measure |
Month | Dimension | |
Month | Month Description | Dimensional Attribute |
Year | Dimension | |
Year | Year Description | Dimensional Attribute |
Adjust the Display Preferences for your diagram, to display the stereotype for both entities and attributes. Your diagram should look something like Figure 16.26. To be sure that you haven’t missed something essential, run the model check, making sure you select all the checks.
Key Points · A logical data model (LDM) represents a detailed business solution. · A relational logical model represents how the business works. A dimensional logical model represents what the business is monitoring. · Normalizing is a formal process of asking business questions. Normalization ensures that every data element is a fact about the key (1NF), the whole key (2NF), and nothing but the key (3NF). · Abstraction brings flexibility to your logical data models by redefining and combining some of the data elements, entities, and relationships within the model into more generic terms. · There are a number of important terms unique to dimensional modeling, including factless facts and conforming dimensions. · Dimensional modeling requires having mandatory cardinality on relationship lines and not relating dimensions to each other. · Relationships in a Dimensional model do not have to mimic their relational counterparts. · The LDM is the most appropriate type of model for a Logical Data Model in PowerDesigner. · Make sure how you present the LDM to your audience(s) is appropriate for what you’re trying to accomplish. · Use the PowerDesigner repository and portal to provide comprehensive impact analysis. |