CHAPTER 20
What other data modeling features exist in PowerDesigner?
Manage the whole chain
Glossary and Library
Names and Codes matter
In earlier chapters, we described the core data modeling features of PowerDesigner. In this chapter, we tempt you with features for the mature, discerning, modeler.
Distribution of Reference Models
A common issue in any organization is the creation and distribution of reference models, the models we want everybody to take notice of, such as a data dictionary, a PDM containing standard domains, or any model containing objects to share, reference, or reuse. They don’t even have to be PowerDesigner models, you can also share standard spreadsheets and document templates.
The PowerDesigner Library gives you a means of distributing those models. If you have a repository, you can deploy an enterprise library containing reference models, which are pushed to repository users, and appear in a special folder in the Browser’s ‘Local’ tab. The Library models are held locally, and automatically updated whenever users connect to the repository. By default, the Library appears at the top of your workspace as a folder named ‘.Library’. The Library shown in Figure 20.1 includes three models and an Excel file.
Figure 20.1 The library

The models can be used in the same way as any other model, though update access is managed via the repository. If the Library contains models that your license doesn’t support, you won’t even see them.
You can rename your local library folder, move it in the Browser tree, or detach it from your workspace. To ensure that you have the very latest version of library models, select Repository|Synchronize Library. This will also add the Library to a workspace if it is not visible.
![]() “The Library” (Core Features Guide)
“The Library” (Core Features Guide)
Deploying an Enterprise Glossary
We introduced you to the Glossary in Chapter 12, where we showed you how Terms in the Glossary can impact the names of objects. Terms aren’t the only objects the Glossary can hold. Each of the Glossary objects are described in Table 20.1.
Table 20.1 Glossary Objects
Category | A container for grouping Terms, Rules, and other Categories. Categories allow you to construct a hierarchical structure for managing Terms and Rules. See sample hierarchy in Figure 20.2. |
Term | A word or phrase that forms part of a controlled vocabulary. If auto-completion of object names is enabled in a model, Terms are suggested from the Glossary as you type the name of an Object. |
Synonym | A word or phrase that means the same as a Term, but is not approved for use. If auto-completion of object names is enabled in a model, when you type a synonym into an object name the relevant Term is suggested, instead. |
Business Rule | The Glossary allows you to share common business rules across all models. |
Reports | The standard Report Editor is used to create reports to extract information from the Glossary. |
Extensions | If you add your own properties to objects in the Glossary, they are stored as an Extension. |
Excel Imports | If you use the Excel Import feature to import into your Glossary, the details of the import are recorded in the Glossary, allowing you to re-run the import in the future, and also providing a path to the source of definitions. |
The Glossary appears in its own pane in the Browser window, and has two views. The Filter view lets you dynamically filter a flat list of Glossary terms, and the Category view allows you to construct or display a hierarchy of Categories, together with all other Glossary objects. A sample Category view is shown in Figure 20.2.
In this Glossary, we have one high-level Category ‘Business Terms’, which has three child Categories, and one grand-child Category. There are a number of Terms within the Categories, and two of them (Division and Cone) have synonyms.
We also have two Business Rules, a Glossary Report, and an Extension. The presence of the Extension implies that we have customized the properties of at least one Glossary object type.
Behind the scenes here, we also have relationships between Terms, between Terms and Business Rules, and between Categories and Business Rules. The best way to see these relationships is to generate a report to a web browser, or to use the Repository Portal.
Figure 20.2 Glossary category view

You can create a new Glossary very quickly by importing Terms, etc. from existing models. If you right-click the name of the Glossary in the Browser (or press <F4>), you can check the contents using the standard model check feature.
Just like any other type of object, you can run impact and lineage analysis for objects in the Glossary.
 The Glossary does not have an ‘undo’ function
Creating a Glossary From Existing Documentation
Right-click the Glossary entry in the Browser, and you’ll see several options for loading a Glossary from existing documentation, which could be an existing model, an Excel file, or a Glossary in another repository. (See Figure 20.3.)
Figure 20.3 Glossary import options

If you choose to import from an existing PowerDesigner model, you can select the kind of object whose names you want to import as glossary terms and, optionally, a property of the object to specify the category of the imported term.
Creating an Object in the Glossary
You create objects in the Glossary using all the standard techniques, bar one – you cannot open a list of objects from the Model menu, because there is no Model menu. Instead, open a list of objects by right-clicking the Glossary entry in the Browser, select List Of, and then the required object type.
How can we use the Glossary?
The words used in the names of Business Rules are just as likely to be used in the names of Entities and Attributes. It is important to be consistent in your terminology: avoid the use of synonyms, and direct modelers to the correct words to use in names. There should be a great deal of commonality in the vocabulary used in object names; the question is, how can we manage that vocabulary?
The PowerDesigner Glossary allows you to document your enterprise vocabulary: you can limit it to critical common terminology, or define all the words modelers can use in their object names. Realistically, most of us would aim for somewhere in between.
You could use the Glossary as a simple dictionary of terms and synonyms, and allow non-modelers to update it using the ‘Composer’ license. However, the power of the Glossary really comes into play when you use it as part of your name management process, which we demonstrated in Chapter 12.
Linking the Glossary to Existing Objects
There are only two ways to link existing objects to terms in the Glossary:
· Add a traceability link to each object, via the ‘Traceability’ tab or via dependency matrix
· Manually rename each object – this will cause PowerDesigner to suggest terms from the Glossary.
Managing Names and Codes
We first talked about object names and codes in Chapter 10. As you generate a chain of data models, the object names are passed from object to object. In each model, the code is derived from the name, according to the rules set in the naming conventions. You access the naming conventions via the ‘Model Options’. You can set conventions for the whole model, as well as for individual types of objects. Change the conventions here, click <OK>, and object names and codes are automatically changed to reflect the changes you’ve made on all of the tabs. PowerDesigner refers to this as ‘mirroring’.
Use the ‘Naming Template’ options to save settings in a file, or to import previously saved settings. You can save settings in a template model, which modelers use when creating new models. You can also create and share user profiles containing standard model options.
There are four tabs for Naming Conventions, but we only need to show you two tabs to explain them to you. The ‘Name’ and ‘Code’ tabs are identical, and allow you to set the convention for the format of names and codes.
Figure 20.4 The ‘Name’ tab

Figure 20.4 shows the ‘Name’ tab, and the common options above the four tabs. You have seen some of these common options before. They allow you to enable Glossary checking, and choose what to display (names or codes) on diagram symbols. There is also a vital check box that tells PowerDesigner to apply whatever conversions you specify in the ‘Name To Code’ and ‘Code To Name’ tabs.
The ‘Name’ tab provides straightforward options for the format of object names.
The ‘Name To Code’ tab, shown in Figure 20.5, allows you to control how codes are derived from names. The default conversion script shown will replace spaces with underscores. You can alter the script to carry out more complex transformations, including adding prefixes or suffixes to codes. If your naming standards require you to replace specific strings encountered in the name when you derive the code, then you can specify a conversion table to use. For example, you may wish to replace the word ‘Customer’ with ‘Cust’. In Figure 20.5, we have chosen to use the names and codes in the Glossary as our conversion table.
If you change the conversion script or conversion table settings and want to apply them immediately, you must select ‘Enable name/code conversions’ and ‘Apply name to code conversion’. The radio buttons allow you to ignore objects where you have deliberately desynchronized the name-code mirroring, perhaps by typing in your own code, or to apply the rules to all objects.
Figure 20.5 The Name To Code tab

The ‘Code To Name’ tab is almost the same. It’s useful when you reverse-engineer a database into a PDM, and you want to convert the object codes back into ‘real names’, by applying abbreviation standards in reverse. This can only be run against all objects in your new model.
Model Generation
When you generate a new model, you can alter the model options before the new model is created – this is the best time to set the model’s naming standards.
The Lineage of Data Elements
When you create a chain of data models, data elements are transferred from model to model. The names and codes of the data elements are automatically subjected to the naming conventions in each model. In addition, you need to define standards for the ‘content’ of data elements. Those standards will be an integral part of your approach to managing domains, data items, and data elements. In this section, we describe one possible approach, and use it to illustrate the potential impact on object names.
The following three figures illustrate some sample data elements, showing how they would be integrated, where they may reference other objects, and the Glossary Terms required to completely support the names.
First, Figure 20.6 shows six Domains that are referenced by a total of 10 Data Items in a CDM. One of the Data Items also references a Business Rule, which may be held locally in the model, or held in the Glossary.
There are three categories of domain in use here; which ones you use in your organization will depend on your local standards. The first three, Date, Email Address, and Identifier, fall into the first category, simple format domains that can apply to many attributes in many entities. Order Line Status Code and Order Status Code fall into the second category - domains that can only be referenced by one Data Item because they are used to manage the allowed values for that Data Item. They may, of course, be referenced by copies of the Data Item in other data models, or by Attributes and Columns. The remaining Domain, Person Name, is a combination of the two. Its purpose is to define the format of names, but only those names that describe a Person.
Figure 20.6 Domains and business rules referenced by data items

Figure 20.7 takes the lineage of the first of our Data Items, Employee Hire Date, further; it shows the CDM Attribute that references the Data Item, and the LDM Attribute and Column that have been generated from the CDM Attribute. Notice that the names of the LDM Attribute and Column, while they obviously have the same meaning, are not identical to the name of the Data Item.
Figure 20.7 The lineage of a column

We do not need to include the word ‘Employee’ in the name of our LDM attribute; we know that it applies to an Employee because it is an Attribute of the Employee Entity – it helps us to describe an Employee. The same logic is true for the column in the database table. In the LDM, we had to manually change the name of the Attribute; you could probably write a script to handle most of this conversion, stripping the entity name from the start of each attribute name.
Figure 20.7 demonstrates the name-code mirroring – as the name changes, so does the code. It is only in the PDM where the mirroring process has used a conversion table to replace words. You could also apply this conversion table in higher level models, which has the advantage of making the database names (in the form of codes) more visible in higher-level models. It does require more effort to ensure consistency – you need to distribute the conversion table to more modelers and make sure they apply the same version to all models. The easiest way to do this is to use the Glossary. To manage the names of all the Data Elements in our sample, we would need to define the Terms shown in Figure 20.8.
Figure 20.8 Glossary terms required
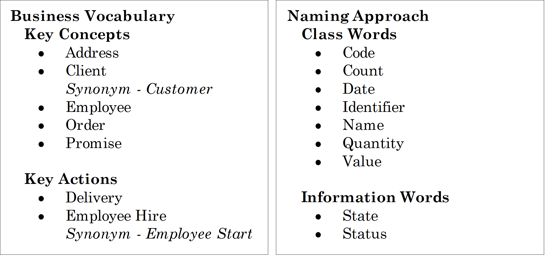
In this example, we have two broad categories of Terms, ‘Business Vocabulary’ and ‘Naming Approach’; each is used for a different reason, and will have different ownership. The business vocabulary will be defined by data owners, and the words used in the naming approach will form part of the organization’s data modeling standards.
Test Data
So you have a PDM and a development database, and you need to populate the database with test data – a common scenario. PowerDesigner can generate data into the database for you by using data it generates, data read from another database, or data specified by you in PowerDesigner or an external file.
To make use of this feature, you need to create Test Data Profiles and link them to domains (on the ‘General’ tab) or database columns (on the ‘Detail’ tab).
On the Database menu, choose Generate Test Data. Here you can specify more options, then generate data in the database.
Multidimensional Diagrams
A multidimensional data diagram provides a graphical view of your data mart or data warehouse database, and helps you identify its facts, cubes, and dimensions. 
![]() “Multidimensional Diagrams” (Data Modeling)
“Multidimensional Diagrams” (Data Modeling)
Generating Extraction Scripts
You can model operational and data warehouse data structures in PDMs, and specify mappings between the operational data sources and the data warehouse to generate extraction scripts to populate the data warehouse with operational data.
In the Physical Diagram, select Database|Generate Extraction Script to open the Extraction Script Generation dialog box.
![]() “Generating Extraction Scripts” (Data Modeling)
“Generating Extraction Scripts” (Data Modeling)
Data Movement Modeling
A data movement model (DMM) provides a global view of the movement of information in your organization. You can analyze and document where your data originates, where it moves to, and how it is transformed on the way, including replications and ETL. Depending on the technology you use, you may also be able to generate and reverse-engineer data replications. If you have defined mappings between PDMs, you can use the Convert Mappings to ETL Wizard on the Tools menu, to create data movements in the model.
Key Points · Distribute reference models via the Library. · Use the Glossary to standardize your vocabulary and share business rules. · The Glossary is the best name conversion table you can have. · Naming conventions apply to whole models, and can be overridden for selected object types. · Generate Test Data directly into a database. · Convert your PDM-PDM mappings into a Data Movement Model. |