
CHAPTER 21
How do we get information in and out of PowerDesigner?
Information In
Models, Communication
Information Out
Integration with associated activities is key to the success of data modeling. This integration is achieved within PowerDesigner by the broad range of modeling techniques supported, which reduces the need for integration with external tools. The integration features are summarized in Table 21.1.
Table 21.1 PowerDesigner integration features
Capability | Supported by |
Importing from Spreadsheets | Excel Import Extension - See this chapter |
Exporting to Spreadsheets | See this chapter |
Exporting via the Clipboard | See this chapter |
Exporting Diagram Images | See Chapter 11 |
Reverse-engineering external artifacts | Reverse Engineering - see Chapter 18 |
Generating external artifacts | Model Generation - see Chapter 18 |
Importing from Word Documents | Creating Requirements Model from a Word document - See this chapter |
Importing from existing data models | Model import – See this chapter |
Exporting models in other formats | Supported by third-party tool interfaces – see ‘Model Import’, below |
Generating test data | See Chapter 20 |
Publication via Microsoft Office format documents | Reporting - See this chapter |
Publication via HTML extracts | Reporting - See this chapter |
Web access to repository | Repository Portal - See Chapter 23 |
See Figure 25.1 for an alternative view of PowerDesigner’s external dependencies, and some of the internal links.
The straightforward methods for importing and exporting content are described below.
Model Import
PowerDesigner can import models from a number of other tools. None of these imports require the original tool to be installed, and they all create new PowerDesigner models. The following types of models are supported:
CA ERwin (.erx or .xml) | Data Models |
XML Metadata Interchange (XMI) | Object-oriented models |
IBM Rational Rose | Object-oriented models |
SIMUL8 | Process simulation |
Legacy PowerDesigner models | Various |
You’ll find the import options under Import, on the File menu.
An ERwin XML format file can contain a Logical Data Model and/or a Physical Data Model; during the import, you can choose to create a CDM, LDM, and/or a PDM. You can even import several ERwin files at the same time, following the same approach.
If you’re not an ERwin user, the best approach is to use your existing tool to save your models in PowerDesigner or ERwin XML format. If you have a lot of models to migrate, or you have to maintain two or more tools concurrently, you should investigate the ‘point-to-point’ tool interfaces supplied by Reischmann Informatik[10]. Some of their interfaces also transform models, such as converting UML class models into PowerDesigner Conceptual or Logical data models.
| “Migrating from ERwin to PowerDesigner” (Data Modeling) |

XMI format files can be imported, but implementation of the XMI standard[11] is notoriously inconsistent, so it may or may not work for you.
Importing Requirements
PowerDesigner can import the structure and contents of a Word document into a Requirements model. You can use a Requirements model to represent any structured document (e.g. functional specification, test plan, business goals, etc.) and import and export hierarchies of requirements as Microsoft Word documents. Take a look under Import on the File menu.
Once you have agreed on your requirements, take them one stage further by generating other objects (such as conceptual entities) from them.
Excel Export
PowerDesigner allows you to export parts of your models into Microsoft Excel format files. Just click on the Export to Excel tool  , available within several PowerDesigner features:
· Object Lists
· Property Sheets
· List reports
· Dependency Matrices
Excel Import
The Excel Import extension allows you to launch a wizard that guides you through mapping tables of objects to be modeled from Excel files (v2003 and higher) to PowerDesigner objects and properties, and to import the contents of the files into your model.
You can import any number of different types of objects from a single Excel file, so long as they can all be imported into a single type of model. Each worksheet of the Excel file must contain only one type of object. Each row in a table represents one object to import, and each column represents one property (an attribute or collection of associated objects) of the object.
You can create a new model by importing objects from an Excel file, or import your objects into an existing model.
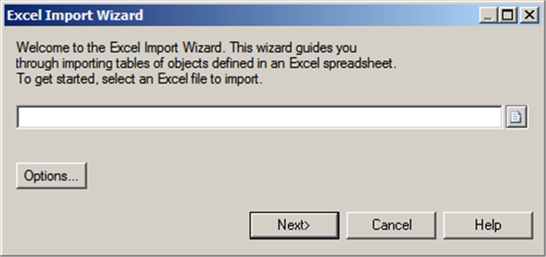
To create a new model from an Excel file, select File|Import|Excel File. Specify the kind of model you want to create in the New Model dialog, and then click <OK>. Now follow the steps in the wizard. The first step is shown in Figure 21.1.
To import objects into an existing model, you must have the Excel Import extension in your model. Instructions for doing this are in “Attaching Extensions to an Existing Model”, in Chapter 23).
Once the model has the extension attached, you just need to right-click the model in the Browser and select Import Excel File. Now follow the steps in the Wizard.
Figure 21.1 Excel import wizard step 1
The specification for the Excel Import will be saved as an object in your model, with the same name as the Excel import file, and can be copied to or generated for another model of the same type. Like any other object, an Excel Import object has a contextual menu that allows you to rerun the import, change the mappings, or change the options. If the structure of the Excel file has changed since the last import, you will need to change the mappings.
 To reference a sub-object or composite object in an Excel Import, you need to provide a qualified name so that PowerDesigner can locate the object you’re referring to, or provide the name of the parent object in a separate column. Table 21.2 provides some examples. This approach is also useful in another way – if you have a spreadsheet containing attributes, the Excel Import will create new entities if you qualify the attributes, as in the first example in Table 21.2.
Table 21.2 Examples of qualified names
Object Type | Example |
Entity.Attribute | Class.Class Full Name |
Package (referenced by any object) |
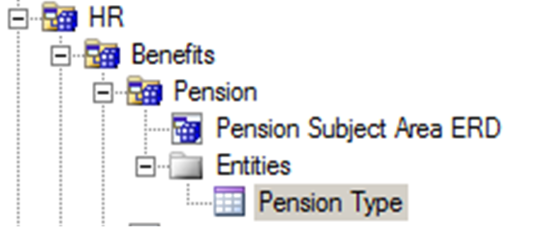
The entity Pension Type is owned by the Pension package, which is owned by the Benefits package, which is owned, in turn, by the HR package, so the full reference for the entity is: “HR.Benefits.Pension.Pension Type” The full reference for the Pension Type Code attribute for this entity would be: “HR.Benefits.Pension.Pension Type.Pension Type Code” |
The default separator for qualified names is ‘.’. You can change this within the Options for the Excel import.
![]() “Importing Objects from Excel Files” (Core Features Guide)
“Importing Objects from Excel Files” (Core Features Guide)![]() “Preparing Your Excel File for Import” (Core Features Guide)
“Preparing Your Excel File for Import” (Core Features Guide)
Exporting and Importing Lists of Values
Data items, domains, attributes, and columns all have a List of Values property, where you specify the allowed values for the data. This property may look like a list of sub-objects, but values are not sub-objects, so you cannot export and import values in the way you might think.
You cannot display the List of Values property in a list of objects or a list report, but you can export the property one object at a time, via the Export to Excel tool in the List of Values property. The only other way to export them is via a report.
There are two ways of importing values:
- Pasting values and labels from the Windows clipboard.
- Importing values (but not labels) via the Excel Import wizard – all the values have to be in a single cell, as illustrated in Figure 21.2. To create a new line inside a cell, press <Alt+Enter>.
Figure 21.2 Formatting Excel values

Using Excel Import to Create Surrogate Keys
By default, tables in the PDM have the same primary key as the equivalent entities in the LDM. If you want to replace some or all of these with surrogate keys, here’s a simple guide:
1. Using a list of Keys (from the Model menu), remove the primary designation of the existing keys. If you have many Keys to change, select all the rows you want to change, then click on the ‘P’ column for any entry. Every row will then change. When you change the primary designation, the underlying Index will also change, and the constraint name will be updated.
2. Create an Excel spreadsheet containing the new columns, and set the Primary property to ‘True’. When you import this using the Excel Import Wizard, PowerDesigner will automatically create the required Keys and Indexes. Use the format shown in Figure 21.3 to import the new columns and keys.
Figure 21.3 Importing new identifiers

Exporting via the Clipboard
The Edit menu and keyboard shortcuts allow you to copy symbols to the Windows Clipboard. If you paste the Clipboard contents into an external application such as a word processor, spreadsheet, or image editor, you are effectively exporting part of the contents of the model.
![]() “Copying and Pasting Objects” (Core Features Guide)
“Copying and Pasting Objects” (Core Features Guide)
Reporting
PowerDesigner provides three ways of creating report definitions, which you can use to provide documentation from your models in various output formats.
Report
Reports document the contents of a model, listing all or a selection of its objects, and showing how they are associated with one another. Reports are listed in the Browser within the Reports folder beneath their parent model, and saved with the model.
To create a Report, right-click the model name in the Browser, select New, and then Report. Give your report a name, choose the language you want for the headings, etc., and the template you want to use, if any. The Report Editor opens as a new tab in the model, and gives you complete control over the content and format of your report.
Figure 21.4 shows the Report Editor, containing a report based upon the ‘Full LDM Report’ template.
You can also create a blank report from the List of Reports, open it in the Report Editor, and build it using Report Items.
| To change the content of the report title page and set the RTF or HTML layout preferences, open the property sheet for the model. If you need to add extra sections to the report, do that here as well. |

The output of reports can be generated as HTML or RTF files. Once a report has been created, you can generate it by right-clicking the report name in the Browser; you don’t need to open the Report Editor.
You can save a report as a template so that it can be used by other modelers. You can also copy reports between models of the same type.
Figure 21.4 The report editor

List Report
A List Report is very similar to a list of objects – it documents a single object type within a model, and is displayed as a customizable list with columns and rows that you can filter, as necessary. What makes a List Report different is that it is saved in the model, and can be exchanged between models of the same type. They are listed in the Browser within the ‘List Reports’ folder.
You can create snapshots (called result sets) of a List Report to keep a history of its execution in your model. In effect, they are snapshots of your model. Result sets are listed in the Browser beneath their parent List Report, and are saved with the model. Result sets can contain information about objects that no longer exist in the model.
The content of a List Report can be exported in various formats: CSV, RTF, HTML, or XML. Launch the List Report Wizard by selecting Report|List Report Wizard, and select the type of object for which you want to create the report.
You can create List Reports for objects and sub-objects, such as attributes.
To create a List Report, right-click the model name in the Browser, select ‘New’, and ‘List Report’. Figure 21.5 shows the content of a List Report containing the description and generation origin of all of the entities in a model.
You can see that the ‘Content’ tab looks like a customized List of Objects, but you can have many List Reports showing different entities, and you can save the results as result sets. List Reports are objects in a model, so you can copy them (including any existing result sets) between models of the same type.
Figure 21.5 A List Report

You can edit and access the objects in the List Report in the same ways as you can in a List of Objects.
![]() “Creating a List Report” (Custom Features Guide)
“Creating a List Report” (Custom Features Guide)
Multi-Model Report
A Multi-Model Report documents one or more models, and can help you to see, for example, the links from tables in a physical data model (PDM) to entities in a conceptual data model (CDM). The report is treated like a model, shown in the Browser as a top-level object, and saved as a file with the suffix “.mmr”.
To create a Multi-Model Report, click on the ‘New Model’ button on the Main toolbar. For a ‘normal’ report, choose the language and template, and also choose one of the currently open models for content. The Report Editor is essentially the same as that of the standard single model report.
To change the content of the report title page and set the RTF or HTML layout preferences, open the property sheet for the model. If you need to add extra sections to the report, you can do that here, as well. To add a new model to a Multi-Model Report, create a new section via the property sheet.
![]() “Reports” (Core Features Guide)
“Reports” (Core Features Guide)
Exercise 22: Importing from Excel
Find the Excel file you created in Exercise 9 in Chapter 11. Use the Excel Import wizard to create a new Conceptual Data Model from the spreadsheet, call this model ‘Exercise 22’. Compare the model to the model you created in Exercise 9.
Notes for the Excel Import:
· You can’t import the Modification Date property
· The ‘G’ column can be imported as the Generate property
Exercise 23: Creating a List Report
In your ‘Exercises’ workspace, open one of your Logical Data Models. Create at least two List Reports containing entities, and one containing attributes. Sort the Entity Reports by the entity name, and the Attribute Report by a combination of the entity name and the attribute name. Note that the property containing the attribute name is just called ‘Name’.
In at least one of your List Reports, filter the report to select objects where the Description is empty.
Key Points · Import complete models using File|Import or reverse engineering. · Import existing information from Microsoft Word documents (as a Requirements model) or from Microsoft Excel worksheets (as new models or updates to existing models). · Third-party interfaces can be used to extend PowerDesigner’s capabilities. · Configure reports to suit your audience. · Utilize the web portal – it provides direct access to models in your repository via a web browser. |