Visual Basic supports the four major defining concepts required for a language to be fully object-oriented:
Abstraction — Abstraction is merely the ability of a language to create "black box" code, to take a concept and create an abstract representation of that concept within a program. A
Customerobject, for instance, is an abstract representation of a real-world customer. ADataTableobject is an abstract representation of a set of data.Encapsulation — This is the concept of a separation between interface and implementation. The idea is that you can create an interface (
Publicmethods, properties, fields, and events in a class), and, as long as that interface remains consistent, the application can interact with your objects. This remains true even when you entirely rewrite the code within a given method — thus, the interface is independent of the implementation. Encapsulation enables you to hide the internal implementation details of a class. For example, the algorithm you use to compute pi might be proprietary. You can expose a simple API to the end user, but hide all the logic used by the algorithm by encapsulating it within your class.Polymorphism — Polymorphism is reflected in the ability to write one routine that can operate on objects from more than one class — treating different objects from different classes in exactly the same way. For instance, if both the
Customerand theVendorobjects have aNameproperty and you can write a routine that calls theNameproperty regardless of whether you are using aCustomerorVendorobject, then you have polymorphismVisual Basic supports polymorphism in two ways — through late binding (much like Smalltalk, a classic example of a true object-oriented language) and through the implementation of multiple interfaces. This flexibility is very powerful and is preserved within Visual Basic.
Inheritance — Inheritance is the idea that a class can gain the interface and behaviors of a preexisting class. This is done by inheriting these behaviors from the existing class through a process known as subclassing.
The next chapter discusses these four concepts in detail; this chapter focuses on the syntax that enables you to utilize these concepts.
Visual Basic is also a component-based language. Component-based design is often viewed as a successor to object-oriented design, so component-based languages have some other capabilities. These are closely related to the traditional concepts of object orientation:
Multiple interfaces — Each class in Visual Basic defines a primary interface (also called the default or native interface) through its
Publicmethods, properties, and events. Classes can also implement other, secondary interfaces in addition to this primary interface. An object based on this class has multiple interfaces, and a client application can choose with which interface it will interact with the object.Assembly (component) level scoping — Not only can you define your classes and methods as
Public(available to anyone),Protected(available through inheritance), andPrivate(available only locally), you can also define them asFriend— meaning they are available only within the current assembly or component. This is not a traditional object-oriented concept, but is very powerful when used with component-based applications.
This chapter explains how to create and use classes and objects in Visual Basic. We won't get too deeply into code, but it is important that you spend a little time familiarizing yourself with basic object-oriented terms and concepts.
To begin, let's take a look at the word object itself, along with the related class and instance terms. Then we will move on to discuss the four terms that define the major functionality in the object-oriented world: encapsulation, abstraction, polymorphism, and inheritance.
An object is a code-based abstraction of a real-world entity or relationship. For instance, you might have a Customer object that represents a real-world customer, such as customer number 123, or you might have a File object that represents C:config.sys on your computer's hard drive.
A closely related term is class. A class is the code that defines an object, and all objects are created based on a class. A class is an abstraction of a real-world concept, and it provides the basis from which you create instances of specific objects. For example, in order to have a Customer object representing customer number 123, you must first have a Customer class that contains all of the code (methods, properties, events, variables, and so on) necessary to create Customer objects. Based on that class, you can create any number of objects, each one an instance of the class. Each object is identical to the others, except that it may contain different data.
You can create many instances of Customer objects based on the same Customer class. All of the Customer objects are identical in terms of what they can do and the code they contain, but each one contains its own unique data. This means that each object represents a different physical customer.
You use an interface to get access to an object's data and behaviors. The object's data and behaviors are contained within the object, so a client application can treat the object like a black box, accessible only through its interface. This is a key object-oriented concept called encapsulation. The idea is that any program that makes use of this object will not have direct access to the behaviors or data; rather, those programs must make use of your object's interface.
Let's walk through each of the three elements in detail.
The interface is defined as a set of methods (Sub and Function routines), properties (Property routines), events, and fields (also known as variables) that are declared Public in scope.
You can also have Private methods and properties in your code. While these methods can be called by code within your object, they are not part of the interface and cannot be called by programs written to use your object. Another option is to use the Friend keyword, which defines the scope to be your current project, meaning that any code within your project can call the method, but no code outside your project (that is, from a different .NET assembly) can call the method. To complicate things a bit, you can also declare methods and properties as Protected, and these are available to classes that inherit from your class. You will look at Protected in Chapter 3, along with inheritance.
For example, you might have the following code in a class:
Public Function CalculateValue() As Integer

End Function
Because this method is declared with the Public keyword, it is part of the interface and can be called by client applications that are using the object. You might also have a method such as this:
Private Sub DoSomething()

End Sub
This method is declared as being Private, so it is not part of the interface. This method can only be called by code within the class — not by any code outside the class, such as code in a program that's using one of the objects.
Conversely, you can do something like this:
Public Sub CalculateValue()
  DoSomething()
End Sub
In this case, you're calling the Private method from within a Public method. While code using your objects can't directly call a Private method, you will frequently use Private methods to help structure the code in a class to make it more maintainable and easier to read.
Finally, you can use the Friend keyword:
Friend Sub DoSomething()

End Sub
In this case, the DoSomething method can be called by code within the class, or from other classes or modules within the current Visual Basic project. Code from outside the project will not have access to the method.
The Friend scope is very similar to the Public scope in that it makes methods available for use by code outside the object itself. Unlike Public, however, the Friend keyword restricts access to code within the current Visual Basic project, preventing code in other .NET assemblies from calling the method.
The code inside a method is called the implementation. Sometimes it is also called behavior, as it is this code that actually makes the object do useful work. For instance, you might have an Age property as part of the object's interface. Within that method, you might have code similar to the following:
Private _Age As Integer

Public ReadOnly Property Age() As Integer
  Get
    Return _Age
  End Get
End Property
In this case, the code is returning a value directly out of a variable, rather than doing something better such as calculate the value based on a birth date. However, this kind of code is often written in applications, and it seems to work fine for a while.
The key point is to understand that client applications can use the object even if you change the implementation, as long as you do not change the interface. If the method name and its parameter list and return data type remain unchanged, then you can change the implementation any way you want.
The code necessary to call the Age property would look something like this:
theAge = myObject.Age
The result of running this code is that you get the Age value returned for your use. While the client application will work fine, you will soon discover that hard-coding the age into the application is a problem, so at some point you'll want to improve this code. Fortunately, you can change the implementation without changing the client code:
Private _BirthDate As Date

Public ReadOnly Property Age() As Integer
  Get
     Return CInt(DateDiff(DateInterval.Year, _BirthDate, Now))
  End Get
End Property
You have changed the implementation behind the interface, effectively changing how it behaves, without changing the interface itself. Now, when you run the client application, the Age value returned is accurate over time, whereas in the previous implementation it was not.
Keep in mind that encapsulation is a syntactic tool — it enables the code to continue to run without change. However, it is not semantic, meaning that just because the code continues to run, that does not mean it continues to do what you actually want it to do.
In this example, the client code may have been written to overcome the initial limitations of the implementation in some way, and thus the client code might both rely on being able to retrieve the Age value, and count on the result of that call being a fixed value over time.
The update to the implementation won't stop the client program from running, but it may very well prevent it from running correctly.
The third key part of an object is its data, or state. In fact, it might be argued that the only important part of an object is its data. After all, every instance of a class is absolutely identical in terms of its interface and its implementation; the only thing that can vary at all is the data contained within that particular object.
Fields are variables that are declared so that they are available to all code within the class. Typically, fields that are declared Private in scope are available only to the code in the class itself. They are also sometimes referred to as instance variables or member variables.
Don't confuse fields with properties. In Visual Basic, a Property is a type of method geared to retrieving and setting values, whereas a field is a variable within the class that may hold the value exposed by a Property. For instance, you might have a class that has these fields:
Public Class TheClass

   Private _Name As String
   Private _BirthDate As Date
End Class
Each instance of the class — each object — will have its own set of these fields in which to store data. Because these fields are declared with the Private keyword, they are only available to code within each specific object.
While fields can be declared as Public in scope, this makes them available to any code using the objects in a manner you cannot control. This directly breaks the concept of encapsulation, as code outside your object can directly change data values without following any rules that might otherwise be set in the object's code.
If you want to make the value of a field available to code outside of the object, you should instead use a property:
Public Class TheClass
  Private _Name As String
  Private _BirthDate As Date

   Public ReadOnly Property Name() As String
     Get
Return _Name
End Get
End Property
End ClassBecause the Name property is a method, you are not directly exposing the internal variables to client code, so you preserve encapsulation of the data. At the same time, through this mechanism, you are able to safely provide access to your data as needed.
Fields can also be declared with the Friend scope, meaning they are available to all code in your project. Therefore, like declaring them as Public, this breaks encapsulation and is strongly discouraged.
Now that you have a grasp of some of the basic object-oriented terminology, you are ready to explore the creation of classes and objects. First you will see how Visual Basic enables you to interact with objects, and then you will dive into the actual process of authoring those objects.
In the .NET environment in general and within Visual Basic in particular, you use objects all the time without even thinking about it. Every control on a form — in fact, every form — is an object. When you open a file or interact with a database, you are using objects to do that work.
Objects are created using the New keyword, indicating that you want a new instance of a particular class. There are numerous variations on how or where you can use the New keyword in your code. Each one provides different advantages in terms of code readability or flexibility.
The most obvious way to create an object is to declare an object variable and then create an instance of the object:
Dim obj As TheClass
obj = New TheClass()
The result of this code is that you have a new instance of TheClass ready for use. To interact with this new object, you use the obj variable that you declared. The obj variable contains a reference to the object, a concept explored later.
You can shorten the preceding code by combining the declaration of the variable with the creation of the instance, as illustrated here:
Dim obj As New TheClass()
In previous versions of Visual Basic, this substitution was a bad idea because it had negative performance and maintainability effects. However, since Visual Basic 2005, there is no difference between the first example and this one, other than code length.
The preceding code both declares the variable obj as data type TheClass and creates an instance of the class, immediately creating an object that you can use. Another variation on this theme is as follows:
Dim obj As TheClass = New TheClass()
Again, this both declares a variable of data type TheClass and creates an instance of the class. It is up to you how you create these instances, as it is really a matter of style. This third syntax example provides a great deal of flexibility while remaining compact. Though it is a single line of code, it separates the declaration of the variable's data type from the creation of the object.
Such flexibility is very useful when working with inheritance or multiple interfaces. You might declare the variable to be of one type — say, an interface — and instantiate the object based on a class that implements that interface. You will revisit this syntax when interfaces are covered in detail in Chapter 3.
So far, you've been declaring a variable for new objects, but sometimes you simply need to pass an object as a parameter to a method, in which case you can create an instance of the object right in the call to that method:
DoSomething(New TheClass())
This calls the DoSomething method, passing a new instance of TheClass as a parameter. This can be even more complex. Perhaps, instead of needing an object reference, your method needs an Integer. You can provide that Integer value from a method on the object:
Public Class TheClass
  Public Function GetValue() As Integer
    Return 42
  End Function
End Class
You can then instantiate the object and call the method all in one shot, thus passing the value returned from the method as a parameter:
DoSomething(New TheClass().GetValue())
Obviously, you need to carefully weigh the readability of such code against its compactness. At some point, having code that is more compact can detract from readability, rather than enhance it.
Typically, when you work with an object, you are using a reference to that object. Conversely, when you are working with simple data types, such as Integer, you are working with the actual value, rather than a reference. Let's explore these concepts and see how they work and interact.
When you create a new object using the New keyword, you store a reference to that object in a variable, as shown here:
Dim obj As New TheClass()
This code creates a new instance of TheClass. You gain access to this new object via the obj variable. This variable holds a reference to the object. You might then do something like this:
Dim another As TheClass
another = obj
Now, you have a second variable, another, which also has a reference to the same object. You can use either variable interchangeably, as they both reference the exact same object. Remember that the variable you have is not the object itself but just a reference, or pointer, to the object.
When you are done working with an object, you can indicate that you are through with it by dereferencing the object. To dereference an object, simply set the object reference to Nothing:
Dim obj As TheClass

obj = New TheClass()
obj = Nothing
After any or all variables that reference an object are set to Nothing, the .NET runtime knows that you no longer need that object. At some point, the runtime destroys the object and reclaims the memory and resources it consumed. You can find more information on the garbage collector in Chapter 4.
Between the time when you dereference the object and the time when the .NET Framework gets around to actually destroying it, the object simply sits in the memory, unaware that it has been dereferenced. Right before .NET destroys the object, the Finalize method is called on the object (if it has one).
One of the strengths of Visual Basic has long been that it provides access to both early and late binding when interacting with objects. Early binding means that code directly interacts with an object by directly calling its methods. Because the Visual Basic compiler knows the object's data type ahead of time, it can directly compile code to invoke the methods on the object. Early binding also enables the IDE to use IntelliSense to aid development efforts by enabling the compiler to ensure that you are referencing methods that exist and are providing the proper parameter values.
Late binding means that your code interacts with an object dynamically at runtime. This provides a great deal of flexibility because the code doesn't care what type of object it is interacting with as long as the object supports the methods you want to call. Because the type of the object is not known by the IDE or compiler, neither IntelliSense nor compile-time syntax checking is possible, but in exchange you get unprecedented flexibility.
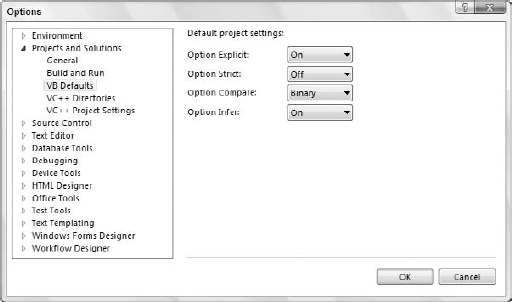
If you enable strict type checking by using Option Strict On in the project's Properties dialog or at the top of the code modules, then the IDE and compiler enforce early binding behavior. By default, Option Strict is turned off, so you have easy access to the use of late binding within the code. Chapter 1 discusses Option Strict. You can change this default directly in Visual Studio 2008 by selecting Tools
Late binding occurs when the compiler cannot determine the type of object that you'll be calling. This level of ambiguity is achieved using the Object data type. A variable of data type Object can hold virtually any value, including a reference to any type of object. Thus, code such as the following could be run against any object that implements a DoSomething method that accepts no parameters:
Option Strict Off

Module LateBind
  Public Sub DoWork(ByVal obj As Object)
   obj.DoSomething()
  End Sub
End Module
If the object passed into this routine does not have a DoSomething method that accepts no parameters, then an exception will be thrown. Thus, it is recommended that any code that uses late binding always provide exception handling:
Option Strict Off

Module LateBind
  Public Sub DoWork(ByVal obj As Object)
     Try
        obj.DoSomething()
     Catch ex As MissingMemberException
       ' do something appropriate given failure
       ' to call this method
     End Try
  End Sub
End Module
Here, the call to the DoSomething method has been put in a Try block. If it works, then the code in the Catch block is ignored; but in the case of a failure, the code in the Catch block is run. You need to write code in the Catch block to handle the case in which the object does not support the DoSomething method call. This Catch block only catches the MissingMemberException, which indicates that the method does not exist on the object.
While late binding is flexible, it can be error prone and is slower than early-bound code. To make a late-bound method call, the .NET runtime must dynamically determine whether the target object actually has a method that matches the one you are calling. It must then invoke that method on your behalf. This takes more time and effort than an early-bound call whereby the compiler knows ahead of time that the method exists and can compile the code to make the call directly. With a late-bound call, the compiler has to generate code to make the call dynamically at runtime.
Whether you are using late binding or not, it can be useful to pass object references around using the Object data type, converting them to an appropriate type when you need to interact with them. This is particularly useful when working with objects that use inheritance or implement multiple interfaces, concepts discussed in Chapter 3.
If Option Strict is turned off, which is the default, then you can write code using a variable of type Object to make an early-bound method call:
Module LateBind
  Public Sub DoWork(obj As Object)

     Dim local As TheClass
     local = obj
     local.DoSomething()
  End Sub
End Module
This code uses a strongly typed variable, local, to reference what was a generic object value. Behind the scenes, Visual Basic converts the generic type to a specific type so that it can be assigned to the strongly typed variable. If the conversion cannot be done, then you get a trappable runtime error.
The same thing can be done using the CType function. If Option Strict is enabled, then the previous approach will not compile, and the CType function must be used. Here is the same code making use of CType:
Module LateBind
  Public Sub DoWork(obj As Object)

     Dim local As TheClass
     local = CType(obj, TheClass)
     local.DoSomething()
  End Sub
End Module
This code declares a variable of type TheClass, which is an early-bound data type that you want to use. The parameter you're accepting is of the generic Object data type, though, so you use the CType method to gain an early-bound reference to the object. If the object isn't of type TheClass, then the call to CType fails with a trappable error.
Once you have a reference to the object, you can call methods by using the early-bound variable local. This code can be shortened to avoid the use of the intermediate variable. Instead, you can simply call methods directly from the data type:
Module LateBind
  Public Sub DoWork(obj As Object)
     CType(obj, TheClass).DoSomething()
  End Sub
End Module
Even though the variable you are working with is of type Object and therefore any calls to it will be late bound, you use the CType method to temporarily convert the variable into a specific type — in this case, the type TheClass.
If the object passed as a parameter is not of type
TheClass, then you get a trappable error, so it is always wise to wrap this code in aTry...Catchblock.
As shown in Chapter 3, the CType function can also be very useful when working with objects that implement multiple interfaces. When an object has multiple interfaces, you can reference a single object variable through the appropriate interface as needed.
Another function that is very similar to CType is the method DirectCast. The DirectCast call also converts values of one type into another type. It works in a more restrictive fashion than CType, but the trade-off is that it can be somewhat faster than CType:
Dim obj As TheClass

obj = New TheClass
DirectCast(obj, ITheInterface).DoSomething()
This is similar to the last example with CType, illustrating the parity between the two functions. There are differences, however. First, DirectCast works only with reference types, whereas CType accepts both reference and value types. For instance, CType can be used in the following code:
Dim int As Integer = CType(123.45, Integer)
Trying to do the same thing with DirectCast would result in a compiler error, as the value 123.45 is a value type, not a reference type.
Second, DirectCast is not as aggressive about converting types as CType. CType can be viewed as an intelligent combination of all the other conversion functions (such as CInt, CStr, and so on). DirectCast, conversely, assumes that the source data is directly convertible, and it won't take extra steps to convert the data.
As an example, consider the following code:
Dim obj As Object = 123.45

Dim int As Integer = DirectCast(obj, Integer)
If you were using CType this would work, as CType uses CInt-like behavior to convert the value to an Integer. DirectCast, however, will throw an exception because the value is not directly convertible to Integer.
A function similar to DirectCast is TryCast. TryCast converts values of one type into another type, but unlike DirectCast, if it can't do the conversion, then TryCast doesn't throw an exception. Instead, TryCast simply returns Nothing if the cast can't be performed. TryCast only works with reference values; it cannot be used with value types such as Integer or Boolean.
Using TryCast, you can write code like this:
Module LateBind

  Public Sub DoWork(obj As Object)
     Dim temp As TheClass = TryCast(obj, Object)
     If temp Is Nothing Then
       ' the cast couldn't be accomplished
       ' so do no work
     Else
       temp.DoSomething()
     End If
  End Sub

End Module
If you are not sure whether a type conversion is possible, then it is often best to use TryCast. This function avoids the overhead and complexity of catching possible exceptions from CType or DirectCast and still provides you with an easy way to convert an object to another type.
Using objects is fairly straightforward and intuitive. It is the kind of thing that even the most novice programmers pick up and accept rapidly. Creating classes and objects is a bit more complex and interesting.
As discussed earlier, objects are merely instances of a specific template (a class). The class contains the code that defines the behavior of its objects, and defines the instance variables that will contain the object's individual data.
Classes are created using the Class keyword, and include definitions (declaration) and implementations (code) for the variables, methods, properties, and events that make up the class. Each object created based on this class will have the same methods, properties, and events, and its own set of data defined by the fields in the class.
If you want to create a class that represents a person — a Person class — you could use the Class keyword:
Public Class Person

   ' Implementation code goes here

End Class
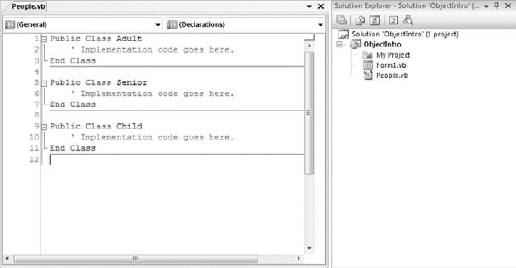
As you know, Visual Basic projects are composed of a set of files with the .vb extension. It is possible for each file to contain multiple classes, which means that within a single file you could have something like this:
Public Class Adult
  ' Implementation code goes here.
End Class

Public Class Senior
  ' Implementation code goes here.
End Class

Public Class Child
  ' Implementation code goes here.
End Class
The most common and preferred approach is to have a single class per file. This is because the Visual Studio 2008 Solution Explorer and the code-editing environment are tailored to make it easy to navigate from file to file to find code. For instance, if you create a single class file with all these classes, the Solution Explorer simply displays a single entry, as shown in Figure 2-2.
However, the Visual Studio IDE does provide the Class View window. If you do decide to put multiple classes in each physical .vb file, you can make use of the Class View window to quickly and efficiently navigate through the code, jumping from class to class without having to manually locate those classes in specific code files, as shown in Figure 2-3.
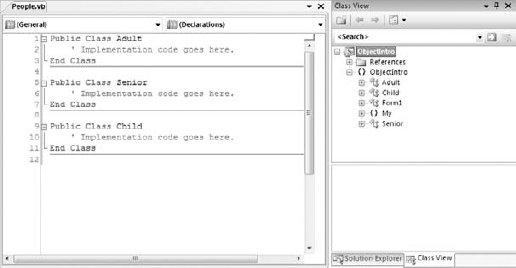
The Class View window is extremely useful even if you stick with one class per file, as it still provides you with a class-based view of the entire application.
This chapter uses one class per file in the examples, as this is the most common approach. To begin, open the Visual Studio IDE and create a new Windows Application project named "ObjectIntro." Choose the Project
Public Class Person

End Class
With the Person class created, you are ready to start adding code to declare the interface, implement the behaviors, and declare the instance variables.
Fields are variables declared in the class. They will be available to each individual object when the application is run. Each object gets its own set of data — basically, each object gets its own copy of the fields.
Earlier, you learned that a class is simply a template from which you create specific objects. Variables that you define within the class are also simply templates — and each object gets its own copy of those variables in which to store its data.
Declaring member variables is as easy as declaring variables within the Class block structure. Add the following code to the Person class:
Public Class Person

   Private mName As String
   Private mBirthDate As Date
End Class
You can control the scope of the fields with the following keywords:
Friend— Available only to code within the project/componentProtected— Available only to classes that inherit from the class (discussed in detail in Chapter 3)Protected Friend— Available to code within your project/component and classes that inherit from the class whether in the project or not (discussed in detail in Chapter 3)Public— Available to code outside the class and to any projects that reference the assembly
Typically, fields are declared using the Private keyword, making them available only to code within each instance of the class. Choosing any other option should be done with great care, because all the other options allow code outside the class to directly interact with the variable, meaning that the value could be changed and your code would never know that a change took place.
One common exception to making fields
Privateis to use theProtectedkeyword, as discussed in Chapter 3.
Objects typically need to provide services (or functions) that can be called when working with the object. Using their own data or data passed as parameters to the method, they manipulate information to yield a result or perform an action.
Methods declared as Public, Friend, or Protected in scope define the interface of the class. Methods that are Private in scope are available to the code only within the class itself, and can be used to provide structure and organization to code. As discussed earlier, the actual code within each method is called an implementation, while the declaration of the method itself is what defines the interface.
Methods are simply routines that are coded within the class to implement the services you want to provide to the users of an object. Some methods return values or provide information to the calling code. These are called interrogative methods. Others, called imperative methods, just perform an action and return nothing to the calling code.
In Visual Basic, methods are implemented using Sub (for imperative methods) or Function (for interrogative methods) routines within the class module that defines the object. Sub routines may accept parameters, but they do not return any result value when they are complete. Function routines can also accept parameters, and they always generate a result value that can be used by the calling code.
A method declared with the Sub keyword is merely one that returns no value. Add the following code to the Person class:
Public Sub Walk()

  ' implementation code goes here

End Sub
The Walk method presumably contains some code that performs some useful work when called but has no result value to return when it is complete. To make use of this method, you might write code such as this:
Dim myPerson As New Person()
myPerson.Walk()
Once you've created an instance of the Person class, you can simply invoke the Walk method.
If you have a method that does generate some value that should be returned, you need to use the Function keyword:
Public Function Age() As Integer
  Return CInt(DateDiff(DateInterval.Year, mBirthDate, Now()))
End Function
Note that you must indicate the data type of the return value when you declare a Function. This example returns the calculated age as a result of the method. You can return any value of the appropriate data type by using the Return keyword.
You can also return the value without using the Return keyword, by setting the value of the function name itself:
Public Function Age() As Integer
    Age = CInt(DateDiff(DateInterval.Year, mBirthDate, Now()))
End Function
This is functionally equivalent to the previous code. Either way, you can use this method with code similar to the following:
Dim myPerson As New Person()
Dim age As Integer

age = myPerson.Age()
The Age method returns an Integer data value that you can use in the program as required; in this case, you're just storing it in a variable.
Adding the appropriate keyword in front of the method declaration indicates the scope:
Public Sub Walk()
This indicates that Walk is a Public method and thus is available to code outside the class and even outside the current project. Any application that references the assembly can use this method. Being Public, this method becomes part of the object's interface.
Alternately, you might restrict access to the method somewhat:
Friend Sub Walk()
By declaring the method with the Friend keyword, you are indicating that it should be part of the object's interface only for code inside the project; any other applications or projects that make use of the assembly will not be able to call the Walk method.
The Private keyword indicates that a method is only available to the code within your particular class:
Private Function Age() As Integer
Private methods are very useful to help organize complex code within each class. Sometimes the methods contain very lengthy and complex code. In order to make this code more understandable, you may choose to break it up into several smaller routines, having the main method call these routines in the proper order. Moreover, you can use these routines from several places within the class, so by making them separate methods, you enable reuse of the code. These subroutines should never be called by code outside the object, so you make them Private.
You will often want to pass information into a method as you call it. This information is provided via parameters to the method. For instance, in the Person class, you may want the Walk method to track the distance the person walks over time. In such a case, the Walk method would need to know how far the person is to walk each time the method is called. Add the following code to the Person class:
Public Class Person
  Private mName As String
  Private mBirthDate As Date
  Private mTotalDistance As Integer

  Public Sub Walk(ByVal distance As Integer)
     mTotalDistance += distance
  End Sub
  Public Function Age() As Integer
    Return CInt(DateDiff(DateInterval.Year, mBirthDate, Now()))
  End Function
End Class
With this implementation, a Person object sums all of the distances walked over time. Each time the Walk method is called, the calling code must pass an Integer value, indicating the distance to be walked. The code to call this method would be similar to the following:
Dim myPerson As New Person()
myPerson.Walk(12)
The parameter is accepted using the ByVal keyword, which indicates that the parameter value is a copy of the original value. This is the default way in which Visual Basic accepts all parameters. Typically, this is desirable because it means that you can work with the parameter inside the code, changing its value with no risk of accidentally changing the original value in the calling code.
If you do want to be able to change the value in the calling code, you can change the declaration to pass the parameter by reference by using the ByRef qualifier:
Public Sub Walk(ByRef distance As Integer)
In this case, you get a reference (or pointer) back to the original value, rather than a copy. This means that any change you make to the distance parameter is reflected back in the calling code, very similar to the way object references work, as discussed earlier in this chapter.
Using this technique can be dangerous, as it is not explicitly clear to the caller of the method that the value will change. Such unintended side effects can be hard to debug and should be avoided.
The .NET environment provides for a specialized type of method called a property. A property is a method specifically designed for setting and retrieving data values. For instance, you declared a variable in the Person class to contain a name, so the Person class may include code to allow that name to be set and retrieved. This can be done using regular methods:
Public Sub SetName(ByVal name As String)
  mName = name
End Sub

Public Function GetName() As String
  Return mName
End Function
Using methods like these, you write code to interact with the object:
Dim myPerson As New Person()

myPerson.SetName("Jones")
Messagebox.Show(myPerson.GetName())
While this is perfectly acceptable, it is not as nice as it could be with the use of a property. A Property style method consolidates the setting and retrieving of a value into a single structure, and makes the code within the class smoother overall. You can rewrite these two methods into a single property. Add the following code to the Person class:
Public Property Name() As String
  Get
     Return mName
  End Get
  Set(ByVal Value As String)
    mName = Value
  End Set
End Property
By using a property method instead, you can make the client code much more readable:
Dim myPerson As New Person()

myPerson.Name = "Jones"
Messagebox.Show(myPerson.Name)
The Property method is declared with both a scope and a data type:
Public Property Name() As String
In this example, you've declared the property as Public in scope, but it can be declared using the same scope options as any other method — Public, Friend, Private, or Protected.
The return data type of this property is String. A property can return virtually any data type appropriate for the nature of the value. In this regard, a property is very similar to a method declared using the Function keyword.
Though a Property method is a single structure, it is divided into two parts: a getter and a setter. The getter is contained within a Get...End Get block and is responsible for returning the value of the property on demand:
Get
  Return mName
End Get
Though the code in this example is very simple, it could be more complex, perhaps calculating the value to be returned, or applying other business logic to change the value as it is returned. Likewise, the code to change the value is contained within a Set ... End Set block:
Set(ByVal Value As String)
   mName = Value
End Set
The Set statement accepts a single parameter value that stores the new value. The code in the block can then use this value to set the property's value as appropriate. The data type of this parameter must match the data type of the property itself. Declaring the parameter in this manner enables you to change the name of the variable used for the parameter value if needed.
By default, the parameter is named Value, but you can change the parameter name to something else, as shown here:
Set(ByVal NewName As String)
   mName = NewName
End Set
In many cases, you can apply business rules or other logic within this routine to ensure that the new value is appropriate before you actually update the data within the object. It is also possible to restrict either the Get or Set block to be narrower in scope than the scope of the property itself. For instance, you may want to allow any code to retrieve the property value, but only allow other code in your project to alter the value. In this case, you can restrict the scope of the Set block to Friend, while the Property itself is scoped as Public:
Public Property Name() As String
  Get
    Return mName
  End Get
  Friend Set(ByVal Value As String)
    mName = Value
  End Set
End Property
The new scope must be more restrictive than the scope of the Property itself, and either the Get or Set block can be restricted, but not both. The one you do not restrict uses the scope of the Property method.
The Name property you created is an example of a single-value property. You can also create property arrays or parameterized properties. These properties reflect a range, or array, of values. For example, people often have several phone numbers. You might implement a PhoneNumber property as a parameterized property, storing not only phone numbers, but also a description of each number. To retrieve a specific phone number you would write code such as the following:
Dim myPerson As New Person()
Dim homePhone As String

homePhone = myPerson.Phone("home")
Or, to add or change a specific phone number, you'd write the following code:
myPerson.Phone("work") = "555-9876"Not only are you retrieving and updating a phone number property, you are also updating a specific phone number. This implies a couple of things. First, you can no longer use a simple variable to hold the phone number, as you are now storing a list of numbers and their associated names. Second, you have effectively added a parameter to your property. You are actually passing the name of the phone number as a parameter on each property call.
To store the list of phone numbers, you can use the Hashtable class. The Hashtable is very similar to the standard VB Collection object, but it is more powerful — allowing you to test for the existence of a specific element. Add the following declaration to the Person class:
Public Class Person
  Private mName As String
  Private mBirthDate As Date
  Private mTotalDistance As Integer
  Private mPhones As New Hashtable
You can implement the Phone property by adding the following code to the Person class:
Public Property Phone(ByVal location As String) As String
  Get
Return CStr(mPhones.Item(Location))
  End Get
  Set(ByVal Value As String)
    If mPhones.ContainsKey(location) Then
      mPhones.Item(location) = Value
    Else
      mPhones.Add(location, Value)
    End If
  End Set
End Property
The declaration of the Property method itself is a bit different from what you have seen:
Public Property Phone(ByVal location As String) As String
In particular, you have added a parameter, location, to the property itself. This parameter will act as the index into the list of phone numbers, and must be provided when either setting or retrieving phone number values.
Because the location parameter is declared at the Property level, it is available to all code within the property, including both the Get and Set blocks. Within your Get block, you use the location parameter to select the appropriate phone number to return from the Hashtable:
Get
  Return mPhones.Item(location)
End Get
With this code, if there is no value stored matching the location, then you get a trappable runtime error.
Similarly, in the Set block, you use the location to update or add the appropriate element in the Hashtable. In this case, you are using the ContainsKey method of Hashtable to determine whether the phone number already exists in the list. If it does, then you simply update the value in the list; otherwise, you add a new element to the list for the value:
Set(ByVal Value As String)
  If mPhones.ContainsKey(location) Then
    mPhones.Item(location) = Value
  Else
    mPhones.Add(location, Value)
  End If
End Set
This way, you are able to add or update a specific phone number entry based on the parameter passed by the calling code.
Sometimes you may want a property to be read-only, so that it cannot be changed. In the Person class, for instance, you may have a read-write property for BirthDate, but only a read-only property for Age. If so, the BirthDate property is a normal property, as follows:
Public Property BirthDate() As Date
  Get
Return mBirthDate
  End Get
  Set(ByVal Value As Date)
   mBirthDate = Value
  End Set
End Property
The Age value, conversely, is a derived value based on BirthDate. This is not a value that should ever be directly altered, so it is a perfect candidate for read-only status.
You already have an Age method implemented as a Function. Remove that code from the Person class because you will replace it with a Property routine instead. The difference between a Function routine and a ReadOnly Property is quite subtle. Both return a value to the calling code, and either way the object is running a subroutine defined by the class module to return the value.
The difference is less a programmatic one than a design choice. You could create all your objects without any Property routines at all, just using methods for all interactions with the objects. However, Property routines are obviously attributes of an object, whereas a Function might be an attribute or a method. By carefully implementing all attributes as ReadOnly Property routines, and any interrogative methods as Function routines, you create more readable and understandable code.
To make a property read-only, use the ReadOnly keyword and only implement the Get block:
Public ReadOnly Property Age() As Integer
  Get
    Return CInt(DateDiff(DateInterval.Year, mdtBirthDate, Now()))
  End Get
End Property
Because the property is read-only, you will get a syntax error if you attempt to implement a Set block.
As with read-only properties, sometimes a property should be write-only, whereby the value can be changed but not retrieved.
Many people have allergies, so perhaps the Person object should have some understanding of the ambient allergens in the area. This is not a property that should be read from the Person object, as allergens come from the environment, rather than from the person, but it is data that the Person object needs in order to function properly. Add the following variable declaration to the class:
Public Class Person
  Private mstrName As String
  Private mdtBirthDate As Date
  Private mintTotalDistance As Integer
  Private colPhones As New Hashtable()
  Private mAllergens As Integer
You can implement an AmbientAllergens property as follows:
Public WriteOnly Property AmbientAllergens() As Integer
  Set(ByVal Value As Integer)
    mAllergens = Value
End Set End Property
To create a write-only property, use the WriteOnly keyword and only implement a Set block in the code. The property is write-only, so you will get a syntax error if you try to implement a Get block.
Objects can implement a default property, which can be used to simplify the use of an object at times by making it appear as if the object has a native value. A good example of this behavior is the Collection object, which has a default property called Item that returns the value of a specific item, allowing you to write the following:
Dim mData As New HashTable() Return mData(index)
Default properties must be parameterized properties. A property without a parameter cannot be marked as the default. This is a change from previous versions of Visual Basic, in which any property could be marked as the default.
Our Person class has a parameterized property — the Phone property you built earlier. You can make this the default property by using the Default keyword:
Default Public Property Phone(ByVal location As String) As String
Get
Return CStr(mPhones.Item(location))
End Get
Set(ByVal Value As String)
If mPhones.ContainsKey(location) Then
mPhones.Item(location) = Value
Else
mPhones.Add(location, Value)
End If
End Set
End PropertyPrior to this change, you would have needed code such as the following to use the Phone property:
Dim myPerson As New Person()

MyPerson.Phone("home") = "555-1234"
Now, with the property marked as Default, you can simplify the code:
myPerson("home") = "555-1234"By picking appropriate default properties, you can potentially make the use of objects more intuitive.
Both methods and properties enable you to write code that interacts with your objects by invoking specific functionality as needed. It is often useful for objects to provide notification as certain activities occur during processing. You see examples of this all the time with controls, where a button indicates that it was clicked via a Click event, or a text box indicates that its contents have been changed via the TextChanged event.
Objects can raise events of their own, providing a powerful and easily implemented mechanism by which objects can notify client code of important activities or events. In Visual Basic, events are provided using the standard .NET mechanism of delegates, but before discussing delegates, let's explore how to work with events in Visual Basic.
We are all used to seeing code in a form to handle the Click event of a button, such as the following code:
Private Sub Button1_Click(ByVal sender As System.Object, _
  ByVal e As System.EventArgs) Handles Button1.Click

End Sub
Typically, we write our code in this type of routine without paying a lot of attention to the code created by the Visual Studio IDE. However, let's take a second look at that code, which contains some important things to note here.
First, notice the use of the Handles keyword. This keyword specifically indicates that this method will be handling the Click event from the Button1 control. Of course, a control is just an object, so what is indicated here is that this method will be handling the Click event from the Button1 object.
Second, notice that the method accepts two parameters. The Button control class defines these parameters. It turns out that any method that accepts two parameters with these data types can be used to handle the Click event. For instance, you could create a new method to handle the event:
Private Sub MyClickMethod(ByVal s As System.Object, _
    ByVal args As System.EventArgs) Handles Button1.Click

End Sub
Even though you have changed the method name and the names of the parameters, you are still accepting parameters of the same data types, and you still have the Handles clause to indicate that this method handles the event.
The Handles keyword offers even more flexibility. Not only can the method name be anything you choose, but a single method can handle multiple events if you desire. Again, the only requirement is that the method and all the events being raised must have the same parameter list.
This explains why all the standard events raised by the .NET system class library have exactly two parameters — the sender and an
EventArgsobject. Being so generic makes it possible to write very generic and powerful event handlers that can accept virtually any event raised by the class library.
One common scenario where this is useful is when you have multiple instances of an object that raises events, such as two buttons on a form:
Private Sub MyClickMethod(ByVal sender As System.Object, _
    ByVal e As System.EventArgs) _
    Handles Button1.Click, Button2.Click

End Sub
Notice that the Handles clause has been modified so that it has a comma-separated list of events to handle. Either event will cause the method to run, providing a central location for handling these events.
The WithEvents keyword tells Visual Basic that you want to handle any events raised by the object within the code:
Friend WithEvents Button1 As System.Windows.Forms.Button
The WithEvents keyword makes any events from an object available for use, whereas the Handles keyword is used to link specific events to the methods so that you can receive and handle them. This is true not only for controls on forms, but also for any objects that you create.
The WithEvents keyword cannot be used to declare a variable of a type that does not raise events. In other words, if the Button class did not contain code to raise events, you would get a syntax error when you attempted to declare the variable using the WithEvents keyword.
The compiler can tell which classes will and will not raise events by examining their interface. Any class that will be raising an event has that event declared as part of its interface. In Visual Basic, this means that you will have used the Event keyword to declare at least one event as part of the interface for the class.
Your objects can raise events just like a control, and the code using the object can receive these events by using the WithEvents and Handles keywords. Before you can raise an event from your object, however, you need to declare the event within the class by using the Event keyword.
In the Person class, for instance, you may want to raise an event anytime the Walk method is called. If you call this event Walked, you can add the following declaration to the Person class:
Public Class Person
  Private mstrName As String
  Private mdtBirthDate As Date
  Private mintTotalDistance As Integer
  Private colPhones As New Hashtable()
  Private mintAllergens As Integer
  Public Event Walked()
Events can also have parameters, values that are provided to the code receiving the event. A typical button's Click event receives two parameters, for instance. In the Walked method, perhaps you want to also indicate the distance that was walked. You can do this by changing the event declaration:
Public Event Walked(ByVal distance As Integer)
Now that the event is declared, you can raise that event within the code where appropriate. In this case, you'll raise it within the Walk method, so anytime a Person object is instructed to walk, it fires an event indicating the distance walked. Make the following change to the Walk method:
Public Sub Walk(ByVal distance As Integer)
   mTotalDistance += distance
   RaiseEvent Walked(distance)
End Sub
The RaiseEvent keyword is used to raise the actual event. Because the event requires a parameter, that value is passed within parentheses and is delivered to any recipient that handles the event.
In fact, the RaiseEvent statement causes the event to be delivered to all code that has the object declared using the WithEvents keyword with a Handles clause for this event, or any code that has used the AddHandler method. The AddHandler method is discussed shortly.
If more than one method will be receiving the event, then the event is delivered to each recipient one at a time. By default, the order of delivery is not defined — meaning you can't predict the order in which the recipients receive the event — but the event is delivered to all handlers. Note that this is a serial, synchronous process. The event is delivered to one handler at a time, and it is not delivered to the next handler until the current handler is complete. Once you call the RaiseEvent method, the event is delivered to all listeners one after another until it is complete; there is no way for you to intervene and stop the process in the middle.
As just noted, by default you have no control over how events are raised. You can overcome this limitation by using a more explicit form of declaration for the event itself. Rather than use the simple Event keyword, you can declare a custom event. This is for more advanced scenarios, as it requires that you provide the implementation for the event itself.
The concept of delegates is covered in detail later in this chapter, but it is necessary to look at them briefly here in order to declare a custom event. A delegate is a definition of a method signature. When you declare an event, Visual Basic defines a delegate for the event behind the scenes based on the signature of the event. The Walked event, for instance, has a delegate like the following:
Public Delegate Sub WalkedEventHandler(ByVal distance As Integer)
Notice how this code declares a "method" that accepts an Integer and has no return value. This is exactly what you defined for the event. Normally, you do not write this bit of code, because Visual Basic does it automatically; but if you want to declare a custom event, then you need to manually declare the event delegate.
You also need to declare within the class a variable where you can keep track of any code that is listening for, or handling, the event. It turns out that you can tap into the prebuilt functionality of delegates for this purpose. By declaring the WalkedEventHandler delegate, you have defined a data type that automatically tracks event handlers, so you can declare the variable like this:
Private mWalkedHandlers As WalkedEventHandler
You can use the preceding variable to store and raise the event within the custom event declaration:
Public Custom Event Walked As WalkedEventHandler
  AddHandler(ByVal value As WalkedEventHandler)
    mWalkedHandlers = _
      CType([Delegate].Combine(mWalkedHandlers, value), WalkedEventHandler)
  End AddHandler

  RemoveHandler(ByVal value As WalkedEventHandler)
    mWalkedHandlers = _
      CType([Delegate].Remove(mWalkedHandlers, value), WalkedEventHandler)
  End RemoveHandler

  RaiseEvent(ByVal distance As Integer)
    If mWalkedHandlers IsNot Nothing Then
      mWalkedHandlers.Invoke(distance)
    End If
  End RaiseEvent
End Event
In this case, you have used the Custom Event key phrase, rather than just Event to declare the event. A Custom Event declaration is a block structure with three sub-blocks: AddHandler, RemoveHandler, and RaiseEvent.
The AddHandler block is called anytime a new handler wants to receive the event. The parameter passed to this block is a reference to the method that will be handling the event. It is up to you to store the reference to that method, which you can do however you choose. In this implementation, you are storing it within the delegate variable, just like the default implementation provided by Visual Basic.
The RemoveHandler block is called anytime a handler wants to stop receiving your event. The parameter passed to this block is a reference to the method that was handling the event. It is up to you to remove the reference to the method, which you can do however you choose. In this implementation, you are replicating the default behavior by having the delegate variable remove the element.
Finally, the RaiseEvent block is called anytime the event is raised. Typically, it is invoked when code within the class uses the RaiseEvent statement. The parameters passed to this block must match the parameters declared by the delegate for the event. It is up to you to go through the list of methods that are handling the event and call each of those methods. In the example shown here, you are allowing the delegate variable to do that for you, which is the same behavior you get by default with a normal event.
The value of this syntax is that you could opt to store the list of handler methods in a different type of data structure, such as a Hashtable or collection. You could then invoke them asynchronously, or in a specific order or based on some other behavior required by the application.
Now that you have implemented an event within the Person class, you can write client code to declare an object using the WithEvents keyword. For instance, in the project's Form1 code module, you can write the following code:
Public Class Form1
  Inherits System.Windows.Forms.Form
  Private WithEvents mPerson As Person
By declaring the variable WithEvents, you are indicating that you want to receive any events raised by this object. You can also choose to declare the variable without the WithEvents keyword, although in that case you would not receive events from the object as described here. Instead, you would use the AddHandler method, which is discussed after WithEvents.
You can then create an instance of the object, as the form is created, by adding the following code:
Private Sub Form1_Load(ByVal sender As System.Object, _
    ByVal e As System.EventArgs) Handles MyBase.Load

  mPerson = New Person()

End Sub
At this point, you have declared the object variable using WithEvents and have created an instance of the Person class, so you actually have an object with which to work. You can now proceed to write a method to handle the Walked event from the object by adding the following code to the form. You can name this method anything you like; it is the Handles clause that is important because it links the event from the object directly to this method, so it is invoked when the event is raised:
Private Sub OnWalk(ByVal distance As Integer) Handles mPerson.Walked
  MsgBox("Person walked " & distance)
End Sub
You are using the Handles keyword to indicate which event should be handled by this method. You are also receiving an Integer parameter. If the parameter list of the method doesn't match the list for the event, then you'll get a compiler error indicating the mismatch.
Finally, you need to call the Walk method on the Person object. Add a button to the form and write the following code for its Click event:
Private Sub Button1_Click(ByVal sender As System.Object, _
    ByVal e As System.EventArgs) Handles button1.Click

  mPerson.Walk(42)

End Sub
When the button is clicked, you simply call the Walk method, passing an Integer value. This causes the code in your class to be run, including the RaiseEvent statement. The result is an event firing back into the form, because you declared the mPerson variable using the WithEvents keyword. The OnWalk method will be run to handle the event, as it has the Handles clause linking it to the event.
Figure 2-4 illustrates the flow of control, showing how the code in the button's Click event calls the Walk method, causing it to add to the total distance walked and then raise its event. The RaiseEvent causes the form's OnWalk method to be invoked; and once it is done, control returns to the Walk method in the object. Because you have no code in the Walk method after you call RaiseEvent, the control returns to the Click event back in the form, and then you are done.
Many people assume that events use multiple threads to do their work. This is not the case. Only one thread is involved in the process. Raising an event is like making a method call, as the existing thread is used to run the code in the event handler. Therefore, the application's processing is suspended until the event processing is complete.

Now that you have seen how to receive and handle events using the WithEvents and Handles keywords, consider an alternative approach. You can use the AddHandler method to dynamically add event handlers through your code, and RemoveHandler to dynamically remove them.
WithEvents and the Handles clause require that you declare both the object variable and event handler as you build the code, effectively creating a linkage that is compiled right into the code. AddHandler, conversely, creates this linkage at runtime, which can provide you with more flexibility. However, before getting too deeply into that, let's see how AddHandler works.
In Form1, you can change the way the code interacts with the Person object, first by eliminating the WithEvents keyword
Private mPerson As Person
and then by also eliminating the Handles clause:
Private Sub OnWalk(ByVal distance As Integer)
  MsgBox("Person walked " & distance)
End Sub
With these changes, you've eliminated all event handling for the object, and the form will no longer receive the event, even though the Person object raises it.
Now you can change the code to dynamically add an event handler at runtime by using the AddHandler method. This method simply links an object's event to a method that should be called to handle that event. Anytime after you have created the object, you can call AddHandler to set up the linkage:
Private Sub Form1_Load(ByVal sender As System.Object, _
    ByVal e As System.EventArgs) Handles MyBase.Load

   mPerson = New Person()
   AddHandler mPerson.Walked, AddressOf OnWalk
 End Sub
This single line of code does the same thing as the earlier use of WithEvents and the Handles clause, causing the OnWalk method to be invoked when the Walked event is raised from the Person object.
However, this linkage is performed at runtime, so you have more control over the process than you would have otherwise. For instance, you could have extra code to determine which event handler to link up. Suppose that you have another possible method to handle the event for cases when a message box is not desirable. Add this code to Form1:
Private Sub LogOnWalk(ByVal distance As Integer)
  System.Diagnostics.Debug.WriteLine("Person walked " & distance)
End Sub
Rather than pop up a message box, this version of the handler logs the event to the output window in the IDE. Now you can enhance the AddHandler code to determine which handler should be used dynamically at runtime:
Private Sub Form1_Load(ByVal sender As System.Object, _
    ByVal e As System.EventArgs) Handles MyBase.Load

  mPerson = New Person()
  If Microsoft.VisualBasic.Command = "nodisplay" Then
    AddHandler mPerson.Walked, AddressOf LogOnWalk
  Else
    AddHandler mPerson.Walked, AddressOf OnWalk
  End If
End Sub
If the word nodisplay is on the command line when the application is run, then the new version of the event handler is used; otherwise, you continue to use the message-box handler.
The counterpart to AddHandler is RemoveHandler. RemoveHandler is used to detach an event handler from an event. One example of when this is useful is if you ever want to set the mPerson variable to Nothing or to a new Person object. The existing Person object has its events attached to handlers, and before you get rid of the reference to the object, you must release those references:
If Microsoft.VisualBasic.Command = "nodisplay" Then
  RemoveHandler mPerson.Walked, AddressOf LogOnWalk
Else
  RemoveHandler mPerson.Walked, AddressOf OnWalk
End If
mPerson = New Person
If you do not detach the event handlers, the old Person object remains in memory because each event handler still maintains a reference to the object even after mPerson no longer points to the object.
This illustrates one key reason why the WithEvents keyword and Handles clause are preferable in most cases. AddHandler and RemoveHandler must be used in pairs; failure to do so can cause memory leaks in the application, whereas the WithEvents keyword handles these details for you automatically.
In Visual Basic, classes can implement a special method that is always invoked as an object is being created. This method is called the constructor, and it is always named New.
The constructor method is an ideal location for such initialization code, as it is always run before any other methods are ever invoked, and it is only run once for an object. Of course, you can create many objects based on a class, and the constructor method will be run for each object that is created.
You can implement a constructor in your classes as well, using it to initialize objects as needed. This is as easy as implementing a Public method named New. Add the following code to the Person class:
Public Sub New()
  Phone("home") = "555-1234"
  Phone("work") = "555-5678"
End Sub
In this example, you are simply using the constructor method to initialize the home and work phone numbers for any new Person object that is created.
You can also use constructors to enable parameters to be passed to the object as it is being created. This is done by simply adding parameters to the New method. For example, you can change the Person class as follows:
Public Sub New(ByVal name As String, ByVal birthDate As Date)
  mName = name
  mBirthDate = birthDate
  Phone("home") = "555-1234"
  Phone("work") = "555-5678"
End Sub
With this change, anytime a Person object is created, you will be provided with values for both the name and birth date. However, this changes how you can create a new Person object. Whereas you used to have code such as
Dim myPerson As New Person()
now you will have code such as
Dim myPerson As New Person("Bill", "1/1/1970")In fact, because the constructor expects these values, they are mandatory — any code that needs to create an instance of the Person class must provide these values. Fortunately, there are alternatives in the form of optional parameters and method overloading (which enables you to create multiple versions of the same method, each accepting a different parameter list). These topics are discussed later in the chapter.
In the .NET environment, an object is destroyed and the memory and resources it consumes are reclaimed when there are no references remaining for the object. As discussed earlier in the chapter, when you are using objects, the variables actually hold a reference or pointer to the object itself. If you have code such as
Dim myPerson As New Person()
you know that the myPerson variable is just a reference to the Person object you created. If you also have code like
Dim anotherPerson As Person
anotherPerson = myPerson
you know that the anotherPerson variable is also a reference to the same object. This means that this specific Person object is being referenced by two variables.
When there are no variables left to reference an object, it can be terminated by the .NET runtime environment. In particular, it is terminated and reclaimed by a mechanism called garbage collection, or the garbage collector, covered in detail in Chapter 4.
Unlike COM (and thus VB6), the .NET runtime does not use reference counting to determine when an object should be terminated. Instead, it uses garbage collection to terminate objects. This means that in Visual Basic you do not have deterministic finalization, so it is not possible to predict exactly when an object will be destroyed.
Let's review how you can eliminate references to an object. You can explicitly remove a reference by setting the variable equal to Nothing, with the following code:
myPerson = Nothing
You can also remove a reference to an object by changing the variable to reference a different object. Because a variable can only point to one object at a time, it follows naturally that changing a variable to point at another object must cause it to no longer point to the first one. This means that you can have code such as the following:
myPerson = New Person()
This causes the variable to point to a brand-new object, thus releasing this reference to the prior object. These are examples of explicit dereferencing.
Visual Basic also provides facilities for implicit dereferencing of objects when a variable goes out of scope. For instance, if you have a variable declared within a method, then when that method completes, the variable is automatically destroyed, thus dereferencing any object to which it may have pointed. In fact, anytime a variable referencing an object goes out of scope, the reference to that object is automatically eliminated. This is illustrated by the following code:
Private Sub DoSomething()
  Dim myPerson As Person

  myPerson = New Person()
End Sub
Even though the preceding code does not explicitly set the value of myPerson to Nothing, you know that the myPerson variable will be destroyed when the method is complete because it will fall out of scope. This process implicitly removes the reference to the Person object created within the routine.
Of course, another scenario in which objects become dereferenced is when the application itself completes and is terminated. At that point, all variables are destroyed, so, by definition, all object references go away as well.
So far, you have learned how to work with objects, how to create classes with methods, properties, and events, and how to use constructors. You have also learned how objects are destroyed within the .NET environment and how you can hook into that process to do any cleanup required by the objects.
Now you can move on to some more complex topics and variations on what has been discussed so far. First you'll look at some advanced variations of the methods you can implement in classes, including an exploration of the underlying technology behind events.
Methods often accept parameter values. The Person object's Walk method, for instance, accepts an Integer parameter:
Public Sub Walk(ByVal distance As Integer)
  mTotalDistance += distance
  RaiseEvent Walked(distance)
End Sub
Sometimes there is no need for the parameter. To address this, you can use the Optional keyword to make the parameter optional:
Public Sub Walk(Optional ByVal distance As Integer = 0)
  mTotalDistance += distance
  RaiseEvent Walked(distance)
End Sub
This does not provide you with a lot of flexibility, however, as the optional parameter or parameters must always be the last ones in the list. In addition, this merely enables you to pass or not pass the parameter. Suppose that you want to do something fancier, such as allow different data types or even entirely different lists of parameters.
Use of the
Optionalkeyword makes the code harder to consume from C# or other .NET languages because they do not support optional parameters as VB does. If you are only working in Visual Basic, this may be a non-issue, but if you are working in a multilanguage environment, avoid using theOptionalkeyword. In addition, optional parameters require a default value.
Method overloading provides exactly those capabilities. By overloading methods, you can create several methods of the same name, with each one accepting a different set of parameters, or parameters of different data types.
As a simple example, instead of using the Optional keyword in the Walk method, you could use overloading. You keep the original Walk method, but you also add another Walk method that accepts a different parameter list. Change the code in the Person class back to the following:
Public Sub Walk(ByVal distance As Integer)
  mTotalDistance += distance
  RaiseEvent Walked(distance)
End Sub
Now create another method with the same name but with a different parameter list (in this case, no parameters). Add this code to the class, without removing or changing the existing Walk method:
Public Sub Walk()
  RaiseEvent Walked(0)
End Sub
At this point, you have two Walk methods. The only way to tell them apart is by the list of parameters each accepts: the first requiring a single Integer parameter, the second having no parameter.
There is an
Overloadskeyword as well. This keyword is not needed for the simple overloading of methods described here, but it is required when combining overloading and inheritance, which is discussed in Chapter 3.
You can call the Walk method either with or without a parameter, as shown in the following examples:
objPerson.Walk(42)
objPerson.Walk()
You can have any number of Walk methods in the class as long as each individual Walk method has a different method signature.
All methods have a signature, which is defined by the method name and the data types of its parameters:
Public Function CalculateValue() As Integer

End Sub
In this example, the signature is f (). The letter f is often used to indicate a method or function. It is appropriate here because you do not care about the name of the function; only its parameter list is important.
If you add a parameter to the method, then the signature is considered changed. For instance, you could change the method to accept a Double:
Public Function CalculateValue(ByVal value As Double) As Integer
In that case, the signature of the method is f (Double).
Notice that in Visual Basic the return value is not part of the signature. You cannot overload a Function routine by just having its return value's data type vary. It is the data types in the parameter list that must vary to utilize overloading.
Also note that the name of the parameter is totally immaterial; only the data type is important. This means that the following methods have identical signatures:
Public Sub DoWork(ByVal x As Integer, ByVal y As Integer)

Public Sub DoWork(ByVal value1 As Integer, ByVal value2 As Integer)
In both cases, the signature is f (Integer, Integer).
The data types of the parameters define the method signature, but whether the parameters are passed ByVal or ByRef does not. Changing a parameter from ByVal to ByRef will not change the method signature.
Overloading is more flexible than using optional parameters, but optional parameters have the advantage that they can be used to provide default values, as well as make a parameter optional.
You can combine the two concepts: overloading a method and having one or more of those methods utilize optional parameters. Obviously, this sort of thing can become very confusing if overused, as you are employing two types of method "overloading" at the same time.
The Optional keyword causes a single method to effectively have two signatures. This means that a method declared as
Public Sub DoWork(ByVal x As Integer, Optional ByVal y As Integer = 0)
has two signatures at once: f (Integer, Integer) and f (Integer).
Because of this, when you use overloading along with optional parameters, the other overloaded methods cannot match either of these two signatures. However, as long as other methods do not match either signature, you can use overloading, as discussed earlier. For instance, you could implement methods with the signatures
Public Sub DoWork(ByVal x As Integer, Optional ByVal y As Integer = 0)
and
Public Sub DoWork(ByVal data As String)
because there are no conflicting method signatures. In fact, with these two methods, you have actually created three signatures:
f
(Integer, Integer)f
(Integer)f
(String)
The IntelliSense built into the Visual Studio IDE will indicate that you have two overloaded methods, one of which has an optional parameter. This is different from creating three different overloaded methods to match these three signatures, in which case the IntelliSense would list three variations on the method, from which you could choose.
In many cases, you may want the constructor to accept parameter values for initializing new objects, but also want to have the capability to create objects without providing those values. This is possible through method overloading, which is discussed later, or by using optional parameters.
Optional parameters on a constructor method follow the same rules as optional parameters for any other Sub routine: They must be the last parameters in the parameter list, and you must provide default values for the optional parameters.
For instance, you can change the Person class as shown here:
Public Sub New(Optional ByVal name As String = "", _
    Optional ByVal birthDate As Date = #1/1/1900#)
  mName = name
  mBirthDate = birthDate

  Phone("home") = "555-1234"
  Phone("work") = "555-5678"
End Sub
The preceding example changed both the Name and BirthDate parameters to be optional, and provides default values for both of them. Now you have the option to create a new Person object with or without the parameter values:
Dim myPerson As New Person("Bill", "1/1/1970")or
Dim myPerson As New Person()
If you do not provide the parameter values, then the default values of an empty String and 1/1/1900 will be used and the code will work just fine.
You can combine the concept of a constructor method with method overloading to allow for different ways of creating instances of the class. This can be a very powerful combination because it allows a great deal of flexibility in object creation.
You have already explored how to use optional parameters in the constructor. Now let's change the implementation in the Person class to make use of overloading instead. Change the existing New method as follows:
Public Sub New(ByVal name As String, ByVal birthDate As Date)
    mName = name
    mBirthDate = birthDate
    Phone("home") = "555-1234"
    Phone("work") = "555-5678"
  End Sub
With this change, you require the two parameter values to be supplied. Now add that second implementation, as shown here:
Public Sub New()
  Phone("home") = "555-1234"
  Phone("work") = "555-5678"
End Sub
This second implementation accepts no parameters, meaning you can now create Person objects in two different ways — either with no parameters or by passing the name and birth date:
Dim myPerson As New Person()
or
Dim myPerson As New Person("Fred", "1/11/60")This type of capability is very powerful because it enables you to define the various ways in which applications can create objects. In fact, the Visual Studio IDE considers this, so when you are typing the code to create an object, the IntelliSense tooltip displays the overloaded variations on the method, providing a level of automatic documentation for the class.
So far, all of the methods you have built or used have been instance methods, methods that require you to have an actual instance of the class before they can be called. These methods have used instance variables or member variables to do their work, which means that they have been working with a set of data that is unique to each individual object.
With Visual Basic, you can create variables and methods that belong to the class, rather than to any specific object. In other words, these variables and methods belong to all objects of a given class and are shared across all the instances of the class.
You can use the Shared keyword to indicate which variables and methods belong to the class, rather than to specific objects. For instance, you may be interested in knowing the total number of Person objects created as the application is running — kind of a statistical counter.
Because regular variables are unique to each individual Person object, they do not enable you to easily track the total number of Person objects ever created. However, if you had a variable that had a common value across all instances of the Person class, you could use that as a counter. Add the following variable declaration to the Person class:
Public Class Person
  Implements IDisposable
   Private Shared mCounter As Integer
By using the Shared keyword, you are indicating that this variable's value should be shared across all Person objects within your application. This means that if one Person object makes the value 42, then all other Person objects will see the value as 42: It is a shared piece of data.
You can now use this variable within the code. For instance, you can add code to the constructor method, New, to increment the variable so that it acts as a counter — adding 1 each time a new Person object is created. Change the New methods as shown here:
Public Sub New()
  Phone("home") = "555-1234"
  Phone("work") = "555-5678"
  mCounter += 1
End Sub

Public Sub New(ByVal name As String, ByVal birthDate As Date)
  mName = name
  mBirthDate = birthDate

  Phone("home") = "555-1234"
  Phone("work") = "555-5678"
  mCounter += 1
End Sub
The mCounter variable will now maintain a value indicating the total number of Person objects created during the life of the application. You may want to add a property routine to allow access to this value by writing the following code:
Public ReadOnly Property PersonCount() As Integer
  Get
    Return mCounter
  End Get
End Property
Note that you are creating a regular property that returns the value of a shared variable, which is perfectly acceptable. As shown shortly, you could also create a shared property to return the value.
Now you could write code to use the class as follows:
Dim myPerson As Person
myPerson = New Person()
myPerson = New Person()
myPerson = New Person()

Messagebox.Show(myPerson.PersonCount)
The resulting display would show 3, because you've created three instances of the Person class. You would also need to decrement the counter after the objects are destroyed.
You can share not only variables across all instances of a class, but also methods. Whereas a regular method or property belongs to each specific object, a shared method or property is common across all instances of the class. There are a couple of ramifications to this approach.
First, because shared methods do not belong to any specific object, they can't access any instance variables from any objects. The only variables available for use within a shared method are shared variables, parameters passed into the method, or variables declared locally within the method itself. If you attempt to access an instance variable within a shared method, you'll get a compiler error.
In addition, because shared methods are actually part of the class, rather than any object, you can write code to call them directly from the class without having to create an instance of the class first.
For instance, a regular instance method is invoked from an object:
Dim myPerson As New Person()

myPerson.Walk(42)
However, a shared method can be invoked directly from the class itself:
Person.SharedMethod()
This saves the effort of creating an object just to invoke a method, and can be very appropriate for methods that act on shared variables, or methods that act only on values passed in via parameters. You can also invoke a shared method from an object, just like a regular method. Shared methods are flexible in that they can be called with or without creating an instance of the class first.
To create a shared method, you again use the Shared keyword. For instance, the PersonCount property created earlier could easily be changed to become a shared method instead:
Public Shared ReadOnly Property PersonCount() As Integer
  Get
    Return mCounter
  End Get
End Property
Because this property returns the value of a shared variable, it is perfectly acceptable for it to be implemented as a shared method. With this change, you can now determine how many Person objects have ever been created without having to actually create a Person object first:
Messagebox.Show(CStr(Person.PersonCount))
As another example, in the Person class, you could create a method that compares the ages of two people. Add a shared method with the following code:
Public Shared Function CompareAge(ByVal person1 As Person, _
    ByVal person2 As Person) As Boolean

  Return person1.Age > person2.Age
End Function
This method simply accepts two parameters — each a Person — and returns True if the first is older than the second. Use of the Shared keyword indicates that this method doesn't require a specific instance of the Person class in order for you to use it.
Within this code, you are invoking the Age property on two separate objects, the objects passed as parameters to the method. It is important to recognize that you're not directly using any instance variables within the method; rather, you are accepting two objects as parameters, and invoking methods on those objects. To use this method, you can call it directly from the class:
If Person.CompareAge(myPerson1, myPerson2) Then
Alternately, you can also invoke it from any Person object:
Dim myPerson As New Person()

If myPerson.CompareAge(myPerson, myPerson2) Then
Either way, you're invoking the same shared method, and you'll get the same behavior, whether you call it from the class or a specific instance of the class.
As with other types of methods, you can also have shared property methods. Properties follow the same rules as regular methods. They can interact with shared variables but not member variables. They can also invoke other shared methods or properties, but cannot invoke instance methods without first creating an instance of the class. You can add a shared property to the Person class with the following code:
Public Shared ReadOnly Property RetirementAge() As Integer
  Get
    Return 62
  End Get
End Property
This simply adds a property to the class that indicates the global retirement age for all people. To use this value, you can simply access it directly from the class:
Messagebox.Show(Person.RetirementAge)
Alternately, you can access it from any Person object:
Dim myPerson As New Person()

Messagebox.Show(myPerson.RetirementAge)
Either way, you are invoking the same shared property.
As with other interface elements, events can also be marked as Shared. For instance, you could declare a shared event in the Person class:
Public Shared Event NewPerson()
Shared events can be raised from both instance methods and shared methods. Regular events cannot be raised by shared methods. Because shared events can be raised by regular methods, you can raise this one from the constructors in the Person class:
Public Sub New()
  Phone("home") = "555-1234"
  Phone("work") = "555-5678"
  mCounter += 1
  RaiseEvent NewPerson()
End Sub

Public Sub New(ByVal name As String, ByVal birthDate As Date)
  mName = Name
  mBirthDate = BirthDate

  Phone("home") = "555-1234"
  Phone("work") = "555-5678"
  mCounter += 1
  RaiseEvent NewPerson()
End Sub
The interesting thing about receiving shared events is that you can get them from either an object, such as a normal event, or from the class itself. For instance, you can use the AddHandler method in the form's code to catch this event directly from the Person class.
First, add a method to the form to handle the event:
Private Sub OnNewPerson()
  Messagebox.Show("new person " & Person.PersonCount)
End Sub
Then, in the form's Load event, add a statement to link the event to this method:
Private Sub Form1_Load(ByVal sender As System.Object, _
    ByVal e As System.EventArgs) Handles MyBase.Load

     AddHandler Person.NewPerson, AddressOf OnNewPerson
mPerson = New Person()
If Microsoft.VisualBasic.Command = "nodisplay" Then
AddHandler mPerson.Walked, AddressOf LogOnWalk
Else
AddHandler mPerson.Walked, AddressOf OnWalk
End If
End SubNotice that you are using the class, rather than any specific object in the AddHandler statement. You could use an object as well, treating this like a normal event, but this illustrates how a class itself can raise an event. When you run the application now, anytime a Person object is created you will see this event raised.
A class can also have a Shared constructor:
Shared Sub New()

End Sub
Normal constructors are called when an instance of the class is created. The Shared constructor is called only once during the lifetime of an application, immediately before any use of the class.
This means that the Shared constructor is called before any other Shared methods, and before any instances of the class are created. The first time any code attempts to interact with any method on the class, or attempts to create an instance of the class, the Shared constructor is invoked.
Because you never directly call the Shared constructor, it cannot accept any parameters. Moreover, because it is a Shared method, it can only interact with Shared variables or other Shared methods in the class.
Typically, a Shared constructor is used to initialize Shared fields within an object. In the Person class, for instance, you can use it to initialize the mCount variable:
Shared Sub New()
  mCount = 0
End Sub
Because this method is called only once during the lifetime of the application, it is safe to do one-time initializations of values in this constructor.
Many basic data types, such as Integer and String, support the use of operators, including +, −, =, <>, and so forth. When you create a class, you are defining a new type, and sometimes it is appropriate for types to also support the use of operators.
In your class, you can write code to define how each of these operators works when applied to objects. What does it mean when two objects are added together? Or multiplied? Or compared? If you can define what these operations mean, you can write code to implement appropriate behaviors. This is called operator overloading, as you are overloading the meaning of specific operators.
Operator overloading is performed by using the Operator keyword, in much the same way that you create a Sub, Function, or Property method.
Most objects at least provide for some type of comparison, and so will often overload the comparison operators (=, <>, and maybe <, >, <=, and >=). You can do this in the Person class, for example, by adding the following code:
Public Shared Operator =(ByVal person1 As Person, _
  ByVal person2 As Person) As Boolean

  Return person1.Name = person2.Name
End Operator

Public Shared Operator <>(ByVal person1 As Person, _
  ByVal person2 As Person) As Boolean

  Return person1.Name <> person2.Name
End Operator
Note that you overload both the = and <> operators. Many operators come in pairs, including the equality operator. If you overload =, then you must overload <> or a compiler error will result. Now that you have overloaded these operators, you can write code in Form1 such as the following:
Dim p1 As New Person("Fred", #1/1/1960#)
Dim p2 As New Person("Mary", #1/1/1980#)
Dim p3 As Person = p1

Debug.WriteLine(CStr(p1 = p2))
Debug.WriteLine(CStr(p1 = p3))
Normally, it would be impossible to compare two objects using a simple comparison operator, but because you overloaded the operator, this becomes valid code. The result will display False and True.
Both the = and <> operators accept two parameters, so these are called binary operators. There are also unary operators that accept a single parameter. For instance, you might define the capability to convert a String value into a Person object by overloading the CType operator:
Public Shared Narrowing Operator CType(ByVal name As String) As Person
  Dim obj As New Person
  obj.Name = name
  Return obj
End Operator
To convert a String value to a Person, you assume that the value should be the Name property. You create a new object, set the Name property, and return the result. Because String is a broader, or less specific, type than Person, this is a Narrowing conversion. Were you to do the reverse, convert a Person to a String, that would be a Widening conversion:
Public Shared Widening Operator CType(ByVal person As Person) As String
  Return person.Name
End Operator
Few non-numeric objects will overload most operators. It is difficult to imagine the result of adding, subtracting, or dividing two Customer objects against each other. Likewise, it is difficult to imagine performing bitwise comparisons between two Invoice objects. The following chart lists the various operators that can be overloaded:
If an operator is meaningful for your data type, then you are strongly encouraged to overload that operator.
Notice that neither the AndAlso nor the OrElse operators can be directly overloaded. This is because these operators use other operators behind the scenes to do their work. To overload AndAlso and OrElse, you need to overload a set of other operators, as shown here:
AndAlso | OrElse |
|---|---|
Overload the | Overload the |
Overload | Overload |
If these operators are overloaded in your class, then you can use AndAlso and OrElse to evaluate statements that involve instances of your class.
Sometimes it would be nice to be able to pass a procedure as a parameter to a method. The classic scenario is when building a generic sort routine, for which you need to provide not only the data to be sorted, but also a comparison routine appropriate for the specific data.
It is easy enough to write a sort routine that sorts Person objects by name, or to write a sort routine that sorts SalesOrder objects by sales date. However, if you want to write a sort routine that can sort any type of object based on arbitrary sort criteria, that gets pretty difficult. At the same time, because some sort routines can get very complex, it would be nice to reuse that code without having to copy and paste it for each different sort scenario.
By using delegates, you can create such a generic routine for sorting; and in so doing, you can see how delegates work and can be used to create many other types of generic routines. The concept of a delegate formalizes the process of declaring a routine to be called and calling that routine.
The underlying mechanism used by the .NET environment for callback methods is the delegate. Visual Basic uses delegates behind the scenes as it implements the
Event, RaiseEvent, WithEvents, andHandleskeywords.
In your code, you can declare what a delegate procedure must look like from an interface standpoint. This is done using the Delegate keyword. To see how this works, let's create a routine to sort any kind of data.
To do this, you will declare a delegate that defines a method signature for a method that compares the value of two objects and returns a Boolean indicating whether the first object has a larger value than the second object. You will then create a sort algorithm that uses this generic comparison method to sort data. Finally, you will create an actual method that implements the comparison, and then you will pass the method's address to the sort routine.
Add a new module to the project by choosing Project
Module Sort

   Public Delegate Function Compare(ByVal v1 As Object, ByVal v2 As Object) _
     As Boolean
End Module
This line of code does something interesting. It actually defines a method signature as a data type. This new data type is named Compare, and it can be used within the code to declare variables or parameters that are accepted by your methods. A variable or parameter declared using this data type could actually hold the address of a method that matches the defined method signature, and you can then invoke that method by using the variable.
Any method with the following signature can be viewed as being of type Compare:
f(Object, Object)
You can write a routine that accepts this data type as a parameter, meaning that anyone calling your routine must pass the address of a method that conforms to this interface. Add the following sort routine to the code module:
Public Sub DoSort(ByVal theData() As Object, ByVal greaterThan As Compare)
  Dim outer As Integer
  Dim inner As Integer
  Dim temp As Object

  For outer = 0 To UBound(theData)
  For inner = outer + 1 To UBound(theData)
     If greaterThan.Invoke(theData(outer), theData(inner)) Then
      temp = theData(outer)
      theData(outer) = theData(inner)
      theData(inner) = temp
    End If
   Next
  Next
End Sub
The GreaterThan parameter is a variable that holds the address of a method matching the method signature defined by the Compare delegate. The address of any method with a matching signature can be passed as a parameter to your Sort routine.
Note the use of the Invoke method, which is how a delegate is called from the code. In addition, note that the routine deals entirely with the generic System.Object data type, rather than with any specific type of data. The specific comparison of one object to another is left to the delegate routine that is passed in as a parameter.
Now create the implementation of the delegate routine and call the sort method. On a very basic level, all you need to do is create a method that has a matching method signature, as shown in the following example:
Public Function PersonCompare(ByVal person1 As Object, _
  ByVal person2 As Object) As Boolean

End Function
The method signature of this method exactly matches what you defined by your delegate earlier:
Compare(Object, Object)
In both cases, you are defining two parameters of type Object.
Of course, there is more to it than simply creating the stub of a method. The method needs to return a value of True if its first parameter is greater than the second parameter. Otherwise, it should be written to deal with some specific type of data.
The Delegate statement defines a data type based on a specific method interface. To call a routine that expects a parameter of this new data type, it must pass the address of a method that conforms to the defined interface.
To conform to the interface, a method must have the same number of parameters with the same data types defined in your Delegate statement. In addition, the method must provide the same return type as defined. The actual name of the method does not matter; it is the number, order, and data type of the parameters and the return value that count.
To find the address of a specific method, you can use the AddressOf operator. This operator returns the address of any procedure or method, enabling you to pass that value as a parameter to any routine that expects a delegate as a parameter.
The Person class already has a shared method named CompareAge that generally does what you want. Unfortunately, it accepts parameters of type Person, rather than of type Object as required by the Compare delegate. You can use method overloading to solve this problem.
Create a second implementation of CompareAge that accepts parameters of type Object as required by the delegate, rather than of type Person as shown in the existing implementation:
Public Shared Function CompareAge(ByVal person1 As Object, _
    ByVal person2 As Object) As Boolean

  Return CType(person1, Person).Age > CType(person2, Person).Age

End Function
This method simply returns True if the first Person object's age is greater than the second. The routine accepts two Object parameters, rather than specific Person type parameters, so you have to use the CType method to access those objects as type Person. You accept the parameters as type Object because that is what is defined by the Delegate statement. You are matching its method signature:
f(Object, Object)
Because this method's parameter data types and return value match the delegate, you can use it when calling the Sort routine. Place a button on the form and write the following code behind that button:
Private Sub Button2_Click(ByVal sender As System.Object, _
    ByVal e As System.EventArgs) Handles button2.Click

  Dim myPeople(4) As Person

  myPeople(0) = New Person("Fred", #7/9/1960#)
  myPeople(1) = New Person("Mary", #1/21/1955#)
  myPeople(2) = New Person("Sarah", #2/1/1960#)
  myPeople(3) = New Person("George", #5/13/1970#)
  myPeople(4) = New Person("Andre", #10/1/1965#)

  DoSort(myPeople, AddressOf Person.CompareAge)
End Sub
This code creates an array of Person objects and populates them. It then calls the DoSort routine from the module, passing the array as the first parameter, and the address of the shared CompareAge method as the second parameter. To display the contents of the sorted array in the IDE's output window, you can add the following code:
Private Sub button2_Click(ByVal sender As System.Object, _
    ByVal e As System.EventArgs) Handles button2.Click

   Dim myPeople(4) As Person

   myPeople(0) = New Person("Fred", #7/9/1960#)
   myPeople(1) = New Person("Mary", #1/21/1955#)
   myPeople(2) = New Person("Sarah", #2/1/1960#)
   myPeople(3) = New Person("George", #5/13/1970#)
   myPeople(4) = New Person("Andre", #10/1/1965#)

   DoSort(myPeople, AddressOf Person.CompareAge)
   Dim myPerson As Person
   For Each myPerson In myPeople
     System.Diagnostics.Debug.WriteLine(myPerson.Name & " " & myPerson.Age)
   Next
End Sub
When you run the application and click the button, the output window displays a list of the people sorted by age, as shown in Figure 2-5.
What makes this so powerful is that you can change the comparison routine without changing the sort mechanism. Simply add another comparison routine to the Person class:
Public Shared Function CompareName(ByVal person1 As Object, _
    ByVal person2 As Object) As Boolean
Return CType(person1, Person).Name > CType(person2, Person).Name End Function

Then, change the code behind the button on the form to use that alternate comparison routine:
Private Sub Button2_Click(ByVal sender As System.Object, _
    ByVal e As System.EventArgs) Handles Button2.Click

   Dim myPeople(4) As Person

   myPeople(0) = New Person("Fred", #7/9/1960#)
   myPeople(1) = New Person("Mary", #1/21/1955#)
   myPeople(2) = New Person("Sarah", #2/1/1960#)
   myPeople(3) = New Person("George", #5/13/1970#)
   myPeople(4) = New Person("Andre", #10/1/1965#)

   DoSort(myPeople, AddressOf Person.CompareName)

   Dim myPerson As Person

   For Each myPerson In myPeople
     System.Diagnostics.Debug.WriteLine(myPerson.Name & " " & myPerson.Age)
   Next
End Sub
When you run this updated code, you will find that the array contains a set of data sorted by name, rather than age, as shown in Figure 2-6.
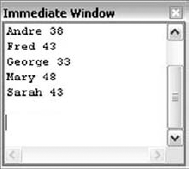
Simply by creating a new compare routine and passing it as a parameter, you can entirely change the way that the data is sorted. Better still, this sort routine can operate on any type of object, as long as you provide an appropriate delegate method that knows how to compare that type of object.
Visual Basic has another concept that is very similar to a class: the component. In fact, you can pretty much use a component and a class interchangeably, though there are some differences.
A component is little more than a regular class, but one that supports a graphical designer within the Visual Studio IDE. This means you can use drag-and-drop to provide the code in the component with access to items from the Server Explorer or the Toolbox.
To add a component to a project, select Project
When you add a class to the project, you are presented with the code window. When you add a component, you are presented with a graphical designer surface, much like what you would see when adding a Web Form to the project.
If you switch to the code view (by right-clicking in the Design view and choosing View Code), you will see the code that is created automatically, just as it is with a Windows Form, Web Form, or regular class:
Public Class Component1

End Class
This is not a lot more code than you see with a regular class, though there are differences behind the scenes. A component uses the same partial class technology as Windows Forms or Web Forms. This means that the code here is only part of the total code in the class. The rest of the code is hidden behind the designer's surface and is automatically created and managed by Visual Studio.
In the designer code is an Inherits statement that makes every component inherit from System.ComponentModel.Component. Chapter 3 discusses the concept of inheritance, but note here that this Inherits line is what brings in all the support for the graphical designer in Visual Studio.
The designer also manages any controls or components that are dropped on it. Those controls or components are automatically made available to your code. For instance, if you drag and drop a Timer control from the Windows Forms tab of the Toolbox onto the component, it will be displayed in the designer.
From here, you can set its properties using the standard Properties window in the IDE, just as you would for a control on a form. Using the Properties window, set the Name property to theTimer. You now automatically have access to a Timer object named theTimer, simply by dragging and dropping and setting some properties.
This means that you can write code within the component, just as you might in a class, to use this object:
Public Sub Start()
  theTimer.Enabled = True
End Sub
Public Sub Stop()
    theTimer.Enabled = False
  End Sub

  Private Sub theTimer_Tick(ByVal sender As System.Object, _
    ByVal e As System.EventArgs) Handles theTimer.Tick

    ' do work
  End Sub
For the most part, you can use a component interchangeably with a basic class, but using a component also provides some of the designer benefits of working with Windows Forms or Web Forms.
Visual Basic offers a fully object-oriented language with all the capabilities you would expect. This chapter described the basic concepts behind classes and objects, as well as the separation of interface from implementation and data. You have learned how to use the Class keyword to create classes, and how those classes can be instantiated into specific objects, each one an instance of the class. These objects have methods and properties that can be invoked by the client code, and can act on data within the object stored in member or instance variables.
You also explored some more advanced concepts, including method overloading, shared or static variables and methods, and the use of delegates. Finally, the chapter provided a brief overview of attributes and how you can use them to affect the interaction of classes or methods with the .NET environment.
The next chapter continues the discussion of object syntax as you explore the concept of inheritance and all the syntax that enables inheritance within Visual Basic. You will also walk through the creation, implementation, and use of multiple interfaces — a powerful concept that enables objects to be used in different ways, depending on the interface chosen by the client application.
Also covered in the next chapter is a discussion of objects and object-oriented programming, applying all of this syntax. It explains the key object-oriented concepts of abstraction, encapsulation, polymorphism, and inheritance, and shows how they work together to provide a powerful way to design and implement applications.
Chapter 4 explores the .NET common language runtime (CLR). Because the .NET platform and runtime are object-oriented at their very core, this chapter examines how objects interact with the runtime environment and covers topics such as using and disposing of objects and memory management.