ASP.NET is an exciting technology. It enables the creation and delivery of remotely generated applications (Web applications) accessible via a simple browser — a container that many are rather familiar with. The purpose of Web-based applications (in our case, ASP.NET applications) is to deliver only a single instance of the application to the end user over HTTP. This means that the end users viewing your application will always have the latest and greatest version at their disposal. Because of this, many companies today are looking at ASP.NET to not only deliver the company's website, but also to deliver some of their latest applications for their employees, partners, and customers.
The last chapter looked at some of the basics of ASP.NET 3.5. This chapter continues that exploration, showing you some additional and exciting technologies that you will find in ASP.NET 3.5, including master pages, configuration, data access, and more.
This chapter touches upon many topics, as ASP.NET has become a rather large offering with many possibilities and capabilities. Sit back, pull up that keyboard, and enjoy!
The previous chapter looked at the structure of ASP.NET pages and their life cycle. You can do quite a bit with the applications and pages in ASP.NET to change how they behave or how you compile and deliver them. This section looks at some of these possibilities.
In Active Server Pages 2.0/3.0 (also called classic ASP), values from forms were usually posted to other pages. These pages were typically steps in a process that the end user worked through. With the introduction of ASP.NET, pages in this environment posted back results to themselves in a step called a postback. One of the most frequent requests of Web developers in the ASP.NET world has been the capability to do postbacks, not only to the page from which the values originated, but also to other pages within the application. You can easily accomplish this cross-page posting functionality in ASP.NET 3.5, which makes it possible to post page values from one page (Page1.aspx) to an entirely different page (Page2.aspx). Normally, when posting to the same page (as with ASP.NET 1.0/1.1), you could capture the postback in a postback event, as shown here:
If Page.IsPostBack Then
   ' do work here
End If
Now look at Page1.aspx and see how you accomplish cross-page posting with ASP.NET 3.5:
<%@ Page Language="VB" %>

<script runat="server">
    Protected Sub Button1_Click(ByVal sender As Object, _
       ByVal e As System.EventArgs)

        Label1.Text = "Your name is: " & TextBox1.Text & "<br>" & _
            "Your appointment is on: " & _
            Calendar1.SelectedDate.ToLongDateString()
    End Sub
</script>

<html xmlns="http://www.w3.org/1999/xhtml" >
<head runat="server">
    <title>Cross-Page Posting</title>
</head>
<body>
    <form id="form1" runat="server">
    <div>
        What is your name?<br />
        <asp:TextBox ID="TextBox1" runat="server"></asp:TextBox>
        <br />
        <br />
        When is your appointment?<br />
        <asp:Calendar ID="Calendar1" runat="server">
        </asp:Calendar><br />
        <asp:Button ID="Button1" OnClick="Button1_Click" runat="server"
         Text="Do a PostBack to this Page" />
        <br />
        <br />
        <asp:Button ID="Button2" runat="server"
         Text="Do a PostBack to Another Page" PostBackUrl="~/Page2.aspx" />
        <br />
        <br />
        <asp:Label ID="Label1" runat="server"></asp:Label>
    </div>
    </form>
</body>
</html>
With Page1.aspx, there is nothing really different about this page — except for the Button2 server control. This page contains a new attribute, which you will find with the Button, ImageButton, and LinkButton controls — the PostBackUrl attribute. The value of this attribute points to the location of the file that this page should post to. In this case, the PostBackUrl attribute states that this page should post to Page2.aspx. This is the only thing needed on the Page1.aspx to cause it to post back to another page. As for Button1, this is a simple button that causes the page to post back to itself, as was the case even in ASP.NET 1.x. The event handler for this postback is in the OnClick attribute within the Button1 control. Pressing this button causes the page to post back to itself and to populate the Label1 control at the bottom of the page.
Clicking on the second button, though, will post to the second page, which is shown here:
<%@ Page Language="VB" %>

<script runat="server">
    Protected Sub Page_Load(ByVal sender As Object, _
     ByVal e As System.EventArgs)

        Dim pp_TextBox1 As TextBox
        Dim pp_Calendar1 As Calendar

        pp_TextBox1 = CType(PreviousPage.FindControl("TextBox1"), TextBox)
        pp_Calendar1 = CType(PreviousPage.FindControl("Calendar1"), Calendar)

        Label1.Text = "Your name is: " & pp_TextBox1.Text & "<br>" & _
            "Your appointment is on: " & _
            pp_Calendar1.SelectedDate.ToLongDateString()
    End Sub
</script>

<html xmlns="http://www.w3.org/1999/xhtml" >
<head runat="server">
    <title>Second Page</title>
</head>
<body>
    <form id="form1" runat="server">
    <div>
        <asp:Label ID="Label1" runat="server"></asp:Label>
    </div>
    </form>
</body>
</html>
In this page, the first step is the creation in the Page_Load event of instances of both the TextBox and Calendar controls. From here, these instances are populated with the values of these controls on the previous page (Page1.aspx) by using the PreviousPage.FindControl method. The String value assigned to the FindControl method is the ID value of the ASP.NET server control from the originating page (in this case, TextBox1 and Calendar1). Once you have assigned the values to these control instances, you can then start working with the new controls and their values as if they were posted from the same page.
You can also expose the server controls and other items as properties from Page1.aspx, as illustrated in this partial code sample:
<%@ Page Language="VB" %>

<script runat="server">
    Public ReadOnly Property pp_TextBox1() As TextBox
        Get
            Return TextBox1
        End Get
    End Property

    Public ReadOnly Property pp_Calendar1() As Calendar
        Get
            Return Calendar1
        End Get
    End Property

    Protected Sub Button1_Click(ByVal sender As Object, _
       ByVal e As System.EventArgs)

        Label1.Text = "Your name is: " & TextBox1.Text & "<br>" & _
            "Your appointment is on: " & Calendar1.SelectedDate.ToLongDateString()
    End Sub
</script>
Once you have exposed the properties you want from Page1.aspx, you can easily get at these properties in the cross-page postback by using the new PreviousPageType page directive, as shown in the following example:
<%@ Page Language="VB" %>
<%@ PreviousPageType VirtualPath="~/Page1.aspx" %>

<script runat="server">
    Protected Sub Page_Load(ByVal sender As Object, _
      ByVal e As System.EventArgs)

        Label1.Text = "Your name is: " & PreviousPage.pp_TextBox1.Text & _
            "<br>" & _
            "Your appointment is on: " & _
            PreviousPage.pp_Calendar1.SelectedDate.ToLongDateString()
    End Sub
</script>
After your properties are on Page1.aspx, you can access them easily by strongly typing the PreviousPage property on Page2.aspx by using the PreviousPageType directive. The PreviousPageType directive specifies the page from which the post will come. Using this directive enables you to specifically point at Page1.aspx. This is done using the VirtualPath attribute of the PreviousPageType directive. The VirtualPath attribute takes a String whose value is the location of the directing page.
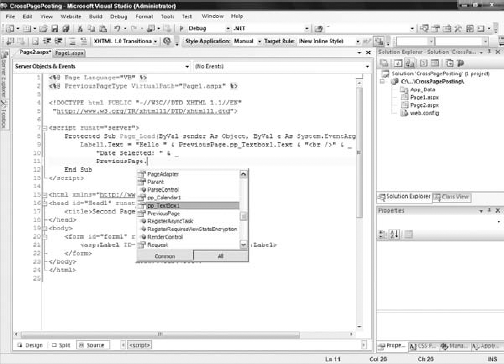
Once this association has been made, you can then use the PreviousPage property. The pp_TextBox1 and pp_Calendar1 properties that were created on Page1.aspx are now present in Visual Studio 2008's IntelliSense (see Figure 20-1). Working with the PreviousPage property is a bit easier and is less error prone than using weak typing.
One thing to guard against is a browser hitting a page that is expecting information from a cross-page post; this action causes errors if the information the second page is expecting is not there. You have always had to guard against pages that were looking for postback information — even when dealing with ASP.NET pages (1.0/1.1) that performed postbacks to themselves. With standard pages that are not cross-page posting, you could protect your code from this postback behavior through the use of the Page.IsPostBack property, as shown here:
If Page.IsPostBack Then
   ' code here
End If
When cross-page posting, use the Page.IsCrossPagePostBack property:
<%@ Page Language="VB" %>
<%@ PreviousPageType VirtualPath="~/Page1.aspx" %>

<script runat="server">
    Protected Sub Page_Load(ByVal sender As Object, _
       ByVal e As System.EventArgs)

       If Not PreviousPage Is Nothing And _
          PreviousPage.IsCrossPagePostBack Then
        Label1.Text = "Your name is: " & PreviousPage.pp_TextBox1.Text & _
            "<br>" & _
            "Your appointment is on: " & _
            PreviousPage.pp_Calendar1.SelectedDate.ToLongDateString()
Else
Response.Redirect("Page1.aspx")
End If
End Sub
</script>In this example, if someone hits this page without going to Page1.aspx first to get cross-posted to Page2.aspx, then the request will be checked to determine whether the request is a cross post. If it is (checked using the Page.IsCrossPagePostBack property), then the code is run; otherwise, the request is redirected to Page1.aspx.
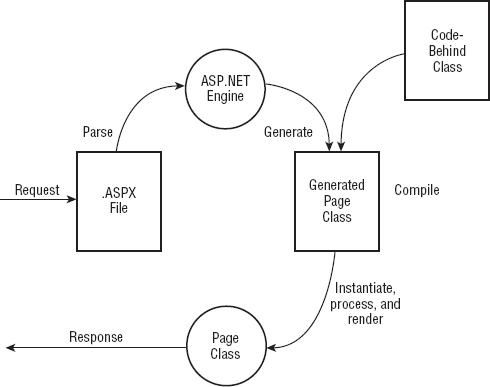
With ASP.NET, you can observe this compilation process and how it works when you hit one of the ASP.NET pages you have built for the first time. You will notice that it takes a few seconds for the page to be generated. When an ASP.NET page is referenced in the browser for the first time, the request is passed to the ASP.NET parser that creates the class file in the language of the page. It is passed to the parser based on the file's extension (.aspx) because ASP.NET realizes that this file extension type is meant for its handling and processing. After the class file has been created, it is compiled into a DLL and then written to the disk of the Web server. At this point, the DLL is instantiated and processed, and output is generated for the initial requester of the ASP.NET page. This process is detailed in Figure 20-2.
On the next request, great things happen. Instead of going through the entire process again for the second and subsequent requests, the request simply causes an instantiation of the already created DLL, which sends out a response to the requester (see Figure 20-3).

Previously, because of the mechanics of this process, if you made changes to your .aspx code-behind pages, then it was necessary to recompile your application. This was quite a pain if you had a larger site and didn't want your end users to experience the extreme lag that occurs when an .aspx page is referenced for the first time after compilation. Many developers, consequently, began to develop their own tools that automatically hit every single page within the application to remove this first-time lag hit from the end user's browsing experience.
ASP.NET 3.5 provides a few ways to precompile your entire application with a single command that you can issue through a command line. One type of compilation is referred to as in-place precompilation. In order to precompile your entire ASP.NET application, you must use the aspnet_compiler.exe tool that comes with ASP.NET. To do so, open the command prompt window and navigate to C:WindowsMicrosoft.NETFrameworkv2.0.50727. From there you can work with the aspnet_compiler tool. You can also access this tool directly by pulling up the Visual Studio 2008 command prompt window. Choose Start
After you get the command prompt, use the aspnet_compiler.exe tool to perform an in-place precompilation using the following command:
aspnet_compiler -p "C:InetpubwwwrootWROX" -v none
In the example just shown, -v is a command for the virtual path of the application, which is provided by using WROX. The next command is -p, which points to the physical path of the application. In this case, it is C:WebsitesWROX. Finally, the last bit, C:Wrox, is the location of the compiler output. The following table describes the possible commands for the aspnet_compiler.exe tool:
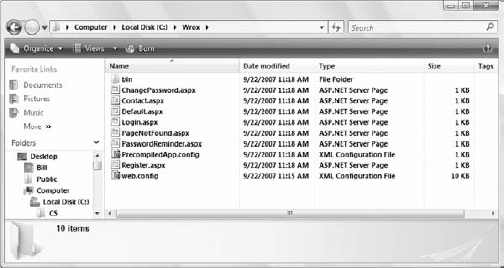
After compiling the application, you can go to C:Wrox to see the output. Here you see all the files and file structures that were in the original application, but if you look at the content of one of the files, the file is simply a placeholder. In the actual file is the following comment:
This is a marker file generated by the precompilation tool
and should not be deleted!
In fact, you find a Code.dll file in the bin folder where all the page code is located. Because it is in a DLL file, it provides great code obfuscation as well. From here on, all you do is move these files to another server using FTP or Windows Explorer, and you can run the entire Web application from these files. When you have an update to the application, you simply provide a new set of compiled files. Sample output is displayed in Figure 20-4.
Note that this compilation process does not compile every type of Web file. In fact, it compiles only the ASP.NET-specific file types, omitting from the compilation process the following types of files:
You cannot do much to get around this, except in the case of the HTML files and the text files. For these file types, just change the file extensions of these file types to .aspx; they are then compiled into the Code.dll like all the other ASP.NET files.
Many Web applications are built so that each page of the application has some similarities. For instance, a common header might be used on every page of your application. Similarly, there may be other common page elements, including navigation sections, advertisements, footers, and more. In fact, individual Web pages rarely have their own unique look and feel. Most people prefer uniformity in their applications in order to give end users a consistent experience in a multi-paged application.
What is needed for these types of applications is a way to provide a template that can be used by your pages — a sort of visual inheritance (such as you can achieve with Windows Forms). With a feature that was first introduced in ASP.NET 2.0 called master pages, you can now employ visual inheritance in your Web applications.
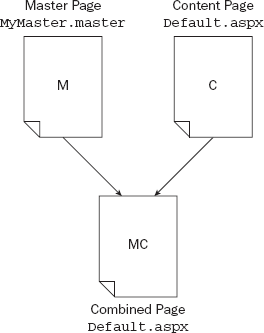
The use of master pages means that you are working with a template file (the master page), which has a .master extension. Once a .master page is created, you can then take a content page, with an .aspx extension, and create an association between the two files. Doing this enables ASP.NET to combine the two files into a single Web page to display in a browser, as illustrated in Figure 20-5.
The following sections describe how you make this work, beginning with the master page.
The first step is to create a template that will end up being your master page. You can build a master page using any text editor (such as Notepad), but it is far easier to use Visual Studio 2008 or Visual Web Developer, as described here.
Start within the Solution Explorer. Right-click on the solution and select Add New Item. In the Add New Item dialog is an option to add a master page to the solution, as shown in Figure 20-6.
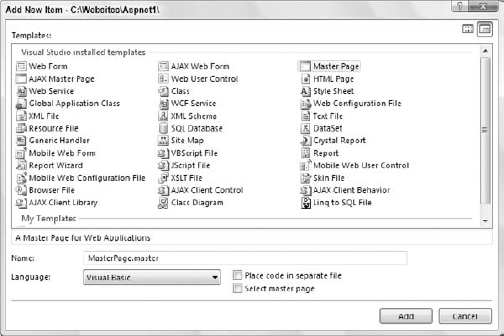
Your master page options are quite similar to those when working with a standard .aspx page. You can create master pages to be inline or you can have master pages that utilize the code-behind model. If you wish to use the code-behind model, then make sure that you have the "Place code in separate file" check box checked in the dialog — otherwise, leave it blank. Creating an inline master page produces a single .master file. Using the code-behind model produces a .master file in addition to a .master.vb or .master.cs file. You also have the option of nesting your master page within another master page by selecting the Select Master Page option.
A master page should be built so that it contains one or more content regions that are utilized by the content pages. The following master page example (named Wrox.master) contains two of these content areas:
<%@ Master Language="VB" %>

<!DOCTYPE html PUBLIC "-//W3C//DTD XHTML 1.1//EN"
 "http://www.w3.org/TR/xhtml11/DTD/xhtml11.dtd">

<script runat="server">
</script>

<html xmlns="http://www.w3.org/1999/xhtml" >
<head runat="server">
    <title>Wrox</title>
    <asp:ContentPlaceHolder id="head" runat="server">
    </asp:ContentPlaceHolder>
</head>
<body>
    <form id="form1" runat="server">
    <div>
        <table cellpadding="3" border="1">
            <tr bgcolor="silver">
                <td colspan="2"><h1>The Wrox Company Homepage</h1></td>
            </tr>
            <tr>
                <td>
                    <asp:ContentPlaceHolder ID="ContentPlaceHolder1"
                     runat="server">
                    </asp:ContentPlaceHolder>
                </td>
                <td>
                    <asp:ContentPlaceHolder ID="ContentPlaceHolder2"
                     runat="server">
                    </asp:ContentPlaceHolder>
                </td>
            </tr>
            <tr>
                <td colspan="2">Copyright 2008 - Wrox</td>
            </tr>
        </table>
    </div>
    </form>
</body>
</html>
The first thing to notice is the <% Master %> directive at the top of the page instead of the standard <% Page %> directive. This specifies that this is a master page and cannot be generated without a content page associated with it. It is not a page that you can pull up in the browser. In this case, the Master directive simply uses the Language attribute and nothing more, but it has a number of other attributes at its disposal to fine-tune the behavior of the page.
The idea is to code the master page as you would any other .aspx page. This master page contains a simple table and two areas that are meant for the content pages. These areas are defined with the use of the ContentPlaceHolder server control. This page contains two such controls. It is only in these two specified areas where content pages will be allowed to interject content into the dynamically created page (as shown shortly).
The nice thing about working with master pages is that you are not limited to working with them in the Code view of the IDE; Visual Studio 2008 also enables you to work with them in Design view as well, as shown in Figure 20-7. In this view, you can work with the master page by simply dragging and dropping controls onto the design surface, just as you would with any typical .aspx page.

Now that there is a master page in your project that you can utilize, the next step is to create a content page that does just that. Right-click on the solution from within the Solution Explorer of Visual Studio 2008 and select Add New Item. This time, though, you are going to add a typical Web Form to the project. However, before you click the Add button, be sure to check the Select Master Page check box in the dialog. This informs VS 2008 that you are going to build a content page that will be associated with a master page. Doing this pulls up a new dialog that enables you to select a master page to associate with this new file, as shown in Figure 20-8.

In this case, if you have been following along with the example, you should only have a single master page available in the dialog, though it is possible to have as many different master pages as you wish in a single project. Select the Wrox.master page and press the OK button.
The page created has only a single line of code to it:
<%@ Page Language="VB" MasterPageFile="~/Wrox.master" Title="Untitled Page" %>
This file is quite a bit different from a typical .aspx page. First, there is none of the default HTML code, script tags, and DOCTYPE declarations that are the norm. Second, note the addition of the MasterPageFile attribute in the Page directive. This new attribute makes the association to the master page that will be used for this content page. In this case, it is the Wrox.master file created earlier.
There isn't much to show while in the Source view of Visual Studio when looking at a content page; the real power of master pages can be seen when you switch to the Design view of the same page (see Figure 20-9).
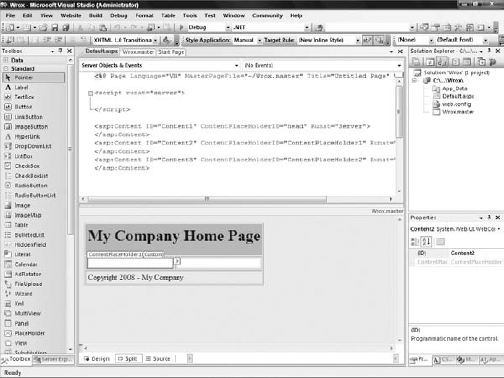
This view shows you the entire template and the two content areas that this content page is allowed to deal with. All the grayed-out areas are off-limits and do not allow for any changes from the content page, whereas the available areas allow you to deal with any type of content you wish. For instance, not only can you place raw text in these content areas, you can also add anything that you would normally place into a typical .aspx page. For example, create a simple form in one of the content areas and place an image in the other. The code is shown here:
<%@ Page Language="VB" MasterPageFile="~/Wrox.master" Title="My Content Page" %>

<script runat="server">
Protected Sub Button1_Click(ByVal sender As Object, _
   ByVal e As System.EventArgs)
    Label1.Text = "Hello " & Textbox1.Text
 End Sub
</script>

<asp:Content ID="Content1" ContentPlaceHolderID="ContentPlaceHolder1"
 runat="server">
   <b>Enter in your name:<br />
   <asp:TextBox ID="TextBox1" runat="server"></asp:TextBox>
   <asp:Button ID="Button1" runat="server" Text="Submit"
    OnClick="Button1_Click" />
   <br />
   <br />
   <asp:Label ID="Label1" runat="server" Font-Bold="True"></asp:Label>
   </b>
</asp:Content>

<asp:Content ID="Content2" ContentPlaceHolderID="ContentPlaceHolder2"
 runat="server">
    <asp:Image ID="Image1" runat="server" ImageUrl="wrox_logo.gif" />
</asp:Content>
Even from this simple example, you can see the differences between a content page and a regular .aspx page. Most important, this page does not contain any <form> element or any of the <html> structure that you would normally see in a typical Web form. All of this content is instead stored inside the master page itself.
This content page contains two Content server controls. Each of these Content server controls maps to a specific <asp:ContentPlaceHolder> control from the master page. This association is made through the use of the ContentPlaceHolderID attribute of the Content control:
<asp:Content ID="Content1" ContentPlaceHolderID="ContentPlaceHolder1"
 runat="Server"> ... </asp:Content>
Just as with typical .aspx pages, you can create any event handlers you may need for your content page. This particular example uses a button-click event for when the end user submits the form. Running this example produces the results shown in Figure 20-10.

As shown in the examples thus far, we have been declaring the master page from the content page through the use of the MasterPageFile attribute of the Page directive:
<%@ Page Language="VB" MasterPageFile="~/Wrox.master" Title="My Content Page" %>
You can apply this attribute to each of your content pages or you can make this declaration in the web.config file of your application, as shown here:
<configuration>
   <system.web>
      <pages masterPageFile="~/Wrox.master"></pages>
   </system.web>
</configuration>
From the <pages> node in the web.config file, you declare that all your content pages will use a specific master page using the masterPageFile attribute. Doing this means that your content pages can simply use the following Page directive construction:
<%@ Page Language="VB" Title="My Content Page" %>
The nice thing about making the master page declaration in the web.config file is you do not have to make this declaration on any of your solution's content pages; if you later decide to change the template and associate all the content pages to a brand-new master page, you can change every content page instantaneously in one spot.
Doing this has no effect on the regular .aspx pages in your solution. They will still function as normal. Moreover, if you have a content page that you wish to associate with a master page other than the one specified in the web.config file, then you simply use the MasterPageFile attribute in the Page directive of the page. This will override any declaration that you may have in the web.config file.
Earlier, you saw how to use a basic ContentPlaceHolder control. In addition to using it as shown, you can also create ContentPlaceHolder controls that contain default content:
<asp:ContentPlaceHolder ID="ContentPlaceHolder1" runat="server">
   Here is some default content!
</asp:ContentPlaceHolder>
For default content, you can again use whatever you want, including any other ASP.NET server controls. A content page that uses a master page containing one of these ContentPlaceHolder controls can then either override the default content — by just specifying content (which overrides the original content declared in the master page) — or keep the default content contained in the control.
ASP.NET 3.5 provides some unique data-access server controls that make it easy for you to get at the data you need. As data for your applications finds itself in more and more types of data stores, it can sometimes be a nightmare to figure out how to get at and aggregate these information sets onto a Web page in a simple and logical manner. ASP.NET data source controls are meant to work with a specific type of data store by connecting to the data store and performing operations such as inserts, updates, and deletes — all on your behalf. The following table details the new data source controls at your disposal:
Data Source Control | Description |
|---|---|
Enables you to work with any SQL-based database, such as Microsoft SQL Server or even Oracle | |
Enables you to work with a Microsoft Access file ( | |
Enables you to work with a business object or a Visual Studio 2008 data component | |
Enables you to use LINQ to query everything from in-memory collections to databases. This is a new control of ASP.NET 3.5. | |
Enables you to work with the information from an XML file or even a dynamic XML source (e.g., an RSS feed) | |
Enables you to work with the hierarchical data represented in the site map file ( |
ASP.NET itself provides a number of server controls that you can use for data-binding purposes. That means you can use these data source controls as the underlying data systems for a series of controls with very little work on your part. These data-bound controls in ASP.NET include the following:
The newest control in this group is the ListView control, introduced in ASP.NET 3.5. Another popular control in this group is the GridView control, which, when introduced in the .NET Framework 2.0, made the DataGrid control more or less obsolete. The GridView control enables paging, sorting, and editing with very little work on your part. The next section looks at using the GridView control with SQL Server and taking advantage of these advanced features.
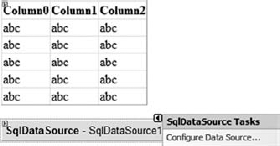
For an example of using these two controls together to display some information, let's turn to Visual Studio 2008. Start a new page and drag and drop a GridView control onto the design surface of the page. Pulling up the smart tag for the control on the design surface, you can click the Auto Format link to give your GridView control a better appearance, rather than the default provided.
Next, drag and drop an SqlDataSource control onto the design surface. This control is a middle-tier component, so it appears as a gray box on the design surface. The first step is to configure the SqlDataSource control to work with the data you want from your Microsoft SQL Server instance (see Figure 20-11).
Working through the configuration process for the SqlDataSource control, you must choose your data connection and then indicate whether you want to store this connection in the web.config file (shown in Figure 20-12), which is highly advisable.
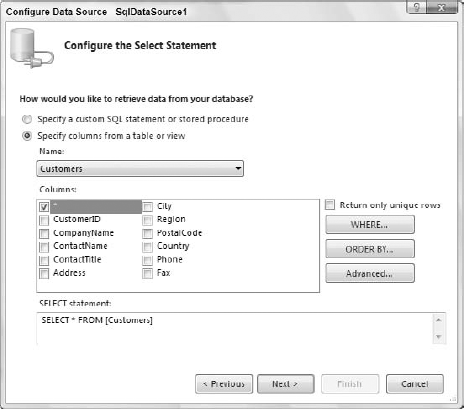
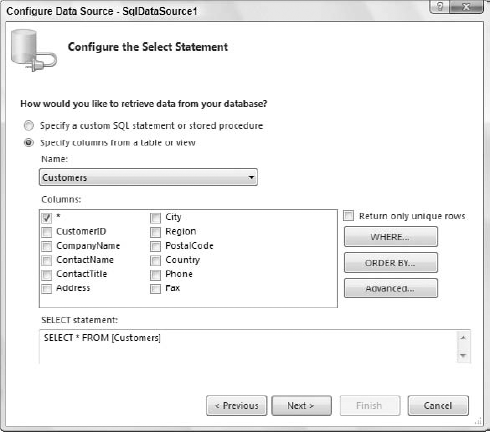
Within this configuration process, you also choose the table you are going to work with, and test out the queries that the wizard generates. For this example, choose the Customers table and select every row by checking the * check box, as shown in Figure 20-13.
After working through the configuration process, you will notice that your web.config file has changed to include the connection string:
<configuration>

   <connectionStrings>
        <add name="NorthwindConnectionString"
         connectionString="Data Source=.SQLEXPRESS;
            AttachDbFilename=|DataDirectory|NORTHWND.MDF;
            Integrated Security=True;User Instance=True"
         providerName="System.Data.SqlClient" />
   </connectionStrings>

   <system.web>
      ...
   </system.web>
</configuration>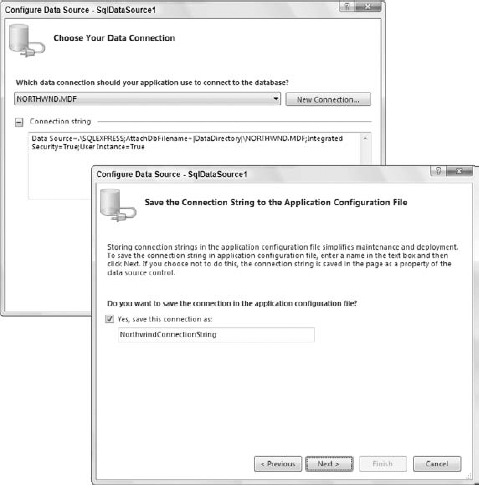

Once you have configured the SqlDataSource control, the next step is to tie the GridView control to this SqlDataSource control instance. This can be done through the GridView control's smart tag, as shown in Figure 20-14. You can also enable paging and sorting for the control in the same form.
The code generated by the wizard (it is also how you would code it yourself) is shown here:
<%@ Page Language="VB" %>

<script runat="server">

</script>

<html xmlns="http://www.w3.org/1999/xhtml" >
<head runat="server">
    <title>GridView Example</title>
</head>
<body>
    <form id="form1" runat="server">
    <div>
        <asp:GridView ID="GridView1" runat="server" BorderWidth="1px"
         BackColor="White" GridLines="Vertical"
         CellPadding="3" BorderStyle="Solid" BorderColor="#999999"
         ForeColor="Black" DataSourceID="SqlDataSource1"
         DataKeyNames="CustomerID" AutoGenerateColumns="False"
         AllowPaging="True"
         AllowSorting="True">
            <FooterStyle BackColor="#CCCCCC"></FooterStyle>
            <PagerStyle ForeColor="Black" HorizontalAlign="Center"
             BackColor="#999999"></PagerStyle>
            <HeaderStyle ForeColor="White" Font-Bold="True"
             BackColor="Black"></HeaderStyle>
            <AlternatingRowStyle BackColor="#CCCCCC"></AlternatingRowStyle>
            <Columns>
                <asp:BoundField ReadOnly="True" HeaderText="CustomerID"
                 DataField="CustomerID"
                 SortExpression="CustomerID"></asp:BoundField>
                <asp:BoundField HeaderText="CompanyName"
                 DataField="CompanyName"
                 SortExpression="CompanyName"></asp:BoundField>
                <asp:BoundField HeaderText="ContactName"
DataField="ContactName"
SortExpression="ContactName"></asp:BoundField>
<asp:BoundField HeaderText="ContactTitle"
DataField="ContactTitle"
SortExpression="ContactTitle"></asp:BoundField>
<asp:BoundField HeaderText="Address" DataField="Address"
SortExpression="Address"></asp:BoundField>
<asp:BoundField HeaderText="City" DataField="City"
SortExpression="City"></asp:BoundField>
<asp:BoundField HeaderText="Region" DataField="Region"
SortExpression="Region"></asp:BoundField>
<asp:BoundField HeaderText="PostalCode" DataField="PostalCode"
SortExpression="PostalCode"></asp:BoundField>
<asp:BoundField HeaderText="Country" DataField="Country"
SortExpression="Country"></asp:BoundField>
<asp:BoundField HeaderText="Phone" DataField="Phone"
SortExpression="Phone"></asp:BoundField>
<asp:BoundField HeaderText="Fax" DataField="Fax"
SortExpression="Fax"></asp:BoundField>
</Columns>
<SelectedRowStyle ForeColor="White" Font-Bold="True"
BackColor="#000099"></SelectedRowStyle>
</asp:GridView>
<asp:SqlDataSource ID="SqlDataSource1" runat="server"
SelectCommand="SELECT * FROM [Customers]"
ConnectionString="<%$ ConnectionStrings:NorthwindConnectionString %>">
</asp:SqlDataSource>
</div>
</form>
</body>
</html>First, consider the SqlDataSource control, which has some important attributes to pay attention to. The first is the SelectCommand attribute. This is the SQL query that you will be using. In this case, it is a Select * From [Customers] query (meaning you are grabbing everything from the Customers table of the Northwind database). The second attribute to pay attention to is the ConnectionString attribute. The interesting aspect of this attribute is the use of <%$ ConnectionStrings:NorthwindConnectionString %> to get at the connection string. This value points at the settings placed inside the web.config file for those who do not want to hard-code their connection strings directly in the code of their pages. If you did want to do this, you would use something similar to the following construction:
ConnectionString="Data Source=.SQLEXPRESS;
   AttachDbFilename=|DataDirectory|NORTHWND.MDF;
   Integrated Security=True;User Instance=True"
Looking now at the GridView control, you can see how easy it is to add paging and sorting capabilities to the control. It is simply a matter of adding the attributes AllowPaging and AllowSorting to the control and setting their values to True (they are set to False by default):
<asp:GridView ID="GridView1" runat="server" BorderWidth="1px"
 BackColor="White" GridLines="Vertical"
 CellPadding="3" BorderStyle="Solid" BorderColor="#999999"
ForeColor="Black" DataSourceID="SqlDataSource1" DataKeyNames="CustomerID" AutoGenerateColumns="False"AllowPaging="True"AllowSorting="True"><!-- Inner content removed for clarity --> </asp:GridView>
Each of the columns from the Customers table of the Northwind database is defined in the control through the use of the <asp:BoundField> control, a subcontrol of the GridView control. The BoundField control enables you to specify the header text of the column through the use of the HeaderText attribute. The DataField attribute actually ties the values displayed in this column to a particular value from the Customers table, and the SortExpression attribute should use the same values for sorting — unless you are sorting on a different value than what is being displayed.
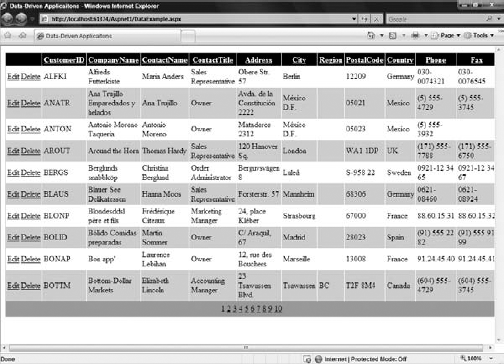
Ultimately, your page should look similar to what is shown in Figure 20-15.

Now let's expand upon the previous example by allowing for the editing and deleting of records that are displayed in the GridView. If you are using the Visual Studio 2008 SqlDataSource Configuration Wizard to accomplish these tasks, then you need to take some extra steps beyond what was shown in the preceding GridView example.
Go back to the SqlDataSource control on the design surface of your Web page and pull up the control's smart tag. Select the Configure Data Source option to reconfigure the SqlDataSource control to enable the editing and deletion of data from the Customers table of the Northwind database.
When you come to the Configure the Select Statement screen (see Figure 20-16), click the Advanced button.
This will pull up the Advanced SQL Generation Options dialog, shown in Figure 20-17.

As shown in this dialog, select the Generate Insert, Update, and Delete statements check box. This will instruct the SqlDataSource control to not only handle the simple Select query, but also the Update and Delete queries. Press OK and then work through the rest of the wizard.
Return to the GridView control's smart tag and select Refresh Schema. You will also now find check boxes in the smart tag for editing and deleting rows of data. Make sure both of these check boxes are checked, as shown in Figure 20-18.

Now look at what changed in the code. First, the SqlDataSource control has changed to allow for the updating and deletion of data:
<asp:SqlDataSource ID="SqlDataSource1" runat="server"
 SelectCommand="SELECT * FROM [Customers]"
 ConnectionString="<%$ ConnectionStrings:AppConnectionString1 %>"
 DeleteCommand="DELETE FROM [Customers] WHERE [CustomerID] =
    @original_CustomerID"
 InsertCommand="INSERT INTO [Customers] ([CustomerID], [CompanyName],
    [ContactName], [ContactTitle], [Address], [City], [Region], [PostalCode],
    [Country], [Phone], [Fax]) VALUES (@CustomerID, @CompanyName,
    @ContactName, @ContactTitle, @Address, @City,
    @Region, @PostalCode, @Country, @Phone, @Fax)"
 UpdateCommand="UPDATE [Customers] SET [CompanyName] = @CompanyName,
    [ContactName] = @ContactName,
    [ContactTitle] = @ContactTitle, [Address] = @Address, [City] =
    @City, [Region] = @Region, [PostalCode] = @PostalCode,
    [Country] = @Country, [Phone] = @Phone,
    [Fax] = @Fax WHERE [CustomerID] = @original_CustomerID">
            <DeleteParameters>
                <asp:Parameter Type="String" Name="CustomerID">
                </asp:Parameter>
            </DeleteParameters>
            <UpdateParameters>
                <asp:Parameter Type="String" Name="CompanyName">
                </asp:Parameter>
                <asp:Parameter Type="String" Name="ContactName">
                </asp:Parameter>
                <asp:Parameter Type="String" Name="ContactTitle">
                </asp:Parameter>
                <asp:Parameter Type="String" Name="Address"></asp:Parameter>
                <asp:Parameter Type="String" Name="City"></asp:Parameter>
                <asp:Parameter Type="String" Name="Region"></asp:Parameter>
                <asp:Parameter Type="String" Name="PostalCode">
                </asp:Parameter>
                <asp:Parameter Type="String" Name="Country"></asp:Parameter>
                <asp:Parameter Type="String" Name="Phone"></asp:Parameter>
                <asp:Parameter Type="String" Name="Fax"></asp:Parameter>
                <asp:Parameter Type="String" Name="CustomerID">
</asp:Parameter>
</UpdateParameters>
<InsertParameters>
<asp:Parameter Type="String" Name="CustomerID">
</asp:Parameter>
<asp:Parameter Type="String" Name="CompanyName">
</asp:Parameter>
<asp:Parameter Type="String" Name="ContactName">
</asp:Parameter>
<asp:Parameter Type="String" Name="ContactTitle">
</asp:Parameter>
<asp:Parameter Type="String" Name="Address"></asp:Parameter>
<asp:Parameter Type="String" Name="City"></asp:Parameter>
<asp:Parameter Type="String" Name="Region"></asp:Parameter>
<asp:Parameter Type="String" Name="PostalCode">
</asp:Parameter>
<asp:Parameter Type="String" Name="Country"></asp:Parameter>
<asp:Parameter Type="String" Name="Phone"></asp:Parameter>
<asp:Parameter Type="String" Name="Fax"></asp:Parameter>
</InsertParameters>
</asp:SqlDataSource>Second, other queries have been added to the control. Using the DeleteCommand, InsertCommand, and UpdateCommand attributes of the SqlDataSource control, these functions can now be performed just as Select queries were enabled through the use of the SelectCommand attribute. As you can see in the queries, many parameters are defined within them. These parameters are then assigned through the <DeleteParameters>, <UpdateParameters>, and <InsertParameters> elements. Within each of these subsections, the actual parameters are defined through the use of the <asp:Parameter> control, where you also assign the data type of the parameter (through the use of the Type attribute) and the name of the parameter.
Besides these changes to the SqlDataSource control, only one small change has been made to the GridView control:
<Columns>
   <asp:CommandField ShowDeleteButton="True"
    ShowEditButton="True"></asp:CommandField>
    <asp:BoundField ReadOnly="True" HeaderText="CustomerID"
    DataField="CustomerID"
    SortExpression="CustomerID"></asp:BoundField>
   <asp:BoundField HeaderText="CompanyName" DataField="CompanyName"
    SortExpression="CompanyName"></asp:BoundField>
   <asp:BoundField HeaderText="ContactName" DataField="ContactName"
    SortExpression="ContactName"></asp:BoundField>
   <asp:BoundField HeaderText="ContactTitle" DataField="ContactTitle"
    SortExpression="ContactTitle"></asp:BoundField>
   <asp:BoundField HeaderText="Address" DataField="Address"
    SortExpression="Address"></asp:BoundField>
   <asp:BoundField HeaderText="City" DataField="City"
    SortExpression="City"></asp:BoundField>
<asp:BoundField HeaderText="Region" DataField="Region"
SortExpression="Region"></asp:BoundField>
<asp:BoundField HeaderText="PostalCode" DataField="PostalCode"
SortExpression="PostalCode"></asp:BoundField>
<asp:BoundField HeaderText="Country" DataField="Country"
SortExpression="Country"></asp:BoundField>
<asp:BoundField HeaderText="Phone" DataField="Phone"
SortExpression="Phone"></asp:BoundField>
<asp:BoundField HeaderText="Fax" DataField="Fax"
SortExpression="Fax"></asp:BoundField>
</Columns>The only change needed for the GridView control is the addition of a new column from which editing and deleting commands can be initiated. This is done with the <asp:CommandField> control. From this control, you can see that we also enabled the Edit and Delete buttons through a Boolean value. Once built and run, your new page will look like the one shown in Figure 20-19.
Due to limited space, this chapter can only present one example, but many other DataSource controls are at your disposal. The ObjectDataSource control is rather powerful for those who wish to enforce a strict n-tier model and separate the data retrieval logic into an object that the GridView and other data-bound controls can work with. The XmlDataSource control is one control that you will most likely find yourself using a lot, as more and more data is being stored as XML, including dynamic data (such as Web logs via RSS). These DataSource controls are fine-tuned for the type of data stores for which they are targeted, so you will find a lot of benefit in exploring their capabilities in detail.
Developers rarely build Web applications that are made up of just a single page instance. Instead, applications are usually made up of multiple pages that are all related to each other in some fashion. Some applications have a workflow through which end users can work from page to page, while other applications have a navigation structure that allows for free roaming throughout the pages. Sometimes the navigation structure of a site becomes complex, and managing this complexity can be rather cumbersome.
ASP.NET includes a way to manage the navigational structure of your Web applications. Using this system, you first define your navigational structure through an XML file that can then be bound to a couple of different server controls focused on navigation.
This makes it relatively easy when you have to introduce changes to the structure of your navigation or make name changes to pages contained within this structure. Instead of going from page to page throughout your entire application, changing titles or page destinations, you can now make these changes in one place — an XML file — and the changes are instantaneously reflected throughout your application.
The first step in working with the ASP.NET navigation system is to reflect your navigational structure in the web.sitemap file, the XML file that will contain the complete site structure. For instance, suppose you want the following site structure:
Home
      Books
      Magazines
            U.S. Magazines
            European Magazines
This site structure has three levels to it, with multiple items in the lowest level. You can reflect this in the web.sitemap file as follows:
<?xml version="1.0" encoding="utf-8" ?>
<siteMap xmlns="http://schemas.microsoft.com/AspNet/SiteMap-File-1.0" >
   <siteMapNode url="default.aspx" title="Home"
    description="The site homepage">
      <siteMapNode url="books.aspx" title="Books"
       description="Books from our catalog" />
      <siteMapNode url="magazines.aspx" title="Magazines"
       description="Magazines from our catalog">
         <siteMapNode url="magazines_us.aspx" title="U.S. Magazines"
          description="Magazines from the U.S." />
         <siteMapNode url="magazines_eur.aspx" title="European Magazines"
          description="Magazines from Europe" />
      </siteMapNode>
   </siteMapNode>
</siteMap>
To create a web.sitemap file in Visual Studio 2008, go to the Add New Items dialog and select the Site Map option. You can place the preceding content in this file. To move a level down in the hierarchy, nest <siteMapNode> elements within other < siteMapNode > elements. A <siteMapNode> element can contain several different attributes, as defined in the following table:
The | |
| The |
| The |
If ASP.NET security trimming is enabled, you can use the |
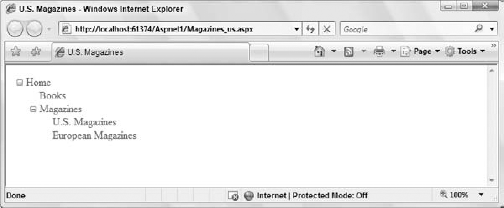
One of the available server controls that works with a web.sitemap file is the SiteMapPath control. This control provides a popular structure found on many Internet websites. Sometimes called breadcrumb navigation, this feature is simple to implement in ASP.NET.
To see an example of this control at work, we'll create a page that would be at the bottom of the site map structure. Within the project that contains your web.sitemap file, create an ASP.NET page named magazines_us.aspx. On this page, simply drag and drop a SiteMapPath control onto the page. You will find this control under the Navigation section in the Visual Studio Toolbox. This control's code looks as follows:
<asp:SiteMapPath ID="SiteMapPath1" runat="server"></asp:SiteMapPath>
What else do you need to do to get this control to work? Nothing. Simply build and run the page to see the results shown in Figure 20-20.
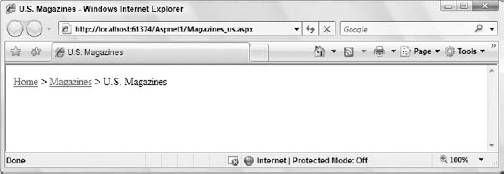
The SiteMapPath control defines the end user's place in the application's site structure. It shows the current page the user is on (U.S. Magazines), as well as the two pages above it in the hierarchy.
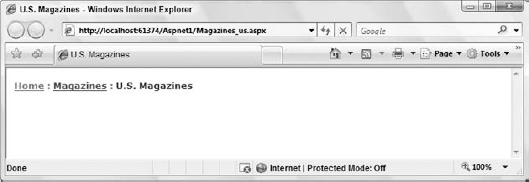
The SiteMapPath control requires no DataSource control, as it automatically binds itself to any .sitemap file it finds in the project, and nothing is required on your part to make this happen. The SiteMapPath's smart tag enables you to customize the control's appearance too, so you can produce other results, as shown in Figure 20-21.
The code for this version of the SiteMapPath control is as follows:
<asp:SiteMapPath ID="SiteMapPath1" runat="server" PathSeparator=" : "
 Font-Names="Verdana" Font-Size="0.8em">
   <PathSeparatorStyle Font-Bold="True"
    ForeColor="#507CD1"></PathSeparatorStyle>
   <CurrentNodeStyle ForeColor="#333333"></CurrentNodeStyle>
   <NodeStyle Font-Bold="True" ForeColor="#284E98"></NodeStyle>
   <RootNodeStyle Font-Bold="True" ForeColor="#507CD1"></RootNodeStyle>
</asp:SiteMapPath>
This example illustrates that a lot of style elements and attributes can be used with the SiteMapPath control. Many options at your disposal enable you to create breadcrumb navigation that is unique.
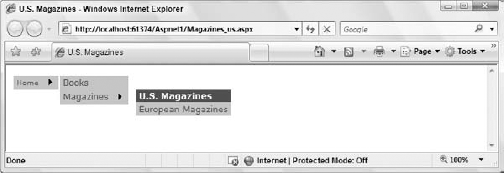
Another navigation control enables end users of your application to navigate throughout the pages based upon information stored within the web.sitemap file. The Menu server control produces a compact navigation system that pops up sub-options when the user hovers the mouse over an option. The result of the Menu server control when bound to the site map is shown in Figure 20-22.
To build this, you must be working off of the web.sitemap file created earlier. After the web.sitemap file is in place, place a Menu server control on the page, along with a SiteMapDataSource control:
<asp:Menu ID="Menu1" runat="server" DataSourceID="SiteMapDataSource1">
</asp:Menu>
<asp:SiteMapDataSource ID="SiteMapDataSource1" runat="server" />
The SiteMapDataSource control automatically works with the application's web.sitemap file. In addition to the SiteMapDataSource control, the other item included is the Menu server control, which uses the typical ID and runat attributes, in addition to the DataSourceID attribute, to connect this control with what is retrieved from the SiteMapDataSource control.
Like the other controls provided by ASP.NET, you can easily modify the appearance of this control. By clicking the Auto Format link in the control's smart tag, you can give the control the "classic" look and feel. This setting produces the result shown in Figure 20-23.
As with the other controls, a lot of sub-elements contribute to the changed look of the control's style:
<asp:Menu ID="Menu1" runat="server" DataSourceID="SiteMapDataSource1"
Font-Names="Verdana" Font-Size="0.8em" BackColor="#B5C7DE"
ForeColor="#284E98"
StaticSubMenuIndent="10px" DynamicHorizontalOffset="2">
<StaticSelectedStyle BackColor="#507CD1"></StaticSelectedStyle>
<StaticMenuItemStyle HorizontalPadding="5"
VerticalPadding="2"></StaticMenuItemStyle>
<DynamicMenuStyle BackColor="#B5C7DE"></DynamicMenuStyle>
<DynamicSelectedStyle BackColor="#507CD1"></DynamicSelectedStyle>
<DynamicMenuItemStyle HorizontalPadding="5"
VerticalPadding="2"></DynamicMenuItemStyle>
<DynamicHoverStyle ForeColor="White" Font-Bold="True"
BackColor="#284E98"></DynamicHoverStyle>
<StaticHoverStyle ForeColor="White" Font-Bold="True"
BackColor="#284E98"></StaticHoverStyle>
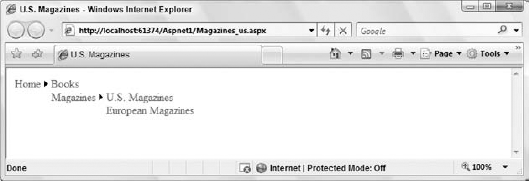
</asp:Menu>The last navigation server control to look at is the TreeView control. This control enables you to render a hierarchy of data. The TreeView control is not only meant for displaying what is contained within the .sitemap file; you can also use this control to represent other forms of hierarchical data, such as data that you might store in a standard XML file.
You may have encountered a similar TreeView control in .NET when using the IE Web controls, which also contained a TreeView control. That previous TreeView control was limited to working only in Microsoft's Internet Explorer, whereas the new TreeView control works in a wide variety of browsers.
The TreeView control is similar to the Menu control in that it will not bind automatically to the web.sitemap file, but instead requires an underlying DataSource control. The code for displaying the contents of the .sitemap file is shown in the following example:
<asp:TreeView ID="TreeView1" runat="server" DataSourceID="SiteMapDataSource1">
</asp:TreeView>
<asp:SiteMapDataSource ID="SiteMapDataSource1" runat="server" />
As with the Menu control example, a SiteMapDataSource is needed. After a basic SiteMapDataSource control is in place, position a TreeView control on the page and set the DataSourceId property to SiteMapDataSource1. This simple construction produces the result shown in Figure 20-24.
Remember that by using the Auto Format link from the control's smart tag, you can format the TreeView control in a wide variety of ways.
The TreeView is not meant only for site maps; as mentioned, it can build upon any underlying hierarchical data set. For instance, you can display a hierarchical data structure from a standard XML file just as easily. Suppose you have the following XML file:
<?xml version="1.0" encoding="utf-8" ?>
<Hardware>
   <Item Category="Motherboards">
      <Option Choice="Asus" />
      <Option Choice="Abit" />
   </Item>
   <Item Category="Memory">
      <Option Choice="128mb" />
      <Option Choice="256mb" />
      <Option Choice="512mb" />
   </Item>
<Item Category="Hard Drives">
<Option Choice="40GB" />
<Option Choice="80GB" />
<Option Choice="100GB" />
</Item>
<Item Category="Drives">
<Option Choice="CD" />
<Option Choice="DVD" />
<Option Choice="DVD Burner" />
</Item>
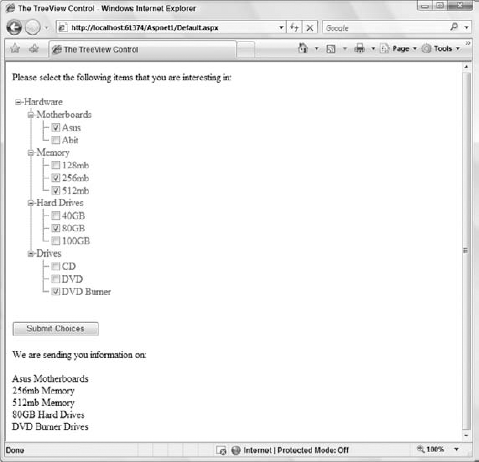
</Hardware>It's obvious that this XML file is not meant for site navigation, but for options from which end users can make selections. As stated, the TreeView control is quite extensible. For example, the following code creates a page that uses the preceding XML file:
<%@ Page Language="VB" %>
<script runat="server">
Protected Sub Button1_Click(ByVal sender As Object, _
ByVal e As System.EventArgs)
If TreeView1.CheckedNodes.Count > 0 Then
Label1.Text = "We are sending you information on:<p>"
For Each node As TreeNode In TreeView1.CheckedNodes
Label1.Text += node.Text & " " & node.Parent.Text & "<br>"
Next
Else
label1.Text = "You didn't select anything. Sorry!"
End If
End Sub
</script>
<html xmlns="http://www.w3.org/1999/xhtml" >
<head runat="server">
<title>The TreeView Control</title>
</head>
<body>
<form id="form1" runat="server">
<div>
Please select the following items that you are interesting in:
<br />
<br />
<asp:TreeView ID="TreeView1" runat="server"
DataSourceID="XmlDataSource1" ShowLines="True">
<DataBindings>
<asp:TreeNodeBinding TextField="Category"
DataMember="Item"></asp:TreeNodeBinding>
<asp:TreeNodeBinding ShowCheckBox="True" TextField="Choice"
DataMember="Option"></asp:TreeNodeBinding>
</DataBindings>
</asp:TreeView> <br />
<br /><asp:Button ID="Button1" runat="server"
Text="Submit Choices" OnClick="Button1_Click" />
<br />
<br />
<asp:Label ID="Label1" runat="server"></asp:Label>
<asp:XmlDataSource ID="XmlDataSource1" runat="server"
DataFile="~/Hardware.xml">
</asp:XmlDataSource>
</div>
</form>
</body>
</html>This example uses an XmlDataSource control instead of the SiteMapDataSource control. The XmlDataSource control associates itself with the XML file shown earlier (Hardware.xml) through the use of the DataFile attribute.
The TreeView control then binds itself to the XmlDataSource control through the use of the DataSourceID attribute, which here is pointed to XmlDataSource1. Another interesting addition in the root TreeView node is the ShowLines attribute, set to True. This feature of the TreeView causes every node in the hierarchy to show its connection to its parent node through a visual line.
When working with XML files, which can basically be of any construction, you must bind the nodes of the TreeView control to specific values that come from the XML file. This is done through the use of the <DataBindings> element. This element encapsulates one or more TreeNodeBinding objects. Two of the more important available properties of a TreeNodeBinding object are DataMember and TextField. The DataMember property points to the name of the XML element that the TreeView control should look for. The TextField property specifies the XML attribute of that particular XML element. If you do this correctly with the use of the <DataBindings> construct, you get the result shown in Figure 20-25.
In the button click event from our example, you can see how easy it is to iterate through each of the checked nodes from the TreeView selection by creating instances of TreeNode objects. These selections are made from one of the TreeNodeBinding objects, which sets the ShowCheckBox property to True.
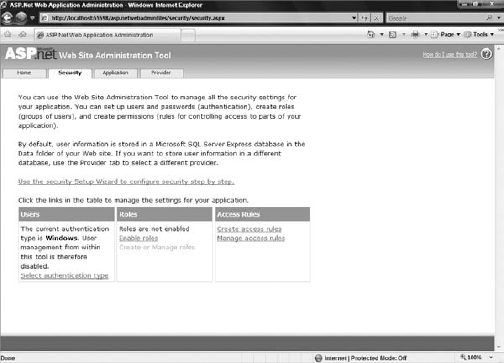
ASP.NET contains a built-in membership and role management system that can be initiated either through code or through the ASP.NET Web Site Administration Tool. This is an ideal system for authenticating users to access a page or even your entire site. This management system not only provides a new API suite for managing users, but also provides you with some server controls that interact with this API.
As the first step in setting up your site's security and the user roles, open the ASP.NET Web Site Administration Tool. You can launch this tool through a button in the Visual Studio 2008 Solution Explorer or by clicking Website
Click the link to start the Security Setup Wizard, shown in Figure 20-27.
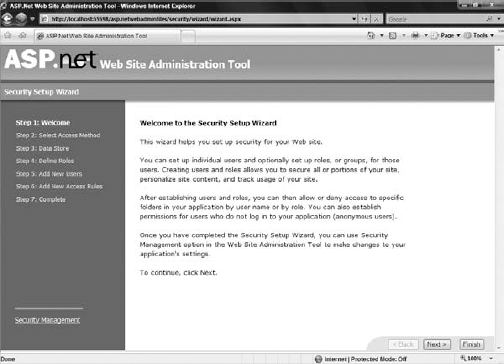
The wizard first asks whether your application will be available on the public Internet or hosted on an intranet. If you select Internet, then your website will be enabled with Forms Authentication. If you select Intranet, then your site will be configured to work with Windows Integrated Authentication. For our example, select the Internet option.
Working through the wizard, you are also asked whether you are going to work with role management. Enable role management by checking the appropriate check box and add a role titled Manager. After this step, you can begin to enter users into the system. Fill out information for each user you want in the system, as shown in Figure 20-28.
The next step is to create the access rules for your site. You can pick specific folders and apply the rules for the folder. In this example, anyone in the Manager role would have access to the site, while anonymous users would be denied access (see Figure 20-29).
Click the Finish button to exit the wizard. If you refresh the Solution Explorer in Visual Studio, a new data store (an SQL Server Express Edition .mdf file) appears in the App_Data folder. This is where all of the user and role information is stored. Note that you can configure both of the systems (the membership and role management systems) to work with other data stores besides these SQL Express data files. For example, you can configure these systems to work with a full-blown version of Microsoft's SQL Server. Notice in the Solution Explorer that if you didn't already have a web.config file, you have one now. The contents added to the web.config file includes the following:
<?xml version="1.0" encoding="utf-8"?>
<configuration>
    <system.web>
        <authorization>
            <allow roles="Manager" />
            <deny users="?" />
        </authorization>
<roleManager enabled="true" />
<authentication mode="Forms" />
</system.web>
</configuration>

This shows all the settings that were enabled. The <authorization> section allows for users who are in the role of Manager, and denies all anonymous users (defined with a question mark). The <roleManager> element turns on the role management system, while the <authentication> element turns on forms authentication. Now, let's utilize these configurations.
Create a login page, as everyone will access any page in this application as an anonymous user first. The login page enables people to enter their credentials in order to be authorized in the Manager role created earlier.
ASP.NET includes a slew of controls that make working with the membership and role management systems easier. On the login page (Login.aspx), place a simple Login server control:
<asp:Login ID="Login1" runat="server"></asp:Login>
The nice thing here is that you have to do absolutely nothing to tie this Login control to the .mdf database created earlier through the wizard. Now access another page in the application (other than the Login.aspx page) and start up that page. This example starts up Default.aspx (which only contains a simple text statement), but looking at Figure 20-30 you can see from the URL specified in the browser that I was redirected to Login.aspx because I wasn't yet authenticated.
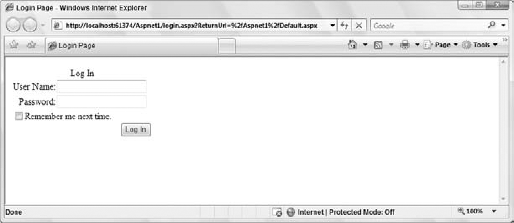
The Login.aspx page enables me to enter my credentials, which then authorize me in the Manager role. Pressing the Login button causes the browser to redirect me to the appropriate page. I am now authenticated and authorized for the site!
Many Web applications have features that allow for personalization of some kind. This might be as simple as greeting a user by name, or it might deal with more advanced issues such as content placement. Whatever the case, personalization techniques have always been tricky. Developers have used anything from cookies, sessions, or database entries to control the personalization that users can perform on their pages.
ASP.NET includes an easy to use and configure personalization system. It is as simple as making entries in the web.config file to get the personalization system started. Like the membership and role management systems, the personalization system also uses an underlying data store. The next example continues to work with the SQL Server Express Edition .mdb file.
This example creates two properties, FirstName and LastName, both of type String. First, alter the web.config file as shown here:
<?xml version="1.0"?>
<configuration>
   <system.web>
      <profile>
         <properties>
            <add name="FirstName" type="System.String" />
            <add name="LastName" type="System.String" />
         </properties>
      </profile>
   </system.web>
</configuration>
Now that the profile properties we are going to store for each user are configured in the web.config file, the next step is to build a simple ASP.NET page that utilizes these property settings. Create a simple page that contains two TextBox controls that ask end users for their first and last name. We will then input the values collected into the personalization engine via a button Click event. The code for this page is as follows:
<%@ Page Language="VB" %>

<script runat="server">
    Protected Sub Button1_Click(ByVal sender As Object, _
       ByVal e As System.EventArgs)

        Profile.FirstName = TextBox1.Text
        Profile.LastName = TextBox1.Text


        Label1.Text = "First name: " & Profile.FirstName & _
            "<br>Last name: " & Profile.LastName
    End Sub
</script>

<html xmlns="http://www.w3.org/1999/xhtml" >
<head runat="server">
    <title>Welcome Page</title>
</head>
<body>
    <form id="form1" runat="server">
    <div>
        First name:<br />
        <asp:TextBox ID="TextBox1" runat="server"></asp:TextBox>
        <br />
        Last name:<br />
        <asp:TextBox ID="TextBox2" runat="server"></asp:TextBox>
        <br />
        <asp:Button ID="Button1" runat="server" Text="Submit Information"
         OnClick="Button1_Click" />
        <br />
        <br />
        <asp:Label ID="Label1" runat="server"></asp:Label>
    </div>
    </form>
</body>
</html>
When this page is posted back to itself, the values placed into the two text boxes are placed into the personalization engine and associated with this particular user through the use of the Profile object. When working with the Profile object in Visual Studio, note that the custom properties you created are provided to you through IntelliSense. Once stored in the personalization engine, they are then available to you on any page within the application through the use of the same Profile object.
If you are using IIS as the basis of your ASP.NET applications, you will find that it is quite easy to configure the ASP.NET application directly through the Internet Information Services (IIS) Manager if you are using Windows Vista. To access the ASP.NET configurations, open IIS and expand the Web Sites folder, which contains all the sites configured to work with IIS. Remember that not all your websites are configured to work in this manner because it is also possible to create ASP.NET applications that make use of the new ASP.NET built-in Web server.
Once you have expanded the IIS Web Sites folder, right-click one of the applications in this folder. You will notice that the available options for configuration appear in the IIS Manager (see Figure 20-31).
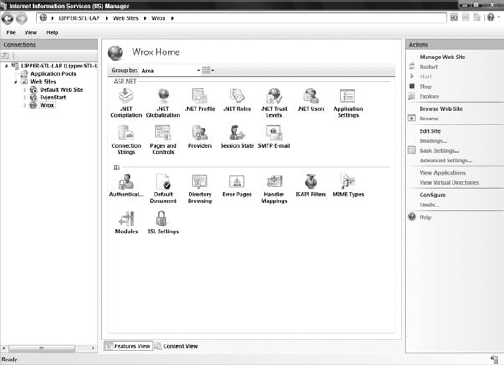
The options available to you enable you to completely configure ASP.NET or even configure IIS itself. The focus of this chapter is on the ASP.NET section of the options. In addition to the options you can select from the available icons, you can also configure some basic settings of the application by clicking the Basic Settings link in the Actions pane on the right-hand side of the IIS Manager. When clicking the Basic Settings link, you will get the Edit Web Site dialog box shown in Figure 20-32.
Changes you make in the IIS Manager are actually being applied to the
web.configfile of your application; making changes to the Default website (the root node) enables you edit themachine.configfile.

This dialog enables you to change the following items:
Web site name: The name of the website. In the case of Figure 20-32, naming the website "Wrox" means that the URL will be
http://[IP address or domain name]/Wrox.Application pool: The application pool you are going to use for the application. Note that you have three options by default: DefaultAppPool (which uses the .NET Framework 2.0 and an integrated pipeline mode), Classic .NET AppPool (which uses the .NET Framework 2.0 and a classic pipeline mode), and ASP.NET 1.1 (which uses the .NET Framework 1.1 as it states and a classic pipeline mode).
Physical path: The folder location where the ASP.NET application can be found. In this case, it is
C:Wrox.
The sections that follow describe some of the options available to you through the icons in the IIS Manager.
Ever since the beginning days of ASP.NET, users wanted to be able to store sessions by means other than the three methods: InProc, StateServer, and SQLServer. One such request was for a provider that could store sessions in an Oracle database. This might seem like a logical thing to add to ASP.NET in the days of ASP.NET 1.1, but if the team added a provider for Oracle, they would soon get requests to add even more providers for other databases and data storage methods. For this reason, instead of building providers for every possible scenario, the developers designed a provider model that enabled them to add any providers they wished. Thus was born the new provider model introduced in ASP.NET 2.0.
ASP.NET includes a lot of systems that require state storage of some kind. In addition, instead of recording state in a fragile mode (the way sessions are stored by default), many of these new systems require their state to be stored in more concrete data stores such as databases or XML files. This also enables a longer-lived state for the users visiting an application — something else that is required by these new systems.
The systems found in ASP.NET today that require advanced state management include the following:
Membership
Role management
Site navigation
Personalization
Health-monitoring Web events
Web parts personalization
Configuration file protection
The membership system enables ASP.NET to work from a user store of some kind to create, delete, or edit application users. Because it is apparent that developers want to work with an unlimited amount of different data stores for their user store, they need a means to easily change the underlying user store for their ASP.NET applications. The provider model found in ASP.NET is the answer.
Out of the box, ASP.NET provides two membership providers that enable you to store user information: SQL Server and the Active Directory membership providers (found at System.Web.Security.SqlMembershipProvider and System.Web.Security.ActiveDirectoryMembershipProvider, respectively). In fact, for each of the systems (as well as for some of the ASP.NET 1.x systems), a series of providers is available to alter the way the state of that system is recorded. Figure 20-33 illustrates these providers.
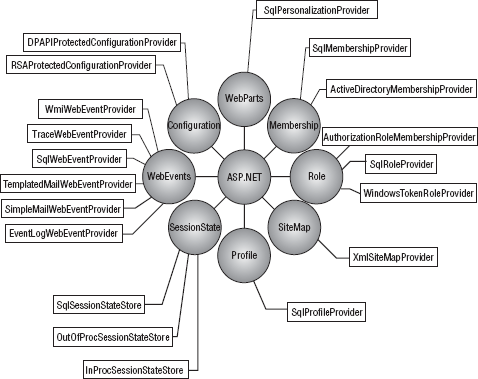
As shown in the diagram, ASP.NET provides a large number of providers out of the box. Some systems have only a single provider (such as the profile system, which includes only a provider to connect to SQL Server), whereas other systems include multiple providers (such as the WebEvents provider, which includes six separate providers). The next section describes how to set up SQL Server to work with several of the providers presented in this chapter. You can use SQL Server 7.0, 2000, 2005, or 2008 for the back-end data store for many of the providers presented (although not all of them). After this explanation is an overview of the available providers built into ASP.NET.
Quite a number of providers work with SQL Server. For instance, the membership, role management, personalization, and other systems work easily with SQL Server. However, all these systems work with the new Microsoft SQL Server Express Edition file (.mdf) by default instead of with one of the full-blown versions of SQL Server, such as SQL Server 7.0, SQL Server 2000, SQL Server 2005, or SQL Server 2008.
To work with either Microsoft SQL Server 7.0, 2000, 2005, or 2008, you must set up the database using the aspnet_regsql.exe tool. Working with aspnet_regsql.exe creates the necessary tables, roles, stored procedures, and other items needed by the providers. To access this tool, open the Visual Studio 2008 command prompt by selecting Start
The command-line version of the Setup Wizard gives developers optimal control over how the database is created. Working from the command line using this tool is not difficult, so don't be intimidated by it.
You can get at the actual tool, aspnet_regsql.exe, from the Visual Studio command prompt if you have Visual Studio 2008. At the command prompt, type aspnet regsql.exe -? to get a list of all the command-line options at your disposal for working with this tool.
The following table describes some of the available options for setting up your SQL Server instance to work with the personalization framework:
Command Option | Description |
|---|---|
| Displays a list of available option commands |
Uses the Wizard mode. This uses the default installation if no other parameters are used. | |
Specifies the SQL Server instance to work with | |
Specifies the username for logging in to SQL Server. If you use this, then you also use the | |
Specifies the password to use for logging in to SQL Server. If you use this, then you also use the | |
Provides instructions for using the current Windows credentials for authentication | |
Specifies the connection string for connecting to SQL Server. If you use this, then you don't need to use the | |
Adds support for all the available SQL Server operations provided by ASP.NET, including membership, role management, profiles, site counters, and page/control personalization | |
Adds support for working with profiles | |
Removes support for all the available SQL Server operations that have been previously installed. These include membership, role management, profiles, site counters, and page/control personalization. | |
| Removes support for the profile capability from SQL Server |
Specifies the database name to use with the application services. If you don't specify a database name, then aspnetdb is used. | |
Instead of modifying an instance of a SQL Server database, use this command in conjunction with the other commands to generate a SQL script that adds or removes the features specified. This command creates the scripts in a file that has the name specified in the command. |
To modify SQL Server to work with the personalization provider using this command-line tool, you enter a command such as the following:
aspnet_regsql.exe -A all -E
After you enter the preceding command, the command-line tool creates the features required by all the available ASP.NET systems. The results are shown in the tool itself, as illustrated in Figure 20-34.

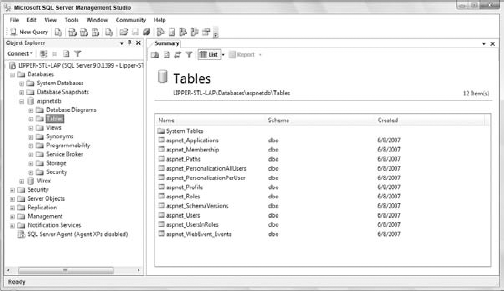
When this action is completed, you can see that a new database, aspnetdb, has been created in the SQL Server Enterprise Manager of Microsoft SQL Server 2005 (the database used for this example). You now have the appropriate tables for working with all the ASP.NET 3.5 systems that are able to work with SQL Server (see Figure 20-35).
One advantage of using the command-line tool, rather than the GUI-based version of the ASP.NET SQL Server Setup Wizard, is that you can install in the database just the features you're interested in working with, instead of installing everything (as the GUI-based version does). For instance, if you want only the membership system to interact with SQL Server 2005 — not any of the other systems (such as role management and personalization) — then you can configure the setup so that only the tables, roles, stored procedures, and other items required by the membership system are established in the database. To set up the database for the membership system only, use the following on the command line:
aspnet_regsql.exe -A m -E
Instead of working with the tool through the command line, you can also work with a GUI version of the same wizard. To access the GUI version, type the following at the Visual Studio command prompt:
aspnet_regsql.exe
At this point, the ASP.NET SQL Server Setup Wizard welcome screen appears, as shown in Figure 20-36.
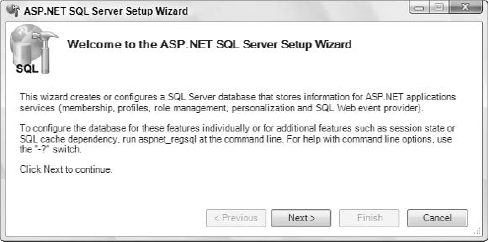
Clicking the Next button gives you a new screen that offers two options: one to install management features into SQL Server and the other to remove them (see Figure 20-37).

From here, choose "Configure SQL Server for application services" and click Next. The third screen (see Figure 20-38) asks for the login credentials to SQL Server and the name of the database to perform the operations. The Database option is <default> — meaning the wizard creates a database called aspnetdb. If you want to choose a different folder, such as the application's database, choose the appropriate option.
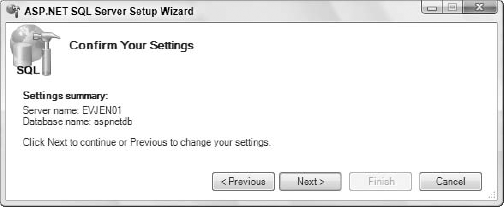
After you have made your server and database selections, click Next. The screen shown in Figure 20-39 asks you to confirm your settings. If everything looks correct, click the Next button — otherwise, click Previous and correct your settings.
When this is complete, you get a notification that everything was set up correctly.
After you set up the full-blown Microsoft SQL Server to work with the various systems provided by ASP.NET 3.5, you create a connection string to the database in your machine.config or web.config file, as shown in the following code:
<configuration>

     <connectionStrings>
        <add name="LocalSql2005Server"
         connectionString="Data Source=127.0.0.1;Integrated Security=SSPI" />
     </connectionStrings>

</configuration>
You may want to change the values provided if you are working with a remote instance of SQL Server, rather than an instance that resides on the same server as the application. Changing this value in the machine.config file changes how each ASP.NET application uses this provider. Applying this setting in the web.config file causes only the local application to work with this instance.
After the connection string is set up, look further in the <providers> area of the section you are going to work with. For instance, if you are using the membership provider, then you want to work with the <membership> element in the configuration file. The settings to change SQL Server are shown here:
<configuration>

  <connectionStrings>
     <add name="LocalSql2005Server"
      connectionString="Data Source=127.0.0.1;Integrated Security=SSPI" />
</connectionStrings>
<system.web>
<membership defaultProvider="AspNetSql2005MembershipProvider">
<providers>
<add name="AspNetSql2005MembershipProvider"
type="System.Web.Security.SqlMembershipProvider,
System.Web, Version=2.0.0.0, Culture=neutral,
PublicKeyToken=b03f5f7f11d50a3a"
connectionStringName="LocalSql2005Server"
enablePasswordRetrieval="false"
enablePasswordReset="true"
requiresQuestionAndAnswer="true"
applicationName="/"
requiresUniqueEmail="false"
passwordFormat="Hashed"
maxInvalidPasswordAttempts="5"
minRequiredPasswordLength="7"
minRequiredNonalphanumericCharacters="1"
passwordAttemptWindow="10"
passwordStrengthRegularExpression="" />
</providers>
</membership>
</system.web>
</configuration>With these changes in place, the SQL Server 2005 instance is now one of the providers available for use with your applications. The name of this instance is AspNetSql2005MembershipProvider. You can see that this instance also uses the connection string of LocalSql2005Server, which was defined earlier.
Pay attention to some important attribute declarations in the preceding configuration code. For example, the provider used by the membership system is defined via the defaultProvider attribute found in the main <membership> node. Using this attribute, you can specify whether the provider is one of the built-in providers or whether it is a custom provider that you have built yourself or received from a third party. With the code in place, the membership provider now works with Microsoft SQL Server 2005 (as shown in this example) instead of the Microsoft SQL Server Express Edition files.
AJAX is definitely the current hot buzzword in the Web application world. AJAX is an acronym for Asynchronous JavaScript and XML, and in Web application development it signifies the capability to build applications that make use of the XMLHttpRequest object.
The creation and inclusion of the XMLHttpRequest object in JavaScript and the fact that most upper-level browsers support it led to the creation of the AJAX model. AJAX applications, although they have been around for a few years, gained popularity after Google released a number of notable, AJAX-enabled applications such as Google Maps and Google Suggest. These applications clearly demonstrated the value of AJAX.
Shortly thereafter, Microsoft released a beta for a new toolkit that enabled developers to incorporate AJAX features in their Web applications. This toolkit, code-named Atlas and later renamed ASP.NET AJAX, makes it extremely simple to start using AJAX features in your applications today.
The ASP.NET AJAX toolkit was not part of the default .NET Framework 2.0 install. If you are using the .NET Framework 2.0, it is an extra component that you must download from the Internet.
Today, if you are going to build an application, you have the option of creating either a thick-client or a thin-client application. A thick-client application is typically a compiled executable that end users can run in the confines of their own environment — usually without any dependencies elsewhere (such as an upstream server). Generally, the technology to build this type of application is the Windows Forms technology, or MFC in the C++ world. A thin-client application is typically one that has its processing and rendering controlled at a single point (the upstream server), and the results of the view are sent down as HTML to a browser to be viewed by a client. To work, this type of technology generally requires that the end user be connected to the Internet or an intranet of some kind.
Each type of application has its pros and cons. The thick-client style of application is touted as more fluid and more responsive to an end user's actions. In a Web-based application, for many years the complaint has been that every action by an end user takes numerous seconds and results in a jerky page refresh. In turn, the problem with a thick-client style of application has always been that the application sits on the end user's machine and any patches or updates to the application require you to somehow upgrade each and every machine upon which the application sits. In contrast, the thin-client application, or the Web application architecture, includes only one instance of the application. The application in this case is installed on a Web server, and any updates that need to occur happen only to this instance. End users who are calling the application through their browsers always get the latest and greatest version of the application. That change model has a lot of power to it.
With this said, it is important to understand that Microsoft is making huge inroads into solving this thick- or thin-client problem, and you now have options that completely change this model. For instance, the Windows Presentation Foundation technology recently offered by Microsoft and the new Silverlight technology blur the lines between the two traditional application styles.
Even with the existing Windows Forms and ASP.NET technologies to build the respective thick- or thin- client applications, each of these technologies is advancing to a point where it is even blurring the lines further. ASP.NET AJAX in particular is further removing any of the negatives that would have stopped you from building an application on the Web.
ASP.NET AJAX makes your Web applications seem more fluid than ever before. AJAX-enabled applications are highly responsive and give the end user immediate feedback and direction through the workflows that you provide. The power of this alone makes the study of this new technology and its incorporation into your projects of the utmost importance.
So, what is AJAX doing to your Web application? First, let's take a look at what a Web page does when it does not use AJAX. Figure 20-40 shows a typical request and response activity for a Web application.
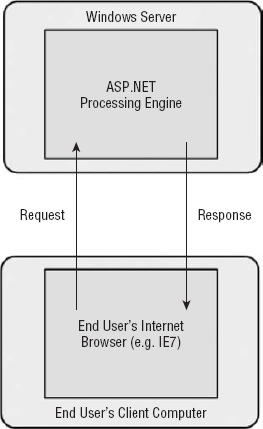
In this case, an end user makes a request from his or her browser to the application that is stored on your Web server. The server processes the request, and ASP.NET renders a page, which is then sent to the requestor as a response. The response, once received by the end user, is displayed within the end user's browser.
From here, many events that take place within the application instance as it sits within the end user's browser cause the complete request and response process to reoccur. For instance, the end user might click a radio button, a check box, a button, a calendar, or anything else, and this action causes the entire Web page to be refreshed or a new page to be provided.
Conversely, an AJAX-enabled Web page includes a JavaScript library on the client that takes care of issuing the calls to the Web server. It does this when it is possible to send a request and get a response for just part of the page and using script; the client library updates that part of the page without updating the entire page. An entire page is a lot of code to send down to the browser to process each and every time. With only part of the page being processed, the end user experiences what some people term "fluidity" in the page, which makes the page seem more responsive. The amount of code required to update just a portion of a page is less and produces the responsiveness the end user expects. Figure 20-41 shows a diagram of how this works.
First, the entire page is delivered in the initial request and response. From there, any partial updates required by the page are performed using the client script library. This library can make asynchronous page requests and update just the portion of the page that needs updating. One major advantage to this is that a minimal amount of data is transferred for the updates to occur. Updating a partial page is better than recalling the entire page for what is just a minor change.
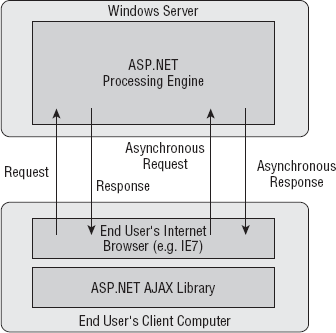
AJAX is dependent upon a few technologies in order for it to work:
The first is the
XMLHttpRequestobject. This object enables the browser to communicate to a back-end server and has been available in the Microsoft world since Internet Explorer 5 through the MSXML ActiveX component.The other major component is JavaScript. This technology provides the client-side initiation to communication with the back-end services and takes care of packaging a message to send to any server-side services.
Another aspect of AJAX is support for DHTML and the Document Object Model (DOM). These are the pieces that will change the page when the asynchronous response is received from the server.
The last piece is the data being transferred from the client to the server. This is done in XML or, more important, JavaScript Object Notation (JSON).
Support for the XMLHttpRequest object gives JavaScript functions within the client script library the capability to call server-side events. As stated, typically HTTP requests are issued by a browser. It is also the browser that takes care of processing the server's response, and then usually regenerates the entire Web page in the browser after a response is issued.
If you use the XMLHttpRequest object from your JavaScript library, you do not actually issue full-page requests from the browser. Instead, you use a client-side script engine (which is basically a JavaScript function) to initiate the request and to receive the response. Because you are not issuing a request and response to deal with the entire Web page, you can skip a lot of the page processing because it is not needed. This is the essence of an AJAX Web request.
This opens the door to a tremendous number of possibilities. Microsoft has provided the necessary script engines to automate much of the communication that must take place in order for AJAX-style functionality to occur.
Prior to Visual Studio 2008, the ASP.NET AJAX product used to be a separate installation that you were required to install on your machine and the Web server that you were working with. This release gained in popularity quite rapidly and is now a part of the Visual Studio 2008 offering. Not only is it a part of the Visual Studio 2008 IDE, the ASP.NET AJAX product is also baked into the .NET Framework 3.5. This means that to use ASP.NET AJAX, you don't need to install anything if you are working with ASP.NET 3.5.
If you are using an ASP.NET version prior to the ASP.NET 3.5 release, then you need to visit
www.asp.net/AJAXto get the components required to work with AJAX.
Because ASP.NET AJAX is now part of the ASP.NET framework, when you create a new Web application you don't have to create a separate type of ASP.NET application. Instead, all ASP.NET applications that you create are AJAX-enabled.
If you have already worked with ASP.NET AJAX prior to this 3.5 release, there is really nothing new to learn. The entire technology is seamlessly integrated.
Overall, Microsoft has fully integrated the entire ASP.NET AJAX experience so you can easily use Visual Studio and its visual designers to work with your AJAX-enabled pages and even have the full debugging story that you would want to have with your applications. Using Visual Studio 2008, you can now debug the JavaScript that you are using in the pages.
In addition, note that Microsoft focused a lot of attention on cross-platform compatibility with ASP.NET AJAX. The AJAX-enabled applications that you build upon the .NET Framework 3.5 can work within all the major up-level browsers available (e.g., Firefox and Opera).
There are actually two parts to the ASP.NET AJAX story. The first is a client-side framework and a set of services that are completely on the client-side. The other part of the story is a server-side framework. Remember that the client side of ASP.NET AJAX is all about the client communicating asynchronous requests to the server side of the offering.
For this reason, Microsoft offers a Client Script Library, which is a JavaScript library that takes care of the required communications. The Client Script Library is presented in Figure 20-42.
The Client Script Library provides a JavaScript, object-oriented interface that is reasonably consistent with aspects of the .NET Framework. Because browser compatibility components are built in, any work that you build in this layer or (in most cases) work that you let ASP.NET AJAX perform for you here will function with a multitude of different browsers. In addition, several components support a rich UI infrastructure capable of producing many things that would otherwise take some serious time to build yourself.
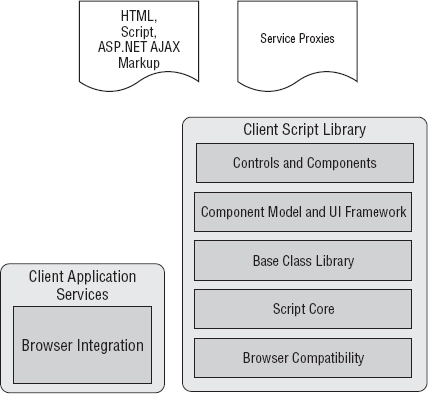
The interesting thing about the client-side technologies provided by ASP.NET AJAX is that they are completely independent of ASP.NET. In fact, any developer can freely download the Microsoft AJAX Library (again from asp.net/AJAX) and use it with other Web technologies such as PHP (www.php.net) and Java Server Pages (JSP). That said, the entire Web story is actually a lot more complete with the server-side technologies provided with ASP.NET AJAX.
As an ASP.NET developer, you will most likely be spending most of your time on the server-side aspect of ASP.NET AJAX. Remember that ASP.NET AJAX is all about the client-side technologies talking back to the server-side technologies. You can actually perform quite a bit on the server side of ASP.NET AJAX.
The server-side framework knows how to deal with client requests, such as putting responses in the correct format. The server-side framework also takes care of the marshalling of objects back and forth between JavaScript objects and the .NET objects that you are using in your server-side code. Figure 20-43 illustrates the server-side framework provided by ASP.NET AJAX.
When you have the .NET Framework 3.5, you have the ASP.NET AJAX Server Extensions on top of the core ASP.NET 2.0 Framework, the Windows Communication Foundation, as well as ASP.NET-based Web services (.asmx).
Some Web developers are used to working with ASP.NET, and have experience working with server-side controls and manipulating these controls on the server-side. Other developers concentrate on the client side and work with DHTML and JavaScript to manipulate and control the page and its behaviors.

ASP.NET AJAX was designed for both types of developers. If you want to work more on the server side of ASP.NET AJAX, you can use the new ScriptManager control and the new UpdatePanel control to AJAX-enable your current ASP.NET applications with little work on your part. All this work can be done using the same programming models that you are quite familiar with in ASP.NET. In turn, you can also use the Client Script Library directly and gain greater control over what is happening on the client's machine. In the next section, you'll build a simple Web page that makes use of AJAX.
For this example, you will be adding some simple controls. Two of the controls to add are typical ASP.NET server controls — another Label and Button server control. In addition to these controls, you are going to add some ASP.NET AJAX controls.
In the Visual Studio 2008 Toolbox is a new section titled AJAX Extensions, as shown in Figure 20-44.
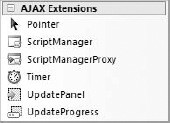
From AJAX Extensions, add a ScriptManager server control to the top of the page and include the second Label and Button control inside the UpdatePanel control. The UpdatePanel control is a template server control that enables you to include any number of items within it (just as other templated ASP.NET server controls). When you have your page set up, it should look something like what is shown in Figure 20-45.

The code for this page is as follows:
<%@ Page Language="VB" %>

<script runat="server">
    Protected Sub Button1_Click(ByVal sender As Object, _
       ByVal e As System.EventArgs)
        Label1.Text = DateTime.Now.ToString()
    End Sub

    Protected Sub Button2_Click(ByVal sender As Object, _
       ByVal e As System.EventArgs)
        Label2.Text = DateTime.Now.ToString()
    End Sub
</script>

<html xmlns="http://www.w3.org/1999/xhtml">
<head runat="server">
    <title>My ASP.NET AJAX Page</title>
</head>
<body>
    <form id="form1" runat="server">
    <div>
        <asp:ScriptManager ID="ScriptManager1" runat="server">
        </asp:ScriptManager>
        <asp:Label ID="Label1" runat="server"></asp:Label>
        <br />
        <br />
        <asp:Button ID="Button1" runat="server"
         Text="Click to get machine time"
         onclick="Button1_Click" />
<br />
<br />
<asp:UpdatePanel ID="UpdatePanel1" runat="server">
<ContentTemplate>
<asp:Label ID="Label2" runat="server" Text=""></asp:Label>
<br />
<br />
<asp:Button ID="Button2" runat="server"
Text="Click to get machine time using AJAX"
onclick="Button2_Click" />
</ContentTemplate>
</asp:UpdatePanel>
</div>
</form>
</body>
</html>When this page is pulled up in the browser, it has two buttons. The first button causes a complete page postback and updates the current time in the Label1 server control. Clicking on the second button causes an AJAX asynchronous postback. Clicking this second button updates the current server time in the Label2 server control. When you click the AJAX button, the time in Label1 will not change at all, as it is outside of the UpdatePanel. The result is presented in Figure 20-46.
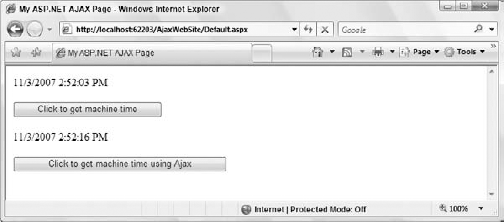
When you first pull up the page from the preceding listing, the code is quite different from the page that would be built if you weren't using AJAX. The following code listing shows the page results that you see by using AJAX:
<html xmlns="http://www.w3.org/1999/xhtml">
<head><title>
 My ASP.NET AJAX Page
</title></head>
<body>
    <form name="form1" method="post" action="Default.aspx" id="form1">
<div>
<input type="hidden" name="__EVENTTARGET" id="__EVENTTARGET" value="" />
<input type="hidden" name="__EVENTARGUMENT" id="__EVENTARGUMENT" value="" />
<input type="hidden" name="__VIEWSTATE" id="__VIEWSTATE"
 value="/wEPDwULLTE4NzE5NTc5MzRkZDRIzHpPZg4GaO9Hox9A/RnOflkm" />
</div>
<script type="text/javascript">
//<![CDATA[
var theForm = document.forms['form1'];
if (!theForm) {
theForm = document.form1;
}
function __doPostBack(eventTarget, eventArgument) {
if (!theForm.onsubmit || (theForm.onsubmit() != false)) {
theForm.__EVENTTARGET.value = eventTarget;
theForm.__EVENTARGUMENT.value = eventArgument;
theForm.submit();
}
}
//]]>
</script>
<script src="/AJAXWebSite/WebResource.axd?d=o84znEj-
n4cYi0Wg0pFXCg2&t=633285028458684000" type="text/javascript"></script>
<script src="/AJAXWebSite/ScriptResource.axd?
d=FETsh5584DXpx8XqIhEM50YSKyR2GkoMoAqraYEDU5_
gi1SUmL2Gt7rQTRBAw56lSojJRQe0OjVI8SiYDjmpYmFP0
CO8wBFGhtKKJwm2MeE1&t=633285035850304000"
type="text/javascript"></script>
<script type="text/javascript">
//<![CDATA[
if (typeof(Sys) === 'undefined') throw new Error('ASP.NET AJAX client-side
framework failed to load.'),
//]]>
</script>
<script src="/AJAXWebSite/ScriptResource.axd?
d=FETsh5584DXpx8XqIhEM50YSKyR2GkoMoAqraYEDU5_
gi1SUmL2Gt7rQTRBAw56l7AYfmRViCoO2lZ3XwZ33TGiC
t92e_UOqfrP30mdEYnJYs09ulU1xBLj8TjXOLR1k0&t=633285035850304000"
type="text/javascript"></script>
<div>
<script type="text/javascript">
//<![CDATA[
Sys.WebForms.PageRequestManager._initialize('ScriptManager1',
document.getElementById('form1'));
Sys.WebForms.PageRequestManager.getInstance()._updateControls(['tUpdatePanel1'],
[], [], 90);
//]]>
</script>
<span id="Label1"></span>
<br />
<br />
<input type="submit" name="Button1" value="Click to get machine time"
id="Button1" />
<br />
<br />
<div id="UpdatePanel1"><span id="Label2"></span>
<br />
<br />
<input type="submit" name="Button2"
value="Click to get machine
time using AJAX" id="Button2" />
</div>
</div>
<div>
<input type="hidden" name="__EVENTVALIDATION" id="__EVENTVALIDATION"
value="/wEWAwLktbDGDgKM54rGBgK7q7GGCMYnNq57VIqmVD2sRDQqfnOsgWQK" />
</div>
<script type="text/javascript">
//<![CDATA[
Sys.Application.initialize();
//]]>
</script>
</form>
</body>
</html>From there, if you click Button1 and perform the full-page postback, you get this entire bit of code back in a response — even though you are interested in updating only a small portion of the page! However, if you click Button2 — the AJAX button — you send the request shown here:
POST /AJAXWebSite/Default.aspx HTTP/1.1
Accept: */*
Accept-Language: en-US
Referer: http://localhost.:62203/AJAXWebSite/Default.aspx
x-microsoftAJAX: Delta=true
Content-Type: application/x-www-form-urlencoded; charset=utf-8
Cache-Control: no-cache
UA-CPU: x86
Accept-Encoding: gzip, deflate
User-Agent: Mozilla/4.0 (compatible; MSIE 7.0; Windows NT 6.0; SLCC1; .NET CLR
2.0.50727; Media Center PC 5.0; .NET CLR 1.1.4322; .NET CLR 3.5.21004; .NET CLR
3.0.04506)
Host: localhost.:62203
Content-Length: 334
Proxy-Connection: Keep-Alive
Pragma: no-cache

ScriptManager1=UpdatePanel1%7CButton2&__EVENTTARGET=&__EVENTARGUMENT=&__
VIEWSTATE=%2FwEPDwULLTE4NzE5NTc5MzQPZBYCAgQPZBYCAgMPDxYCHgRUZXh0BRQxMS8zLzI
wMDcgMjoxNzo1NSBQTWRkZHZxUyYQG0M25t8U7vLbHRJuKlcS&__
EVENTVALIDATION=%2FwEWAwKCxdk9AoznisYGArursYYI1844
hk7V466AsW31G5yIZ73%2Bc6o%3D&Button2=Click%20to%20get%20machine
%20time%20using%20Ajax
The response for this request is shown here:
HTTP/1.1 200 OK
Server: ASP.NET Development Server/9.0.0.0
Date: Sat, 03 Nov 2007 19:17:58 GMT
X-AspNet-Version: 2.0.50727
Cache-Control: private
Content-Type: text/plain; charset=utf-8
Content-Length: 796
Connection: Close

239|updatePanel|UpdatePanel1|
                <span id="Label2">11/3/2007 2:17:58 PM</span>
                <br />
                <br />
                <input type="submit" name="Button2"
                 value="Click to get machine
                 time using AJAX" id="Button2" />
            |172|hiddenField|__VIEWSTATE|/wEPDwULLTE4NzE5NTc5MzQPZBYCAgQPZBYEAgM
PDxYCHgRUZXh0BRQxMS8zLzIwMDcgMjoxNzo1NSBQTWRkAgcPZBYCZg9kFgICAQ8PFgI
fAAUUMTEvMy8yMDA3IDI6MTc6NTggUE1kZGQ4ipZIg91+XSI/dqxFueSUwcrXGw==|56
|hiddenField|__EVENTVALIDATION|/wEWAwKCz4mbCAK7q7GGCAKM54rGBj8b4/mkK
NKhV59qX9SdCzqU3AiM|0|asyncPostBackControlIDs|||0|postBackControlIDs
|||13|updatePanelIDs||tUpdatePanel1|0|childUpdatePanelIDs|||12|panels
ToRefreshIDs||UpdatePanel1|2|asyncPostBackTimeout||90|12|formAction||
Default.aspx|22|pageTitle||My ASP.NET AJAX Page|
Clearly, the response is much smaller than an entire Web page! In fact, the main part of the response is only the code contained within the UpdatePanel server control and nothing more. The items at the bottom deal with the ViewState of the page (as it has now changed) and some other small page changes.
This chapter and the previous chapter offered a whirlwind tour of ASP.NET 3.5 and some of the application features that you can provide to the projects you develop. ASP.NET is highly focused on the area of developer productivity, and works very hard at providing you access to the features and functions that most websites need to employ today. This chapter covered the following ASP.NET technologies:
Cross-page posting
ASP.NET compilation techniques
Master pages
The data source controls
The navigation system and some of the navigation server controls
Membership and role management
The new ASP.NET AJAX capabilities
A nice aspect of the features presented is that you can either utilize the wizards that are built into the underlying technology or simply skip these wizards and employ the technologies yourself. Either way is fine. Another useful aspect of the technologies introduced is that they all enable a huge amount of customization. You can alter the behavior and output of these technologies to achieve exactly what you need. If you want to dig deeper into ASP.NET, be sure to take a look at Professional ASP.NET 3.5 (Wiley, 2008).