Applications developed with the .NET Framework have a host of deployment options that were not available for older, COM-based software. These options completely change the economics of deployment. The changes are so important that they can even alter the preferred architecture for a system written in .NET.
Deployment encompasses many activities required to place an application into a production environment, including setting up databases, placing software in appropriate directories on servers, and configuring options for a particular installation. Deployment also includes handling changes and upgrades to the application.
This chapter covers the major deployment options for .NET applications. The previous chapter on assemblies should be considered a prerequisite for this chapter, as assemblies are the basic unit of deployment.
First, you'll look at some of the problems that can occur when you deploy applications, along with a number of terms that are used when talking about application deployment. Then you'll learn how .NET addresses many of these deployment issues. The remainder of the chapter covers the following:
Creating deployment projects in Visual Studio 2008 that enable initial installation of applications
Deployment of the .NET Framework itself on systems where it does not already reside
Updating applications on servers, including components and ASP.NET applications
Installing and updating Windows Forms applications on client machines with ClickOnce
Deployment in .NET is a huge topic that can't be covered completely within one chapter. This chapter should provide you with a basic understanding of the options available, and a desire to learn more about them.
In the context of this chapter, application deployment includes two principal functions:
The process of taking an application, packaging it up, and installing it on another machine
The process of updating an already installed application with new or changed functionality
Deployment can, in some cases, also include placing the .NET Framework itself on a particular machine. This chapter assumes that the .NET Framework is installed on any machines in question. During the discussion of creating deployment projects, you will learn what to do if the .NET Framework is not available on a system.
As covered in the previous chapter, assemblies in .NET are self-describing. All the information needed to execute an assembly is normally contained in the assembly itself. There is no need to place any information in the Windows registry. If the CLR can find an assembly needed by an application (the process of location was discussed in the previous chapter), then the assembly can be run.
The previous chapter also discussed side-by-side execution of .NET assemblies. Multiple versions of an assembly can be executed by .NET, even if they have exactly the same interface and nominal version number. The implication for deployment is that each application can deploy the assemblies it needs and be assured that there will be no conflict with assemblies needed by other applications.
These .NET capabilities provide a range of deployment possibilities, from simple to complex. Let's start by looking at the simplest method of deployment, which harkens back to the days of DOS-XCOPY deployment.
The term XCOPY deployment was coined to describe an ideal deployment scenario. Its name derives from the DOS xcopy command. XCOPY deployment means that the only thing you need to do in order to deploy an application is copy the directory (including all child directories) to the computer on which you want to run the program.
XCOPY deployment is fine for very simple applications, but most business applications require other dependencies (such as databases and message queues) to be created on the new computer. .NET cannot help with those, so applications that have them need more sophisticated deployment.
The Windows Installer service is available on all operating systems that support .NET Framework 3.0. It was specifically created for installing applications onto a Windows system.
The Windows Installer service uses a file, called a Windows Installer package file, to install an application. Such files have an extension of .msi, an abbreviation derived from "Microsoft Installer." The files that make up a product can be packaged inside the .msi file, or externally in a number of cabinet files.
When the user requests that a particular application be installed, he or she can just double-click the .msi file. The Windows Installer service reads the file and determines what needs to be done (such as which files need to be copied and where they need to be copied to) to install the application. All the installation rules are implemented centrally by the service and do not need to be distributed as part of a setup executable. The Windows Installer package file contains a list of actions (such as copy file mfc40.dll to the Windows system folder) and what rules need to be applied to these actions.
The Windows Installer service also has a rollback method to handle failed installations. If the installation fails for some reason, the Windows Installer service will roll back the computer to its original state.
You can manually create a Windows Installer package file using the Windows Installer SDK tools, but it's much easier to use Visual Studio. Several templates in VS 2008 create projects that output .msi files, as discussed in detail in the section "Visual Studio Deployment Projects," later in this chapter.
An alternative to Windows Installer for Windows Forms and WPF applications is ClickOnce. This deployment technology was first included in Visual Studio 2005. Creating ClickOnce deployments is simpler than creating .msi files, but the most important ClickOnce advantage is that it is designed to deploy over the Internet. ClickOnce is discussed later in the chapter in the section "Internet Deployment of Windows Applications."
Previous versions of Visual Studio have always been associated with a single version of the .NET Framework. As such, you had no choice regarding which version of the framework should be associated with your projects; if you used Visual Studio 2005, for example, then you automatically used the 2.0 version of the Framework.
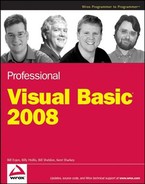
Visual Studio 2008 enables you to target a particular version of the framework. You can choose to base your application on the 2.0, 3.0, or 3.5 version of the framework by selecting it from the Advanced Compiler Settings dialog, which is available by selecting the properties for a project, navigating to the Compile page, and clicking the Advanced Compile Options button. The Advanced Compiler Settings dialog is shown in Figure 24-1, and the last option in the dialog is a drop-down list for the version of the .NET Framework you want to target.
Visual Studio 2008 provides a set of project templates that can be used to help package your application and deploy it. Most of these templates use Windows Installer technology. Before looking at the project templates, however, it is important to understand the difference between setup and deployment. Setup is the process that you use to package your application. Deployment is the process of installing an application on another machine, usually through a setup application/process.
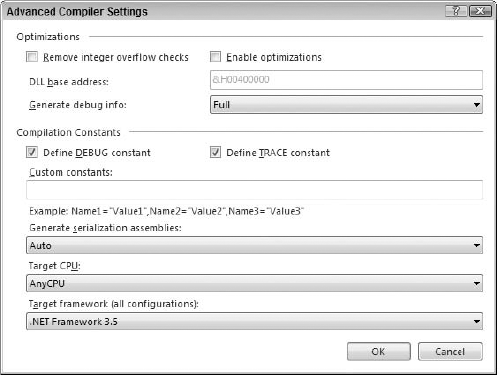
The deployment project templates available within Visual Studio 2008 can be created by the same means as any other project type, by using the New Project dialog box, shown in Figure 24-2.
As shown in the figure, you first select the Other Project Types node, and then the Setup and Deployment Projects node from the tree view of project types on the left of the dialog box. Of the six available project templates, five are actual project templates:
CAB Project
Merge Module Project
Setup Project
Web Setup Project
Smart Device CAB Project
The sixth is a wizard (called the Setup Wizard) that can be used to help create any of the project templates listed except the Smart Device CAB Project.
The CAB Project template is used to create a cabinet file. A cabinet file (.cab) can contain any number of files. It is often used to package a set of related components in an application.
Controls hosted within Internet Explorer are often packaged into a cabinet file, with a reference added to the file in the Web page that uses the control. When Internet Explorer encounters this reference, it confirms that the control isn't already installed on the user's computer, at which point it downloads the cabinet file, extracts the control, and installs it to a protected part of the user's computer.
You can compress cabinet files to reduce their size and consequently the amount of time it takes to download them.
The Merge Module Project template is used to create a merge module, which is similar to a cabinet file in that it can be used to package a group of files. The difference is that a merge module file (.msm) cannot be used by itself to install the files that it contains. The merge module file created by this project template can only be used within another setup project.
Merge modules were introduced as part of the Microsoft Windows Installer technology to enable a set of files to be packaged into an easy-to-use file that could be reused and shared between Windows-Installer-based setup programs. The idea is to package all the files and any other resources (e.g., registry entries, bitmaps, and so on) that are dependent on each other into the merge module.
This type of project can be very useful for packaging a component and all its dependencies. The resulting merge file can then be used in the setup program of each application that uses the component. This enables applications such as Crystal Reports to have a prepackaged deployment set that can be integrated into the deployment of other applications.
The Setup Project template is used to create a standard Windows Installer setup for an application, which is normally installed in the Program Files directory of a user's computer.
The Web Setup Project template is used to create a Windows Installer setup program that can be used to install a project into a virtual directory of a web server. It is intended to be used to create a setup program for a Web application, which may contain ASP.NET Web Forms or Web services.
The Smart Device CAB Project template is used to create a CAB file for an application that runs on a device containing the .NET Compact Framework, such as a Pocket PC device. Such applications are often referred to as mobile applications, and they have many capabilities and limitations that do not apply to other .NET-based applications. This book does not discuss mobile applications, so this template isn't covered here.
A deployment project can be created in exactly the same way as any other project in Visual Studio 2008. It can be standalone, or it can be part of a solution that contains other projects.
To illustrate a typical deployment project, the following section contains a simple walk-through of one of the most commonly used templates for a deployment project — the Setup Project, which is used to deploy a Windows application.
First create an application that will serve as the desktop application you want to deploy. Create a new project and choose Windows Application from the list of available Visual Basic project templates. Name the project SampleForDeployment and don't add any code to it yet.
Next, add a new project to the solution and choose Setup Project from the list of available Setup and Deployment Project templates. You now have a Visual Studio solution containing two projects.
When created, the deployment project does not contain any files. It has a folder called Detected Dependencies, which is discussed later. You will need to add the executable file from your Windows application SampleForDeployment to the deployment project.
You add files to a setup deployment project using the Add function, which is available in two places: You can select the deployment project in the Solution Explorer and use the Add option from the Project menu, or you can right-click the setup project file in the Solution Explorer and choose Add from the pop-up menu. Both methods enable you to choose from one of four options:
If you select File from the submenu, you are presented with a dialog box that enables you to browse for and select a particular file to add to the setup project. This method is suitable if a file needed by the application is not the output from another project within the solution.
The Merge Module option enables you to include a merge module in the deployment project. Third-party vendors can supply merge modules or you can create your own with Visual Studio.
The Assembly option can be used to select a .NET component (assembly) to be included in the deployment project.
If the deployment project is part of a solution (as in this walk-through), you can use the Project

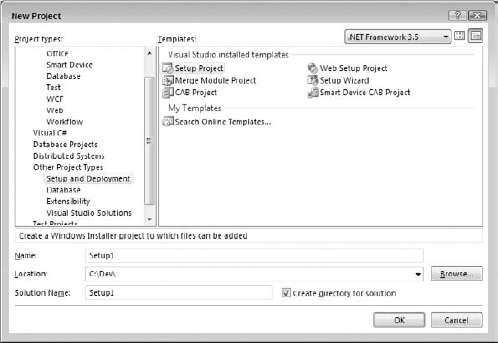
Add the output of the Windows application project to the setup project. Select the Project Output menu item to bring up the dialog box shown in Figure 24-3.
The Add Project Output Group dialog box is divided into several parts:
The combo box at the top contains a list of names of all the nondeployment projects in the current solution. In your case, there is only one project: SampleForDeployment.
Below the combo box is a list box containing all the possible outputs from the selected project. You are interested in the Primary output, so make sure that this is selected. (Other options for output are described in the MSDN for Visual Studio help files.)
Below the list of possible outputs is a combo box from which you can select the configuration to use for the selected project. You will use the (Active) option here, because this uses whatever configuration is in effect when the project is built.
Click OK to return to the solution.
At this point, not only has the output from the Windows application been added to the Setup project, but the Detected Dependencies folder also contains an entry.
Whenever you add a .NET component to this deployment project, its dependencies are added to this folder. The dependencies of the dependencies are also added, and so on until all the required files have been added. The files listed in the Detected Dependencies folder are included in the resulting setup and, by default, are installed into the application's directory as application-private assemblies. This default behavior helps reduce the possible effects of DLL hell by making the application use its own copies of dependent files.
If you don't want a particular dependency file to be included in the resulting setup, you can exclude it by right-clicking the file entry under Detected Dependencies and selecting Exclude from the pop-up menu. For example, you may decide that you want to exclude a detected dependency from the setup of an application because you know that the dependency is already installed on the target computer. The dependency will then have a small "circle and slash" icon before its name to indicate that it has been excluded.
Dependencies can also be excluded by selecting the particular dependency and using the Properties window to set the
Excludeproperty toTrue. The listed dependencies are refreshed whenever a .NET file is added to or removed from the setup project, taking into account any files that have already been excluded.
You can select an item in the setup project in the Solution Explorer and that particular item's properties will be displayed in the Properties window. Because there are too many properties to discuss them all, we will take a look at the properties from the root setup node and each of the two different project items. First, however, make sure that the root setup node is selected, and take some time to browse the list of available properties.
The root setup node represents the output from this deployment project type: a Windows Installer package (.msi). Therefore, the Properties window contains properties that affect the resulting .msi that is produced.
The ProductName property is used to set the text name of the product that this Windows Installer package is installing. By default, it is set to the name of the setup project (in this case Setup1). The value of this property is used throughout the steps of the resulting setup. For instance, it is used for the text of the title bar when the resulting .msi file is run. The property is used along with the Manufacturer property to construct the default installation directory: C:ProgramFiles < Manufacturer > < ProductName >. The ProductName property is also used within the control panel by the Add/Remove Programs applet to show that the application is installed.
The AddRemoveProgramsIcon property enables you to set the icon that appears in the Add/Remove Programs control panel applet. The default of (None) means that the default icon will be used. You can select an icon with the (Browse) option. The icon can be a standalone icon file or you can select an executable or DLL that contains an icon you want to use.
The Title property is used to set the textual title of the application that is installed. By default, this property has the same name as the setup project.
In addition, you may need to set several additional properties of the root node. The remaining properties for the root setup node are for various advanced options and are not discussed in this walk-through.
Previously, you added the primary output from the SampleForDeployment Windows application to your deployment project. It should now appear as an item in that project. Primary Output project items also have several important properties that you should know about, including the following:
Items that reside in the DetectedDependencies folder have some of the preceding properties, and they also have some read-only properties that provide you with detailed information about the item. This chapter does not include a detailed discussion of those informational properties.
This has been only a brief look at the Setup Project template. It uses all the project defaults and provides a standard set of steps to users when they run the Windows Installer package. Of course, a real application needs more than a single application file and its dependencies. You can customize the setup project extensively to meet those additional needs.
Besides adding more files to the deployment project, you may need to create shortcuts, directories, registry entries, and so on. These customizations and more can be accomplished using the set of built-in editors, which are covered in the section "Modifying the Deployment Project."
Another commonly used deployment scenario is that of a Web application that has been created using the ASP.NET Web Application Project template. Typically, the Web application is developed on a development web server, and you need to create a deployment project to transfer the finished application to a production web server.
For this scenario, the template to use is the Web Setup Project template. There is one major difference between this template and the previously described Setup Project template: The Web Setup Project will, by default, deploy the application to a virtual directory of the web server on which the setup is run, whereas a Setup Project deploys the application to the Program Files folder on the target machine by default.
There are substantial similarities between producing a deployment project for this scenario and producing a Windows application deployment project as shown in the walk-through. They both produce a Windows Installer package and have the same set of project properties discussed earlier.
As in the previous walk-through, you need to add the output of the Web application to the deployment project. This is accomplished in much the same way as earlier, by right-clicking on a Web Setup project and selecting Add — Project Output. There is one key difference: When you add the project representing the website, the only option you have for the type of files to add is Content Files, which encompasses the files that make up the website.
As before, if you build such a project, then the result in an .msi file, which can be used in this case to deploy a website.
In the walk-through, you created a default Windows Installer package for a particular project template. You didn't customize the steps or actions that were performed when the package was run. What if you want to add a step to the installation process in order to display a ReadMe file to the user? Or what if you need to create registry entries on the installation computer?
This section focuses on additional capabilities for deployment projects. Most of these capabilities are accessed by using a series of "editors" to change parts of the deployment project. You can use six editors to customize a Windows-Installer-based deployment project:
The editors are accessible through the View
You can also modify the resulting Windows Installer package through the project's Properties window. This section takes a brief look at each of the six editors and the project properties, and describes how you can use them to modify the resulting Windows Installer package. You will use the project created in the Windows application walk-through.
The first step to take in customizing the Windows Installer package is to use the project's property pages. The Property Pages dialog box is accessed by right-clicking the root of the setup project in the Solution Explorer and selecting Properties from the pop-up menu. You can also select the Properties item from the Project menu when the setup project is the active project. Both of these methods will bring up the dialog box shown in Figure 24-4.
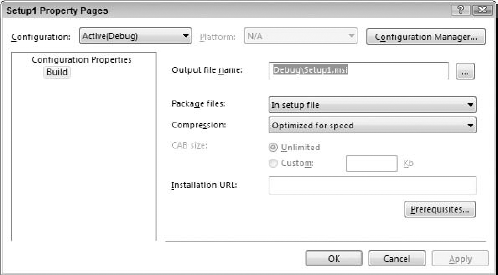
The only page available from the Property Pages dialog is the Build page. The options on this page can be used to affect the way that the resulting Windows Installer package is built.
As with most other projects in VS 2008, you can create different build configurations. Use the Configuration combo box to select the build configuration for which you want to alter properties. In Figure 24-4, notice that you are modifying the properties for the currently active build configuration: Debug. The button labeled Configuration Manager enables you to add, remove, and edit the build configurations for this project.
The Output File Name setting can be used to modify where the resulting Windows Installer package (.msi) file is created. You can modify the filename and path directly or you can click the Browse button.
The next setting, Package Files, enables you to specify how the files that make up the installation are packaged. The following table describes the possible options:
Package | Description |
|---|---|
As loose uncompressed files | When you build the project, the files that are to be included as part of the installation are copied to the same directory as the resulting Windows Installer package ( |
In setup file | When the project is built, the files that are to be included as part of the installation are packaged in the resulting Windows Installer package file. When you use this method, you have only one file to distribute. This is the default setting. |
In cabinet file(s) | With this option, when the project is built, the files that are to be included as part of the installation are packaged into a number of cabinet files. |
Prerequisites are standard components that may be needed to install or run the application but are not a part of the application. There are several of these, as shown in Figure 24-5, which shows the dialog that is displayed when the Prerequisites button is clicked.
The .NET Framework is checked by default, and so is the Windows Installer. You should only uncheck these if you are sure that all the machines upon which your application will be installed already have the correct versions of these prerequisites installed. As mentioned earlier in this chapter, Visual Studio 2008 allows targeting of the .NET Framework version you would like to use (2.0, 3.0, or 3.5), so the targeted version of the framework needs to be coordinated with the prerequisites.
If the box for any of these prerequisites is checked, then the resulting installation package will automatically check for the presence of that prerequisite and install it if required. If you are installing from a CD or network share, then it is common for the packages that install these prerequisites to be placed in the same location as your installation package. The default settings assume that this is true and install the prerequisites from that location.
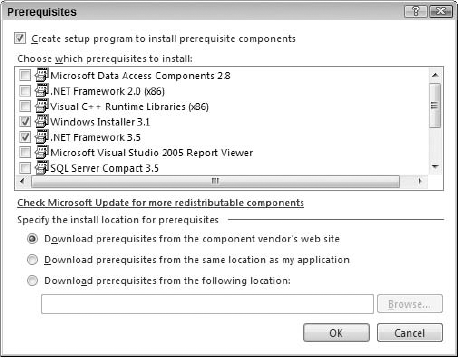
However, you can specify a different location for packages that install prerequisites. You can select the "Download prerequisites from the following location:" option at the bottom of the dialog and then specify the URL at which the packages are located. Alternately, you can select "Download prerequisites from the component vendor's web site," and then the Installation URL on the previous dialog will be used (refer to Figure 24-5).
You also have the option to modify the compression used when packaging the files that are to be contained within the installation program. The three options (Optimized for Speed, Optimized for Size, and None) are self-explanatory and are not covered. The default is Optimized for Speed.
If you want to package the files in cabinet files, then you have the option to specify the size of those resulting cabinet file(s):
The first option is to let the resulting cabinet file be of an unlimited size. What this effectively means is that all the files are packaged into one big cabinet file. The resulting size of the cabinet file depends on the compression method selected.
If you are installing from floppy disks or CDs, then creating one large cabinet file may not be wise. In this case, you can use the second option to specify the maximum size of the resulting cabinet file(s). If you select this option, then you need to specify the maximum allowed size for a cabinet file (this figure is in KB). If all the files that need to be contained within this installation exceed this size, then multiple cabinet files are created.
The File System Editor is automatically displayed for you in VS 2008's document window when you first create the Setup project. You can also access this editor (and the other editors that are available) via the View
Creating folders on the user's machine
Adding files to the folders defined
Creating shortcuts
Basically, this is the editor that you use to define what files need to be installed and where they should be installed on the user's machine. The File System Editor is divided into two main panes in the document window (see Figure 24-6).
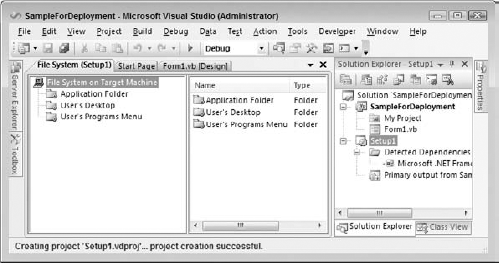
The left pane shows a list of the folders that have been created automatically for the project. When you select a folder in the left pane, two things happen: first, the right pane of the editor displays a list of the files to be installed into the selected folder, and second, the Properties window will change to show you the properties of the currently selected folder. Depending on the size of the Visual Studio 2008 window, you might not see the right-hand pane unless you widen the screen.
To add an item that needs to be installed to a folder, you can either right-click the folder in the left pane and choose Add from the pop-up menu or you can select the required folder, right-click in the right pane, and again choose Add from the pop-up menu. You will be presented with four options, three of which were discussed earlier in the walk-through:
Project output
File
Assembly
The fourth option (Folder) enables you to add a subfolder to the currently selected folder. This subfolder then becomes a standard folder that can be used to add files. If you add any .NET components or executables, the dependencies of these components are also added to the installation automatically.
When you create a new deployment project, a set of standard folders is created for you (listed in the desktop application section). If the folders created do not match your requirements, you can also use the File System editor to add special folders. To add a special folder, right-click anywhere in the left pane (other than on a folder), and you will be presented with a pop-up menu containing one item: Add Special Folder. This menu item expands to show you a list of folders that you can add to the installation (folders already added to the project are grayed out).
You can choose from several system folders, which are summarized in the following table:
Name | Description | Windows Installer Property |
|---|---|---|
Files (nonsystem) that are shared by multiple applications are usually installed to this folder. | ||
Common Files Folder (64-bit) | Same as Common Files Folder, but for 64-bit systems | |
Used to contain all the fonts that are installed on the computer. If your application used a specific font, then you should install it in this folder. | ||
Most applications are installed in a directory below the Program Files Folder. This acts as root directory for installed applications. | ||
Program Files Folder (64-bit) | Same as Program Files Folder, but for 64-bit systems | |
System Folder | This folder is used to store shared system files. The folder typically holds files that are part of the OS. | |
System Folder (64-bit) | Same as System Folder, but for 64-bit systems | |
This folder is used to store data on a per-application basis, specific to a user. | ||
This folder represents the user's desktop. It can be used to create and display a shortcut that users can use to start your application. | ||
Used as a central place to store links to the user's favorite websites, documents, folders, and so on | ||
This folder is where a user stores important files. It is normally referred to as My Documents. | ||
This folder is where shortcuts are created to applications that appear on the user's Program menu. This is an ideal place to create a shortcut to your application. | ||
Stores all the user's send-to shortcuts. A send-to shortcut is displayed when you right-click a file in the Windows Explorer and choose Send To. The send-to shortcut usually invokes an application, passing in the pathname of the files it was invoked from. | ||
This folder can be used to add items to the user's Start menu. This is not often used. | ||
Used to start applications whenever the user logs in to the computer. If you want your application to start every time the user logs in, then you can add a shortcut to your application in this folder. |
| |
This folder contains templates specific to the logged-in user. Templates are usually used by applications such as Microsoft Office 2000. | ||
The Windows root folder. This is where the OS is installed. | ||
Used to store all shared assemblies on the user's computer |
If none of the built-in folders match your requirements, you can create your own custom folder. Right-click in the left pane of the File Editor and choose Custom Folder from the pop-up menu.
The new folder is created in the left pane of the editor. The folder name appears in edit mode, so enter the name of the folder and press Enter. The folder will now be selected, and the Properties window will change to show the properties of the new folder. The properties of a folder are summarized in the following table:
Description | |
|---|---|
The name of the selected folder. The | |
Indicates whether this folder should be created on installation even if it's empty ( | |
This enables you to enter a condition that will be evaluated when the installation is run. If the condition evaluates to | |
This is where you define where the folder is going to be created on the target machine. You can enter a literal folder name (such as | |
| Defines a Windows Installer property that can be used to override the |
Indicates whether the condition specified in the condition property is reevaluated on subsequent (re)installs. If the value is |
Suppose you name your folder "Wrox Press" and you set the DefaultLocation property for your folder to [FavoritesFolder]Wrox Press. You could add some shortcuts to this folder using the technique described in the following section. When the installation is run, a new folder is added to the user's Favorites folder called Wrox Press, and those shortcuts are placed in it.
The first step in creating a shortcut is to locate the file that is the target of the shortcut. Select the target file and right-click it. The pop-up menu that appears includes an option to create a shortcut to the selected file, which is created in the same folder. Select this option.
To add the shortcut to the user's desktop, you need to move this shortcut to the folder that represents the user's desktop. Likewise, you could move this shortcut to the folder that represents the user's Programs menu. Cut and paste the new shortcut to the User's Desktop folder in the left pane of the editor. The shortcut will be added to the user's desktop when the installation is run. You should probably rename the shortcut, which is easily accomplished via the Rename option of the pop-up menu.
This has been only a brief tour of the File System Editor. There are many additional capabilities that you can explore.
You can use the Registry Editor to do the following:
Like the File System Editor, the Registry Editor is divided into two panes, as illustrated in Figure 24-7.
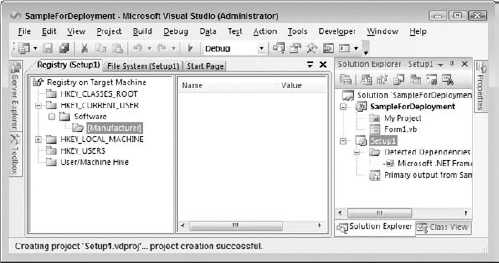
The left pane of the editor represents the registry keys on the target computer. When you select a registry key, two things happen. One, the right pane of the editor is updated to show the values that are to be created under the selected registry key. Two, if the registry key selected is not a root key in the left pane, then the Properties window is updated with a set of properties for this registry key.
When you create a new deployment project, a set of registry keys is created for you that correspond to the standard base registry keys of Windows. Notice in Figure 24-7 that there is a key defined with a name of [Manufacturer]. When the installation is run, this will be replaced with the value of the Manufacturer property described earlier in the chapter. [Manufacturer] is a property of the installation and can be used elsewhere within the installation. Several of these properties are defined and can be used in much the same way (consult the "Property Reference" topic in the MSDN documentation for a full list).
Before adding a value, you must select (or create) the registry key that will hold the value. There are several ways to add the registry value:
Right-click the registry key and use the resulting pop-up menu.
Right-click in the right-hand pane and use the resulting pop-up menu.
Use the Action menu.
For illustrational purposes here, select one of the Software registry keys. The Action menu contains one item, New, which contains a number of submenu items:
Using this menu, you can create a new registry key below the currently selected key (via Key), or you can create a value for the currently selected registry key using one of the four Value types: String, Environment String, Binary, and DWORD.
For example, suppose you need to create a registry entry that informs the application whether or not to run in Debug mode. The registry value must be applicable to a particular user, must be called Debug, and must contain the text True or False.
The first step is to select the following registry key in the left pane of the editor:
HKEY_CURRENT_USERSoftware [Manufacturer].
The registry key HKEY>_CURRENT>_USER is used to store registry settings that apply to the currently logged-in user.
Now you want to create a value that it is applicable to only this application, not all applications created by you. You need to create a new registry key below the HKEY>_CURRENT>_USER Software Manufacturer] key that is specific to this product, so select the Action
When the key is created, the key name is editable, so give it a name of [ProductName] and press Enter. This creates a key that is given the name of the product contained within this Windows Installer package. The ProductName property of the setup was discussed earlier in this chapter.
Now that you have created the correct registry key, the next step is to create the actual registry value. Make sure that your new registry key is selected, and choose String Value from the Action
Once the value has been created, you can set a default value for it in its Properties window; in this case False. When the Windows Installer package is run in the Debug registry, the value will be created. If a value already exists in the registry, then the Windows Installer package will overwrite the existing value with what is defined in the Registry Editor.
You can move around most keys and values in the Registry Editor by using cut and paste or simply by dragging and dropping the required item.
The alternative to creating registry entries during installation is to have your application create registry entries the first time they are needed. However, this has one significant difference from registry keys created with a Windows Installer package. The uninstall corresponding to a Windows Installer installation automatically removes any registry keys created during the install. If the registry entries are created by the application instead, then the uninstall has no way of knowing that these registry entries should be removed.
If you already have a registry file containing the registry settings that you would like to be created, you can import the file into the Registry Editor. To import a registry file, you need to ensure that the root node (Registry on Target Machine) is selected in the left pane of the editor. You can then use the Import item of the Action menu to select the registry file to import.
Registry manipulation should be used with extreme caution. Windows relies heavily on the registry, so you can cause yourself a great number of problems if you delete, overwrite, or change registry values and keys without knowing the full consequences of the action.
If you want to create the registry entries that are required to create file associations, then use the editor covered next.
The File Types Editor can be used to create the required registry entries to establish a file association for the application being installed. A file association is simply a link between a particular file extension and a particular application. For example, the file extension .doc is normally associated with Microsoft WordPad or Microsoft Word.
When you create a file association, not only do you create a link between the file extension and the application, you also define a set of actions that can be performed from the context menu of the file with the associated extension. For example, when you right-click a document with an extension of .doc, you get a context menu that can contain any number of actions, such as Open and Print. The action in bold (Open, by default) is the default action to be called when you double-click the file, so in the example, double-clicking a Word document starts Microsoft Word and loads the selected document.
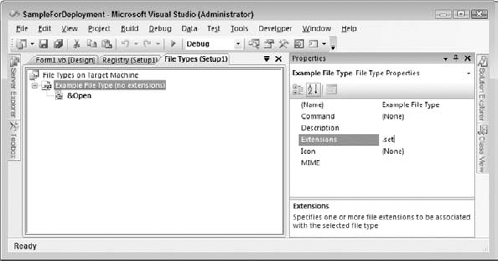
Let's walk through the creation of a file extension for the application. Suppose that the application uses a file extension of .set and that the file is to be opened in the application when it is double-clicked. Start the File Types editor, which contains a single pane. In a new deployment project, this pane will only contain a root node called "File Types on Target Machine."
To add a new file type, make sure the root element is selected in the editor. You can then choose Add File Type from the Action menu, or right-click on the root node and select Add File Type. Give the new file type the name "Example File Type."
Next, you must set the extension and application for this file type. Use the Properties window (shown in Figure 24-8). Enter .set as the value for the Extensions property.
To associate an application with this file type, use the Command property. The ellipsis button for this property presents you with a dialog box from which you can select an executable file contained within any of the folders defined in the File System Editor. In this case, you'll select Primary Output from WindowsApplication (active) from the Application Folder as the value for Command.
When this new file type was first created, a default action was added for you called &Open — select it. Now take a look at the Properties window again. Notice the Arguments property: You can use this to add command-line arguments to the application defined in the last step. In the case of the default action that has been added for you, the arguments are "%1", where the value "%1" will be replaced by the filename that invoked the action. You can add your own hard-coded arguments (such as /d). You can set an action to be the default by right-clicking it and selecting Set as Default from the pop-up menu.
The User Interface Editor is used to manage the interface that is shown during the installation of the application. This editor enables you to define the dialog boxes that are displayed to the user and in what order they are shown. The User Interface Editor appears in Figure 24-9.
The editor uses a tree view with two root nodes: Install and Administrative Install. Below each of these nodes are three nodes that represent the stages of installation: Start, Progress, and End. Each of the three stages can contain a number of dialog boxes that are displayed to the user when the resulting Windows Installer package is run. A default set of dialog boxes is predefined when you create the deployment project. Which default dialog boxes are present depends on the type of deployment project: Setup Project or Web Setup Project. Figure 24-9 shows the dialog boxes that were added by default to a Setup Project. However, if you are creating a Web Setup Project, the Installation Folder dialog box will be replaced by an Installation Address dialog box.
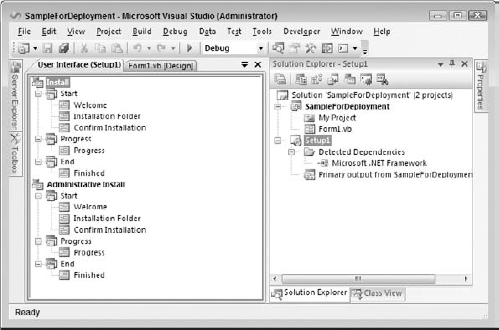
Using Figure 24-9, the following section discusses the two modes in which the installer can be run, and explains the three stages of the installation.
The installation can run in two modes, which correspond to the two root nodes of the editor: Install and Administrative Install. These distinguish between an end user installing the application and a system administrator performing a network setup.
To use the Administrative Install mode of the resulting Windows Installer package, you can use
msiexec.exewith the/acommand-line parameter:msiexec.exe /a < PACKAGE > .msi.
The Install mode is most frequently used and is what you will use in this exercise. As mentioned earlier, the installation steps are divided into three stages, represented as subnodes of the parent installation mode.
The Start stage is the first stage of the installation. It contains the dialog boxes that need to be displayed to the user before the actual installation of the files begins. The Start stage should be used to gather any information from the user that may affect what is installed and where it is installed.
This stage is commonly used to ask the user to select the base installation folder for the application and which parts of the system should be installed. Another common task at this stage is asking users for their name and organization. At the end of this stage the Windows Installer service determines how much disk space is required on the target machine and checks whether this amount of space is available. If the space is not available, then the user receives an error and the installation will not continue.
The Progress stage is the second stage of the installer. This is where the actual installation of the files occurs. There isn't usually any user interaction in this stage of installation, and typically one dialog box indicates the current progress of the install, which is calculated automatically.
Once the actual installation of the files has finished, the installer moves into the End stage. The most common use of this stage is to inform the user that the installation has been completed successfully. It is also often used to provide the option to run the application immediately or to view any release notes.
The order in which the dialog boxes appear within the tree view determines the order in which they are presented to the user during an installation. Dialog boxes cannot be moved between different stages.
The order of the dialog boxes can be changed by dragging the respective dialog boxes to the position in which you want them to appear. You can also move a particular dialog box up or down in the order by right-clicking the dialog box and selecting either Move Up or Move Down.
A set of predefined dialog boxes has been added to the project for you, enabling actions such as prompting a user for a registration code. If these do not match your requirements, you can add or remove dialog boxes in any of the stages.
When adding a dialog box, you have the choice of using a built-in dialog box or importing one. To illustrate how to add a dialog box, consider an example of adding a dialog box to display a ReadMe file to the user of a Windows Installer package. The ReadMe file needs to be displayed before the actual installation of the files occurs.
The first step is to choose the mode in which the dialog box is to be shown: Install or Administrative Install. In this example, you will use the Install mode. Next, you need to determine the stage at which the dialog box is to be shown. In the example, you want to display the ReadMe file to the user before the actual installation of the files occurs, which means you have to show the ReadMe file in the Start stage. Make sure the Start node is selected below the Install parent node.
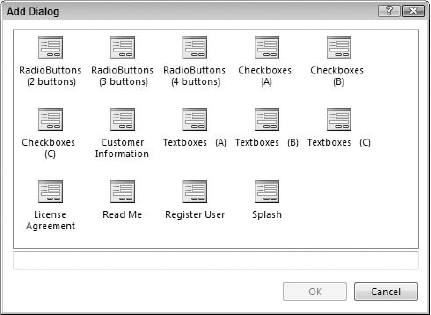
You are now ready to add the dialog box. Using the Action menu again, select the Add Dialog menu item, which will display a dialog box (see Figure 24-10) from which you can choose the desired dialog box.
As you can see, several built-in dialog boxes are available. Each dialog box includes a short description that appears at the bottom of the window to inform you of its intended function. In this case, you want to use the Read Me dialog box, so select it and click OK.
New dialog boxes are always added as the last dialog box in the stage that they are added to, so now you need to move it into the correct position. In this case, you want the Read Me dialog box to be shown immediately after the Welcome dialog box, so drag and drop it into position.
Like most other project items in Visual Studio, dialog boxes have a set of properties that you can change to suit your needs using the Properties window. If you make sure a dialog box is selected, you will notice that the Properties window changes to show the properties of the selected dialog box. The properties that appear vary according to the dialog box selected. Details of all the properties of the built-in dialog boxes can be found by looking at the "Properties of the User Interface Editor" topic in the MSDN documentation.
The Custom Actions Editor (see Figure 24-11) is used for fairly advanced installations. It enables you to define actions that are to be performed due to one of the following installation events: Install, Commit, Rollback, and Uninstall. For example, you can use this editor to define an action that creates a new database when the installation is committed.
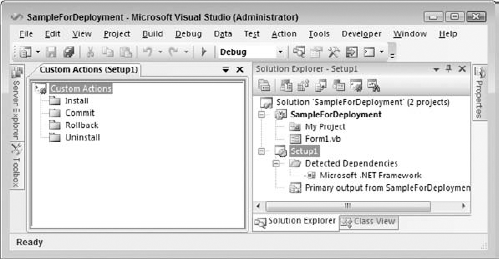
The custom actions that are added using this editor can be Windows script-based, compiled executables, or DLLs. Load the editor by right-clicking on the Setup1 project and selecting View
As with the User Interface Editor, the order in which the actions appear determines the order in which they are run, but you can modify this by dragging and dropping the actions or using the context menus of the actions to move them up or down.
To add a custom action you must select the node of the event into which you want to install the action. You can then use the Action menu to select the executable, DLL, or script that implements the custom action. The four actions defined in the editor are described in the following table:
Suppose that you want to start your application as soon as the installation is completed successfully. Use the following process to accomplish this.
First, decide when the action must occur. Using the preceding table, you can see that the Commit event will be run when the installation has been successful. Ensure that this node is selected in the editor. You are now ready to add the actual action you want to occur when the Commit event is called. Using the Action menu again, select the Add Custom Action menu item, which will display a dialog box that you can use to navigate to and select a file (.exe, .dll, or Windows script) from any that are included in the File System Editor. For this example, select Primary output from WindowsApplication (Active), which is contained within the Application Folder.
As with most items in the editors, the new custom action has a number of properties. Here are some of the properties you are most likely to need:
Property | Description |
|---|---|
This is the name given to the selected custom action. | |
This property enables you to pass command-line arguments into the executable that makes up the custom action. This only applies to custom actions that are implemented in executable files ( | |
By default, the first argument passed in indicates what event caused the action to run. It can have the following values:
| |
This enables you to enter a condition that will be evaluated before the custom action is run. If the condition evaluates to | |
This property enables you to pass additional information to the custom action. | |
If the custom action is implemented by an |
Set the InstallClass property to equal False because your application does not contain an Installer class.
That's it. When you run the Windows Installer package and the installation is successful, the application will automatically start. The custom action that you implemented earlier is very simple, but custom actions can be used to accomplish any customized installation actions that you could want. Take some time to play around with what can be accomplished using custom actions. For instance, try creating a custom action that writes a short file into the application directory.
The Launch Conditions Editor can be used to define a number of conditions for the target machine that must be met before the installation will run. For example, if your application relies on the fact that users must have Microsoft Word 2000 installed on their machine, you can define a launch condition that will check this.
You can define a number of searches that can be performed to help create launch conditions:
File search
Registry search
Windows Installer search
As with the Custom Actions Editor, the Launch Conditions Editor (shown in Figure 24-12) uses a tree view to display the information contained within it. The example shows a Custom Actions Editor that has had an item added. The steps for adding that item are covered later.

There are two root nodes. The first (Search Target Machine) is used to display the searches that have been defined. The second (Launch Conditions) contains a list of the conditions that will be evaluated when the Windows Installer package is run on the target machine.
As with many of the other editors, the order in which the items appear below these two nodes determines the order in which the searches are run and the order in which the conditions are evaluated. If you wish, you can modify the order of the items in the same way that you did with the previous editors.
The searches are run and then the conditions are evaluated as soon as the Windows Installer package is run, before any dialog boxes are shown to the user.
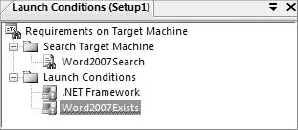
We are now going to look at an example of adding a file search and launch condition to a setup project. For this exercise, suppose that you want to make sure that your users have Microsoft Word 2007 installed on their machine before they are allowed to run the installation for your application.
To add a file search, you begin by searching for the Microsoft Word 2007 executable. Making sure the Search Target Machine node is currently selected in the editor, add a new file search by selecting the Add File Search item from the Action menu. The new item should be given a meaningful name, so enter Word2007Search. The end result is shown in Figure 24-12.
Like most items contained within the editors mentioned in this chapter, the new file search item has a set of properties that you can modify using the Properties window. The properties of the file search item determine the criteria that will be used when searching for the file. Most of the properties are self-explanatory and have been covered in previous sections, so they are not covered in this chapter.
In this example, you need to search for the Microsoft Word 2007 executable, which means that a number of these properties need to be modified to match your own search criteria.
The first property that requires modification is FileName. In this case, you are searching for the Microsoft Word 2007 executable, so enter winword.exe as the value for this property. Previous versions of Microsoft Word used the same filename.
There is no need to search for the file from the root of the hard drive. The Folder property can be used to define the starting folder for the search. By default, the value is [SystemFolder], which indicates that the search will start from the Windows system folder. There are several of these built-in values; if you are interested, you can look up what these folders correspond to in the section "Adding Special Folders."
In this example, you do not want to search the Windows system folder because Microsoft Word is usually installed in the Program Files folder. Set the value of the Folder property to [ProgramFilesFolder] to indicate that this should be your starting folder.
When the search starts, it will only search the folder specified in the Folder property, as indicated by the default value (0) of the Depth property. The Depth property is used to specify how many levels of subfolders the search will look in for the file in question, beginning from the starting folder specified. Note that there are performance issues associated with the Depth property. If a search is performed for a file that is very deep in the file system hierarchy, then it can take a long time to find the file. Therefore, wherever possible, use a combination of the Folder and Depth properties to decrease the possible search range. The file that you are searching for in your example will probably be at a depth of greater than 1, so change the value to 3.
There may be different versions of the file that you are searching for on a user's machine. You can use the remaining properties to specify a set of requirements for the file that must be met in order for it to be found, such as minimum version number or minimum file size.
You are searching for the existence of Microsoft Word 2007, which means you need to define the minimum version of the file that you want to find. To search for the correct version of winword.exe, you need to enter 12.0.0.0 as the value for the MinVersion property. This ensures that the user has Microsoft Word 2007 or later installed and not an earlier version.
To use the results of the file search, there must be a name for the results. This name is assigned to a Windows Installer property and is normally used to create a launch condition later. The Property property is where this name is specified.
For our example, enter WORDEXISTS as the value for the Property property. If the file search is successful, then the full path to the found file will be assigned to this Windows Installer property; otherwise, it will be left blank. At this point, the Properties window should look like the window shown in Figure 24-13.
A file search alone is pretty useless. The second step of the process of ensuring that the user has Microsoft Word 2007 installed is creating a launch condition that uses the results of the file search.
Make sure that the Launch Conditions node is selected in the editor, and add a new launch condition to the project by selecting Add Launch Condition from the Action menu. You need to give this new item a meaningful name; in this case, give it a name of Word2007Exists (see Figure 24-14).
This new item has a number of properties that you will need to modify. The first property you will change is called Message, and it is used to set the text of the message box that appears if this condition is not met. Enter any meaningful description that explains why the installation cannot continue.

The next property that you need to change is called Condition. It is used to define a valid deployment condition that is evaluated when the installation runs. The deployment condition entered must evaluate to True or False. When the installer is run, the condition is evaluated; if the result of the condition is False, then the message defined is displayed to the user and the installation stops.
For this example, you need to enter a condition that takes into account whether the winword.exe file was found. You can use the Windows Installer property defined earlier (WORDEXISTS) as part of the condition. Because the property is empty if the file was not found, and non-empty if the file was found, you can perform a simple test to determine whether the property is empty to create the condition. Enter WORDEXISTS <> "" as the value for the Condition property.
It is hoped that based on the preceding discussion of this search, you will be able to understand how to use the other searches and create your own launch conditions. That completes our brief tour of the editors that you can use to modify the resulting Windows Installer package to suit your needs. Although you have looked only briefly at the functionality of the editors, you have seen that they are extremely powerful, and worth investment of your time for further investigation.
The final step is to build the deployment or setup project you have created. There is no difference between how you build a Visual Basic .NET application and a deployment/setup project. If the project is the only project contained within the solution, then you can just use the Build item from the Build menu, which will cause the project to be built. As with the other projects, you are informed of what is happening during the build through the Output window.
The deployment/setup project can also be built as part of a multiproject solution. If the Build Solution item is chosen from the Build menu, then all the projects in the solution will be built. Any deployment or setup projects are built last. This ensures that if they contain the output from another project in the solution, they pick up the latest build of that project.
The earlier discussions of creating an installation package for your application assumed that you were able to transfer the MSI file to each machine that needed installation, either electronically or via some storage medium such as a CD-ROM. This works well for installations within an organization and can work acceptably for initial installation from CD-ROMs on distributed systems.
However, the availability of the Internet has raised the bar for acceptable deployment of Windows-based client applications. Perhaps the most important advantage of browser-based applications has been their ease of deployment for the user. For Windows Forms applications to be cost-competitive with browser-based applications, low-cost deployment over the Internet is needed.
Fortunately, there are several ways to achieve low-cost deployment over the Internet, including the following:
Different deployment techniques are suitable for different applications. The following sections describe each technique and how it works, and what kinds of applications it is suitable for use with.
Built into all versions of the .NET Framework is the capability to run applications from a web server instead of from the local machine. There are two ways to do this, depending on how the application is launched.
First, an application EXE that exists on a web server can be launched via a standard HTML hyperlink. For example, an application named MyApp.exe that is located at www.mycompany.com/apps can be launched with the following HTML in a Web page:
<a href="http://www.mycompany.com/apps/MyApp.exe">Launch MyApp</a>
When the hyperlink is clicked on a system with the .NET Framework installed, Internet Explorer transfers control to the .NET Framework to launch the program. The Framework then tries to load the EXE assembly, which does not yet exist on the client. At that point, the assembly is automatically fetched from the deployment web server and placed on the local client machine. It resides on the client machine in an area called the application download cache, which is a special directory on the system managed by the .NET. Framework.
If the EXE tries to load a class from another application assembly (typically, a DLL), then that assembly is assumed to be in the same directory on the web server as the EXE. The application assembly is also transferred to the application download cache and loaded for use. This process continues for any other application assemblies needed. The application is said to trickle-feed to the client system.
Whenever an assembly in the application download cache is needed, the .NET Framework automatically checks for a new version in the appropriate directory on the web server. Thus, the application can be updated for all client machines by simply placing an assembly on the web server.
One drawback of this technique for deploying the application is that it can be launched only from a Web page or some other means of accessing a URL (such as a shortcut or the Start
To get around this limitation, you can get a similar deployment capability by using a small launching application that uses dynamic loading to start the main application. Dynamic loading was discussed in the previous chapter. In this case, the location for the assembly used in dynamic loading will be the URL of the assembly on the web server. An application that uses this technique still gets all the trickle feeding and auto-update features of an application launched straight from a URL.
No-touch deployment is useful for simple applications, but it has some serious drawbacks for more complex applications:
An active Internet connection is required to run the application — no offline capability is available.
Only assemblies can be deployed via no-touch deployment — application files such as configuration files cannot be included.
Applications deployed via no-touch deployment are subject to code-access security limitations, as discussed in Chapter 12.
No-touch deployment has no capability to deploy any prerequisites for the application or any COM components that it may need.
Given the limitations of no-touch deployment, in the 2.0 version of the .NET Framework Microsoft added an alternative called ClickOnce. It is essentially a complete replacement for no-touch deployment. Thus, while no-touch deployment is still supported in .NET Framework 2.0 and higher, it is no longer recommended for use and is not covered here.
ClickOnce has several advantages over alternatives such as no-touch deployment, including the following:
Updating from a web server with a user control — No-touch deployment allows only completely automatic updating from the web server. ClickOnce can be configured for completely automatic updates from a web server, but can also be set up to allow more control by the user regarding when the application is installed and uninstalled.
Offline access — Applications deployed with ClickOnce can be configured to run in an offline condition also. Applications that can be run offline have a shortcut installed on the Start menu.
ClickOnce also has advantages over applications installed with Windows Installer. These include auto-updating of the application from the deployment server, and installation of the application by users who are not administrators. (Windows Installer applications require the active user to be an administrator of the local machine. ClickOnce applications can be installed by users with fewer permissions.)
ClickOnce deployment can be done from a web server, a network share, or read-only media such as a CD-ROM or DVD-ROM. The following discussion assumes you are using a web server for deployment, but you can substitute a network share if you do not have access to a web server.
For a simple case, no special work is needed to prepare a typical Windows application to be deployed via ClickOnce. Unlike the deployment options discussed earlier, it is not necessary to add additional projects to the solution. If you use standard options in ClickOnce, then it is also unnecessary to add any custom logic to your application. All of the work to enable ClickOnce deployment for an application can be performed by selecting options in the IDE.
It is possible to control the ClickOnce deployment by writing your own custom logic controlling the ClickOnce deployment processes, but that capability is beyond the scope of this book and is not covered here. Instead, this chapter explains the basic configuration of ClickOnce and common options that don't require you to write any code.
Applications installed via ClickOnce are one of two types:
Online applications, which can be accessed by the user only when the system has a connection to the website used to deploy the application
Offline applications, which can be used when no connection is available
Online applications must be launched with a URL (Uniform Resource Locator), a standard filename, or a UNC (Universal Naming Convention) filename. This may be done in various ways, such as clicking a link in a Web page, typing a URL into the Address text box of a browser, typing a filename into the Address text box of Windows Explorer, or selecting a shortcut on the local machine that contains the URL or filename. However, ClickOnce does not automatically add any such mechanisms to a user's machine to access the application. That is up to you.
Offline applications can also be launched with a URL or UNC, and are always launched that way the first time. The differences are as follows:
When ClickOnce performs the initial install of the application on the user's machine, by default it places a shortcut to the application on the user's Start
The application can be started from the shortcut, and will run with no connection to the original location used for installation. Of course, any functionality of the application that depends on a network or Internet connection will be affected if the system is not online. It is your responsibility to build the application in such a way that it functions properly when offline.
A deployment walk-through for a simple Windows application will demonstrate the basics of ClickOnce. This first walk-through deploys an online application to a web server, which is one of the simpler user scenarios for ClickOnce.
First, create a simple Windows Application in Visual Studio, and name it SimpleApp. On the blank Form1 that is created as part of the application, place a single button.
To enable ClickOnce deployment, access the Build menu and select the Publish SimpleApp option. The ClickOnce Publish Wizard will appear. The first screen of the wizard is shown in Figure 24-15.
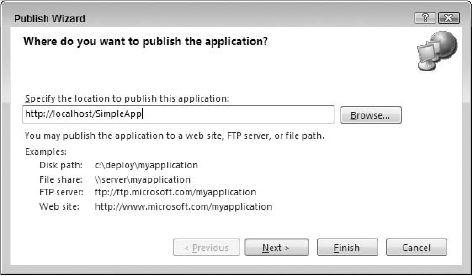
The location defaults to a local web server if you have one, but as discussed earlier, deployment can be done on a remote website, a network share, or even a local directory. You should change the location if the default is not appropriate for your circumstances. Once you've verified the location to publish to, click Next.
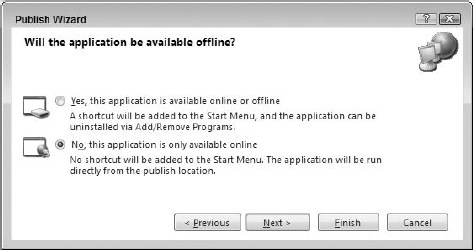
Select one of the two types of ClickOnce applications discussed earlier. Because this example is for an online application, click the second option to make the application available online only, as shown in Figure 24-16.
Click Next to see a summary of your selections, and then click Finish. The ClickOnce deployment process will begin. A new item will be added to your project called "SimpleApp_TemporaryKey.pfx," a complete build will be done, a new virtual directory will be created for the application on the web server, and the files needed to deploy the application will be copied to that virtual directory. (The new item is discussed later in the chapter, in the section "Signing the Manifest.")
If your publish operation fails, look in the Output window for Visual Studio to determine the reason. Usually, either Internet Information Server (IIS) is not running or you don't have the appropriate permissions to publish to a website.
IIS is not installed by default on Windows Vista or Windows XP. Under Vista, you need to ensure that the account in which you are developing with Visual Studio has appropriate security permissions to create new websites under IIS.
When the process is complete, a Web page will be generated that contains the link needed to deploy the application. The Web page has a Run button that activates the link. If you click this button, the application will be deployed by ClickOnce. (You may wish to view the source for this Web page to obtain the HTML needed to launch the application from your own Web pages.)
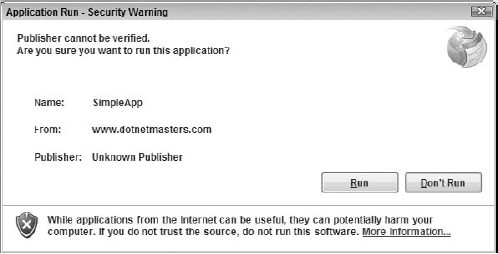
First, the prerequisites for the application are verified. In this case, that just means the .NET Framework. If the website is remote, then you will see a Security Warning dialog much like you would get if you attempted to download a file, and you'll need to select the Run option.
Next, an Application Run - Security Warning dialog is displayed, asking if it is acceptable to run the application, as shown in Figure 24-17. You can run the application by selecting the Run button, or select Don't Run, which aborts the process. For now, select Run, and after a short delay you will see the application's form appear.
If you now make any changes to the SimpleApp application, you must publish the application again to make the changes available via ClickOnce. You can do that by stepping through the Publish Wizard once again. More details about automatic updating of ClickOnce applications are provided later in this chapter in the section "The Update Process."
In the second screen of the Publish Wizard, if you select the first option, then the installation process has some differences:
The Web page that ClickOnce generates to test the deployment has an Install button instead of a Run button.
When the button is pressed, a shortcut to the application is added to the user's Start
The application is launched at the end of the install process, as it was with an online application, but future launches can be accomplished with the same URL or via the shortcut in the Start menu.
The virtual directory used by ClickOnce to deploy your application contains a number of files for different aspects of the deployment. Figure 24-18 shows what the directory for SimpleApp looks like after ClickOnce has finished copying all needed files.
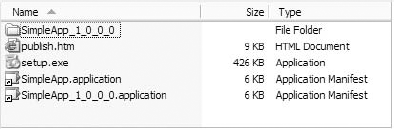
The virtual directory contains a folder for the first version of SimpleApp, which by default is version 1.0.0.0. It also contains the Web page that was displayed after ClickOnce finished, which is named publish.htm.
The next file is Setup.exe. This is an executable that does not need the .NET Framework to run. It is used during the ClickOnce process for all the activities that must take place before the application is launched. This includes activities such as checking for the presence of the .NET Framework. It is discussed further later in the chapter in the section "The Bootstrapper."
The next file is SimpleApp.application. The ".application" extension is specific to ClickOnce, and indicates the special file called a manifest, introduced in the last chapter. This is an XML-based file that contains all the information needed to deploy the application, such as what files are needed and what options have been chosen. There is also a file named SimpleApp_1_0_0_0.application, which is the manifest specifically associated with version 1.0.0.0.
Each version of the application has its own manifest, and the one named SimpleApp.application (with no embedded version number) is typically the currently active one. (Thus, the link to the application does not need to change when the version number changes.)
Other files associated with a version are in the folder for that version.
Because the manifest controls the update process, it is essential that ClickOnce be assured that the manifest is valid. This is done by signing the manifest, using a public-private key pair. As long as a third party does not have the key pair, that party cannot "spoof" a manifest, preventing any malicious interference in the ClickOnce deployment process.
A key pair is automatically generated when you publish with ClickOnce. However, you can supply your own key pair if you like. Options for signing the application are discussed later in the section "ClickOnce Configuration Options."
Note that your application assemblies do not need to be signed in order for them to be used in a ClickOnce deployment. Only the manifest must be signed. The manifest contains hash codes of all the assemblies involved, and those hash codes are checked before assemblies are used. This prevents malicious third parties from inserting their own versions of your assemblies.
By default, all ClickOnce applications check for updates each time the application is launched. This is done by getting the current version of the manifest and checking whether any changes were made since the last time the application was launched. This process is automatic, so there's nothing you need to do to make it happen, but it's helpful for you to understand the steps that are taken.
For an online application, if a change is detected, then it is immediately applied by downloading any changed files. Then the application is launched. This is conceptually similar to a browser-based application because the user has no option to use an older version.
For an application available offline, if changes are detected, then the user is asked whether the update should be made. The user can choose to decline the update. A configuration option enables you to specify a minimum version number, and that can force a user to accept an update. You will look at ClickOnce configuration options later.
If an update is made for an offline application, then the previous version is kept. The user can then roll back to that version using the Add/Remove Programs option in the control panel. A user can also uninstall the ClickOnce-deployed application from that same location.
Only one previous version is kept. Older versions are removed when a new version is installed, so the only versions available at any point in time are the current version and the one immediately before it. A rollback can be made to the immediately preceding version, but not to any earlier versions.
You can control the update process by including code in your application that detects when changes have been made and applies the changes as necessary. As previously mentioned, this chapter does not cover writing such logic. You can find samples in the MSDN documentation for this capability.
In Visual Studio 2008, the properties for a Windows Application project include several pages that affect ClickOnce. (You can get to the properties for a project by right-clicking on it in the Solution Explorer and selecting Properties.)
The Signing tab page includes options for signing the ClickOnce manifest. There are buttons to select a particular certificate from a store or a file, or to generate a new test certification for signing. This page also contains an option to sign the assembly that is compiled from the project, but as mentioned previously, this is not necessary for ClickOnce to operate.
The Security tab page provides settings related to the code access security permissions needed by the application to run. Because the application is being deployed from a source other than the local machine, if you use ClickOnce, code access security limitations are in effect, as described in Chapter 12. A typical example of the Security tab page is shown in Figure 24-19.
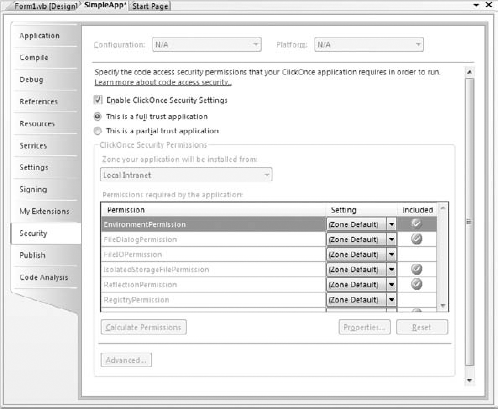
Using the options on the Security tab page, you can calculate the permissions needed by the application, using the Calculate Permissions button. You can also arrange to test your application against a particular set of permissions. To do that, change from the default option "This is a full trust application" to the option immediately below it, labeled "This is a partial trust application." Then select the zone from which the application will be installed. When the application is run by Visual Studio, permission for that zone will be enforced.
All of the other ClickOnce configuration options are on the Publish tab, shown in Figure 24-20.

You can set many options with the Publish page, but here are some of the most important:
Because applications deployed by ClickOnce are a part of the .NET Framework, the .NET Framework must be available on the user's machine before your application can be installed and run. In addition, your application may require other items, such as a database or COM component, to be installed.
To provide for such needs, ClickOnce includes a bootstrapper that runs as the first step in the ClickOnce process. The bootstrapper is not a .NET program, so it can run on systems that do not yet have the .NET Framework installed. The bootstrapper is contained in a program called Setup.exe, which is included by ClickOnce as part of the publishing process.
When setup.exe runs, it checks for the prerequisites needed by the application, as specified in the Prerequisites options discussed previously. If needed, these options are then downloaded and installed. Only if the user's system contains installed prerequisites does ClickOnce attempt to install and run your Windows application.
The MSDN documentation includes more details on configuring and using the ClickOnce bootstrapper.
Sometimes an application manifest created by ClickOnce needs to be manually changed. For example, if the application contains dynamically loaded .NET DLLs (as discussed in the previous chapter), then such DLLs are not automatically included in a ClickOnce manifest.
In creating a manifest for an installation, ClickOnce relies on the compile-time references for the application being deployed. It will place any application assemblies that have compile-time references into the manifest.
However, dynamically loaded assemblies do not have a compile time reference, which means ClickOnce can't put them in the manifest automatically. If you have dynamically loaded assemblies in your Windows Forms application, then you must add them to the manifest manually.
ClickOnce includes a tool for manually editing the manifest. Named MAGE.exe, it can be started from the Visual Studio 2008 command prompt. It offers a UI to open a manifest and perform various manual operations on it. MAGE.exe can also be used from the command line, so you can create batch files or PowerShell scripts to automate insertion of files in a ClickOnce manifest.
How to use MAGE.exe is beyond the scope of this chapter, but the help files for MAGE.exe are extensive, and you can find MSDN samples on using it.
In addition to deploying an application for use, ClickOnce also provides the capability to uninstall or roll back applications that are deployed with the offline option. Such applications will have an entry in the Add/Remove Programs section of the control panel. That entry will offer an uninstall option; and if a rollback version is present, an option to roll back the last update.
Only one level of rollback is available. If multiple updates have occurred, then the user can only roll back to the most recent one. Once a rollback is done, no further rollback is possible until another update has been deployed.
ClickOnce is a complete replacement for no-touch deployment. However, there are other deployment scenarios for which ClickOnce may not be the ideal solution. For example, ClickOnce can deploy only a per-user installation. It cannot install an application once to be used by all users on the system.
ClickOnce may be used in combination with technologies such as the Windows Installer. If you create .msi files, as discussed earlier in the chapter, you may include them as part of ClickOnce's bootstrapper process. This is an advanced technique not discussed in this book, but you can learn more about this capability in the MSDN documentation.
For cases in which ClickOnce is not appropriate, you may wish to use more customized deployment technologies, which are discussed next.
If an application needs deployment capabilities not covered by the technologies discussed so far, it may be necessary to use alternative technologies, or even develop them yourself. For example, you can create a deployment function that checks, via a Web service, whether updating needs to take place and that uses FTP to transfer files from a web server to a client machine.
Rather than start from scratch on such a deployment/installation technology, you can look at starting points such as the Updater Application Block. Created by Microsoft's Patterns and Practices Group, the Updater Application Block can be downloaded from Microsoft's website. It includes manifest-based checking of modules for updating, and background transfer of new modules using the same transfer technology as Windows Update.
You can use the Updater Application Block as is, or customize it for your own needs. For example, you could create a version that enables different classes of users to have different update strategies, so that new updates are sent to a select group of users first.
An application must be deployed to be useful. How an individual application should be deployed depends heavily on circumstances. Factors such as the geographic distribution of the application, its complexity, and how often it will be updated must all be considered when choosing an appropriate strategy.
The main possibilities for deployment are as follows:
XCOPY deployment
Installation via the Windows Installer
No-touch deployment
ClickOnce deployment
Deployment with other technologies such as the Application Updater Block
This chapter has covered each of these, with some discussion of their applicability. It will be helpful for you to understand all of these options to make appropriate decisions for the deployment of individual applications.
On the one hand, simple utilities, for example, might be best installed by simply copying files. On the other hand, standalone applications that have many dependencies on COM-based components will more often use Windows Installer technology. Applications that depend on Web services for data will often be best deployed with ClickOnce. Corporate applications with special needs for security during installation, or that need to install an application once for multiple users, may be better off using the Application Updater Block.
You should also be aware that these options are not mutually exclusive. You might have an application with COM dependencies that needs to use an .msi file for an initial install, but gets the rest of the application and future updates via ClickOnce or the Application Updater Block. Whatever your application, the plethora of application deployment technologies available for .NET-based applications means you should be able to find an option or combination that suits your needs.