This chapter introduces the Visual Studio Tools for Office (VSTO) project templates. VSTO has been around as an add-in to Visual Studio for several releases. Visual Studio 2008 includes it as part of the standard installation of all versions of Visual Studio Professional and above. The VSTO package isn't so much a set of new menus as it is templates and DLLs that enable you to integrate custom business logic into Microsoft Office products.
VSTO has been somewhat neglected in the .NET development world. The main Office client applications that most people think about to target, Word and Excel, have supported customization through Visual Basic for Applications (VBA) since long before .NET, so for most developers the power of VSTO hasn't really been leveraged. With the release of Office 2007 and the new project types available in Visual Studio 2008, you can expect Outlook to start to take center stage in terms of Office-based application customization.
More important, Visual Studio 2008 not only introduces VSTO as a mainline set of tools with Visual Studio Professional Edition and above, but also provides one of the largest deltas in terms of new features from previous versions of anything in Visual Studio 2008. These new features are intended to provide much more end-to-end use of VSTO to enable the creation of business applications.
This chapter introduces you to the role of the VSTO family of tools and demonstrates three different implementation examples. The topics in this chapter include the following:
VSTO releases
Office business application architecture
VBA-VSTO interop
Creating a document template (Word)
Creating an Office add-in (Excel)
Outlook form regions
These tools are available as part of Visual Studio 2008 Professional and are focused on enabling you to move from a goal of "this project will create a custom grid with the following capabilities" to a goal of "this project will enable users to leverage Excel 2007 and surface our business application data in the robust Excel table management system, where users can customize and save the data back into our custom line-of-business data store." Developers and customers often talk about how nice it would be to embed Excel in their application. Now, as you'll see in this chapter, the real solution is the reverse — your application can be embedded in Excel.
With Visual Studio 2005, the VSTO package was available as an add-in to Visual Studio. VSTO has been around since early in the .NET tools life cycle. That original package targeted Office 2003, which was the most recent version of Office at the time Visual Studio 2007 was released. There were five templates, two each for Word and Excel document-level customizations and then a single template for creating Outlook add-ins.
With the release of Office 2007, Microsoft provided an update to the Visual Studio 2005 environment called VSTO 2005 SE, where SE stood for Second Edition. This update essentially enabled VSTO to access some of the same templates for Office 2007; however, access to, say, the Office 2007 Ribbon was limited in this set of tools. The requirement to manually create and edit an XML file to define a custom Ribbon bar made approaching this solution somewhat intimidating. However, VSTO 2005 SE was just an interim release until the VSTO team could put together a more complete package for Visual Studio 2008.
With the release of Visual Studio 2008, the number of available options enabling you to extend the standard features of Office VSTO has exploded. As shown in Figure 22-1, the number of project templates referencing the Microsoft Office System far exceeds the five offered in 2005. Moreover, note that Visual Studio 2008 supports templates for both Office 2003 and Office 2007. There are in fact twice as many Office 2003 templates in Visual Studio 2008 as there were in VSTO 2005.
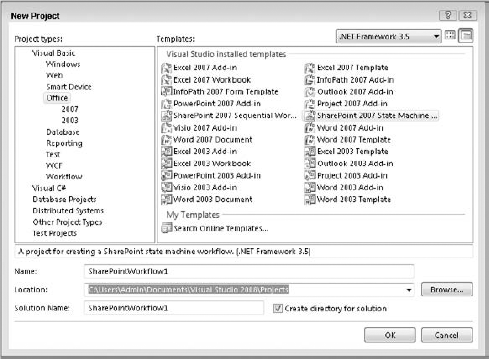
Figure 22-1 shows a template for creating a workflow project that targets SharePoint 2007. Note that under Visual Studio 2008, the types of VSTO projects available include not only client-based templates, but also server-based templates. The two workflow templates available in the Office 2007 collection are also available as part of the template collection in the Workflow category.
This chapter bypasses working with examples of the Office 2003 packages, not because there is anything wrong with them but simply to devote the most coverage to the current version of Office. Note that the project templates can all be created while targeting the .NET 2.0 Framework. Conversely, all the Office 2007 projects require you to target .NET 3.5; there are no .NET 3.0 targeted projects in the package.
In any discussion of VSTO, it's important to distinguish between Office automation and VSTO. Office automation is a term that actually refers to your ability to create a custom application that references Word or Excel or some other Office application. In this case, the user of your custom application can start and send data to your application. This type of automation does not necessarily involve VSTO or VBA.
Office automation relies on the custom application having a reference to Office and then sending information into or retrieving information from that application without Office being customized. This type of automation leverages COM-based interop to the Office components and doesn't fall into the same category of application as VSTO. A VSTO application is one in which the actual Office application is aware of and connected to the custom logic. Thus, when a user of an application that supports Office automation wants to retrieve data from an Excel spreadsheet, that user exits Excel, goes to that custom application, asks it to connect to the currently running instance of Excel, and attempts to retrieve the data. This type of automation tends to treat Office as more of a black box.
VSTO applications are built into Office. They can and do display UI elements directly within applications such as Word, and they can and do leverage the same automation elements and interop assemblies that Office automation clients leverage. The key difference is that VSTO applications are directly integrated with the application process (threads) and have direct access to UI elements that are part of the application.
When it comes to the Office Primary Interop Assemblies (PIA) for Office 2003, the Office installer did not automatically include these when Office 2003 was installed. As a result, if at some point you choose to do either a VSTO or Office automation project for an Office 2003 project, you'll want to include the redistributable for these assemblies. The PIA for Office 2003 is available from Microsoft Downloads, currently located at www.microsoft.com/downloads/details.aspx?familyid=3c9a983a-ac14-4125-8ba0-d36d67e0f4ad&displaylang=en.
While the difference between a Word project and an Excel project is no doubt self-evident to you, the difference between an Add-In and a Document project might not be. In short, each of the different VSTO project types targets not only a given client or server Office application, but also a different way of customizing that application. In the case of Add-In projects, the project type enables you to customize the application. The main project types for VSTO are as follows:
Add-In — This template enables you to create an extension to an Office project that is loaded every time that product is started. Add-ins, as with Visual Studio add-ins, are code that is registered with the application and started every time that application is started. Add-ins are needed for some applications such as Outlook in which an inbound customized message would need the add-in support on the client to recognize the customizations in order to load the document (mail message) correctly.
Document/Workbook — These are two separate templates, associated with Word and Excel, respectively. The key aspect of these templates is that the code associated with your custom logic is embedded in a specific document file. The model is much closer to the model exposed by the original VBA customization in these products. In fact, there is even a way to interoperate between Document/Workbook projects and VBA projects. If you open Word or Excel and select a new document or a document that doesn't include this logic, the custom code isn't loaded. On the one hand, this makes these projects lower risk in that you are less likely to disable a client's system. On the other hand, without a central location such as SharePoint to host these custom documents, the application model is much weaker.
Template — These projects are similar to the Document/Workbook model in that you are defining code that lives in a single template. This template and code are loaded only when a user chooses to use it from within Office.
Workflow — These templates target the SharePoint workflow engine. This chapter doesn't go into much detail on these project types, as the process of creating custom workflow projects is described in Chapter 27. The templates in this section are not generic Windows Workflow Foundation (WF) templates, but rather are specific to creating workflows installed and run on MOSS 2007 (SharePoint 3.0).
A Word Add-In template is a project template that enables you to create a custom actions pane and a custom menu and/or ribbon bar for Word. The Add-In project types host code that will run each time that Word (or the selected application) is started. Thus, it doesn't matter which document the user chooses to open or the underlying template that is part of the current document — the code in the Add-In will be loaded.
This doesn't mean that an Add-In template can't be document specific. In the case of Outlook, the only available template is an Add-In template. This is because of the nature of the extensions to Outlook, which loads a complete collection of "documents" (i.e., e-mail messages) when it is started. As such, the document model isn't directly used in Outlook, although Outlook does support custom Outlook Form Regions.
What makes an Outlook Form Region (OFR) different from a Document or Template model VSTO extension? Well, the OFR is part of an add-in to Outlook, so if a new message is received that references that custom OFR, Outlook is ready to load the custom application logic. The potential challenges of OFR messages are discussed later in this chapter. The OFR customization provides a very powerful, compelling application model, but as a result it also has key requirements in order for it to function correctly.
The Office Business Application (OBA) model is one that Microsoft is beginning to promote as a product. Indeed, if you go to www.microsoft.com/oba, you'll find yourself redirected to the OBA product site at Microsoft. However, there isn't a license or a product called OBA that you can order in a box. Rather, the OBA model is conceptual, explaining how you can leverage the components that make up Microsoft Office to create a custom business logic solution. Instead of building applications from scratch, you can integrate the functionality of Excel for managing table data into your business logic using VSTO (not that VSTO is the only enabling technology associated with an OBA).
The OBA model has been made possible by a combination of several changes to Microsoft Office that have occurred over the years. When products such as Word and Excel were originally rolled into the larger "Office" product group, it was primarily a licensing arrangement. The original Office designation was a little like MSDN in that it enabled you to purchase a group of products for a lower price than purchasing each independently. Aside from some limited integration points, such as using the Word engine to edit Outlook messages, these products were independent.
However, over time integration has gone beyond COM-based document integration. Arguably one of the key enabling technologies within the Office integration and collaboration framework is SharePoint. Other servers in the Office suite also fill this role in specialized areas — for example, Office Communication Server. This chapter doesn't cover SharePoint in depth, or its far more functional upgrade, Microsoft Office SharePoint Server (MOSS).
SharePoint provides a central location from which you can host customized Office documents. It also enables you to host custom workflow logic and provides a central location for e-mail and notification messages related to business processes. Feature-rich versions of MOSS include capabilities such as Excel Services and other advanced capabilities.
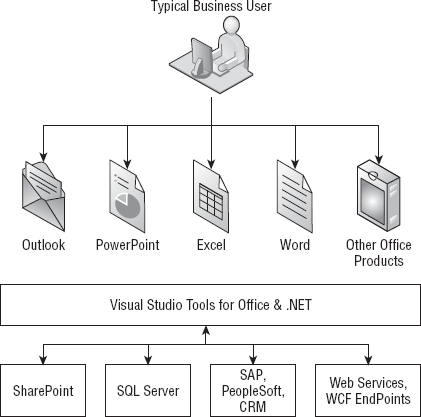
Because of these benefits, the OBA model builds around a central server. As noted, this might be a SharePoint server if the goal is to create a custom workflow to monitor an internal business process. However, it doesn't have to be SharePoint. As shown in Figure 22-2, you might choose to create your OBA to leverage data stored in a line-of-business (LOB) system such as SAP, PeopleSoft, SQL Server, or any of several other business and data systems. Often these systems have either limited or no custom user interface. As a result, the user interface may or may not include features that your customers are familiar with from Office. Given that millions of people are familiar with Office and its interface, taking this data and placing it into that interface is the OBA model.
This brings up the second key enabling technology: the ease with which you can now import and export data and behavior to the Office client applications via VSTO. In fact, even with SharePoint it is the VSTO piece that truly enables you to integrate your custom business application into the Office client tools. VSTO enables you to retrieve data either from a database via ADO.NET or LINQ or to communicate with XML Web Services and WCF. Once you have the data, you can enable your users to leverage their experience with the Office user interface to manipulate that data. As you'll see in this chapter, with the release of Visual Studio 2008 on top of Office 2007, you can now interface your LOB processes and data into every one of the Microsoft Office client applications.
This should give you a better idea of what an OBA is and how it provides an architectural pattern that you can use to create a business application using VSTO. In addition to the Microsoft.com line provided at the start of this section, you can also find more information at the Microsoft-sponsored site www.obacentral.com.
Finally, if you want to see an example of an OBA built against Office 2003 and Windows SharePoint Services (WSS) 2.0, take a look at Team System. The Team Explorer install for Team Foundation Server not only provides a set of add-ins for Visual Studio, but also provides support for a set of custom VSTO document applications. Every time you create a new Team Foundation Server (TFS) project, a new WSS project site is created. The site will contain several VSTO-based documents for Word and Excel. These illustrate how to use VSTO and the OBA model for your custom applications.
Of course, VSTO wasn't the original or even now the only way to create custom logic within an Office client application. Since the early days of COM, both Microsoft Word and Microsoft Excel have supported Visual Basic for Applications (VBA). Fortunately, ongoing improvements occurring within VSTO can be integrated with existing VBA.
The VBA model for Office document customization was limited at best. For starters, it is only available in Word and Excel. However, the VBA application model is not yet retired. That bears repeating: VBA is still a viable and supported set of tools for customizing the Microsoft Office experience. As with all such changes in technology, there are certain things that VSTO does that VBA wasn't designed to do and to a certain degree is not capable of doing. However, there are also certain VBA optimizations within the existing tools with which VSTO can't currently compete.
Office 2007 is also known as Office version 12. Microsoft has committed to keeping VBA through Office version 14, which is still quite a way off. Thus, instead of doing a blanket conversion, you'll be able to interoperate with existing code. Just like the WPF interop library and the Visual Basic 6.0 interop library, VSTO and VBA have an interop library. Microsoft suggests that companies with complex VBA solutions will probably want to update these Document/Workbook style solutions with VSTO features, but not necessarily attempt to convert working code and features. Thus, your new VSTO code may call existing VBA functions; and similarly, your existing VBA code may start calling your VSTO objects.
There are, of course, limitations to this model, and it isn't one that's recommended for new development. When it comes to the ability to call VBA from VSTO, you can call the Run method on the Office object model. This method accepts the name of a VBA method and a list of parameters. There is no IntelliSense, as what you are doing is making a dynamic runtime call. An example of this call is as follows:
Dim result As Integer = Me.Application.Run("MyFunctionAdd", 1, 2)That's it — no special steps or hoops, just a standard call. Of course, your document or workbook needs to actually include the VBA function MyFunctionAdd, but that should be apparent. Also note that when you combine VBA and VSTO, you have to handle permissions for both, so plan to spend a little more time building your installation package and permissions. In addition, when you create your first custom VSTO Document or Workbook project, you'll get the warning shown in Figure 22-3.
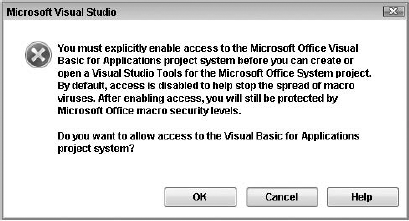
At this point, you may not know whether you want to enable VBA interop within Visual Studio and your VSTO projects. If you've worked with VBA in the past or think you might need to do any VBA, consider enabling access to the VBA project system. As noted in the dialog, while turning this off completely is meant to act as a first layer of defense against the spread of macro viruses, your project will still maintain protection via other layers of security. Keep in mind that this option is available only to Word Document and Excel Workbook templates.
While this chapter isn't going to focus on security, sometimes — such as when you are enabling VBA macro interop — you do require a few specific settings. While it's possible to call VSTO from VBA in Office 2007, it isn't the default. Note the reference to "Office 2007." With Office 2007 it's possible to enable macros, and as part of the creation of a VSTO project on a macro-enabled document, by changing a couple of document properties in your VSTO project you can reference your VSTO methods and properties from VBA code. This process only begins after you have enabled macros within your document.
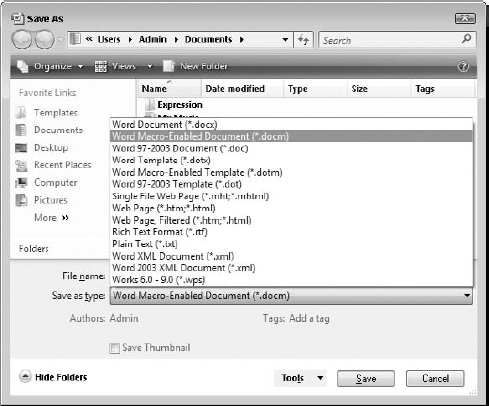
Your first step in enabling macros in a document is to ensure that the file is saved as a .docm file instead of a .docx file. The same is true for Excel, where the file type needs to be .xlsm as opposed to .xlsx. By default, documents saved with the extension .docx do not allow macros, so open Word 2007 and press Alt + F11 to open the VBA editor for your document. You can add an actual macro or something as simple as a comment inside a default event handler. Alternatively, you can select a document that already contains a macro. Once this is complete, you need to save your document. For this example, call your document VBAInterop. Then, select the .docm document type, as shown in Figure 22-4.
If you accidentally attempt to save your document as a .docx, the file system should warn you that it is about to clear your macros. The message box will allow you to return to the Save As window and change the document type to a macro-enabled document.
Next, you need to ensure that Word considers your macro available whenever the document is opened. This demo was written on the Vista operating system with Office 2007. In this environment you need to change your Trust settings for Office. Once you have added your comment macro and saved your .docm file, within Word (you may need to reopen the document) you should see a notification that a macro in the document has been prevented from running.
At this point you can choose to enable the macro. However, that choice is for the currently running instance only. If you closed and reopened the document, you would again be presented with that prompt. To make the change permanent, you need to either use the link in the lower-left corner of that display or traverse the menus to access the Trust Center for Word.
To traverse the menus, go to the Office button in the upper-left corner of your document and open the menu associated with this button. On the bottom of the menu is a button labeled Word Options. Select this button to open the Word Options dialog. On the left side of that dialog is an item labeled Trust Center that is similar to the link mentioned earlier. This opens the Trust Center dialog, shown in Figure 22-5.
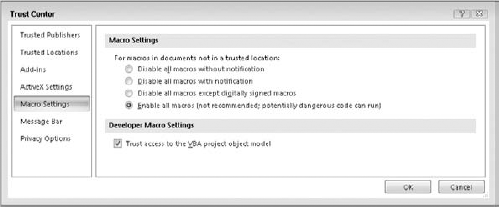
For the VBA interop to work, go to the Macro Settings in the Word/Excel Trust Center and update the Macro Settings to always enable all macros. Yes, you essentially need to turn off the security for macros on your development machine (unless you are using digitally signed macros — which isn't the case for this example).
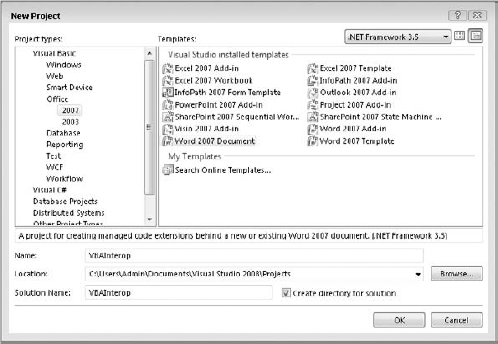
Once you have saved your document, it's time to open Visual Studio 2008 and create a new Office 2007 Word Document project, which in this case you can also name VBAInterop, as shown in Figure 22-6.
This brings up a second dialog, which is where you need to change from the default process. Normally, you would create a new document in the dialog shown in Figure 22-7. However, in this case you actually want to import your macro-enabled document VBAInterop.docm. By default, the Browse button limits the display of available files to those with the .docx extension, so you need to change the default in the file browse window to .docm in order to see your document.
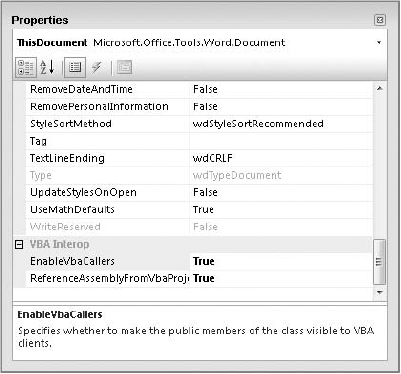
Clicking OK triggers Visual Studio to generate your project. When the generation is complete, Visual Studio will display your Word document within the main window, and in the lower right-hand corner you should have your Properties window. This window, shown in Figure 22-8, has two new Interop properties at the bottom. You need to modify both these properties from their default of False to the new value of True.
These properties cause your VSTO project to regenerate and insert a new property within your project's macro file. To test this, you can start your project; once the project builds, you'll see Word start and it will open your custom document. Once your document is open, press Alt-F11 to open the Macro Editor. Above your custom code should be the newly generated property value. The resulting code if you merely entered a comment should look similar to the following:
Property Get CallVSTOAssembly() As VBAInterop.ThisDocument
    Set CallVSTOAssembly = GetManagedClass(Me)
End Property
Private Sub Document_New()
' This is a placeholder comment.
End Sub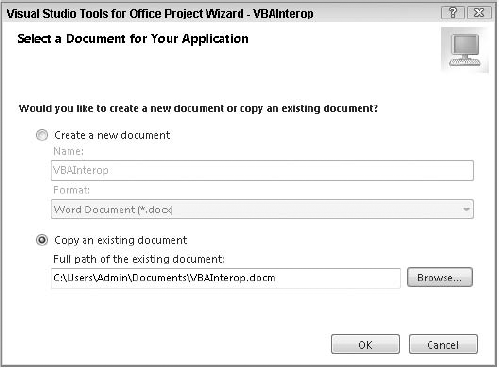
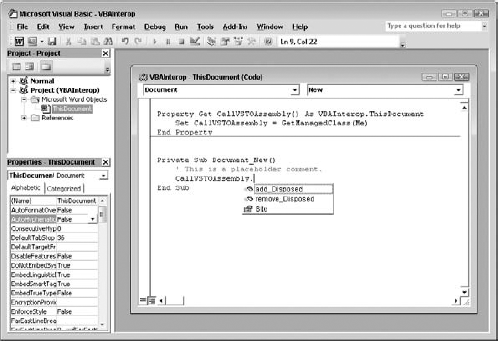
The code in this block shows the newly generated property that associates your VBA environment with the VSTO code that you are creating. You can then proceed to the placeholder comment in the Document_New method where you initially entered a comment to maintain your macro's existence. Within this method, on a new line, make a call to CallVSTOAssembly, and you'll see that you have full IntelliSense for the list of available methods and properties, as shown in Figure 22-9. Note that because you didn't create any custom code in your VSTO solution during this process, the options shown in Figure 22-9 reflect those which are generated as part of your project template.
There are a few additional steps in order to enable VBA to connect to VSTO, but for those who are already working with VBA these steps won't be a significant challenge. After all, it is the development experience and ability to continue to leverage existing resources that really drive this interop feature. The fact that this feature is so natural for a VBA developer — who may want to leverage key new capabilities such as WCF, WF, or possibly even WPF-based graphics in Excel — means that you can expect to be able to leverage your existing VBA code for several more years. When you do "migrate," the process is one that you control and can carry out in stages based on your requirements and decisions, not some overriding conversion process.
The previous section introduced you to creating a document template from the standpoint of interoperating with VBA, but unless you have an existing VBA application, in most cases you'll just create a new, clean Word Document project. These projects focus on a specific document. They are self-contained in the sense that your changes only affect the user's system when the user chooses to open a document that specifically includes your changes.
This is great, as it isolates your changes. When users open Word or Excel they don't automatically load your customization. This way, your code won't impact the overall performance of their system — not that most developers care about this. The model also means that customizations for Application A aren't competing with Application B, which is in some ways a bigger challenge with add-ins.
However, this model (shared by VBA) has a limitation. The user must open a copy of the correct document to access your custom code. In an uncontrolled environment it may be difficult for a user to find the most recent version of that code. Sure, the first time your document customization is sent out to 10, 20, or 200,000 users, it's easy to locate and update the source documents. However, when you need to update some element of that standalone document, you have a problem.
Fortunately, this is where the OBA model and SharePoint become invaluable. By placing your documents onto SharePoint, you now have a controlled location from which users can access your VSTO application. In fact, with SharePoint 3.0 and MOSS 2007 you can actually create a library for copies of your custom document that uses your document as what is known as a content type. By using your VSTO document as a SharePoint content type, when users access that SharePoint library and request a "new" document, they'll automatically open a new document that leverages your customizations.
An alternative to leveraging SharePoint is illustrated by another way to leverage document-based VSTO solutions. Your document might be included in a Microsoft or Windows Installer (MSI) package that is part of a larger installed application. In fact, you might not want users to directly open your customizations. Instead, your custom application might install your custom document via an MSI, so that updates can occur in conjunction with your application updates. Then, when a user needs to modify data in a grid, you might open a custom Excel document, which, rather then save data in Excel automatically, places the data back into your application data store when the user asks to save.
The first step in creating such a solution is to create a new project. In this case the sample project will be named "ProVB_WordDocument." Once you have changed the default name, click OK in the New Project dialog. This will take you to the Office Project Wizard dialog shown in Figure 22-10.

Note that you can specify a name for the document but it defaults to the project name you've chosen. That's because as part of this process, Visual Studio is going to generate a new Office 2007 document and place that .docx file in your solution directory. When you work on this project, you'll be customizing that document. Thus, in many cases you may want to give the document that will host your customization an end-user-friendly name instead of your project name.
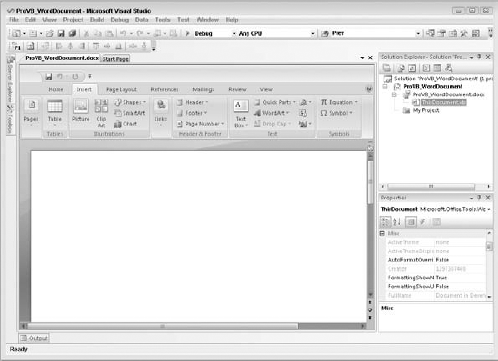
Once this is complete you are returned to the main Visual Studio window with a new project. Unlike other project types, however, in this case the template creates a Word document and then opens that document within Visual Studio. As shown in Figure 22-11, within the Solution Explorer, on the upper-right side of the display, your project contains a .docx file. Associated with this file is a second .vb file, which is where some of your custom code may be placed. As shown in Figure 22-11, the Visual Studio user interface actually encapsulates this document. The Properties window shows the properties for this document. Note that unlike when you created your VSTO project from an existing VBA document, there are no properties to support integration with VBA.
Also noteworthy (although not shown) is that if you were to open your project's properties and review the references, you'd find that all the Office Primary Interop assemblies you need in order to work with the Office object model have automatically been added to your project. You no longer need to try to figure out which COM interop assemblies you'll need for accessing that interface from Word.
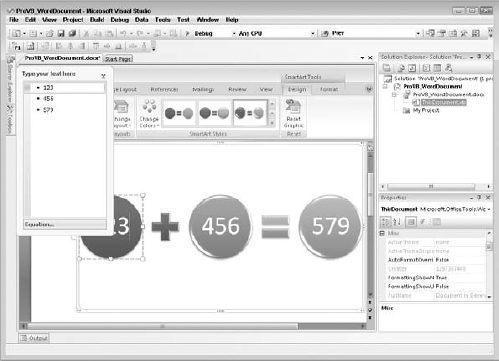
Of course, the main feature of Figure 22-11 is that Visual Studio has fully encapsulated the Word user interface. Note how the Insert tab has been selected in the document. You have full access to all the features in Word in this mode; and to demonstrate this, let's adjust the default contents of this document. Choose the Smart Art category. Then, from within its dialogs, go to the Process tab of the SmartArt Graphic dialog, scroll down, and select the circular equation image. This will add that item to your document and automatically open an equation editor, as shown in Figure 22-12.
You can enter some numbers into the text box for this equation, but there is no built-in adding logic. Close that text window and return to Visual Studio. Of course, at this point you haven't actually added any code to your document, so switch to the code view. By default, VSTO inserts two event handlers when your project is created. Note that as long as the .docx file is displayed, you can't access the ThisDocument.vb file for that document. To switch the view, close the default .docx display and then right-click on the ThisDocument.vb file in the Solution Explorer and select Code View from the context menu. Now you should be able to see the code that was created as part of your project:
Public Class ThisDocument

    Private Sub ThisDocument_Startup(ByVal sender As Object, _
                              ByVal e As System.EventArgs) Handles Me.Startup

    End Sub

    Private Sub ThisDocument_Shutdown(ByVal sender As Object, _
                              ByVal e As System.EventArgs) Handles Me.Shutdown

    End Sub

End Class
As the preceding code illustrates, the document has two events available within VSTO. The first handles the startup event; the second handles the shutdown event. These are the only two that are added to your project by default. You'll learn more about these shortly, but first add another event. This is the BeforeSave event, and as you might expect, it fires just before your document is saved:
Private Sub ThisDocument_BeforeSave(ByVal sender As Object, _
                   ByVal e As Microsoft.Office.Tools.Word.SaveEventArgs) _
                   Handles Me.BeforeSave
    Dim res As DialogResult = MessageBox.Show( _
                    "Should I save?", "Before Save", _
                    MessageBoxButtons.YesNo)
    If res = DialogResult.No Then
        ' This code could call a backend data store and then
        ' not save the associated document so the document would remain
        ' unchanged.
        e.Cancel = True
    Else
        ' This code would allow you to encourage the user to
        ' always save a new copy of the document
        e.ShowSaveAsDialog = True
    End If
End Sub
The preceding code illustrates a custom override of the BeforeSave event on the document. Note that after the event handler is declared, the code creates a local variable to hold a dialog result. It then shows a message box asking the user if it should save. Normally this isn't something you would do on this event, but in this case it enables you to see two of the attributes of the SaveEventArgs class.
If the user chooses not to save, then you have the option to not save data. Alternatively, you don't have to offer a choice to the user; instead you can simply add code ensuring that the user simultaneously saves data to a backend data store. Whether you need to call a Web service or update a database, this is a good place to call that logic. You then can save to the database and decide whether or not you actually want to update the underlying document. In some cases you might quietly save the data to the database and never save the document; then, when the document is next opened, you retrieve the data from the database as part of the startup. This is a particularly useful trick if you don't trust the file system's read-only privileges or want to ensure that data from multiple different users is properly refreshed each time the document is opened.
Alternatively, you can force the user to perform a "save as" instead of a typical save. This uses the self-explanatory ShowSaveAsDialog property. The idea, again, is that you might not want the user to save over the original; to keep that from happening, you can have Word automatically prompt the user to save the document with a different name. You can also save data to a database or other data store during this process.
The preceding work provides some baseline code in your application, but it doesn't provide either a custom ribbon or custom task pane. Therefore, before testing this, let's add one of each of these items to the project. To add either of these controls, right-click on your project in the Solution Explorer and then select the Add button to open the Add New Item dialog.
As shown in Figure 22-13, when this dialog opens you can select from one or more categories. In order to manage the available selections, select the Office category. This will reduce the number of available options from dozens to the three that are appropriate for a Word Document project. Start by adding a new ribbon bar. There are two options: XML and Visual Designer. Select Visual Designer and provide "DocRibbon" for your control's name.
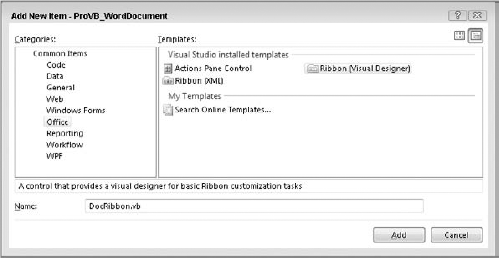
Figure 22-13 shows two alternatives for the Ribbon control, for backward compatibility. If you were customizing a ribbon bar for Office 2007 under Visual Studio 2007 and VSTO 2005 SE, then you didn't have access to a visual designer for the ribbon bar. Instead, you needed to create and edit an XML file, which would define your ribbon and the controls that were placed on it. There was neither a designer, nor a tool customized for this task.
With the release of Visual Studio 2008, the VSTO team had an opportunity to create a visual designer for the ribbon bar. Thus, unless you are working with a legacy XML definition file, you should always select the ribbon with visual design support. Once you have modified the name of the new control to DocRibbon, select OK and return to Visual Studio. The control template will generate the control and open in Design mode.
In Design mode, note that if you open the control Toolbox, you have a new category of controls available at the top. The Office Ribbon Controls, shown in Figure 22-14, provide a list of controls that you can add to the default ribbon. Note that these controls are Windows Forms controls, not WPF controls.
Add a button to the default Group1 in the designer. Once the button has been added, go to its properties and change the label for the button to Hide/Show the Actions Pane. You can optionally add an icon to the button. For this I went into the Visual Studio directory to retrieve one of the icons that ship with Visual Studio 2008. If you navigate to the folder where you installed Visual Studio 9.0 and navigate the folder tree: Common7VS2008ImageLibrary1033, within this folder you'll find a zip file: VS2008ImageLibrary.zip. Within this zip file are several thousand different images and icons that you can leverage within your application. Shown in Figure 22-14 is one similar to the shape of the task pane.
For now, skip implementing a handler for this button, as you want to see the default behavior of the ribbon and the actions pane. Instead, right-click on your project and again request to add a new item. In the Add New Item dialog, select an actions pane and name it "DocActionPane." Once you have created your new actions pane you'll again be in Visual Studio, this time in the designer for your new pane.

Unlike the Ribbon control, the designer for the actions pane doesn't require a special set of controls and by default has a white background. Unfortunately, I've had trouble delineating the edges of the control in a white-on-white scenario. Therefore, before doing anything else, I proceed to the properties for the control and select the Background Color property. Visual Studio 2008 opens a small window with three tabs, as shown in Figure 22-15.
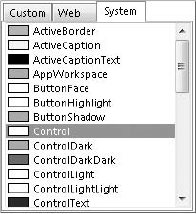
This illustrates the default setting for the background, which is the system-defined color for control surfaces. Specifically, the System tab colors are those defined for your system based on setting your own visual preferences. The other two tabs present color options the developer has selected. Because I only want to change the display color while I am working on the design and layout, it's good to capture the original color and then go to the highlighted Custom tab and select a nice bright color such as red to highlight the actual surface area of my actions pane.
Now it's time to add a simple control to this panel. Once again, drag a button onto the design surface. Orient it in the upper-left corner and change the label to "Load." Eventually this button will be used to load some data into the document, but this is a good time to test run your project using F5. Your project starts and Visual Studio starts Microsoft Word. When Word opens you'll see your document with the image that you've embedded displayed, as shown in Figure 22-16.
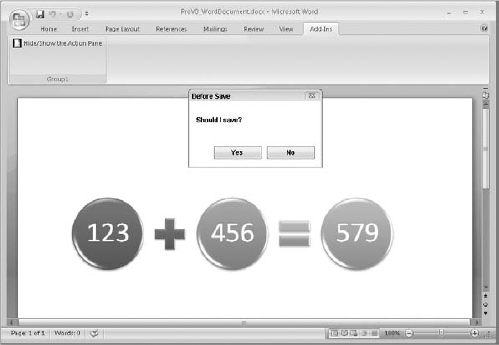
Figure 22-16 shows your custom document in Word. Note a few things about the running application at this point. First, the tab Add-Ins is set to display the custom ribbon bar. This isn't an error; even though you have created a custom VSTO Document solution, the customizations you made to the ribbon bar were automatically placed in this section.
Next, Figure 22-16 also captures the message box that was added to the BeforeSave event earlier. The Save button in the upper-left corner of the title bar was selected and as a result the event was fired. Below this you see the custom smart graphics that were added to the document itself. So far, so good, but where is the document's actions pane?
Unlike the ribbon bar, which is automatically associated with your custom document when you add it to your project, the document actions pane needs to be manually associated with your document. As a result, Figure 22-16 does not show your custom actions pane, so your next step is to add that pane to your document, and in this case have it shown or hidden based on the selection of the toggle button added to the ribbon bar. Close the running document and return to Visual Studio once the debugger has stopped.
If you choose to view all files in your project, you can select and open your DocActionPane.Designer.vb source file. Within this file you'll find that your DocActionPane class inherits from System.Windows.Forms.UserControl. That's right; the document actions pane is just a customized user control.
Knowing this tells you that you can in fact include not only individual controls but also panel controls, such as a tab panel, or other custom user controls in this display area. More important, you can take a user control that you might be using in your current application logic and use it with no significant changes within the document's actions pane. However, anticipating your probable question, the reason the panel didn't show up is that both Word and Excel expect you to associate a user control with the ActionsPane property of your document.
Because the actions pane is actually open for use by any user control in your project, it is up to you to tell Word which control to assign. View the code for your document in the ThisDocument.vb file. Earlier you saw that the template created the Startup event handler by default. Add to this handler the following line:
Private Sub ThisDocument_Startup(ByVal sender As Object, _
                          ByVal e As System.EventArgs) Handles Me.Startup

    ActionsPane.Controls.Add(New DocActionPane())
End Sub
That line of code takes the built-in actions pane associated with your document and adds a control to that pane. Of course, you could also add items such as buttons and text boxes directly to your document's actions pane. However, as the control you added demonstrated, the preferred method is to create a custom user control and add this one control to the embedded actions pane in your document. The New DocActionPane() literally creates a new instance of your user control and places it onto the actions pane.
However, this isn't very flexible, in that you want users to be able to show or hide that pane. Instead of relying on the built-in controls for displaying or hiding the pane, you want to be able to toggle the actions pane on and off, which is why you have already added a button to the ribbon. That means customizing the Click handler for your toggle button. Before leaving the ThisDocument.vb display, make sure you close this file's editor so that later you'll be able to get to the document itself.
Next, select DocRibbon and double-click your button to add an event handler for your ToggleButton1 control's Click event. This is where you want to alter the status of your actions pane's display. The way to access the actions pane from the ribbon bar is through the application's Globals collection. Within VSTO you'll find a reference to the current document or workbook within this collection. From here you have access to objects such as the actions pane. In fact, you can type Globals.ThisDocument.ActionsPane to get access to the actions pane to which you assigned your user control.
However, while this does give you access to the user control, that control in your display is hosted by a frame, so even if you add code that sets the Visibility property on the ActionsPane attribute of your document, it probably won't have the desired effect. Setting the visibility status on the control only hides the control; it does not hide the now empty frame that was hosting the control. However, keep in mind that you can access the actions pane directly, as there may be a point when you want to do more then just hide and show the actions pane. For example, if you wanted to pass data or set a custom property on your user control, then you would leverage this object and retrieve your control from the Controls collection.
For this task you want to hide the entire Document Actions frame, not just the control it contains. The secret to this is the fact that the frame is considered by Word to be a CommandBar. Therefore, you need to access the CommandBars collection. However, the CommandBars collection has multiple different controls in it, so you need to retrieve the Document Actions pane from this collection. The most reliable way to do that is by name, so your Click event handler code should look similar to the following:
Private Sub ToggleButton1_Click(ByVal sender As System.Object, _
        ByVal e As Microsoft.Office.Tools.Ribbon.RibbonControlEventArgs) _
        Handles ToggleButton1.Click
    If ToggleButton1.Checked = True Then
        Globals.ThisDocument.CommandBars("Document Actions").Visible = _
                                                                     True
        ToggleButton1.Label = "Hide Action Pane"
    Else
        Globals.ThisDocument.CommandBars("Document Actions").Visible = _
                                                                     False
        ToggleButton1.Label = "Show Action Pane"
    End If
End Sub
The preceding code is called when the toggle button on your ribbon is clicked. It first determines whether the toggle button is selected or unselected. The Checked property provides this, and if the button is being selected, then the next step is to ensure that the Document Actions command bar is visible. Next, the code updates the text label on the button to "Hide Action Pane." This provides the user with initial feedback regarding what the button will do if it is clicked again.
Similarly, the code does the reverse, hiding the command bar and updating the text on the toggle button to indicate that in order to restore the command bar, the user should press the button again.
Now there is only one other thing to do. By default, because you are assigning a control to the actions pane, your pane should be displayed. However, it may not be; the user might load an add-in that suppresses the Document Actions command bar. Additionally, your toggle button is by default not selected, which is the state normally associated with the command bar being hidden.
To resolve these issues, you can override the Load event on your ribbon. Within the Load event, check the visibility status of the command bar and set the appropriate values for the display text and checked status of your toggle button:
Private Sub DocRibbon_Load(ByVal sender As System.Object, _
                           ByVal e As RibbonUIEventArgs) _
                           Handles MyBase.Load
    If Globals.ThisDocument.CommandBars("Document Actions").Visible Then
        ToggleButton1.Checked = True
        ToggleButton1.Label = "Hide Action Pane"
    Else
        ToggleButton1.Label = "Show Action Pane"
    End If
End Sub
Now that you have created the appropriate handlers for your ribbon bar, which will enable you to show and hide the actions pane, it's a good time to again test your application. Figure 22-17 shows your custom document. It shows the Add-Ins ribbon, and your Show/Hide toggle button is selected with the caption "Hide Action Pane." This correctly reflects that the next time that button is toggled, the display of the actions pane will be hidden. Notice how the toggle button gives you the visual state by applying the Office color scheme for a selected control. When working with a custom Office application, it's often said that your UI will be more intuitive to a user familiar with the workings of Office; this example demonstrates that.
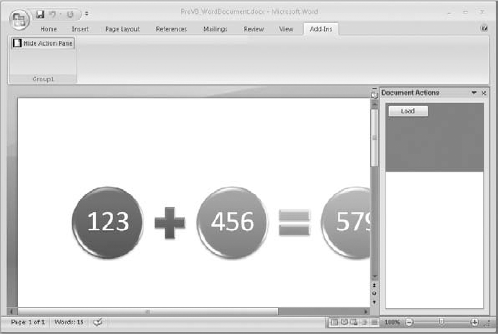
The other item that Figure 22-17 displays is the actual Document Actions window with your actions pane. You may recall that I changed the background color of the DocActionPane control to red. This should leave you a little concerned about why that red background (invisible in the figure here in the book) is near only the top of the window. This challenge is one for which there is only a partial resolution.
Unfortunately, the layout of a .NET control within the Document Actions host is limited. You can ask that your control fill the display, but this value is ignored. You can ask that it stretch, but this setting determines whether the size of the control should by default match the display area of its contents. There simply isn't a good way to automatically resize your custom display area.
You can return to Visual Studio and increase the height of your background. In fact, you can make the background tall enough and wide enough to account for a display area of almost any size, but the real challenge is related to the controls that you place in your display. Unfortunately, you can't be certain that as the user resizes Word, the key controls you've chosen to place on the actions pane will always be displayed. However, right now there is only a single button on this control and it isn't doing anything, so it's time to add some logic for placing data into the Word document.
Until now the only thing placed in your Word document was a simple graphic. While this made it apparent that you can in fact customize the content of this VSTO document, it didn't really demonstrate the capability to dynamically update the content of the document. The first step is to look at one of the new features of Office 2007 — content controls. Return to the designer view of your Word document, as shown in Figure 22-18, and notice the Toolbox. Within this Toolbox is a section titled Word Controls, which has been expanded.

The controls shown in this section of the Toolbox are controls that you can apply to your document. Let's look at a couple of simple examples. Add some text similar to what you see in Figure 22-18 (the actual content isn't that important). Then, on a new line within the document, add the text "Document Name:" followed by a tab or two. Drag a PlainTextContentControl onto your document. On the next line, add the label "Application Name:" followed by a tab. Then drag a RichTextContentControl onto the document. These two controls will provide a simple example of working with content controls.
On the lower right-hand side of Figure 22-18, you'll notice the Properties window. It is currently selected for the second control, but it provides an illustration of a few key content control properties. The first two are the capability to lock the control or to lock the contents of the control. Locking the control prevents users of your document from being able to delete the control. Locking the contents enables you to ensure that the text within the control can't be modified by the user. Of the other properties shown, the Text property represents the text that should be displayed in the control, which is customized along with the Title property.
I customized the Title property because of how you can reference these controls within your code. Keep in mind that these are controls, which means you can data bind these controls to data you have retrieved, and you can handle events on these controls. Several chapters have already covered handling events, so this demo code focuses on having the actions pane interface with these controls.
With that in mind, switch to the Design view for your DocActionPane control. Not that you are going to make changes to this beautiful design — you just want to double-click your Load button to create an event handler for the Click event. This will take you to the code view, where you can enter the custom code to update your content controls. The code block that follows includes two methods for accessing these controls, one of which has been commented out:
Public Class DocActionPane
    Private Sub Button1_Click(ByVal sender As System.Object, _
                              ByVal e As System.EventArgs) _
                              Handles Button1.Click
        'This code could make database calls, process user input etc.
        'For Each ctrl As Word.ContentControl In _
                                          Globals.ThisDocument.ContentControls
        '    'This will retrieve all of the embedded content controls.
        '    'Cycle through the list looking for those of interest
        '    Select Case ctrl.Title
        '        Case "PlainText1"
        '            ctrl.Range.Text = My.User.Name
        '        Case "RichText1"
        '            ctrl.Range.Text = My.Application.Info.ProductName
        '        Case Else
        '    End Select
        'Next

        Globals.ThisDocument.PlainTextContentControl1.Text = _
                                                    Globals.ThisDocument.Name
        Globals.ThisDocument.PlainTextContentControl1.LockContentControl = _
                                                                         True
        Globals.ThisDocument.PlainTextContentControl1.LockContents = True
        Globals.ThisDocument.RichTextContentControl1.Text = _
                                              My.Application.Info.ProductName
    End Sub
End Class
The event handler starts with a comment related to the fact that at this point you are essentially working within the confines of a user control. Thus, you can add any data access code or XML processing code you want into this class. (Because those have already been covered in other chapters, this code focuses on the content controls.)
The first block of code, which is associated with a For loop, has been commented out because it isn't needed or even the preferred solution in this scenario. However, if instead of working with Word this solution were focused on Excel, and if you were working with cells, each of which might contain a content control, then the odds are good you would want an efficient way to access this large array of controls. This loop leverages the Content Controls collection. It also serves to illustrate a couple of key idiosyncrasies of this control collection.
Unlike what you might expect after the controls are retrieved from the collection, they do not directly expose all of their properties. In fact, the first missing property is the Name property. Thus, for this code to work based on identifying specific controls, you would need to use a separate identifier such as Title. In fact, a title has been added to each of the controls in the document, so if you want to you can uncomment and run this code. However, in typical scenarios where you use this code, you would be processing an array of controls and be primarily interested in control type and control location.
Control location would be related in Excel to the range associated with that control. Specifically, the Range property and its property Cells would tell you where on the spreadsheet you were. The Range property is important for a second reason. Like the control's Name property, the controls in this array don't expose a Text property. Instead, you can access the Text property of the Range in order to update the text in that control. As noted, however, this code has been commented out because there is a more direct way to access named properties.
The uncommented lines of code leverage the Globals.ThisDocument object to access by name the controls in your document. This code is not limited to Word and will work for Excel if you have only a small number of controls in your workbook. Note that the first line updates the value displayed in the PlainTextContentControl. It replaces the default text (which was formatted with a larger font and colored red) with the current document name.
Next, the code locks the control and its content. Not that you would necessarily wait until this point to set those properties, but this is just an illustration of accessing these properties and seeing the results when you run your document. The final line updates the RichTextContentControl using the My namespace, this time to retrieve the application name for your project.
At this point you can build and run your code. Once your document is displayed, go to the actions pane and use the Load button. Your results should look similar to what is shown in Figure 22-19. Note that the formatting for both the plain text and rich-text controls, which was applied in your source code, has remained unchanged.
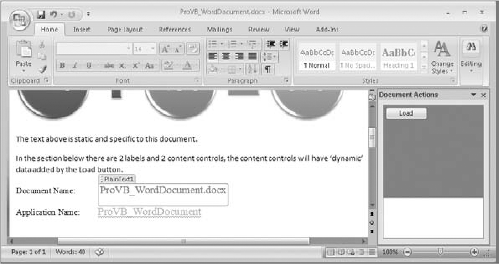
Note also that the highlight around your content control is by default visible to the end user. This is why you may want to lock these controls. In fact, you can attempt to delete or edit the document name to get a feel for the end-user experience. In case it wasn't clear, the work shown in this section can be replicated in an Excel workbook. In fact, the next section looks at using Excel, but instead of doing another VSTO document, the focus is on creating an add-in.
Unlike the Document/Workbook project, the Add-In project type is installed on the user's computer and then loaded for every document that is opened. This introduces a set of different issues and concerns. For starters, unlike the document project, where you focused on the content of the document or workbook, in an add-in scenario you don't have an associated document in your project. Nor can you access the actions pane, although the Add-In project allows you to access not only the ribbon bar but also a similar UI feature called the task pane.
Of course, the most important difference is the fact that once your add-in is registered, it will be loaded for every document that the user accesses. This means that even if the user opens a VSTO document project, your add-in will be loaded alongside the customizations associated with that document. Similarly, if the user has multiple add-ins installed, then each one will be loaded for every document the user accesses. In short, your code has to play well with others and should load with minimal delay. Keep in mind when working with an add-in that you probably aren't alone.
Create a new project of the type Excel 2007 Add-In. While in the New Project dialog, name your project ProVB_ExcelAddIn and select OK. You'll notice that, unlike when you created a document project and were deposited within your Office client inside Visual Studio, you are now in a code page. As shown in Figure 22-20, the code associated with your document looks very similar to what you had with your document project. However, unlike that project, you don't have access to the document itself.
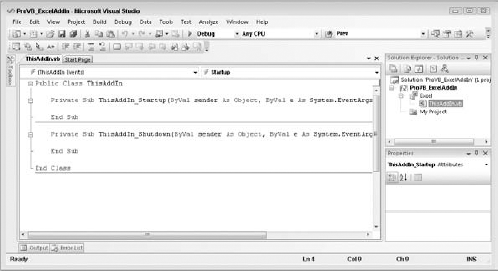
Just like the document-based project, you have the Startup and Shutdown event handlers and no others, but you can create any that are available for your application. To begin, access the ribbon bar and task pane by right-clicking on your project. Select Add New Item to open the Add New Item dialog and select the Office category. This is where the next difference for an Add-In project becomes apparent: As illustrated in Figure 22-21, only the two Ribbon templates are available.
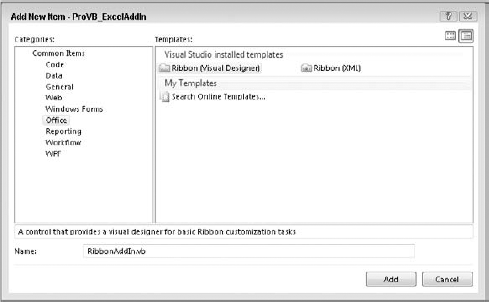
Select the Ribbon (Visual Designer) template and name your new control "RibbonAddIn." Selecting Add will add this control to your project; and just as with the document project, you'll be in the designer for your ribbon. Leaving the ribbon alone for now, return to your project and again select Add New Item and return to the dialog shown in Figure 22-21. This time select the Common Items category.
Earlier in this chapter, the Actions Pane template was described as a customized user control. The template took a common user control and added some custom properties to enable it to work with the actions pane. The task pane, conversely, doesn't need much in the way of customization for the user control it will use, so simply select the User Control template, use "TaskPaneUC" for your control name, and click Add.
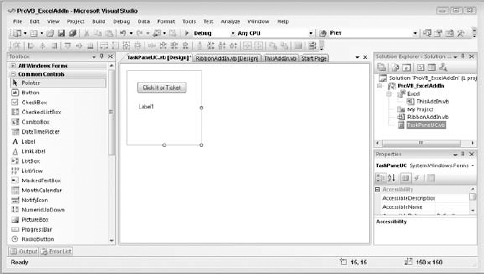
After you are returned to Visual Studio, drag a button and a label into your new user control's design surface. The result should look similar to what is displayed in Figured 22-22. You can provide a custom label for your button if you choose, but once you have reviewed the layout of your controls, go ahead and double-click your button to create the event handler for the Click event.
After adding the event handler, add a simple call to reset the text displayed by the label control, which is in your user control. In theory, you could add any code you wanted, but in keeping with the idea that you don't want to necessarily target or count on anything existing within your document, the goal is just to ensure that your code is accessible:
Public Class TaskPaneUC
    Private Sub Button1_Click(ByVal sender As System.Object, _
                              ByVal e As System.EventArgs) _
                              Handles Button1.Click
        Label1.Text = "Clicked it."
    End Sub
End Class
You could run your project and look for your custom task pane at this point, but by now you can probably guess that you won't find it. Just as with the actions pane, you need to associate your custom control with the collection of available task panes. Unlike the actions pane, for which there is only a single instance, each Add-In project could in theory want access to its own task pane. To resolve this, when you create an instance of a task pane, you create an item in a collection and assign it a unique name. This is significant, because although it wasn't mentioned earlier, regardless of how badly you want to change the name of the Document Actions pane, it isn't possible.
To associate your control with the task pane, switch to your document and take two steps. First, declare a property for your document that will hold a copy of your task pane. Note that this property has been declared as a "Friend" member so that other classes in the same project can access it. This will be important when you want to reference that control from within your ribbon bar.
Second, code is added to the Startup event handler. The first line assigns your custom user control as a new entry in the list of available task panes, and passes a copy of that control to the member variable you created. The second line is temporary; it indicates that your task pane should be visible, so you can ensure that you are seeing what you expect:
Public Class ThisAddIn
    Private m_ProVBTaskPane As Microsoft.Office.Tools.CustomTaskPane

    Friend Property ProVBTaskPane() As Microsoft.Office.Tools.CustomTaskPane
        Get
            Return m_ProVBTaskPane
        End Get
        Set(ByVal value As Microsoft.Office.Tools.CustomTaskPane)
            m_ProVBTaskPane = value
        End Set
    End Property

    Private Sub ThisAddIn_Startup(ByVal sender As Object, _
                                  ByVal e As System.EventArgs) _
                                  Handles Me.Startup
        ProVBTaskPane = Me.CustomTaskPanes.Add(New TaskPaneUC(), _
                                                            "Do Not Push Me")
        ProVBTaskPane.Visible = True
    End Sub
Once you've added the preceding code to your project, it's time to test run your application. Using F5, build and start your project. Excel 2007 will open and then a blank spreadsheet will open. Your custom task pane should appear on the left-hand side, and once you click the button, your display should look similar to Figure 22-23.
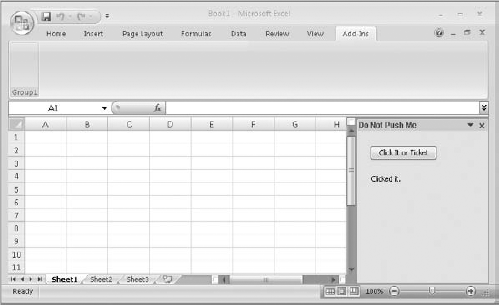
Notice that your custom title for the task pane is displayed. Of course, you could exit Visual Studio right now and open an Excel spreadsheet that was completely unrelated to your current project. However, your code has been registered for COM interop, so if you do this your custom task pane appears within your totally unrelated spreadsheet. This would quickly become annoying, which is why you'll want to display your custom task pane only when the user asks for it.
The next step is to customize your ribbon so that it can control your task pane. First, within your ThisAddIn.vb logic, remove the ProVBTaskPane.Visible = True line of code. Next, go to the designer for your ribbon and add a new ToggleButton. You can label this button with some descriptive text. Additionally, select the group control that is already on your ribbon and change the text shown as the label for that control to something such as "ProVB Add-In." Double-click on your new button and add the event handler for the Click event. Within this event you are going to again hide and show the control and update the display text of the button:
Private Sub ToggleButton1_Click(ByVal sender As System.Object, _
        ByVal e As Microsoft.Office.Tools.Ribbon.RibbonControlEventArgs) _
                                              Handles ToggleButton1.Click
    If ToggleButton1.Checked = True Then
        Globals.ThisAddIn.ProVBTaskPane.Visible = True
        ToggleButton1.Label = "Hide Push Me Pane"
    Else
        Globals.ThisAddIn.ProVBTaskPane.Visible = False
        ToggleButton1.Label = "Show Push Me Pane"
    End If
End Sub
The preceding code block should in fact look very similar to what you did within your Document project earlier in this chapter. However, there is a key difference when it comes to referencing the task pane.
Notice that instead of accessing the Command Bars collection to make the entire pane display clear correctly, you are instead referencing the local Friend property that you declared in your ThisAddIn class. In addition, instead of a global reference to ThisDocument, you access the ThisAddIn object.
Similar to working with the earlier project, you will want to modify the Load event. However, there is an additional consideration here. When your add-in is loaded by Excel, the ribbon bar is loaded before the core add-in's Startup event fires. This is important because you can't just check to see whether your task pane is visible. First you need to determine whether the task pane exists. Then, if it does, you check whether it is visible. To do this you create an If statement, which as shown in the following code block leverages the conditional AndAlso:
Imports Microsoft.Office.Tools.Ribbon

Public Class RibbonAddIn

    Private Sub RibbonAddIn_Load(ByVal sender As System.Object, _
                                 ByVal e As RibbonUIEventArgs) _
                                 Handles MyBase.Load
        If Globals.ThisAddIn.ProVBTaskPane IsNot Nothing AndAlso _
           Globals.ThisAddIn.ProVBTaskPane.Visible Then
            ToggleButton1.Checked = True
            ToggleButton1.Label = "Hide Push Me Pane"
        Else
            ToggleButton1.Label = "Show Push Me Pane"
        End If

    End Sub
    Private Sub ToggleButton1_Click(ByVal sender As System.Object, _
          ByVal e As Microsoft.Office.Tools.Ribbon.RibbonControlEventArgs) _
                                                   Handles ToggleButton1.Click
        If ToggleButton1.Checked = True Then
            Globals.ThisAddIn.ProVBTaskPane.Visible = True
            ToggleButton1.Label = "Hide Push Me Pane"
        Else
            Globals.ThisAddIn.ProVBTaskPane.Visible = False
            ToggleButton1.Label = "Show Push Me Pane"
        End If
    End Sub
End Class
If you fail to add that check, you'll throw an exception as Excel is trying to load. Excel won't appreciate this, and it remembers. The next time Excel starts it will warn the user that your add-in caused an error the last time it tried to load it, and suggest that the user disable your add-in — not exactly the result you want for your code.
If your code is working, your display should look similar to what is shown in Figure 22-24, which shows the user interface with the mouse hovering over your new ribbon bar button. If you leave the mouse there, then you'll get an Office tip telling you that you can select F1 for help about this control. Using the F1 key starts the help system and Excel opens a help page describing how you can manage add-ins within Excel.
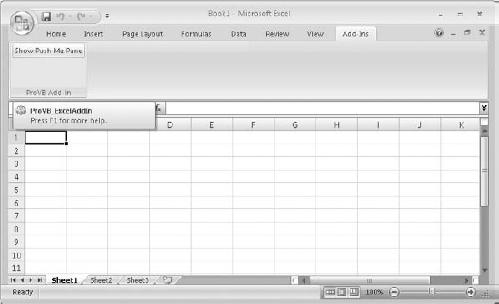
The available help page is a good resource for Office 2007, for which you may need a bit of help finding the options. You can test the add-in at this point to ensure that it opens and closes the task pane correctly. However, just as you can manage add-ins from Excel, it is difficult to dispose of them from within Excel. This is important, because if you start creating add-ins for several different customers, you could wind up with ten or twenty such add-ins taking up residence on your system. Excel would open only after a longer and longer delay.
Of course, it's bad enough that during testing, every time you debug, you're paying a price to ensure that your current code is registered properly. Having add-ins piling up could be even more of a problem. Fortunately, Visual Studio has an easy solution (see Figure 22-25).

This same menu option is available across all the different Add-In project types. Selecting this enables you to easily remove from your system the test add-ins that you make. As annoying as this might be for Excel or Word, when you see the implications of an Outlook Form Region, which relies on an Outlook add-in, you'll understand why this clean option is important.
As previously noted, Visual Studio 2008 VSTO provides templates for every client application in the Microsoft Office 2007 suite. Some of these, such as Word and Excel, are the traditional favorites for customization. Others, such as Power Point, may see very little automation. However, there is a new kid on the block. Outlook supports an add-in template and as part of this template provides what is sure to become one of the more popular extension models.
Outlook Form Regions (OFR) provide you with the capability to customize what users see when they open an e-mail message or a contact or any of several other components within Outlook. As you'll see in this section, the OFR is a very flexible framework that enables you to embed anything from an HTML view to a custom WPF user control in Outlook. Because Outlook is as popular as almost any other Office client application, this feature will have a broad reach.
OFR provides a canvas that isn't simply visible alongside your primary focus; the OFR provides a very configurable UI that enables you to extend or replace the default interface associated with typical components in Outlook. Because e-mail has become the ubiquitous office and home communication tool, being able to customize how key business data is presented in this medium is powerful.
To get started, create a new Outlook add-in project with the name "ProVB_OFR." Not shown here are screenshots of the New Project dialog or the initial view in Visual Studio after the template has run, as the Outlook add-in looks very similar to the Excel add-in discussed earlier. You'll find yourself in the code view for your add-in, with the Startup and Shutdown event handlers.
At this point, add your OFR to your project. Right-click on your project and select the Add option from the context menu to open the Add New Item dialog. As before, go to the Office category to review the available templates, where you'll find an Outlook Form Region template (see Figure 22-26). Give it a meaningful name, such as "AdjoiningOFR," to reflect the type of form region you'll create.

After clicking the Add button, instead of being returned to Visual Studio, you'll be presented with the first screen in the wizard for the New Outlook Form Region. This wizard walks you through several different options related to your OFR. The first choice, shown in Figure 22-27, is whether you want to generate your form from scratch or would like to import one of the standard templates that ship with Outlook.
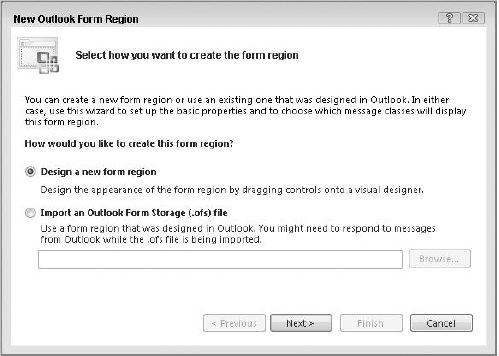
The current example will go through the steps to create a new form region. (Take some time to explore one or more of the standard forms on your own, as a complete discussion is beyond the scope of this chapter.) Click Next to be taken to the second step of the wizard — selecting a type of form.
The dialog shown in Figure 22-28 lists four different types of potential region. As you move between the different options, the wizard will display a graphic to better illustrate how each one affects the default display. These four options can actually be grouped in two sets. The first two options — Separate and Adjoining — are form types that modify the built-in components of Excel. At their core, these forms continue to display the underlying components associated with whatever class they are associated with. The second group consists of the Replacement and Replace-all regions. These form types replace the object that would normally display within Outlook.
As noted in the naming of your OFR, the plan is to demonstrate creating an Adjoining form region, but to demonstrate how Replacement and Replace-all forms actually work, select one of these two options and click Next. This will take you to a screen where you can name and set some options related to your OFR. You will return to this screen when you revert to the Adjoining OFR type. Instead of discussing this now, click Next a second time and move to the next step in the wizard. This will take you to the screen shown in Figure 22-29, defining the object(s) that will be associated with your OFR.


Keep in mind that Figure 22-29 shows this dialog as it looks when you have selected either a Replacement or Replace-all OFR type. As noted, these form types replace the underlying class. In Figure 22-29, each of the built-in classes has been disabled, so you can't ask to apply your change to one of those existing types. Instead, your only option is to define a custom class or classes — the best practice is to define a single class.
This custom message class is one that you would define within your custom add-in. To better explain what is occurring, let's use a mail message as an example. Typically, when Outlook receives a mail message, the message is assigned to the class IPM.Note. The IPM.Note class is what provides all of the typical display elements that you see in a message within Outlook. If you create a replacement form, then when that form is sent it is flagged not as a typical message, but instead as an instance of your custom class.
In other words, the sender of the message needs to be aware of the name of the class used for this type of OFR. In theory, this is all that the sender needs to be aware of — however, that's only a theory. The Replacement and Replace-all form types work fine as long as the initial message is sent to the Microsoft Exchange Server. However, if you are attempting to trigger a message from, say, SharePoint, there is a problem. Typically, when SharePoint is installed and configured, the e-mail options are set up such that SharePoint handles its own messages. However, SharePoint doesn't allow for sending messages with custom message types, so when your code attempts to trigger this custom message type from within SharePoint, the message is sent only if you have configured your SharePoint server to communicate with an Exchange Server.
There are other unique features to Replacement and Replace-all forms. On the positive side, unlike the OFRs that modify an existing object type, Replacement and Replace-all forms are only instantiated when a message of that specific class is received. As discussed later in this section, Adjoining and Separate forms need to have custom code added that screens when that OFR should be displayed.
Another advantage of Replacement and Replace-all forms is that they give you more control over the message content. Any text in the underlying body is hidden, which means that you can embed information in the message body that will later be used in the form. In addition, these form types also hide enclosures, so it is possible to enclose, for example, an XML file containing application data and then retrieve and process this data when the message is opened.
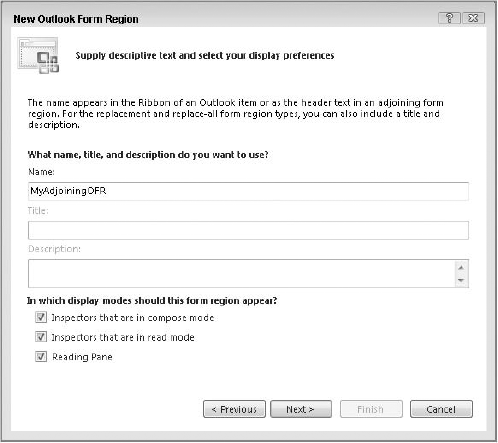
However, for this example you are creating a new Adjoining OFR, so use the Previous button twice in order to return to the screen shown in Figure 22-27. Change your OFR type from Replacement to Adjoining and click Next. This should bring you to the screen shown in Figure 22-30. Here you have the option to provide a display name for your OFR. In order to see the effect of this, place the word "My" at the start of your class name so that you'll be able to see where this value is used.
The three check boxes in this dialog represent times when this OFR will, by default, be available in Outlook. In the case of the first one at least, you might not want to accept that default. "Inspectors that are in compose mode," enables you to determine whether someone who is creating a new message or contact should also see your OFR region by default.
Although the setting is present for all OFR types, it in fact is not applicable to Replacement and Replace-all. In the case of Replacement and Replace-all forms, Outlook doesn't automatically offer these as an option for creating a new message. Instead, users need to access the File menu and select the Forms option to tell Outlook that they are attempting to send a message defined by the custom type.
However, for Separate and Adjoining forms, Outlook will, if you leave this checked, automatically add your custom region to the standard new message, contact, appointment, and so on, window. This could get quite annoying if your users aren't going to be placing data into that OFR and it is for display only. Thus, in many cases you'll clear this first check box. However, if you are customizing a contact to capture and update new data elements, you would probably want to leave this check box selected.
As for the other two check boxes in Figure 22-30, these refer to displaying your custom OFR, and typically these remain selected so that your OFR will be visible to display data.
Clicking Next takes you to the dialog shown in Figure 22-31. This dialog enables you to select from any of the standard classes that are used within Outlook. The goal is to enable you to create a custom OFR for one or more of these classes, although typically you'll select just one. For now, select just Mail Message and click Finish to complete the creation of your OFR and return to Visual Studio.
On your return to Visual Studio you'll be in the designer for your AdjoiningOFR user control. That's right, once again you are working with a Windows Forms user control that has been customized by the VSTO team to provide the characteristics you defined in the preceding wizard. At this point you can open the Toolbox and drag and drop controls onto the form.
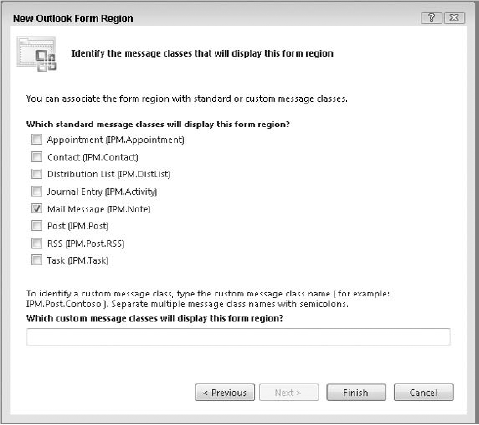
Figure 22-32 illustrates a few changes that you can make so that your form will be both visible and have some simple elements you can manipulate. The user control shown in Figure 22-32 has had a new background color assigned, and has had two label controls dragged onto the form. Label1 has had its font changed to a much larger size and the background changed to white. The default text in Label1 is now a zero. To the left of Label1 is Label2, which has had its text updated to read "Attachment Count."

You still haven't written any actual code, so this is a great time to test your application. Use F5 to build and run it. Once the build is complete, Outlook will automatically open. You should see something similar to what is shown in Figure 22-33.
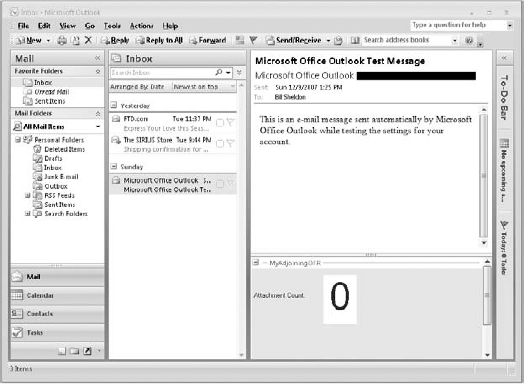
Note that even the original Outlook test message, which was received two days ago, now includes your custom OFR. In fact, you'll find that every message you open includes the OFR — which could easily become annoying, given that in a real application your OFR would probably be targeting a single message type. Similarly, if you choose to create a new message, there it is again — an OFR that has only display information. Once you have satisfied yourself with the impact of this region on Outlook, close Outlook and return to Visual Studio.
Figure 22-34 provides a view of the default generated code for your OFR. Your goal is to carry out two tasks: first, make it so that this OFR only displays if the associated message includes one or more attachments. Second, update Label1 so that the number of attachments is shown in the OFR.
The first item to note is the Form Region Factory code block, which has been collapsed. There are actually three generated methods, and it is the method hidden inside this code block where you'll want to put the custom logic specifying when this OFR should be visible. When expanded, as shown in the following code block, not only do you have your AdjoiningOFR class, but within this collapsed block is a second partial class definition that defines an implementation to create your OFR as part of a factory. Factories are a well-known software pattern wherein the calling application might not know the details of which class is being created, but only the base-class OFR and the methods and properties exposed at the base-class level.

Software patterns are outside the scope of this chapter, but in short, the factory patterns indicate that there will be a FormRegionInitializing event handler, and that the calling application will be able to create several different types of OFRs based on which factory has been implemented within each OFR.
Public Class AdjoiningOFR
#Region "Form Region Factory"
  <Microsoft.Office.Tools.Outlook.FormRegionMessageClass
  (Microsoft.Office.Tools.Outlook.FormRegionMessageClassAttribute.Note)> _
  <Microsoft.Office.Tools.Outlook.FormRegionName("ProVB_OFR.AdjoiningOFR")> _
    Partial Public Class AdjoiningOFRFactory

    ' Occurs before the form region is initialized.
    ' To prevent the form region from appearing, set e.Cancel to true.
    ' Use e.OutlookItem to get a reference to the current Outlook item.
        Private Sub AdjoiningOFRFactory_FormRegionInitializing( _
                    ByVal sender As Object, _
                    ByVal e As _
            Microsoft.Office.Tools.Outlook.FormRegionInitializingEventArgs) _
                    Handles Me.FormRegionInitializing
    End Sub

    End Class

#End Region

    'Occurs before the form region is displayed.
    'Use Me.OutlookItem to get a reference to the current Outlook item.
    'Use Me.OutlookFormRegion to get a reference to the form region.
    Private Sub AdjoiningOFR_FormRegionShowing(ByVal sender As Object, _
                                              ByVal e As System.EventArgs) _
                                              Handles MyBase.FormRegionShowing
    End Sub
'Occurs when the form region is closed.
'Use Me.OutlookItem to get a reference to the current Outlook item.
'Use Me.OutlookFormRegion to get a reference to the form region.
Private Sub AdjoiningOFR_FormRegionClosed(ByVal sender As Object, _
ByVal e As System.EventArgs) _
Handles MyBase.FormRegionClosed
End Sub
End ClassIn order to prevent your OFR from being displayed, you need to add custom code to the FormRegionInitializing event handler. In this case you simply want to determine whether the message has one or more attachments. If it doesn't have any attachments, then you want the OFR to remain hidden:
Private Sub AdjoiningOFRFactory_FormRegionInitializing( _
                                 ByVal sender As Object, _
ByVal e As Microsoft.Office.Tools.Outlook.FormRegionInitializingEventArgs) _
                                 Handles Me.FormRegionInitializing
            Try
                Dim mail = CType(e.OutlookItem, Outlook.MailItem)
                If Not mail.Attachments.Count > 0 Then
                    e.Cancel = True
                    Return
                End If
            Catch
                e.Cancel = True
            End Try
        End Sub
The preceding code illustrates some of the key elements to screening your OFR. The first thing to note is that you can access the inbound e-mail message by retrieving the OutlookItem object from the parameter e. Of course, you need to cast this item, as it is passed as type Object. Once you've done this, you have full access to the Outlook object model for e-mail messages. Thus, you can quickly determine the number of attachments; and if there are none, you can set the Cancel property to True.
Next up is getting the number of attachments in your message into the OFR. This is a fairly easy task. Unlike the decision about whether to display the OFR, which occurs when the code is looking to create that OFR, your ability to influence what is displayed doesn't occur until the FormRegionShowing event handler is called. In the code block that follows, instead of retrieving the current e-mail object from a parameter, it is one of the member values for your OFR:
Private Sub AdjoiningOFR_FormRegionShowing(ByVal sender As Object, _
                                          ByVal e As System.EventArgs) _
                                          Handles MyBase.FormRegionShowing
    Dim mail = CType(Me.OutlookItem, Outlook.MailItem)
    Me.Label1.Text = mail.Attachments.Count
End Sub
Thus, the code to get the number of attachments and assign that as the contents of the label boils down to two lines of custom code. At this point you can rerun the application to test your code. Once Outlook opens, you should see that the MyAdjoiningPane, which was previously displayed for all messages, is now gone except in the case of those that have attachments.
What this means is that when you now create a new message, the OFR is still not shown. However, if you add an attachment and then save that message before sending, you can reopen the saved message and you'll see the OFR displayed. Keep in mind that the determination of whether the OFR should be displayed occurs during the creation of the OFR, and once the OFR has been hidden you can't change that setting while the object remains open.
This chapter looked at VSTO and introduced many of its new features and where it is headed in the future. It didn't spend a lot of time talking about how you can add controls and logic to user controls, but instead focused on how to work with the custom task pane or actions pane, and how to leverage new capabilities such as content controls. Overall, VSTO's enhancements are some of the most significant in Visual Studio 2008. VSTO isn't just a simple set of extensions that mirrors what you could do in VBA. In fact, VSTO extends every client in the Office system and provides multiple templates. It provides flexibility with Word and Excel to customize either at the document level or by creating a custom add-in; and if you do customize at the document level, it provides the option to interoperate with any existing VBA code you have in your document.
In addition to Word and Excel, you've been introduced to Windows Outlook Form Regions. The OFR model enables you to send business data directly into the application that everyone uses. The various OFR models have differing advantages and disadvantages, but each is based on an underlying user control, which enables you to leverage everything that is available via Windows Forms, including WPF interop.
Highlights of this chapter included the following:
Office Business Application Architecture as the target of VSTO solutions
How SharePoint can provide additional capabilities when used as the central document store for document-based VSTO applications
VSTO-VBA interop and the steps to enable VBA to call new VSTO capabilities
A document-based VSTO solution
Customizing the Document Actions pane and the ribbon bar and enabling them to communicate
Working with content controls
Creating an Excel add-in solution and customizing the ribbon bar and task pane
Differences between the OFR types
While the concept of an OBA is relatively recent, you learned that the OBA model is becoming an increasingly important focus for Microsoft. The ability to tie your business logic into applications such as Word, Excel, and Outlook means that your developers can spend less time creating and maintaining custom grid controls, and your end users can get started with less time spent in training.