
While Windows Communication Foundation and Windows Presentation Foundation enjoy much of the attention, the .NET Framework 3.0 also comes with another "Foundation": Windows Workflow Foundation (usually abbreviated WF). WF can be a powerful tool in developing applications, as it provides a standard means of adding workflow to an application. Workflow refers to the steps involved in an application. Most business applications contain one or more workflows, such as the approval steps in an expense-tracking application or the steps involved in paying for a cart full of items at an online store. Normally, a workflow is created in code and is inextricably bound to the application. WF enables developers to graphically build the workflow, keeping it logically separated from the code itself. It also enables the workflow to change as the needs of the business change. These workflows may be as complex as needed and may integrate human processes or Web services.
This chapter looks at how you can take advantage of WF in your applications: how you can add and edit workflows, how you can integrate workflows into an existing business process, and how the graphical tools used to build workflows with Visual Studio can help you communicate with business users and avoid errors caused by mistakes in the workflow.
Just what is workflow? It's a very heavily used word, and many developers use it in multiple contexts. For our purposes, it is the description of the steps involved in some process performed at least partially by a computer. Workflows are common in many types of business applications. For example, if you were building an application for tracking employee expense reports, the workflow might look something like the following:
The employee completes a form and submits it into the system.
The employee prints the expense report form, attaches original invoices, and sends it to accounting for a permanent record.
The system examines the data in the expense report:
Depending on the rules defined by the company, it may be automatically approved, require management approval, or require investigation by the accounting department. Some of the rules that may come into play would likely be the expense types, the amount of each expense, how the expense was paid, and so on.
Copies of the expense report are e-mailed if additional approval is required.
If approved, the expense report continues in the workflow; otherwise, it is returned to the submitting employee for correction (or to complain to the employee's manager).
Expense report values are recorded in the accounting system.
A check is printed and sent to the happy employee. This step may be delayed if the originals have not been received. Alternatively, the company may delay future expense reimbursement requests.
The steps in a workflow may be carried out by a human or computer; they may require custom code or calculations, or may need to integrate with an external application. Building workflows into an application is frequently a difficult process. Unless a developer completely understands the process (and they rarely do), identifying the true workflow used for a process requires interviewing multiple people at one or more companies. This often results in conflicting descriptions of the steps involved, or of the actions required at each step, requiring someone to decide on the actual intent.
Even after the exact workflow has been defined, it frequently changes. This may be due to some new legal requirements, a company merger, or even (frequently) the whims of management. In traditional applications, this would likely mean that a developer would have to change the code for one or more steps of the process, ideally without introducing any new bugs into the system. In short, developing workflow applications using traditional tools can be a difficult, time-consuming process. WF makes building and maintaining these workflows easier by abstracting away the logic of the workflow, and by providing several of the common services required.
The actual workflow files in WF are XML files written in a version of XAML. This is the same XAML used to describe Windows Presentation Foundation (WPF) files. (See Chapter 17 for more details on WPF.) They describe the actions to perform within the workflow, and the relationship between those actions. You can create a workflow using only a text editor, but Visual Studio makes creating these workflows much easier. It provides a graphical designer that enables developers to visually design the workflow, creating the XAML in the background. See the following code:
<RuleDefinitions xmlns="http://schemas.microsoft.com/winfx/2006/xaml/workflow">
  <RuleDefinitions.Conditions>
    <RuleExpressionCondition Name="TranslationCallWorked">
      <RuleExpressionCondition.Expression>
        <ns0:CodeBinaryOperatorExpression Operator="ValueEquality"
         xmlns:ns0="clr-namespace:System.CodeDom;Assembly=System, Version=2.0.0.0,
Culture=neutral, PublicKeyToken=b77a5c561934e089">
<ns0:CodeBinaryOperatorExpression.Left>
<ns0:CodeBinaryOperatorExpression Operator="ValueEquality">
<ns0:CodeBinaryOperatorExpression.Left>
<ns0:CodeMethodInvokeExpression>
<ns0:CodeMethodInvokeExpression.Parameters>
<ns0:CodeFieldReferenceExpression
FieldName="OutputTextProperty">
<ns0:CodeFieldReferenceExpression.TargetObject>
<ns0:CodeTypeReferenceExpression
Type="TranslateActivity.TranslateActivity" />
</ns0:CodeFieldReferenceExpression.TargetObject>
</ns0:CodeFieldReferenceExpression>
</ns0:CodeMethodInvokeExpression.Parameters>
<ns0:CodeMethodInvokeExpression.Method>
<ns0:CodeMethodReferenceExpression MethodName="GetValue">
<ns0:CodeMethodReferenceExpression.TargetObject>
<ns0:CodeThisReferenceExpression />
</ns0:CodeMethodReferenceExpression.TargetObject>
</ns0:CodeMethodReferenceExpression>
</ns0:CodeMethodInvokeExpression.Method>
</ns0:CodeMethodInvokeExpression>
</ns0:CodeBinaryOperatorExpression.Left>
<ns0:CodeBinaryOperatorExpression.Right>
<ns0:CodePrimitiveExpression />
</ns0:CodeBinaryOperatorExpression.Right>
</ns0:CodeBinaryOperatorExpression>
</ns0:CodeBinaryOperatorExpression.Left>
<ns0:CodeBinaryOperatorExpression.Right>
<ns0:CodePrimitiveExpression>
<ns0:CodePrimitiveExpression.Value>
<ns1:Boolean xmlns:ns1="clr-namespace:System;Assembly=mscorlib,
Version=2.0.0.0, Culture=neutral,
PublicKeyToken=b77a5c561934e089">false</ns1:Boolean>
</ns0:CodePrimitiveExpression.Value>
</ns0:CodePrimitiveExpression>
</ns0:CodeBinaryOperatorExpression.Right>
</ns0:CodeBinaryOperatorExpression>
</RuleExpressionCondition.Expression>
</RuleExpressionCondition>
</RuleDefinitions.Conditions>
</RuleDefinitions>The workflow comprises a number of rule definitions. Each definition includes activities, conditions, and expressions. Activities are the steps involved in the workflow. They are executed based on the workflow's design and the conditions included. Controlling the behavior of the workflow are conditions, which are evaluated and may result in code running. Finally, expressions describe the individual tests used as part of the conditions. For example, each side of an equality condition would be expressions. When building the workflow by hand, you are responsible for creating the markup. Fortunately, Visual Studio writes it as you design your workflow.
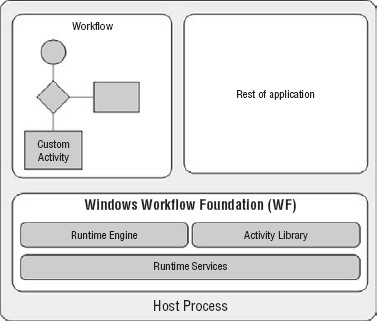
Windows Workflow Foundation is composed of a number of components that work together with your application to carry out the desired workflow. Six main components make up any WF application:
Host process — This is the executable that will host the workflow. Typically, this is your application, and is usually a Windows Form, ASP.NET, or a Windows service application. The workflow is hosted and runs within this process. All normal rules of application design apply here: If another application needs to communicate with the workflow, then you need to use Web services or remoting to enable communication between the two applications.
WF runtime services — Windows Workflow Foundation provides several essential services to your application. Most notable, of course, is the capability to execute workflows. This service is responsible for loading, scheduling, and executing your workflows within the context of the host process. In addition to this service, WF provides services for persistence and tracking. The persistence service enables saving the state of a workflow as needed. Because a workflow may take a long time to complete, having multiple workflows in process can use a lot of the computer's memory. The persistence services enable the workflow to be saved for later use. When there is more to complete, the workflow can be reactivated and continue, even after weeks of inactivity. The tracking services enable the developer to monitor the state of the workflows. This is particularly useful when you might have multiple workflows active at any given time (such as in a shopping checkout workflow). The tracking services enable the creation of applications to monitor the health of your workflow applications.
Workflow runtime engine — The runtime engine is responsible for executing each workflow instance. It runs in process within the host process. Each engine may execute multiple workflow instances simultaneously, and multiple engines may be running concurrently within the same host process.
Workflow — The workflow is the list of steps required to carry out an action. It may be created graphically using a tool such as Visual Studio, or manually. Each workflow is composed of one or more activities, and may consist of workflow markup and/or code. Multiple instances of a workflow may be active at any given moment in an application.
Activity library — The activity library is a collection of the standard actions used to create workflows. There are several different types of activities. Some are used to communicate with outside processes, while others affect the flow of a workflow.
Custom activities — In addition to the standard activities that exist within the activity library, developers can create custom activities. This may be to support a particular application you need to integrate with WF, or as a simplification of a complex composite activity. Creating custom activities is done mostly through attributes and inheritance.
Figure 27-1 shows how the main components of WF fit together.
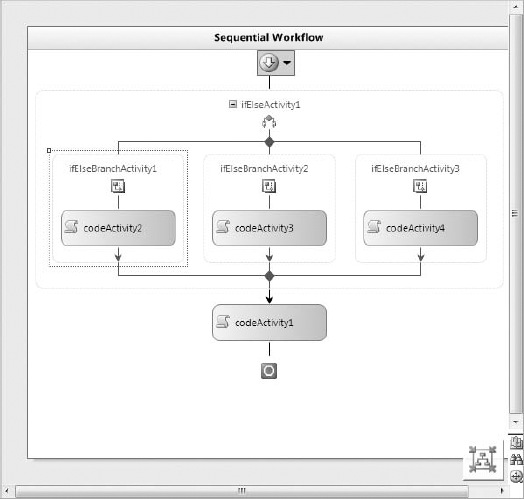
Windows Workflow Foundation supports two main styles of creating workflows: sequential and state machine. Sequential workflows (see Figure 27-2) are the classic flowchart style of process. They begin when some action initiates the workflow, such as the submission of an expense report or a user decision to check out a shopping cart. The workflow then continues stepwise through the activities until it reaches the end. There may be branching or looping, but generally the flow moves down the workflow. Sequential workflows are best when a set series of steps is needed for the workflow.
State machine workflows (see Figure 27-3) are less linear than sequential workflows. They are typically used when the data moves through a series of steps toward completion. At each step, the state of the application has a particular value. Transitions move the state between steps. One example of a state machine workflow that most people are familiar with (unfortunately) is voice mail. Most voice-mail systems are collections of states, represented by a menu. You move between the states by pressing the keys of your phone. State machine workflows can be useful when the process you are modeling is not necessarily linear. There may still be some required steps, but generally the flow may iterate between the steps for some time before completion.
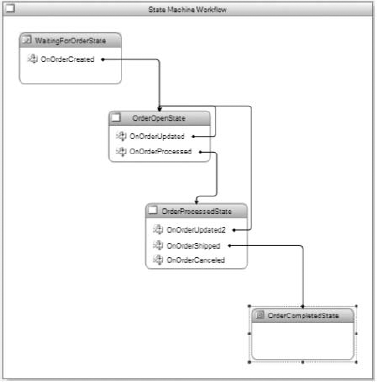
A good way to identify a candidate for a state machine workflow is determining whether the process is better defined in terms of modes, rather than a linear series of steps. For example, a shopping site is a classic example of a state machine. The user is either in browse mode or cart view mode. Selecting checkout would likely initiate a sequential workflow, as the steps in that process are more easily described in a linear fashion.
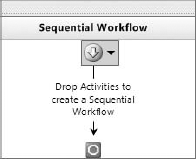
As with any other programming endeavor, the best way to understand WF is to create a simple workflow and extend it with additional steps. Start Visual Studio and create a new Sequential Workflow Console application (see Figure 27-4) called HelloWorkflow.
This project creates two files: a module that includes the Main file for the application and the workflow. The sequential workflow begins life with only two steps: start and finish, as shown in Figure 27-5. You build the workflow by adding steps between these two.
To begin, drag a Code activity between the start and finish markers. Note the red exclamation mark on the new activity in the diagram (shown without color in Figure 27-6). WF makes heavy use of these tips to help you set required properties.

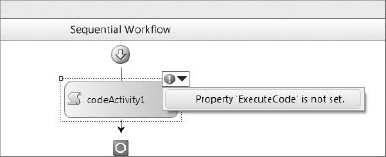
Click the code tip and select the menu item "Property 'ExecuteCode' is not set." This will bring up the Properties window for the Code activity. Enter SayGreetings and press Enter. This brings up the code window for the activity. Add the following code:
Private Sub SayGreetings(ByVal sender As System.Object, _
ByVal e As System.EventArgs)
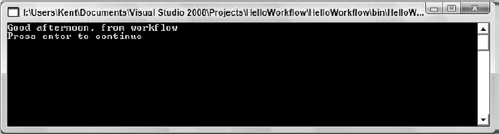
Console.WriteLine("Hello world, from workflow")
Console.WriteLine("Press enter to continue")
Console.ReadLine()
End SubNotice that coding the action for the activity is the same as any other event. Run the project to see the console window (see Figure 27-7), along with the message you should be expecting.
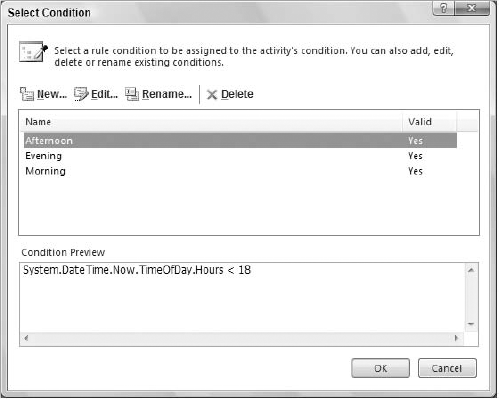
While trivial, the project makes a useful test bed for experimenting with the various activities. Add an IfElse activity before the Code activity. IfElse activities are one of the main ways to add logic and control of flow to your workflows. They have a condition property that determines when each half of the flow will be executed. The condition may be code that executes or a declarative rule. For this example, declarative rules are enough. You create these rules in the Select Condition Editor (see Figure 27-8). To display the Select Condition Editor, select Declarative Rule Condition for the Condition property of the ifElseBranchActivity component. Once you have selected Declarative Rule Condition, you can click the ellipsis on the ConditionName property to display the dialog.
Clicking New brings up the Rule Condition Editor (see Figure 27-9). This enables you to create simple expressions that will be used by the IfElse activity to determine flow.
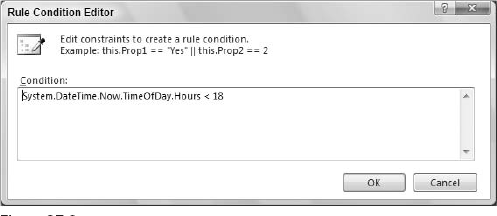
Set the rule on the If half of the IfElse activity to determine whether the current time is before noon:
System.DateTime.Now.TimeOfDay.Hours < 12
Right-click on the activity and select Add Branch to create a third branch to the IfElse activity. Set the condition for this one as you did for the first activity, but use 18 for the value to check for hours.
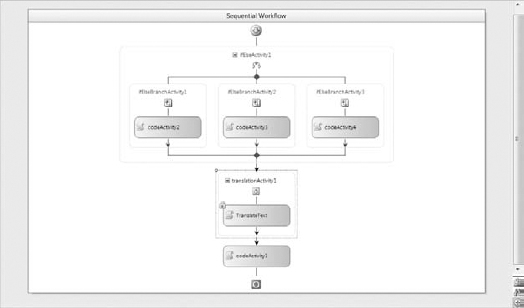
Add a Code activity to each of the three sections of the diagram (see Figure 27-10). You will use these activities to affect the message that is displayed. Assign the properties as follows:
Activity | Property | Value |
|---|---|---|
codeActivity2 |
|
|
codeActivity3 |
|
|
codeActivity4 |
|
|
Finally, change the code in the workflow to the following (note that this replaces the SayGreetings method created earlier):
Public class Workflow1
    Inherits SequentialWorkflowActivity

    Private Message As String
    Private Sub SayGreetings(ByVal sender As System.Object, _
        ByVal e As System.EventArgs)
        Console.WriteLine(Message & ", from workflow")
        Console.WriteLine("Press enter to continue")
        Console.ReadLine()
    End Sub

    Private Sub SetMessageMorning(ByVal sender As System.Object, _
      ByVal e As System.EventArgs)
Message = "Good morning"
End Sub
Private Sub SetMessageAfternoon(ByVal sender As System.Object, _
ByVal e As System.EventArgs)
Message = "Good afternoon"
End Sub
Private Sub SetMessageEvening(ByVal sender As System.Object, _
ByVal e As System.EventArgs)
Message = "Good night"
End Sub
End Class
Each of the three SetMessage methods changes the greeting as appropriate. The final greeting is displayed in the SayGreetings method. Run the project again. You should be greeted appropriately for the time of day.
While this workflow is probably overkill to generate a simple message, the example does show many of the common steps used in defining a workflow. Workflows are composed of multiple activities. Many activities can in turn be composed of other activities. Activities may use declarative properties, or code may be executed as needed.
The standard WF activities can be divided into five major categories:
Activities that communicate with external code — These activities are either called by external code to initiate a workflow or used to call to external code as part of a workflow.
Control of flow activities — These activities are the equivalent of Visual Basic's
Ifstatement orWhileloop. They enable the workflow to branch or repeat as needed to carry out a step.Scope activities — These activities group a number of other activities together into some logical element. This is usually done to mark a number of activities that participate in a transaction.
State activities — These activities are used exclusively in state machine workflows. They represent the state of the process involved as part of the overall state machine.
Action activities — These activities perform some action as part of the overall workflow.
In order for a workflow to begin, there must be some way for external code to initiate it. In addition, a workflow would be limited if there were no way for the workflow to execute external code and/or Web services. The standard activities that are used to communicate with external code include the following:
All programming languages need some form of flow control to regulate the applications. Visual Basic includes language elements such as If..Else, Do..While, For..Next, and Select Case to perform these actions. WF includes a number of activities to perform similar actions, although the options are more limited:
Activity | Description |
|---|---|
Provides for executing two or more different workflow paths based on the status of a condition. The condition may be code or an expression. This is a commonly used activity to branch a workflow. | |
Provides for executing two or more different workflow paths based on an event. The path chosen is selected by the first event that occurs. This is a useful activity for monitoring a class that could generate multiple events (such as a class that could either approve or reject a request). | |
Provides for executing multiple rules. Each rule is a condition with some resulting action. This activity provides a way to group multiple related rules into a single activity. | |
Enables the workflow to create multiple instances of an activity for processing. The resulting child activities may run serially or in parallel. This is an excellent way to divide a large task: For example, you could have the | |
| Loops the workflow until a condition has been met. The condition may be the result of code or an expression. This is typically used to receive multiple input values or to process multiple requests, such as a batch job. |
Several composite activities may cooperate to complete a single logical action by grouping other activities:
State activities represent the current state of the data and process for the workflow. They are only used within state-machine workflows:
Activity | Description |
|---|---|
| Represents the current state of the workflow. For example, in a workflow driving a voice-mail system, the state would represent the current menu that the client is on. |
Provides an activity to handle the actions needed as a given state is completed. This would provide a place to record the user's selection or to free up resources used by the state. | |
Provides an activity to handle the actions needed before the given state is entered. This would enable the creation of any data or code needed to prepare for the state functioning. |
The final group of activities are those that perform some action. You already saw this activity type in the form of the CodeActivity. These activities are the cornerstone of any workflow. The standard activities in this group include the following:
Activity | Description |
|---|---|
| Enables custom Visual Basic code to be performed at a stage in the workflow. You can use these wherever you need to perform some action not done by another activity. Whenever you use one of these — especially if you use the same type of code frequently — you should consider moving the code into a custom activity. |
Enables custom code to undo a previous action. This is typically done if an error occurs within the workflow. | |
Pauses the flow of the workflow. This is typically used to schedule some event. For example, you might have a workflow that is responsible for printing a daily report. The | |
Temporarily stops the workflow. This is usually due to some extraordinary event that you would want an administrator or developer to correct. The workflow will continue to receive requests, but not complete them past the | |
Ends the workflow immediately. This should only be done in extreme situations such as when the workflow is not capable of any further processing (e.g., it has lost the connection to a database or other needed resource). | |
Creates an exception that can be caught by the code hosting the workflow. This provides a means of propagating an error from the workflow to the containing code. |
In addition to the standard activity library, WF supports extensibility through the creation of custom activities. Creating custom activities is a matter of creating a new class that inherits from Activity (or one of the existing child classes). Several available attributes enable customization of the activity and how it appears when you use it in your workflows.
Creating custom activities is the primary means of extending WF. You might use custom activities to simplify a complex workflow, grouping a number of common activities into a single new activity.
Alternatively, custom activities can create a workflow that is easier to understand, using terms that are more familiar to the developers and business experts. Finally, custom activities can be used to support software used within the business, such as activities to communicate with a CRM or ERP system.
So you can see the steps required for creating a custom activity, the next exercise creates a simple activity that wraps the Google translation service. Create a new project using the Workflow Activity Library template. This project will create a DLL that contains the activities you create. Name the project TranslationActivity. It will include a single custom activity initially. This activity inherits from SequenceActivity, so it might include multiple child activities. You can change this as needed, but it's a good enough default for most activities. Drag a Code activity onto the designer. This activity does the actual translation work.
Because the new activity will be used to convert between a number of set language pairs, create an enumeration containing the valid options. This enumeration can be expanded as new options become available. You can either add this enumeration to a new class file or add it to the bottom of the current module (after the End Class statement):
Public Enum TranslationOptions As Integer
    EnglishToFrench
    EnglishToSpanish
    EnglishToGerman
    EnglishToItalian
    EnglishToRussian
    EnglishToChinese
    FrenchToEnglish
    SpanishToEnglish
    GermanToEnglish
    ItalianToEnglish
    RussianToEnglish
    ChineseToEnglish
End Enum
The new activity has three properties: the input text, a language pair that defines the source and target languages, and the output text (the latter being a read-only property). You can create properties normally in an activity, but it is beneficial to create them so that they participate in the workflow and are available to other activities. In order to do this, use the following pattern to describe your properties:
Public Shared SomeProperty As DependencyProperty = _
     DependencyProperty.Register("PropertyName", _
     GetType(ReturnType), _
     GetType(ClassName))

    Public Property PropertyName () As ReturnType
    Get
        Return CType(MyBase.GetValue(SomeProperty), _
            ReturnType)
    End Get
    Set(ByVal value As ReturnType)
        MyBase.SetValue(SomeProperty, value)
    End Set
End Property
The initial shared field of type DependencyProperty identifies the field that will be used to communicate with other activities. DependencyProperty is a common type used in WPF programming, enabling easier communication between nested types. The Public property enables the more common use of the property. Notice that it stores the data in the shared property between all instances of the type.
As described, there are three properties in the translate activity:
Public Shared InputTextProperty As DependencyProperty = _
      DependencyProperty.Register("InputText", _
      GetType(System.String), _
      GetType(TranslateActivity))
  Public Shared TranslationTypeProperty As DependencyProperty = _
      DependencyProperty.Register("TranslationType", _
      GetType(TranslationOptions), _
      GetType(TranslateActivity))
  Public Shared OutputTextProperty As DependencyProperty = _
      DependencyProperty.Register("OutputText", _
      GetType(System.String), _
      GetType(TranslateActivity))

  <DesignerSerializationVisibilityAttribute(DesignerSerializationVisibility.
Visible)> _
      <BrowsableAttribute(True)> _
      <DescriptionAttribute("Text to be translated")> _
      Public Property InputText() As String
      Get
          Return CStr(MyBase.GetValue(InputTextProperty))
      End Get
      Set(ByVal value As String)
          MyBase.SetValue(InputTextProperty, value)
      End Set
  End Property

  <DesignerSerializationVisibilityAttribute(DesignerSerializationVisibility.
Visible)> _
  <BrowsableAttribute(False)> _
  <DescriptionAttribute("Translated text")> _
  Public ReadOnly Property OutputText() As String
      Get
          Return CStr(MyBase.GetValue(OutputTextProperty))
      End Get
  End Property

  <DesignerSerializationVisibilityAttribute(DesignerSerializationVisibility.
Visible)> _
  <BrowsableAttribute(True)> _
  <DescriptionAttribute("Language pair to use for the translation")> _
  Public Property TranslationType() As TranslationOptions
      Get
          Return CType(MyBase.GetValue(TranslationTypeProperty), TranslationOptions)
      End Get
      Set(ByVal value As TranslationOptions)
MyBase.SetValue(TranslationTypeProperty, value)
End Set
End PropertyAttributes are added to the properties to enable communication with the designer. The core translation method is assigned to the ExecuteCode property of the Code activity. It calls the Google translation service and extracts the result from the returned HTML:
Private Const SERVICE_URL As String = _
  "http://translate.google.com/translate_t"

Private Sub Translate(ByVal sender As System.Object, _
    ByVal e As System.EventArgs)
        Dim reqString As String = _
          String.Format("{0}?hl=en&ie=UTF8&text={1}&langpair={2}", _
          SERVICE_URL, _
          Encode(Me.InputText), _
          BuildLanguageClause(Me.TranslationType))
        Dim respString As String
        Dim req As System.Net.HttpWebRequest

        Try
            req = CType(Net.WebRequest.Create(reqString), Net.HttpWebRequest)
            req.ProtocolVersion = Net.HttpVersion.Version10

            Dim resp As Net.WebResponse
            resp = req.GetResponse()
            Using reader As _
              New IO.StreamReader(resp.GetResponseStream(), Encoding.UTF8)
                respString = reader.ReadToEnd
            End Using

            If Not String.IsNullOrEmpty(respString) Then
                MyBase.SetValue(OutputTextProperty, _
                  Decode(ExtractText(respString)))
            End If
        Catch ex As Exception
            Console.WriteLine("Error translating text: " & ex.Message)
        End Try
End Sub
A typical request to the Google translation service is performed using the service's Web page, available at www.google.com/translate_t. However, you can make the same type of request the Web page would, and parse the resulting HTML to extract the returned text. The request is made using a POST, to enable sending large blocks of text. For safety, the text is URL encoded using the HttpUtility class.
The routines used by the Translate method are as follows:
Private _langOptions As New List(Of String)()

Public Sub New()
' This call is required by the Windows Form Designer.
    InitializeComponent()

    ' Add any initialization after the InitializeComponent() call.
    _langOptions.Add("en|fr")
    _langOptions.Add("en|es")
    _langOptions.Add("en|de")
    _langOptions.Add("en|it")
    _langOptions.Add("en|zn-CH")
    _langOptions.Add("en|ru")
    _langOptions.Add("fr|en")
    _langOptions.Add("es|en")
    _langOptions.Add("de|en")
    _langOptions.Add("it|en")
    _langOptions.Add("ru|en")
    _langOptions.Add("zn-CH|en")

End Sub


Private Function Encode(ByVal value As String) As String
    Return Web.HttpUtility.UrlEncode(value)
End Function
Private Function Decode(ByVal value As String) As String
    Return Web.HttpUtility.HtmlDecode(value)
End Function

Private Function BuildLanguageClause( _
    ByVal languages As TranslationOptions) As String

    Dim result As String = String.Empty
    result = _langOptions.Item(languages)
    Return result
End Function

Private Function ExtractText(ByVal value As String) As String
    Dim result As String = String.Empty
    Dim r As RegularExpressions.Regex
    Dim m As RegularExpressions.Match

    r = New RegularExpressions.Regex("<div?[^>]*>(?<result>[^<]*)</div", _
        RegularExpressions.RegexOptions.IgnoreCase Or _
        RegularExpressions.RegexOptions.Multiline Or _
        RegularExpressions.RegexOptions.IgnorePatternWhitespace)
    m = r.Match(value)
    If m IsNot Nothing Then
        result = m.Groups.Item("result").Value
    End If

    Return result
End Function
The _langOptions list is used to track the strings needed by the various language pairs. This is used by the BuildLanguageClause method to write the appropriate pair to the posted data. The order of the items in the TranslationOptions enumeration matches the order in which items are added to the list, so the BuildLanguageOptions method simply does a lookup into the list.
The ExtractText function uses a regular expression to extract the translated text. The translated text appears in a <div> tag within the resulting HTML. Fortunately, it is the only <div>, although you could modify the regular expression to look for a div with the id of result_box:
<div id=result_box dir=ltr>Bonne chance, Mandrin. Je pense que ceci pourrait juste
fonctionner </div>
The resulting activity can now be compiled and included in other workflows. Just as with custom controls, you can add this DLL to the Toolbox using the Choose Toolbox Items dialog after it has been compiled. If the Workflow Activity project is in the same solution as the workflow, it will be automatically added to the Toolbox after it has been compiled. Figure 27-11 shows the Translate activity added to the earlier example.
Recall that the Message field was used to store the message you wanted the workflow to generate. This is the text you want to translate. Click the ellipsis button on the InputText property in the property grid to bring up the Bind property dialog (see Figure 27-12). This enables you to visually connect the Message field to the input of the TranslateActivity.
The last change to the workflow is to update the text you output. Change the code for the SayGreetings method to display the OutputText of the TranslateActivity, as shown here:
Private Sub SayGreetings(ByVal sender As System.Object, _
    ByVal e As System.EventArgs)
    Console.WriteLine(Message & ", from workflow")
    Console.WriteLine("Press enter to continue")
    Console.ReadLine()
End Sub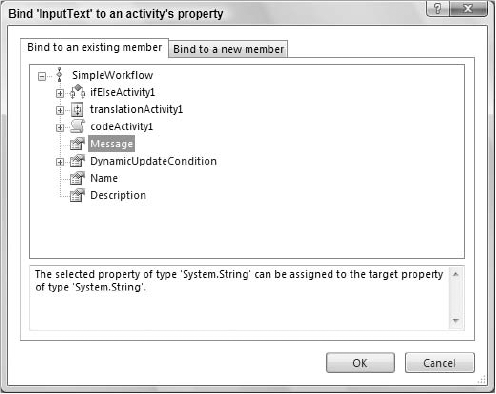
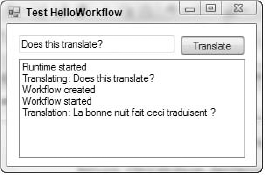
Select the TranslationType and run the test project. Depending on the time of day and the language selected, you should see something similar to what is shown in Figure 27-13.

Workflows are not typically standalone applications, or run as part of a console application, although this is an excellent way to develop them initially. Usually workflows are created to work within some larger application, so you need to integrate your workflow with the rest of your application, whether it is a Windows Forms application or ASP.NET.
When combining WF with Windows Forms, there are three main points of contact: hosting (and starting) the workflow, setting parameters for the workflow, and getting data out of the workflow.
Recall that the workflow runs within a host process. This process may be the Windows Forms process itself or an external one. If the Windows Forms process is hosting the workflow, then the workflow only exists as long as the application is running. The alternative is a workflow hosted within a Windows Service or another Windows Forms application. In this case, your application needs to use some form of interprocess communication to communicate with the workflow. Typically, this would take the form of remoting between the two applications. The application that hosts the workflow needs to initialize the WF runtime, load the workflow, and start it. In addition, the workflow host may initialize event handlers for the events that the WF runtime will throw. The following code shows an example of hosting the WF runtime and loading a workflow:
Imports System.Workflow.Activities
Imports System.Workflow.ComponentModel
Imports System.Workflow.Runtime

Public Class MainForm

    Private WithEvents wr As WorkflowRuntime
    Private wf As WorkflowInstance

    Private Sub TranslateButton_Click(ByVal sender As System.Object, _
        ByVal e As System.EventArgs) _
        Handles TranslateButton.Click
        If wr Is Nothing Then
            wr = New WorkflowRuntime
            wr.StartRuntime()
        End If
        'load a new instance of the workflow
        Me.EventList.Items.Add("Translating: " & Me.MessageField.Text)
        Dim parms As New Dictionary(Of String, Object)
        parms.Add("Message", Me.MessageField.Text)
        wf = wr.CreateWorkflow(GetType(HelloWorkflowDLL.SimpleWorkflow), parms)
        'start the workflow
        wf.Start()
    End Sub

    Private Sub MainForm_FormClosing(ByVal sender As Object, _
        ByVal e As System.Windows.Forms.FormClosingEventArgs) _
        Handles Me.FormClosing

        If wr IsNot Nothing Then
            If wr.IsStarted Then
                wr.StopRuntime()
            End If
        End If
    End Sub
In addition, you have to load references to the three workflow DLLs, and to the assembly that holds the workflow you want to create. Notice that you must create and start the WF runtime before you can load and start workflows. While the preceding code only creates a single instance of a workflow, you can create multiple instances from a single application. Stopping the runtime is not absolutely necessary, but gives you better control when the resources used by the WF runtime are freed.
The second step in working with WF and Windows Forms is providing parameters to the workflow. This is done by supplying a Dictionary when you create the workflow. The items in the Dictionary should match the public properties of the workflow. This changes the code used to create the workflow in the preceding sample as follows:
'load a new instance of the workflow
Dim parms As New Dictionary(Of String, Object)
parms.Add("Message", Me.MessageField.Text)
wf = wr.CreateWorkflow(GetType(TranslatedWorkflowDLL.SimpleWorkflow), parms)
By using a Dictionary with an Object value, any type of data can be supplied to the workflow. This provides flexibility in terms of the number and type of parameters you supply to the workflow, including changing the parameters over time.
The final step when working with WF and Windows Forms is retrieving data from the workflow. This is slightly more difficult than it may first seem because the workflow runs on a separate thread from the Windows Forms code. Therefore, the workflow can't directly access the controls on a form, and vice versa. The communication between the two is best performed by having the workflow generate events. The following code receives the WorkflowCompleted event and updates the ListBox on the form:
Private Sub wr_WorkflowCompleted(ByVal sender As Object, _
    ByVal e As System.Workflow.Runtime.WorkflowCompletedEventArgs) _
    Handles wr.WorkflowCompleted

    If Me. EventList.InvokeRequired Then
        Me. EventList.Invoke(New EventHandler(Of WorkflowCompletedEventArgs)( _
                AddressOf Me.wr_WorkflowCompleted), _
                New Object() {sender, e})
    Else
        Me.EventList.Items.Add("Translation: " & _
            e.OutputParameters("Message").ToString())
    End If

End Sub
Recall that the workflow runtime is actually running on a separate thread. Therefore, any attempts to access the EventList directly throw an exception. The first time through this code, the InvokeRequired property of the EventList is true. This means that the running code is executing on a separate thread. In this case, the code invokes a new instance of the event, passing in copies of the sender and EventArgs. This has the side effect of marshalling the data across to the thread containing the form. In this case, InvokeRequired is false, and you can retrieve the data from the workflow. Figure 27-14 shows the result.
Combining ASP.NET with Windows Workflow Foundation raises many of the same issues involved in using WF with other technologies. That is, you still need to host the services and the runtime of WF within the host process under which ASP.NET runs. However, developing solutions using ASP.NET offers more features and requires more decisions than other solutions. In particular, it is possible to publish workflows as ASP.NET Web services. Hosting workflows within ASP.NET solutions is similar to hosting workflows with Windows Forms, but an ASP.NET solution might actually be supporting multiple concurrent users. This means that you must be more aware of where the runtime is created and how instances are created and freed.
You can host a workflow as a Web service if it has one or more WebServiceInput activities. This activity represents a SOAP endpoint. The WebServiceInput activity needs two properties set: InterfaceType and MethodName. Communication between the client code and the Web service is achieved via a shared interface. This interface is the value needed for the InterfaceType property. It represents the contract between the client code and the WebServiceInput activity. The MethodName identifies the method on the interface that will initiate the Web service call. The first WebServiceInput activity should have the IsActivating property set to true. In addition to the WebServiceInput activity, the workflow should also include a WebServiceOutput activity if the method includes a return value. Including a WebServiceFault activity is also useful if you need to return an error to the client code. If the Web service has parameters or return values, these may be mapped to the properties of the workflow using the Bind property dialog (refer to Figure 27-12).
Once you have built the workflow, including the WebServiceInput and WebServiceOutput activities (see Figure 27-15), you must publish it as a Web service. This adds an additional ASP.NET Web Service project to the solution. The wizard creates the ASMX file that wraps the workflow and adds the required settings to the web.config file. The ASMX wrapper does nothing but delegate to the workflow class.
<%@WebService Class="TranslatedWorkflowDLL.SimpleWorkflow_WebService" %>
The additional settings in the configuration file add a new section for configuring the WorkflowRuntime and load the workflow HTTP handler that translates the incoming request:
<?xml version="1.0"?>
<configuration>
  <configSections>
    <section name="WorkflowRuntime"
      type="System.Workflow.Runtime.Configuration.WorkflowRuntimeSection,
      System.Workflow.Runtime, Version=3.0.00000.0, Culture=neutral,
      PublicKeyToken=31bf3856ad364e35"/>
  </configSections>
  <WorkflowRuntime Name="WorkflowServiceContainer">
    <Services>
    <add type="System.Workflow.Runtime.Hosting.ManualWorkflowSchedulerService,
        System.Workflow.Runtime, Version=3.0.0.0, Culture=neutral,
        PublicKeyToken=31bf3856ad364e35"/>
    <add
      type="System.Workflow.Runtime.Hosting.DefaultWorkflowCommitWorkBatchService,
        System.Workflow.Runtime, Version=3.0.0.0, Culture=neutral,
        PublicKeyToken=31bf3856ad364e35"/>
    </Services>
  </WorkflowRuntime>
<appSettings/>
<connectionStrings/>
<system.web>
<httpModules>
<add type="System.Workflow.Runtime.Hosting.WorkflowWebHostingModule,
System.Workflow.Runtime, Version=3.0.0.0, Culture=neutral,
PublicKeyToken=31bf3856ad364e35" name="WorkflowHost"/>
</httpModules>
</system.web>
</configuration>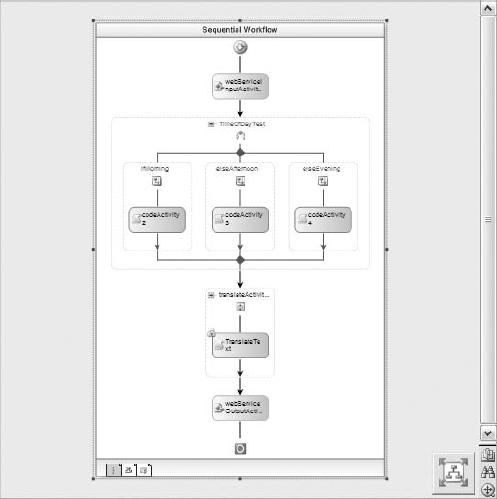
The resulting Web service works just like any other created by Visual Studio: You can access it in a browser to receive a test form (see Figure 27-16), request the WSDL, and access it using Web service clients.
Beyond Web services, ASP.NET applications can also host and access regular workflows. When hosting workflows in ASP.NET, keep in mind that your application may be accessed by many concurrent users, so you must be aware of when you create the runtime instance. In addition, remember that each workflow instance can use a good deal of memory. Therefore, limit the creation of workflows to when they are needed and free them quickly when they are no longer needed.

As you will probably want a single workflow runtime instance supporting all of your workflows, the best place to create the workflow runtime is when the application first starts. You can do this in the application's Start event in the global.asax file:
Sub Application_Start(ByVal sender As Object, ByVal e As EventArgs)
    Dim wfRun As New System.Workflow.Runtime.WorkflowRuntime
    Dim wfSked As _
      New System.Workflow.Runtime.Hosting.ManualWorkflowSchedulerService

    wfRun.AddService(wfSked)
    wfRun.StartRuntime()
    Application.Item("WorkflowRuntime") = wfRun
End Sub
This ensures that the same runtime is available to all sessions. Next, free up the resources used by the runtime when the application ends:
Sub Application_End(ByVal sender As Object, ByVal e As EventArgs)
    Dim wfRun As System.Workflow.Runtime.WorkflowRuntime
    wfRun = CType(Application.Item("WorkflowRuntime"), _
        System.Workflow.Runtime.WorkflowRuntime)
    wfRun.StopRuntime()

End Sub
Running a workflow instance is now a matter of retrieving the runtime instance and using it to execute the workflow. This leads to another issue related to the way Web pages are handled. Recall that the workflow typically runs asynchronously. This could mean that the workflow instance continues to run in the background after the Web page has returned. Therefore, you must run the workflow instance synchronously, so that it completes before returning data to the Web page:
Dim wfRun As WorkflowRuntime
wfRun = CType(Application.Item("WorkflowRuntime"), WorkflowRuntime)
Dim wfSked As ManualWorkflowSchedulerService wfSked = wfRun.GetService(GetType(ManualWorkflowSchedulerService)) Dim wfInst As WorkflowInstance wfInst = wfRun.CreateWorkflow(GetType(SimpleWorkflow)) wfInst.Start() wfSked.RunWorkflow(wfInst.InstanceId)
The preceding code extracts the workflow runtime from the Application storage. It then retrieves the workflow scheduling service that was associated with the runtime as part of the Application_Start event handler. This scheduling service executes the workflows synchronously. This ensures that the entire workflow runs before the Web page is returned. The runtime is also used to create a new instance of the workflow desired, which is then started and associated with the scheduler. You could provide parameters to the workflow just as you did with the Windows Forms sample, by creating a Dictionary and populating it with the properties. This Dictionary would then be provided as a second parameter on the CreateWorkflow call. Similarly, you could retrieve the result of the workflow using the OutputParameters property in the Completed event handler for the workflow, just as you did with Windows Forms.
While Windows Workflow Foundation does not have the visual glitz of WPF or the broad reach of WCF, it is a highly useful addition to the .NET Framework 3.0. Most business applications have some need for workflows, and having a standard means of creating this workflow ensures that the workflow is fully featured and accurately reflects business needs. As WF is readily available with the .NET Framework, developers no longer need to recreate a core business rules engine with each application. WF is extensible, so developers can take advantage of it in their applications, without being limited to the designed features.
As with the other components of the .NET Framework, WF integrates well into other applications, including Windows Forms and ASP.NET applications. It provides the means to extract the frequently complex workflow from those applications and to graphically design it. This graphical representation can be used to communicate the process to business users, increasing the chance that the workflow is represented correctly. Finally, as business needs change, it is a simple process to update the workflow, without requiring changes to the core application.
While Windows Workflow Foundation is a relatively new component of the .NET Framework, you can already find useful websites for information:
Microsoft .NET Framework 3.0 Community (
http://wf.netfx3.com) — The main community site for WF and the other frameworks added with .NET Framework 3.0. This site has a number of useful samples, custom activities, and forums available.WF on MSDN (
http://msdn.microsoft.com/workflow) — Articles, documentation, and more assistance on the main MSDN site.