The introduction of ASP.NET 1.0/1.1 changed the Web programming model, and ASP.NET 3.5 is just as revolutionary in the way it increases the productivity of .NET developers. The primary goal of ASP.NET is to enable you to build powerful, secure, and dynamic applications using the least possible amount of code. This chapter covers some of the exciting features provided by ASP.NET 3.5 and most of what the ASP.NET technology offers.
ASP.NET 3.5 is a substantial release of the product and an integral part of the .NET Framework 3.5. This release of ASP.NET heralds a new wave of development for AJAX-enabled applications and provides a new means of coding a rich application.
ASP.NET 3.5 has specific goals to achieve. These goals are focused around developer productivity, administration, and management, as well as performance and scalability. After working with ASP.NET, you will find that these goals have indeed been achieved.
Much of ASP.NET's focus is on productivity. Huge productivity gains were made with the release of ASP.NET 1.x — could it be possible to expand further on those gains?
The ASP.NET development team's ongoing goal has been to eliminate much of the tedious coding that ASP.NET originally re0quired and to make common ASP.NET tasks easier. After the release of the first version of ASP.NET, the Microsoft team developing ASP.NET has had the goal of reducing by two-thirds the number of lines of code required for an ASP.NET application. It succeeded: you will be amazed at how quickly you can create your applications in ASP.NET 3.5.
The initial release of ASP.NET focused on the developer, and little thought was given to the people who had to administer and manage all the ASP.NET applications that were built and deployed. Instead of working with consoles and wizards as they did in the past, administrators and managers of these new applications now had to work with unfamiliar XML configuration files such as machine.config and web.config.
To remedy this situation, if you are using Windows XP, ASP.NET includes a Microsoft Management Console (MMC) snap-in that enables Web application administrators to edit configuration settings easily on-the-fly through IIS. If you are using Windows Vista, the IIS Manager has been enhanced to give you the same capabilities that the MMC snap-in included.
The Microsoft team set out to provide the world's fastest Web application server. One of the most exciting performance features of ASP.NET 3.5 is the caching capability aimed at exploiting Microsoft's SQL Server. This feature is called SQL cache invalidation. Before ASP.NET 2.0, it was possible to cache the results that came from SQL Server and to update the cache based on a time interval — for example, every 15 seconds or so. This meant that end users might see stale data if the result set changed sometime during that 15-second interval.
In some cases, this time interval result set is unacceptable. Ideally, the result set stored in the cache is destroyed if any underlying change occurs in the source from which the result set is retrieved — in this case, SQL Server. Ever since ASP.NET 2.0, you can make this happen with the use of SQL cache invalidation. When the result set from SQL Server changes, the output cache is triggered to change, and the end user always sees the latest result set. The data presented is never stale.
ASP.NET 3.5 provides 64-bit support, which means you can run your ASP.NET applications on 64-bit Intel or AMD processors. In addition, because ASP.NET 3.5 is fully backwardly compatible with ASP.NET 1.0/1.1 and 2.0, you can now take any former ASP.NET application, recompile it on the .NET Framework 3.5, and run it on a 64-bit processor.
In ASP.NET, code is constructed and compiled in an interesting way. Compilation in ASP.NET 1.0 was always tricky. You could build an application's code-behind files using ASP.NET and Visual Studio, deploy it, and then watch as the .aspx files were compiled page by page as each page was requested. If you made any changes to the code-behind file in ASP.NET 1.0, it was not reflected in your application until the entire application was rebuilt, which meant that the same page-by-page request had to be done again before the entire application was recompiled.
Everything regarding how ASP.NET 1.0 worked with classes and compilation changed with the release of ASP.NET 2.0. The mechanics of the ASP.NET compilation system actually begin with how a page is structured. In ASP.NET 1.0, you constructed your pages either by using the code-behind model or by placing all the server code inline between <script> tags on your .aspx page. Most pages were constructed using the code-behind model because this was the default when using Visual Studio .NET 2002 or 2003. It was quite difficult to create your page using the inline style in these IDEs. If you did, then you were deprived of the use of IntelliSense, which can be quite a lifesaver when working with the tremendously large collection of classes that the .NET Framework offers.
ASP.NET 3.5 offers a code-behind model because the .NET Framework 2.0 (the core of the .NET Framework 3.5) offers the capability to work with partial classes (also called partial types). Upon compilation, the separate files are combined into a single offering. This gives you much cleaner code-behind pages. The code that was part of the Web Form Designer Generated section of your classes is separated from the code-behind classes that you create yourself. Contrast this with the ASP.NET 1.0 .aspx file's requirement to derive from its own code-behind file to represent a single logical page.
ASP.NET 3.5 applications can include an App_Code directory in which you place your class's source. Any class placed here is dynamically compiled and reflected in the application. Unlike ASP.NET 1.0, you do not use a separate build process when you make changes. This enables a "just save and hit" deployment model like the one in classic ASP 3.0. Visual Studio Web Developer also automatically provides IntelliSense for any objects placed in the App_Code directory, whether you are working with the code-behind model or are coding inline.
ASP.NET 3.5 provides you with tools that enable you to precompile your ASP.NET applications — both .aspx pages and code-behind — so that no page within your application experiences latency when it is retrieved for the first time. This is also a great way to discover any errors in the pages without invoking every page. Precompiling your ASP.NET 3.5 applications is as simple as using aspnet_compiler.exe and employing some of the available flags. As you precompile your entire application, you receive error notifications if errors are found anywhere within it. Precompilation also enables you to deliver only the created assembly to the deployment server, thereby protecting your code from snooping, unwanted changes, and tampering after deployment.
The built-in health-monitoring capabilities are rather significant features designed to make it easier to manage a deployed ASP.NET application. Health monitoring provides what the term implies — the capability to monitor the health and performance of your deployed ASP.NET applications.
ASP.NET health monitoring is built around various health-monitoring events (referred to as Web events) occurring in your application. Using the health-monitoring system enables you to perform event logging for Web events such as failed logins, application starts and stops, or any unhandled exceptions. The event logging can occur in more than one place, so you can log to the Event Log or even back to a database. In addition to performing this disk-based logging, you can also use the system to e-mail health-monitoring information.
Besides working with specific events in your application, you can use the health-monitoring system to take health snapshots of a running application. As with most systems built into ASP.NET 3.5, you can extend the health-monitoring system and create your own events for recording application information.
Using the WebConfigurationManager class, you can read from and write to the server or application configuration files. This means that you can write and read settings in the machine.config or the web.config files that your application uses.
The capability to read and write to configuration files is not limited to working with the local machine in which your application resides. You can also perform these operations on remote servers and applications.
Of course, a GUI technique exists for performing these read or change operations on the configuration files at your disposal. Most exciting, however, is that the built-in GUI tools that provide this functionality (such as the ASP.NET MMC snap-in available for Windows XP) use the WebConfigurationManager class that is also available for building custom administration tools.
ASP.NET 3.5 makes it easy to localize applications. In addition to using Visual Studio, you can create resource files (.resx) that enable you to dynamically change the pages you create based upon the culture settings of the requester.
ASP.NET also provides the capability to provide resources either application-wide or just to particular pages in your application through the use of two application folders: App_GlobalResources and App_LocalResources.
The items defined in any .resx files you create are then accessible directly in the ASP.NET server controls or programmatically, using expressions such as the following:
<%= Resources.Resource.Question %>
This system is straightforward and simple to implement.
One of the more code-intensive tasks in ASP.NET 1.0 was data retrieval. In many cases, this meant working with several objects. If you have been working with ASP.NET for a while, you know that it is an involved process to display data from a Microsoft SQL Server table within a DataGrid server control. For instance, you first had to create a number of new objects, including a SqlConnection object followed by a SqlCommand object. When those objects were in place, you then created a SqlDataReader to populate your DataGrid by binding the result to the DataGrid. In the end, a table appeared containing the contents of the data you were retrieving (such as the Customers table from the Northwind database).
Ever since version 2.0, ASP.NET eliminates this intensive procedure with the inclusion of a set of objects that work specifically with data access and retrieval. These data controls are so easy to use that you can access and retrieve data to populate your ASP.NET server controls without writing any code. Even better, this functionality is not limited to Microsoft's SQL Server. In fact, several data-source server controls are at your disposal, and you can create your own. In addition to the SqlDataSource server control, ASP.NET 3.5 includes the AccessDataSource, XmlDataSource, ObjectDataSource, and SiteMapDataSource server controls. ASP.NET 3.5 also introduces the new LinqDataSource control, which enables you to work with the LINQ configurations that you design within your applications.
With ASP.NET 1.0/1.1, you can build your ASP.NET application using Notepad, Visual Studio .NET 2002 and 2003, as well as the hobbyist-focused ASP.NET Web Matrix. In ASP.NET 2.0, you were able to use Visual Studio 2005. ASP.NET 3.5 adds another IDE to the Visual Studio family — Visual Studio 2008. Visual Studio 2008 offers some dramatic enhancements to how you build your ASP.NET applications.
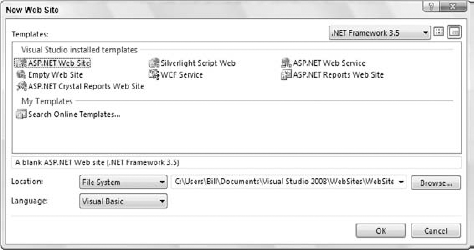
Visual Studio 2008 now enables you to target the version of the framework for which you are building (see Figure 19-1.

In the New Web Site dialog, you are provided with a drop-down list in the top right-hand corner that enables you to choose which version of the framework your ASP.NET should be compiled against.
In addition to this change, AJAX has now become an integrated part of Visual Studio. Prior to Visual Studio 2008, ASP.NET AJAX Extensions was available only as a separate add-on that would be integrated with Visual Studio 2005. It is now completely built into the IDE with the release of Visual Studio 2008.
IntelliSense has always been an important tool used by .NET developers to help them quickly build their applications. With the release of Visual Studio 2008, this capability has also been extended; VS 2008 now supports JavaScript IntelliSense as well as inline JavaScript validation. This means that if your JavaScript is not correct in the document window, then you will see red and green squiggly lines under the corresponding code.
In addition to enhanced support for JavaScript and CSS, the IDE now has full support for WCF. This is true not only for building new WCF services, but also for consuming them. For instance, in addition to the Add Reference and Add Web Reference capabilities, a new Add Service option is available when you right-click on the project within the VS 2008 Solution Explorer.
Note that like Visual Studio 2005, the new Visual Studio 2008 builds applications using a file-based system, not the project-based system used by Visual Studio .NET. When using Visual Studio .NET in the past, you had to create new projects (for example, an ASP.NET Web Application project). This process created a number of project files in your application in addition to the Default.aspx page. Because everything was based on a singular project, it was very difficult to develop applications in a team environment.
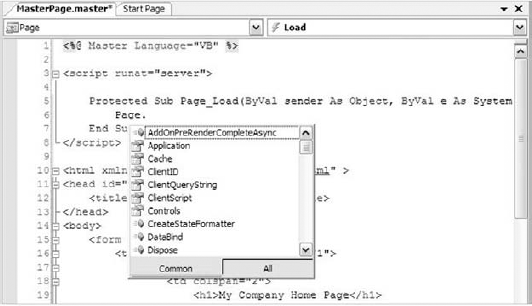
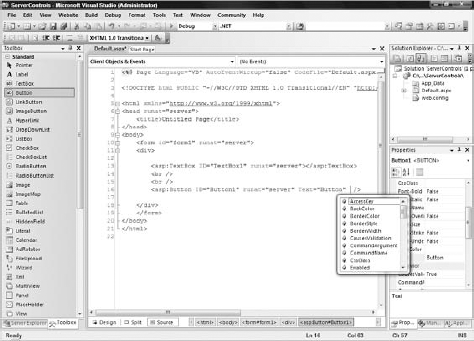
Conversely, Web projects in Visual Studio 2008 are based on a file-system approach. No project files are included in your project, which makes it easy for multiple developers to work on a single application without bumping into each other. Other changes are those to the compilation system discussed earlier. You can build your ASP.NET pages using either the inline model or the code-behind model. Both offer full IntelliSense capabilities. This, in itself, is powerful and innovative. Figure 19-2 shows IntelliSense running from an ASP.NET page that is being built using the inline model.
Another feature of Visual Studio 2008 borrowed from the ASP.NET Web Matrix is that you do not need IIS on your development machine. Visual Studio 2008 has a built-in web server that enables you to launch pages from any folder in your system with relative ease.
If you are new to ASP.NET and are building your first set of applications in ASP.NET 3.5, you may be amazed by all the wonderful new server controls it provides. You may marvel at how it enables you to work with data more effectively using the new data providers, and you are sure to be impressed with how easily you can build in security and personalization.
The outstanding capabilities of ASP.NET 3.5 do not end there, however. This section looks at many exciting additions that facilitate working with ASP.NET pages and applications. One of the first steps you, as the developer, should take when starting a project is to become familiar with the foundation you are building on and the options available for customizing that foundation.
With ASP.NET 3.5, you have the option — using Visual Studio 2008 — to create an application with a virtual directory mapped to IIS, or a standalone application outside the confines of IIS. Whereas Visual Studio .NET forced developers to use IIS for all Web applications, Visual Studio 2008 includes a built-in web server that you can use for development, much like the one used in the past with the ASP.NET Web Matrix.
This built-in web server was previously presented to developers as a code sample called Cassini. In fact, the code for this mini web server is freely downloadable from the ASP.NET team website found at
www.asp.net.
By default, Visual Studio 2008 builds applications without the use of IIS. You can see this when you select File
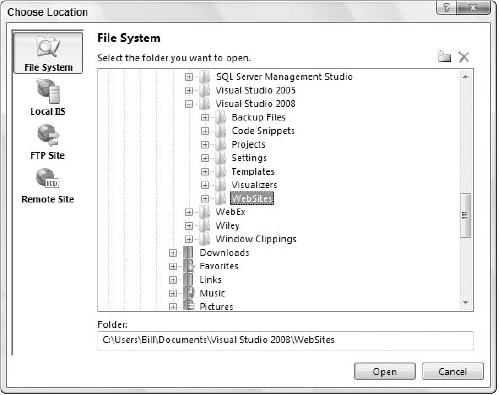
To change this default, you have a handful of options. Click the Browse button in the New Web Site dialog. This brings up the Choose Location dialog, shown in Figure 19-4.
If you continue to use the built-in web server that Visual Studio 2008 provides, you can choose a new location for your Web application from this dialog. To do so, select a new folder and save your .aspx pages and any other associated files to this directory. When using Visual Studio 2008, you can run your application completely from this location. This way of working with the ASP.NET pages you create is ideal if you don't have access to a web server, as you can build applications that don't reside on a machine with IIS. This means that you can even develop ASP.NET applications on operating systems such as Windows XP Home Edition.
From the Choose Location dialog, you can also change where your application is saved and which type of web server your application employs. To use IIS (as you probably did when you used Visual Studio .NET 2002/2003), select the Local IIS button in the dialog. This changes the results in the text area to display a list of all the virtual application roots on your machine.
To create a new virtual root for your application, highlight Default Web Site. Three buttons appear at the top of the dialog (see Figure 19-5). From left to right, the first button in the top-right corner of the dialog is for creating a new Web application — or a virtual root. This button is shown as a globe inside a box. The second button enables you to create virtual directories for any of the virtual roots you created. The third button is a Delete button, which you can use to delete any selected virtual directories or virtual roots on the server.
After you have created the virtual directory you want, click the Open button. Visual Studio 2008 then goes through the standard process to create your application. Now, however, instead of depending on the built-in web server from ASP.NET 3.5, your application will use IIS. When you invoke your application, the URL now consists of something like http://localhost/MyWeb/Default.aspx, which means it is using IIS.
Not only can you choose the type of web server for your Web application when you create it using the Choose Location dialog, you can also decide where to locate your application. The previous options built applications that resided on your local server. The FTP option enables you to actually store and even code your applications while they reside on a server somewhere else in your enterprise — or on the other side of the planet. You can also use the FTP capabilities to work on different locations within the same server. This built-in capability provides a wide range of possible options and represents a major enhancement to the IDE. Previously difficult to accomplish, this task is now quite simple, as illustrated in Figure 19-6.

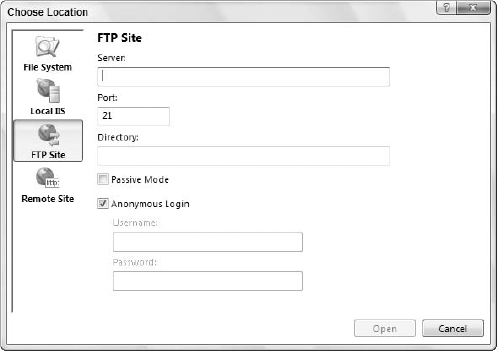
To create your application on a remote server using FTP, simply provide the server name, the port to use, and the directory — as well as any required credentials. If the correct information is provided, then Visual Studio 2008 accesses the remote server and creates the appropriate files for the start of your application, just as if it were doing the job locally. From this point on, you can open your project and connect to the remote server using FTP.
The last option in the Choose Location dialog is the Remote Site option (see Figure 19-7). Clicking this button provides a dialog that enables you to connect to a remote or local server that utilizes FrontPage Extensions.

ASP.NET 3.5 provides two paths for structuring the code of your ASP.NET pages. The first path utilizes the code-inline model. This model should be familiar to classic ASP 2.0/3.0 developers because all the code is contained within a single .aspx page. The second path uses ASP.NET's code-behind model, which enables the separation of the page's business logic from its presentation logic. In this model, the presentation logic for the page is stored in an .aspx page, whereas the logic piece is stored in a separate class file: .aspx.vb or .aspx.cs.
One of the major complaints about Visual Studio .NET 2002 and 2003 is that it forces you to use the code-behind model when developing your ASP.NET pages because it does not understand the code-inline model. The code-behind model in ASP.NET was introduced as a new way to separate the presentation code and business logic. Example 1 (named because it is referred to later) shows a typical .aspx page generated using Visual Studio .NET 2002 or 2003:
Example 19.1. Example 1
<%@ Page Language="vb" AutoEventWireup="false" Codebehind="WebForm1.aspx.vb"
    Inherits="WebApplication.WebForm1"%>
<!DOCTYPE HTML PUBLIC "-//W3C//DTD HTML 4.0 Transitional//EN">
<HTML>
 <HEAD>
    <title>WebForm1</title>
    <meta name="GENERATOR" content="Microsoft Visual Studio .NET 7.1">
    <meta name="CODE_LANGUAGE" content="Visual Basic .NET 7.1">
<meta name="vs_defaultClientScript" content="JavaScript">
<meta name="vs_targetSchema"
content="http://schemas.microsoft.com/intellisense/ie5">
</HEAD>
<body>
<form id="Form1" method="post" runat="server">
<P>What is your name?<br>
<asp:TextBox id="TextBox1" runat="server"></asp:TextBox><BR>
<asp:Button id="Button1" runat="server" Text="Submit"></asp:Button></P>
<P><asp:Label id="Label1" runat="server"></asp:Label></P>
</form>
</body>
</HTML>Example 2, shown next, shows the code-behind file created within Visual Studio .NET 2002/2003 for the .aspx page:
Example 19.2. Example 2
Public Class WebForm1
    Inherits System.Web.UI.Page

#Region " Web Form Designer Generated Code "

    'This call is required by the Web Form Designer.
    <System.Diagnostics.DebuggerStepThrough()> _
       Private Sub InitializeComponent()

    End Sub
    Protected WithEvents TextBox1 As System.Web.UI.WebControls.TextBox
    Protected WithEvents Button1 As System.Web.UI.WebControls.Button
    Protected WithEvents Label1 As System.Web.UI.WebControls.Label

    'NOTE: The following placeholder declaration is required by the Web Form
        Designer.
    'Do not delete or move it.
    Private designerPlaceholderDeclaration As System.Object

    Private Sub Page_Init(ByVal sender As System.Object, ByVal e As
      System.EventArgs) Handles MyBase.Init
        'CODEGEN: This method call is required by the Web Form Designer
        'Do not modify it using the code editor.
        InitializeComponent()
    End Sub

#End Region

    Private Sub Page_Load(ByVal sender As System.Object, ByVal e As
      System.EventArgs) Handles MyBase.Load
        'Put user code to initialize the page here
    End Sub
Private Sub Button1_Click(ByVal sender As System.Object, ByVal e As
System.EventArgs) Handles Button1.Click
Label1.Text = "Hello " & TextBox1.Text
End Sub
End ClassIn this code-behind page from ASP.NET 1.0/1.1, you can see that a lot of the code that developers never have to deal with is hidden in the #Region section of the page. Because ASP.NET 3.5 is built on top of .NET 3.5, which in turn is utilizing the core .NET 2.0 Framework, it can take advantage of the .NET Framework's partial class capability. Partial classes enable you to separate your classes into multiple class files, which are then combined into a single class when the application is compiled. Because ASP.NET 3.5 combines all this page code for you behind the scenes when the application is compiled, the code-behind files you work with in ASP.NET 3.5 are simpler in appearance and the model is easier to use. You are presented with only the pieces of the class that you need.
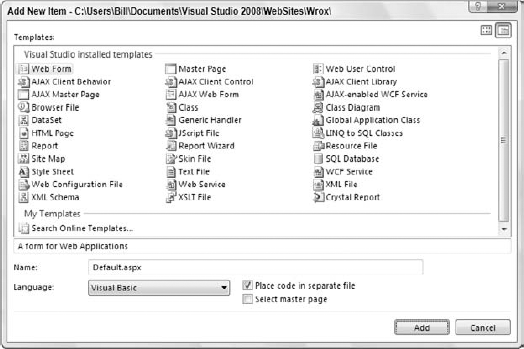
With the .NET Framework 1.0/1.1, developers went out of their way (and outside Visual Studio .NET) to build their ASP.NET pages inline and avoid the code-behind model that was so heavily promoted by Microsoft and others. Visual Studio 2008 (as well as Visual Web Developer 2008) enables you to build your pages easily using this coding style. To build an ASP.NET page inline instead of using the code-behind model, you simply select the page type from the Add New Item dialog and ensure that the Place Code in Separate File check box is unchecked. You can access this dialog by right-clicking the project or the solution in the Solution Explorer and selecting Add New Item (see Figure 19-8).
In fact, many page types have options for both inline and code-behind styles. The following table shows your inline options when selecting files from this dialog:
File Options Using Inline Coding | File Created |
|---|---|
Web Form |
|
AJAX Web Form |
|
Master Page |
|
AJAX Master Page |
|
Web User Control |
|
Web Service |
|
By using the Web Form option with a few controls, you get a page that encapsulates not only the presentation logic, but also the business logic:
<%@ Page Language="VB" %>

<!DOCTYPE html PUBLIC "-//W3C//DTD XHTML 1.1//EN"
 "http://www.w3.org/TR/xhtml11/DTD/xhtml11.dtd">

<script runat="server">
    Protected Sub Button1_Click(ByVal sender As Object, _
       ByVal e As System.EventArgs)

        Label1.Text = "Hello " & Textbox1.Text
    End Sub
</script>

<html xmlns="http://www.w3.org/1999/xhtml" >
<head runat="server">
    <title>Simple Page</title>
</head>
<body>
    <form id="form1" runat="server">
        What is your name?<br />
        <asp:Textbox ID="Textbox1" Runat="server"></asp:Textbox><br />
        <asp:Button ID="Button1" Runat="server" Text="Submit"
         OnClick="Button1_Click" />
        <p><asp:Label ID="Label1" Runat="server"></asp:Label></p>
    </form>
</body>
</html>
From this example, you can see that all the business logic is encapsulated in between <script> tags. The nice feature of the inline model is that the business logic and the presentation logic are contained within the same file. Some developers find that having everything in a single viewable instance makes working with the ASP.NET page easier.
Visual Studio 2008 also provides IntelliSense when working with the inline coding model and ASP.NET 3.5. Before .NET 2.0, this capability did not exist. Visual Studio .NET 2002/2003 forced you to use the code-behind model; and even if you rigged it so your pages were using the inline model, you lost all IntelliSense capabilities.
The other option for constructing your ASP.NET 3.5 pages is to build your files using the new code-behind model. We say "new" because even though the concept of the code-behind model is the same as it was in previous versions, the code-behind model used in ASP.NET 3.5 is quite different.
The preferred method is the code-behind model, rather than the inline model. Using this method employs the proper segmentation between presentation and business logic in many cases. Many of the examples in the ASP.NET chapters use an inline coding model because the inline model works well for showing an example in a book in one listing. Therefore, even though the example uses an inline coding style, it is recommended that you employ the code-behind model.
To create a new page in your ASP.NET solution that uses the code-behind model, select the page type you want from the New File dialog. To build a page using the code-behind model, first select the page in the Add New Item dialog and ensure that the Place Code in Separate File check box is checked. The following table shows the options for pages that use the code-behind model:
File Options Using Code-Behind | File Created |
|---|---|
| |
| |
| |
| |
| |
Web Service |
|
The idea of using the code-behind model is to separate the business logic and presentation logic into separate files. This makes it easier to work with your pages, especially if you are working in a team environment where visual designers work on the UI of the page and coders work on the business logic that sits behind the presentation pieces. In the earlier code labeled Examples 1 and 2, you saw how pages using the code-behind model in ASP.NET 1.0/1.1 were constructed. To see the difference in ASP.NET 3.5, look at how its code-behind pages are constructed in the following two examples, the first for the presentation piece and the second for the code-behind piece:
<%@ Page Language="VB" AutoEventWireup="false" CodeFile="Default.aspx.vb"
    Inherits="_Default" %>

<!DOCTYPE html PUBLIC "-//W3C//DTD XHTML 1.1//EN"
 "http://www.w3.org/TR/xhtml11/DTD/xhtml11.dtd">

<html xmlns="http://www.w3.org/1999/xhtml">
<head runat="server">
<title>Simple Page</title>
</head>
<body>
<form id="form1" runat="server">
What is your name?<br />
<asp:Textbox ID="Textbox1" Runat="server"></asp:Textbox><br />
<asp:Button ID="Button1" Runat="server" Text="Submit"
OnClick="Button1_Click" />
<p><asp:Label ID="Label1" Runat="server"></asp:Label></p>
</form>
</body>
</html>Partial Class _Default
Inherits System.Web.UI.Page
Protected Sub Button1_Click(ByVal sender As Object, _
ByVal e As System.EventArgs) Handles Button1.Click
Label1.Text = "Hello " & TextBox1.Text
End Sub
End ClassThe .aspx page using this ASP.NET 3.5 code-behind model has some attributes in the Page directive that you should pay attention to when working in this mode. The first is the CodeFile attribute. This is an attribute in the Page directive and is meant to point to the code-behind page used with this presentation page. In this case, the value assigned is Default.aspx.vb or Default.aspx.cs. The second attribute needed is the Inherits attribute. This attribute was available in previous versions of ASP.NET but was infrequently used before ASP.NET 2.0. This attribute specifies the name of the class that is bound to the page when the page is compiled. The directives are simple enough in ASP.NET 3.5.
Take another look at the preceding code-behind page. It is rather simple in appearance because of the partial class capabilities that .NET 3.5 provides. You can see that the class created in the code-behind file uses partial classes, employing the Partial keyword in Visual Basic 2008. This enables you to simply place the methods that you need in your Page class. In this case, you have a button-click event and nothing else.
ASP.NET directives are part of every ASP.NET page. You can control the behavior of your ASP.NET pages by using these directives. Here is an example of the Page directive:
<%@ Page Language="VB" AutoEventWireup="false" CodeFile="Default.aspx.vb"
    Inherits="_Default" %>
Eleven directives are at your disposal in your ASP.NET pages or user controls. You use these directives in your applications whether the page uses the code-behind model or the inline coding model. Basically, these directives are commands that the compiler uses when the page is compiled. Directives are simple to incorporate into your pages, and are written in the following format:
<%@ [Directive] [Attribute=Value] %>
A directive is opened with <%@ and closed with %>. It is best to put these directives at the top of your pages or controls because this is traditionally where developers expect to see them (although the page still compiles if the directives are located elsewhere. Of course, you can also add more than a single attribute to your directive statements, as shown here:
<%@ [Directive] [Attribute=Value] [Attribute=Value] %>
The following table describes the directives at your disposal in ASP.NET 3.5:
ASP.NET developers consistently work with various events in their server-side code. Many of the events that they work with pertain to specific server controls. For instance, if you want to initiate an action when the end user clicks a button on your Web page, you create a button-click event in your server-side code, as shown in the following example:
Protected Sub Button1_Click(sender As Object, e As EventArgs) _
   Handles Button1.Click

   Label1.Text = TextBox1.Text
End Sub
In addition to the server controls, developers also want to initiate actions at specific moments when the ASP.NET page is being either created or destroyed. The ASP.NET page itself has always had a number of events for these instances. Following is a list of all the page events you could use in ASP.NET 1.0/1.1:
One popular page event from this list is Load, which is used in VB as shown in the following code (called Example 4 for later reference):
Example 19.3. Example 3
Protected Sub Page_Load(ByVal sender As Object, ByVal e As System.EventArgs)
   Handles Me.Load

   Response.Write("This is the Page_Load event")
End Sub
Besides the page events just shown, ASP.NET 3.5 provides the following events beyond the ones offered in ASP.NET 1.0/1.1:
InitComplete — Indicates that initialization of the page is completed
LoadComplete — Indicates that the page has been completely loaded into memory
PreInit — Indicates the moment immediately before a page is initialized
PreLoad — Indicates the moment before a page has been loaded into memory
PreRenderComplete — Indicates the moment directly before a page has been rendered in the browser
You construct these page events just as you did the previously shown page events. For example, you use the PreInit event as follows:
<script runat="server" language="vb">
    Protected Sub Page_PreInit(ByVal sender As Object, _
      ByVal e As System.EventArgs)

       Page.Theme = Request.QueryString("ThemeChange")
    End Sub
</script>
If you create an ASP.NET 3.5 page and turn on tracing, you can see the order in which the main page events are initiated:
PreInitInitInitCompletePreLoadLoadLoadCompletePreRenderPreRenderCompleteUnload
With the addition of these options, you can work with the page and the controls on the page at many different points in the page-compilation process.
When you create ASP.NET applications, note that ASP.NET 3.5 uses a file-based approach. You can add as many files and folders as you want within your application without recompiling each and every time a new file is added to the overall solution. ASP.NET 3.5 includes the capability to automatically precompile your ASP.NET applications dynamically.
ASP.NET 1.0/1.1 compiled everything in your solution into a DLL. This is no longer necessary because ASP.NET applications now have a defined folder structure. By using the ASP.NET defined folders, you can have your code automatically compiled for you, your application themes accessible throughout your application, and your globalization resources available whenever you need them. The following sections show how these defined folders work.
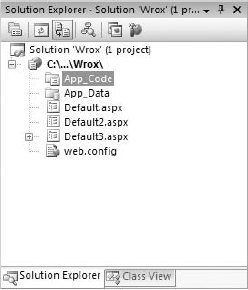
The App_Code folder is meant to store your classes, .wsdl files, and typed datasets. Any of these items stored in this folder are then automatically available to all the pages within your solution. The nice thing about the App_Code folder is that when you place something inside it, Visual Studio 2008 automatically detects this and compiles it if it is a class (such as a .vb file), automatically creates your XML Web service proxy class (from the .wsdl file), or automatically creates a typed dataset for you from your .xsd files.
After the files are automatically compiled, these items are then immediately available to any of your ASP.NET pages in the same solution. Let's look at how to employ a simple class in your solution using the App_Code folder. Create an App_Code folder by right-clicking the solution and choosing Add ASP.NET Folder
After the App_Code folder is in place, right-click the folder and select Add New Item. The Add New Item dialog that appears provides a few options for the types of files that you can place within this folder. These include an AJAX-enabled WCF Service, a Class file, a LINQ to SQL Class, a Text file, a DataSet, a Report, and a Class Diagram if you are using Visual Studio 2008. Visual Web Developer 2008 offers only the Class file, the Text file, and the DataSet file. For the first example, select the file of type Class and name the class Calculator.vb or Calculator.cs. The following listing shows how the Calculator class should appear:
Imports Microsoft.VisualBasic

Public Class Calculator
    Public Function Add(ByVal a As Integer, ByVal b As Integer) As Integer
        Return (a + b)
    End Function
End Class
Simply save this file and it is now available for use in any pages in your solution. To see this in action, create a simple .aspx page that contains a single Label server control. The following example shows the code to place within the Page_Load event to make this new class available:
<%@ Page Language="VB" %>

<!DOCTYPE html PUBLIC "-//W3C//DTD XHTML 1.1//EN"
 "http://www.w3.org/TR/xhtml11/DTD/xhtml11.dtd">
<script runat="server">
    Protected Sub Page_Load(ByVal sender As Object, _
      ByVal e As System.EventArgs)

        Dim myCalc As New Calculator()
        Label1.Text = myCalc.Add(12, 12)
    End Sub
</script>
When you run this .aspx page, note that it utilizes the Calculator class without any problem, with no need to compile the class before use. In fact, right after saving the Calculator class in your solution or moving the class to the App_Code folder, you also immediately receive IntelliSense capability on the methods that the class exposes (as illustrated in Figure 19-10).

To see how Visual Studio 2008 works with the App_Code folder, open the Calculator class again in the IDE and add a Subtract method. Your class should now appear as shown here:
Imports Microsoft.VisualBasic

Public Class Calculator
    Public Function Add(ByVal a As Integer, ByVal b As Integer) As Integer
        Return (a + b)
    End Function

Public Function Subtract(ByVal a As Integer, ByVal b As Integer) _
      As Integer

        Return (a - b)
    End Function
End Class
After adding the Subtract method to the Calculator class, save the file and return to your .aspx page. Note that the class has been recompiled by the IDE, and the new method is now available to your page (see Figure 19-11). You see this directly in IntelliSense.

Everything placed in the App_Code folder is compiled into a single assembly. The class files placed within the App_Code folder are not required to use a specific language. For example, even if all the pages of the solution are written in Visual Basic 2008, the Calculator class in the App_Code folder of the solution can be built in C# (Calculator.cs).
Because all the classes contained in this folder are built into a single assembly, you cannot have classes of different languages sitting in the root App_Code folder, as in the following example:
App_Code
   Calculator.cs
   AdvancedMath.vb
Having two classes made up of different languages in the App_Code folder (as shown here) causes an error to be thrown. It is impossible for the assigned compiler to work with two different languages. Therefore, in order to work with multiple languages in your App_Code folder, you must make some changes to the folder structure and the web.config file.
First, add two new subfolders to the App_Code folder: a VB folder and a CS folder. This gives you the following folder structure:
App_Code
   VB
      Add.vb
   CS
      Subtract.cs
This still will not correctly compile these class files into separate assemblies, at least not until you make some additions to the web.config file. Most likely, you do not have a web.config file in your solution at the moment, so add one through the Solution Explorer. After it is added, change the <compilation> node so that it is structured as shown here:
<compilation>
   <codeSubDirectories>
      <add directoryName="VB"></add>
      <add directoryName="CS"></add>
   </codeSubDirectories>
</compilation>
Now that this is in place in your web.config file, you can work with each of the classes in your ASP.NET pages. In addition, any C# class placed in the CS folder is now automatically compiled just like any of the classes placed in the VB folder. Because you can add these directories in the web.config file, you are not required to name them VB and CS; you can use whatever names you want.
The App_Data folder holds the data stores used by the application. It is a good spot to centrally store all the data stores your application might use. The App_Data folder can contain Microsoft SQL Express files (.mdf files), Microsoft Access files (.mdb files), XML files, and more.
The user account utilized by your application has read and write access to any of the files contained within the App_Data folder. By default, this is the ASP.NET account. Another reason to store all your data files in this folder is that much of the ASP.NET system — from the membership and role management systems to the GUI tools such as the ASP.NET MMC snap-in, the new IIS Manager, and ASP.NET Web Site Administration Tool — is built to work with the App_Data folder.
Themes are a way of providing a common look and feel to your site across every page. You implement a theme by using a .skin file, CSS files, and images used by the server controls of your site. All these elements can make a theme, which is then stored in the App_Themes folder of your solution. By storing these elements within the App_Themes folder, you ensure that all the pages within the solution can take advantage of the theme and easily apply its elements to the controls and markup of the page.
Resource files are string tables that can serve as data dictionaries for your applications when they require changes to content based on things such as changes in culture. You can add Assembly Resource files (.resx) to the App_GlobalResources folder, and they are dynamically compiled and made part of the solution for use by all your .aspx pages in the application. When using ASP.NET 1.0/1.1, you had to use the resgen.exe tool and compile your resource files to a .dll or .exe for use within your solution. It is considerably easier to deal with resource files in ASP.NET 3.5. Simply place your application-wide resources in this folder to make them instantly accessible.
Even if you are not interested in constructing application-wide resources using the App_GlobalResources folder, you may want resources that can be used for a single .aspx page. You can do this very simply by using the App_LocalResources folder.
Add page-specific resource files to the App_LocalResources folder by constructing the name of the .resx file in the following manner:
Default.aspx.resxDefault.aspx.fi.resxDefault.aspx.ja.resxDefault.aspx.en-gb.resx
The resource declarations used on the Default.aspx page are retrieved from the appropriate file in the App_LocalResources folder. By default, the Default.aspx.resx resource file is used if another match is not found. If the client is using a culture specification of fi-FI (Finnish), however, then the Default.aspx.fi.resx file is used instead.
The App_WebReferences folder is a new name for the Web References folder used in earlier versions of ASP.NET. Using the App_WebReferences folder, you have automatic access to the remote Web services referenced from your application.
The App_Browsers folder holds .browser files, which are XML files used to identify the browsers making requests to the application, and to understand the capabilities of these browsers. You can find a list of globally accessible .browser files at C:WindowsMicrosoft.NETFrameworkv2.0.50727CONFIGBrowsers. If you want to change any part of these default browser definition files, just copy the appropriate .browser file from the Browsers folder to your application's App_Browsers folder and change the definition.
To add a new item to your ASP.NET application, you use the Add New Item dialog. From here, you can add a Global Application Class to your applications. This adds a Global.asax file, which is used by the application to hold application-level events, objects, and variables — all of which are accessible application-wide. Active Server Pages developers had something similar with the Global.asa file.
Your ASP.NET applications can have only a single Global.asax file, which supports a number of items. When it is created, you are given the following template:
<%@ Application Language="VB" %>

<script runat="server">

    Sub Application_Start(ByVal sender As Object, ByVal e As EventArgs)
        ' Code that runs on application startup
    End Sub

    Sub Application_End(ByVal sender As Object, ByVal e As EventArgs)
        ' Code that runs on application shutdown
    End Sub

    Sub Application_Error(ByVal sender As Object, ByVal e As EventArgs)
        ' Code that runs when an unhandled error occurs
    End Sub

    Sub Session_Start(ByVal sender As Object, ByVal e As EventArgs)
        ' Code that runs when a new session is started
    End Sub

    Sub Session_End(ByVal sender As Object, ByVal e As EventArgs)
        ' Code that runs when a session ends.
        ' Note: The Session_End event is raised only when the sessionstate mode
        ' is set to InProc in the Web.config file. If session mode is
        ' set to StateServer
        ' or SQLServer, the event is not raised.
    End Sub

</script>
Just as you can work with page-level events in your .aspx pages, you can work with overall application events from the Global.asax file. In addition to the events listed in this code example, the following list details some of the events you can structure inside this file:
Application_Start — Called when the application receives its first request. This is an ideal spot in your application to assign any application-level variables or state that must be maintained across all users.
Session_Start — Similar to the
Application_Startevent except that this event is fired when an individual user accesses the application for the first time. For instance, theApplication_Startevent fires once when the first request comes in, which gets the application going, butSession_Startis invoked for each end user who requests something from the application for the first time.Application_BeginRequest — Although it is not listed in the preceding template provided by Visual Studio 2008, the
Application BeginRequestevent is triggered before each and every request that comes its way. This means that before a request coming into the server is processed,Application_BeginRequestis triggered and dealt with before any processing of the request occurs.Application_AuthenticateRequest — This is triggered for each request and enables you to set up custom authentications for a request.
Application_Error — Triggered when an error is thrown anywhere in the application by any user. This is an ideal spot to provide application-wide error handling or an event recording an error to the server's Event Logs.
Session_End — When running in
InProcmode, this event is triggered when an end user leaves the application.Application_End — Triggered when the application comes to an end. Most ASP.NET developers won't often use this event because ASP.NET does such a good job of closing and cleaning up any objects left around.
In addition to the global application events to which the Global.asax file provides access, you can also use the following directives in this file, just as you can with other ASP.NET pages:
These directives perform in the same way when they are used with other ASP.NET page types. An example of using the Global.asax file is shown in the next code example. It demonstrates how to log when the ASP.NET application domain shuts down. When this happens, the ASP.NET application abruptly comes to an end, so place any logging code in the Application_End method of the Global.asax file:
<%@ Application Language="VB" %>
<%@ Import Namespace="System.Reflection" %>
<%@ Import Namespace="System.Diagnostics" %>

<script runat="server">

    Sub Application_End(ByVal sender As Object, ByVal e As EventArgs)
        Dim MyRuntime As HttpRuntime = _
           GetType(System.Web.HttpRuntime).InvokeMember("_theRuntime", _
           BindingFlags.NonPublic Or BindingFlags.Static Or _
           BindingFlags.GetField, _
           Nothing, Nothing, Nothing)

        If (MyRuntime Is Nothing) Then
            Return
        End If
        Dim shutDownMessage As String = _
           CType(MyRuntime.GetType().InvokeMember("_shutDownMessage", _
           BindingFlags.NonPublic Or BindingFlags.Instance Or _
           BindingFlags.GetField, _
           Nothing, MyRuntime, Nothing), System.String)
Dim shutDownStack As String = _
CType(MyRuntime.GetType().InvokeMember("_shutDownStack", _
BindingFlags.NonPublic Or BindingFlags.Instance Or _
BindingFlags.GetField, _
Nothing, MyRuntime, Nothing), System.String)
If (Not EventLog.SourceExists(".NET Runtime")) Then
EventLog.CreateEventSource(".NET Runtime", "Application")
End If
Dim logEntry As EventLog = New EventLog()
logEntry.Source = ".NET Runtime"
logEntry.WriteEntry(String.Format( _
"shutDownMessage={0}
_shutDownStack={1}", _
shutDownMessage, shutDownStack), EventLogEntryType.Error)
End Sub
</script>With this code in place in your Global.asax file, start your ASP.NET application. Next, do something to cause the application to restart. For example, you could make a change to the web.config file while the application is running. This triggers the Application_End event, resulting in the addition to the Event Log shown in Figure 19-12.

In the past, one of the difficulties in working with classic ASP was that you were completely in charge of the entire HTML output from the browser by virtue of the server-side code you wrote. Although this might seem ideal, it created a problem because each browser interpreted the HTML given to it in a slightly different way.
The two main browsers at the time were Internet Explorer and Netscape Navigator. This meant that not only did developers have to be cognizant of the browser type to which they were outputting HTML, they also had to take into account which versions of those particular browsers might be making a request to their application. Some developers resolved the issue by creating two separate applications. When an end user made an initial request to the application, the code made a browser check to see what browser type made the request. Then, the ASP page redirected the request: down one path for an IE user or down another path for a Netscape user.
Because requests came from so many different versions of the same browser, developers typically designed for the lowest possible version that might be used to visit the site. Everyone loses when the lowest common denominator is used as the target. This technique ensures that the page is rendered properly in most browsers making a request, but it forces developers to dumb down their applications. If applications are built for the lowest common denominator, then developers can't take advantage of the more advanced features offered by newer browser versions.
ASP.NET server controls overcome these obstacles. When using the server controls provided by ASP.NET, you are not specifying the HTML to be output from your server-side code. Rather, you are specifying the functionality you want to see in the browser, letting the ASP.NET determine the output to be sent to the browser.
When a request comes in, ASP.NET examines the request to see which browser type is making it, as well as the version of the browser, and then it produces HTML output specific to that browser. This process is accomplished by processing a User Agent header retrieved from the HTTP request to sniff the browser. This means that you can now build for the best browsers out there without worrying about whether features will work in the different browsers making requests to your applications. Because of these capabilities, these server controls are often referred to as smart controls.
ASP.NET provides two distinct types of server controls: HTML server controls and web server controls. Each type of control is quite different; and as you work with ASP.NET, you will see that much of the focus is on the web server controls. This does not mean that HTML server controls have no value. They do provide you with many capabilities — some that web server controls do not.
If you are wondering which is the better control type to use, it depends on what you are trying to achieve. HTML server controls map to specific HTML elements. You can place an HtmlTable server control on your ASP.NET page that works dynamically with a <table> element. On the other hand, web server controls map to specific functionality that you want on your ASP.NET pages. This means an <asp:Panel> control might use a <table> or an <IFrame> element — it depends on the capability of the requesting browser.
The following table summarizes some advice regarding when to use HTML server controls and when to use web server controls:
Control Type | Use This Control Type ... |
|---|---|
HTML Server | When converting traditional ASP 3.0 Web pages to ASP.NET Web pages and speed of completion is a concern. It is a lot easier to change your HTML elements to HTML server controls than it is to change them to web server controls. |
When you prefer a more HTML-type programming model. | |
When you want to explicitly control the code that is generated for the browser. | |
Web Server | When you require a richer set of functionality to achieve complicated page requirements. |
When you are developing Web pages that will be viewed by a multitude of browser types and that require different code based upon these types. | |
When you prefer a more Visual Basic-type programming model that is based on the use of controls and control properties. |
Of course, some developers like to separate certain controls from the rest and place them in their own categories. For instance, you may see references to the following types of controls:
List controls — Enable data to be bound to them for display purposes of some kind
Rich controls — Controls, such as the Calendar control, that display richer content and capabilities than other controls
Validation controls — Controls that interact with other form controls to validate the data that they contain
Mobile controls — Specific to output to devices such as mobile phones, PDAs, and more
User controls — Not really controls, but page templates that you can work with as you would a control on your ASP.NET page
Custom controls — Controls that you build yourself and use in the same manner as the supplied ASP.NET server controls that are included with the default install of ASP.NET 3.5
When you are deciding between HTML server controls and web server controls, remember that no hard-and-fast rules exist about which type to use. You might find yourself working with one control type more than another, but certain features are available in one control type that might not be available in the other. If you are trying to accomplish a specific task and do not see a solution with the control type you are using, another control type may very well hold the answer. Keep in mind that you can mix and match these control types. Nothing prevents you from using both HTML server controls and web server controls on the same page or within the same application.
You have a couple of ways to use server controls to construct your ASP.NET pages. You can use tools that are specifically designed to work with ASP.NET 3.5 that enable you to visually drag and drop controls onto a design surface and manipulate the behavior of the control, or you can work with server controls directly through code input.
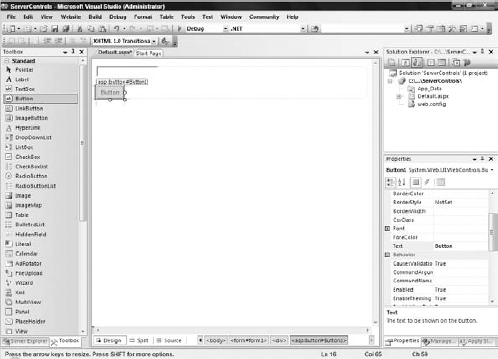
Visual Studio 2008 enables you to visually create an ASP.NET page by dragging and dropping visual controls onto a design surface. You can get to this visual design option by clicking the Design tab at the bottom of the IDE when viewing your ASP.NET page. You can also show the Design mode and the Source code view in the same document window. This is a new feature available in Visual Studio 2008. When the Design view is present, you can place the cursor on the page in the location where you want the control to appear and then double-click the control you want in the Toolbox window of Visual Studio. Unlike the 2002 and 2003 versions of Visual Studio, Visual Studio 2008 (like Visual Studio 2005) does an excellent job of not touching your code when switching between the Design and Source tabs.
In the Design view of your page, you can highlight a control, and the properties for the control appear in the Properties window. For example, Figure 19-13 shows a Button control selected, with its properties displayed in the Properties window on the right.
Changing the properties in the window changes the appearance or behavior of the highlighted control. Because all controls inherit from a specific base class (WebControl), you can highlight multiple controls at the same time and change the base properties of all the controls at once by holding down the Ctrl key as you make your control selections.
You also can work from the code page directly. Because many developers prefer this, it is the default when you first create your ASP.NET page. Hand-coding your own ASP.NET pages may seem to be a slower approach than simply dragging and dropping controls onto a design surface, but it isn't as slow as you might think. You get plenty of assistance in coding your applications from Visual Studio 2008. As you start typing in Visual Studio, the IntelliSense features kick in and help you with code auto-completion. Figure 19-14, for example, shows an IntelliSense drop-down list of possible code completion statements that appeared as the code was typed.
The IntelliSense focus is on the most commonly used attribute or statement for the control or piece of code that you are working with. Using IntelliSense effectively as you work is a great way to code with speed.
Like Design view, the Source view of your page enables you to drag and drop controls from the Toolbox onto the code page itself. For example, dragging and dropping a TextBox control onto the code page produces the same results as dropping it on the design page:
<asp:TextBox ID="TextBox1" Runat="server"></asp:TextBox>
You can also highlight a control in Source view, or simply place your cursor in the code statement of the control, and the Properties window displays the properties of the control. You can apply properties directly in the Properties window of Visual Studio, and these properties are dynamically added to the code of your control.
ASP.NET uses more of a traditional Visual Basic event model than classic ASP. Instead of working with interpreted code, you are actually coding an event-based structure for your pages. Classic ASP used an interpreted model: When the server processed the Web page, the code of the page was interpreted line by line in a linear fashion whereby the only "event" implied was the page loading. This meant that occurrences you wanted to initiate early in the process were placed at the top of the page.
Today, ASP.NET uses an event-driven model. Items or coding tasks are initiated only when a particular event occurs. A common event in the ASP.NET programming model is Page_Load, shown here:
Protected Sub Page_Load(ByVal sender As Object, ByVal e As System.EventArgs)
   ' Code actions here
End Sub
Not only can you work with the overall page — as well as its properties and methods at particular moments in time via page events — you can also work with the server controls contained on the page through particular control events. For example, one common event for a button on a form is Button_Click, illustrated here:
Protected Sub Button1_Click(ByVal sender As Object, ByVal e As System.EventArgs)
   ' Code actions here
End Sub
The event shown here is fired only when the end user actually clicks the button on the form that has an OnClick attribute value of Button1_Click. Therefore, not only does the event handler exist in the server-side code of the ASP.NET page, but that handler is also hooked up using the OnClick property of the server control in the associated ASP.NET page markup, as shown here:
<asp:Button ID="Button1" Runat="server" Text="Button"
 OnClick="Button1_Click" />
How do you fire these events for server controls? You have a couple of ways to go about it. The first way is to pull up your ASP.NET page in Design view and double-click the control for which you want to create a server-side event. For instance, double-clicking a Button server control in Design view creates the structure of the Button1_Click event within your server-side code, whether the code is in a code-behind file or inline. This creates a stub handler for that server control's most popular event.
That said, be aware that a considerable number of additional events are available to the Button control that you cannot access by double-clicking the control. To access them, pull up the page that contains the server-side code, select the control from the first drop-down list at the top of the IDE, and then choose the particular event you want for that control in the second drop-down list. Figure 19-15 shows the event drop-down list displayed. You might, for example, want to work with the Button control's PreRender event, rather than its Click event. The handler for the event you choose is placed in your server-side code.
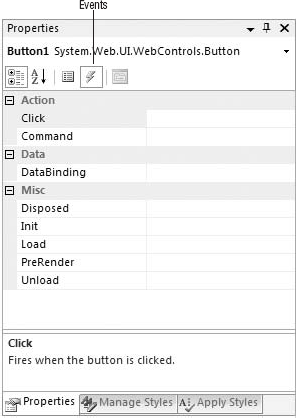
The second way to create server-side events for your server controls is from the Properties window of Visual Studio. This works only from Design view of the page. In Design view, highlight the server control that you want to work with. The properties for the control will appear in the Properties window, along with an icon menu. One of the icons, the Events icon, is represented by a lightning bolt within the IDE (see Figure 19-16).
Clicking the Events icon pulls up a list of events available for the control. Simply double-click one of the events to have that event structure created in your server-side code. After you have an event structure in place, you can program specific actions you want to occur when the event is fired.

Developers generally like to include some of their own custom JavaScript functions in their ASP.NET pages. You have a couple of ways to do this. The first is to apply JavaScript directly to the controls on your ASP.NET pages. For example, the following simple Label server control displays the current date and time:
Protected Sub Page_Load(ByVal sender As Object, ByVal e As System.EventArgs)
   TextBox1.Text = DateTime.Now.ToString()
End Sub
The problem is that the date and time displayed are correct for the web server that generated the page. If the user is in the Pacific time zone (PST) and the web server is in the Eastern time zone (EST), the page won't be correct for that viewer. To ensure that the time is correct for anyone visiting the site, regardless of where they reside in the world, you can employ JavaScript to work with the TextBox control:
<%@ Page Language="VB" %>

<html xmlns="http://www.w3.org/1999/xhtml" >
<head runat="server">
    <title>Using JavaScript</title>
</head>
<body onload="javascript:document.forms[0]['TextBox1'].value=Date();">
    <form id="form1" runat="server">
    <div>
        <asp:TextBox ID="TextBox1" Runat="server" Width="300"></asp:TextBox>
    </div>
    </form>
</body>
</html>
In this example, even though you are using a standard TextBox server control from the web server control family, you can access this control using JavaScript that is planted in the onload attribute of the <body> element. The value of the onload attribute actually points to the specific server control via an anonymous function by using the value of the ID attribute from the server control: TextBox1. You can get at other server controls on your page by employing the same methods. This bit of code produces a text box with the current date and time inside of it.
ASP.NET uses the Page.ClientScript property to register and place JavaScript functions on your ASP.NET pages. Three of these methods are reviewed here. Other methods and properties are available through the ClientScript object (which references an instance of System.Web.UI.ClientScriptManager), but these are the most useful ones. You can find the rest in the SDK documentation.
The
Page.RegisterStartupScriptandPage.RegisterClientScriptBlockmethods from the .NET Framework 1.0/1.1 are now considered obsolete. Both of these options for registering scripts required a key/script set of parameters. Because two separate methods were involved, key name collisions were common. ThePage.ClientScriptproperty is meant to bring all the script registrations under one umbrella, making your code less error-prone.
The RegisterClientScriptBlock method enables you to place a JavaScript function at the top of the page. This means that the script is in place for the startup of the page in the browser. Its use is shown here:
<%@ Page Language="VB" %>

<script runat="server">
    Protected Sub Page_Load(ByVal sender As Object, _
      ByVal e As System.EventArgs)

      Dim myScript As String = _
         "function AlertHello() { alert('Hello ASP.NET'), }"
      Page.ClientScript.RegisterClientScriptBlock(Me.GetType(), "MyScript", _
         myScript, True)
    End Sub
</script>

<html xmlns="http://www.w3.org/1999/xhtml" >
<head runat="server">
    <title>Adding JavaScript</title>
</head>
<body>
    <form id="form1" runat="server">
    <div>
        <asp:Button ID="Button1" Runat="server" Text="Button"
         OnClientClick="AlertHello()" />
    </div>
    </form>
</body>
</html>
You create the JavaScript function AlertHello as a string called myScript. Then, using the Page.ClientScript.RegisterClientScriptBlock method, you program the script to be placed on the page. The two possible constructions of the RegisterClientScriptBlock method are as follows:
RegisterClientScriptBlock(type, key, script)RegisterClientScriptBlock(type, key, script, script tag specification)
The preceding example specifies the type as Me.GetType, the key, the script to include, and then a Boolean value setting of True so that .NET places the script on the ASP.NET page with <script> tags automatically. When running the page, you can view the source code for the page to see the results:
<html xmlns="http://www.w3.org/1999/xhtml" >
<head><title>
    Adding JavaScript
</title></head>
<body>
    <form method="post" action="JavaScriptPage.aspx" id="form1">
<div>
<input type="hidden" name="__VIEWSTATE"
value="/wEPDwUKMTY3NzE5MjIyMGRkiyYSRMg+bcXi9DiawYlbxndiTDo=" />
</div>
<script type="text/javascript">
<!--
function AlertHello() { alert('Hello ASP.NET'), }// -->
</script>
<div>
<input type="submit" name="Button1" value="Button"
onclick="AlertHello();"
id="Button1" />
</div>
</form>
</body>
</html>From this, you can see that the script specified was indeed included on the ASP.NET page before the page code. Not only were the <script> tags included, but the proper comment tags were added around the script (so older browsers will not break).
The RegisterStartupScript method is similar to the RegisterClientScriptBlock method. The big difference is that the RegisterStartupScript places the script at the bottom of the ASP.NET page instead of at the top. In fact, the RegisterStartupScript method even takes the same constructors as the RegisterClientScriptBlock method:
RegisterStartupScript(type, key, script)RegisterStartupScript(type, key, script, script tag specification)
What difference does it make where the script is registered on the page? A lot, actually! If you have a bit of JavaScript that is working with one of the controls on your page, in most cases you want to use the RegisterStartupScript method instead of RegisterClientScriptBlock. For example, you would use the following code to create a page that includes a simple <asp:TextBox> control that contains a default value of Hello ASP.NET:
<asp:TextBox ID="TextBox1" Runat="server">Hello ASP.NET</asp:TextBox>
Then use the RegisterClientScriptBlock method to place a script on the page that utilizes the value in the TextBox1 control:
Protected Sub Page_Load(ByVal sender As Object, ByVal e As System.EventArgs)
   Dim myScript As String = "alert(document.forms[0]['TextBox1'].value);"
   Page.ClientScript.RegisterClientScriptBlock(Me.GetType(), "myKey", myScript, _
      True)
End Sub
Running this page results in the JavaScript error shown in Figure 19-17.

The error occurs because the JavaScript function fired before the text box was even placed on the screen. Therefore, the JavaScript function did not find TextBox1, which caused an error to be thrown by the page. Now try the RegisterStartupScript method shown here:
Protected Sub Page_Load(ByVal sender As Object, ByVal e As System.EventArgs)
Dim myScript As String = "alert(document.forms[0]['TextBox1'].value);"
Page.ClientScript.RegisterStartupScript(Me.GetType(), "myKey", myScript, _
True)
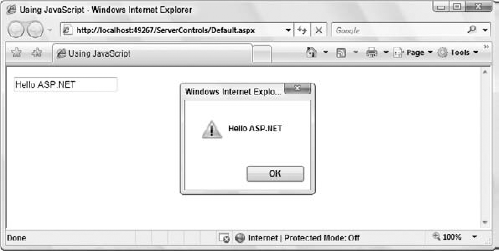
End SubThis approach puts the JavaScript function at the bottom of the ASP.NET page, so when the JavaScript actually starts, it finds the TextBox1 element and works as planned, as shown in Figure 19-18.
The final method is RegisterClientScriptInclude. Many developers place their JavaScript inside a .js file, which is considered a best practice because it makes it very easy to make global JavaScript changes to the application. You can register the script files on your ASP.NET pages using the RegisterClientScriptInclude method, shown here:
Dim myScript As String = "myJavaScriptCode.js"
Page.ClientScript.RegisterClientScriptInclude("myKey", myScript)
This creates the following construction on the ASP.NET page:
<script src="myJavaScriptCode.js" type="text/javascript"></script>
This chapter covered a lot of ground. It discussed many aspects of ASP.NET applications as a whole and the options you have when building and deploying these applications. With the help of Visual Studio 2008, you have a number of options regarding which web server to use when building your application and whether to work locally or remotely through the built-in FTP capabilities.
ASP.NET 3.5 and Visual Studio 2008 make it easy to build your pages using an inline coding model or a code-behind model that is simpler to use and easier to deploy. You also learned about the fixed folders that ASP.NET 3.5 has to make your life easier. These folders make their resources available dynamically with no work on your part. Finally, you saw some of the outstanding JavaScript options that you have at your disposal. The next chapter examines some of the more advanced systems available to you in ASP.NET 3.5.