
Chapter 25 explored the vast hinterland of legacy software known as COM. This chapter looks at "what COM did next" and how it fits into the world of .NET, in the form of .NET Enterprise Services.
To understand Enterprise Services, you must go back in time (all the way to the last century!) when a number of technologies began to emerge from Microsoft, including Microsoft Transaction Server (MTS), Microsoft Message Queuing (MSMQ), and Microsoft Clustering Services. The aim of these developments was to increase the scalability, performance, and reliability of applications.
Handling transactions involved a considerable extension to the NT/COM runtime. It also involved the introduction of several new standard COM interfaces, some to be used or implemented by transactional components and some to be used or implemented by the underlying resource managers, such as SQL Server. These additions, along with some other innovations relating to areas such as asynchronous COM, came to be known as COM+.
This chapter explores the .NET Enterprise Services. In particular, it looks at transaction processing and queued components using the classes of the System.EnterpriseServices and System.Transactions namespaces. This is an enormous subject that could easily fill a whole book by itself, so this chapter only scratches the surface of it. However, by the end of the chapter, you will understand how all the pieces fit together. Let's begin by looking at what transactions are, and how they fit into Visual Basic 2008.
A transaction is one or more linked units of processing placed together as a single unit of work, which either succeeds or fails. If the unit of work succeeds, then all the work is committed. If the unit fails, then every item of processing is rolled back and the process is returned to its original state.
The standard transaction example involves transferring money from account A to account B. The money must either end up in account B (and nowhere else), or — if something goes wrong — stay in account A (and go nowhere else). This avoids the very undesirable case in which we have taken money from account A but haven't put it in account B.
Transaction theory starts with ACID, an acronym describing the following properties that all transactions should have:
Atomicity — A transaction is atomic; that is, everything is treated as one unit. However many different components the transaction involves, and however many different method calls are made on those components, the system treats it as a single operation that either entirely succeeds or entirely fails. If it fails, then the system is left in the state it was in before the transaction was attempted.
Consistency — All changes are done in a consistent manner. The system goes from one valid state to another.
Isolation — Transactions that are going on at the same time are isolated from each other. If transaction A changes the system from state 1 to state 2, transaction B will see the system in either state 1 or 2, but not some half-baked state in between the two.
Durability — If a transaction has been committed, the effect is permanent, even if the system fails.
Let's illustrate this with a concrete example. Imagine that after spending a happy afternoon browsing in your favorite bookstore, you decide to shell out some of your hard-earned dollars for a copy of, yes, Professional Visual Basic 2008 (a wise choice). You take the copy to the checkout and exchange a bit of cash for the book. A transaction is going on here: You pay money and the store provides you with a book.
The important aspect of this transaction isn't the exchange of money, but that only two reasonable outcomes are possible — either you get the book and the store gets its money or you don't get the book and the store doesn't get its money. If, for example, there is insufficient credit on your credit card, then you'll leave the shop without the book. In that case, the transaction doesn't happen. The only way for the transaction to complete is both for you to get the book and the store to get its money. This is the principle of atomicity.
If the store provides you with a copy of some other book instead, then you would reasonably feel that you ended up with an outcome that was neither anticipated nor desirable. This would be a violation of the principle of consistency.
Now imagine that there is one copy of the book in the store, and another potential buyer of that book has gone up to the cashier next to you. As far as the person at the other checkout is concerned, your respective transactions are isolated from each other (even though you are competing for the same resource). Either your transaction succeeds or the other person's does. What definitely doesn't happen is that the bookstore decides to exert the wisdom of Solomon and give you half each.
Now suppose you take the book home and the bookstore calls you to ask if they can have the book back. Apparently, an important customer (well, far more important than you, anyway) needs a copy. You would find this a tad unreasonable, and a violation of the principle of durability.
At this point, it's worth considering what implications all this is likely to have on the underlying components. How can you ensure that all of the changes in the system can be unwound if the transaction is aborted at some point? Perhaps you're in the middle of updating dozens of database files and something goes wrong.
There are three aspects to rescuing this situation with transactions:
Knowledge that something has gone wrong
Knowledge to perform the recovery
Coordination of the recovery process
The middle part of the process is handled by the resource managers themselves. The likes of SQL Server and Oracle are fully equipped to deal with transactions and rollback (even if the resource manager in question is restarted partway through a transaction), so you don't need to worry about any of that. The last part of the process, coordination, is handled by the .NET runtime (or at least the Enterprise Services part of it). The first part, knowing that something is wrong, is shared between the components themselves and the .NET runtime. This isn't at all unusual: Sometimes a component can detect that something has gone wrong itself and signal that recovery is necessary, while on other occasions it may not be able to do so, because it has crashed.
Later, you will see how all this works as you build a transactional application.
To understand what components are actually managed by Enterprise Services and what purpose they serve, you need to consider what a typical real-world n-tier application looks like. The bottom tier is the persistent data store, typically a database such as SQL Server or Oracle. However, there are other possible data stores, including the file system (on Windows NT and above). These are termed resource managers because they manage resources. The software here is concerned with maintaining the integrity of the application's data and providing rapid and efficient access to it.
The top tier is the user interface. This is a completely different specialization, and the software here is concerned with presenting a smooth, easy-to-follow front end to the end user. This layer shouldn't actually do any data manipulation at all, apart from whatever formatting is necessary to meet each user's presentational needs. The interesting stuff is in the tiers in between — in particular, the business logic. In the .NET/COM+ transactional model, the software elements that implement this are components running under the control of the Enterprise Services runtime.
Typically, these components are called into being to perform some sort of transaction and then, to all intents and purposes, disappear again. For example, a component might be called into play to transfer information from one database to another in such a way that the information is either in one database or the other, but not both. This component might have a number of different methods, each of which does a different kind of transfer. However, each method call would carry out a complete transfer:
Public Sub TransferSomething()
  TakeSomethingFromA
  AddSomethingToB
End Sub
Crucially, this means that most transaction components have no concept of state; there are no properties that hold values between method calls. You can see the reason for this if you imagine what would happen if you had a number of instances of the preceding components all vying for the attention of the database. If instance one of the control started the transfer, remembering the state or current values of A and B just after instance two had done the same, you could end up with the state being different between the two instances. This would violate the isolation of the transaction. Persistence is left to the outside data stores in this model.
The business logic is the area of the system that requires all the transactional management. Anything that happens here needs to be monitored and controlled to ensure that all the ACID requirements are met. The neatest way to do this in a component-oriented framework is to develop the business logic as components that are required to implement a standard interface. The transaction management framework can then use this interface to monitor and control how the logic is implemented from a transactional point of view. The transaction interface is a means for the business logic elements to talk to the transaction framework and for the transaction framework to reply to the logic elements.
So what's all this about not having state? Well, if you maintain state inside your components, then you immediately have a scaling problem. The middle tiers of your application are now seriously resource-hungry. If you want an analogy from another area of software, consider why the Internet scales so well: because HTTP is a stateless protocol. Every HTTP request stands in isolation, so no resources are tied up in maintaining any form of session. It's the same with transactional components.
This is not to say that you can never maintain state inside your transactional components. You can, but it's not recommended, and the examples in this chapter don't illustrate it.
For our transaction example, we're going to build a simple business-logic component that transfers data from one bank account to another account. The current balance in the bank account will be represented by a row in one database, while the other will be represented by a row in another database.
Before beginning, note one important point: You can't have transactions without any resource managers. It's very tempting to assume that you can experiment with transactional component services without actually involving, say, a database, because (as you shall see) none of the methods in the transactional classes make any explicit references to one. However, if you do try to do this, then you will find that your transactions don't actually trouble the system's statistics. Fortunately, you don't need to lay out your hard-earned cash for a copy of SQL Server (nice though that is), because Visual Studio 2008 comes with a lightweight (but fully functional) copy of SQL Server, which goes under the name of SQL Server 2005 Express Edition, or more simply SQL Express. In addition, SQL Express is available separately, so you can even work with databases if you use Visual Basic Express.
First, set up the databases. Check whether the Server Explorer tab is visible in Visual Studio 2008 (see Figure 30-1). If not, then open it by selecting View
Right-click Data Connections and select New Database from the menu. Alternately, you can click the icon that looks like a plus sign over a can with a plug (not quite the universal symbol for a database, but it will have to do). The Add Connection dialog box appears (see Figure 30-2).

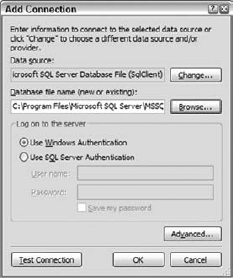
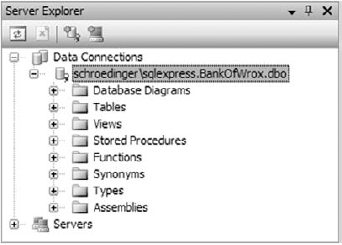
Enter the database name (BankOfWrox) and select Use Windows Authentication. After clicking OK, you are prompted to create the database if it doesn't exist. You should now see BankOfWrox in the list of data connections (see Figure 30-3).
Set up the database. If you open the new node, you will see several other nodes, including Tables. Right-click this and then select New Table from the menu. Another dialog box should appear (see Figure 30-4). Create two columns, Name and Amount, as shown. Make sure that Name is set up to be the primary key. When you click Close, you'll be asked whether you want to save the changes to Table1. Select Yes, and the Choose Name dialog box will appear (see Figure 30-5).

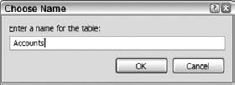
Use the name Accounts for the table. You should now see a child node called Accounts below Tables in the tree. That completes the creation of BankOfWrox. Repeat the process for BankOfMe. The structure is exactly the same (although it doesn't need to be for the purposes of this example). Don't forget to set Name as the primary key. We could have created these two as separate rows in the same database, but it doesn't really simulate the scenario where Enterprise Services is intended (inter-application communication).
The next thing to do is populate the databases. If you right-click over Accounts for either database and select Show Table Data from Table from the menu, you will see a grid that enables you to add rows and initialize the values of their columns (see Figure 30-6).
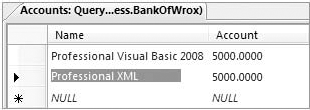
Enter two accounts in BankOfWrox — Professional Visual Basic 2008 and Professional XML — and allocate $5,000 to each. Now repeat the process for BankOfMe, setting up one account, Me, with $0 in it.
The next step is to create the transactional component to support the business logic. Create a new Class Library project called "Transactions." Then, add a reference to System.EnterpriseServices (see Figure 30-7).
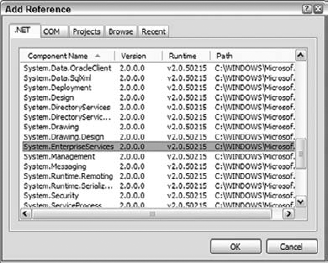
This reference is needed because in order to come under the control of the Enterprise Services runtime, the component must inherit from the System.EnterpriseServices.ServicedComponent class:
Imports System.EnterpriseServices
Imports System.Configuration
Imports System.Data.SqlClient

<Assembly: ApplicationName("WroxTransactions")>
<Assembly: ApplicationAccessControl(True)>
Public Class BankTransactions
    Inherits ServicedComponent
Here's the main function in the component, TransferMoney:
Public Sub TransferMoney(ByVal amount As Decimal, _
  ByVal sourceBank As String, _
  ByVal sourceAccount As String, _
  ByVal destinationBank As String, _
  ByVal destinationAccount As String)

    Try
        Withdraw(sourceBank, sourceAccount, amount)
        Try
            Deposit(destinationBank, destinationAccount, amount)
        Catch ex As Exception
            'deposit failed
            Throw New _
            ApplicationException("Error transfering money, deposit failed.", _
              ex)
        End Try
'both operations succeeded
ContextUtil.SetComplete()
Catch ex As Exception
'withdraw failed
Throw New _
ApplicationException("Error transfering money, withdrawal failed.", _
ex)
End Try
End SubIgnoring for the moment the references to ContextUtil, we have effectively divided the logic into two halves: the half that takes money from the Wrox account (represented by the private function Withdraw), and the half that adds it to your account (represented by the private function Deposit). In order for the function to complete successfully, each of the two halves must complete successfully.
The ContextUtil class represents the context of the transaction. Within that context are basically two bits that control the behavior of the transaction from the point of view of each participant: the consistent bit and the done bit. The done bit determines whether or not the transaction is finished, so that resources can be reused. The consistent bit determines whether or not the transaction was successful from the point of view of the participant. This is established during the first phase of the two-phase commit process. In complex distributed transactions involving more than one participant, the overall consistency and completeness are voted on, so that a transaction is only consistent or done when everyone agrees that it is. If a transaction completes in an inconsistent state, then it is not allowed to proceed to the second phase of the commit.
In this case, there is only a single participant, but the principle remains the same. We can determine the overall outcome by setting these two bits, which is done via SetComplete and SetAbort, which are static methods in the ContextUtil class. Both of these set the done bit to True. SetComplete also sets the consistent bit to True, whereas SetAbort sets the consistent bit to False. In this example, SetComplete is only set if both halves of the transaction are successful.
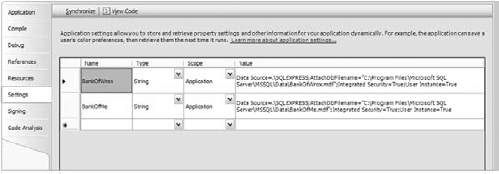
Now it's time to see what's going on in the two halves of the transaction itself. The component is responsible for reading from and writing to the two databases, so it needs two connection strings. You could hard-code these into the component, but a better solution is to use the new My Settings feature to include them. Double-click My Project in the Solution Explorer and navigate to the Settings tab. Add the two connection strings using the names BankOfWrox and BankOfMe, as shown in Figure 30-8.
Here's the function that removes money from the Wrox account:
Private Sub Withdraw(ByVal bank As String, _
  ByVal account As String, _
  ByVal amount As Decimal)
Establish a connection to the database and retrieve the current account balance from it:
Dim ConnectionString As String
Dim SQL As String
Dim conn As SqlConnection = Nothing
Dim cmdCurrent As SqlCommand
Dim currentValue As Decimal
Dim cmdUpdate As SqlCommand

ConnectionString = My.Settings.Item(bank).ToString
SQL = String.Format("SELECT Amount FROM Accounts WHERE Name = '{0}'", _
  account)
The call to
ExecuteScalarretrieves a single value from the database — in this case, the amount for the requested account. Note that we have started an exception handler with theTrykeyword. We'll finish theTryblock in a moment:Try conn = New SqlConnection(ConnectionString) conn.Open() cmdCurrent = New SqlCommand(SQL, conn) currentValue = CDec(cmdCurrent.ExecuteScalar())Note the current balance and determine whether you can afford to transfer the amount asked for. If not, raise an
Exception:'check for overdrafts If amount > currentValue Then Throw New ArgumentException("Attempt to overdraft account") End IfOtherwise, subtract the amount and update the table accordingly:
'otherwise, we're good to withdraw
SQL = _
    String.Format("UPDATE Accounts SET Amount = {0} WHERE Name = '{1}'", _
    currentValue - amount, account)
cmdUpdate = New SqlCommand(SQL, conn)
cmdUpdate.ExecuteNonQuery()
Close the exception handler and the database:
Catch ex As Exception
        Throw New DataException("Error withdrawing", ex)
    Finally
If Not conn Is Nothing Then conn.Close() End If End Try End Sub
The second half of the transaction is similar, except that the failure conditions are slightly different. First, we stipulate that we don't want any transfer of less than $50. Second, we've inserted a bug such that an attempt to transfer a negative amount will cause a divide by zero. (You'll see why we added this rather bizarre act of sabotage in a moment.) Here's the code:
Private Sub Deposit(ByVal bank As String, _
  ByVal account As String, _
  ByVal amount As Decimal)

    Dim ConnectionString As String
    Dim SQL As String
    Dim conn As SqlConnection = Nothing
    Dim cmdCurrent As SqlCommand
    Dim currentValue As Decimal
    Dim cmdUpdate As SqlCommand

    ConnectionString = My.Settings.Item(bank).ToString
    SQL = String.Format("SELECT Amount FROM Accounts WHERE Name = '{0}'", _
      account)

    If amount < 0 Then
        amount = amount / 0
    ElseIf amount < 50 Then
        Throw New ArgumentException("Value of deposit must be greater than $50")
    Else
        Try
            conn = New SqlConnection(ConnectionString)
            conn.Open()

            'get the current value
            cmdCurrent = New SqlCommand(SQL, conn)
            currentValue = CDec(cmdCurrent.ExecuteScalar())

            SQL = _
             String.Format("UPDATE Accounts SET Amount = {0} WHERE Name = '{1}'", _
              currentValue + amount, account)

            cmdUpdate = New SqlCommand(SQL, conn)
            cmdUpdate.ExecuteNonQuery()
        Finally
            If Not conn Is Nothing Then
                conn.Close()
            End If
        End Try
    End If

End Sub
The business logic component is complete. Let's see how you can bring it under the control of Enterprise Services. First, of course, you need to build your DLL.
Why did we intentionally add the divide by zero error? This gives you a chance to see what happens to the transaction when an exception occurs in your code. The transaction will automatically fail and roll back, which means that your data will still be in a good state at the end.
Because the Enterprise Services infrastructure is COM-oriented, you need to expose the .NET component as a COM component, and register it with Component Services. Component Services handles all transaction coordination; that is, Component Services tracks any changes and restores the data should the transaction fail. First, some changes to the component are needed to enable this COM interaction. Prepare to take a trip down memory lane.
All COM components must have a GUID (globally unique identifier) that uniquely identifies it to the COM infrastructure. This was done for you in Visual Basic 6.0, but .NET requires you to add a value. In addition, your component needs an attribute to make it visible to COM. You can set both of these in the Assembly Information dialog. Double-click My Project in the Solution Explorer. On the Application page, click Assembly Information. There should already be a Guid assigned to your component. Check the option Make Assembly COM-Visible. This makes all of the Public types accessible to COM (see Figure 30-9).
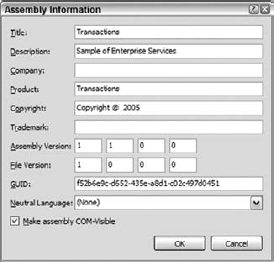
You should also update the Assembly Version fields as you make changes to the component.
chapter 23 contains more information about strong names and assemblies.
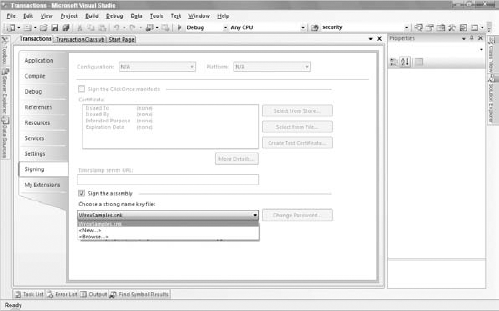
The problem is that the assembly is a private assembly. In order to make it available to the transaction framework, it needs to be a shared assembly. To do this, give the assembly a cryptographically strong name, generally referred to as its strong name.
Cryptographically strong means that the name has been signed with the private key of a dual key pair. This isn't the place to go into a long discussion about dual-key cryptography, but essentially a pair of keys is generated, one public and one private. If something is encrypted using the private key, it can only be decrypted using the public key from that pair, and vice versa. It is therefore an excellent tool for preventing tampering with information. If, for example, the name of an assembly were to be encrypted using the private key of a pair, then the recipient of a new version of that assembly could verify the origin of that new version, and be confident that it was not a rogue version from some other source. This is because only the original creator of the assembly retains access to its private key.
You now need to ensure that your assembly uses the strong name. You can create a new strong name file, or assign an existing strong name file on the Signing tab of the Project Designer dialog (see Figure 30-10).
Once you've built the DLL again, you can run RegSvcs to register the DLL with Component Services (see Figure 30-11).

RegSvcs does a few things at this point. It creates a COM type library for the DLL, which enables it to communicate with COM, and it creates a COM+ application for the component.
The Component Services Console is the control interface for Component Services. This is an MMC snap-in, which you can find by selecting Control Panel
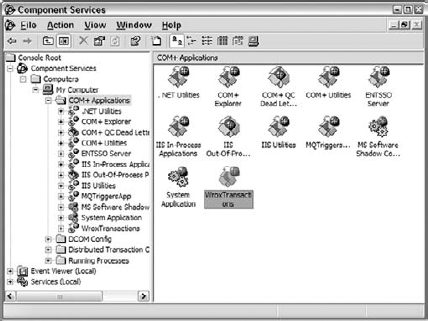
You should be able to find the sample under COM+ Applications. A COM+ application is a set of related COM+ components that have been packaged together.RegSvcs creates a new application for every component that it registers. If you want to bundle together a series of components from separate DLLs, you can do so, but only by creating a new application via the Component Services Console (right-click COM+ Applications and then select New). We'll explore the console a little more as we go on.
Now you need a test application. More important, you need to tell Component Services that you're interested in transactions.
Create a Windows Application project called TestTransactions and a very simple form (see Figure 30-13).
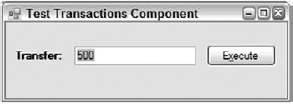
The text field is called TransferField and the command button is called TransferButton. In order to access the transactional component, add references to a couple of DLLs. First, add a reference to the transactional component DLL itself. You'll need to browse for this, as it isn't currently in the global assembly cache. Second, in order to access the objects in this DLL, you also need to make the application aware of the System.EnterpriseServices assembly, so add a reference to that as well. Having done that, it's time to import Transactions into the application:
Imports Transactions
Here's the code behind the TransferButton button:
Private Sub TransferButton_Click(ByVal sender As System.Object, _
  ByVal e As System.EventArgs) Handles TransferButton.Click
    Dim txn As New BankTransactions
    Try
        txn.TransferMoney(CDec(Me.TransferField.Text), _
          "BankOfWrox", "Professional Visual Basic 2008", _
          "BankOfMe", "Me")
        MessageBox.Show(String.Format("{0:C} transfered from {1} to {2}", _
            CDec(Me.TransferField.Text), "BankOfWrox", "BankOfMe"), _
            "Transfer Succeeded", _
            MessageBoxButtons.OK, _
            MessageBoxIcon.Information)

    Catch ex As Exception
        MessageBox.Show(ex.Message, "Transfer failed", _
          MessageBoxButtons.OK, _
          MessageBoxIcon.Error)

    End Try

End SubNow it's time to tell Component Services how the component should enter a transaction. There are two ways of doing this: via the Component Services Console or via an attribute in code. To do it via the Component Services Console, open the Explorer tree to locate the Transactions component (as shown in Figure 30-14).
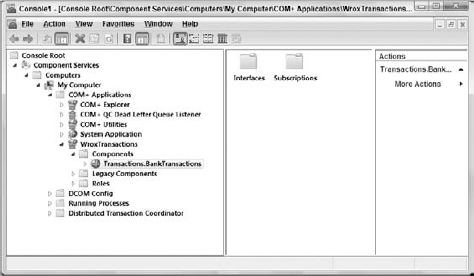
Select one of the available options; you'll learn what these all mean in a moment. It's a little tiresome to require the system manager to do this every time, especially if you already know that your component is always going to have the same transaction characteristics. An alternative mechanism is available: You can explicitly set up an attribute in the code for your component.
Attributes are items of declarative information that can be attached to the elements of code, such as classes, methods, data members, and properties. Anything that uses these can query their values at runtime. One such attribute is called TransactionAttribute, which, unsurprisingly, is used for specifying the transaction characteristics of a component class. The value of this attribute is taken from an enumeration called TransactionOption. Both TransactionAttribute and TransactionOption are found within the System.EnterpriseServices namespace. The enumeration can take the following values:
Value | Description |
|---|---|
Ignores any transaction in the current context. This is the default. | |
Creates the component in a context with no governing transaction | |
Shares a transaction if one exists. Creates a new transaction if necessary. | |
Creates the component with a new transaction, regardless of the state of the current context | |
| Shares a transaction if one exists. If it doesn't, then it creates the component. |
The available values are exactly the same as the ones shown in the Transaction tab. This case is a standalone transaction, so either RequiresNew or Required are equally valid. However, you would most commonly select RequiresNew to create a component that will participate in an existing transaction or create a new transaction if needed.
Before changing the component, deregister the current version to avoid any confusion. Now return to the Transactions project and make the change:
<Assembly: ApplicationName("WroxTransactions")>
<Assembly: ApplicationAccessControl(True)>
<Transaction(TransactionOption.RequiresNew)> _

Public Class BankTransactions
    Inherits ServicedComponent
Having made the change, rebuild Transactions and then register it as before. Now run the test application and start the Component Services Console application. Enter 1000 and click the Confirm button. You might be able to see the number of current active transactions briefly go from none to one (depending on your computer, this may be too fast to see), followed by the number of committed transactions and the total both increasing by one. That's it. You've implemented your first transaction. If you check the two databases, the amount in the BankOfWrox Professional Visual Basic account has been reduced to $4,000, whereas the account in BankOfMe has been increased by $1,000.
What happens if you enter a value that you know is invalid? There are two options here: either try to transfer more money than there is in the Professional Visual Basic account, or try to transfer less than the "approved limit." Run the application again and try to transfer $10. As expected, the transaction will fail, and no changes will be made to the accounts. Professional Visual Basic still has $4,000, and your account still has $1,000. This isn't too much of a big deal, because the invalid condition is spotted before any database manipulation is carried out. If you check the transaction statistics, the number of aborted transactions has been incremented this time.
Now try to transfer $10,000. This time, the first part of the transaction is successful, but the second part fails. Again the number of aborted transactions is incremented, but what's happened to the database? Well, fortunately for everyone concerned, there is still $4,000 in the Professional Visual Basic account, and still $1,000 in your account. The entire transaction has failed.
Recall that bit of mindless vandalism that we did to the Deposit function so that it would divide by zero if we entered a negative value? Here's where we get to try it out. Run the application again and try to transfer $-1. You should receive an error message. It was halfway through a transaction, but when you look at the transaction statistics, the aborted count has increased by one. More important, if you check the databases, the Pro VB account still has $4,000, and the other account still has $1,000, so you're protected against software failures as well.
Dealing with transactions involves several other topics as well, including just-in-time (JIT) activation and object pooling.
Creating and deleting components takes time. Instead of discarding the component when finished with it, why not keep it around in case it's needed again? The mechanism by which this is done is called just-in-time (JIT) activation, and it's set by default for all automatic transactional components (it's unset by default for all other COM+ components, however). This is another reason why holding state is undesirable within components — it limits the ability to share them.
All good transactional components are entirely stateless, but real life dictates differently. For example, you might want to maintain a link to your database, one that would be expensive to set up every time. The JIT mechanism provides a couple of methods that you can override in the ServicedComponent class in this case.
The method that is invoked when a JIT component is activated is called Activate, and the component that is invoked when it is deactivated is called, unsurprisingly, Deactivate. In Activate and Deactivate you put the things that you would normally put in your constructor and deconstructor. JIT can also be activated by adding the JustInTimeActivation attribute to any class within the ServicedComponent class.
You can, if you want, take this a step further and maintain a pool of objects already constructed and prepared to be activated whenever required. When an object is no longer required (i.e., it's deactivated), it is returned to the pool until the next time it is needed. By retaining objects, you don't have to continually create them anew, which reduces your application's performance costs. You can use the ObjectPooling attribute within your class to determine how the pool operates:
<Transaction(TransactionOption.RequiresNew), _
ObjectPooling(MinPoolSize:=5, MaxPoolSize:=20, _
                        CreationTimeOut:=30)> _
Public Class BankTransactionsThe traditional component programming model is very much a synchronous one. Put simply, you invoke a method and you get a result. Unfortunately, many real-world problems are inherently asynchronous. You can't always wait for a response to your request before moving on to the next task. A real-world analogy is the difference between phoning someone and sending an e-mail. Phoning is a synchronous process; either the phone is answered (a successful transaction) or it isn't (or you've called a wrong number, another form of unsuccessful transaction). E-mailing someone is asynchronous; you have no control over how long the e-mail takes to arrive, or when the person will actually look at it. Therefore, in order to tackle everything that the real world throws at us, we need an asynchronous component model for those scenarios where it is appropriate.
Why only some scenarios? The synchronous model is quite simple to manage, because the three possible outcomes of a request are quite straightforward to handle. First, the request can be successful. Second, the request can fail. Finally, the target of the request can simply not respond at all, in which case it times out. However, when dealing with asynchronous requests, expect all manner of unusual conditions. For example, the target system may not currently be operational, so you have to make a decision regarding how long to wait before it comes back up again. Each outstanding request takes up system resources, so they need to be managed carefully. You need to be able to determine when the response comes back; you need to make certain that the recipient only receives a given message once, and so on. We are, in fact, dealing with a different infrastructure than MTS here, an infrastructure to handle reliable messaging. Microsoft's product to tackle this type of problem is Microsoft Message Queue (MSMQ).
The idea behind reliable messaging is that once you have asked the system to send a message to a given target, you can effectively stop worrying about it. The system handles the storing and forwarding of messages to their target. It also handles retries and timeouts, ensuring a message is received only once, and returning a message to the dead letter queue if all else fails. MSMQ is, in fact, a whole technology in itself, and can seem quite complex. However, Enterprise Services provides a handy, simple abstraction called queued components.
Queued components take the sometimes gnarly aspects of working with MSMQ and make them easier to deal with than the raw queue handling. Instead, you have the concepts of recorders, listeners, and players. Recorders create messages that are put on a queue. Eventually, a listener receives the message. This could happen immediately or it could take weeks if the two components are disconnected. Finally, the player does whatever the message requests. Naturally, this places some restrictions on the kind of component that can be used. For example, you can't have any output arguments or return values. If you have either of these, the values can't be set until the action is complete, removing the benefit of the asynchronous aspects of the call. However, there are some cool things that you can do, explored in the next section.
Note
In order to run the queued components examples, you need MSMQ, which comes with Windows 2000, XP, and Vista. However, you need to install it separately using the Add Windows Components dialog.
This example creates a very simple logging component that takes a string as its input and writes it out to a sequential file, as well as outputs it in a message box. To keep the example simple, the client and the server are on the same machine; in a production scenario they would be separate. The benefit of using queued components here is that the logging doesn't slow down the main process.
Create a Class Library project called Reporter and add a reference to the System.EnterpriseServices namespace. First, define an interface:
Imports System.IO
Imports System.EnterpriseServices
Public Interface IReporter
  Sub Log(ByVal message As String)
End Interface
Notice that the Log method follows the requirements listed earlier. There is no return value, and all parameters are input only. We need to separate the interface from the implementation because the implementation, residing on the server, is going to be sitting on another machine somewhere. The client isn't the slightest bit interested in the details of this; it only needs to know how to interface to it.
Take a look at the actual implementation. As with the transactional component, we inherit from ServicedComponent, and implement the interface just defined. However, notice the <InterfaceQueuing()> attribute that indicates to the Component Services runtime that the interface can be queued (we did the same for the interface):
<InterfaceQueuing(Interface:="IReporter")> Public Class Reporter
  Inherits ServicedComponent
  Implements IReporter
In the logging method, simply output a message box, open a StreamWriter component to append to the log file, and then close it:
Sub Log(ByVal message As String) Implements IReporter.Log
    MsgBox(strText)
    Using writer As  _
New StreamWriter("c:account.log", True)
writer.WriteLine(String.Format("{0}: {1}", _
DateTime.Now, message))
writer.Close()
End Using
End Sub
End ClassThat's it for the component's code. To enable queuing, click Show All Files on the Solution Explorer to see the hidden files for the project. Open the My Project item and then open the AssemblyInfo.vb file. Ensure that it has these attributes:
'Enterprise Services attributes
<Assembly: EnterpriseServices.ApplicationAccessControl(False, _
    Authentication:=EnterpriseServices.AuthenticationOption.None)>
<Assembly: EnterpriseServices.ApplicationQueuing(Enabled:=True, _
    QueueListenerEnabled:=True)>
<Assembly: EnterpriseServices.ApplicationName("WroxQueue")>
Next, ensure that queuing is correctly enabled for this component. The next line is a special line to enable message queuing to work correctly in a workgroup environment, by switching off authentication. If we didn't do this, we would need to set up an entire domain structure and create specific users for the queues. (In a production scenario, that's exactly what you would use, so you would need to remove this line.) Finally, ensure that the component runs as a server, rather than a library. This was optional for transactional components, but it's mandatory for queued components. You'll soon see why. In addition, add a strong name file to your project, as you did with the Transactions component.
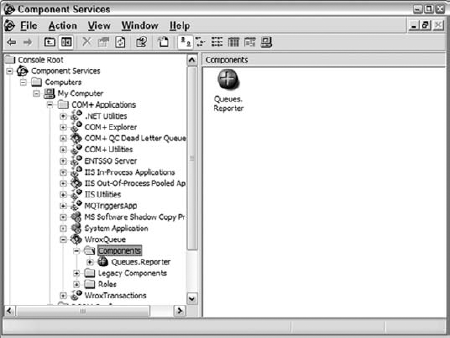
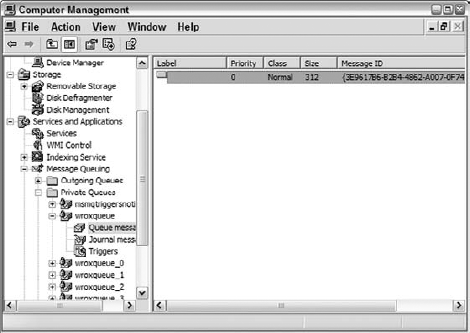
It's time to build your component. Once built, register it using RegSvcs just as you did with the Transactions component. Take a look at the Component Services Console to see how it's going. Also, look closely at Figure 30-15. It looks fine, but there's one other console to check out: the Computer Management Console. Access this either from the system console or by right-clicking the My Computer icon and selecting Manage from the menu. Tucked away at the bottom is the relevant part. Open Services and Applications to find it. Component Services has set up some queues for us. There are five queues feeding into the main one, so the infrastructure is ready. Keep in mind that all this would be running on the server machine in a production scenario, not the client.
The problem is that all the code you've written in this project is built on top of the MSMQ infrastructure, which is, inevitably, a COM infrastructure. Worse, the current tasks involve marshaling COM objects into a stream suitable for inserting into a queued message. For the purposes of this discussion, think of marshaling as intelligently serializing the contents of a method invocation on an interface. We do this in such a way that they can then be deserialized at the other end and turned into a successful invocation of the same method in a remote implementation of the interface. We get COM to do this for us by constructing a moniker, which is basically an intelligent name.
Begin by creating a Windows Application project called TestReporter. Add a reference to the Reporter component in the usual manner. Figure 30-16 shows the form.

The text box is called MessageField, and the button is called SendButton. Here's the code:
Imports System.Runtime.InteropServices
Public Class MainForm
  Inherits System.Windows.Forms.Form
  Private Sub SendButton_Click(ByVal sender As System.Object, _
                            ByVal e As System.EventArgs) _
                            Handles SendButton.Click
Here's the crucial section. Note the references to the interface and how the object is instantiated:
Dim logger As Queues.IReporter

Try
    logger = _
      CType(Marshal.BindToMoniker("queue:/new:Queues.Reporter"), _
      Queues.IReporter)
Once the object is created, you can make the queued call:
logger.Log(Me.MessageField.Text)
Finally, release the reference to the underlying COM object:
Marshal.ReleaseComObject(logger)
    MessageBox.Show("Message sent")

Catch ex As Exception
    MessageBox.Show(ex.Message, "Error sending message")
End Try
It's not pretty, but you only have to do it once to use it repeatedly.
Now try using this application to put a message onto the queue (see Figure 30-17). Run the client application and enter a suitable message, such as "Hello everyone."
We've definitely created a message, so that represents our invocation. If we were able to read it, we would see the message you typed in earlier embedded somewhere in it. (Unfortunately, the console only allows us to inspect the start of the message, but we can see the name of the component in there.) Why hasn't anything happened? We haven't actually started our server. Recall that our component has to run as a server; this is why. The server has to sit there all the time, serving the incoming queue. Therefore, return to the Component Services Console, right-click Reporter, select Start from the menu, and you're off. Lo and behold, there's the message box (see Figure 30-18).

Now that the message has been delivered, return to the Component Services Console. Right-clicking over the message queue and selecting Refresh confirms that the message has indeed been removed from the queue. Look in account.log and notice that it has been updated as well. Running the application results in the message boxes popping up right away, as the server is now running and responding to the messages entering the queue.
Why were you instructed to call that file account.log? MSMQ, like SQL Server, is a resource manager, and it can take part in transactions. This may seem a little counterintuitive at first because how on earth can anything as asynchronous as MSMQ have anything to do with transactions? The key is that it is reliable. Anything you put into a queue is guaranteed to come out the other end. If we take a transaction to the point at which a message is securely in the queue, we definitely have something that can participate. What happens at the other end of the queue is an entirely separate transaction. Of course, if something goes wrong there, you may need to look at setting up a compensating transaction coming back the other way to trigger some kind of rollback.
For the final example, then, we're going to take our original transactional component and add in a queued element, so that not only does the transfer of money take place, but that fact is also logged to a remote file. Use exactly the same queued component as last time.
Begin by making a clone of TestTransactions called TestQueuedTransactions. Add a reference to Queues and an Imports statement:
Imports System.Runtime.InteropServices
You also need a new private subroutine:
Private Shared Sub LogTransaction(ByVal amount As Decimal, _
  ByVal sourceBank As String, ByVal sourceAccount As String, _
  ByVal destinationBank As String, ByVal destinationAccount As String)
Dim logger As Queues.IReporter

    Try
        logger = _
          CType(Marshal.BindToMoniker("queue:/new:Queues.Reporter"), _
          Queues.IReporter)

        logger.Log(String.Format("{0:c} transfered from {1}:{2} to {3}:{4}", _
            amount, _
            sourceBank, sourceAccount, _
            destinationBank, destinationAccount))

        Marshal.ReleaseComObject(logger)
        MessageBox.Show("Message sent")

    Catch ex As Exception
        MessageBox.Show(ex.Message, "Error sending message")
    End Try
End Sub
This may look similar to the previous queued component example application. Finally, add a call to this subroutine in the Button_Click event handler:
Private Sub TransferButton_Click(ByVal sender As System.Object, _
  ByVal e As System.EventArgs) Handles TransferButton.Click
    Dim txn As New Transactions.BankTransactions
    Try
        txn.TransferMoney(CDec(Me.TransferField.Text), _
          "BankOfWrox", "Professional VB", _
          "BankOfMe", "Me")
        LogTransaction(CDec(Me.TransferField.Text), _
          "BankOfWrox", "Professional VB", _
          "BankOfMe", "Me")

        MessageBox.Show(String.Format("{0:C} transfered from {1} to {2}", _
            CDec(Me.TransferField.Text), "BankOfWrox", "BankOfMe"), _
            "Transfer Succeeded", _
            MessageBoxButtons.OK, _
            MessageBoxIcon.Information)

    Catch ex As Exception
        MessageBox.Show(ex.Message, "Transfer failed", _
          MessageBoxButtons.OK, _
          MessageBoxIcon.Error)

    End Try
End Sub
Here, we're including a queued component in our transaction. It's been deliberately placed at the beginning to determine whether it genuinely takes part in the two-phase committal. If the transaction fails, then you shouldn't see any messages come through the queue.
You also need to make a small change to the Reporter component, but you must shut it down via the Component Services Console first. The change is very simple. To ensure that the queued component takes part in the transaction, it must be marked with the Transaction attribute:
<InterfaceQueuing(Interface:="Reporter.IReporter"), _
Transaction(TransactionOption.Required)> _
Public Class Reporter
If you now transfer $1,000, you'll see the usual "Transfer complete" message box, and if you start up the Reporter component, you also see the message box from our queued component (see Figure 30-19).
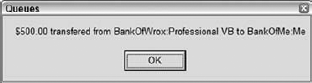
If you try it again, you see the queued message coming through first, so you know it's OK for valid transfers. What happens if you try to transfer $100? As we know from the earlier example, this will fail, and indeed, we see the "Transfer failed" message box from the main component, but not a peep out of the queued component.
While the classes within System.EnterpriseServices make working with transactions easier, they are not the only way to define transactions with VB. Visual Basic 2008 includes a set of classes specifically designed for working with transactions: the System.Transactions namespace. As the name implies, these classes make it easier to define and work with transactions in your code.
You may well be wondering at this point why we need two sets of classes that work with transactions. The classes of System.Transaction, particularly the Transaction class itself, abstract the code from the resource managers participating in the transaction. While this is similar to the goal of the COM+ model described earlier, it is subtly different. The classes of Enterprise Services worked with the Distributed Transaction Coordinator (MSDTC) service, which in turn worked with the participating resource managers. The Transaction class does not need to work with the MSDTC and can coordinate multiple resource managers itself.
The classes of System.Transaction also provide the means to create your own resource managers. These resource managers may then participate in transactions. At first, you may balk at this prospect, wondering how you could write something that manages all the details of a transactional data store. Aren't the details enormous? Fortunately, the classes make it easy to enlist in a transaction and report on your results.
System.Transaction supports two means of working with transactions: implicit and explicit. With implicit transactions, you define a boundary for the transaction. Any resource managers you use within this boundary become part of the transaction. That is, if you have defined a boundary and then call a database such as SQL Server, the actions performed on the database are part of the transaction. If the code reaches the boundary without incident, then the transaction is committed. If an exception occurs during this implicit transaction, then the transaction is rolled back. Explicit transactions, as you may have guessed, mean that you explicitly commit or roll back the transaction as needed.
Using the implicit model can greatly simplify the code involved in a transaction. For example, the TransferMoney method used in the preceding sample could be rewritten to use an implicit transaction:
Public Sub TransferMoney(ByVal amount As Decimal, _
  ByVal sourceBank As String, _
  ByVal sourceAccount As String, _
  ByVal destinationBank As String, _
  ByVal destinationAccount As String)

    Using scope As New TransactionScope
        Withdraw(sourceBank, sourceAccount, amount)
        Deposit(destinationBank, destinationAccount, amount)
    End Using
End Sub
The Using clause wraps the two methods within an implicit transaction. All resource managers that recognize transactions participate in this transaction. The Using clause guarantees that the TransactionScope object is disposed of when the transaction is complete.
Using explicit transactions requires a bit more code but provides greater control over the transaction. You can use either the Transaction class or the CommittableTransaction class to wrap transactions in this model. CommittableTransaction is a child class of Transaction, and adds the capability to commit a transaction, as the name implies.
Using a CommittableTransaction in the bank sample changes the TransferMoney method as follows:
Public Sub TransferMoney(ByVal amount As Decimal, _
    ByVal sourceBank As String, _
    ByVal sourceAccount As String, _
    ByVal destinationBank As String, _
    ByVal destinationAccount As String)

    Using txn As New CommittableTransaction
        Withdraw(sourceBank, sourceAccount, amount, txn)
        Deposit(destinationBank, destinationAccount, amount, txn)
    End Using
End Sub
Notice that the Withdraw and Deposit methods now have an additional parameter to receive the transaction. These additions enable the two methods to vote on the transaction:
Private Sub Deposit(ByVal bank As String, _
  ByVal account As String, _
  ByVal amount As Decimal, _
ByVal txn As CommittableTransaction)

    Dim ConnectionString As String
    Dim SQL As String
    Dim cmdCurrent As SqlCommand
    Dim currentValue As Decimal
    Dim cmdUpdate As SqlCommand


    ConnectionString = My.Settings.Item(bank).ToString
    SQL = String.Format("SELECT Amount FROM Accounts WHERE Name = '{0}'", _
      account)

    If amount < 0 Then
        amount = amount / 0
    ElseIf amount < 50 Then
        Throw New ArgumentException("Value of deposit must be greater than 50")
    Else
        Using conn As New SqlConnection(ConnectionString)
            Try
                conn.Open()
                'join the transaction
                conn.EnlistTransaction(txn)
                'get the current value
                cmdCurrent = New SqlCommand(SQL, conn)
                currentValue = CDec(cmdCurrent.ExecuteScalar())

                SQL = String.Format("UPDATE Accounts SET Amount = " _
                  "{0} WHERE Name = '{1}'", _
                  currentValue + amount, account)

                cmdUpdate = New SqlCommand(SQL, conn)
                cmdUpdate.ExecuteNonQuery()
                txn.Commit()
            Catch ex As Exception
                'deal with transaction here
                txn.Rollback()
                Throw New DataException("Error depositing", ex)
            End Try
        End Using
    End If

End Sub
The principal change here is that the SQL connection must be enlisted in the transaction using the EnlistTransaction method (or EnlistDistributedTransaction if the transaction will span multiple computers). Once it is a part of the transaction, it can then use the transaction methods to commit or roll back each part of the transaction.
Using the TransactionScope and Transaction classes can greatly decrease the amount of effort involved in creating and working with transactions in your applications. Generally, using implicit transactions using TransactionScope is easier and less error prone, and should be your first choice.
In addition to using the classes in System.Transactions for managing transactions, you can also use them to define your own resource managers. These resource managers can then participate in transactions with databases, MSDTC, message queues, and more. There are three basic steps to defining a resource manager:
Create an enlistment class. This class is used to track the resource manager's participation in the transaction. That is, this is the class that will vote on whether the transaction should complete or be rolled back. This class should implement the
IEnlistmentNotificationinterface.Enlist the new enlistment class in the transaction. There are two main ways the class may participate in the transaction:
EnlistDurableorEnlistVolatile. You useEnlistDurableif your resource manager stores data permanently, such as in a file or database.EnlistVolatileis used if your resource manager stores its information in memory or in some other nonrecoverable location.Implement the methods of the
IEnlistmentNotificationinterface to react to the states of the transaction. TheIEnlistmentNotificationinterface provides four methods:Prepare, Commit, Rollback, andInDoubt. CommitandRollbackare self-explanatory, used at these two phases of the transaction.Prepareis called beforeCommit, to determine whether it is possible to commit the transaction. Finally,InDoubtis called if the transaction is questionable. This can happen if the transaction coordinator has lost track of one of the resource managers.
Why would you define your own resource managers and not simply use an existing one such as SQL Server? You might need to store data in another database that does not directly participate in transactions. Alternately, you may want to enable a normally nontransactional component with transactional behavior. For example, the cache in ASP.NET doesn't support the addition of items using transactions. You could create a resource manager that wraps the ASP.NET cache and adds support for commit and rollback of entries. This might be part of a system in which you want to use the cache as an in-memory data store. While this would work without the transactions, adding transactional support would ensure that if the database write fails for any reason, then the entry could be rolled back out of the cache.
This chapter looked at creating applications using the classes of System.EnterpriseServices and System.Transactions. We first examined transactions and their importance in maintaining data integrity when multiple simultaneous changes may affect your data. Properly applied, transactions can ensure that even with multiple users editing data, your database always reflects the correct data. We also looked at asynchronous processing using MSMQ and queued components. Many scenarios, such as logging or other "background" processes, are better handled using asynchronous code. Queued components make building these asynchronous handlers much easier. Many other aspects of Enterprise Services were beyond the scope of this chapter, including role-based security, object constructors, and more.
In addition to creating transactions with the Enterprise Services classes, Visual Basic 2008 provides the System.Transactions namespace. This namespace provides even more ways of implementing transactions in your code. Beyond their use in creating transactions, they can also be used to create your own resource managers: data stores that can participate in transactions.